DB081 Lack of Discernment AAR – Defending!

DB081 - Start-proc

Here’s the AAR of when I played this scenario as the attacker against Carl Nogueira.

Now that I got a chance to see how the grownups do it, Carl gave me a chance to put my learning to the test.  He let me play this again, with me defending as the Red Chinese this time.

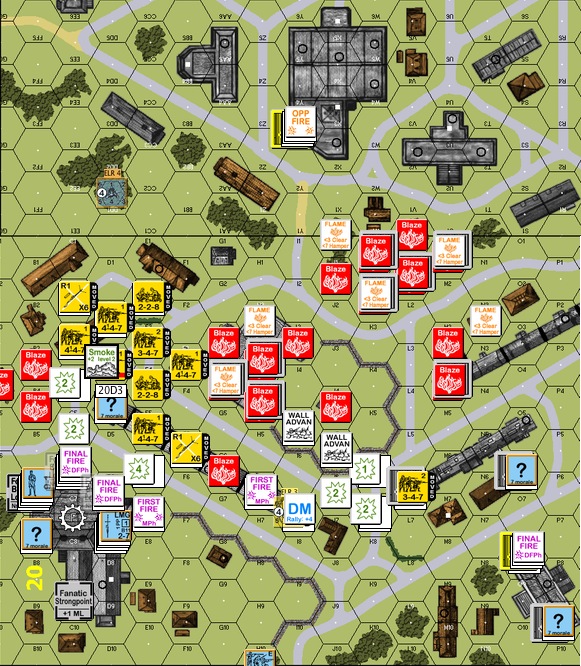
The above is my attempt to draw a pentagram with imaginary fire lanes when setting up the defence.  Carl put his defence all upfront.  I am not so confident.  Just so everyone knows, this scenario has a variable ending depending on when the GMT can capture enough multi-hex buildings to get the points required by the end of Turn 4 to 7 while  suffering no more than 24 CVPs.  The multi-hex buildings on the south of the canal are worth 1 point each, the ones to the north are worth 2.  The two bigger buildings on the south I labelled “Factory” are worth 2.  The first target for the GMT is to get 8 points by the end of Turn 4.  However if the Reds reinforcements come in south of the canal, that requirement for the GMT falls to 7.

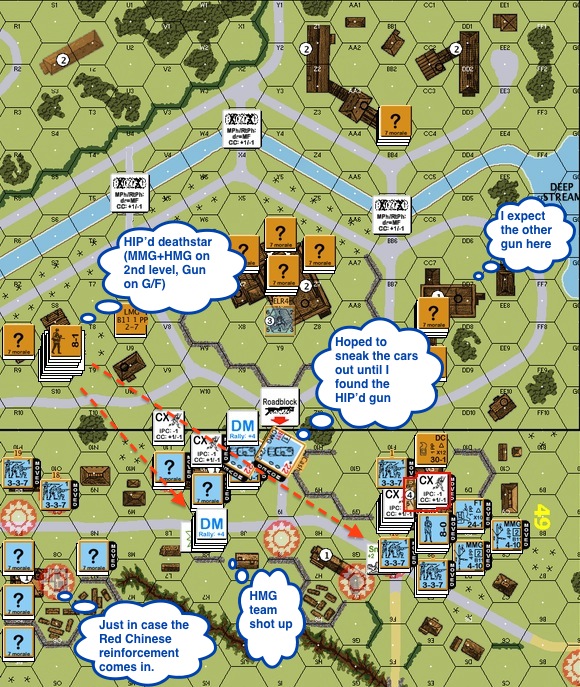
Carl put his defence up front.  I wasn’t so confident.  I thought the weight will come from the right and that the GMTs would be crossing the canal up the top right corner to grab at the 2 point buildings.  I couldn’t give up the use of the single hex multi storied building on the left, that was where I placed my HMG, a quick fire 37* gun and ground level fortifications.  I put another fortification in the middle of the factory where my commissar sat.  I got another fortification hex behind him as “the Alamo”.

He would expect the Red Chinese “death star” on the left so I didn’t bother HIPing it.  I did however HIP’d two half squads on the right to help with the defence.  The MMG and the 70* gun were across the canal to the North.  In a way the longer the big gun laid unfound, the better it is.

Notice Carl got a nasty death star : 2 MMGS + HMG + 9-2 on level 1 of a building.

Okay, talk is cheap, let’s see how all these work out.

DB081 - T1 RC 02 Deathstar duel-proc

Red Chinese Turn 1 : The GMT pushed very aggressively into and in some case past the first line of buildings.  The Reds death star exchanged shots with the powerful GMT one and didn’t fare too well.  The GMT staged for the attack on the (middle) factory.   Yes, the Reds “sulked” and skulked as well into the factory and later advanced back out.

DB081 - T2 GMT02 CC'd-proc

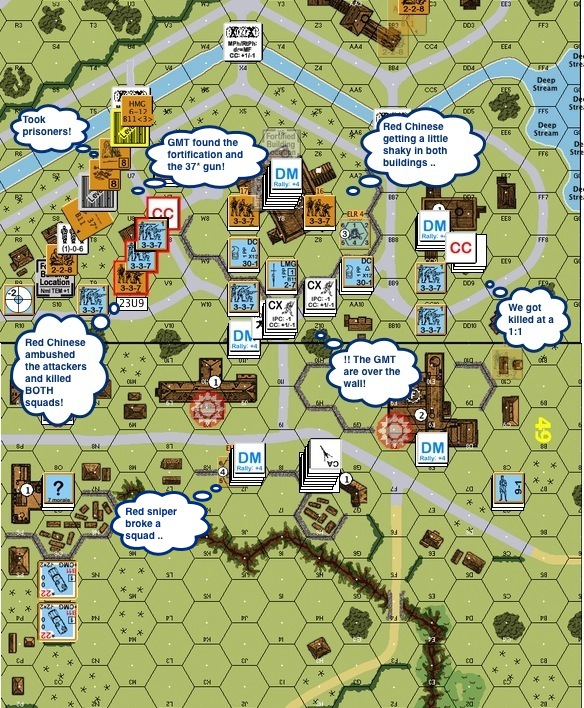
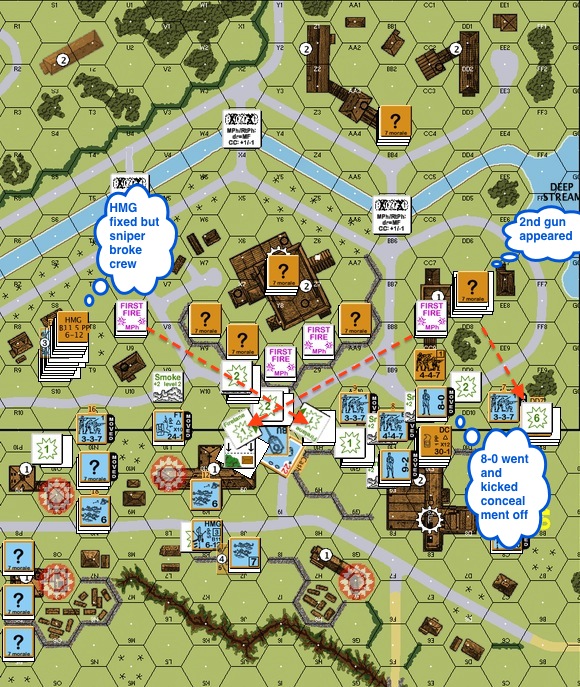
GMT Turn 2 : GMT attacked across the street!  They quickly found the 37* gun on the fortified ground floor in the building to the left.  The broken attacker was taken prisoner and was ushered into the building quickly.  The Reds position in the factory and in the building to the right looked shaky.  Broken Reds quickly piled up.  There were two close combats.  The 2 GMT squads to the left was ambushed by the Reds and were both KIA’d.  The GMT squad to the right fared better, it killed the Reds squad and flanked the building.

DB081 - T2 RC01 UnHIP right Leader ran Deathstar dead-proc

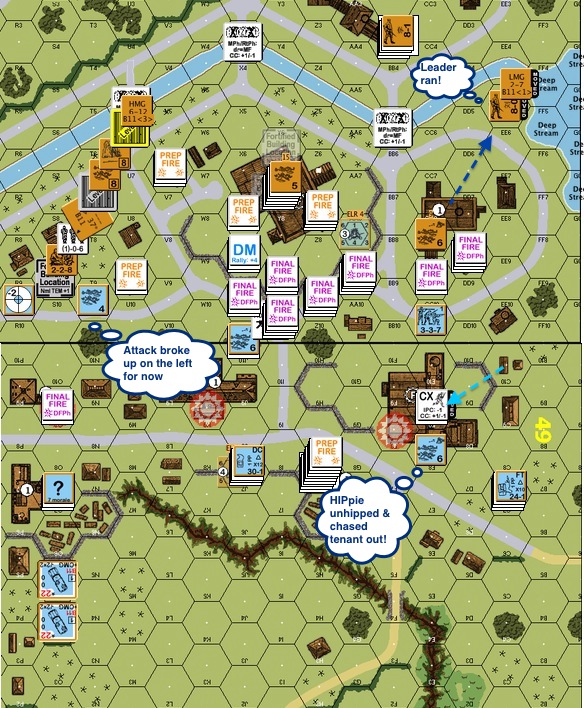
Red Chinese Turn 2 : The GMT had pretty much captured the building on the right.  The Reds leader decided to make a run for it with the LMG and head for the canal!  A HIPpie on the right popped out and headed for the factory on the right, going after the broken GMT squad and absolutely intend to be a nuisance.  The factory being 2 points, Carl had to comeback and root the little Reds squad out.

I hope to survive past Turn 4 and receive the GMTs across the canal.

DB081 - T2 RC02 New Prisoner-proc

Red Chinese Turn 2 (contd) : The Reds took another GMT squad prisoner and dragged them into the (middle) factory.  The broken Reds squad ran after their leader to the right.  The GMT now had 5 points against the required 8 needed to win the game in Turn 4.

DB081 - T3 GMT01 Left DD rush Encircled FT blew out RightTop squad ran-proc

GMT Turn 3 : The GMT went back into the factory to the right to reclaim it.  A GMT Dare Death squad led the charge to the left!  May be the GMT was looking to cut off the middle factory from the left as well.

DB081 - T3 GMT02 DD snakeeyes CVP19 GMT7 need factory-procGMT Turn 3 (contd) : Prospects for the Reds weren’t looking up.  Their “death star” on the left was slowly getting cut off and surrounded.  The GMTs were all lined up outside the middle factory.  The canal was ready for a cross over.  The GMT got squads lined up against the left in case the Reds send reinforcements in from south of the canal.

DB081 - T3 RC01 CC Ambush CVP24 then CVP 26 Bldg 7 Req -1-proc

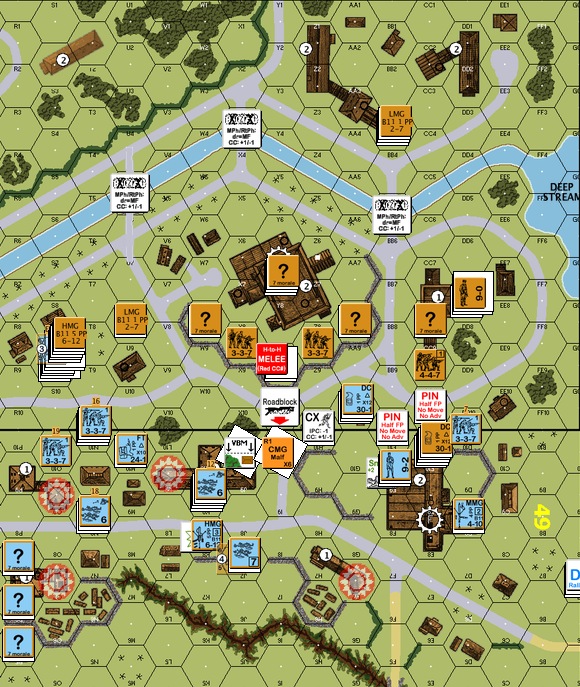
Reds Turn 3 : Turn 4 was coming up and doing the usual was not going to help me survive.  I need some GMT CVPs fast.  The GMT armoured trucks hadn’t been moving from the bottom left at all.  Trap or not, I had to go for it.  Each armoured truck gives me 5 CVPs.  The one with the armoured leader gives me another 3 CVPs for a total of 8.

So the Reds moved in concealed.  One of the Reds squad survived Defensive Fire from the GMT death star (broke one of the guns as well), passed the PAATC check, placed its demolition charge properly and ..

Blew up one of the armoured trucks with no survivors.

Too bad the armour leader was in the other truck!  Another Reds squad moved in, ambushed and killed a GMT squad in close combat.

All these gave the Reds 22 CVPs.  However, since the Reds had 2 GMT prisoners squads and prisoner CVP bonus counts at game end, the Reds stand to get 26 CVP if the game end right there.  (The GMT are only allowed 24 or less.)

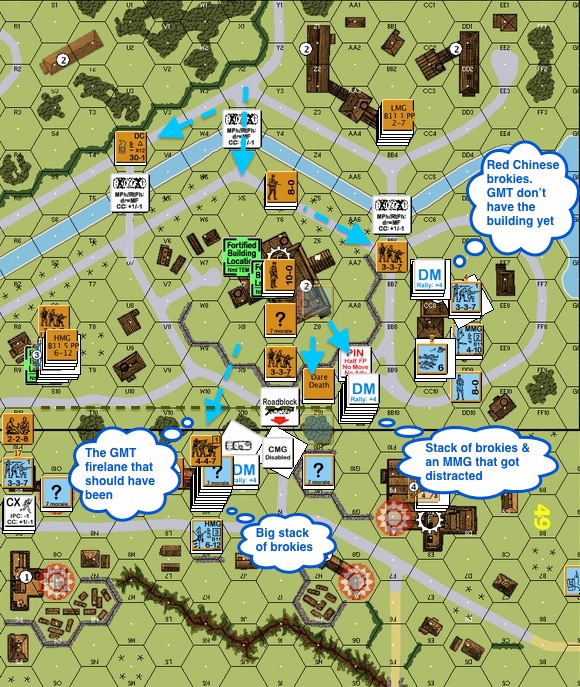
This created a funny situation.  Since the Red Chinese reinforcement entered south of the canal, the GMT build points requirement in Turn 4 dropped from 8 to 7 which the GMT now had.  The GMT would need to rescue the prisoners before the end of Turn 4 to win the game.  Otherwise if the game “ends”, the Reds would realise 26 CVPs (+4 CVP bonus from the prisoners) instead of 22 and 2 CVPs more that what the GMT were allowed to lose.

DB081 - T4 GMT01 Sniper 9-2, CVP26 Bldg 7-proc

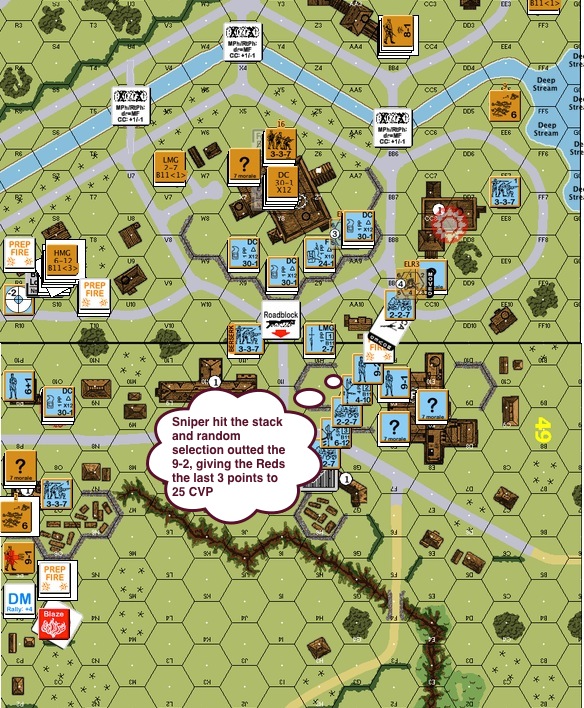
GMT Turn 4 : GMT squads started off a new turn prep firing away.  One of the shots invited a Reds hot sniper that hit the GMT death star.  A round of random selection nailed the GMT 9-2 leader in a stack of 4.

This gave the Reds the 3 CVPs need to reach the 25 CVPs to win the game (29 CVPs with the prisoners).  Great game! 


DB081 Lack of Discernment AAR – Attacking

This scenario took place on Dec 15th 1927, a full 12 years before World War Two.  It’s based on some of the earlier conflicts between the Red Chinese and the Nationalists (Guomintang, GMT or Kuomintang, KMT).  The conflict took place in Canton 廣東, not too far away from Hong Kong.  The Canton Red Chinese overestimated their strategic position, started a general uprising on Dec 12th and the Nationalist Chinese came for a brutal visit.

DB081 Starting position-proc

Carl Nogueira and I played this scenario twice.  I was the attacker – KMT Chinese and Carl the Red Chinese.  We then switched sides and played it again, you will read about the second one from a later AAR.

The victory conditions of this scenario is structured around the multi-hex buildings on the map.  The ones north of the canal are worth 2 points.  The ones south of the canal are worth 1 point except for the two building designated as factories.  The game ends on Turn 4 if the KMT Chinese get 8 points, Turn 5 for 9 points, Turn 6 for 10 points and Turn 7 for 12 points.  The KMT has to accomplish that while losing no more than 24 CVPs.

I planned to focus the main body of my troops to the right.  They are to capture the building on the right.  From there they can attack the factory immediately to the south of the canal, meeting up with a smaller force on the left flank.  Capturing the right building also allows for the possibility of forces wading across the canal for the higher value buildings on the north bank.  The small force on the far left is to protect the buildings from possible Red Chinese reinforcement  on Turn 3.  You see, the Red Chinese can choose to introduce their reinforcements from the north (top) side of the map, or the west (left) side of the map.   However if they come in from the south side of the canal, the VP requirements for the KMT drops by 1.

Anyway, that’s the plan .. until bullets start flying.

DB081 KMT1 DF-proc

KMT Turn 1 : The KMT rushed across the street.  A fearful death star appeared on the left flank in the single hex two storey building I never paid attention to before.  On the 2nd level, there was an MMG, a HMG and an 8-1.  On the ground level, there’s the 37mm gun sporting an ROF of 3.  These guys shot up a few of the squads on the left, rendered my HMG team useless for the duration of the scenario and made the rest of the folks very nervous.  The fortunate bit was that the elite Chinese squads were well placed to offer smoke grenades in support.

I was perhaps too careful with the armoured cars.  They are 5 CVPs and 7 CVPs (with a 9-1 armour leader) each, points that I hope won’t contribute to the Red Chinese 25 CVP goal.  Fearing a gun on the right side of the board, I planned to sneak around the side of the roadblock.  However when we ran into the death star, we froze.  In retrospect, the 37mm infantry gun has little more than 6% chance (HE only) of killing the KMT Type 22 armour truck (Chris Edwards’ Kill Calculator).  Granted, MGs can kill these vehicles but freezing in place is not the proper tactic either.

DB081 RC1 Sniper killed RC 8-0 GMT Ldr wound malf deathstar-proc

Red Chinese Turn 1 : Folks in the Red Chinese death star probably didn’t get their ancestors properly lined up.  First, a sniper killed the 8-1 .. and then both the MMG and the HMG malfunctioned on the same shot!  The concealed squads in the factory advanced out to the walls, which was brilliant.  I am not entirely sure why I never made use of the upper levels of the buildings I had to negate the walls.

DB081 KMT2 Sniper broke crew fire lanes-proc

KMT Chinese Turn 2 : KMT attacks!  The turn opened with squads advancing into the smoke that the élite squads laid down.  A 8-0 leader on the right went across the street and kicked the door in with the squad behind him ready to fire.  Other squads moved up and found the second gun at the rear of the building to the right of the map, as expected.  You can see the  laid and the Red Chinese squads putting down residual fire very efficiently.  The deathstar saw the HMG fixed but the sniper returned and broke the crew!

DB081 KMT2 End CVP 4-proc

End of KMT Chinese Turn 2 : This showed how ineffective the KMT attack was.  Losses was light fortunately, the Red Chinese accrued 4 CVP so far.

Red Chinese Turn 2 : On the right of the map, the KMT squads in front of their target building hope to  survived enemy fire and return a massive Defensive Fire back.  The KMT got a MMG team together with a 9-2 and kept the MGs in the death star suppressed. The KMT Chinese were getting ready to attack again.

DB081 KMT3 MPh-proc

KMT Chinese Turn 3 : KMT troops advanced forward on the right into the building.  LMG fire from across the canal came straight down the street.  On the left flank the KMT Chinese figured they should take advantage of the crippled death star and tried to rush the building, only to find the bottom floor fortified.  Worse – it’s fortified with a building full of self rallying crew!

DB081 KMT3 End-proc

End of KMT Chinese Turn 3 : We got into the building on the right. The rush on the left failed as the squad got shot up and bounced off the side of the fortified building.  The centre was pretty decimated.  The leaders were working hard to convince a few to get back into the fight.

DB081 RC3 End-proc

Red Chinese Turn 3 : The reinforcement came in from the north.  Things were not looking up for the KMT Chinese.   We only had a foothold on the right.  The troops on the left and in the middle were broken in huddled masses.  KMT didn’t seem to have enough people to make a third try.

DB081 KMT4 MPh All Shot up-proc

KMT Chinese Turn 4 : The KMT made an all out attack for the factory and the rightmost buildings.  Whilst they would get the right most building, the KMT Chinese got shot up everywhere else.

DB081 KMT4 End CVP18-proc

End of KMT Chinese Turn 4 : The KMT Chinese captured the gun on the right although they haven’t quite secured that building.  The force in the middle were almost entirely reduced into broken stacks.  Folks on the right who were there to guard against the Red Chinese reinforcement decided to move north to have a go at the death star.  I really like Carl’s demonstration of high level tactics.  Here we have a position where, if I attack, makes no contribution to the CVP.  However if I don’t, it will always interfere with my attack elsewhere.

DB081 RC4 End-proc

Red Chinese Turn 4 : The Red Chinese counter attacked!  Can you see the stack with the “DM” counter on top and a grey dotted line that extended to the left?  There’s an MMG in the stack and I should have laid a fire lane down that path to stop the Red Chinese from counter attacking.  However instead I was distracted by the first squad that rushed up.  Now I got 2 big stacks of broken troops threatened by marauding Red Chinese troops.  Since the Red Chinese already racked up 25 CVP, the scenario ended and Carl Nogueira won as the defender.

Notice the 2 fortified locations Carl revealed after the game.  He had the commissar situated in a fortified location in the middle of the factory.  He also had the other fortified hex immediately behind.  That last hex would be his “Alamo” before the Red Chinese bow out of the building.  Capturing a building like so was going to take a few turns more.

I would have the opportunity to improve my play by being the Red Chinese defenders against Carl’s KMT Chinese.

That will be in the next AAR!


Shanghai 1937 in Flames!!!

"Shanghai 1937 - Stalingrad on the Yangtze" by Peter Harmsen

(This is an interview conducted via email, where I talked to Peter Harmsen, the author of “Shanghai 1937 – Stalingrad on the Yangtze” about Advanced Squad Leader.)

Iacta Alea Est!

Wargaming is a method for historians, professionals and hobbyists alike, to get inside the minds of the actors of past conflicts. The games, or simulations, can take place at the grand strategic level, as described in a previous post about the game Dai Senso. They can also offer a more intimate look at combat, putting the player in charge of just a handful of soldiers and facing him or her with difficult tactical decisions. The Advanced Squad Leader (ASL) system is an example of the latter. It has thousands of fans around the world who use its flexibility to play scenarios from a range of theaters during World War Two and the years just before and after – including the Second Sino-Japanese War. We asked Jackson Kwan, a veteran Hong Kong-based ASL player, to introduce the system and especially describe how its versatility facilitates scenarios from the war in China. (The Q & A was performed by email, with special thanks to Jon Halfin for editing.)

Very briefly, what is the Advanced Squad Leader system?

Advanced Squad Leader is a detailed tactical gaming system that models company to battalion level combat in the Second World War period.  It simulates an amazing range of combat parameters: from weather to terrain, national characteristics, leadership and morale, different weapon systems and artillery support.  This allows the examination of engagements from the Pacific theatre to desert terrain, to European theatre and even tundra conditions.  It’s detailed enough to have rules for night battles and for vision effects under differing moon phases.

A short synopsis can be found here:

http://en.wikipedia.org/wiki/Advanced_Squad_Leader

How do you generate new scenarios?

Scenario designers from all over work with Multi-Man Publishing and other third party publishers to produce scenario packs and/or entire new modules (settings) that includes map boards and new counters that represents new nationalities, troop types or weapon systems that did not already exist in the system. Scenario designers combine detailed research of certain engagements and various elements including weather, terrain, troop types, conditions and morale, weapons available and ammunition supply into an abstraction that may or may not completely parallel historical outcomes. The best scenarios often have a creative feeling of the historical events, yet balance out asymmetric conditions, allowing both sides equal chances of winning the engagement.

How good is the system at simulating the Second Sino-Japanese War? Are the results realistic, i.e. are they similar to what really happened during the war?

This is a game system that reflects the feel of the position the opposing commanders faced. It seeks to address asymmetric conditions that battles often are while giving both sides a balanced opportunity to prevail through specific winning conditions and other parameters.

T6 Axis Move-procFor example : if you look at the battle at Shanghai’s Sihang warehouse*) alone, you will find at least four scenarios from different designers that put their own interpretation to the events.  My favorite of the four is a scenario named “Shanghai in Flames” where the Imperial Japanese Army (IJA) battles top quality Chinese troops (who were still around at the time) across a generically represented map reflecting the terrain styles, into the warehouse. Some of the buildings start already on fire and may spread according to wind conditions as the battle progress. As the Chinese fight a desperate withdrawal through the streets against the IJA pushing aggressively in, as the spreading fire almost becomes a third player, routing friends and foes alike.

Producing realistic results is not the primary objective of Advanced Squad Leader designs.  Putting players under similar decision making parameters and operating constraints to reflect the feel of combat command is the bigger goal.

But making these battles competitive and fun is the biggest objective!

What are the main differences between scenarios based on the war in China and, say, scenarios from Europe 1939-1945?

Obvious differences are weapon systems that the IJA uses (vs various European combatant). Differences in national characteristics, leadership styles, training and morale level – of the Japanese, Chinese, Gurkhas etc vs the Germans, Soviets, partisans plus the myriad of Allied and Axis minors. Differences in weather and terrain – jungles, kunai, caves, beaches, marshes, palm trees and huts in the Pacific Theatre of Operations vs woods, brush, buildings, rubble etc in the European Theatre of Operations.

If people want to get into the ASL system, what should they do?

The heart of the Advanced Squad Leader system is the Advanced Squad Leader Rulebook (version 2).  There are various modules for different nationalities and theatres.  The more modules you have therefore, the more variation you will have in the scenarios you can play.  The best thing to do however for new players is: Get in touch with Advanced Squad Leader players in various cities (and there are tournaments held almost every month around the world  http://aslladder.com/asltournaments.html) and/or on online forums.  Advanced Squad Leader is primarily about the chap across the table and definitely not meant for solo play.  (Although a well-developed Solitaire ASL system does exist, it has been out of print for some time. It does indeed make solitaire play possible.)  Most people in the ASL community are willing to teach new players and proficiency in the basic rules usually requires 3 to 6 games before you are ready to move into the various spectra the system can provide.

The Advanced Squad Leader Starter Kit #1 is designed as an initial step to see if this game’s for them. The Starter Pack is a small, self-contained system that will help any new player make the decision as to whether to dive into the full system headfirst, at a minimal cost – and was designed to replace the long out of print original “introductory” module for Advanced Squad Leader “Paratrooper”.

*) An incident during the 1937 battle of Shanghai when during a general retreat about 400 Chinese soldiers stayed behind, defending the Sihang Warehouse next to Suzhou Creek. The decision to make the stand at the warehouse was mainly motivated by a wish to demonstrate to local and foreign opinion China’s willingness to continue the fight.

(Original of this interview can be found : China in WW2)