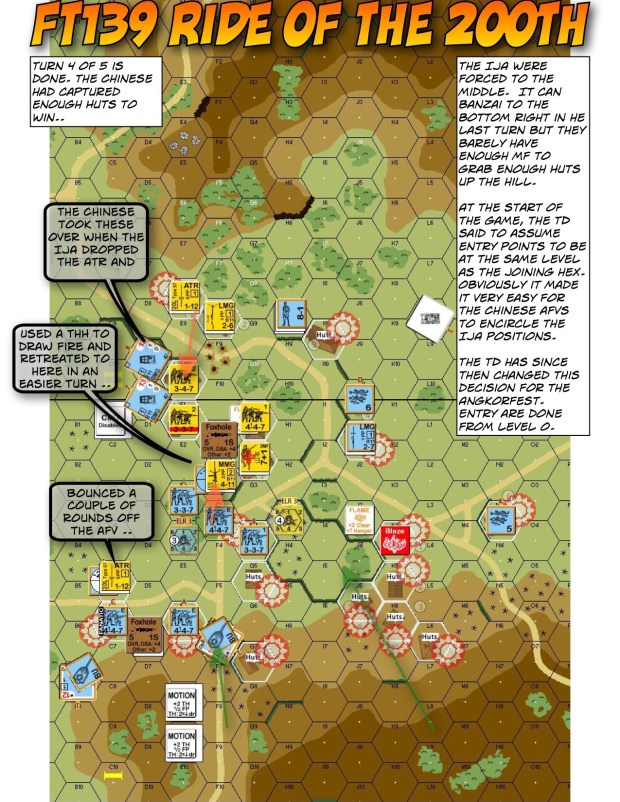
Advanced Squad Leader scenario 145 Shanghai in Flames (AAR)

This is the third time I am playing this scenario.  This is a great scenario that confers the heart pounding excitement of a PTO scenario without having to deal with PTO terrain.  As far as China battles go, this is perhaps the most famous one (internationally) and hence also the most over covered by ASL designers!

There’s even a new movie on the battle “The Eight Hundred”!  

84e02a7b 60f4 49d4 8b58 fb97db1c3a46Zhang Yimou s The Eight Hundred movieQN1j7mThe800

The IJA are to control the building with 3 Fortified hexes on the bottom left of the map in 6.5 turns (GMT has the balance), a representation of the Sihang Warehouse no doubts.  Clearing a large (fortified) building is a time consuming task!  Hence I race my IJA forces down the board where I can.  Being able to cut off retreating Chinese forces would be good too but so far I hadn’t been too successful.  On the otherhand, I am not as keen as my earlier self in running Banzai’s through the map.  As a matter of fact, I did none so far.  IJA’s are great in their ability to go wherever they want to with striping.  However one they get reduced, they don’t recover.  So I want be very deliberate in any losses via striping.  The “IJA HS strategy” of course hinges on having IJA leaders who behaves like Commissars.  Unfortunately, they had been replacing units over half of my rallies so far.  

Advanced Squad Leader scenario 145 Shanghai in Flames (AAR)

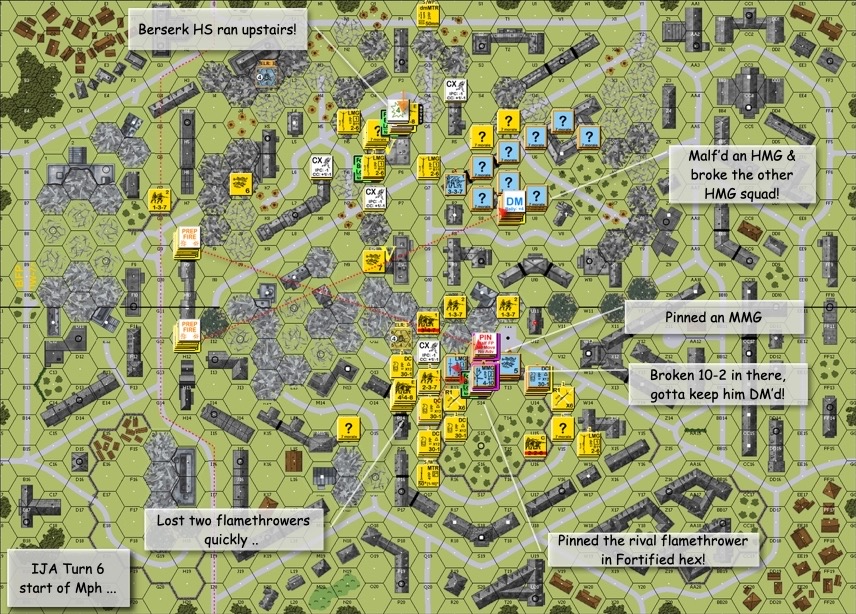
We were almost all at the Sihang factory after 3 Movement phases.  Not the quickest really.  Let’s kill the gents in the rowhouse and figure out which hex is fortified!  The IJA has unfortunately broke though the Chinese right flank and was last seen streaking down the length of the map.  I, on the otherhand, should deploy more IJA to stop them from (unnecessarily) striping.  

145 Shanghai in Flames Advanced Squad Leader ASL AAR


The IJA ran through the rowhouse and came in front of the warehouse itself!  The massive firegroup broke the MMG stack in the fortified C6 hex (where you see an IJA 2-3-7).  The IJA were now in the house!  The platoon of IJA Banzai’d in from the right and fortunately broke the defenders in the “courtyard” and even trapped a defender at the wall (G8).  

Oh and the GMT sniper drilled a hole through my 10-0’s forehead.  His neighbours described him as nice, quiet and unassuming.  He will be missed.  Painful.  

Advanced Squad Leader scenario 145 Shanghai in Flames (AAR)

The GMT promptly counterattacked and took that MMG back.  Unfortunately, an IJA Death Star assembled (2 x MMG + 1 x HMG) and broke the GMT MMG team!  The IJA HS’s decided to do two Banzais into the factory, forcing GMT squads to FPF as much as they can.  The other IJA squads came in the right and left nowhere for the GMT squads to rout.  

It’s over.  

A Dice Tower from an old Artisan …

My ASL buddy in Chengdu (China) showed an old artisan a drawing of a dice tower design.  This is what happened …


Mayhem in Manila, July 29 2016

People profiles

Benji at McDonalds

I got up rather early on the last day and so I checked out, took my luggage to the venue and went down to McD for a nice breakfast. I met Benji there. Benji travelled in from nearby via Uber. He told me how he’s been playing Mark Humphries every Friday evening. As a matter of fact John Knowles told me about Benji earlier and said he’s one of those guys who’s been picking ASL up really quickly. Apparently this is his first tournament and he’s enjoying it. He knows there’s a learning curve to be surmounted and he is focusing on getting through the first 100 games. I, on the other hand, is on my 123rd game and I am no where close to NOT feeling like a beginner. I didn’t tell him that.

The China crew

IMG_2027

One of the Dare Death editors with his BattleDice

The China crew showed up with 5 players this year (6 including myself). They have already been playing in regional tournaments so they are no strangers to most in attendance. These guys definitely held their own : after all Kyle, Johnny & Xavier are experienced players. Xavier, aka the X teacher, holds monthly ASL classes in a Shanghai game store. However, since he was never before ranked internationally, he is awarded “The Outstanding Newbie” award. Kyle & Zhen “Richard” Wang, are the two chief editors of the Chinese ASL magazine “Dare Death”. We even came in personalised team t-shirts, designed by Xavier.

Jamie Westlake’s Four Dice

One thing a lot of us noticed was Westlake throwing 4 dice at a time. He came in second in the tourney and so whatever he’s doing must have worked. Either that or it’s his superhero t-shirts. We asked him to explain this “Four Dice System”:

“Hi guys…..Aussie convention…..red and white first. Blue and yellow second. If multiple morale checks, top unit red and white, next blue and yellow. Then roll again for third and fourth etc. exception: if you roll HOB, blue and white become HOB resolution. If leader creation, yellow is next. When first introduced to this twenty years ago I hated it. Now I love it…..on a to hit roll, red and white is the hit, blue and yellow the kill. Instant gratification….whack!”

All the “other” folks I’d like to thank

Will Fleming

With so many players coming in from overseas and with a good number of new players, we knew there’s going to be an issue with maps and overlays. Will Fleming worked meticulously to put together good solid printouts of scenario maps on thick paper.

George Bates

George Bates couldn’t make the tournament because of real life issues. However, he’s instrumental to the success of Mayhem in Manila. He pushed through a lot of decisions and set the tone we want to bring forth in these tournaments. He was the one who went to Perry at Multi-Man Publishing and asked for sponsorship. That man showed me how it’s done.

Vlad See

Vlad See did the fantastic Mayhem t-shirts, amongst other things like driving players to airports. The graphics on the t-shirt is actually done by a professional design artist, not that it’s not noticeable.

The Sponsors

The sponsors! Oh my god, the sponsors!! They go such a very long way to make this a proper tournament. I can’t be more thankful of their support.

The Blog of Five Rounds

AP89 To the Pain, Bruce Probst

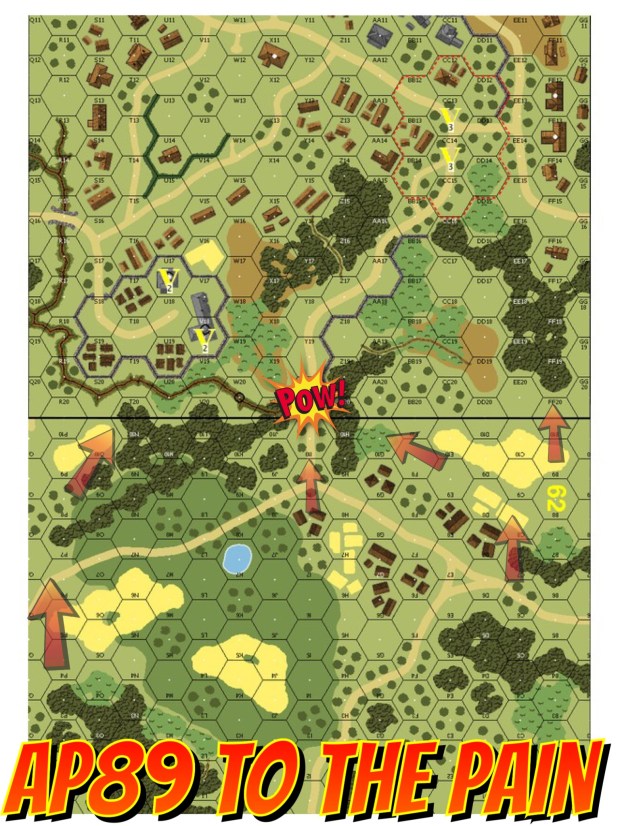
This is a Gary Fortenberry scenario from Action Pack 9 “To the Bridge”. The victory condition is a little out of the ordinary, there are multiple ways you can win. If you fulfil certain number of VC conditions at a certain point in time, the game ends. Otherwise it goes on to the next checkpoint until the 6.5 turn scenario is over.
Bruce Probst was my opponent on this first round. I played him in a Dare Death VASL tourney round before and he’s really one of the nicest chaps you can get matched up with.

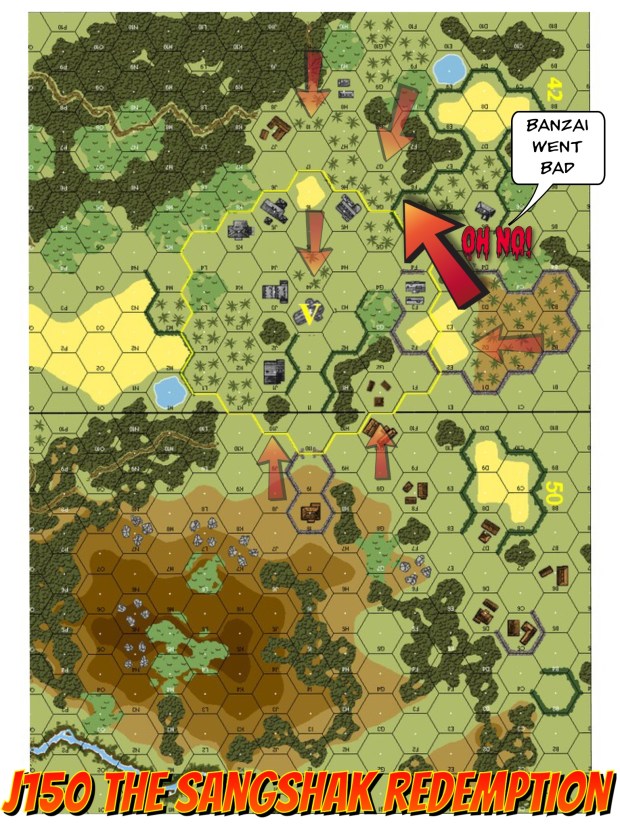
If you look the picture above, the locations marked with a “V” are the places that allows the British to score. The arrows show where Probst’s Gurkha Rifles roamed. Probst was probing the left, centre as well as the right. My attention was draw more to the right because my asset allocation was more towards the middle. I don’t worry about the left as much since it’s a much harder terrain to traverse.

Probst took advantage of his mobility and shifted his weight from the left to the centre, where he started focusing on around Turn 3, our first “checkpoint” so to speak. I wasn’t setup very well and so I had no multi-man counters around the middle VC. However, I was confident that I could advance a MMG crew into the area and extend the game to the next checkpoint (from Turn 3 to Turn 5).

As luck would have it, the crew had to roll for an NMC on the Defensive Fire and produced boxcars. It’s easy for me to blame the dice for this but I shouldn’t be in this situation to start with. I should have focused much better on the Victory Conditions.

Focus on the VC!

J150 The Sangshak Redemption, John Knowles

This 5 turn scenario is from ASL Journal 10. Both the Japan side and the Indian / Gurkha’s side get to attack as well as to defend. All the buildings are huts apart from the building in the middle of the VC circle which is a stone church. The IJA wins by winning ownership of the church (even just briefly) and keep two building within the VC circle at game’s end. My opponent was John Knowles, John and I play every Thursday evening, from “Into the Rubble” scenarios to Campaign Game playtests.

Initially, the IJA faced off a weak India setup. I needed to capture the church as soon as possible and to kill those 2 guns, to get into the right positions and to preserve my forces for the Gurkha onslaught. I didn’t move fast enough, I don’t think. I also saw an opportunity to banzai through cover and take out his ordnance. Those ordnance weren’t even pointed towards the banzai’er. Well, that didn’t turn out so well. I was able to pile into one of the Indian squads but neither of the guns.

My guys were off position and then John got a CH on the church from his 76mm mortar.

The expert that he is, he took maximum advantage of the opportunity to push into the church. My IJA couldn’t shoot at all that day, the Gurkhas were stacked and unloading barrages after barrages into the huts that the IJA were holding onto for dear life. In the diagram above, the bottom two arrows were how the IJA made their initial push. The arrows on the top and on the right were the Gurkha reinforcements.

I could have conceded after Turn 3, which was 2 Gurkha Movement Phases after his reinforcement arrived but I fought on. I surprised myself when the battle lasted through to Turn 5 until the necessary IJA forces were KIA’d off the map. To me this is a terrific reason as to why one should never concede. You never know how things will go.

Never concede!

AP59 Taking Heads, Zhen Wang

This is a 6.5 Turn scenario by another Fortenberry pack, Action Pack 6 A Decade of War. My opponent was Zhen Wang. Zhen’s one of the chief editors of Dare Death, the Chinese ASL magazine. The IJA attack down from the top of the map pushing against some ELR2 Philippines Army (“PA”) personnel. They could either win by exiting CVPs off the board, or by a combination of killing US units / capturing buildings (largely to the left of the “Fake HT”.

My issue started before the game even began and is perhaps the key weakness to date in my game. The “weak” Americans also get a 37LL AT Gun and two M3 GMC’s which are halftracks with 75mm guns. If you look at the diagram above, the 2 “bright” red dots are where they were located. The 37LL gun was at the back and never got used. They never really got into the right and is a big reason why I failed to get as many IJA kills as I should when they advance down over the top part of the map. To prevent CVP losses by losing those halftracks, I took them out of play myself. It absolutely obvious but it never hit me until now.

Zhen was able to demolish my PA troops piecemeal all the way back into the village buildings.

Put all your assets into the fight!


ITR1 Debacle at Sungkiang, Akira Lu

I was the defending Chinese in this 6.5 Turn Scott Holst scenario from “Into the Rubble”. My opponent was Akira Lu who is a relative newcomer into the hobby. He came to the tournament with nothing, not even Beyond Valor, but he left the tournament with Mark Humphries’ old Raaco boxes & bag set. I guess he’s finally convinced!

Alan Smee had a quick chat with me about what he saw in my play. He said I need to get as many assets as possible into the fight. I can even fall back into Fortifications but don’t put my assets out of play by putting them the backfields. He told me how he’d do a A103 Mayhem in Manila defence and that point came through loud and clear.

The red points on the map are where I placed my two 76mm artillery.

I put most of my assets forward and engaged the attackers for half the game around the top part of the map. The IJA had to capture 11 of those multihex buildings I won this one by adjudication as we ran out of time. My opponent is a newbie but I could feel the difference from my change in approach.

Push your assets forward, you can always back into fortified positions

AP90 Smashing the Hook, Benji Dayco

This is my other favourite scenario out of Action Pack 9 “To the Bridge”. This is a fast 5.5 turn scenario. The British needed to either destroy both roadblocks or clear IJA units from around the roadblock area.

My opponent was Benji Dayco whom I met that very morning at McD!

I figured we will fight this one in front. I put my 75mm infantry gun on the hill overlooking the first ridge. I had a MMG there in case the gun needed support. I also had HIP units on both sides of the road in front just in case some of these British breaks or if a leader wandered to the wrong place.

This worked out every well. The British seemed torn between running for the first roadblock or fighting it out. I won this one by concession as I had to make for the airport.

Lesson learned.

Defenders can still choose to fight the attackers in the ground of their choice.

Siem Reap, Cambodia?

We did a quick vote towards the end of Mayhem regarding the location of the next tournament. Siem Reap came out to be the winner and Raphael Ferry can’t be more enthusiastic in taking that on.

Siem Reap, home of Le Franc Tireur, does seem to be a top notched idea.

Snake eyes in the shadows of Ankor Wat.

I was chatting with Witchbottles the other day. Given all the issues and problems we have in life, whether personal or professional, to be able to see each other once a year means the both of you probably didn’t have too bad a year. It’s a blessing really.

See you there, Summer 2017. Have a good year!

Dare Death 3 Preface (Original) “What ASL is to me”

Dare Death 3One day in February 2013, I chanced upon a copy of Squad Leader on eBay. I was a Squad Leader player back when I was in high school. Unfortunately when I went to university, I found a few other things more interesting and I forgot about wargames all together. So, decades later, while I stared at the screen, memories of great times came back and I bought myself that copy. The internet connected me with some very active Squad Leader groups. I planned to learn the game again and get back into it.

I then came across the tiniest military bookstore one day. It’s the size of a small walk-in closet, except that it’s wall to wall military books. There it was, up on a shelf near the ceiling, a shrink wrapped copy of the Advanced Squad Leader Rulebook v2. I asked to have a look at it, and I never put it back down.

The ASLRB is not an easy book to read, so I asked to see a live game one Sunday afternoon. The local ASL’rs would have none of it. Erwin Lau & Lorricount Hall shoved a Pz IV my direction and said “Here, you are in charge of this one.” They then proceed to tell me what to do with my Pz IV every step of the way. I couldn’t fathom why people who I have just met would let me break into their Sunday game and spend that much time teaching me the mechanics, but they did.

It was a fun afternoon but it’s not an event I can attend on a regular basis. Nonetheless, the rulebook became a lot easier to understand now that I have context.

One day I got an email from Don Lazov. He said if I want to learn ASL, he could teach. I know then it’s choice between continuing to read the rulebook and solo’ing scenarios or having a mentor and actively playing. It was a choice between being a tinkerer and an active player.

I said “Yes but give me a few weeks to finish up Chapter A and Chapter B.” I wasn’t sure why I wanted to push it off. He asked again “Do you want to do this or not?”

I jumped in with both feet. Our first scenario was “RPT1 Ferenc Jozef Barracks”.

After that I ran into Witchbottles, who helped me get permission from Rodney Kinney (who created VASL) for permission to use VASL graphics in my blog. To me, Witchbottles is the embodiment of the modern day Renaissance man. We play ASL and we spent countless hours chatting about history and about life.

I don’t remember how I heard about “Malaya Madness” the 2014 ASL tournament in Singapore. I didn’t give it any thought at first but both Don Lazov and Witchbottles thought I absolutely must go. I struggled with it for a while. I mean, paying for flight and hotel to play a boardgame is crazy! I brought up the topic to my wife, expecting her to kill it (for good reasons). She thought about it for a minute and said “Yes”.

I rented a bunk bed in a hostel to save money but I went to Singapore for the tournament. There’s something truly magical about ASL that ties people together. Playing 1 on 1 on a weekend is one thing. Being in a room with other ASL’rs and playing games after games is definitely something else!

I got a bigger group of opponents after the Malaya Madness. I went on to help organise and to promote the 2014 Hong Kong ASL tournament, “The Gin Drinkers’ Revenge”. I was in New York City on Dec 2014 and I jumped on the train and stopped by Albany. It is THE Albany, the New York State ASL Championship. Joe Loece and Gary Trezza are simply some of the best hosts I have ever met. I met so many people at Albany. I met a lot of the best known names in ASL. I decided to shoot a video for these guys and leveraged on that to chat with as many people as I could.

That of course open me up to more venues and to more people. I picked up a chat from Carl Nogueira when I was walking down the street at lunch one day and he wanted to know if I want to play and to learn. I was getting so used to jumping in at that point I said “yes” immediately.

So you see, ASL is about people. ASL is about the guy on the other side of the table. ASL is one of the few good reasons in life that pulls guys together periodically, to share identical experiences and to chat about other thing as well. If you do solo play most of the time, you are truly missing the best thing ASL has to offer.

ASL is about playing. That rulebook is not for reading. It’s for referencing and as such, the INDEX is the command central for the ASL rulebook The value of an ASL kit is much higher when used and played than it will ever get on eBay.

ASL is about self discovery. As we compete with others, we learn more about our fears and shortcomings. We learn about our risk management and our decision making processes. The man to overcome game after game is yourself. This not something you will realize from ASL not played or ASL played solo.

Dare Death is an effort to arouse and to maintain that interest. Dare Death is the embodiment of a group of ASL’rs who play on a regular basis and discuss rules and tactics on live chats when not playing. If enthusiasm sells then Dare Death is a powerful force in ASL.

And enthusiasm sells.

Who’s Flying Number Seven? (Player Interview)

DD1Dare-Death is the world’s first Chinese ASL magazine created by Richard “Ferguson” Wang and Grandiose Pz.Kpfw.V Ausf G Driver (or “G Driver”. The term “Driver” in Chinese is the equivalence of “Grognard”.) 
Player Interview – “Flying No. 7”

Our interviewee for our Premier Issue is 飞翔的七号 “Flying No. 7”. He started ASL only 6 months ago and had already finished reading Chapter D. Displaying a remarkable grasp of the rules, he took the championship at our recent ASLSK tournament. Today we invite him to share his insights about learning ASL.

It was love at first sight.

Ferguson : First of all, we’d like to thank you for doing our interview.
No. 7 : You are welcome.
Ferguson : If memory serves not only did you stopped playing wargames for 2 years, you have never played ASL before. Is that correct No. 7?
No. 7 : Right, almost 2 years, that’s when I stopped playing “panzer”. No, I have never played ASL before.
Ferguson : Right. I miss you at DAK2 (laughs).
No. 7 : (laughs)
Ferguson : Well, I stopped playing OCS myself. How did you get into ASL? You decided to play again and you got right into a ASL, I can’t think of a better call.
No. 7 : Life got busy before. When life freed up a little, I missed playing again. I guess having played other wargames I have a better feel for what I like. I decided ASL is a good fit for me.
Ferguson: That’s great! I am always curious as to how people hear about ASL. For me, I learned about ASL from the “Science Fiction World” magazine.
No. 7 (“7” going forward): I don’t remember how I heard about ASL. It was probably from BGC(note: a China board game site). Then I went to an ASL coaching session in Beijing and I was hooked ever since.
Ferguson (“F” going forward): That’s ASL for you! What about you, “G driver”, how did you hear about ASL?
Grandiose (“G” going forward): It was BGC for me too.
F: Which one’s your first scenario?
7: S1
F: Hahaha .. it’s S1 for most people, including me.

Play Lots!

F: 7 do you know why we want to interview you?
7: Because I am new?
F: That’s part of it. The other part is because you are the fastest developing newbie that I have ever seen.
7: Thankyou.
G: Absolutely!
F: Any advice for folks learning ASL rules? I think you are well on your way to become a “human rule machine” (laughs). You have a better handle on the rules than I do.
7: You need to read the rules at least once. Those rules flowcharts we find on the internet help a lot as well.
F: Oh yes, those rules flowcharts are a huge help! I really appreciate the grognards who took the time to prepare them.
7: The most important thing is to play. Don’t worry about getting the rules wrong. You learn the most from playing seasoned players.
F: Right. We make rule mistakes all the time especially when we first started playing but if you don’t play you won’t know which rule you got wrong.
7: Agreed. We didn’t even know we were making rules mistakes when we were going through ASLSK until we played more experienced people.
F: I am still discovering points in the rules that I wasn’t entirely clear about and am often reminded of details that I should know with every new game I play. ASL is a game of fine details.
7: My biggest motivation for reading the rules is so that I don’t lose games because of (the lack of) rule knowledge.
F: Hahaha, this is a great motivator!
G: Avoid getting killed by the rules huh?  This is a big one.
F: Well, reality is grognards aren’t always stumbled by the rules because even they don’t always know they made rule mistakes!
7: Yup, that’s why I like studying the rules.
F: True, you do have a deep grasp of the details inherent in a wide section of the rules.
G: How do you remember all that?
7: Well, at the moment, I am really just keeping the ASL rules in my short term memory, that’s why I remember with such clarity.  I think over time I will lose details. I really don’t have a method to it, I just play as much as I can!
G: I prefer to match up the rules I read to actual game situations. The more sense the rules make, the easier they are to remember.
F: G’s right. Understanding the context of ASL and actual situations being modelled helps one learn the rules better.

I Like to Attack!

G: How many games have you played, 7? Which ones do you like better?
7: About 15. I like scenarios featuring complex terrain like in urban battles, and preferably those with a more balanced OB.
F: Out of these 15, which one do you remember best?
7: I’d say S18 Baking Bread. I was really just starting then (although I am still starting..).
F: I see! What is it about this scenario that gives you such a deep impression?
7: That game went all the way to the wire! The fight was a swirling brawl. It’s also my first win against an experienced player.
F: Oh yes, I love those games that teeters on the balance until the end!
7: S18 is also one of those rare scenarios where both players have to attack relentlessly to win.
F: That’s true, most ASL scenarios draw clear delineations between attack and defense.
G: 7 must feel that’s his tactical style.
7: Attack all & fear none! I am not well suited to ASL scenarios that make clear differentiations between attackers and defenders.
F: I actually think ASL’s designed for the attacker. We have an article in this coming issue around that view.
7: Oh I look forward to reading that!
G: Whether warfare favors the defense or the offense is determined by tactical parameters of the prevailing times. “On War” for example, written in the 19th century, describes a tactical world when battles favored the defense.
7: I actually think ASL rules favor the defense as well.
F: Okay, I agree the rules favors the defense when it comes to the IJA, their troops don’t even need to rally.
7: I agree with that.
G: What do you think of F’s and my fighting styles? (Laughs)
F: Hahaha
7: Well, the two of you are of course well experienced.
F: 7 must really like being the attacker right? “Attack all & fear none!”
7: I don’t like playing defense, no.
F: Why’s that?
7: I haven’t been playing too many ASL scenarios yet. Most of the ASLSK scenarios where I played defence pit Germans defenders against US attackers. I win some and lose some but whenever I win as the defender, those battles were never glamorous. They were really just me dragging things out until time ran out on the attackers.
F: Hahaah .. you are saying defense wasn’t as bold and as sweeping as the attack.
G: I think the mental stress is higher for defense.
7: Especially in S3, I have never been able to win that one as the defense. I don’t even know where to start!
F: True. I am more nervous when I play defense.
G: Well, it’s the same with ASL scenarios as with ASLSK scenarios.
7: When there’s too big of a numerical difference between the attacker OB and the defense OB, I feel especially helpless as the defense. Oh man, when I get all 447 and 436 defending against a mass of 666 and 747, the pressure is horrible!
G: Then again if the defense OB has absolutely no issues holding the line, the game will be hard to balance. The ASL rules though do give better mobility vs the ASLSK rules.
7: I haven’t played ASL that much, but I think “concealment” rules give a big boost to the defense.
F: I just think defense is harder with ASL rules. 7 you have played a lot of nationalities, which one do you like the most?
7: I have used about 5 or 6 and I like playing Germans the best. Then again, when I get a better handle on the IJA, that might be a fun choice too.
F: The IJA sure are special.
7: I really like the Step Reduction capabilities of the IJA.
F: Looks like your next port of call is Chapter G then?
7: Actually no, I’d like to learn AFVs first.
F: Oh yes, makes sense!
7: I have never played AFVs under ASL rules.
F: Yes, take it step by step. One last question : what expectations do you have for yourself in the upcoming ASLSK tournament? Have you set yourself any targets? You can be frank about this one!  (laughs)
7: Most opponents there are experienced players. I will just do my best. If I win even half the games I will be happy.
F: I think you are being modest. That wraps up our interview nicely though. 7, I would like to thank you again for doing this interview and I wish you the best of luck in the ASLSK tournament!
G: Thanks 7
7: You are welcome.

(Translated from Dare-Death magazine Issue 01)

Dare Death 01 “Preface” (translation)

DD1Dare-Death is the world’s first Chinese ASL magazine created by Richard “Ferguson” Wang and Grandiose Pz.Kpfw.V Ausf G Driver (or “G Driver”.  The term “Driver” in Chinese is the equivalence of “Grognard”.)  In support of their efforts and with their blessing, I will translate articles from Dare-Death whenever possible.  

Preface

To all ASL & ASLSK players in China :

ASL developed bountifully in the 30 years since its start in 1985. To date it has more than 10 official modules, addon packs in the hundreds and scenarios in the thousands. Through the support of its fan base, ASL is second to none in the Second World War tactical combat simulation genre. ASL offers a large library of official products and an even bigger array of third party publications and fanzines from around the world.  Unfortunately, there’s no third party product or fanzine from China until now.

Richard “Ferguson”/“爵爷” Wang approached me a month ago about publishing a China ASL e-magazine. I jumped on the idea immediately and hence the first China ASL fanzine was born! The primary goal of this magazine is to serve and to support ASL players in the Chinese speaking world. We will publish new product alerts, AARs, tactical analysis, newbie guides, articles focusing on rules and about historical backgrounds etc. We hope to develop more ASL players and to encourage more game play. We want more people to experience the uniqueness of the ASL system and we hope to promote ASL across China.

Since this is our Premier Issue, both Ferguson and I want to keep a lower profile. That’s why we did all the articles and translations ourselves. Going forward we will try to keep to a quarterly schedule. We welcome all ASL related article submissions. Since we want to keep this a free publication for now, we apologize for not being able to pay any remuneration. Please lend us your support! Finally, we’d like to invite anyone interested in finding out more about ASL to join QQ group 450676993 (a China online chat group). Our ASL chat group is covered around the clock by grognards (aka “old drivers”) who helps with ASL queries and discussions. We also encourage players to look for games online and we might even organise tournaments going forward. Our immediate target is to get more people to play. If conditions allow in future, we will publish scenarios.

By grandiose 开豹式的 g 司机 (grandiose Pz.Kpfw.V Ausf G driver)
2015/11/10

(Translated from “Preface” in Dare-Death magazine Issue 01)

DB081 Lack of Discernment AAR – Defending!

DB081 - Start-proc

Here’s the AAR of when I played this scenario as the attacker against Carl Nogueira.

Now that I got a chance to see how the grownups do it, Carl gave me a chance to put my learning to the test.  He let me play this again, with me defending as the Red Chinese this time.

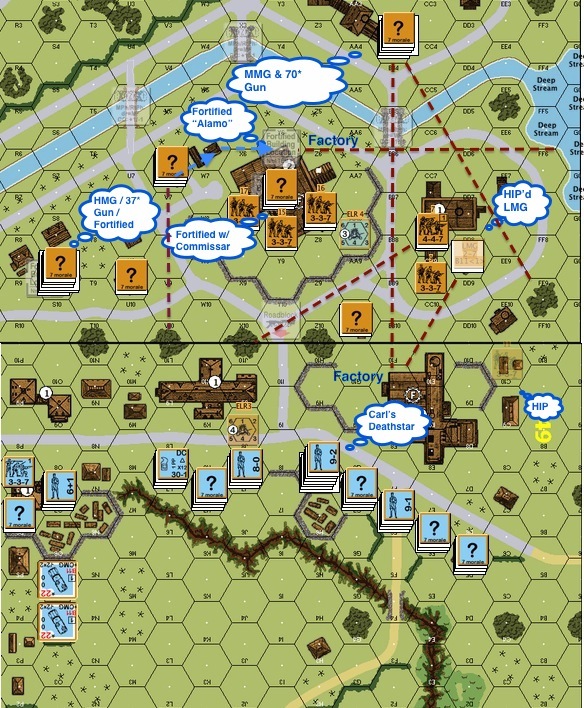
The above is my attempt to draw a pentagram with imaginary fire lanes when setting up the defence.  Carl put his defence all upfront.  I am not so confident.  Just so everyone knows, this scenario has a variable ending depending on when the GMT can capture enough multi-hex buildings to get the points required by the end of Turn 4 to 7 while  suffering no more than 24 CVPs.  The multi-hex buildings on the south of the canal are worth 1 point each, the ones to the north are worth 2.  The two bigger buildings on the south I labelled “Factory” are worth 2.  The first target for the GMT is to get 8 points by the end of Turn 4.  However if the Reds reinforcements come in south of the canal, that requirement for the GMT falls to 7.

Carl put his defence up front.  I wasn’t so confident.  I thought the weight will come from the right and that the GMTs would be crossing the canal up the top right corner to grab at the 2 point buildings.  I couldn’t give up the use of the single hex multi storied building on the left, that was where I placed my HMG, a quick fire 37* gun and ground level fortifications.  I put another fortification in the middle of the factory where my commissar sat.  I got another fortification hex behind him as “the Alamo”.

He would expect the Red Chinese “death star” on the left so I didn’t bother HIPing it.  I did however HIP’d two half squads on the right to help with the defence.  The MMG and the 70* gun were across the canal to the North.  In a way the longer the big gun laid unfound, the better it is.

Notice Carl got a nasty death star : 2 MMGS + HMG + 9-2 on level 1 of a building.

Okay, talk is cheap, let’s see how all these work out.

DB081 - T1 RC 02 Deathstar duel-proc

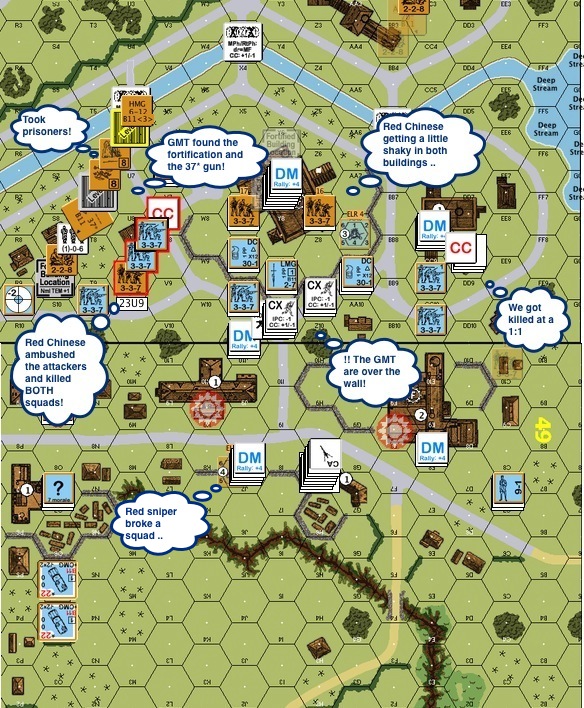
Red Chinese Turn 1 : The GMT pushed very aggressively into and in some case past the first line of buildings.  The Reds death star exchanged shots with the powerful GMT one and didn’t fare too well.  The GMT staged for the attack on the (middle) factory.   Yes, the Reds “sulked” and skulked as well into the factory and later advanced back out.

DB081 - T2 GMT02 CC'd-proc

GMT Turn 2 : GMT attacked across the street!  They quickly found the 37* gun on the fortified ground floor in the building to the left.  The broken attacker was taken prisoner and was ushered into the building quickly.  The Reds position in the factory and in the building to the right looked shaky.  Broken Reds quickly piled up.  There were two close combats.  The 2 GMT squads to the left was ambushed by the Reds and were both KIA’d.  The GMT squad to the right fared better, it killed the Reds squad and flanked the building.

DB081 - T2 RC01 UnHIP right Leader ran Deathstar dead-proc

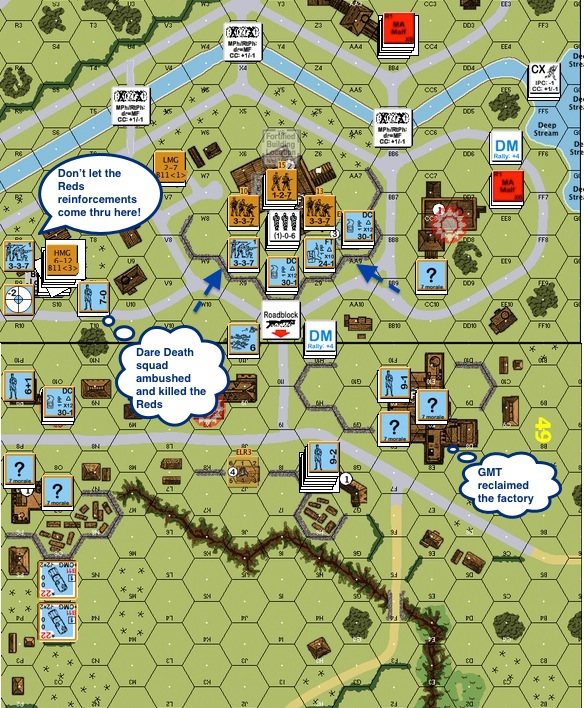
Red Chinese Turn 2 : The GMT had pretty much captured the building on the right.  The Reds leader decided to make a run for it with the LMG and head for the canal!  A HIPpie on the right popped out and headed for the factory on the right, going after the broken GMT squad and absolutely intend to be a nuisance.  The factory being 2 points, Carl had to comeback and root the little Reds squad out.

I hope to survive past Turn 4 and receive the GMTs across the canal.

DB081 - T2 RC02 New Prisoner-proc

Red Chinese Turn 2 (contd) : The Reds took another GMT squad prisoner and dragged them into the (middle) factory.  The broken Reds squad ran after their leader to the right.  The GMT now had 5 points against the required 8 needed to win the game in Turn 4.

DB081 - T3 GMT01 Left DD rush Encircled FT blew out RightTop squad ran-proc

GMT Turn 3 : The GMT went back into the factory to the right to reclaim it.  A GMT Dare Death squad led the charge to the left!  May be the GMT was looking to cut off the middle factory from the left as well.

DB081 - T3 GMT02 DD snakeeyes CVP19 GMT7 need factory-procGMT Turn 3 (contd) : Prospects for the Reds weren’t looking up.  Their “death star” on the left was slowly getting cut off and surrounded.  The GMTs were all lined up outside the middle factory.  The canal was ready for a cross over.  The GMT got squads lined up against the left in case the Reds send reinforcements in from south of the canal.

DB081 - T3 RC01 CC Ambush CVP24 then CVP 26 Bldg 7 Req -1-proc

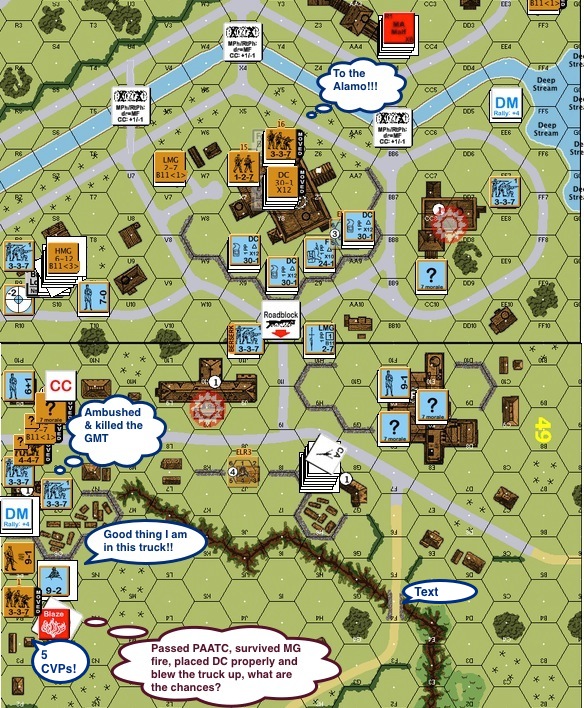
Reds Turn 3 : Turn 4 was coming up and doing the usual was not going to help me survive.  I need some GMT CVPs fast.  The GMT armoured trucks hadn’t been moving from the bottom left at all.  Trap or not, I had to go for it.  Each armoured truck gives me 5 CVPs.  The one with the armoured leader gives me another 3 CVPs for a total of 8.

So the Reds moved in concealed.  One of the Reds squad survived Defensive Fire from the GMT death star (broke one of the guns as well), passed the PAATC check, placed its demolition charge properly and ..

Blew up one of the armoured trucks with no survivors.

Too bad the armour leader was in the other truck!  Another Reds squad moved in, ambushed and killed a GMT squad in close combat.

All these gave the Reds 22 CVPs.  However, since the Reds had 2 GMT prisoners squads and prisoner CVP bonus counts at game end, the Reds stand to get 26 CVP if the game end right there.  (The GMT are only allowed 24 or less.)

This created a funny situation.  Since the Red Chinese reinforcement entered south of the canal, the GMT build points requirement in Turn 4 dropped from 8 to 7 which the GMT now had.  The GMT would need to rescue the prisoners before the end of Turn 4 to win the game.  Otherwise if the game “ends”, the Reds would realise 26 CVPs (+4 CVP bonus from the prisoners) instead of 22 and 2 CVPs more that what the GMT were allowed to lose.

DB081 - T4 GMT01 Sniper 9-2, CVP26 Bldg 7-proc

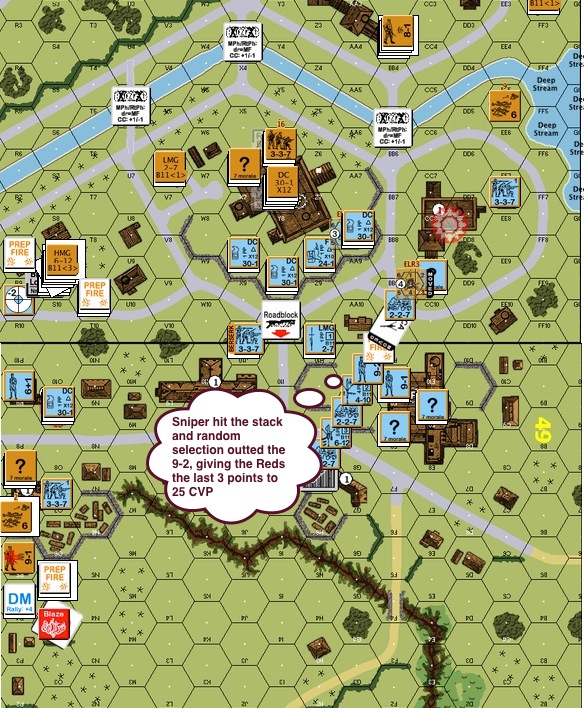
GMT Turn 4 : GMT squads started off a new turn prep firing away.  One of the shots invited a Reds hot sniper that hit the GMT death star.  A round of random selection nailed the GMT 9-2 leader in a stack of 4.

This gave the Reds the 3 CVPs need to reach the 25 CVPs to win the game (29 CVPs with the prisoners).  Great game! 


DB081 Lack of Discernment AAR – Attacking

This scenario took place on Dec 15th 1927, a full 12 years before World War Two.  It’s based on some of the earlier conflicts between the Red Chinese and the Nationalists (Guomintang, GMT or Kuomintang, KMT).  The conflict took place in Canton 廣東, not too far away from Hong Kong.  The Canton Red Chinese overestimated their strategic position, started a general uprising on Dec 12th and the Nationalist Chinese came for a brutal visit.

DB081 Starting position-proc

Carl Nogueira and I played this scenario twice.  I was the attacker – KMT Chinese and Carl the Red Chinese.  We then switched sides and played it again, you will read about the second one from a later AAR.

The victory conditions of this scenario is structured around the multi-hex buildings on the map.  The ones north of the canal are worth 2 points.  The ones south of the canal are worth 1 point except for the two building designated as factories.  The game ends on Turn 4 if the KMT Chinese get 8 points, Turn 5 for 9 points, Turn 6 for 10 points and Turn 7 for 12 points.  The KMT has to accomplish that while losing no more than 24 CVPs.

I planned to focus the main body of my troops to the right.  They are to capture the building on the right.  From there they can attack the factory immediately to the south of the canal, meeting up with a smaller force on the left flank.  Capturing the right building also allows for the possibility of forces wading across the canal for the higher value buildings on the north bank.  The small force on the far left is to protect the buildings from possible Red Chinese reinforcement  on Turn 3.  You see, the Red Chinese can choose to introduce their reinforcements from the north (top) side of the map, or the west (left) side of the map.   However if they come in from the south side of the canal, the VP requirements for the KMT drops by 1.

Anyway, that’s the plan .. until bullets start flying.

DB081 KMT1 DF-proc

KMT Turn 1 : The KMT rushed across the street.  A fearful death star appeared on the left flank in the single hex two storey building I never paid attention to before.  On the 2nd level, there was an MMG, a HMG and an 8-1.  On the ground level, there’s the 37mm gun sporting an ROF of 3.  These guys shot up a few of the squads on the left, rendered my HMG team useless for the duration of the scenario and made the rest of the folks very nervous.  The fortunate bit was that the elite Chinese squads were well placed to offer smoke grenades in support.

I was perhaps too careful with the armoured cars.  They are 5 CVPs and 7 CVPs (with a 9-1 armour leader) each, points that I hope won’t contribute to the Red Chinese 25 CVP goal.  Fearing a gun on the right side of the board, I planned to sneak around the side of the roadblock.  However when we ran into the death star, we froze.  In retrospect, the 37mm infantry gun has little more than 6% chance (HE only) of killing the KMT Type 22 armour truck (Chris Edwards’ Kill Calculator).  Granted, MGs can kill these vehicles but freezing in place is not the proper tactic either.

DB081 RC1 Sniper killed RC 8-0 GMT Ldr wound malf deathstar-proc

Red Chinese Turn 1 : Folks in the Red Chinese death star probably didn’t get their ancestors properly lined up.  First, a sniper killed the 8-1 .. and then both the MMG and the HMG malfunctioned on the same shot!  The concealed squads in the factory advanced out to the walls, which was brilliant.  I am not entirely sure why I never made use of the upper levels of the buildings I had to negate the walls.

DB081 KMT2 Sniper broke crew fire lanes-proc

KMT Chinese Turn 2 : KMT attacks!  The turn opened with squads advancing into the smoke that the élite squads laid down.  A 8-0 leader on the right went across the street and kicked the door in with the squad behind him ready to fire.  Other squads moved up and found the second gun at the rear of the building to the right of the map, as expected.  You can see the  laid and the Red Chinese squads putting down residual fire very efficiently.  The deathstar saw the HMG fixed but the sniper returned and broke the crew!

DB081 KMT2 End CVP 4-proc

End of KMT Chinese Turn 2 : This showed how ineffective the KMT attack was.  Losses was light fortunately, the Red Chinese accrued 4 CVP so far.

Red Chinese Turn 2 : On the right of the map, the KMT squads in front of their target building hope to  survived enemy fire and return a massive Defensive Fire back.  The KMT got a MMG team together with a 9-2 and kept the MGs in the death star suppressed. The KMT Chinese were getting ready to attack again.

DB081 KMT3 MPh-proc

KMT Chinese Turn 3 : KMT troops advanced forward on the right into the building.  LMG fire from across the canal came straight down the street.  On the left flank the KMT Chinese figured they should take advantage of the crippled death star and tried to rush the building, only to find the bottom floor fortified.  Worse – it’s fortified with a building full of self rallying crew!

DB081 KMT3 End-proc

End of KMT Chinese Turn 3 : We got into the building on the right. The rush on the left failed as the squad got shot up and bounced off the side of the fortified building.  The centre was pretty decimated.  The leaders were working hard to convince a few to get back into the fight.

DB081 RC3 End-proc

Red Chinese Turn 3 : The reinforcement came in from the north.  Things were not looking up for the KMT Chinese.   We only had a foothold on the right.  The troops on the left and in the middle were broken in huddled masses.  KMT didn’t seem to have enough people to make a third try.

DB081 KMT4 MPh All Shot up-proc

KMT Chinese Turn 4 : The KMT made an all out attack for the factory and the rightmost buildings.  Whilst they would get the right most building, the KMT Chinese got shot up everywhere else.

DB081 KMT4 End CVP18-proc

End of KMT Chinese Turn 4 : The KMT Chinese captured the gun on the right although they haven’t quite secured that building.  The force in the middle were almost entirely reduced into broken stacks.  Folks on the right who were there to guard against the Red Chinese reinforcement decided to move north to have a go at the death star.  I really like Carl’s demonstration of high level tactics.  Here we have a position where, if I attack, makes no contribution to the CVP.  However if I don’t, it will always interfere with my attack elsewhere.

DB081 RC4 End-proc

Red Chinese Turn 4 : The Red Chinese counter attacked!  Can you see the stack with the “DM” counter on top and a grey dotted line that extended to the left?  There’s an MMG in the stack and I should have laid a fire lane down that path to stop the Red Chinese from counter attacking.  However instead I was distracted by the first squad that rushed up.  Now I got 2 big stacks of broken troops threatened by marauding Red Chinese troops.  Since the Red Chinese already racked up 25 CVP, the scenario ended and Carl Nogueira won as the defender.

Notice the 2 fortified locations Carl revealed after the game.  He had the commissar situated in a fortified location in the middle of the factory.  He also had the other fortified hex immediately behind.  That last hex would be his “Alamo” before the Red Chinese bow out of the building.  Capturing a building like so was going to take a few turns more.

I would have the opportunity to improve my play by being the Red Chinese defenders against Carl’s KMT Chinese.

That will be in the next AAR!


Shanghai 1937 in Flames!!!

"Shanghai 1937 - Stalingrad on the Yangtze" by Peter Harmsen

(This is an interview conducted via email, where I talked to Peter Harmsen, the author of “Shanghai 1937 – Stalingrad on the Yangtze” about Advanced Squad Leader.)

Iacta Alea Est!

Wargaming is a method for historians, professionals and hobbyists alike, to get inside the minds of the actors of past conflicts. The games, or simulations, can take place at the grand strategic level, as described in a previous post about the game Dai Senso. They can also offer a more intimate look at combat, putting the player in charge of just a handful of soldiers and facing him or her with difficult tactical decisions. The Advanced Squad Leader (ASL) system is an example of the latter. It has thousands of fans around the world who use its flexibility to play scenarios from a range of theaters during World War Two and the years just before and after – including the Second Sino-Japanese War. We asked Jackson Kwan, a veteran Hong Kong-based ASL player, to introduce the system and especially describe how its versatility facilitates scenarios from the war in China. (The Q & A was performed by email, with special thanks to Jon Halfin for editing.)

Very briefly, what is the Advanced Squad Leader system?

Advanced Squad Leader is a detailed tactical gaming system that models company to battalion level combat in the Second World War period.  It simulates an amazing range of combat parameters: from weather to terrain, national characteristics, leadership and morale, different weapon systems and artillery support.  This allows the examination of engagements from the Pacific theatre to desert terrain, to European theatre and even tundra conditions.  It’s detailed enough to have rules for night battles and for vision effects under differing moon phases.

A short synopsis can be found here:

http://en.wikipedia.org/wiki/Advanced_Squad_Leader

How do you generate new scenarios?

Scenario designers from all over work with Multi-Man Publishing and other third party publishers to produce scenario packs and/or entire new modules (settings) that includes map boards and new counters that represents new nationalities, troop types or weapon systems that did not already exist in the system. Scenario designers combine detailed research of certain engagements and various elements including weather, terrain, troop types, conditions and morale, weapons available and ammunition supply into an abstraction that may or may not completely parallel historical outcomes. The best scenarios often have a creative feeling of the historical events, yet balance out asymmetric conditions, allowing both sides equal chances of winning the engagement.

How good is the system at simulating the Second Sino-Japanese War? Are the results realistic, i.e. are they similar to what really happened during the war?

This is a game system that reflects the feel of the position the opposing commanders faced. It seeks to address asymmetric conditions that battles often are while giving both sides a balanced opportunity to prevail through specific winning conditions and other parameters.

T6 Axis Move-procFor example : if you look at the battle at Shanghai’s Sihang warehouse*) alone, you will find at least four scenarios from different designers that put their own interpretation to the events.  My favorite of the four is a scenario named “Shanghai in Flames” where the Imperial Japanese Army (IJA) battles top quality Chinese troops (who were still around at the time) across a generically represented map reflecting the terrain styles, into the warehouse. Some of the buildings start already on fire and may spread according to wind conditions as the battle progress. As the Chinese fight a desperate withdrawal through the streets against the IJA pushing aggressively in, as the spreading fire almost becomes a third player, routing friends and foes alike.

Producing realistic results is not the primary objective of Advanced Squad Leader designs.  Putting players under similar decision making parameters and operating constraints to reflect the feel of combat command is the bigger goal.

But making these battles competitive and fun is the biggest objective!

What are the main differences between scenarios based on the war in China and, say, scenarios from Europe 1939-1945?

Obvious differences are weapon systems that the IJA uses (vs various European combatant). Differences in national characteristics, leadership styles, training and morale level – of the Japanese, Chinese, Gurkhas etc vs the Germans, Soviets, partisans plus the myriad of Allied and Axis minors. Differences in weather and terrain – jungles, kunai, caves, beaches, marshes, palm trees and huts in the Pacific Theatre of Operations vs woods, brush, buildings, rubble etc in the European Theatre of Operations.

If people want to get into the ASL system, what should they do?

The heart of the Advanced Squad Leader system is the Advanced Squad Leader Rulebook (version 2).  There are various modules for different nationalities and theatres.  The more modules you have therefore, the more variation you will have in the scenarios you can play.  The best thing to do however for new players is: Get in touch with Advanced Squad Leader players in various cities (and there are tournaments held almost every month around the world  http://aslladder.com/asltournaments.html) and/or on online forums.  Advanced Squad Leader is primarily about the chap across the table and definitely not meant for solo play.  (Although a well-developed Solitaire ASL system does exist, it has been out of print for some time. It does indeed make solitaire play possible.)  Most people in the ASL community are willing to teach new players and proficiency in the basic rules usually requires 3 to 6 games before you are ready to move into the various spectra the system can provide.

The Advanced Squad Leader Starter Kit #1 is designed as an initial step to see if this game’s for them. The Starter Pack is a small, self-contained system that will help any new player make the decision as to whether to dive into the full system headfirst, at a minimal cost – and was designed to replace the long out of print original “introductory” module for Advanced Squad Leader “Paratrooper”.

*) An incident during the 1937 battle of Shanghai when during a general retreat about 400 Chinese soldiers stayed behind, defending the Sihang Warehouse next to Suzhou Creek. The decision to make the stand at the warehouse was mainly motivated by a wish to demonstrate to local and foreign opinion China’s willingness to continue the fight.

(Original of this interview can be found : China in WW2)