West wall of Sihang Warehouse, Shanghai, China, late Oct or early Nov 1937

Chinese soldiers on the roof of Sihang Warehouse, Shanghai, China, late Oct 1937
It was October 27 1937. The Imperial Japanese Army had already been in China for years. Manchuria and Beijing were already under Japanese control. Chiang Kai-Shek, the leader of the Chinese Nationalist Party and a graduate of the Imperial Japanese Army Academy had been until then, conceding to Japan’s demands at every turn while building up an army with the Germans (see the German helmets in the photo? The Tripartite Pact wasn’t signed until 1940.) The 88th Division was the elite of the Nationalist Chinese forces. Its 524th Regiment held out against IJA’s 3rd Divison at Sihang warehouse situated across the Whampoa River from the “foreign concessions” long enough to sway western opinions about IJA’s aggression on Chinese soil. (Here’s a GamesSquad Forum thread with a great writeup about the battle.)
I am playing another scenario around this battle at the same time – AP54 800 Heroes. You will certainly see an AAR here once that’s done. By the way, there was only 423 men and 16 officers defending the warehouse but they reported their numbers to be 800. Hence this incident is known to the Chinese as “800 Heroes” or “八百壯士”.
The interesting bit about A110 Shanghai in Flames is that the Blaze is the 3rd player. Both players need to work around it and even with it, as you will see.
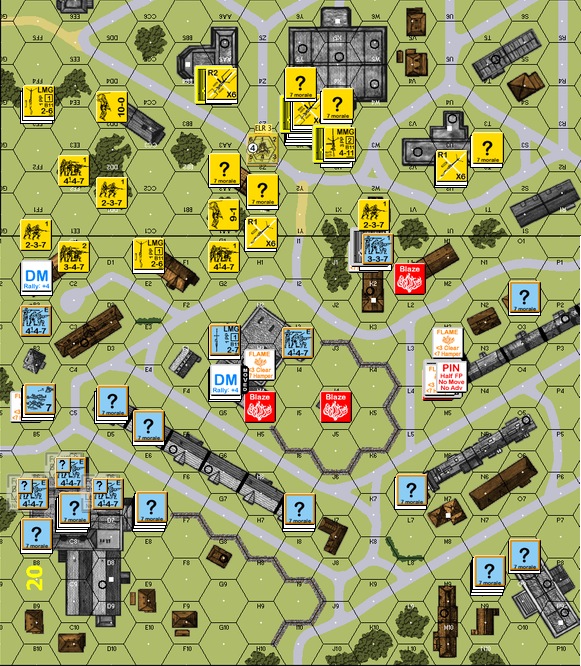
I am fortunate enough to be playing the Chinese. Here’s the IJA Turn 1.
The Sihang warehouse is the factory on the lower left of the screen. Three hexes within were fortified. I find the row house in front to be incredibly useful in providing blind hexes against IJA machine guns situated in the multilevel buildings at jump-off (top part of the picture). The IJA could slide down the far left, come through the row house (using the big stone building in the middle) or swing around the far right. I made sure that I got fire lanes down some of the streets and the leaders (there are only 2) sited to keep the chaps from cowering. I also made sure approaches to these machine guns were covered even if it’s the inherent firepower of lone squads, FFMO+FFNAM (penalties for moving on open ground and not using assault movement) is a deadly thing.

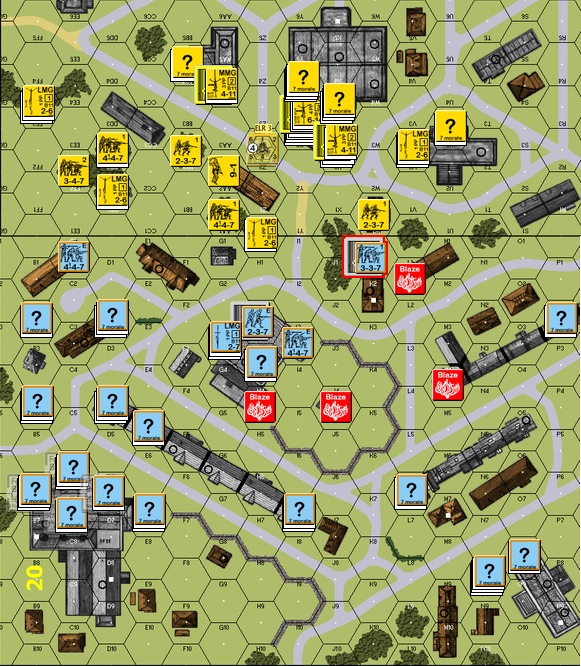
The above was the IJA turn 2. IJA pressed down on the left and the middle. A Chinese squad broke voluntarily to avoid close combat on the far left. The mission was to survive long enough to delay the IJA onslaught for as long as possible! The IJA machine guns from the top of the map were pretty threatening but my opponent had the worst of luck with the dice. They broke repeated and finally knock themselves out of the game!
The best thing I did was to lit the building on the bottom left of the screen above the factory (see the “flame” blow the broken unit?) up early. It soon developed into a blaze that denied the IJA use of a terrific jump off point for the final attack on the factory.

Okay, this is the Axis Turn 5 where the Chinese took the wraps off their heavy machine gun (lower left, “First Fire”) from within the factory and laid a fire lane down the street. Unfortunately it malfunctioned not long after. A light machine gun in the row house did the same joined by the medium machine gun from the bottom right at the end of the long street.
You can also see that the big stone building the middle was pretty much engulfed in flames. The IJA was forced to come through its immediate right. The Chinese was able to put a HS up the wall and laid out some pain as the IJA squads came towards it on open ground.
This is what I mean by the Blaze being the 3rd player. Time and time ahead the Chinese had to rout out of buildings as their hex bursted into flames but it also denied the IJA some really great positions.

Two more IJA turns to go, the Chinese troops skulked like the best of them. The MMG on the bottom right should have went down to the other side of the row house and prep for the last fire lane but had to scoot upstairs instead to avoid the pesky IJA half squad hanging around the streets. The row house defence line was collapsing at this point.
IJA Turn 6 – the legendary IJA step-reduce steamroller! I was careful about planting each residual fire right but it’s awe-inspiring to see them running through the bullet storm.
The board’s on fire ..
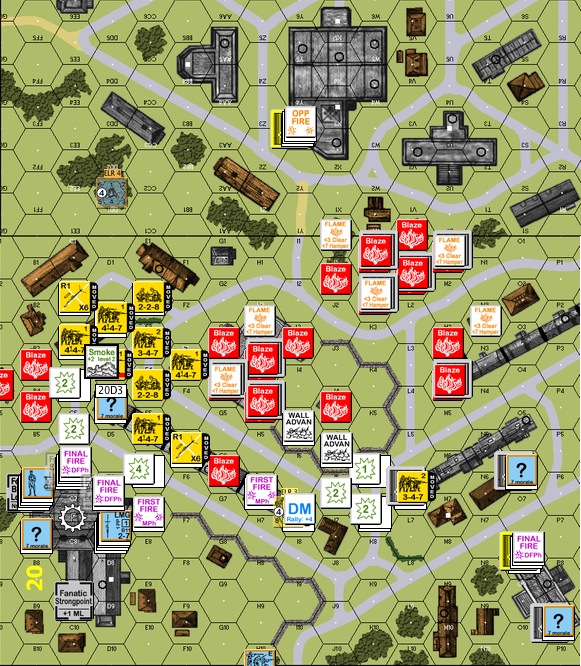
 This was the scene immediately after the last IJA Defensive Fire Phase. The Chinese saw no less than three Banzai attacks after waves of feints from reduced-strengths/half squads. You can see where they were from the red “Human Wave” markers. The Chinese heavy machine gun had already malfunctioned and their medium machine gun was out of place, so no fire lanes were possible. They had to be careful about their shooting so they don’t run out of bullets before the IJA run out of squads. The focus of course was to build a “wall of fire” in an inverted “v” immediately north of the factory. The top three factory hexes in that “v” was fortified and was invaluable in stopping two out of three banzai attacks.
You can see the two places where the IJA broke in as well. The Chinese could only spread out inside the factory so that the IJA couldn’t engage them all in close combat before time ran out. Oh, stacked underneath the broken squad on the bottom end of the factory right next to the IJA squad was a 8-0 leader holding out his corner with a light machine gun!
Both players had to account for and in the Chinese case, “ally” with the Blaze. The triangular cluster of houses top left of the factory should be lit up as soon as possible, as should the big stone complex (H2) in the middle of the board, top of the row house in the picture . Blazes in these locations denied the IJA important jump-off points for attack. The row house top right of the factory was a terrific defense line that allowed routs back into the factory (especially when the left cluster of buildings were on fire).
Overall, an awesome scenario and I had an awesome opponent!
Resources :