2020 Top 10 Posts on HongKongWargamer

2020 Top 10 Posts on HongKongWargamer

Advanced Squad Leader


Folks, these are the top 10 articles that got the most reads this year.

10. Do not let Valuable ASL Time slip by – Walter Branham, Berserk Commissars

09. What I love best about the Global ASL Community

08. About Me

07. Grognards Speaks : Advanced Squad Leader Articles That Change Their Lives

06. Tactical Notes

05. Getting Started with Advanced Squad Leader

04. Katz: Designer’s Response to the Desperation Morale Review of Forgotten War

03. Resources for Advanced Squad Leaders

02. Advanced Squad Leader is the Greatest Wargame Ever Published

01. Upcoming Advanced Squad Leader Products

204 Human Bullets After Action Report (AAR) Advanced Squad Leader scenario


204 Human Bullets After Action Report (AAR) Advanced Squad Leader scenario 

Scenario Background

I am finally in South Korea!!  This is an early Korean war action.  On one fine day, June 28 1950, the North Koreans came cruising down Hongch’on Road.  

Google Map : Seoraksan

(Steep hills.  STEEP.)

The North Koreans had 6 x T-34/85 (some of which might have SD6’s) and 3 x SU-76M (ROF2) with 2 Armor Leaders.  They were unfortunately separated from a lot of angry North Koreans (24 squads) spurred on by 5 leaders, one of which a commissar.  The South Koreans had a 6 squads + 2 leaders reception committee, plus an unknown composition lying in wait in the Steep Hills.  Given the ROF 3 AT Guns, I thought it’s a no-brainer choice.  I picked the 3 x AT Gun combo.  

Victory Conditions and Tactical Considerations

The North Koreans rolled into the narrow mountain passes (aka Steep Hill) where the South Koreans (HIP’d Fanatic units) prepared an ambush.  The North Koreans needed to exit 15 VPs (3 vehicles) in 8.5 turns.  I would have to kill all the tanks before the North Korean infantry overrun my blocking force, outnumbered 4 to 1.  

Fighting in Steep Hills

Steep Hills is a new terrain feature to Forgotten Wars.  This is some of the best ambush terrain.  

  • AFVs cannot venture offroad and these roads are one lane only.  
  • Open Ground Steep Hill hexes are Concealment Terrain. 
  • Guns with L or LL barrel lengths (all the AFVs in this scenario) cannot fire Main Gun / CMG at a higher elevation target if the LOS crosses any hill terrain in the hex adjacent to the firer that is of a higher elevation (but Guns on Steep Hills can fire down).  

Wait, the South Koreans (Ambush team) had Molotovs!  (They were Fanatic as well, a point that we completely forgot.)

As you know, Molotovs kill AFVs at 6 or less, -1 for Elevation Advantage +2 for  Moving and -1 for Crew Exposed.  

However, the SU76’s should be very afraid.  Some of the Hill hexes next to the Road were 2 levels higher than the Road.  That meant an Open Top AFV could be treated as unarmored!  (D5.311).  A Korean squad dropping a MOL into an SU76 from an adjacent hex would have an IFP of 8+4 or 12, which is 8 on the “vehicle line”.  If those rides don’t burn, there were scores of Human Bullets (remember ATMMs) and DC heros to get the job done.  

Here’s the thing: we all knew it’s going to be ugly for the Korean tank column.  Should it move forward as per normal and hope to survive the ambush?  Or should it do what one of the playtester did, crawl along as slow as possible until the N Korea infantry catch up?

After Action Report

Advanced Squad Leader scenario 204 Human Bullets After Action Report (AAR) NK Turn 1

The N Koreans had to do PTCs at the start of the scenario, but it’s more of an inconvenience really.  Everything’s very quiet.  

Advanced Squad Leader scenario 204 Human Bullets After Action Report (AAR) NK Turn 2

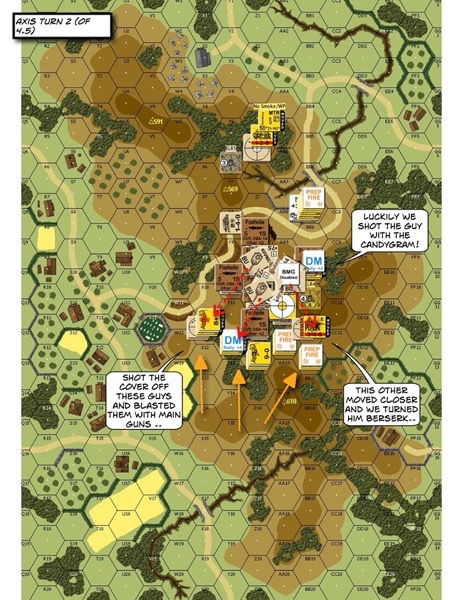
The S Korean AT guns appeared and shot the lead tanks!  This One Lane Road obviously created issues for the convoy.  S Korean infantry then appeared and rained Molotovs  down from two levels up and burned the SU76M’s on the other end.  On the far left, the N Korean infantry rushed the vastly outnumbered S Korean defenders.  The only thing the S Koreas banked on was the open ground between the hordes and themselves.  There were 2 dozen dummy counters amongst the S Koreans on the left.  Hopefully their protected position would help delay the N Koreans some.  

Advanced Squad Leader scenario 204 Human Bullets After Action Report (AAR) NK Turn 3

We held off the first infantry onslaught but the N Koreas were getting too close for comfort.  On the right flank, we had to back off via the gully.  They could follow us into the gully but if they wanted to go faster they would need to get on Open Ground and take our point blank fire.  We must hold the flanks!  Up on the Steep Hills some Human Bullets started appearing.  One of surviving SU76M crews vaporized one of them as soon as he came into view.  The other got to a T34 and even remembered an ATMM but failed to do any damage!

Advanced Squad Leader scenario 204 Human Bullets After Action Report

A third AT gun appeared and completed the destruction that was the N Korean armor column.  It’s just as well ‘cause one of the other AT Guns malf’d.  The ambush team tried to dig some foxholes but got wiped out by the MTR (we forgot they were fanatic).  Over on the left of the map, the right flank was on the verge of collapsing.  They were pretty much just blocking the way with brokies.  The left flank was still firing away and leaving Residual on Open Ground.  

Advanced Squad Leader scenario 204 Human Bullets After Action Report (AAR)

Over on the left of the map, the right flanked crumbled and the N Koreans were rushing for the right edge of the map!  Their MTR kept pounding away at one of our AT Guns but good thing its concealment held for a while.  Unfortunately no one brought too many HE rounds and we were just pinging infantry with AT rounds.  We had very few warm bodies left to stop the N Koreans. Good thing they didn’t want to spend too much time messing with us.  

Advanced Squad Leader scenario 204 Human Bullets After Action Report (AAR)
We focused on putting a line of residual fire across where most of the N Koreans had to cross and it was deadly.  The N Koreans conceded when its apparent that they couldn’t squeeze 15 CVP’s of folks through the north.  

How’s this Scenario Interesting?

This is certainly a great lesson on how Steep Hills were hostile environments to AFVs.  I suspect it’s easy for the N Korea player to fail his Personal Morale Check when it didn’t take much to light the whole armor column up in flames.  This is my first game with a new opponent and I am very impressed with how resilient he was and how he kept pushing on til the very end.  It wouldn’t be such a great game had it not been him.  In case we start thinking that this is an unbalanced scenario, ROAR reads 8:9 North K: South K.  I’d love to hear what some of the winning strategies for the N Koreans are!

SP247 Golden Arrow After Action Report (AAR) Advanced Squad Leader scenario

SP247 Golden Arrow After Action Report (AAR) Advanced Squad Leader scenario

Scenario Background

This is got to be one of the shortest scenarios I have ever played!  It’s April 2 1945 around Siegen, Germany.  The US 8th Infantry Division (“Golden Arrow Divison”) along with some armor were met by paratroopers from the 6th Fallschirmjäger Regiment.  The Americans win if they have more MMCs than the Germans on Level 1 across (map left) the Sieg River in 4.5 turns.  The Americans brought a M4A3 with a 105mm howitzer (US Vehicle Note 17) for infantry support and a M10 TD (US Vehicle Note 23) to back the Sherman up.  The Germans had a StuPzIV “Brummbär” (German Vehicle Note 37) which sports a 150mm howitzer, practically a DC hurler on tracks!

Tactical Considerations

The Germans started with 5 squads, 2 reinforcing.  The Americans ran with 7.  Apart from pushing across the river, they best whittle each other’s forces between movement phases.  The Germans have better morale and better cover but a shorter range and an ELR of 2.  The Americans can win most firefights but their morale is not the best for moving under fire.  We would have to rely on a lot of smoke.  Good thing the M4A3(105) got a lot of it (WP9 S7 sM8).  I planned to use the M4A3(105) to help get rid of the German infantry and the M10 was to keep the Brummbär away.  Having said that, the M10 with its open top would try not to let the 150mm roving howitzer have the first shot.  

M4A3


M10 Tank Destroyer


Brummbär


Golden Arrow

​​

After Action Report

The Germans got their Brummbär nicely holed up in a stone building.  German reinforcements could come in from either the left (bottom) or the right (top) on Turn 2.  That kept me off the hill on my right because it’ s very hard to rout properly from.  I put a little firebase high (9-2) up in a stone building to help me clear the hill on the left.  

SP247 Golden Arrow Nov28 01

Advanced Squad Leader scenario SP247 Golden Arrow (AAR) starting position

Advanced Squad Leader scenario SP247 Golden Arrow (AAR)

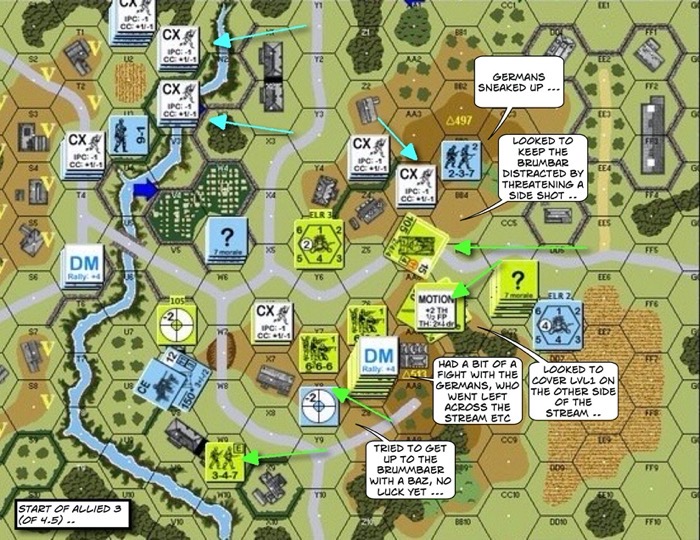
Advanced Squad Leader scenario SP247 Golden Arrow (AAR) start of Allied Turn 3

We managed to clear off the hill top on my left (map bottom), but not without suffering a few broken squads.  Some Germans sneaked back on the hill to the right, plus the Brummbär hadn’t moved yet, hmm .. 

Advanced Squad Leader scenario SP247 Golden Arrow (AAR)

Advanced Squad Leader scenario SP247 Golden Arrow (AAR) MPh Allied Turn 3

Later in Allied Turn 3:  The German (+reinforcements) were already scrambling onto the hills over on the north shore.  One dang HS managed to pull a panzerfaust and burned my Sherman!  I meant for it to go hulldown around the building in W5, so much for that now.  That left my M10 weaving its way up hill to get a better shot across the stream while avoiding the Brummbär.  I had a leader snatch a baz from some brokies and delivered to the chaps at Y7.  A HS had also gotten behind the Brummbär. However, a HS’s CCV is 3 (-1 CE target).  We wondered as to whether the HS should go for the CC or jump into the river.  These fellas were screaming themselves hoarse and throwing beer cans but the Brummbär didn’t seem the least bit bothered.  Everyone need to cross the stream in the next 2 turns.

Advanced Squad Leader scenario SP247 Golden Arrow (AAR)

Advanced Squad Leader scenario SP247 Golden Arrow (AAR) Post AFPh Axis Turn 4

Turn 4 and it was now or never.  We figured if we move our TD last we could keep the Brummbär in place while we move everyone closer to the stream.  Once in the stream they should be able to scramble up the hill on the north shore (map left) with a move vs Difficult Terrain.  TD’s there VBM’d against the building to keep the Germans getting close enough to give us enough firepower and to provide some smoke in the last turn.  

Advanced Squad Leader scenario SP247 Golden Arrow (AAR) last Allied MPh

Last Movement Phase! There was a CX’d German HS behind my TD. I could back the TD up, go through the “sunken road” in W7 and try a non-hulled down side shot on the Brummbär. I’d be chancing a successful panzerfaust pull from the HS and if the TD bought it, it’s out of the game. I could drive the TD forward in full view of the Brummbär and try to lay Smoke or better yet, threaten to shoot the monster. If the Brummbär shoot back and/or blow me up, that would have protected my infantry. So that’s what I planned to do. First, I advanced a couple of squads into the stream, the Germans shot back but it wasn’t too bad. Unfortunately no one could find any smoke grenades to toss back up to cover the TD. Ah well, the TD crew thought, everything in their lives had evidently brought them to this point. So it rolled forward, turned and moved towards the Brummbär. They hoped to lay some smoke for the 9-2 platoon that’s waiting to move but the smoke pot didn’t work either. The M10 drove straight up to the Brummbär and stopped, open topped vs 150mm howitzer. The Brummbär refused to be distracted, it wanted the 9-2 platoon. The only way the TD could be cover for the 9-2 platoon is to be a wreck and the Brummbär wouldn’t allow that! The TD went for a round of APCR, and the round sailed over the stone wall …

It connected!! The turret hit wrecked the Brummbär. The 9-2 platoon gleefully splashed into the stream, survived the residual and cheered!

The Americans won this round by putting 7 squads on Level 1 vs the German’s 5.

Advanced Squad Leader scenario DB131 Thorn in the Side (AAR)

Advanced Squad Leader scenario DB131 Thorn in the Side (AAR)

Scenario Background

A buddy and I continue to play the excellent series of “Dispatches from the Bunker” scenarios backwards.  After DB132 One Last Victory, we were on DB131 A Thorn in the Side.  This scenario puts us in February 1 1944 Kangaw Burma.  The No 1 Commando “Royal Marines” took a hill (Hill 170) that oversaw a vital road junction in the path of Japanese retreat.  The Japanese found that unacceptable.

The first map is from Combined Operations and the photo of the “salamander badge” of the 1 Commando is from Commando Veterans Archive.

Victory Conditions & Tactical Considerations

So here we have a 4.5 turn scenario in which the Japanese wins at the end of any Player Turn if all British AFV are eliminated/ recalled/ not on level 3 hill hexes.  It’s never good to meet the IJA in close quarters.  I hope to take advantage of distance, higher firepower and all the leader mods.  It would be hard to keep the IJA off my tanks for 5 IJA Movement Phases.  I thought about this and I realized there’s a clue in the Victory Conditions.  I had 3 AFV’s and AFV’s can move.  The Victory Conditions say “If ALL British AFVs .. not in Level 3 hill hexes.”  There are 3 Level 3 hill tops on the map.  I could start on one side, delay the IJA for as long as I could and move the tanks to the other level 3 hexes.  I would be fine as along as 1 of the 3 Shermans stayed on level 3 at any given time!

So that was my plan.

After Action Report

Advanced Squad Leader scenario DB131 Thorn on the Side (AAR)

The IJA moved up to my positions from the south (bottom of the map).  Most of them succeeded in keeping their Concealment but we weren’t shy about opening fire.  We were not going to find out whether we could survive IJA ambushes even though we were Stealthy.  We simply didn’t have the numbers to swap them bodies for bodies.  The time to reduce the IJA was now!  We were mindful about keeping rout paths open but that wouldn’t last as the IJA close in.  We also made sure that we keep HS’s between our main forces and the IJA.  We didn’t want our main force caught in a Banzai or even in a friendly HtH.  The idea here was to block them, to induce MC’s and to waste their time.

Advanced Squad Leader scenario DB131 Thorn in the Side (AAR)

Post Allied MPh, Turn 3 (of 4.5), the British got a line of HS’s blocking off the IJA from their foxholes (FH).  HtH’ing these guys would take one of the 2 Movement phases they had left.  The AFV’s moved to the “3rd” Level 3 hill top to the North.  Some infantry went as well as the last line of defense.  The 2 Level Jungle helped here as you need to see a target to initiate a Tank Hunter Hero or a Banzai.  Our 10-2 ran off successfully but we had issues moving the MMG squad out of their FHs.  The squad broke under IJA fire but a Hero came by to pick up the MMG.  We figured we could do a Minimum Move and pass it to some friendies nearby (but we were wrong, as per A4.134 we need to have at least 1 MF to do a Minimum Move, best we can do was to send a HS back in and hand the toy over during the Rally Phase).  Those guys were also looking to CC the Wounded IJA 8+1 nearby since he couldn’t vol break.

The IJA conceded.

How’s this Scenario Interesting?

It’s interesting when I remembered Guderian insisting that an AFV’s engine is as much a weapon as its guns.  This scenario a delightful “return” to the PTO for me.  It takes discipline to minimize CC contact with the IJA in the Jungle.  More to screen off Banzai attacks, to keep my distance and to shoot to get MC’s.  This is a very tight design: terrific troops on both sides, tight mapboard and a tigher 4.5 turns.  This definitely reminds me why PTO is my first love.

We are on to the next: DB130 Tigers and Flames!

Advanced Squad Leader scenario RbFI-1 Weather the Sturm After Action Report (AAR)

Advanced Squad Leader scenario RbFI-1 Weather the Sturm After Action Report

Scenario Background

We are going OLD SCHOOL baby!!  Rob and I want to take a crack at the HOB Recon by Fire series of scenarios.

We are talking Dubrovno Russia on June 23 1944.  The Germans got a double row of mines laid out to keep the Russians away from the Moscow-Minsk highway.  The Russians come in with 6 tanks, a pair of fighter bombers, 15 squads and 4 leaders.

As the Russians, I have three IS-2 or the Iosef Stalin heavy tanks and an ISU-122 assault gun which used the same chassis.  Both had limited ammunition storage (circled 11) but the assault gun had smoke rounds (S8).  Five squads of assault engineers and a couple of PT-34 minerolling tanks round up this special assault group.  The Germans have a Nashorn sporting an 88LL plus two STuG IIIGs (small targets with 75L’s and plenty of smoke) working together with an 88LL Pak 43 (ROF2) to discourage the neighbours from scratching their minefield.

Victory Conditions and Tactical Considerations

The Russians win by exiting 20 EVPs off the west (left) edge or by inflicting 38 CVPs on the Germans in 7.5 turns.

The initial problem here is to decide which part of the mine belt to work on.  Looking at this from the Russian point of view, the middle part provides a wide playing area for the Russians to bring their arms to bear and eventually no where for the Germans to rout.  Operating there will also offer some measure of cover against the German offboard observer.  The downside about the middle patch is that there’s not a lot of Woods for the Russians to established a beachhead into.  Plus I’d expect the Germans to put wire on the right tip of the Woods to deny places for broken Russians to rout back into.  The Woods on the right flank (top of the map) offer quite a bit more cover for the Russian Breaching team.  Unfortunately we have very short ranged weapons and won’t be able to fight the Germans in the middle patch of Woods as we race through.  Plus the right flank is open to the German offboard observer.

The After Action Report

Advanced Squad Leader scenario RbF1-1 Weather the Sturm After Action Report (AAR) Russian 1

Our Support team came under heavy fire from their Nashorn and 88 FlaK gun immediately.  We expected them to be there but made a conscious choice to have the Breach team enter right (top).  Hopefully the Support team would survive long enough to keep their Nashorn & 88 occupied.  Our armor stand a decent chance again the STuGs.  We noticed the Nashorn’s OT and in Woods.  That could get pretty nasty with Air Burst if we could get a shot off!  Our Breach team went to work right away under an OBA smoke cover.  The Assault team laid in wait.  They might be able to sneak past the German HMG’s (pillbox) CA.  Having said all that, our ISU122 was the only AFV that had smoke and it was the first to go.  I didn’t like my chances running down those Woods (there’s a 2nd Pillbox) since the German reach was longer than mine.

Advanced Squad Leader scenario RbF1-1 Weather the Sturm After Action Report (AAR) German 4

All Russian armor apart from an IS-2 were shot by Turn 4 but we vaporized the 88 and airbursted the Nashorn.  It’s now the IS-2 vs two STuGs.  They didn’t have a good chance against the IS-2’s armor but the IS-2 couldn’t hit the side of a barn.  The German 100mm OBA then came down on the Woods right over my chaps!  We made a decision to bank on our 8 morale and push through so as to not lose time.  The Germans then drew a RED card which was a welcomed break.  We made several trails through the minefield but we spent too much time there.  One of our fighter bombers caught a STuG in the open and stunned the commander but its bombs missed and disappeared into thin air.  We would have to get as close to the Nazis as possible.  HUG THE ENEMY!!  Perhaps that would save us from their OBA.

Advanced Squad Leader scenario RbF1-1 Weather the Sturm After Action Report 03

By Turn 6 it’s quite apparent that we might not be able to exit 20 EVPs (so we start counting CVPs).  The Germans made a bid for my IS-2 while my infantry hid deep in the Woods to avoid the OBA.  Thank goodness for those fighter bombers!  I was just waiting for one of these to miss its Sighting DR and finish off the last tank on the board.  Two German leaders got to the wrong side of my IS-2, one of these guys’ got to have brought a Panzerfaust along.  The world’s going to turn into a giant fireball at any moment.  I laid harassment fire on my IS-2 to give it some cover.

Advanced Squad Leader scenario RbF1-1 Weather the Sturm After Action Report (AAR)

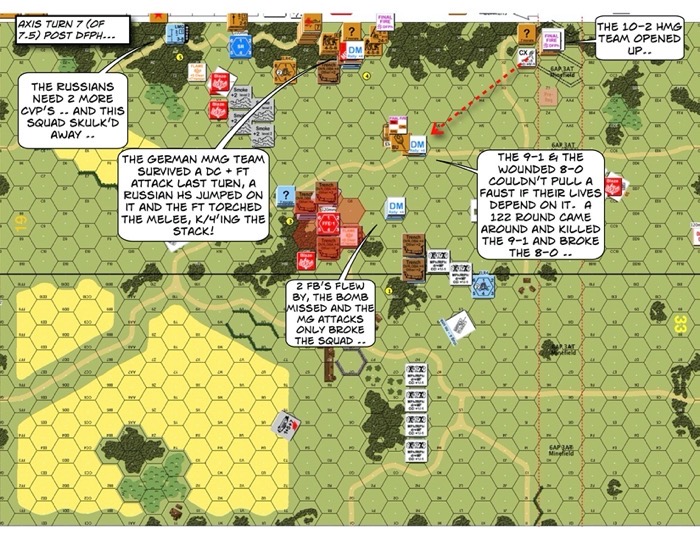
That German MMG team up (top) in the Woods really did a number on my Russians.   A squad placed a DC on them but it didn’t do a thing, nor did the flamethrower.  So a HS enthusiastically jumped in so as to hold them for another turn.  My Russians light up the Melee again (who needs friends?) and broke everyone in the brawl (K/4 the German).  I was counting on capturing the HS for my last CVP.

Advanced Squad Leader scenario RbF1-1 Weather the Sturm After Action Report (AAR)

Last Allied turn. we didn’t think we would but we drew a black chit for our OBA.  We requested for the OBA to be moved on top of the wounded German 8-0 who was still frantically padding his pockets for a Panzerfaust …

The OBA came down, rolled snakes, vaporized the 8-0 and gave the Russians their last CVP!

How is Scenario Interesting?

As the Russians, we got two problems to work on and at least two approaches to take.  Reading Chas Smith’s article “Breaching Operations” in Recon by Fire #2 helped me get things organized.  That ferocious gun fight with the Nashorn and the 88 luckily resulted in (with a lot of help from the fighter bombers) the Russians having the only AFV on the board.  We lost every other tank but that gave the Breaching team enough time to work through the mines and let the Assault team through.  The German OBA almost ended it right there in the Woods.  The battle turned when the Russians realized they could no longer get off the board and hence didn’t have to care about casualties as long as they could take enough Germans down with them.

I wonder still as to whether I should have went down through the clump of Woods in the middle of the board instead.  It’s there that Russians can fight with their short ranges (high firepower) and numerical superiority.  We lucked out.

Advanced Squad Leader scenario FrF3 The Swedish Voluntary Corps After Action Report (AAR)

Advanced Squad Leader scenario FrF3 The Swedish Voluntary Corps After Action Report (AAR)

Scenario Background

It’s March 2 1940, Märkäjärvi, Finland.  Russians discovered a Swedish base camp and decided to move in to shut them down.  It’s minus 47C (-52.6F)!!

Victory Conditions & Tactical Challenges

The situation’s not pretty from the start, the Swede OB was cool but not Finnish-self-rallying cool.  The Russians came in two directions with 24 (6 on ski’s) squads and 2 leaders.  The Swedes had 9 squads and 3 leaders and all of them on ski’s.  Extreme Winter, Winter Camoflage and Deep Snow’s in effect (did I mention it’s cold?).  The Russians have to force all Good Order Swedes out of a 7 hex magic circle drawn in the Woods within 5.5 turns.  

After Action Report

Advanced Squad Leader scenario FrF3 The Swedish Voluntary Corps (AAR)

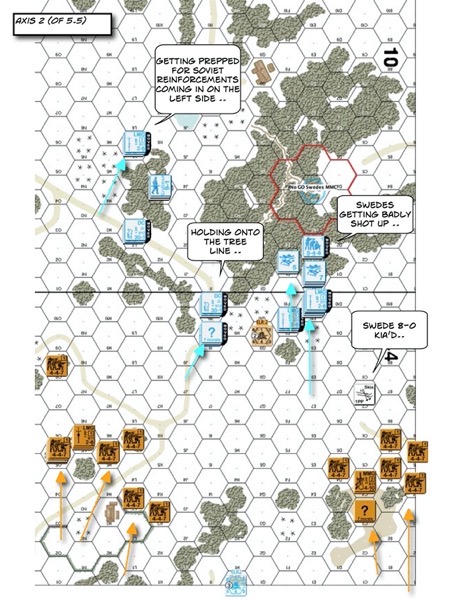
By Turn 2, the Swedes were already suffering heavy losses (KIA’d a 8-0 too) plus morale’s breaking all over, level 8 or not.  They had the same range as the Russians, which didn’t allow them to take good advantage of the Open Ground that he Russians had to cross.  Russians were taking on an orderly pattern of moving and doing big firegroups.  What we were most wary of were Human Waves that would propel the Russian quickly over that Open Ground (snow).  We tried to keep LMG’s in firelane positions and put Half Squads out to catch Human Wav’ing Russians forward.  However at the rate at which we took casualties, I would be amazed if we could hang on (as the Swedes) to the magic circle for 5.5 turns!  

IMG 4277

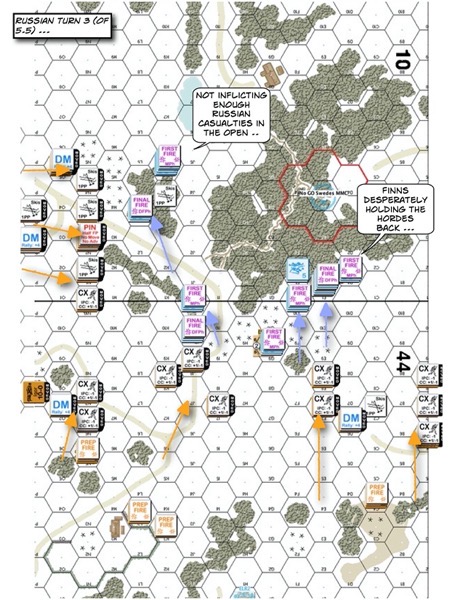
Somehow we kept the Russian hordes in the open for a little while longer.  We were still careful about  keeping HS’s between our main forces and the Russians to fend off potential Human Waves but none materialised.  Timing is everything, if we duck into the Woods too early it would give the Russians free passage across the snow.  

IMG 4301

We fought hard to not let the Russians flank us.  Unfortunately two berserkers popped up and punched holes in our lines.  At the end of the turn we would see one melee and most Swedes melting into the Woods.  We ran out of Open Ground already!  Okay, 2 more Russian moves to go.  

Advanced Squad Leader scenario FrF3 The Swedish Voluntary Corps After Action Report (AAR)

We deployed to cover more ground and some of our troops rallied.  In our last MPh, a HS drew fire by placing a Demo Charge on a 2 x 447 stack.  It got shot to bits, a Hero ran in, picked up the DC and tried to place it again, he too got blown away by Subsequent Fire, The good news was that the Residual wasn’t placed in our “escape” hex.  A leader picked up the DC, backed up through the escape rout and casually chucked it at the 2 x 447 in Advance Fire Phase.  That package of love didn’t do anything to anyone.  Well, we did try!  On the otherhand a Hero on the right sneaked up to a Russian brokie.  He ambushed the brokie, killed it and positioned himself to interdict the incoming Russian MMG team.  The rest of the Swedes formed up into a hedgehog inside the magic circle.  The Russians conceded.  

How is this Scenario Interesting?

This is classic quantity vs quality.  I count myself lucky to not have seen a Russian Human Wave over the snow.  That would have likely given the Russians a lot more time to work the Swedes over in the Woods.  I mean, these guys had more squads than I had bullets!  Close Combat in the Woods with 9 squads vs 24 is not a welcomed prospect either.  As I mentioned earlier, timing is everything with this scenario.  The Swedes had to hold their ground until towards the end even though Russian firegroups (and Berserkers) were breaking the Swedish lines all over.  Then again, the ROAR records on this scenario is 11:4 in favor of the Swedes, perhaps I am being a bit of a drama queen here.  

Advanced Squad Leader scenario AP142 The Closer After Action Report (AAR)

Advanced Squad Leader scenario AP142 The Closer After Action Report 

Scenario Background

This is the second part of AP141 Currie’s Favor.  Major Currie’s Canadian unit captured the town of St Lambert-sur-Dives, one of the last points where Germans units fleeing the Falaise Pocket could cross the Dives river.  However, a lot of fleeing German units were not aware of it and continued to stream to the point.  

Victory Conditions and Tactical Considerations

Twenty German squads, a Tiger, a Panther, two Panzer IVH and an armored car in three waves are pitted against 7.5 Canadian squads, 4 Shermans and a Firefly.  The Germans can win by either exiting units or killing Canadian tanks at 2 VPs a piece in 5.5 turns.  One of the challenges for the Canadians was that only the Firefly had enough punch (TK23) to kill a Panther (AF18) / Tiger (AF11) frontally.  The other challenge was of course having to defend the board length where Germans could  pop up anywhere in three waves.  The good news was that Stream-Brush costs Infantry 5MF and Stream-Orchard costs them 4MF.  The Grain fields would cost them as well so I weighted heavier on defending the Roads / Town Center.  

After Action Report

Advanced Squad Leader AP142 The Closer After Action Report (AAR)

German armor entered on Turn 3.  Frankly I was surprised that most of the armor came in on the west (top of the map) where they might need to cross (and bog) in the gully.  The Panther (probably because they expected my Firefly at the bridge) went with a lot of infantry to the east.  The two Shermans to the west backed off a turn earlier as the Canadian infantry started to get overwhelmed.  Unfortunately, the one on the extreme West didn’t get on the right side of the gully.  Another Sherman got nailed when it tried to “speed” across in front of the Panther!  (Note to self : it’s hard to flash large size tanks pass enemy guns.)

Advanced Squad Leader AP142 The Closer After Action Report (AAR)

German Turn 4.  The Tiger stopped by an killed the Sherman in the gully with a Bounding Fire shot!  The PIAT team pulled off from the city center to help towards the west.  It stood where the Bocage converges and withstood German attacks well til now.  Down east the 10-2 PIAT team pulled back along with the Firefly and the Sherman from the eastern board edge.  The Panther did a beautiful loop around the lone Canadian squad defending the road in G15 and got its gun trained on a Sherman.  Unfortunately we couldn’t hit him with a HE shot.  The Sherman spun around to get ready to leave in the next turn.  Meanwhile in the middle one Canadian squad and two stacks of expertly done dummies held the Germans back.  

Advanced Squad Leader scenario AP142 The Closer After Action Report (AAR)

In the Canadian turn that followed, the Firefly went for its sM but couldn’t get a smoke canister off to cover the Sherman.  It went down to the northern edge to cover the exit where the German tanks  to the west seemed to be heading.  Too bad there wouldn’t be a Sherman covering its flank now.  Major Currie’s PIAT team pulled off a “miracle” DI shot at the Panther though (quite understandable, isn’t it?) and Immobilized the monster.  the Currie team then put itself in a positon to get concealed, get more coverage against the Panther’s main guns and a path where it could possibly close combat the vehicle.  Unfortunately the last Sherman to the west got blown up by the Tiger and we were practically haemorrhaging Germans out of the Falaise Gap!  The western PIAT team recovered from earlier German attacks but couldn’t pull off another “miracle shot”.  The end of the scenario would see the German armor pulling back from going beyond the Bocage cover (and into the Firefly’s LOS) in favor of another route further west.  

The Canadians resigned.  

How’s this scenario interesting?

The Germans could either win by exiting enough units or by killing enough Canadian tanks.  However, killing a Canadian tank only get them 2 CVPs vs 8 CVPs (10 with the Armor Leader) for a Panther, so the Germans really need to do a good job with combined arms.  I, on the otherhand, need to play armor better.  Spread out Shermans don’t stand a chance against a Tiger or a Panther.  Perhaps I should focus my armor to one point after Turn 1 so as to converge on where German armor shows up in Turn 3?  

Advanced Squad Leader scenario AP141 Currie’s Favor After Action Report (AAR)

Advanced Squad Leader scenario AP141 Currie’s Favor After Action Report (AAR)

Scenario Background

We now open up to another chapter in Action Pack 14, this time arriving in St. Lambert-Sur-Dives, France, 19 August 1944.  The famous Falaise pocket was drawing close and German forces redoubled their efforts to escape.  One such exit was around this village by the river Dives.  The Canadian 4th Armored Division under Major Currie sped onsite to take care of the issue.  

Credit : War History Online
DK Completel Atlas of the World - Northern France
Excerpt: DK The Complete Atlas of the World 3e

Victory Conditions and Tactical Considerations

There’s a little town square in the middle of board 12a.  The Canadians win at the end of any turn if they can capture as many building/ rubble hexes as the prevailing Turn Number (after Turn 3).  The Canadians attacked at dusk and hence there’s a +1 Low Visibility hindrance for the first 2 turns.  The Germans are offered certain SW purchases and we went with a LMG, a MMG and a PSK.  They also have a 81 MTR and an 88L AA gun.  The Canadians come with a pair of Sherman V’s laden with a lot of smoke and WP plus a trio of Stuarts V’s packing smoke and cannister (C6).  There are 5.5 turns and Bocages are in play.  

The Canadians can come in from the right and the bottom edge.  I don’t have enough forces to spread around and can really only strive to block off the closest routes.  As such the “tank” at the top of the map is a dummy.  I also have an 81 MTR at the back (left) of the buildings which I completely mismanaged.  Somehow I thought it will discourage Canadian armor from coming to the back (left) side those buildings.  The thing here though, is that double layer of buildings will cut down on encirclement opportunities.  I situated the 88 close to the town center to cover 3 of the road approaches.  

After Action Report

Advanced Squad Leader scenario AP141 Currie's Favor After Action Report 01

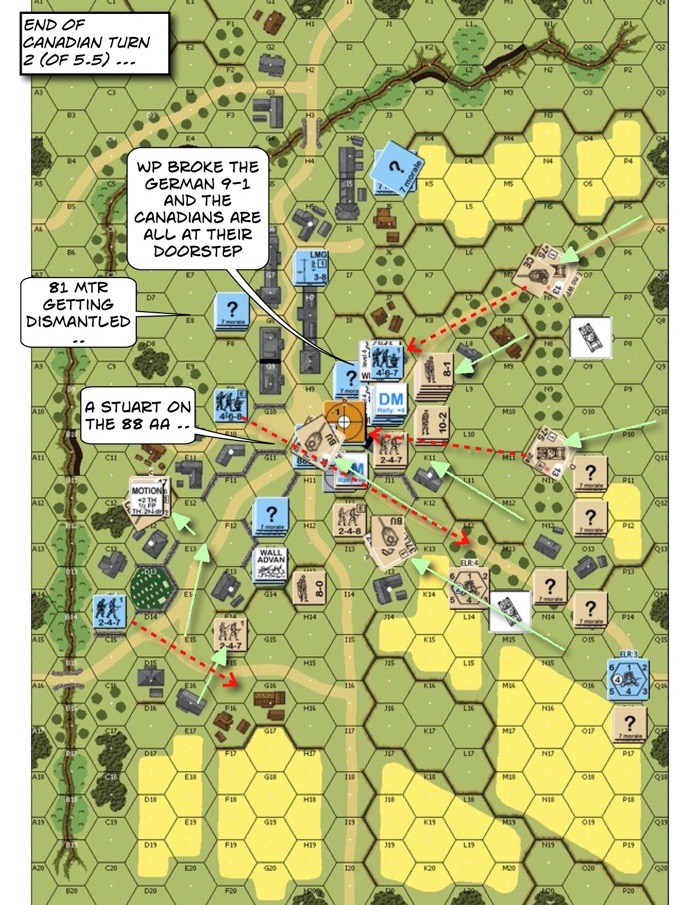
Sure enough, the Canadians didn’t go for the top right corner.  They approached largely from the right side of the map with a small flanking force from the bottom.  Unfortunately we couldn’t get any effective shots to land, partly due to the dice and the rest due to the +1 LV.  A Canadian WP broke the 9-1 and a CH sent the PSK team flying as well.  The 88 and the accompanying infantry put up a bit more fight but ended up with a Stuart on top of it.  

The bottom part of the map fared no better.  A squad moved off to cover the 88 and a HS failed its PAATC when it came time to Streetfight a passing Stuart!  The Canadians made it right up to the buildings at the end of Turn 2.  This was not going to end well.Advanced Squad Leader scenario AP141 Currie's Favor After Action Report 02

A German 468 risked Backblast and took out the Stuart sitting on the 88, unfortunately they rolled too low and got K/‘d as well.  It’s the price to pay I guess.  We need the Canadians to hit their 20 CVP cap.  The other Stuart got to the (left) back of our buildings and took out our big mortar.  Quite honestly I messed that one up, to think an 81 MTR could pose a plausible threat to AFVs.  The “double layered” buildings protected us from getting Encircled but we said goodbye to having DM’s taken off.  The Canadians were already in town and we didn’t have the firepower to take them out.  Plus we withdrew quicker than we should and that proved to be our undoing.  

Advanced Squad Leader scenario AP141 Currie's Favor After Action Report 03

The Canadian got 4 building hexes around the Town Center at Turn 4 .. and we only had 1 squad (under the -2 Acq) who couldn’t not mount an effective counterattack.  The Germans conceded.  We failed to control the tempo of the battle.  

How is this Scenario Interesting?

The Victory Condition makes this scenario interesting : “Provided the Germans have amassed ≦ 20 CVP, at least as many building/rubble hexes adjacent to the “town square” as the current Turn number.”  So the Canadians need to strike a balance between pushing to get to the town square with time to spare vs losing too many units.  The Germans also need to balance their desire to kill Canadian units versus contracting & consolidating their strength and always releasing a town square hex “too late”.  

The German SW purchases also adds a layer of variability to the scenario.  The H/MMGs will make a difference at early stages of the game, although the abundance of Bocages make efficient use of Firelanes problematic.  The DCs and the PSK will be useful towards the end.  

This is actually a small and manageable scenario for when you don’t have a lot of time.  The turn by turn tension makes this an exciting proposition.  Another interesting bit is that this is really the first part of the battle.  The next scenario: AP142 The Closer describes the subsequent waves of Germans trying to break out of the Falaise Pocket through this village.  (We are playing AP142 right now.)

Interesting Stories about this Battle

“Cork in the Bottle – Canadian and Poles at the Falaise Gap” from Legion

“The Canadian Mechanic Who Sealed off the Falaise Pocket & Trapped over 50,000 Germans” from War HIstory Online

Advanced Squad Leader scenario FT228 Last Charge at Umbrega (AAR)

Advanced Squad Leader scenario FT228 Last Charge at Umbrega After Action Report (AAR)

Background of the Scenario

This is another scenario from Le Franc Tireur 14 Italians.  It’s 2 January 1941 on the Umbrega Plateau, Eritra.  Le Franc Tireur’s designs often bring you to rather exotic locations.  

The 1er Régiment de Spahis Marocains ran into an Italian bivouac on the Umbrega Plateau and commenced attacks.  That was to be the last French cavalry charge of the war.  

As such this scenario features the Italian cavalry against the French cavalry on a fairly open terrain where where Woods is Brush and all buildings are Collapsed Huts.  Brush is Woods for Rally/Rout pupose.  (ASL Zen : Woods is Brush and Brush is Woods)

Victory Conditions and Tactical Considerations

The French wins immediately if they control 3 out of the 4 hexes identified as Italian campsites.  One campsite is on the lower left of the map around the depression.  Two campsites are on the top right and the last one is half way down the map from these two.  A French group enters/setup on the left and the rest can enter anywhere along a “C” shaped arc on the right board edge.  All units are Fanatic when Mounted/Bailing Out.  

The bit we forgot when we play was that any unmounted Italians must take a PTC at the start, but it didn’t affect the game too much.  

Cavalry in ASL

This is the first time I played with Cavalry rules.  Horses are a great way to extend your mobility in ASL.  They also carry with them a “permanent” -2 DRM when mounted, so you need to be mindful of the hindrance between you and any enemy units.  The Italians can setup 2 squads HIP’d in this scenario which further exacerbates the situation.  Cavalry charges however, allows the mounted unit to deliver Triple Point Blank Fire (Mounted Fire NA) into a target hex and render any defensive shooting Final Protective Fire.  So conceivably a Defender can break when forced into the FPF and break again when the charging unit fires!  There’s a great article regarding Cavalry units in Advanced Squad Leader Annual 1997 “A Cavalry Primer for Neighsayers” by Michael Puccio.  I know all of you got the official PDF version, now is the time to break it open if you still haven’t yet!  

After Action Report

IMG 4293

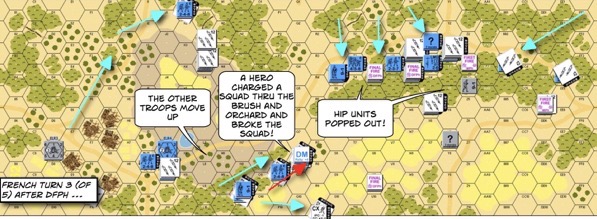
My French units started onboard to the left, with only a couple of half squads and a Hero mounted.  I figured the Hero might be a particularly powerful weapon since he sports a morale level of 10 when mounted!  I was also mindful that small arms can lit huts on fire especially when the EC is very dry but that didn’t happen.  I wondered about the significance of the Collapsed Huts until I reallized Cavalry can’t enter buildings but can ride through Collapsed Huts.  Most of my units moved forward on foot but when an Italian squad pin a mounted HS charged through a few collapsed huts and broke it!  Another French unit scored a KIA on a mounted Italian squad but the rest of them started moving away.

The rest of my French units moved in from the north from a point closest to two Italian campsites.  With only 5 turns, I figured we didn’t have much time to mess about.  Again, most of them were on foot, forcing the lower morale and lower firepower Italians into a shooting battle.  A couple of HS’s stay mounted on the far right, just close enough to be threatening.  

IMG 4294

I put my 9-1 LMG team into a position where they could interdict most of the open area in the middle of the map.  I wasn’t going to let the Italian units join up without a challenge.  Short with time, I had my mounted Hero earn his pay by charging through some orchards into a rather isolated Italian squad on the middle of the map.  If it fail to KIA my Hero, it would be tied down allowing my other mounted units to pass.  The one man charge was a success as the 2 down 1 fire in-hex broke that Italian squad as well.  

Meanwhile the French units on the upper right closed in on the Italians, KIA’d another unit and broke others.  HIP’d Italian units popped out of the ground but the French managed to pass MCs after MCs.  

The Italians conceded.  

The presence of LMGs and HIP’d Italian squads made mounted squads a decidely unattractive option for the French.  Throughout the game one need to suppress the desire  to ride your enemy down because even fire from PIN’d squads can be deadly with the permanent -2 DRM.  However, you do need to keep a few units on horsebacks just to keep your opponent uncomfortable and to mess with his routing.  

How is this Scenario Interesting?

This is a playground made for Cavalry.  Both sides have a choice of how aggressive (and hence how mobile) he wants to be.  The Italians got the short end of the morale and the firepower stick and I am not sure if their advantage in squads : 15 vs 10 balance it out.  The 2 HIP’d Italian squads definitely kept the French honest.  I’d say: play this for the Cavalry!  My thanks to Lionel Colin who designed this fun introduction to Cavalry rules for me.  I look forward to the next scenario in LFT14, FT229 A Push in the Bush by Philippe Naud & Jean Devaux.  

Advanced Squad Squad scenario AP139 Emergency Surgery After Action Report (AAR)

Advanced Squad Squad scenario AP139 Emergency Surgery After Action Report (AAR)

Background of the Scenario

This scenario from Action Pack 14 takes us to Chateau-Neuf, France, 4 August 1944.  Patton’s Task Force A, supported by the Forces Françaises de l’Intérieur Bretagne, ran into a retreating element of XXV Armeekorps.  The American cavalry units and the FFI were tasked with clearing this German blocking position.  

Victory Conditions & Tactical Challenges

The Americans could win by one of two ways : 

– at the end of any Game Turn: if there are more Good Order, non overstacked American infantry VP in buildings north of the river than there are Good Order German VP on the south side.  Or

– at Game End: by having >= 20VP American north of the river

The Americans had 2 tank destroyers (M10), 2 armoured cars , 2 half tracks, 2 scout cars and 2 trucks.  There were 3 bridges they can use: 1 Foot Bridge and 2 two-lane Stone Bridges.  I decided that blocking the 2 Stone Bridges is a priority over the Foot Bridge.  The Americans could still win by getting infantry over the Footbridge but there were only 6 US squads vs 10 German squads.  They would have to whittle down the Germany Infantry first.  

The challenging setup restraint of the day: Germans couldn’t setup on the top board, so they were all “up front”, with the Americans having the mobility advantage. 

After Action Report

The fun bit about this scenario is that the Germans get to spend 15 points on Fortifications, picking from a table.  I got myself 3 Road Blocks, 2 x 6 A-P mine, some Wire and a number of Trenches.  The lovely bit about Trenches is that they are roadblocks to non tracked vehicles, meaning 8 out of 10 of their vehicles.  

In terms of setup I located places to put the Road Blocks and situated everything else to defend the Road Blocks.  Unfortunately the Americans didn’t spent much time trying to clear the Road Blocks but used their mobility to seek ways around them.  

IMG 4286

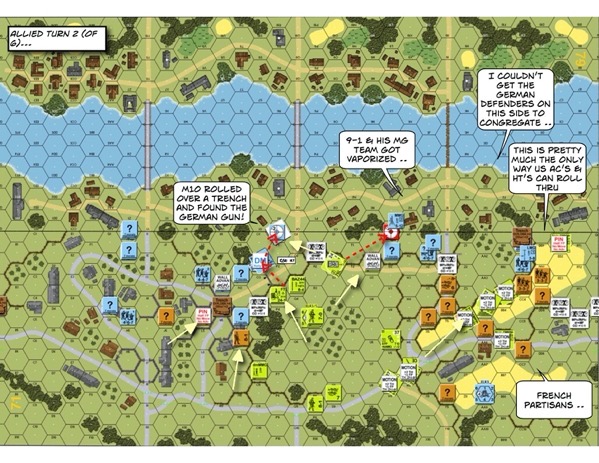
My right side was too thin and failed to muster at the buildings immediately behind them by the river.  In fact, they couldn’t get out of there at all before the French maquis overwhelmed them.  I made a careless move when retrograding my 9-1 MMG team and was CH’d by the M10 and vaporised.  Another M10 went through the gap in the Bocage near the middle Bridge.  The 7.5cm IeIG 18 (leichtes Infanterie Geschuetz: light infantry gun) appeared and killed it in a blinding flash of light but everyone then knew where it was (where the “DM” counter is amidst the red arrows).  My left wasn’t touched at all and the troops started to run over towards the middle.  Meanwhile my Germans on the right couldn’t make it off in time and was tied down by the maquis in melee.  

IMG 4285

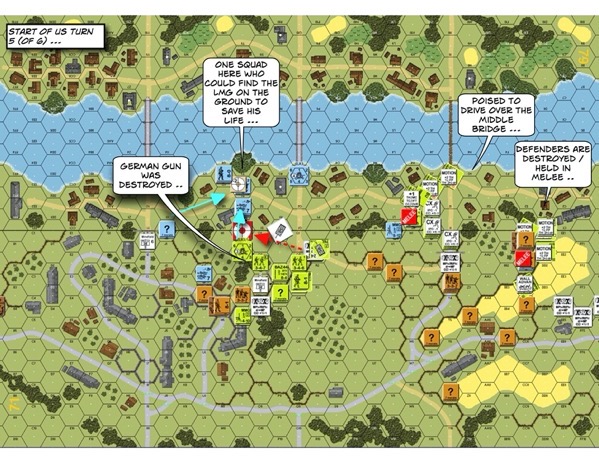
The American armor broke through even though in one last act of defiance, a retreating German squad stunned an OT vehicle.  The Americans in the middle started to rout the defenders and the second M10 made leaving problematic.  We couldn’t make it close enough to the bridge to lay down any meaningful fire on it.  (That blurb in the center meant to say “One squad here who COULDN’T find the LMG on the ground to save his life.”

The Germans conceded.  

I knew backing off to the river bank is key but I couldn’t find the balance between holding the Attackers off versus withdrawing intact.  That infantry gun didn’t last long either in  spite of the +2 emplacement.  Perhaps it’s too far forward but I couldn’t find a place (on the bottom map) where it could shoot across both stone bridges.  I would have to pick one bridge and defend the other with panzerfausts and MGs.  I should also have  heeded the “natural” cavalry bias for open country and put more resources towards the right side of the map.  

How is this Scenario Interesting?

This scenario is interesting because of the multi-faceted victory conditions that forced choices out of both the Attacker and the Defender.  The Defender being given flexilibity in his fortifications made for an interesting puzzle as well.  There are a range of possibilities you can try with this scenario.  So folks, this is AP139 Emergency Surgery by Pete Shelling from MMP Action Pack 14 Oktoberfest XXXIV.