CH97 Final Crisis at Blackpool – Advanced Squad Leader AAR

CH97 Final Crisis at Blackpool – Advanced Squad Leader AAR

Scenario Background

It’s 24 May 1944 near Namkwin, Burma.  “Blackpool” was the hill in the scenario that served as a blocking position against the Japanese.  The 111th Indian Infantry Brigade constructed an airfield against it.  However on this day in the Monsoon rain, the IJA cut inside the perimeters of Blackpool.  Elements of the King’s Own Royal Regiment, the King’s Scottish Rifles and the 3/9th Gurkha Rifles mounted a counterattack in the torturous terrain, dense jungle and heavy rain.

Physical Map of NamkwinPhysical Location Map of Namkwin
Physical Location Map of Namkwin
Physical Map of Namkwin

Victory Conditions & Tactical Considerations

The IJA wins at game end if they have Good Order units who can lay down >= 4FP on the Flooded Pool you can see on the top right of the game map.

IJA 01
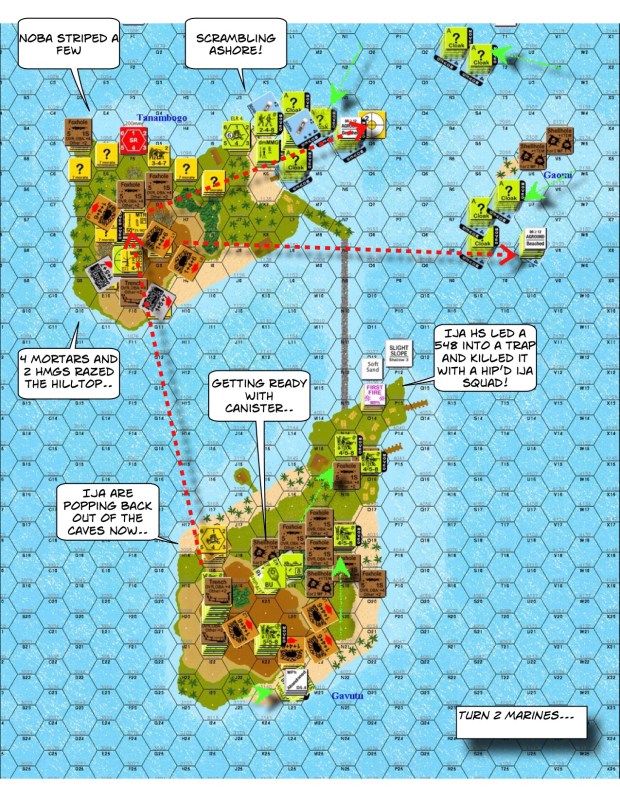
The IJA starts in two groups.  The first group of 6 squads setup in the airfield (no Smoke in the rain) in the face of a 75* Artillery, a murderous Bofors AA (IFE 8 ROF 2) and a leader who can make it rain 70mm OBA.  The second group of 9 squads setup on the east side (lower side on the map) of the hill.  To counter that group, the King’s Own Royal Regiment and the King’s Own Scottish Rifles setup on the hill top.  A group of Gurkhas setup within 3 hexes of the Flooded Pool.

The IJAs in the airfield have a short trip over Open Ground, barely protected by the falling rain drops.  So I had them spread out as much as possible.  The biggest task was to guess at where those ordnance were.  Their task was to not have British ordnance shooting at the back of the group of IJAs making their way up the hill.  The group of IJAs on the hill had a tough time ahead of them still.  Going up the hill is 5MF per hex.  Unless they were with a leader, that would make them go CX, which of course prevents them from Advancing further.  Of course, if they managed to go 1 hex per turn they would theoretically make it to the Bamboo on the west (top) side of the hill.  (Note: going downhill is 3MF, but there are Abrupt Elevation Changes which takes 5MF.)

On the other hand, there were concealed Scotsmen on the top of the hill and Gurkhas moving up the path.  Being CX’d wasn’t the best thing to do, considering concealed Scotsmen would get -1 vs 0 on the CX’d IJA’s on Ambush rolls (+1 for non first line troops).  Concealed Gurkhas would do -2. (Assuming the CX’d IJA would get advanced on.).

I thought about having a band of IJA making an end run around the hill long the path on the left, but they won’t come into play until Turn 3 or after.  I set that aside as an option.

Advanced Squad Leader AAR

CH97 Final Crisis at Blackpool After Action Report (AAR) Advanced Squad Leader scenario

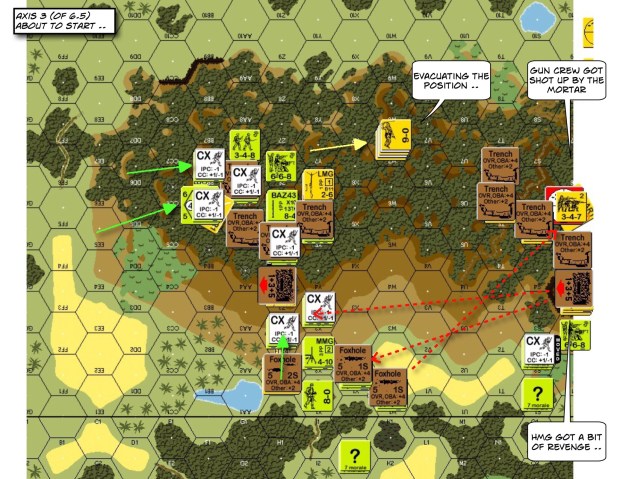
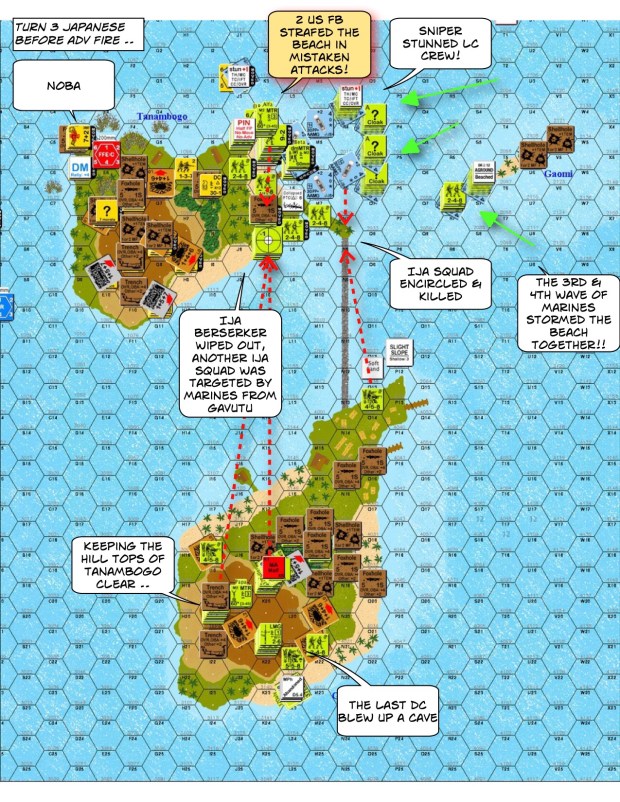
The Bofors went on a rate tear and wiped out half the IJAs (and their 8-0) down at the airfield.  As a matter of fact, it tore up folks on one side, turned CA and continued to tore up folks on the other side!  Their 7-0 got so emboldened that he ran out with his radio to get a better view of the IJAs going up the hill.  The 75* ART came out on the left and shot at the IJA coming down the field.  That prompted one of the squads from the hill to come down behind to help kill the crew.  We killed the gun as well so as not to have a gun shoot us in the back later.  The folks on the hill started to head up the path on the left, pushing some of the concealed enemies to respond.  We hoped to get into the jungle before the Indian units in the airfield free themselves up.

CH97 Final Crisis at Blackpool After Action Report (AAR) Advanced Squad Leader scenario

The Gurkhas went up the west side of the hill path and really started shooting the IJA up with their heavy inherent firepower (12 pointblank!), HMG & MMG.  Heavy Rain started which gave an addition +1 to the Dense Jungle’s +2 but the IJA forces kept shedding away.  The Scotsmen on the left came into contact with IJA units and gave the CX’d IJA units an excuse to Banzai up another level!  We needed to hit the Scotsmen on the flank quickly before our troops melt away like ice cream.  Down in the field, we decided against making an end run around the hill but instead, move to tie down the Indian assets in the airfield.  The Brit with the radio went into the Jungle after an IJA brokie, so we went after him and send a squad after the Bofors, which decided to move into the airfield for a better shot up the hill.

CH97 Final Crisis at Blackpool After Action Report (AAR) Advanced Squad Leader scenario

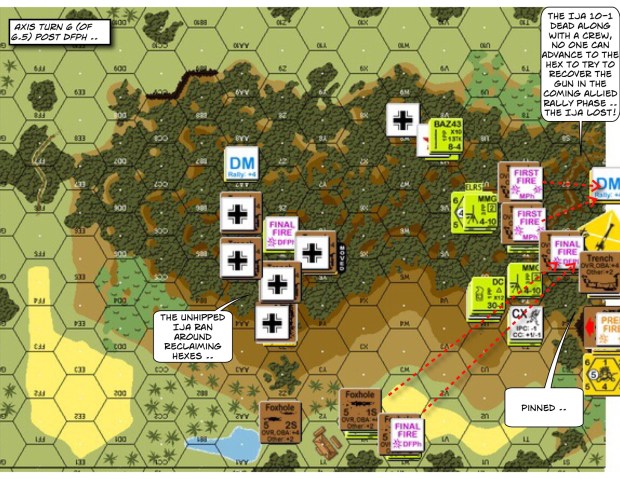
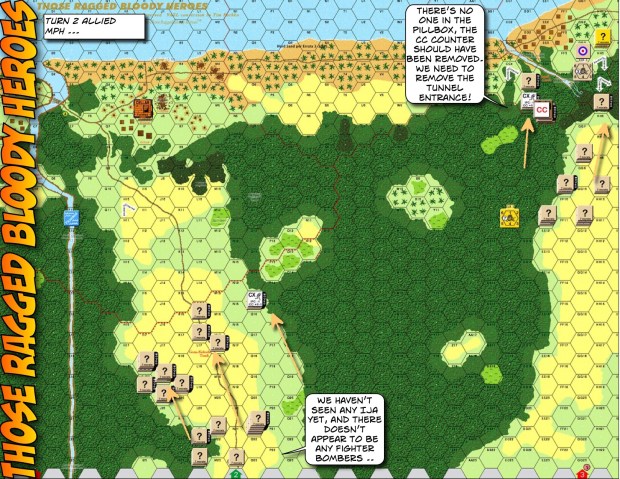
It’s Turn 4 and we were getting shot up at every fire phase.  This could not be allowed to continue!!  The Commonwealth troops were in contact still, so we triggered off 2 Banzai’s to propel IJA forces up the hill.  The Commonwealth line was still holding.  Three more MPh’s to go and their HMG/ MMG teams were still intact.

Down at the airfield we caught and killed the radio guy (no OBA!), meanwhile the Bofors moved further into the airfield.

CH97 Final Crisis at Blackpool After Action Report (AAR) Advanced Squad Leader scenario
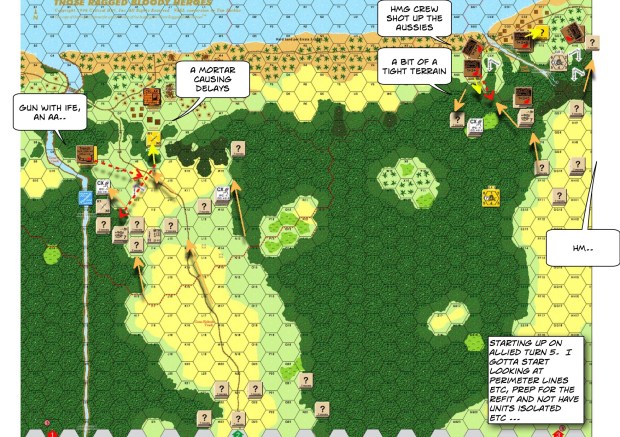
The Commonwealth forces got smart and studiously avoided contact with our folks, so as not to trigger off more Banzais.  At this point, I was pretty sure the defenders had more people than we do.  We kept their brokie stacks under pressure but continuing to bash ourselves up against the Gurkha wall didn’t seem viable at this point.  Things were not going well, the Indian troops even ambushed and killed our mortar team and stole our toys – the NERVE!  Our folks at the airfield rushed up the hill in a bid to keep some of the Commonwealth forces on the airfield (east) side of the hill.

We realised however, that we didn’t have to get up close.  We could bring our MMG/ LMG to the right side down the road and hit that pond (Flooded, hence at Level 0) with 4FP from a distance!  (Credit goes to my opponent.  We have been playing regularly for years.  He’s the smart one.)

At this point, I told the scenario designer – Joe Leoce – that the IJA’s getting wiped out and that the Gurkha HMG & MMG were still there.  He answered “you know where they are”.

CH97 Final Crisis at Blackpool After Action Report (AAR) Advanced Squad Leader scenario

We started to slide towards the left with our 2 leaders escorting our MMG & LMG squads.  Other full squads piled in as well but half squads stayed on the ridge (abrupt elevation in a lot of places) to screen the Commonwealth off.  We maintained a continuous line so as to threaten a massive Banzai.  Some of the enemy forces filed down the hill path, looking to shoot us down on the road no doubts.  We stripe but not break so we should be okay but hey, that’s what half of the dead on the airfield thought.

CH97 Final Crisis at Blackpool After Action Report (AAR) Advanced Squad Leader scenario

We moved onto the road with our 2 leaders.  The Gurkhas opened fire in their last Prep while our folks closed their eyes and cringed!!  They wounded the 9-1 and striped the crew but the MMG remained operational.  With 10 FP on the pool, the Commonwealth conceded.

How is this scenario interesting?

We got tired just thinking of the 4 level hill, the Dense Jungle and the Heavy Rain!!  Both sides battled the terrain as much as each other.  As unforgiving as the terrain was, once you are committed to one course of action, there’s hardly any turning back.  Sure, playing against the IJA can be nerve wrecking but so’s the IJA player’s need to manage his rate of attrition as the turns roll by.  Putting the Gurkhas on the field also give the IJA something to be scared about.  I think this scenario showcases the best elements in the ASL PTO experience.  The IJA 28 vs Brit 25 scoring on ROAR suggests I am not alone.

This is a great scenario done by a talented designer no doubt: Joe Leoce.  I met Joe back in 2014 when I dropped by the Albany tournament for a day.  He took such great care of me that it shaped how I feel about the whole global ASL community to this day.  Here’s a video I cut from that beautiful day:

RbF I-4 Used and Abused – Advanced Squad Leader AAR

RbF I-4 Used and Abused – Advanced Squad Leader AAR

Scenario Background

This is the Mokmer Airstrip (today’s Frans Kaisiepo International Airport) on the island of Biak, 15 June 1944.  The IJN had 3 airfields built and captured by the US 41st Divison.  The IJA decided to recapture them, aided by the remaining 4 IJA tanks on the island.

UntitledImage

(https://upload.wikimedia.org/wikipedia/commons/a/a4/US_landings.jpg)

Google Earth: Biak

UntitledImage

(Credit: Google Earth)

(“Soldiers of the 41st Infantry Division, after emerging from the jungle, overcoming Japanese resistance, advance on an open field on the South Pacific island of Biak, off the New Guinea coast; May-August 1944.” Credit: https://www.ww2incolor.com/)

Victory Conditions & Tactical Considerations

The IJA broke out of the Dense Jungle with 12 squads and 4 leaders, which included a 10-1 and a 9-1.  They had 4 LMGs and 2 MTR that could pump WP out to 6 hexes.  There were also the 4 x Ha-Go’s described in the Historical Perspective.  The Americans had 11 squads: 3×667, 7×666 & 1×546.  They had 3 leaders, which includes a 9-1 and a 8-1, plus 1xHMG, 2xMMG, 4xBaz44 and a 60 MTR.  The IJA win at the end of any Game Turn if they have 7 CVPs or more than the Americans (unbroken) on/adjacent to any runway hex, and they had 7.5 turns to do it.

The IJA didn’t really have an advantage in manpower (so no unnecessary CC), and the Americans outranged and outgunned them.  They did have an advantage in leadership and morale, plus they could get to where they wanted to get to if they want it bad enough.  The 4 AFVs were key for preventing the Americans from backing off into the airfield.  These bazookas had a range of 4 but the Ha-Gos were small.  So TH on a moving Ha-Go is 6 @ 1 hex, 5 @2, 4 @3, 1 @4, ie they were effective at 2 hexes at best unless they catch you stopping.  The 2 knee mortars had WP and these Ha-Gos had vehicular smoke grenades, apart from being able to provide Armor Assault or vehicular hindrances if needed be.

The IJA setup on row 3 while their tanks come in from offboard.  Americans setup near the bottom edge of the top map, however in doing so, would have to retrograde across plenty of Open Ground, first to the tree line on Board 14 (bottom) and then across the airfield (where you get an additional -1 to incoming fire).  We needed to back up before the IJA tanks got behind us!

I took on Brian William’s US setup in his AAR from Jan 2000.  The idea here was to defend the left and the center where it’s closest to the airfield.  We would try to hold the line for as long as possible before backing off onto the airfield.  Having the IJA AFV hooking behind us would definitely be an issue.  Hopefully our bazooka’s would deter some of that.   The HMG (plus 9-1) and the 60 MTR were in the trees located in the center of the board.  One MMG was in the middle with the 8-1 and the other MMG guarded the left side.

After Action Report

RbF I-4 Used and Abused After Action Report (AAR) Advanced Squad Leader scenario

The IJA wasted no time moving in.  Too fast perhaps, they already made me felt like I’d made a mistake and gave them too much ground upfront.  On the left, they prodded my lone squad (which promptly broke and ran) and was well on their way hooking around to the airfield.  In the middle, an IJA tank ran into the dense jungle in a bid to freeze my MMG.  We killed it in CC.  Slightly to the left of it, another IJA tank did the same with another MMG team and was unfortunately bogged in the jungle which only made it easier to kill.  Its partner AFV pivoted and stopped right in front of a HS bearing a Baz but they wouldn’t be able to hit a thing this whole game.  A couple of squads came through the middle with their knee mortars.  They weren’t able to do much damage to the HMG-Mortar team but they laid down smoke for their comrades to the right.  On the right, a body of IJAs came through the dense jungle unmolested.  That gully in middle of the field would be an ideal jump off point.

RbF I-4 Used and Abused After Action Report (AAR) Advanced Squad Leader scenario

In the middle, the concealed units that sat behind the MMG team were in fact, a Baz team!  They slid up under the wreck, shot the other AFV and immobilised it.  Given where it was, we figured an immobilisation was as good as a kill.  The remaining IJA tank (that stopped in front of the Baz team) started up!  The Baz team immediately fired but missed again.  The other Baz team fired but couldn’t connect either!  That Ha-Go waltzed all the way down to the HMG team (with 2×666 and a 9-1, no less!).  The HMG fired and got snakes!!  Pity you can’t CH with a 50 cal.  However, the TK’s 7 (AF1) at that range and the last AFV was put down as well.  The hoard of IJA on the right decided not to wait and did 2 Banzai’s (over OG!).  Meanwhile on the far left, the IJA platoon continue to make their way down south.  The Americans were fortunate enough to keep a team in front of them.  We couldn’t win most standing gunfights though, we had to always try to get the first shot in.

RbF I-4 Used and Abused After Action Report (AAR) Advanced Squad Leader scenario

We were able to decimate enough IJA troops to be able to pull a big withdrawal on the right.  We ran to the end of the airfield and hoped to advance across the runway (add’l -1 to incoming fire).  The IJA tried another Banzai on the far right but some pretty heavy firepower got in the way (and killed the IJA 9-1).  The IJA pulled another Banzai through the kunai on the left towards our MMG as well.  We had a flanker harassing that Banzai but it got hit by the IJA sniper halfway through.

Jungleers on Biak by Keith Rocco COMMENT

(“Jungleers on Biak by Keith Rocco”, https://www.militaryimages.net/)

RbF I-4 Used and Abused After Action Report (AAR) Advanced Squad Leader scenario

IJA Turn 6 – they had lost a good number of troops to the Banzai’s already.  The broken MMG HS from our first position finally managed to self rally!  So even though the IJA tried to run some troops up from the back, they didn’t get too far.  They did a final Banzai attack to get to the edge of the airfield, and lost their 10-1 in the process.  This was when they decided to call it quits and started pulling out RbFI-5 (ATF1) Paper Line ..

(“1944 Biak- Japanese Prisoners being fed” https://www.ww2incolor.com/)

How’s this Scenario Interesting?

I think movement across Open Ground was key for both IJA and US troops.  The IJA had 4 tanks to help hook around and to interdict American movement (their 4 LMGs would have extended the 4 hex IJA range nicely).  Plus their cover / smoke grenades should have provided protection for IJA troops in the face of heavy US firepower.  The Americans couldn’t win standing firefights and as I mentioned before, we had to always get the first shot in.  We would have a very hard time with our low morale if we had to retreat through opposing fire.  We lucked out early on when the first couple of Banzai’s didn’t leave the IJA with enough troops to see beyond the tree line, thus allowing US escapes.  Once we settled into the buildings around the airfield it’s all open ground for the IJA, those AFVs would have been helpful.

I really like Brian William’s setup.  The bazooka teams in particular were looking over the narrowest places (and/ or where those AFVs had to turn).  I couldn’t have done something as good as that.  I might have made the mistake of setting up a little to forward, increase the difficulty of my retreat and enabling Banzai’s through those jungles.

Advanced Squad Leader scenario DB131 Thorn in the Side (AAR)

Advanced Squad Leader scenario DB131 Thorn in the Side (AAR)

Scenario Background

A buddy and I continue to play the excellent series of “Dispatches from the Bunker” scenarios backwards.  After DB132 One Last Victory, we were on DB131 A Thorn in the Side.  This scenario puts us in February 1 1944 Kangaw Burma.  The No 1 Commando “Royal Marines” took a hill (Hill 170) that oversaw a vital road junction in the path of Japanese retreat.  The Japanese found that unacceptable.

The first map is from Combined Operations and the photo of the “salamander badge” of the 1 Commando is from Commando Veterans Archive.

Victory Conditions & Tactical Considerations

So here we have a 4.5 turn scenario in which the Japanese wins at the end of any Player Turn if all British AFV are eliminated/ recalled/ not on level 3 hill hexes.  It’s never good to meet the IJA in close quarters.  I hope to take advantage of distance, higher firepower and all the leader mods.  It would be hard to keep the IJA off my tanks for 5 IJA Movement Phases.  I thought about this and I realized there’s a clue in the Victory Conditions.  I had 3 AFV’s and AFV’s can move.  The Victory Conditions say “If ALL British AFVs .. not in Level 3 hill hexes.”  There are 3 Level 3 hill tops on the map.  I could start on one side, delay the IJA for as long as I could and move the tanks to the other level 3 hexes.  I would be fine as along as 1 of the 3 Shermans stayed on level 3 at any given time!

So that was my plan.

After Action Report

Advanced Squad Leader scenario DB131 Thorn on the Side (AAR)

The IJA moved up to my positions from the south (bottom of the map).  Most of them succeeded in keeping their Concealment but we weren’t shy about opening fire.  We were not going to find out whether we could survive IJA ambushes even though we were Stealthy.  We simply didn’t have the numbers to swap them bodies for bodies.  The time to reduce the IJA was now!  We were mindful about keeping rout paths open but that wouldn’t last as the IJA close in.  We also made sure that we keep HS’s between our main forces and the IJA.  We didn’t want our main force caught in a Banzai or even in a friendly HtH.  The idea here was to block them, to induce MC’s and to waste their time.

Advanced Squad Leader scenario DB131 Thorn in the Side (AAR)

Post Allied MPh, Turn 3 (of 4.5), the British got a line of HS’s blocking off the IJA from their foxholes (FH).  HtH’ing these guys would take one of the 2 Movement phases they had left.  The AFV’s moved to the “3rd” Level 3 hill top to the North.  Some infantry went as well as the last line of defense.  The 2 Level Jungle helped here as you need to see a target to initiate a Tank Hunter Hero or a Banzai.  Our 10-2 ran off successfully but we had issues moving the MMG squad out of their FHs.  The squad broke under IJA fire but a Hero came by to pick up the MMG.  We figured we could do a Minimum Move and pass it to some friendies nearby (but we were wrong, as per A4.134 we need to have at least 1 MF to do a Minimum Move, best we can do was to send a HS back in and hand the toy over during the Rally Phase).  Those guys were also looking to CC the Wounded IJA 8+1 nearby since he couldn’t vol break.

The IJA conceded.

How’s this Scenario Interesting?

It’s interesting when I remembered Guderian insisting that an AFV’s engine is as much a weapon as its guns.  This scenario a delightful “return” to the PTO for me.  It takes discipline to minimize CC contact with the IJA in the Jungle.  More to screen off Banzai attacks, to keep my distance and to shoot to get MC’s.  This is a very tight design: terrific troops on both sides, tight mapboard and a tigher 4.5 turns.  This definitely reminds me why PTO is my first love.

We are on to the next: DB130 Tigers and Flames!

Advanced Squad Leader scenario 145 Shanghai in Flames (AAR)

This is the third time I am playing this scenario.  This is a great scenario that confers the heart pounding excitement of a PTO scenario without having to deal with PTO terrain.  As far as China battles go, this is perhaps the most famous one (internationally) and hence also the most over covered by ASL designers!

There’s even a new movie on the battle “The Eight Hundred”!  

84e02a7b 60f4 49d4 8b58 fb97db1c3a46Zhang Yimou s The Eight Hundred movieQN1j7mThe800

The IJA are to control the building with 3 Fortified hexes on the bottom left of the map in 6.5 turns (GMT has the balance), a representation of the Sihang Warehouse no doubts.  Clearing a large (fortified) building is a time consuming task!  Hence I race my IJA forces down the board where I can.  Being able to cut off retreating Chinese forces would be good too but so far I hadn’t been too successful.  On the otherhand, I am not as keen as my earlier self in running Banzai’s through the map.  As a matter of fact, I did none so far.  IJA’s are great in their ability to go wherever they want to with striping.  However one they get reduced, they don’t recover.  So I want be very deliberate in any losses via striping.  The “IJA HS strategy” of course hinges on having IJA leaders who behaves like Commissars.  Unfortunately, they had been replacing units over half of my rallies so far.  

Advanced Squad Leader scenario 145 Shanghai in Flames (AAR)

We were almost all at the Sihang factory after 3 Movement phases.  Not the quickest really.  Let’s kill the gents in the rowhouse and figure out which hex is fortified!  The IJA has unfortunately broke though the Chinese right flank and was last seen streaking down the length of the map.  I, on the otherhand, should deploy more IJA to stop them from (unnecessarily) striping.  

145 Shanghai in Flames Advanced Squad Leader ASL AAR


The IJA ran through the rowhouse and came in front of the warehouse itself!  The massive firegroup broke the MMG stack in the fortified C6 hex (where you see an IJA 2-3-7).  The IJA were now in the house!  The platoon of IJA Banzai’d in from the right and fortunately broke the defenders in the “courtyard” and even trapped a defender at the wall (G8).  

Oh and the GMT sniper drilled a hole through my 10-0’s forehead.  His neighbours described him as nice, quiet and unassuming.  He will be missed.  Painful.  

Advanced Squad Leader scenario 145 Shanghai in Flames (AAR)

The GMT promptly counterattacked and took that MMG back.  Unfortunately, an IJA Death Star assembled (2 x MMG + 1 x HMG) and broke the GMT MMG team!  The IJA HS’s decided to do two Banzais into the factory, forcing GMT squads to FPF as much as they can.  The other IJA squads came in the right and left nowhere for the GMT squads to rout.  

It’s over.  

Gavutu-Tanambogo, Assault Period 4

This is it!!  The last of 4 Assault Periods in the “Sand & Blood” CG.  All Marines have landed.  The Americans win by controlling all land hexes on both islands (IJA has to surface to get land hexes) and not losing more CVPs than the IJA.

img_3942

So I (as the USMC) lost the equivalence of the entire IJA OB in CVPs.  That makes it impossible for me to fulfil the 2 fold Victory Conditions : to hold all land (aboveground) hexes and to not lose more CVPs than the IJA.

I believe landing the first wave on the south part of Gavutu (bottom island) behind the hill was a good decision.  Landing all the remaining groups in Assault Period 3 was a good decision as well because that effectively overwhelmed the defenders with targets.  I was lucky in that we took out the 2 x AA guns on Gaomi early.  That took out the guns from behind our backs as we attacked Tanambogo.

I would have used my fighter bombers more effectively though, to hit the island early as the landing crafts were approaching.  Sighting on units that broke from NOBA would have brought more devastation.  Oh, DCs are precious.  Sinking a few boatloads of DCs in the first Assault Periods resulted in a lot of Close Combats and manpower wasted to guard IJA exit point.

This is a great little CG.  I learned a ton about ASL seaborne assault.

Here’s the whole series:

(Sand & Blood CG is an Advanced Squad Leader campaign about Gavutu-Tanambogo that comes with MMP Rising Sun)

Gavutu-Tanambogo CG, 3rd Assault Period

Instead of using one regiment in this Assault Period and the remaining regiment the last, I decided to go all in and land all the remaining forces in Assault Period 3.  At least the IJA won’t be able to focus their fire on either one.  Will it work?  (Losing all those demo charges in Assault Period 1 continues to hurt us .. )

img_3531

Here’s the whole series:

(Sand & Blood CG is an Advanced Squad Leader campaign about Gavutu-Tanambogo that comes with MMP Rising Sun)

Those Ragged Bloody Heroes CG, Nov 29 PM

This is December 1942.  The Australians are looking to dislodge the IJA from the Gona mission in 5 CG dates.

This is not looking good.  I forgot how in Platoon Leader (CH’s “standard” campaign) rules, you need to put a slew of foxholes in as strategic locations.  In this case I need to link up my troops with the 3 entry points.  The good news is that I might still have one Prep Fire left.  The bad news is obviously that FHs usually need a couple of turns to prepare, turns that I don’t have.

Gavutu-Tanambogo CG, 2nd Assault Period (Night Landing)

IMG_2940.JPG

Here’s the whole series:

(Sand & Blood CG is an Advanced Squad Leader campaign about Gavutu-Tanambogo that comes with MMP Rising Sun)