ITR11 Cremation Station After Action Report (AAR) Advanced Squad Leader scenario
Victory Conditions
This was 1938 in Tai’erzhuang. The Chinese 31st Division looked to evict all Good Order IJA MMCs from the factory the Japanese used to prepare IJA remains for their return to Japan in 8 turns. The Chinese had a 100+mm OBA and a 37 fighter bomber. There’s a Mild Breeze from the top left but we couldn’t get any smoke going anyway.
After Action Report
The IJA had second floor positions in which they could place their heavy weapons. The Chinese thought of moving the bulk of their forces via the right of the mid line but the rowhouses were a nightmare to attack through vertically. Moving through to the buildings on the far right and coming back in the middle was viable but that seemed a long way off. There were a couple of third floor position for the overwatch but they were too far away for Chinese guns. If we put them forward in the couple of second floor positions left of the mid line we would need to protect them from the IJA on the left flank. So we decided to move the bulk of the forces left to the mid line together with the heavy weapons. As it happened, the Chinese front was too narrow for the Chinese to make the mass of their numbers felt. The Open Ground in the middle of the board to the left of the crematorium proved risky for the attackers as well.
 Advanced Squad Leader scenario.png")
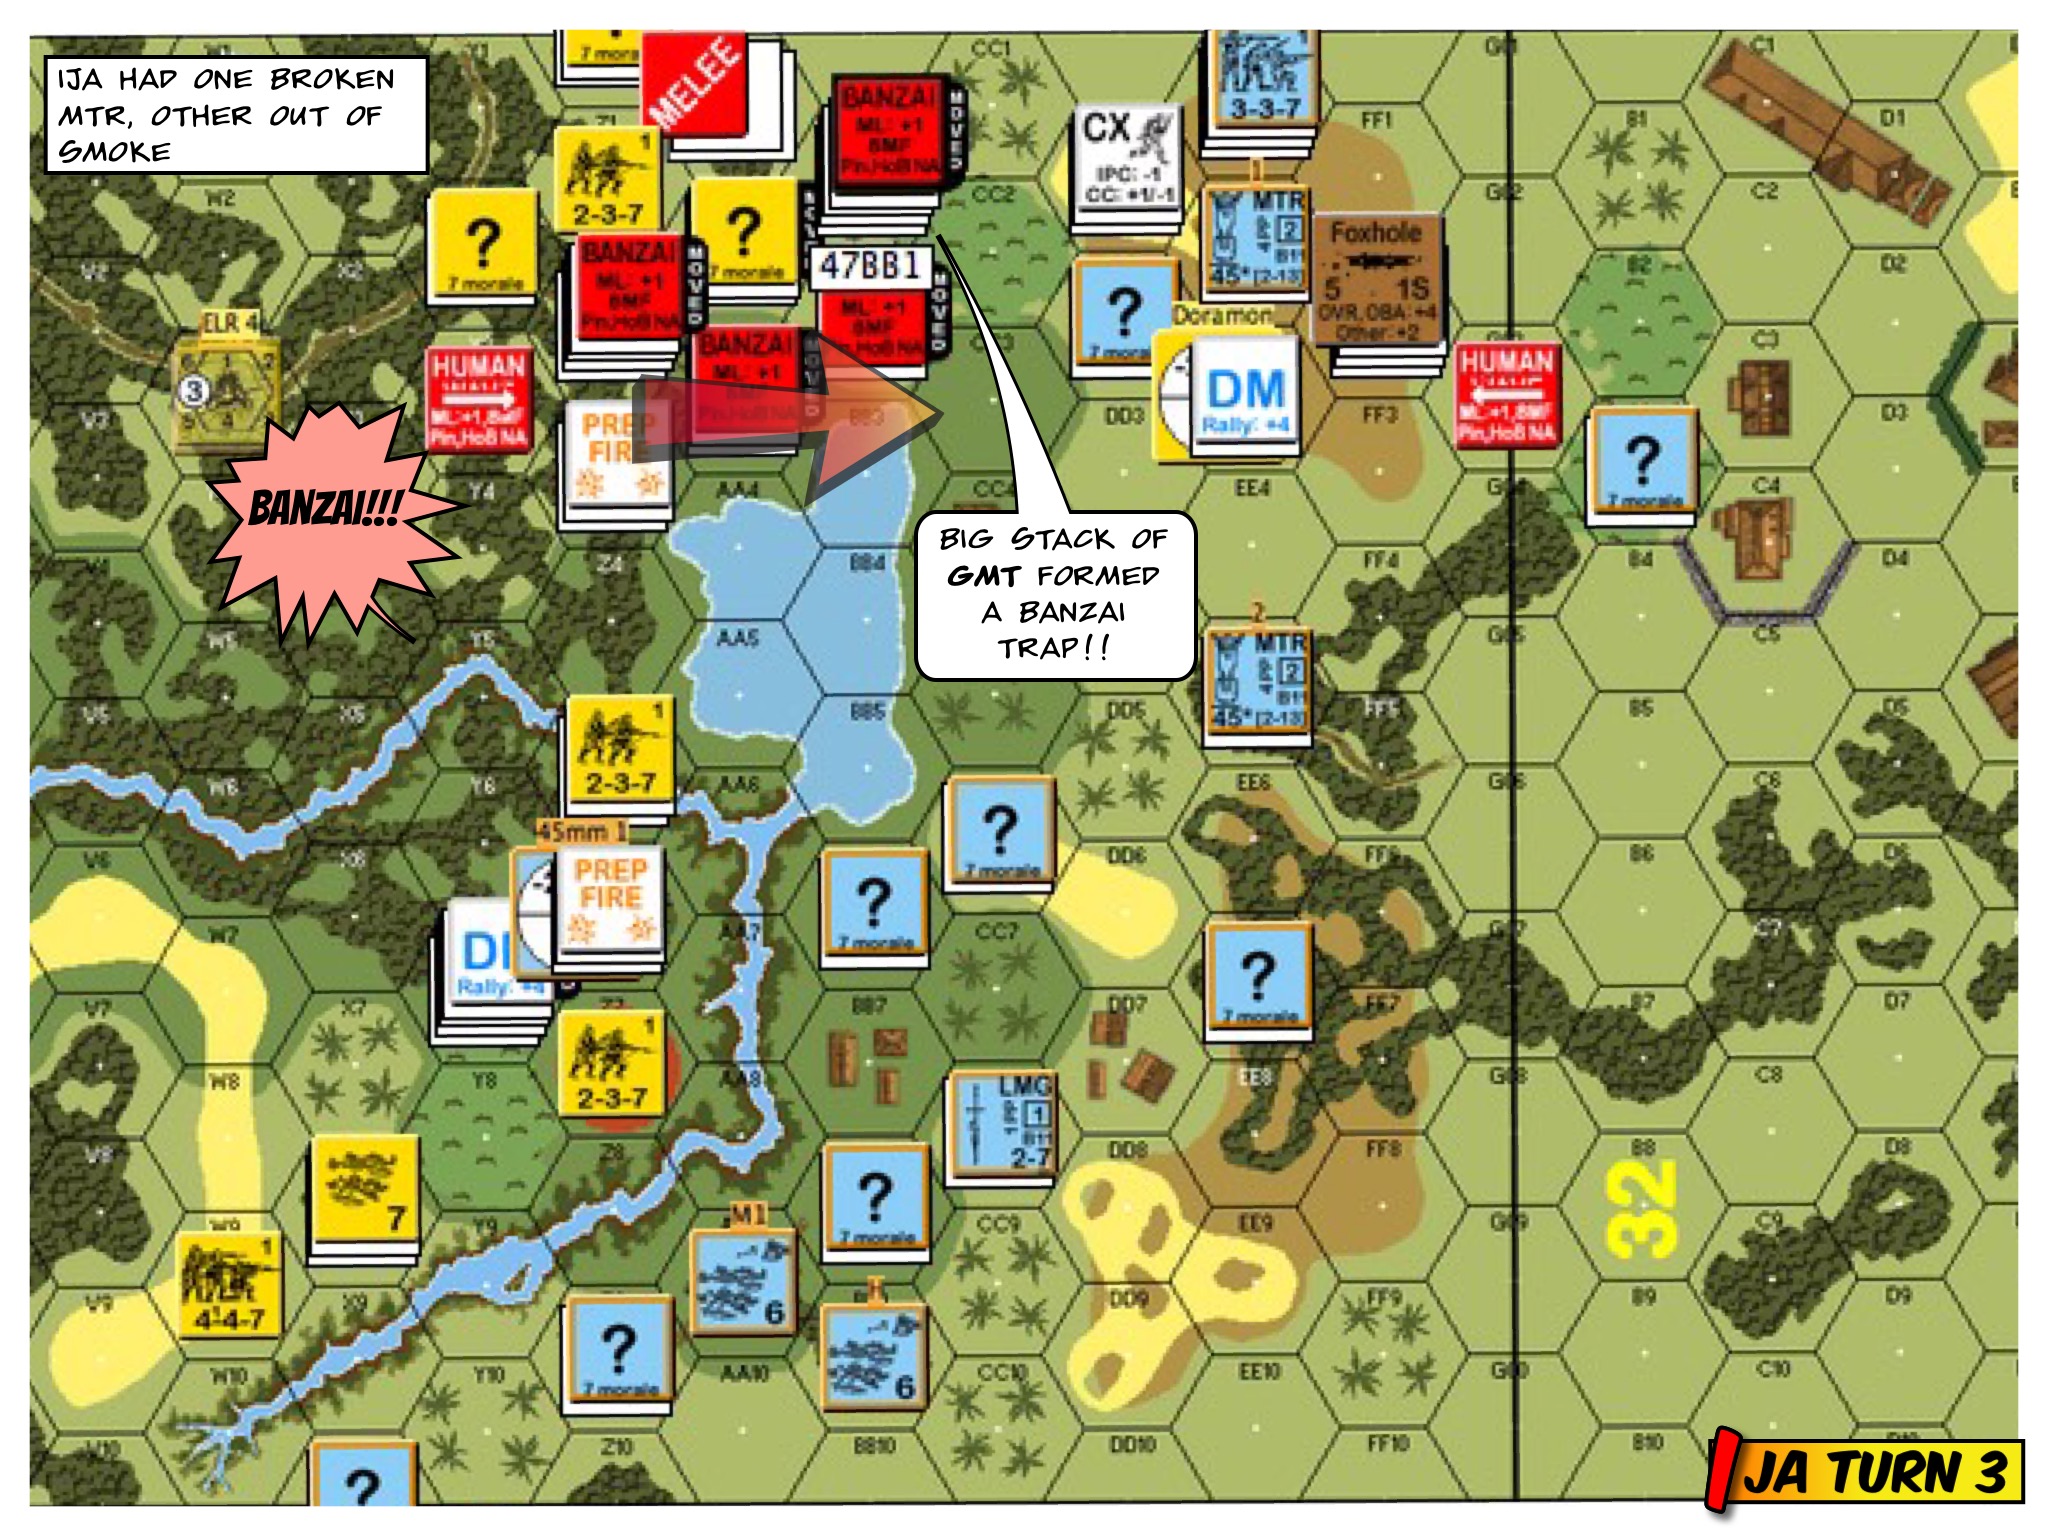
Anyway, the Chinese heavy weapon squads sprinted forward. The pair of Chinese tankettes were useless in the city as gun platforms so they were used as cover on those open streets. The scout car had better guns but they were open topped and were therefore used in hit & runs and as a possible smoke platform. The one good option my opponent pointed out was to position the scout car on the hill to the bottom right to harass reinforcements trying to push back into the crematorium. An IJA MMG opened up and promptly malfunctioned. Spotted mortars took shots at us as well. The thing to do was to get more of the key IJA weapons to fire and to show themselves to the OBA and the incoming fighter bomber.
 Advanced Squad Leader scenario.png")
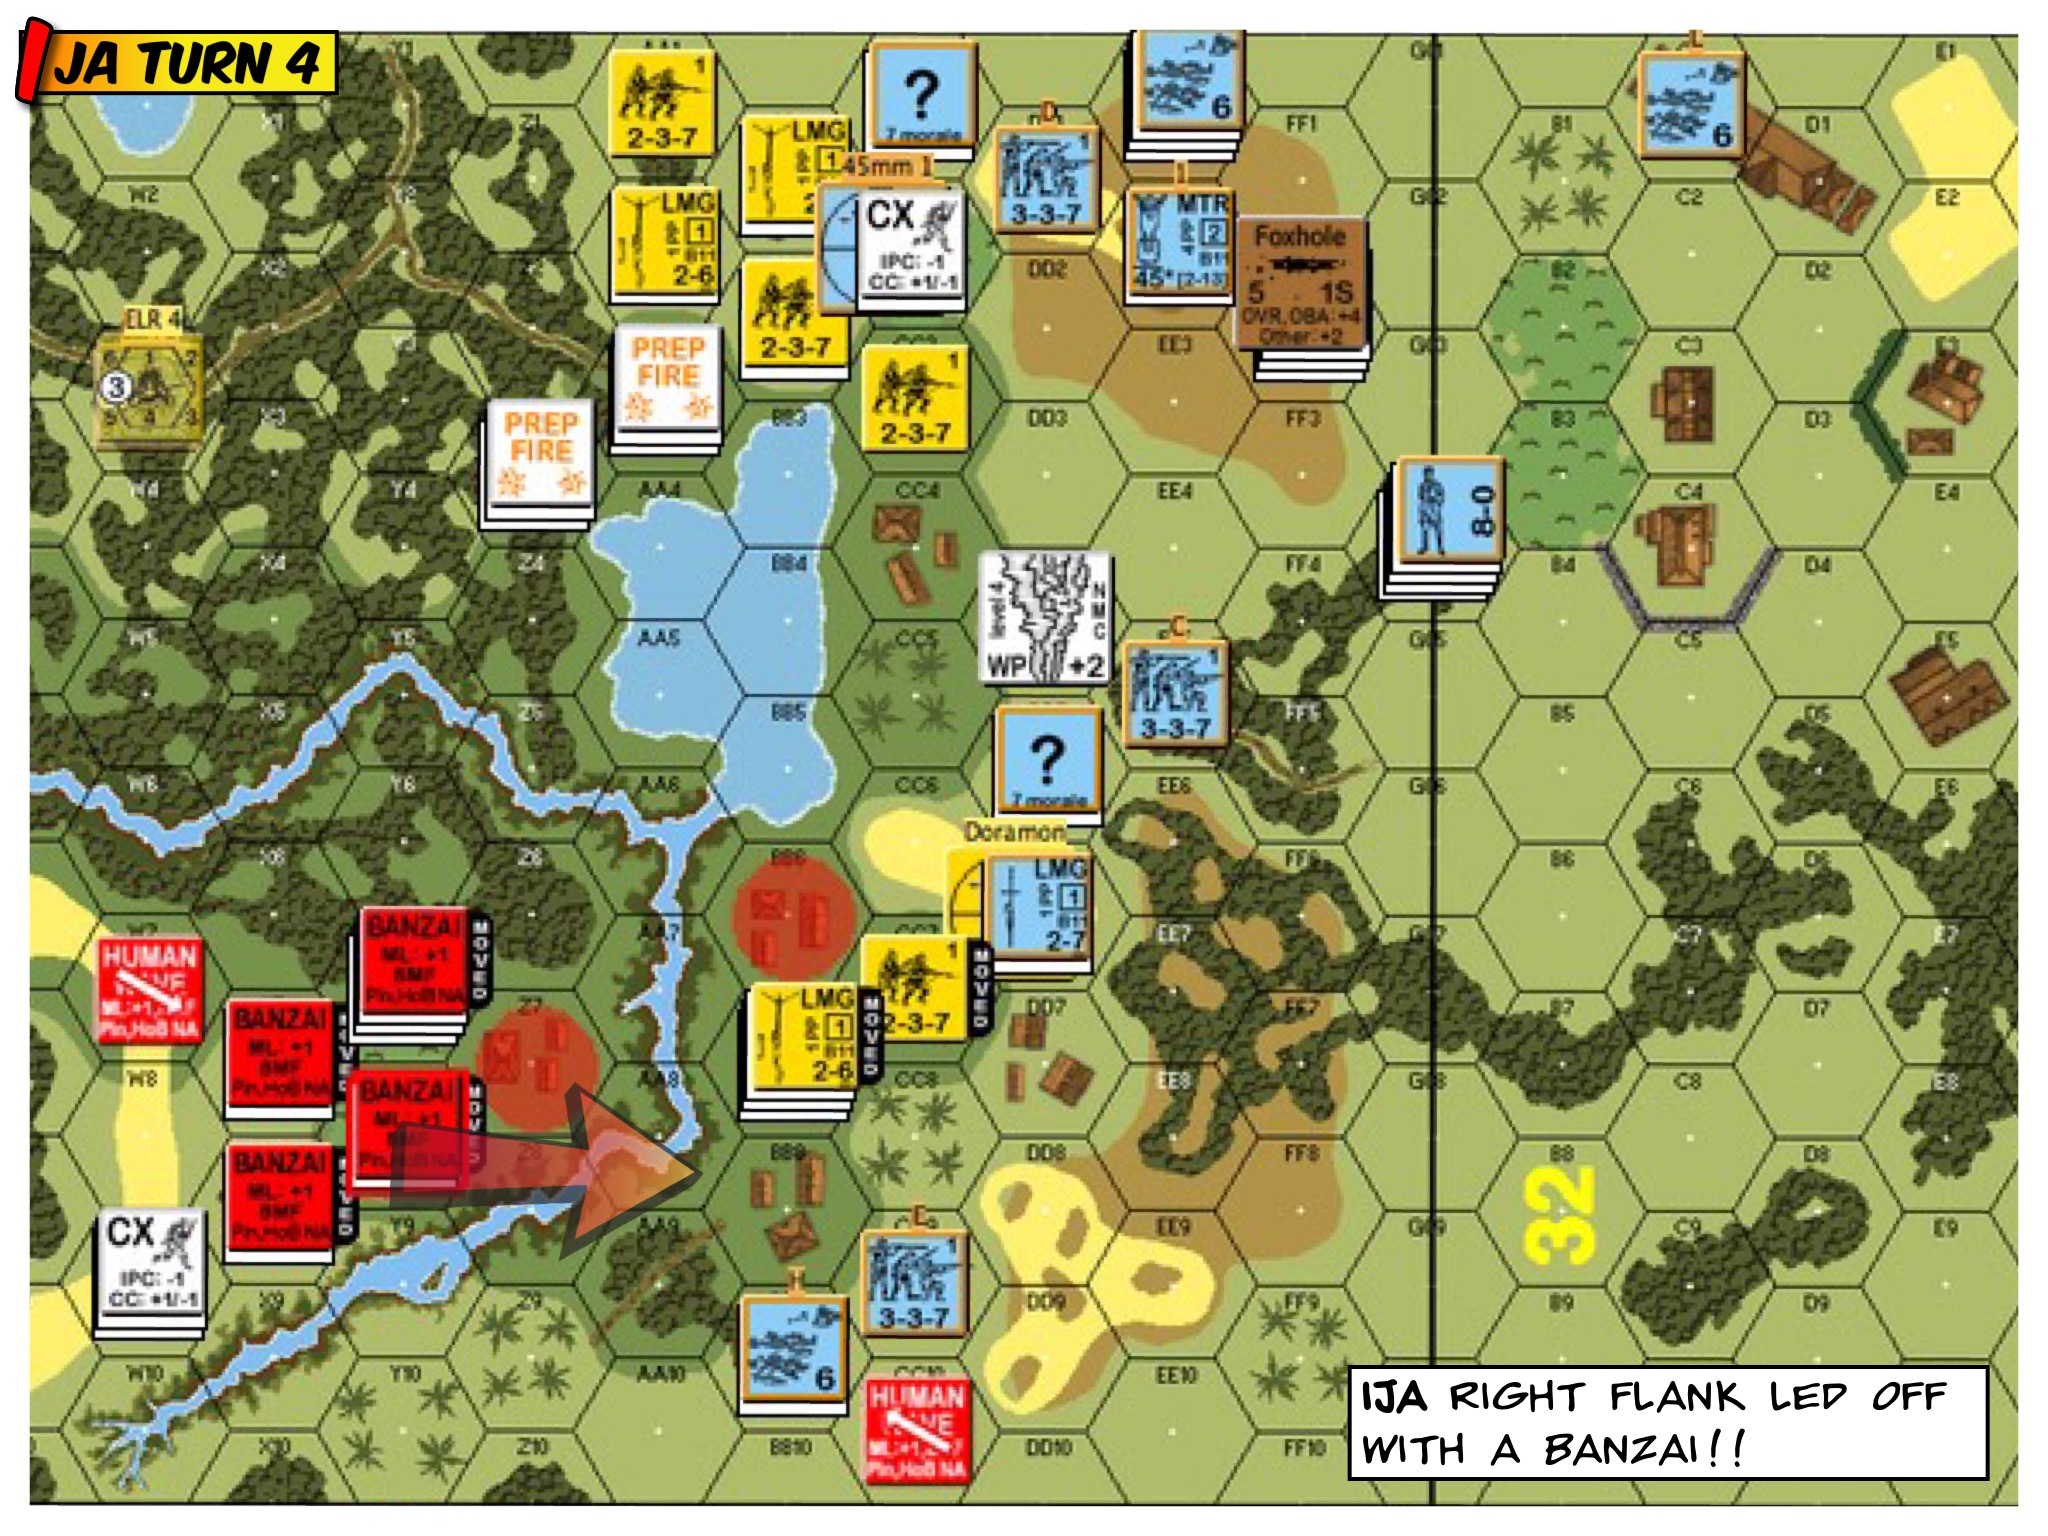
The heavy weapons teams sprinted upstairs and the tankettes were on the street for the Chinese troops to dash across. Exposed or not, we constantly pushed everyone forward and threaten to bypass retreating IJA squads. The more IJA units appear to shoot, the more targets the OBA/FB would had. Given that, the IJA on the right started moving back towards the library. What I needed to a better job at was to constantly organise threaten Human Wave threats. Having said that, I have never been able to execute a mid game HW!!
 Advanced Squad Leader scenario.png")
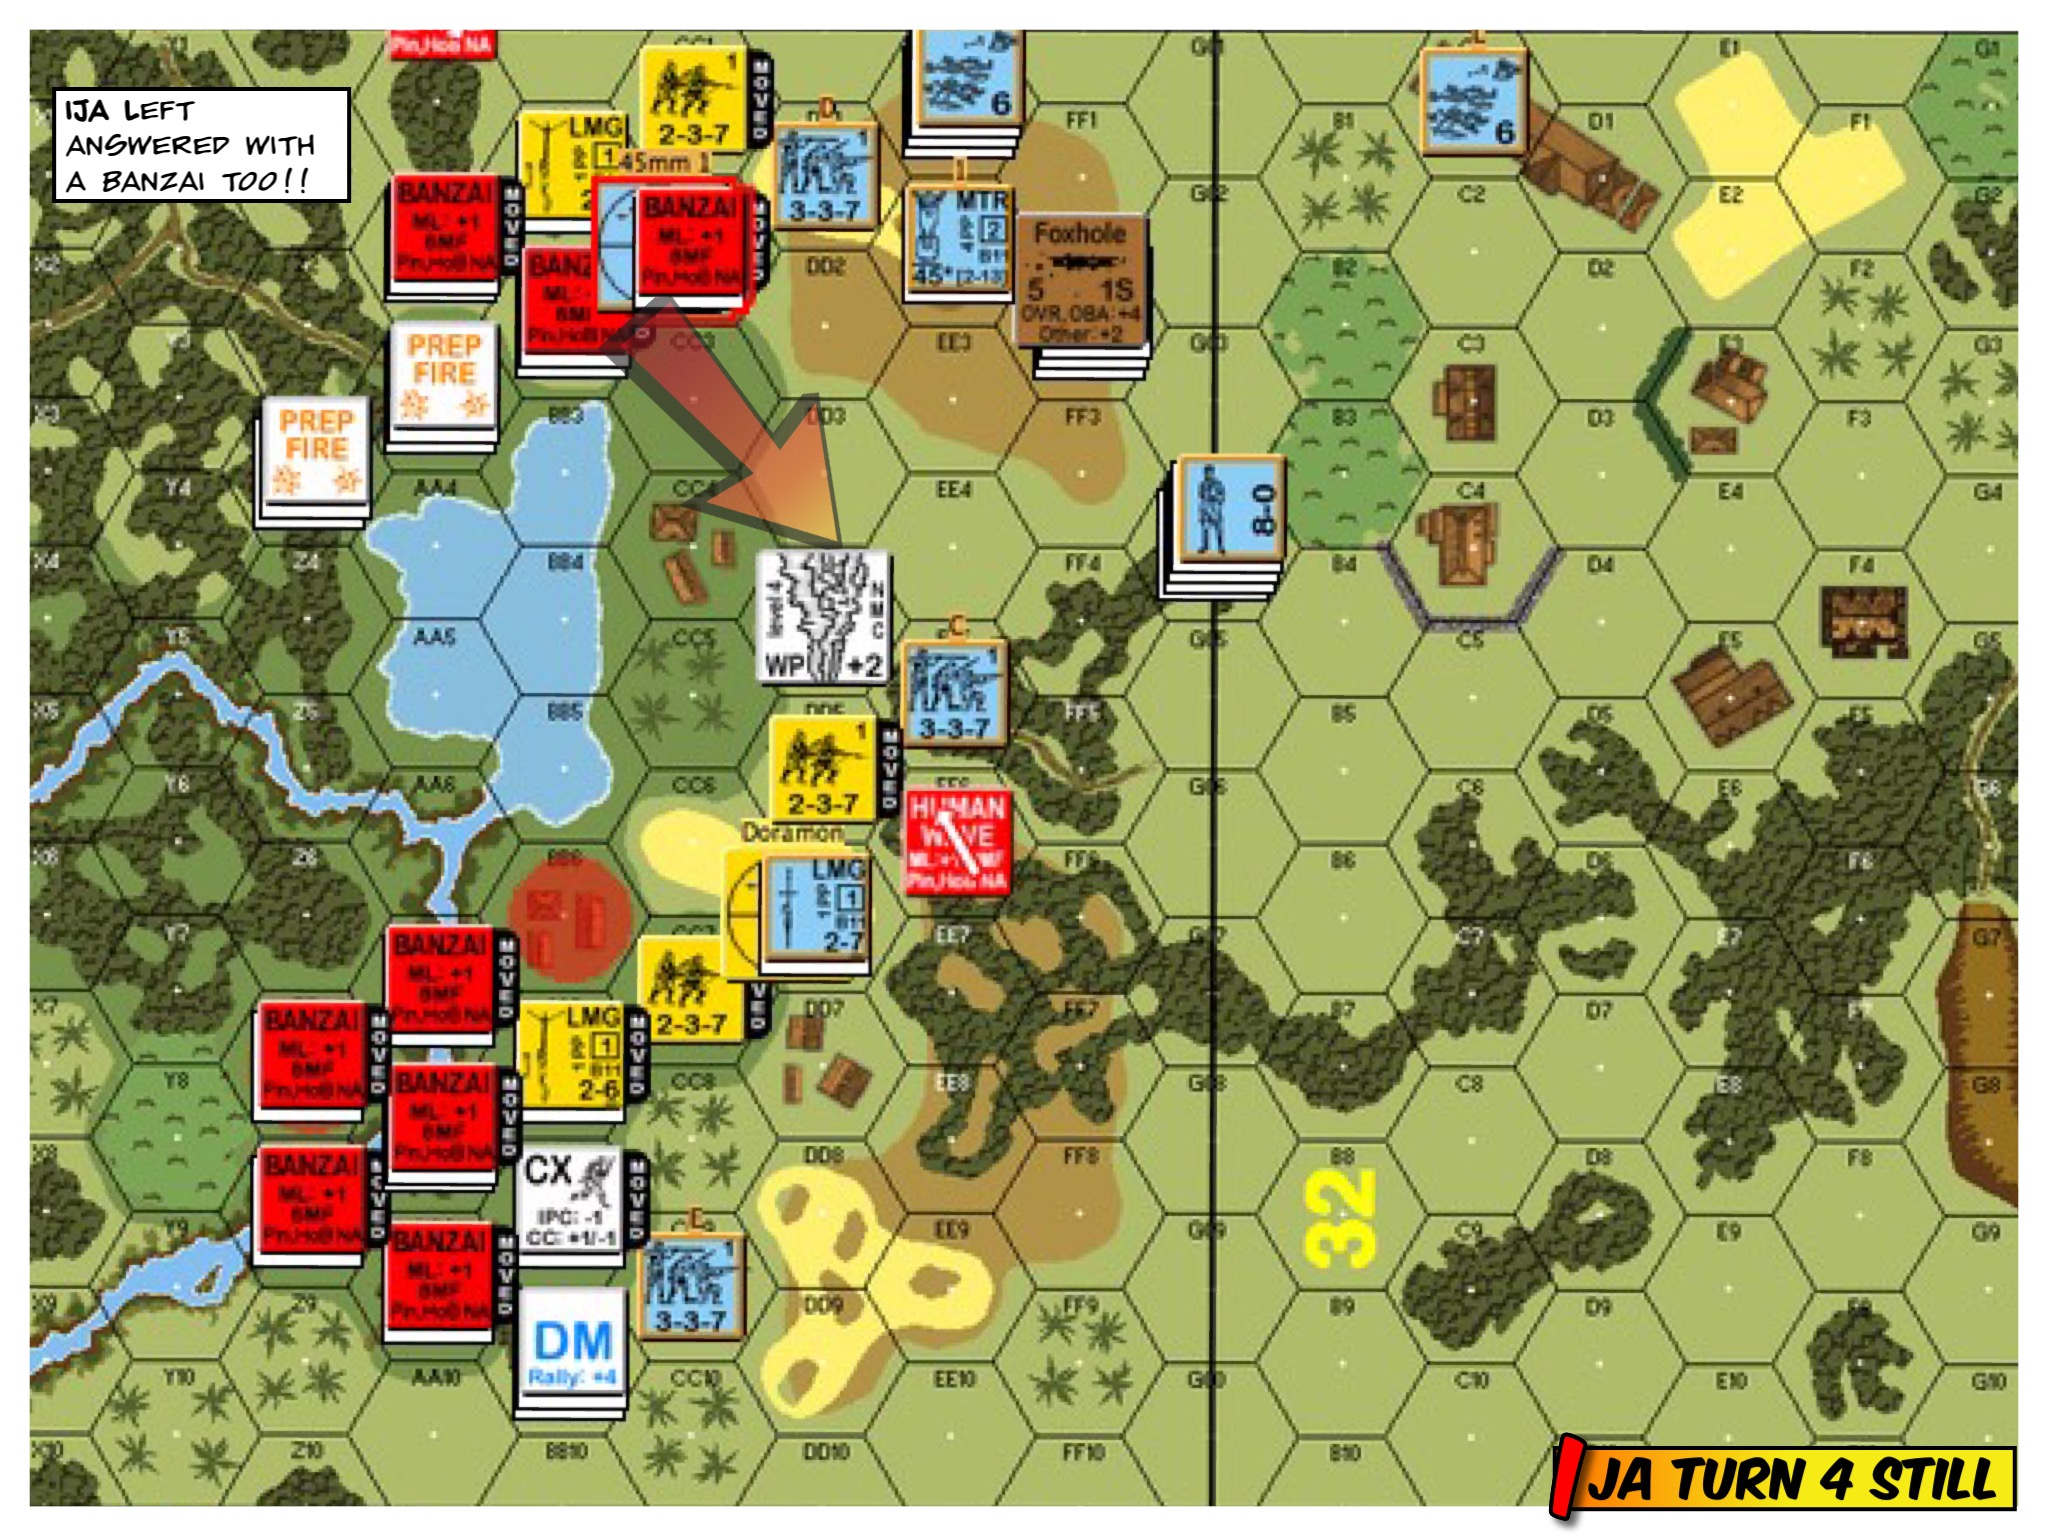
Come Hell or High Water, the Chinese troops kept pushing forward relentlessly. The IJA got a HMG team outside the crematorium as AA cover for their incoming AFVs. The IJA on the right flank were frustratingly successful in making their way towards the crematorium. The Chinese laid an OBA squarely on the IJA MMG commanding the middle of the board (huge surprise), although that was the first and the last of the Chinese OBA. The IJA mortar far off also took potshots at anyone who’s not careful enough about LOS. I didn’t want to waste the fight bomber flying against their AA cover (after their AFVs). However, the presence of the plane suppressed liberal IJA movement.
 Advanced Squad Leader scenario.png")
My patience with the fighter bomber paid off. The Chinese overwatch positions took out the AA HMG and the bomber swooped in! The bomb landed squarely on the biggest IJA tank on the board and lit it up. The bulk of the Chinese pushed through left of the mid line, we were undoubtedly behind schedule and we had to divert troops to meet the IJA reinforcement coming in from the left.
 Advanced Squad Leader scenario.png")
The IJA stunned one of our tankettes and it retreated off the field. Our front was too narrow and was pretty well plugged by the IJA defenders. We triggered a HW in a “Do or Die” quest to bust into the crematorium!! I have to admit, a lot of the IJA shots went wide. The remaining Chinese tankette helped out some of the chaps with an Armored Assault. We couldn’t get distracted by the incoming IJA from the left, we pushed most of the folks towards the crematorium and a few guys remained to keep the IJA off. I had the expensive German scout car in position on the left to help fend them off but it’s MGs promptly malfunctioned!
(Personal first : mid game Human Wave! A Chinese one no less!)
 Advanced Squad Leader scenario.png")
We could have fired off a couple of Dare Death charges as well but it appeared the coast was clear for the rest of the Chinese soldiers. We moved them in as close as possible. The flamethrower team took advantage of the commotion to walk right up to an IJA tank and lit it up. With two movement phrases to go, I had serious concerns that we wouldn’t be able to get to all corners of the crematorium. The internal walls funnelled our troops to where they were plugged up.
 Advanced Squad Leader scenario.png")
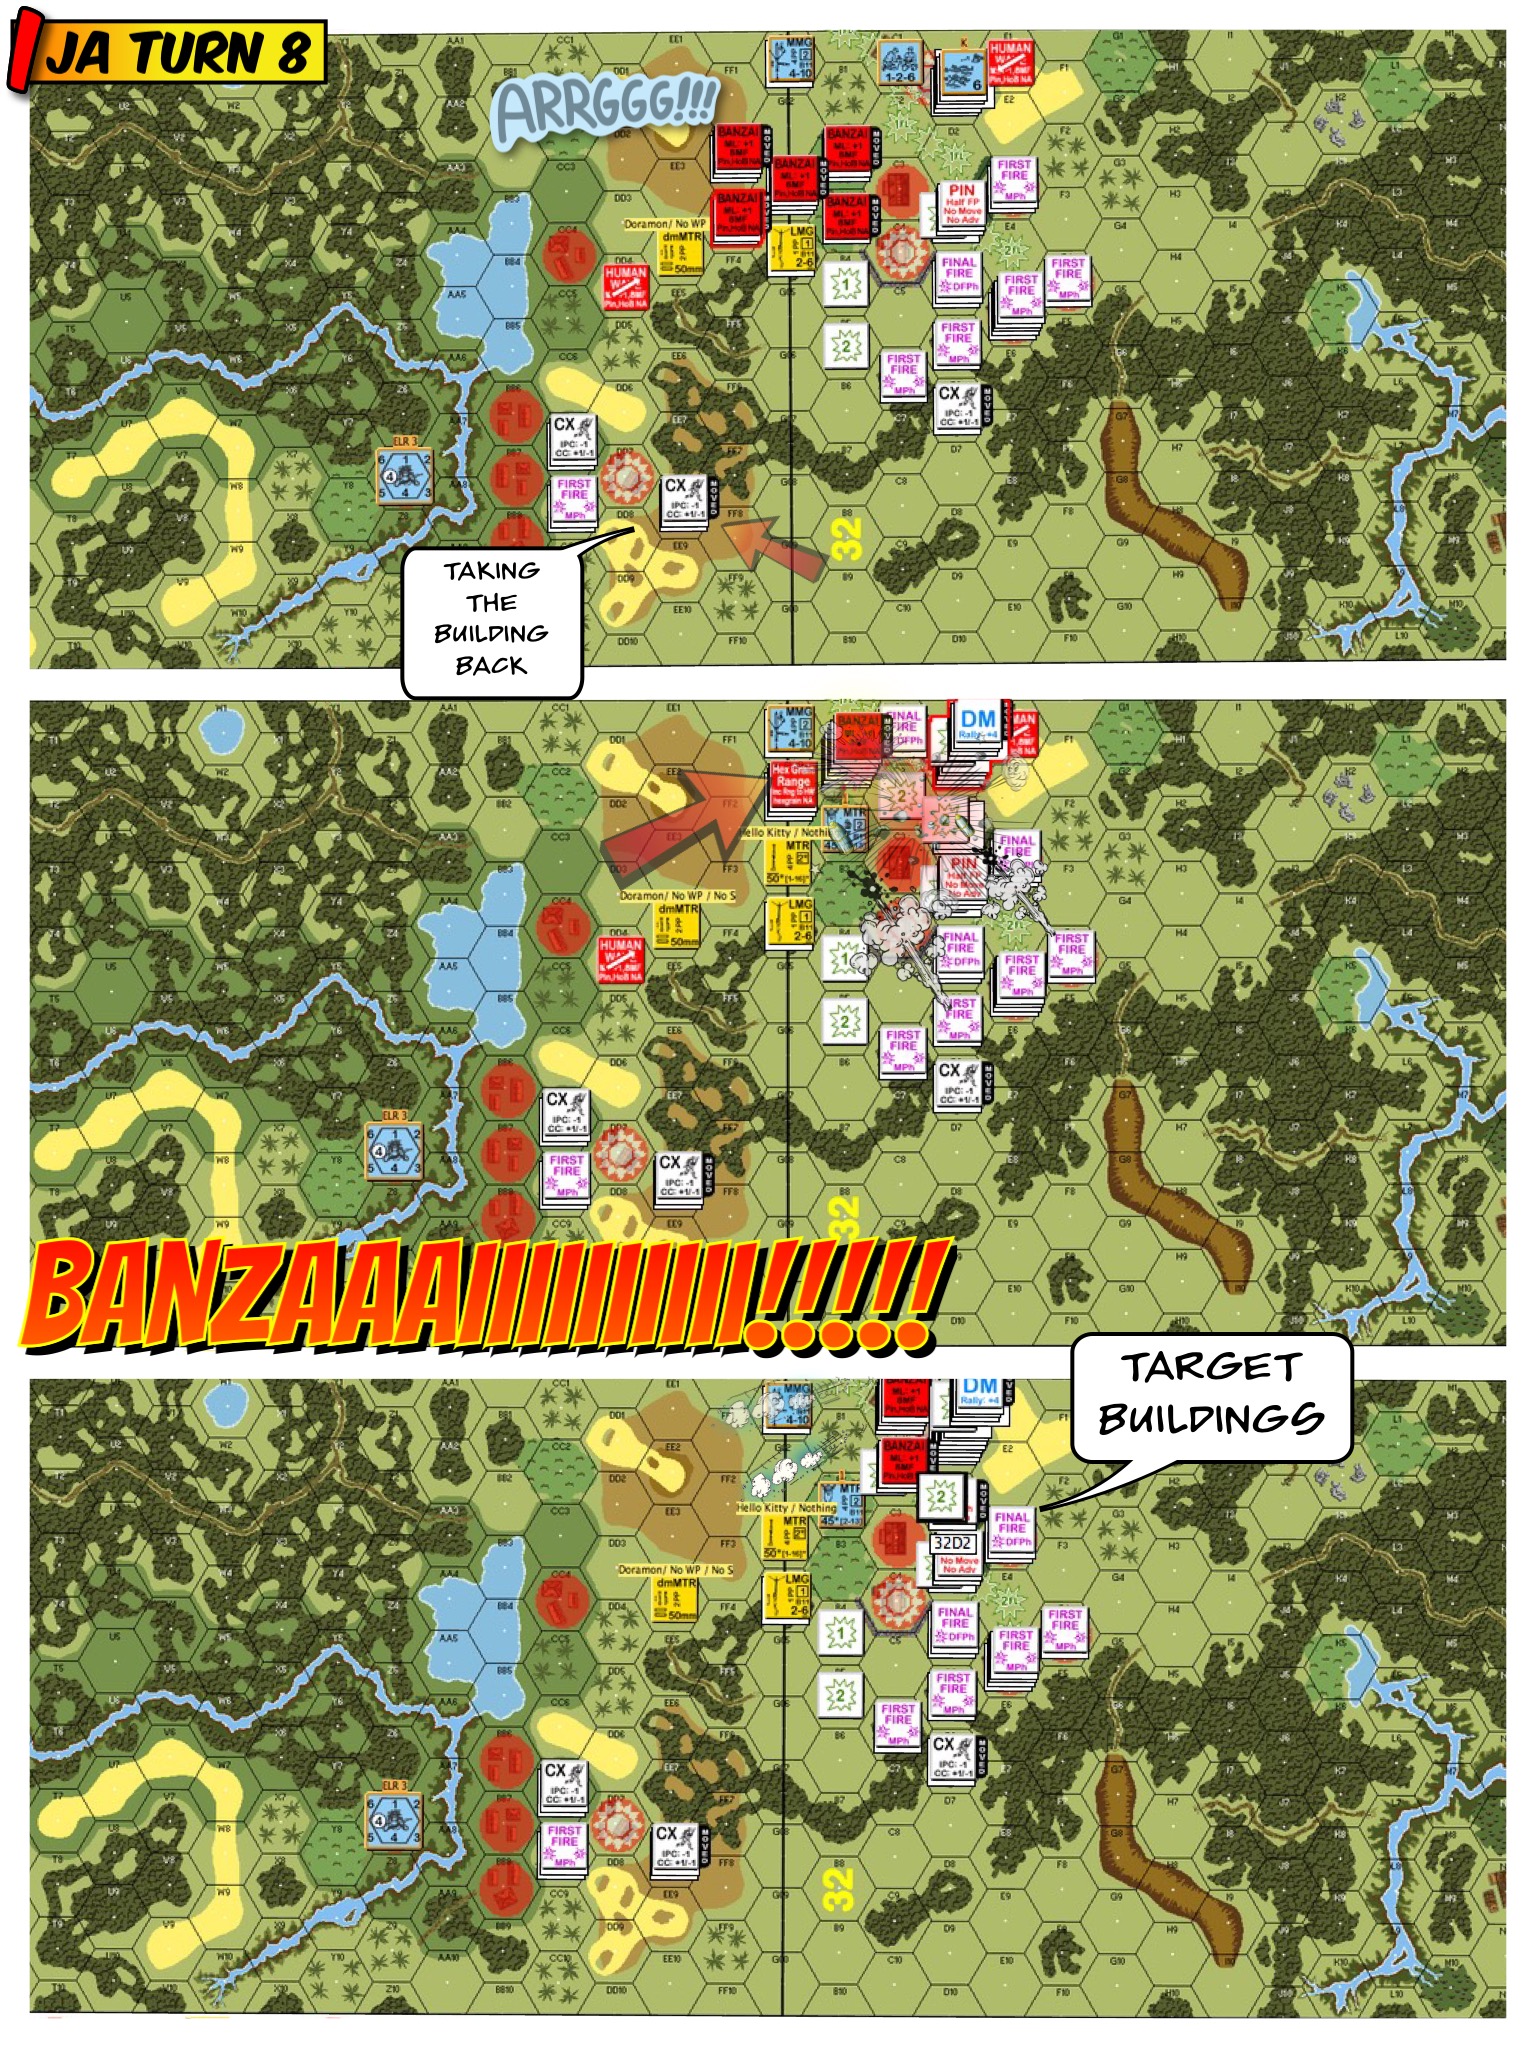
The IJA on the left flank had a chain of units lined up, ready for a Banzai Charge back into the crematorium! Good thing our overwatch positions separated the IJA leader with the rest of the boys. The IJA MMG tried to go high but was pinned by heavy weapons fire as well. The remaining IJA tank crashed into the building but was shot by an LMG near by! I was mulling about the internal walls when my opponent pointed out my DCs near by. The folks went “Oh yeah!!”, ran into the crematorium and placed the DC. All the LMG teams went in (LMGs can fire through breached walls at “full power”). Other Chinese rounded the bottom of the building and got to the bottom left corner as well. All that’s helped by the sniper breaking the IJA spotter team, although breaking one of the remaining IJA units inside the crematorium would have been better!
 Advanced Squad Leader scenario.png")
Wall breached, IJA units shot or killed in close combat!! We had the crematorium!! Now to lined up a reception for the inevitable IJA counterattack!
 Advanced Squad Leader scenario.png")
The IJA was caught in a web of fire. I am frankly surprised that both overwatch positions were still operational (the HMG took a quick break). None of the IJA units reached the crematorium. The game ended as epically as it started.


 The IJA starts in two groups. The first group of 6 squads setup in the airfield (no Smoke in the rain) in the face of a 75* Artillery, a murderous Bofors AA (IFE 8 ROF 2) and a leader who can make it rain 70mm OBA. The second group of 9 squads setup on the east side (lower side on the map) of the hill. To counter that group, the King’s Own Royal Regiment and the King’s Own Scottish Rifles setup on the hill top. A group of Gurkhas setup within 3 hexes of the Flooded Pool.
 Advanced Squad Leader scenario.jpg")
 Advanced Squad Leader scenario.jpg")
 Advanced Squad Leader scenario.jpg")
 Advanced Squad Leader scenario.jpg")
 Advanced Squad Leader scenario.jpg")
 Advanced Squad Leader scenario .jpg")


.jpg")