FT S9 Cowboys and Indians – Advanced Squad Leader AAR

FT S9 Cowboys and Indians – Advanced Squad Leader AAR

Scenario Background

106518783 36b0109f8e w

It was 26 Sep 1950.  The Korean Marine Corps (South Koreans) were mopping up pockets of resistance at and around key thoroughfares.  Chesty Puller thought they were best suited “to tell the cowboys from the Indians”.  The North Korean occupation had not been well received by the city’s inhabitants.  So the locals proved to be excellent sources of intelligence amidst neighbourhoods where North Koreans dressed up as civilians.  (Crudely excerpted from the scenario card..)

(Photo Credit: Don O’Brien, View from atop the Hanto Hotel, Seoul Korea, Nov 1945)

Victory Conditions & Tactical Considerations

The North Koreans had 2 squads & 9 half squads of various quality plus 2 LMGs.  They had self rallying ability as per SSR and no leaders were present.  They were to setup, one squad or less per hex, HIP’d largely on the top half of the map pass the horizontal street and suffered Ammo Shortage (so Fire Lanes are out of the question).  The Korean Marines (‘KMC’) win if they could amass more VPs than the North Koreans (‘KPA’).  For both sides, VP = CVP + Exit VP, and the KPA gets 1 VP each for each Good Order concealed or HIP’d units that survives till game end.  Plus the KPA starts with 3 VP.  So unless it looked like a good kill, the KPA would stay put.  A ‘mole hunt’ then you say?  Yes – but this scenario is how a FUN mole hunt can be done.  Now the KMC could enter on the left or the bottom of the map apart from setting up below the horizontal road.  They started with 7 squads + 1 fire team and 3 leaders, 2 LMGs.  Note that “Steep Hills” were in play, so those brown hexes were concealment terrain as well.  All those Orchards were sparse, while they were concealment terrain, Partial Orchards were not.

My top priority was to prevent the KMC from cutting off my lines of retreat up through the top side of the map.  Secondarily it’s to have a screen so civilian/ prisoner interrogation wouldn’t uncover important KPA ghettos.  The KMC could enter from the left but while I didn’t want him sliding into the top behind us, I couldn’t see KMC’s entering onto the Citywide Boulevard (-1) hexes (‘CWB’) with no where to rout.  I think the KMC expected the KPA to stay as far away as possible, which means the top right of the map was likely to be searched first.  Places the KMC might overlook were rooftops and CWB hexes with Orchards, although my opponent is well known for being meticulous and detail oriented, I have never known him to miss things.

I put the 2 elite 248 HS’s over on the right.  Their mission was to ‘confirm’ my opponent’s suspicions, to draw attention and to survive longer than most.  I had a few units on the top left and at the Dense Urban Terrain (DUT) choke point on the top of the map.  Note that DUT worked like Dense Jungle, stacking limit was two and you couldn’t firegroup with units in other DUT hexes.  I had a HS on the first level of one of those stone rowhouses on the left (not that I really think my opponent would miss them) and another one slightly forward (down towards the horizontal road) to see if we could catch any impatient bypassing KMC units coming down the road.

(Photo credit: Time-Life, Street Fighting in Seoul by Hank Walker, 9 Sep 1950)

Advanced Squad Leader AAR

FT S9 Cowboys and Indians After Action Report (AAR) Advanced Squad Leader scenario

South Korean Turn 3: We had a rather big KMC force hitting the right of the map.  The 2 248’s put out some shots on the road, one was demolished by Turn 3.  The other had a choice of going up next to that massive 8-1 stack or down to the bottom side of the street to mess with the KMC further.  If a unit could survive til the end of the game concealed or HIP’d, they score 1 VP for the team, so they would have to come after it.  Unfortunately the remaining 248 didn’t last long after this but the duo did burn up some time.  The SK rolled civilian interrogation though and a HIP unit on the 1st floor on the left got ratted out (and killed).  So there goes my hope of the SK’s passing him by or it being able to ambush the Korean Marines somehow.  We wondered if the SK’s on the left will wheel counter clockwise and sweep up to the top of the map!  I also started to realize that having conscripts as screeners posed a liability.  They could be easily captured and interrogated!

FT S9 Cowboys and Indians After Action Report (AAR) Advanced Squad Leader scenario

South Korean Turn 4.  We had three Movement Phases left.  The main body of Korean Marines on the left started to wander past our HIP’d crowd apart from one squad with an LMG.  We took that shot at point blank with a HS (and a -1 CWB TEM) but bullets rolled off the Korea Marines.  We decided to back off into the DUT and get reconcealed instead of pressing on, hoping that the SK squad would come in pursuit instead of walking into the other HIP’d units.  Meanwhile on the right, the Korean Marines swept through the hexes in the area.  That single hex two story house on the far right did look tempting but I didn’t want to be (immediately) encircled in it.

FT S9 Cowboys and Indians After Action Report (AAR) Advanced Squad Leader scenario

Using conscripts as screeners was indeed a liability.  One of the captured HS gave into a copy of Doom Battalions v3 and ratted out another HIP’d unit! A HS and a 527 were surrounded.  The 527 was encircled and CC’d but it look out the KMC 8-1.  The other HS who got CC’d rolled infiltration and left off the map (I forgot whether it went with a new leader)!  Over on the left, our sniper took out the guards earlier and a KPA HS was freed for a sweet moment!!  It could try for the board edge but SK units would get to it first.  It decided to go upstairs and it drew some units off the encircled lot.

FT S9 Cowboys and Indians After Action Report (AAR) Advanced Squad Leader scenario

Prisoners were recaptured and the scores were even going into the last (NK) player turn.  The NK 527 had to die!  The Korean Marines stood around and discussed it a bit and decided to ride on the higher Marine morale level and shoot into the Melee.  All the fun triggered the NK sniper again who nailed another Marine unit but worse, the shooting laid an MC on the Melee stack.  The NK 527 pinned but all the Korean Marines in the melee broke.  The NK’s won, glory to the dice (the surviving but unconcealed NK 527 was not credited with VP’s but it’s incumbent on the SK to break the prevailing VP tie)!

(Photo credit: Time-Life, Street Fighting in Seoul, Hank Walker, 9 Sep 1950)

How’s this scenario interesting?

Normally you wouldn’t imagine bug hunt scenarios to be fun.  However, this one’s small and quick enough to not be tedious for the South Koreans and to be nail-bitingly exciting at some points for the North Koreans.  The North Korean player had to keep a pokerface while the Korean Marines swept through the streets.  However it’s not a huge challenge while on VASL as long as you can keep your voice level.  There are definitely multiple ways to play this.  I wonder if any NK players decided to not play possum but actively looked to kill SK units?  I wonder how that worked out.  The use of interrogation kept life interesting and it reflected the historical situation quite well.  The beauty of the Dense Urban Terrain (‘DUT’) rule came to the fore here.  I wondered if more designers will do the same in the PTO with a mix of Dense & Light Jungle?  This is an interesting scenario offering a good bit of fun in the evening, give it a try!

(Photo credit: Time-Life, Street Fighting in Seoul, Hank Walker, 9 Sep 1950)
My Interview with The 2 Half Squads

I did a really fun interview with The 2 Half Squads a little while ago. Most fun I have had at 0400 since I left college!

Here’s the Audio Only version:

The2HalfSquad blog post : http://www.the2halfsquads.com/2021/10/episode-281-action-jackson-kwan.html

FT S3 Last Stand on An-San – Advanced Squad Leader AAR

FT S3 Last Stand on An-San – Advanced Squad Leader AAR

Scenario Background

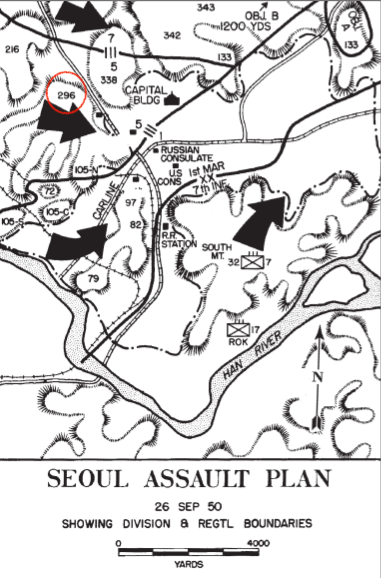
This is 26 September 1950.  Lt Col. Taplett’s (gent in the pic below) 3rd Battalion, 5th Marines fought southeastwards down the slopes of An-San/ Hill 296 towards the city (see the red circle on the map below, credit “Battle of the Barricades” by Col Alexander).  The North Korean 78th Independent Infantry Regiment and the 25th Infantry lead by Colonel Pak Han Lin put up a stout defence.

Battle of the Barricades Colonel Joseph H Alexander

Victory Conditions & Tactical Considerations

The KPA (North Koreans) started on Level 3 or above.  The Marines entered from the left of the map at or above Level 2.  In about 6 turns, the Marines should fight their way to Level 1, the KPA should fight to stay on Level 3 or above.  The KPA started with 2×447, 4×426 (conscripts), an LMG and a 8+1 Commissar.  The KPA counterattack force, comprising of 2.5×458, 2×527, 2×447, 3xLMG and 2 leaders enter from the right side of the map on Turn 3.  The Marines started strong with 4×768 3×248, 2xMMG, 1xBaz and 2 leaders.  They had a reserve platoon coming from the left on Level 5 on Turn 3 as well.  All units counted “Exit Point” style (“Good Order”) toward the Victory Condition, prisoners excluded. USMC wins on ties.

So the KPA had 31 VP vs USMC 22 VP in their OB’s.  The USMC would need to reduce the KPA force.  Soon it would mean tough decisions between putting your squads on your level to score vs going to your opponent’s level to prevent them from scoring.  The KPA had the last turn so we would have a chance to “Advance” back on Level 3.

Advanced Squad Leader AAR

BoF2 Polish Requiem After Action Report (AAR) Advanced Squad Leader scenario

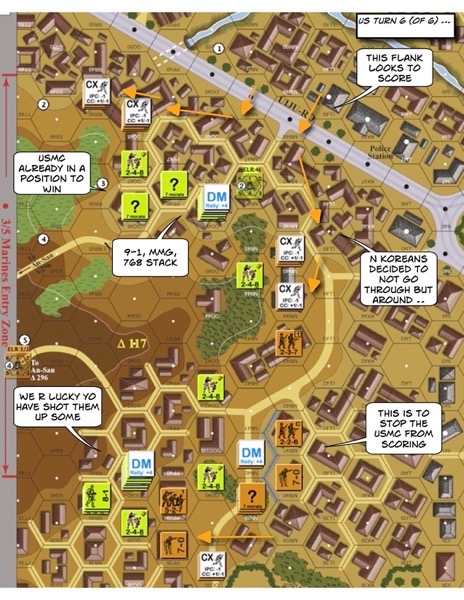
The KPA was weak.  They were also forced to spread out in their setup.  The USMC could go anywhere and shoot anything.  The KPA had their Concealments easily blown, broke up by Assault Fire and Captured in CC.  Very quickly they pushed the KPA off Level 3 and took more than a few prisoners.  The area on the bottom of the map offered more cover for the counterattack, so naturally the USMC focused their forces there.

BoF2 Polish Requiem After Action Report (AAR) Advanced Squad Leader scenario

The original KPA defenders were no longer coherent as a force.  The way to Level 1 was wide open for the USMC on the top and the KPA  had only scattered remnants on the bottom.  However, the Marines weren’t on Level 1 on the bottom of the map yet.  I decided to send the stronger of my Turn 3 reinforcements to the top of the map and the weaker (and more short ranged) to the bottom of the map, just to keep the Marines off Level 1.  The boulevard’s gotta be where the Marines would make their stand with an additional -1, so we needed to cross before the Marines assemble in place.  So hopped along the river edge we did, to a point by the boulevard where there were orchard cover.  The KPA forces at the bottom of the map arrived in time to catch the defenders sent reeling by the USMC.  That (bottom, vertical) road’s where we would make our stand.

BoF2 Polish Requiem After Action Report (AAR) Advanced Squad Leader scenario

At the top of the map, we made it across the boulevard okay when the lone American squad cowered.  We decided to split into two groups and go around the USMC forces, to places where we could Advance up to Level 3.  We simply couldn’t do close range firefights with the Marines on Level 1.  The USMC would have to decide whether they would get off Level 1 where they needed to be to score in order to fight us.  At the bottom of the map we got in a few lucky shots that set some Marines back.  That probably got them more worried about the KPA making a rush for Level 3 rather than them trying to make Level 1.  Nonetheless, we would keep the line at the street.

BoF2 Polish Requiem After Action Report (AAR) Advanced Squad Leader scenario

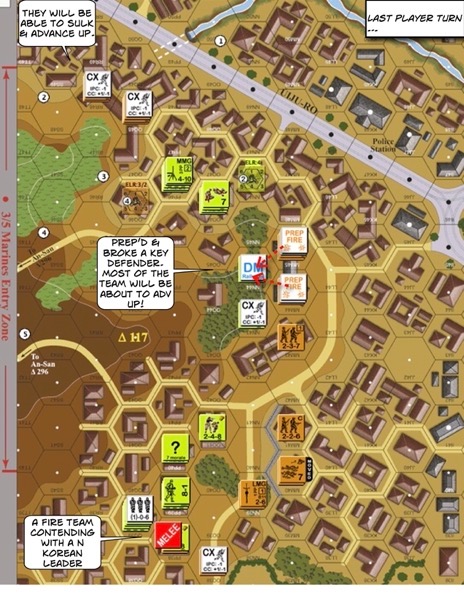
At the top of the map, the USMC decided to keep their forces and hence their gains on Level 1.  No one’s coming after our eventual Advance onto Level 3.  We made a critical PREP at the middle of the map and broke one of the defending Fire Teams in the Woods.  That would allow at least 2 of our MMC’s to Advance up.  At the bottom of the map, our line of KPA conscripts held and so my opponent conceded.

How’s this scenario interesting?

This scenario represents an interesting problem for both sides and it really highlights the terrain in Seoul.  This is a multi-level fight amongst the Dense Urban Terrain.  If a unit’s CX’d, it won’t Advance up a level, so you have to time it right.  A KPA conscript unit has especially limited mobility in this terrain and you don’t want to be CX’d when you are Lax as a conscript (+2 Ambush).  I think USMC Fire Teams would be very useful here.  Fire Teams could block more venues up the hill and it’s not easy to break Morale 8 units in +2 TEM.  Plus each Squad, when broken into Fire Teams is worth 3 VP when it’s worth only 2 VP as a unit.  If every USMC squad’s deployed, the USMC OB is worth 28 VP (vs 22 VP undeployed) against the KPA’s 31.  Both players have to find the balance between pushing through and scoring points versus fighting the opponent on a different level to stop him from scoring.  While the KPA player has to fight uphill, there are more of them that can swamp up to Level 3.  This is a tight little puzzle of a scenario!

(Credits: Wikipedia)

RbF I-4 Used and Abused – Advanced Squad Leader AAR

RbF I-4 Used and Abused – Advanced Squad Leader AAR

Scenario Background

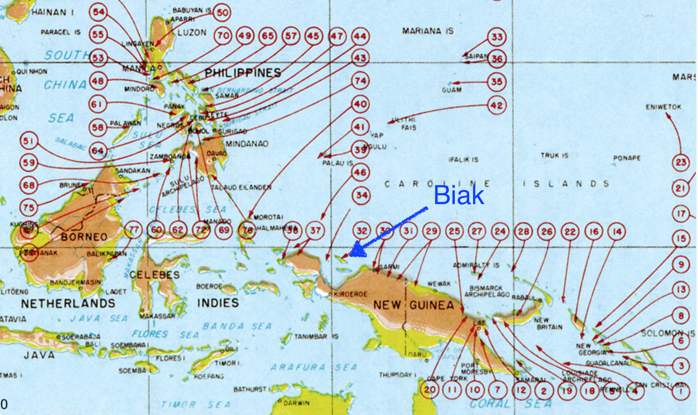
This is the Mokmer Airstrip (today’s Frans Kaisiepo International Airport) on the island of Biak, 15 June 1944.  The IJN had 3 airfields built and captured by the US 41st Divison.  The IJA decided to recapture them, aided by the remaining 4 IJA tanks on the island.

UntitledImage

(https://upload.wikimedia.org/wikipedia/commons/a/a4/US_landings.jpg)

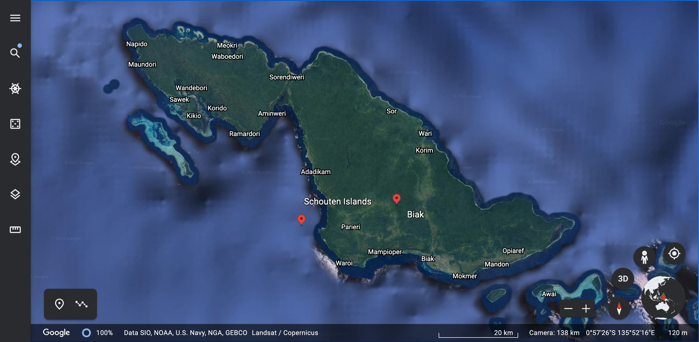
Google Earth: Biak

UntitledImage

(Credit: Google Earth)

(“Soldiers of the 41st Infantry Division, after emerging from the jungle, overcoming Japanese resistance, advance on an open field on the South Pacific island of Biak, off the New Guinea coast; May-August 1944.” Credit: https://www.ww2incolor.com/)

Victory Conditions & Tactical Considerations

The IJA broke out of the Dense Jungle with 12 squads and 4 leaders, which included a 10-1 and a 9-1.  They had 4 LMGs and 2 MTR that could pump WP out to 6 hexes.  There were also the 4 x Ha-Go’s described in the Historical Perspective.  The Americans had 11 squads: 3×667, 7×666 & 1×546.  They had 3 leaders, which includes a 9-1 and a 8-1, plus 1xHMG, 2xMMG, 4xBaz44 and a 60 MTR.  The IJA win at the end of any Game Turn if they have 7 CVPs or more than the Americans (unbroken) on/adjacent to any runway hex, and they had 7.5 turns to do it.

The IJA didn’t really have an advantage in manpower (so no unnecessary CC), and the Americans outranged and outgunned them.  They did have an advantage in leadership and morale, plus they could get to where they wanted to get to if they want it bad enough.  The 4 AFVs were key for preventing the Americans from backing off into the airfield.  These bazookas had a range of 4 but the Ha-Gos were small.  So TH on a moving Ha-Go is 6 @ 1 hex, 5 @2, 4 @3, 1 @4, ie they were effective at 2 hexes at best unless they catch you stopping.  The 2 knee mortars had WP and these Ha-Gos had vehicular smoke grenades, apart from being able to provide Armor Assault or vehicular hindrances if needed be.

The IJA setup on row 3 while their tanks come in from offboard.  Americans setup near the bottom edge of the top map, however in doing so, would have to retrograde across plenty of Open Ground, first to the tree line on Board 14 (bottom) and then across the airfield (where you get an additional -1 to incoming fire).  We needed to back up before the IJA tanks got behind us!

I took on Brian William’s US setup in his AAR from Jan 2000.  The idea here was to defend the left and the center where it’s closest to the airfield.  We would try to hold the line for as long as possible before backing off onto the airfield.  Having the IJA AFV hooking behind us would definitely be an issue.  Hopefully our bazooka’s would deter some of that.   The HMG (plus 9-1) and the 60 MTR were in the trees located in the center of the board.  One MMG was in the middle with the 8-1 and the other MMG guarded the left side.

After Action Report

RbF I-4 Used and Abused After Action Report (AAR) Advanced Squad Leader scenario

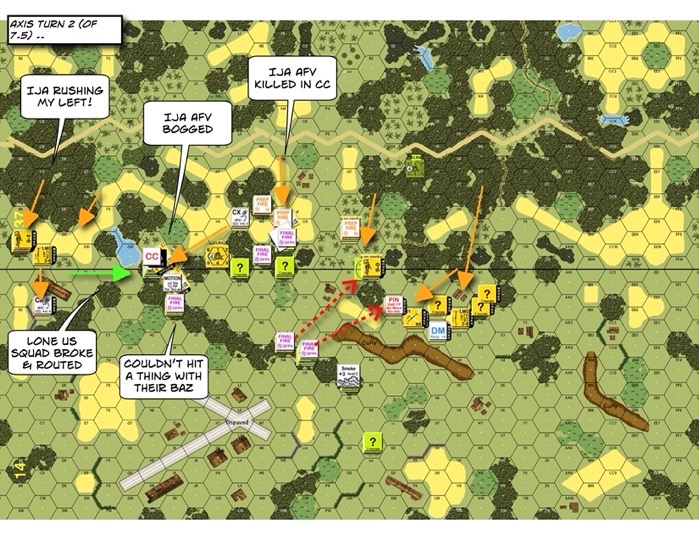
The IJA wasted no time moving in.  Too fast perhaps, they already made me felt like I’d made a mistake and gave them too much ground upfront.  On the left, they prodded my lone squad (which promptly broke and ran) and was well on their way hooking around to the airfield.  In the middle, an IJA tank ran into the dense jungle in a bid to freeze my MMG.  We killed it in CC.  Slightly to the left of it, another IJA tank did the same with another MMG team and was unfortunately bogged in the jungle which only made it easier to kill.  Its partner AFV pivoted and stopped right in front of a HS bearing a Baz but they wouldn’t be able to hit a thing this whole game.  A couple of squads came through the middle with their knee mortars.  They weren’t able to do much damage to the HMG-Mortar team but they laid down smoke for their comrades to the right.  On the right, a body of IJAs came through the dense jungle unmolested.  That gully in middle of the field would be an ideal jump off point.

RbF I-4 Used and Abused After Action Report (AAR) Advanced Squad Leader scenario

In the middle, the concealed units that sat behind the MMG team were in fact, a Baz team!  They slid up under the wreck, shot the other AFV and immobilised it.  Given where it was, we figured an immobilisation was as good as a kill.  The remaining IJA tank (that stopped in front of the Baz team) started up!  The Baz team immediately fired but missed again.  The other Baz team fired but couldn’t connect either!  That Ha-Go waltzed all the way down to the HMG team (with 2×666 and a 9-1, no less!).  The HMG fired and got snakes!!  Pity you can’t CH with a 50 cal.  However, the TK’s 7 (AF1) at that range and the last AFV was put down as well.  The hoard of IJA on the right decided not to wait and did 2 Banzai’s (over OG!).  Meanwhile on the far left, the IJA platoon continue to make their way down south.  The Americans were fortunate enough to keep a team in front of them.  We couldn’t win most standing gunfights though, we had to always try to get the first shot in.

RbF I-4 Used and Abused After Action Report (AAR) Advanced Squad Leader scenario

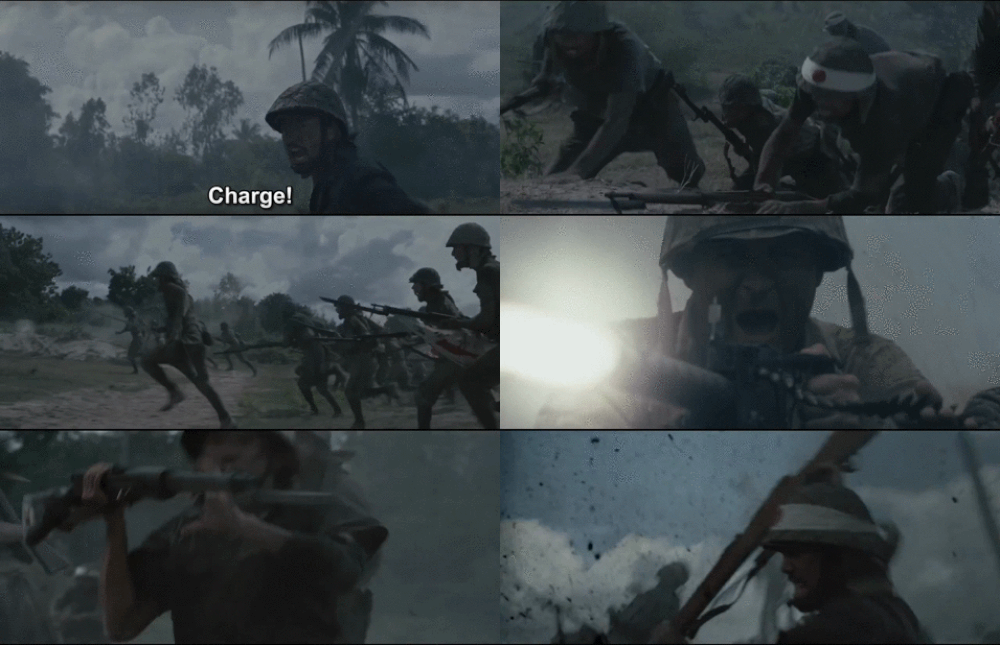
We were able to decimate enough IJA troops to be able to pull a big withdrawal on the right.  We ran to the end of the airfield and hoped to advance across the runway (add’l -1 to incoming fire).  The IJA tried another Banzai on the far right but some pretty heavy firepower got in the way (and killed the IJA 9-1).  The IJA pulled another Banzai through the kunai on the left towards our MMG as well.  We had a flanker harassing that Banzai but it got hit by the IJA sniper halfway through.

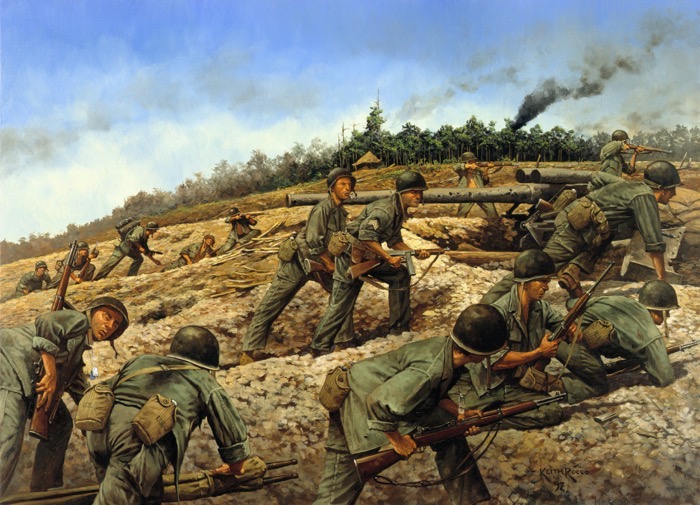
Jungleers on Biak by Keith Rocco COMMENT

(“Jungleers on Biak by Keith Rocco”, https://www.militaryimages.net/)

RbF I-4 Used and Abused After Action Report (AAR) Advanced Squad Leader scenario

IJA Turn 6 – they had lost a good number of troops to the Banzai’s already.  The broken MMG HS from our first position finally managed to self rally!  So even though the IJA tried to run some troops up from the back, they didn’t get too far.  They did a final Banzai attack to get to the edge of the airfield, and lost their 10-1 in the process.  This was when they decided to call it quits and started pulling out RbFI-5 (ATF1) Paper Line ..

(“1944 Biak- Japanese Prisoners being fed” https://www.ww2incolor.com/)

How’s this Scenario Interesting?

I think movement across Open Ground was key for both IJA and US troops.  The IJA had 4 tanks to help hook around and to interdict American movement (their 4 LMGs would have extended the 4 hex IJA range nicely).  Plus their cover / smoke grenades should have provided protection for IJA troops in the face of heavy US firepower.  The Americans couldn’t win standing firefights and as I mentioned before, we had to always get the first shot in.  We would have a very hard time with our low morale if we had to retreat through opposing fire.  We lucked out early on when the first couple of Banzai’s didn’t leave the IJA with enough troops to see beyond the tree line, thus allowing US escapes.  Once we settled into the buildings around the airfield it’s all open ground for the IJA, those AFVs would have been helpful.

I really like Brian William’s setup.  The bazooka teams in particular were looking over the narrowest places (and/ or where those AFVs had to turn).  I couldn’t have done something as good as that.  I might have made the mistake of setting up a little to forward, increase the difficulty of my retreat and enabling Banzai’s through those jungles.

DB058 Vossenack Church – Advanced Squad Leader AAR

DB058 Vossenack Church – Advanced Squad Leader AAR

Scenario Background

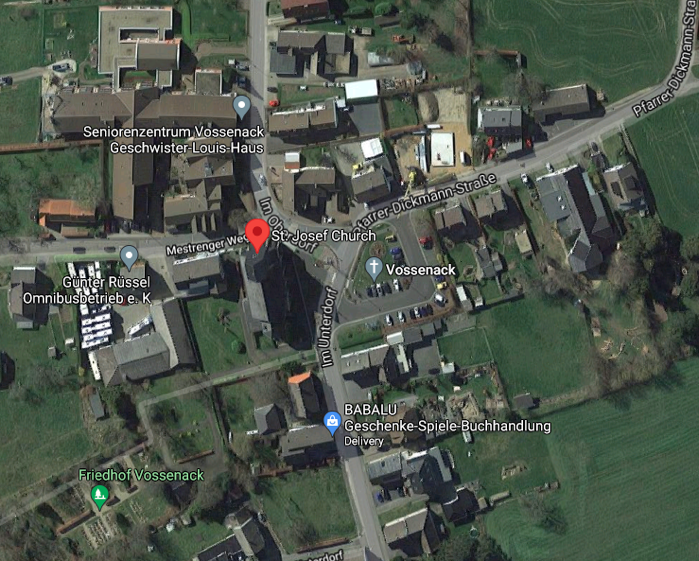
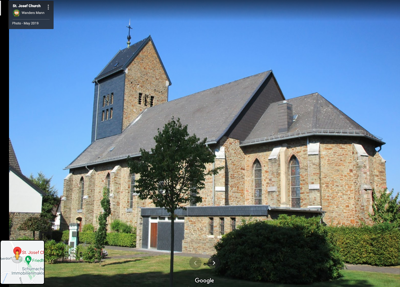
It’s 6 November 1944, some of the Panzer Grenadiers counterattacked after a major bombardment and tried to wrestle the Vossenack Church from elements of the US 28th Division.

Yes, it’s the Vossenack Church in BFP Objective Schmidt, or really, St. Josef Church.

UntitledImage

UntitledImageUntitledImage

(The church after the war © Rureifel Tourismus e.V.)

Victory Conditions and Tactical Considerations

The Germans win at Game End by controlling the church, which is the building partially outlined in my map.  I had the 2 hexes outlined because they are treated as Factory Locations.  Of the 2 hexes outlined, the left hex has a Level 2 Steeple Location.  All hexes have Cellars. Hand-to-Hand CC may be declared in any location of the church which is scary for the Americans considering that the Germans has more than 2:1 on them in terms of bodies.  The Germans also get Winter Camo, which allows them to advance concealed.  The Germans get to setup on 3 sides of the Americans but the Americans are given control of 2 key buildings (Rear & Right) in the defense of the church.

I guess the Americans “can” kindle some of the jump off buildings but the EC is not conducive to that train of thought.  Not only that, it will be horrible if it starts snowing!

After Action Report

DB058 Vossenack Church

The Americans came under heavy attack immediately.  Folks with 8 morale are hard to content with.  The Germans on the top right advanced towards the back of the church but was largely stopped by the mortar designed to sneak shots off down that venue (top of the map).  However, my “Right” building was advanced on from both sides.  Good thing the Germans on the bottom right decided to break off and went to the left off the board instead.  On the top left, the .50 cal and the 9-1 of the HQ group kept their side of the church clean, for the moment.  The Panzer Grenadiers attempted to pushed directly towards the church’s graveyard.

DB058 Vossenack Church

The Germans got a foothold in the graveyard without breaking much of a sweat!  The Right building pushed off approaching Germans while keeping the MMG trained straight down the road to protect the front of the church.  Meanwhile the defenders tried to skulk as much as they could and kept up the volume of fire as the Germans approached.  Meanwhile the 8-1 thought it would be a good idea to hop up to the steeple with a bazooka (why, I have no clue, it’s not like he could fire the dang thing from up there without suffering backblast .. and as it turned out, there’s no cure for stupidity: the “factory floor” hexes are made for firing bazookas!). Towards the back, the Americans shot the German 8-0 on the top right but the Germans sniper took out the US 7-0 on the top left as well.  In the front, the Germans continued to pile across the road.  The Germans got a nice rally point setup in the trees behind 2 buildings which kept recycling rallied troops back towards the church. I gotta do something about that.

DB058 Vossenack Church

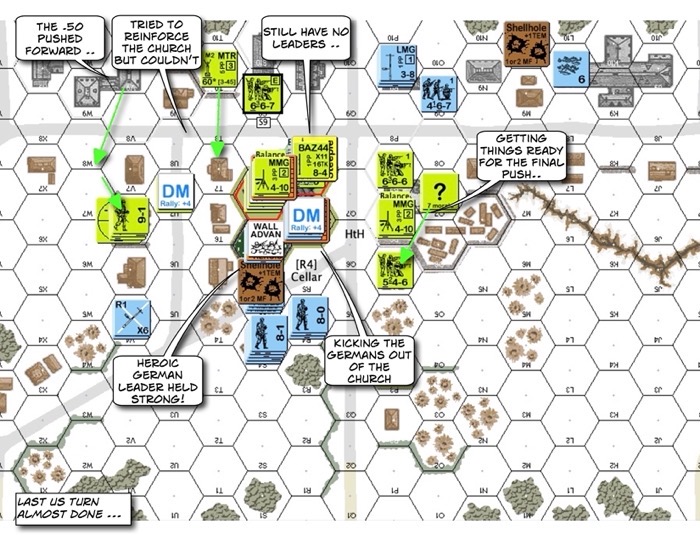
Sure enough our 8-1 leader in the Steeple got blown away by the evil Nazi death star!  That leaves NO leaders in the church to rally anyone.  At the same time, they were getting shot in the back as the Germans approach from the top right.  Over on the top left the MTR and the .50 of the HQ group took out the flankers.  Things got urgent as Germans broke into the church and continued to recycle rallied troops into the fray from their rally point! We were happy that the Germans were largely off our right and the rear though.

DB058 Vossenack Church

This was the last American turn.  The chaps chucked out a few smoke grenades which got the .50 cal team across the street and towards the left of the building.  We couldn’t afford to let the Germans keep streaming in!  Our mortar squad made it across the street nicely but was shot in Defensive Final.  There was no chance of getting folks from the Right building into the church so the choir boys were on their own.  Good thing that the intruding, shrek-yielding German HS was broken and designated back into the graveyard.  We got a HS with some German prisoners and some brokies in the cellar.  Leaders or not, there’s no chance of anyone getting rallied now.

DB058 Vossenack Church

The Germans made a final push into the church!!  The .50 cal was straight up scary.  The MMG in the Right building tried to setup a firelane but it cowered out of existence!  Good thing there were enough squads in the Right building to put down some residual.  The dice were BRUTAL!!  The only survivor to make it into the church (cellar) was an German 8-0.  A couple of squads were blown out of orbit at the rear of the church.  The Germans conceded.

How’s this Scenario Interesting?

This is a very nice and tight 4.5 turn scenario that plunges both players into action right off the gates. The American had to figure out a way to reinforce the church and to not loose too many bodies as they were outnumbered 2:1.  The Germans had to deal with a tight timetable and some merciless firepower.  They could use their winter camo to advance across the street concealed but they risk loosing on time if they do too much else.  Hand-to-Hand combat in the church promises a pretty decisive ending.  This is a great scenario well worth considering for inclusion to any tournaments.

FrF5 The Valley of Death After Action Report (AAR) Advanced Squad Leader scenario

FrF5 The Valley of Death After Action Report (AAR) Advanced Squad Leader scenario 

Scenario Background

The Soviets launched Little Saturn on Dec 16 1942, looked to destroy the Italian 8th Army and to cut off relieving forces to Stalingrad.  This scenario set in the Arbuzovka valley on December 23 1942 depicts Axis efforts to break out of the encirclement.  The Germans and the Italians did break the encirclement historically.  With 10,000 Axis dead, 5,000 wounded/ frostbitten and 10,000-15,000 taken prisoners, Italian soldiers called it the “Valley of Death”.  


Victory Conditions and Tactical Considerations

Elements of the Italian Blackshirt Brigade, Pasubio Division set up on the south (left of map) with 16 squads, 3 leaders, 1 HMG 1 MMG and 3 LMG plus 2 (little) mortars.  They were supported by 2 StuGIIIG’s.  The Axis suffered Ammunition Shortage but that didn’t factor much into our game.  The Russian 35th Guards Rifle Division set up to the north (right of map) with 5 458’s 3 447, 2 leaders, 1 LMG 1 mortar and 2 ATRs.  I took the balance in this game and so 3 527, a leader, a radio (70mm OBA) and a T-34 M41 showed up on Turn 2.  Both sides were to setup on non Hill hexes, so we both had to slog it up the Hills against Ground Snow.  

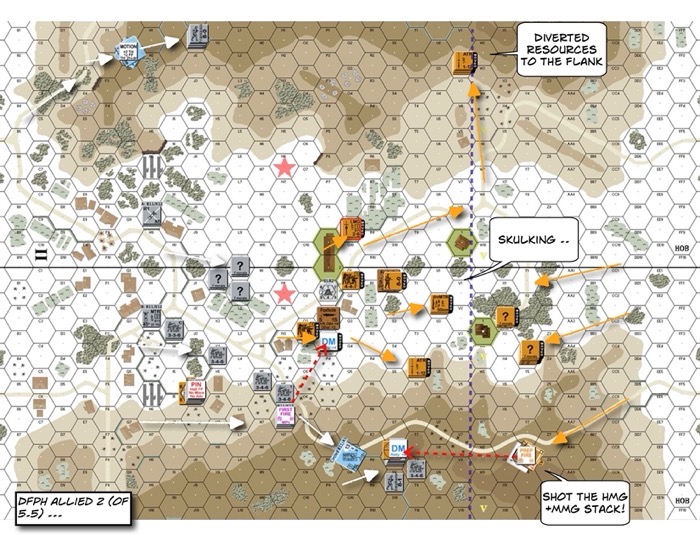
The Italians had 5.5 turns to get more unbroken (didn’t have to be in good order – could be in Melee/Berserk) non-crew infantry CVP north (right) of map than the Russians, provided that the Russians hadn’t destroy both StuGs.  I marked the “victory” line beyond which the Italians had to move on the first AAR map below with a blue dotted line.

The Italians outnumber us 2:1, plus they had more long range toys and 2 StuGs.  Our Russians had better quality troops but that’s a lot of map to cover, good thing the Hills were quite barren.  The Russians would have to rely on their higher morale of their infantry and the higher mobility of their T34 m41.  That T34 wouldn’t win any long range shootouts against StuGs.  We would try to fend off an amoeba attack and to not get caught in Close Combat.  


After Action Report

The StuG’s split off and went to both hills, threatening a pincer action, supported by a platoon each.  The platoon to the east (bottom) was of particular interest since it carried an HMG & an MMG.  I really couldn’t split off my troops since they were thin as it was.  I diverted 2 squads, a leader and an ATR to the west (top) and my T-34 to the left (bottom).  The rest of the Russians on the valley floor dutifully withdrew as their flanks were threatened.  Heck, the Italians on the hills were already shooting at my skulking Russians!  My T-34 got a lucky shot at the “heavy weapons” team.  Italians aren’t easy to rally.  I expect that to put them out of action for a little while.  (The blue dotted line is the goal line.)

Advanced Squad Leader scenario FrF5 The Valley of Death After Action Report (AAR)

I parked my T-34 on the highest point, went Hull Down and congratulated myself for how smart I was.  That didn’t last because a StuG went into a position to engage from the west Hills (top) while another StuG went to my left.  My TH was 6 (+1 BU +1 small) to the west Hill StuG but his TH was 8 coming back, and my HD wasn’t going to hold because of the StuG to my left.  Urgh!  I always thought “lone tanks die” and I was on track to prove this out again with my T34.  Hopefully the Russian squads rushing up the east Hill would save those treads! 

Good thing an ATR shot broke the platoon on the west Hill (perhaps we could meet the StuG alone then) and the heavy weapons guys on the east Hill went for R&R.  The Russians in the valley were slowing the Italians down some but they were moving forward still.  Our first Spotting Round went wildly off which didn’t help things.  I needed a nice Harassing Fire to shut that party down.  

Advanced Squad Leader scenario FrF5 The Valley of Death After Action Report (AAR)

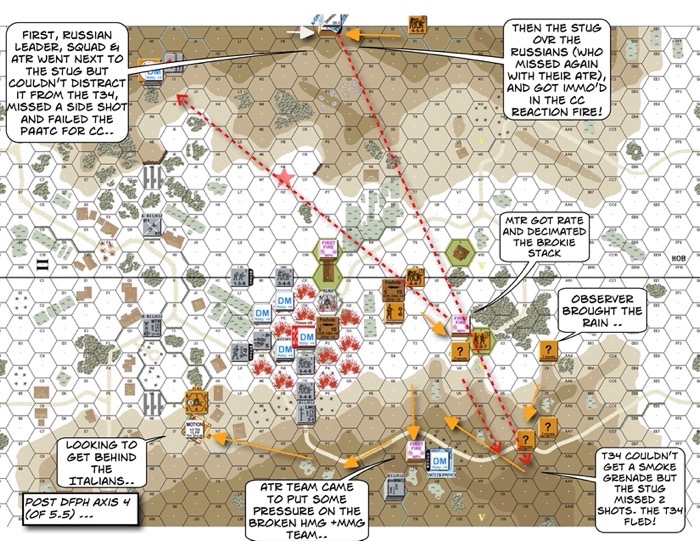
The ATR team on the west (top) Hill went straight for the StuG, if it wanted to deal with us it would have to change VCA.  An ATR hit would immo on a 5, and if they pass their PAATC, immo the STuG on a 7!  But all that talk didn’t distract the west Hill StuG from our T-34.  

It’s time.  I knew my T34 couldn’t fire while being CE but we threw open the hatch and tried for a vehicular smoke grenade anyway.  Nada.  Well, there goes nothing.  We gunned the engines and sure enough the first shot whizzed by!  We pushed forward off the hill and the StuG intensive fired!  The shot came real close but that missed as well.  We couldn’t believe it!  Everyone in the tank screamed “GO GO GO GO!!”.  We thought about rounding to the back of the east (bottom) Hill StuG, DM’ing the Italian heavy weapons team and going HD behind the stone wall.  Unfortunately we wouldn’t get a first shot off anyway being CE and that StuG would have a chance to spin around and we would need a 5 to kill (they needed a 6 and they had a spare AFV).  We decided to make for the area behind Italian lines.  If the StuGs wanted to come for us they would have to go the “wrong” direction and abandon their infantry.  We stayed in motion behind some buildings, hidden from the west Hill StuG.  

Well, our ATR shot went wide, even when our guys were practically bracing the ATR against the side of the StuG!  “We can still go in and kill the thing!” someone yelled.  The 7-0 thought about it for a second and remembered how his momma always told him to not be a hero.  

Next turn came around and as you expect, the StuG started up. POW!!  The ATR team fired again and watched the round arc’d gracefully off to the distance.  The StuG overran the Russian team.  They survived somehow and rolled around for their CC Reaction Fire.  This one’s tough ‘cause the StuG’s moving but they managed to immo the StuG with its gun pointing in a not so useful direction.  

The radio guy got Harassing Fire down properly in the valley as well, catching the Italians in the open.  The Italians conceded.  

Advanced Squad Leader scenario FrF5 The Valley of Death After Action Report (AAR)

How’s this Scenario Interesting?

Classic quality versus quantity?  The pair of StuG’s could be tough to deal with.  I thought I’d just run that T34 around (and not stopping) and lean on my superior mobility, cut rout paths and stuff.  I wouldn’t win shooting matches with either of them.  Putting Italians on the hills made it challenging for the Russians as they didn’t have the bodies to spare.  StuGs were there to lay smoke I think, without which the Italians couldn’t move safely. The Italians also shouldn’t mass up because of the OBA and so spreading them out might well be the way to go.  Some Italians might break but the Russians couldn’t shoot them all.   The StuG should do what assault guns were meant to do: shoot smoke rounds from the back and keep the T34 from getting cute.  They shoot way better at a distance anyway.  I took the balance because it’s largely an Italian win on ROAR but I can see how tough it was for my opponent.  

References

Winners : Great Games Giveaway 2021

Photo by Vlad Cheu021ban on Pexels.com

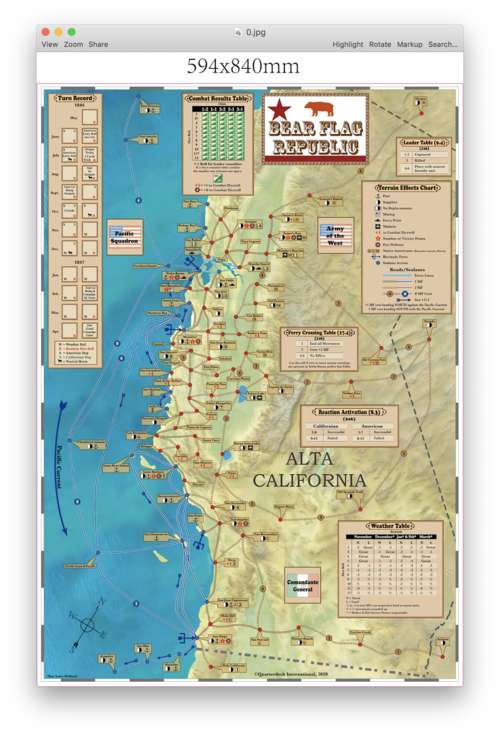
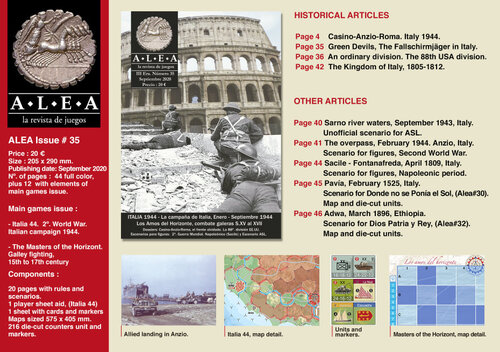
Worldwide Prize #1Bear Flag Republic and ALEA 35 Magazine (with Italia 44 & The Masters of Horizons).  Quarterdeck gives a Shipping Allowance of $30, the winner will pay the difference to Quarterdeck before shipping.
Prize #1 Winner : Cole Mills (USA)

Worldwide Prize #2: From Salerno to Rome (ziplock).  Quarterdeck gives a Shipping Allowance of $30, the winner will pay the difference to Quarterdeck before shipping.
Prize #2 Winner : Ray Newbert (USA)

Hong Kong Prize: Bear Flag Republic, shipped FREE
HK Prize Winner : Michael Chan (HK)

A huge thanks to everyone for the overwhelming response! Thanks also to Jack Greene at Quarterdeck International for his generosity. Congratulations to the prize winners. Here’s to a happy and healthy 2021 to everyone, all the very best to you and yours.

@Prize Winners: I will be in touch today by email and will hook you up with Jack Greene for the prizes. If you don’t see an email from me within 6 hours of this post, please let me know.

RbF I-3 South Park After Action Report (AAR) Advanced Squad Leader scenario

RbF I-3 South Park After Action Report (AAR) Advanced Squad Leader scenario 

Scenario Background

It’s December 22 1944 in Senonchamps (Belgium), not too far from Bastogne.  According to the scenario’s “Historical Perspective”, this was a lightly defended American artillery park.  


(Photo : ASLScenarioArchive.com)

(“The Ardennes, 1944-1945: Hitler’s Winter Offensive”)

Victory Conditions and Tactical Considerations

The Americans started the game with 3 HS and 2 crews but a lot of hardware : an MMG, a baz, 2 x M55 (quad .50-cal carriage with 24FP), 2 Stuarts, 1 Sherman and 2 jeeps (with MMGs).  They have 1x M1A1 “Long Tom (155L) and 2 x M1 (155) howitzers.  Getting tagged by a “One-Five-Five” means 30FP.  The good thing is that they start unmanned.  They would remain so until they got LOS to known German units.  7 US squad would show up on Turn 4 as reinforcements along with 2 leaders and more toys.  

“Kampfgruppe Kunkle” showed up with 6×548, 6×447 with 3 leaders.  They got a STuG and a STuH42 (105) backing them up as well.  

EC’s Wet with Heavy Falling Snow.  So the Americans could try torching some of the buildings but it wouldn’t be the easiest with the lack of personnel and the Wet EC.  Heavy Falling Snow means a +1 LV that would get worse with an additional +1 LV from Turn 5.  There’s however, no Ground Snow, so Smoke is in play.  The Stuarts can’t do much to a STuG front but I would have the STuH or a panzerschreck covering the flanks at all times.  The Quad .50-cal with its ROF3 is probably great for DI shots. We need to be careful about the Sherman with its fast turret and TK14.  Bazookas have TK16, we should stay away from those as well.  We would use assault guns as assault guns as much as we could.  I wondered what he planned to do with those jeeps, ie for mobility or (scrounged) firepower?  They wouldn’t be able to cross those bocages though.  

The Germans have two ways to win: 

* Win immediately if they capture/destroy all 3 of the guns
* Win at Game End if they hold onto the 4 VC buildings

StuH 42 from 242 StuG Abt

After Action Report

Advanced Squad Leader scenario RbF I-3 South Park

I decided to NOT engage the Artillery pieces until we absolutely had to.  The alternative was to “race” down the hill and across the open field with bocages in the way and in the face of heavy US firepower.  The first problem was one of the Quads.  It ripped squads off our OB through +1 Heavy Falling Snow and smoke we laid down.  We finally got to rush it and kill it in CC.  The STuG got out on the flank to keep the 17MP Stuart from squirrelling around our left.  I made sure it’s covered by the STuH from behind.  The Americans decided to abandon their jeeps and ripped off the MMGs.  I wanted to kill one of the Jeeps but the Stuart was a priority.  The other Stuart went around the back into my axis of attack.  The Sherman moved into.  My right’s got panzerschrecks lined up but they didn’t have to know that, did they?  

Advanced Squad Leader scenario RbF I-3 South Park

I had one more turn before proper Americans show up so I was racing those units down the street.  Their Stuart got a little too close and so I stopped the STuH in front of it and shot it with a HEAT round.  The Sherman decided to back off and got immobilised by an ESB roll.  However it’s right next to the last VC building so it was a good place to be!  I fought the urge to make my STuG “more useful” but kept to the discipline of covering the STuH.  Oh, my 9-1 went heroic.  Not sure if it’s a good thing ‘cause hero’s don’t break, they wound and they die.  The units with the US “Baz 44” and the “MMG” right of center were in fact, German.  The other Quad realised it’s going to be out of the game and the gun crew tried desperately to drag it along.  I got to keep this Quad out of play.

Contrary to what you see in the picture, the guns hadn’t yet seen us, and were not crewed yet.  

Advanced Squad Leader scenario RbF I-3 South Park

We sneaked up on the immobilised Sherman with a shreck but it took us 2 phases to shoot it pointblank.  Some pretty ominous ginormous American stack moved up to our last VC building though.  The mods were +5 but we took no comfort in light of the 36FP.  The STuH pumped rounds into the stack but was ineffective.  The big US stack broke our occupant of the last VC building and put us into a position of having to win it back.  Meanwhile squads rushed the middle One Five Five.  Miraculously, it broke the 2 squads but left an 8-0, the heroic 9-1 and a captured bazooka in front of the howitzer.  The STuG went wide, decided that shooting in the +2 LV environment was no longer ideal, prepped itself for a final Overrun of the leftmost (top of the map) gun.  

Advanced Squad Leader scenario RbF I-3 South Park

The heroic 9-1 led the final attack with a +6 shot that connected with the One Five Five.  The IFT effects shot vaporised the crew and the random destruction roll vaporised the gun as well.  Two more to go!  The STuH opt’d for a HEAT shot against the Americans inside the last VC building.  That shot connected as well but it only succeed in breaking the leader and pinning the squad!  We would have to do it the bloody way.  The Americans couldn’t crew the leftmost gun (top of map)!  Feeling luck on its side, the STuG proceeded to overrun the left gun not once but twice!  Unfortunately It only succeeded in breaking its main gun.  Folks did managed to rush up to the 2 remaining guns without a scratch.  Things looked as if they might work out in close combat.  

But it was not to be.  We had a 2:1 attack on one of the Guns but boxcar’d the roll.  All eyes then turned to the last VC building.  3 squads and a concealed leader ambushed the pinned US squad.  Unfortunately we rolled a 5,6 which couldn’t evict the occupants.  The Germans lost.

How’s this Scenario Interesting?

This is a very tight scenario that offers a number of tactical choices.  If I play it again, I might well try a run down the left and go for the 3 guns through the bocage.  The other Quad will be just as tough to content with and I can’t leave it on my flank.  The Germans had a tight schedule to meet.  The two sides had very different forces to play with, which makes it very interesting also.  I really have to give it to my opponent though for hanging tough through it all.  Once reason why the Germans lost is that it couldn’t push past the last VC building before the American reinforcements entered on Turn 4.  

I really like this scenario.  
Advanced Squad Leader scenario RbF I-3 South Park After Action Report (AAR)

Great Games Giveaway 2021 : Jack Greene

Great Games Giveaway 2021: Jack Greene

quarterdeck international

Since none of us have enough quality games on our shelves, Jack Greene of Quarterdeck International is giving a few great games away to usher in 2021!

Three Great Prizes: Two Worldwide & One to Hong Kong

Worldwide Prize #1: One winner worldwide gets Bear Flag Republic and ALEA 35 Magazine (with Italia 44 & The Masters of Horizons).  Quarterdeck will give a Shipping Allowance of $30, the winner will pay the difference to Quarterdeck before shipping.

Worldwide Prize #2: One winner worldwide gets From Salerno to Rome (ziplock).  Quarterdeck will give a Shipping Allowance of $30, the winner will pay the difference to Quarterdeck before shipping.

Hong Kong Prize 🇭🇰 : One winner with a Hong Kong shipping address gets Bear Flag Republic, shipped FREE (note below for special instructions when entering)


How To Enter:

Between Now and Jan 15 2021 Eastern Standard Time…

Leave a Comment under this Post, you are then eligible for the Worldwide Prizes

Got a Hong Kong shipping address?  You are also eligible for the Hong Kong Prize, add “HK” in your Comment.

Results Announcement: 

HongKongWargamer will draw and announce the winners on the Jan 16 2021 weekend.

Don’t Miss Out.  Leave a Comment.

Fine Print : When you enter this games giveaway, you agree that HongKongWargamer has the final say on all disputes.  Just sayin’