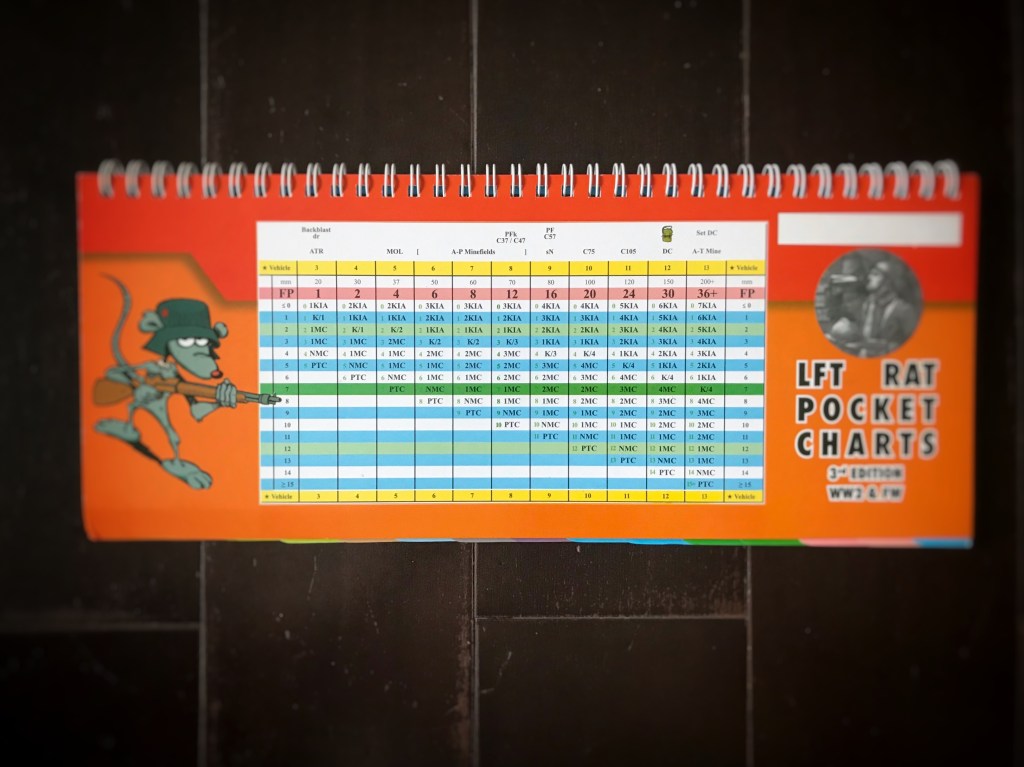
BoF8 Sting of the Italian Hornet – Advanced Squad Leader AAR
BoF8 Sting of the Italian Hornet Scenario Analysis & Setup
The Victory Conditions (“VC”) for the Canadians (Edmonton Regiment, 1st Canadian Infantry Division):
- Control buildings 10Z6 & 10oDD3, which are the two big 4-hex and 5-hex buildings (factories) on the left half of the map
- Control 7 or more other stone buildings on board 10 (left half of the map)
The Victory Conditions call for “Control”, hence Mop Up should come in useful and therefore I should avoid No Quarters and take prisoners where possible. Besides, Prisoner Interrogation is in effect, which would be useful considering the AP Minefields and the two Fortified Building Locations in play.
The Canadian right offers more VC buildings and is less open. It also offers more rally terrain for the attackers. The Canadian left is more open, has more ground to cover and has fewer VC buildings. However, it offers a route to the flank and the side of the VC buildings on the right. There’s really only one logical spot for the OBA Observer, which is on the Level 3 Steeple on the right half of the map. I would put a heavier force on the left to hook around the closest factory on the right, as I didn’t have an abundance of time to take the 7 other stone buildings. Besides, we had Italian reinforcements coming in on Turn 4.
Italian AFVs are all Open Tops, which make them fine OBA targets. The 90L Semovente M41M da 90/53 has a frightening TK 20 vs my best armour of 8. However, it’s an SPG with no turret and it’s a circled B⑨ unless the Italians swap one of their SMV L40 47/32 for an ammo vehicle. The Italians also get two 75 ART guns with TK 10 (IFT 12) and s8. I would need to sniff them out with the Stuart Recce’s. Otherwise, the Italian infantry doesn’t have a real numerical advantage, but has an atrocious ELR1. (“Take them all prisoners!!!”).
The Canadians have three Shermans which are solid as long as they don’t get flank shots. Their infantry has a morale of 8 and plenty of Smoke to tackle the Open Ground. The Stuart Recce’s would mill about, interdict, cut rout paths, chuck vehicle Smoke Grenades, encircle & overrun (AAMG 8 = 16 OVR FP!).

(Above: Semovente da 90/53, graphic credits Tank Encyclopedia)
BoF8 Sting of the Italian Hornet After Action Report (AAR)

The game opened with our Canadians laying a bit of Smoke on the right and advancing amidst the diagonal set of Woods. An Italian 9-1 led “Death Star” opened up, stunned a Sherman and broke the HS passenger in a Stuart Recce! The force on the left fared better. A Sherman pushed down the left until a Cannone da 75/27 popped up and took a shot. The shot bounced off and the Sherman stopped to the side of the 75 ART. The Stuart Recce saw that, sped past and stopped on the left flank near the Woods. One lucky squad found a minefield. The rest moved without too much drama. Our sniper went to work and stunned a SMV L40 da 47/32 at the back. The 90L took potshots at the Steeple where my OBA Observer was. As a final touch, another of our Shermans was STUNNED when its commander lost his head when another Italian “Death Star” opened up! This one’s going home.

We dropped Harassing Fire behind the Italians front line. The 80mm OBA translates to 4FP, but that Shocked the 90L. It also started flames in one of the building hexes. On the right, the infantry routed the gun crew and got right in front of the right VC factory. The Sherman parked itself in bypass to cover the area behind the left VC factory. Canadians on the right walked into the other 75 ART and broke under fire, the Stuart Recce OVR the Gun and it malf’d in FPF. The Stuart on the right went over in support and now we got around to the back of the right VC building on the far side as well. The Italian inside resisted with fierce firepower and they sent their L40 in there for good measure. The leading Canadian 9-1 was KIA’d and troops broken when they tried to break in!

We continued to push amidst strong Italian resistance on the left, but their brokies were stacking up as well. We made an end run around the left VC factory to the row house beyond. Unfortunately, there’s a stack of Concealed defenders in the stone building in the middle of the field that we simply couldn’t get at. On the right, we tried to push back into the VC factory. We slid a PIAT into the right VC factory next to the bogged L40 and toasted it in Advance Fire! Well, it’s good and bad ‘cause now it channelled our lines of attack to the defenders. We were running out of Good Order troops on the right, but we pushed a Stuart Recce deeper to keep the pressure on the retreating Italians in the buildings beyond.
That stunned 90L? It’s UK (‘Unknown’) and would be dead afterwards.

It’s Turn 4 (of 6.5) and we still hadn’t got either of the VC factories! The Italian pushed us out again (leaving our PIAT & MMG) of the right VC factory. We put the OBA down to keep the Italians at bay. We had folks pushing beyond into the buildings behind, but good order manpower was wearing thin. On the left, we made slow progress into the left VC factory. An intrepid HS drew the Ammo vehicle while a Sherman rounded the corner and appeared on its left.

A lucky WP CH from a hulldowned Sherman finally blew the top off the Concealed stack of defenders in the stone building in the middle of the field! The right VC factory caught fire from the burning L40 and the Italian defenders moved out of the factory. They now threaten the Canadian attackers on the left flank. A Stuart Recce went behind the defenders in the group of buildings on the right just to harass. In reality, the lone Canadian 8-0 leader needed to run back to rally the boys. On the left, the Italian reinforcements got onboard. The Canadians were about to dash across the street from the rowhouse to capture a stack of Italian brokies. An 8-1 leader advanced into the street and took the WP’d brokies prisoners as well (most of them anyway). A Sherman moved forth and killed the Ammo vehicle and popped to the back row to threatening the Italian Renault on its left.

It’s Italian Turn 5, and we killed or captured most of the Italian OB. The Hero-led stack of defenders from the right VC factory dashed across to come up behind the Canadians attacking the left VC factory. Unfortunately, the Sherman broke everyone and wounded the Hero. Seeing that their Renault was about to be blown up the lone squad in the left VC factory was about to be dealt with and the Canadians having two Movement Phases left, the Italians conceded.


.JPG")
.JPG")
.JPG")


.jpg")
.jpg")


.jpg")


