DB058 Vossenack Church – Advanced Squad Leader AAR

DB058 Vossenack Church – Advanced Squad Leader AAR

Scenario Background

It’s 6 November 1944, some of the Panzer Grenadiers counterattacked after a major bombardment and tried to wrestle the Vossenack Church from elements of the US 28th Division.

Yes, it’s the Vossenack Church in BFP Objective Schmidt, or really, St. Josef Church.

UntitledImage

UntitledImageUntitledImage

(The church after the war © Rureifel Tourismus e.V.)

Victory Conditions and Tactical Considerations

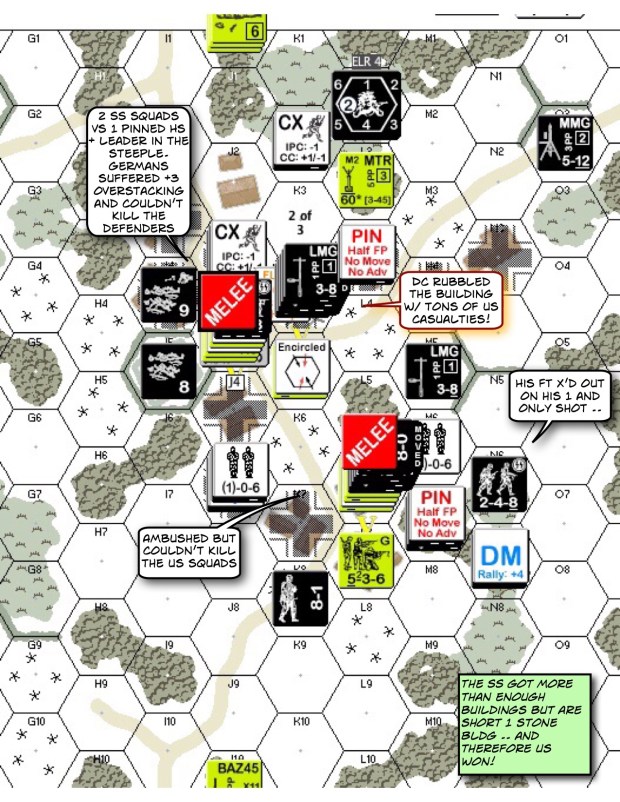
The Germans win at Game End by controlling the church, which is the building partially outlined in my map.  I had the 2 hexes outlined because they are treated as Factory Locations.  Of the 2 hexes outlined, the left hex has a Level 2 Steeple Location.  All hexes have Cellars. Hand-to-Hand CC may be declared in any location of the church which is scary for the Americans considering that the Germans has more than 2:1 on them in terms of bodies.  The Germans also get Winter Camo, which allows them to advance concealed.  The Germans get to setup on 3 sides of the Americans but the Americans are given control of 2 key buildings (Rear & Right) in the defense of the church.

I guess the Americans “can” kindle some of the jump off buildings but the EC is not conducive to that train of thought.  Not only that, it will be horrible if it starts snowing!

After Action Report

DB058 Vossenack Church

The Americans came under heavy attack immediately.  Folks with 8 morale are hard to content with.  The Germans on the top right advanced towards the back of the church but was largely stopped by the mortar designed to sneak shots off down that venue (top of the map).  However, my “Right” building was advanced on from both sides.  Good thing the Germans on the bottom right decided to break off and went to the left off the board instead.  On the top left, the .50 cal and the 9-1 of the HQ group kept their side of the church clean, for the moment.  The Panzer Grenadiers attempted to pushed directly towards the church’s graveyard.

DB058 Vossenack Church

The Germans got a foothold in the graveyard without breaking much of a sweat!  The Right building pushed off approaching Germans while keeping the MMG trained straight down the road to protect the front of the church.  Meanwhile the defenders tried to skulk as much as they could and kept up the volume of fire as the Germans approached.  Meanwhile the 8-1 thought it would be a good idea to hop up to the steeple with a bazooka (why, I have no clue, it’s not like he could fire the dang thing from up there without suffering backblast .. and as it turned out, there’s no cure for stupidity: the “factory floor” hexes are made for firing bazookas!). Towards the back, the Americans shot the German 8-0 on the top right but the Germans sniper took out the US 7-0 on the top left as well.  In the front, the Germans continued to pile across the road.  The Germans got a nice rally point setup in the trees behind 2 buildings which kept recycling rallied troops back towards the church. I gotta do something about that.

DB058 Vossenack Church

Sure enough our 8-1 leader in the Steeple got blown away by the evil Nazi death star!  That leaves NO leaders in the church to rally anyone.  At the same time, they were getting shot in the back as the Germans approach from the top right.  Over on the top left the MTR and the .50 of the HQ group took out the flankers.  Things got urgent as Germans broke into the church and continued to recycle rallied troops into the fray from their rally point! We were happy that the Germans were largely off our right and the rear though.

DB058 Vossenack Church

This was the last American turn.  The chaps chucked out a few smoke grenades which got the .50 cal team across the street and towards the left of the building.  We couldn’t afford to let the Germans keep streaming in!  Our mortar squad made it across the street nicely but was shot in Defensive Final.  There was no chance of getting folks from the Right building into the church so the choir boys were on their own.  Good thing that the intruding, shrek-yielding German HS was broken and designated back into the graveyard.  We got a HS with some German prisoners and some brokies in the cellar.  Leaders or not, there’s no chance of anyone getting rallied now.

DB058 Vossenack Church

The Germans made a final push into the church!!  The .50 cal was straight up scary.  The MMG in the Right building tried to setup a firelane but it cowered out of existence!  Good thing there were enough squads in the Right building to put down some residual.  The dice were BRUTAL!!  The only survivor to make it into the church (cellar) was an German 8-0.  A couple of squads were blown out of orbit at the rear of the church.  The Germans conceded.

How’s this Scenario Interesting?

This is a very nice and tight 4.5 turn scenario that plunges both players into action right off the gates. The American had to figure out a way to reinforce the church and to not loose too many bodies as they were outnumbered 2:1.  The Germans had to deal with a tight timetable and some merciless firepower.  They could use their winter camo to advance across the street concealed but they risk loosing on time if they do too much else.  Hand-to-Hand combat in the church promises a pretty decisive ending.  This is a great scenario well worth considering for inclusion to any tournaments.

FrF5 The Valley of Death After Action Report (AAR) Advanced Squad Leader scenario

FrF5 The Valley of Death After Action Report (AAR) Advanced Squad Leader scenario 

Scenario Background

The Soviets launched Little Saturn on Dec 16 1942, looked to destroy the Italian 8th Army and to cut off relieving forces to Stalingrad.  This scenario set in the Arbuzovka valley on December 23 1942 depicts Axis efforts to break out of the encirclement.  The Germans and the Italians did break the encirclement historically.  With 10,000 Axis dead, 5,000 wounded/ frostbitten and 10,000-15,000 taken prisoners, Italian soldiers called it the “Valley of Death”.  


Victory Conditions and Tactical Considerations

Elements of the Italian Blackshirt Brigade, Pasubio Division set up on the south (left of map) with 16 squads, 3 leaders, 1 HMG 1 MMG and 3 LMG plus 2 (little) mortars.  They were supported by 2 StuGIIIG’s.  The Axis suffered Ammunition Shortage but that didn’t factor much into our game.  The Russian 35th Guards Rifle Division set up to the north (right of map) with 5 458’s 3 447, 2 leaders, 1 LMG 1 mortar and 2 ATRs.  I took the balance in this game and so 3 527, a leader, a radio (70mm OBA) and a T-34 M41 showed up on Turn 2.  Both sides were to setup on non Hill hexes, so we both had to slog it up the Hills against Ground Snow.  

The Italians had 5.5 turns to get more unbroken (didn’t have to be in good order – could be in Melee/Berserk) non-crew infantry CVP north (right) of map than the Russians, provided that the Russians hadn’t destroy both StuGs.  I marked the “victory” line beyond which the Italians had to move on the first AAR map below with a blue dotted line.

The Italians outnumber us 2:1, plus they had more long range toys and 2 StuGs.  Our Russians had better quality troops but that’s a lot of map to cover, good thing the Hills were quite barren.  The Russians would have to rely on their higher morale of their infantry and the higher mobility of their T34 m41.  That T34 wouldn’t win any long range shootouts against StuGs.  We would try to fend off an amoeba attack and to not get caught in Close Combat.  


After Action Report

The StuG’s split off and went to both hills, threatening a pincer action, supported by a platoon each.  The platoon to the east (bottom) was of particular interest since it carried an HMG & an MMG.  I really couldn’t split off my troops since they were thin as it was.  I diverted 2 squads, a leader and an ATR to the west (top) and my T-34 to the left (bottom).  The rest of the Russians on the valley floor dutifully withdrew as their flanks were threatened.  Heck, the Italians on the hills were already shooting at my skulking Russians!  My T-34 got a lucky shot at the “heavy weapons” team.  Italians aren’t easy to rally.  I expect that to put them out of action for a little while.  (The blue dotted line is the goal line.)

Advanced Squad Leader scenario FrF5 The Valley of Death After Action Report (AAR)

I parked my T-34 on the highest point, went Hull Down and congratulated myself for how smart I was.  That didn’t last because a StuG went into a position to engage from the west Hills (top) while another StuG went to my left.  My TH was 6 (+1 BU +1 small) to the west Hill StuG but his TH was 8 coming back, and my HD wasn’t going to hold because of the StuG to my left.  Urgh!  I always thought “lone tanks die” and I was on track to prove this out again with my T34.  Hopefully the Russian squads rushing up the east Hill would save those treads! 

Good thing an ATR shot broke the platoon on the west Hill (perhaps we could meet the StuG alone then) and the heavy weapons guys on the east Hill went for R&R.  The Russians in the valley were slowing the Italians down some but they were moving forward still.  Our first Spotting Round went wildly off which didn’t help things.  I needed a nice Harassing Fire to shut that party down.  

Advanced Squad Leader scenario FrF5 The Valley of Death After Action Report (AAR)

The ATR team on the west (top) Hill went straight for the StuG, if it wanted to deal with us it would have to change VCA.  An ATR hit would immo on a 5, and if they pass their PAATC, immo the STuG on a 7!  But all that talk didn’t distract the west Hill StuG from our T-34.  

It’s time.  I knew my T34 couldn’t fire while being CE but we threw open the hatch and tried for a vehicular smoke grenade anyway.  Nada.  Well, there goes nothing.  We gunned the engines and sure enough the first shot whizzed by!  We pushed forward off the hill and the StuG intensive fired!  The shot came real close but that missed as well.  We couldn’t believe it!  Everyone in the tank screamed “GO GO GO GO!!”.  We thought about rounding to the back of the east (bottom) Hill StuG, DM’ing the Italian heavy weapons team and going HD behind the stone wall.  Unfortunately we wouldn’t get a first shot off anyway being CE and that StuG would have a chance to spin around and we would need a 5 to kill (they needed a 6 and they had a spare AFV).  We decided to make for the area behind Italian lines.  If the StuGs wanted to come for us they would have to go the “wrong” direction and abandon their infantry.  We stayed in motion behind some buildings, hidden from the west Hill StuG.  

Well, our ATR shot went wide, even when our guys were practically bracing the ATR against the side of the StuG!  “We can still go in and kill the thing!” someone yelled.  The 7-0 thought about it for a second and remembered how his momma always told him to not be a hero.  

Next turn came around and as you expect, the StuG started up. POW!!  The ATR team fired again and watched the round arc’d gracefully off to the distance.  The StuG overran the Russian team.  They survived somehow and rolled around for their CC Reaction Fire.  This one’s tough ‘cause the StuG’s moving but they managed to immo the StuG with its gun pointing in a not so useful direction.  

The radio guy got Harassing Fire down properly in the valley as well, catching the Italians in the open.  The Italians conceded.  

Advanced Squad Leader scenario FrF5 The Valley of Death After Action Report (AAR)

How’s this Scenario Interesting?

Classic quality versus quantity?  The pair of StuG’s could be tough to deal with.  I thought I’d just run that T34 around (and not stopping) and lean on my superior mobility, cut rout paths and stuff.  I wouldn’t win shooting matches with either of them.  Putting Italians on the hills made it challenging for the Russians as they didn’t have the bodies to spare.  StuGs were there to lay smoke I think, without which the Italians couldn’t move safely. The Italians also shouldn’t mass up because of the OBA and so spreading them out might well be the way to go.  Some Italians might break but the Russians couldn’t shoot them all.   The StuG should do what assault guns were meant to do: shoot smoke rounds from the back and keep the T34 from getting cute.  They shoot way better at a distance anyway.  I took the balance because it’s largely an Italian win on ROAR but I can see how tough it was for my opponent.  

References

Six guys in a Steeple against the World!! (DB132 One Last Victory)

This is a particularly interesting Advanced Squad Leader (ASL) scenario.  As the SS, having Assault Fire should tip you off to the fact that they should move as fast as possible in spite of heavy American firepower. At one point I had broken SS all over the board but we recovered and got to the last turn barely “on time” for the jump off!

The last turn was classic ASL: keep in mind I needed to get 2 of the 3 key buildings.

A Hero placed a DC in of the VC buildings.  That thing blew up with a original KIA and rubbled the building!  (YEAAAHHH)  The Americans had a 9-X Leader and a couple of squads on the Ground floor. It was bad.

I got my FT HS within 2 hexes of another one of the VC buildings, while under Concealment no less!  This HS X’d out the FT on the first shot!  These guys hadn’t done a thing all game and X’d out the FT on the only shot they got!!

The rest of the SS’s Advanced Fire was ineffective apart from pinning a couple of squads.

I had to win one of two CC’s to win the game.  In the first one,  the SS ambushed the Americans but boxcarred the roll.  Okay, I need to win one of one CCs .. then I realized I had a problem.

I had 2 SS squads at the bottom of the church where a pinned HS and an 8-0 got holed up in the Steeple.  Normally, this would have been the easiest CC to do.

But it’s a Steeple.

My 2 SS squad had to take a +3 overstacking penalty going in, so it’s a 3:1 or 8 +3, needing to roll a 5 (or really a 4).

I rolled an 8.

Notes:

  • Read the VC carefully: the German player needs at least 12 building which includes 1 of 3 buildings around hex D2 (in the back) and 2 of 3 stone buildings around hex J4.
  • Part of the German OB are reinforcements that will show up between Turn 1 to Turn 3.  They are good for keeping the Americans in place and also to grab a building around hex D2 in the back.
  • Keep in mind that the Germans have Winter Camouflage amidst Ground Snow .. ie if needed, they can Advance into Open Ground without losing Concealment (against ridiculous US firepower).
  • We completely forgot about SSR#5 Interrogation
  • That Steeple (J4) is useful in that it keeps an oversized contingent of SS from piling in.  The SS best focus on the other 2 stone buildings around hex J4.

blank 143 page-01img_3939

Next in the countdown: DB131 A Thorn in the Side!