BFP23 Prelim to Death Night – Advanced Squad Leader AAR

BFP23 Prelim to Death Night – Advanced Squad Leader AAR

Scenario Background

The 2nd Armor Divison “Hell on Wheels” broke through to the Germans’ rear in Operation Cobra and put the German 84th Corps in a pocket.  The Germans
started to disengage and to withdraw.  The 17th SS Panzergrenadier “Götz von Berlichingen” was one such unit that ran into an American blocking position held by the 41st Armored Infantry Regiment at St Martin de Cilly at around 0430 on 29th July 1944.

Victory Conditions & Tactical Considerations

Stabswache de Euros Waffen SS NormandyThe Germans need to get at at least 12VP at Game End to win.  VPs are earned by occupying buildings on the right half of the map.  Each VP corresponds to the # of ground hex locations a building occupies, the exception being the long wooden rowhouse which is only 3VP and not 5.  This being early in the morning, there’s a +1LV for the entire game.  The bocages are Light Bocages, meaning they are half height obstacles, don’t throw a blind hex behind and are not as onerous to cross.  A particular evil element to note are the few Up-Slope hexes in the German setup area that allows them to look beyond the Light Bocages.

The Germans set up with 15 squads, 4 leaders (3 with -1) and a Hummel sporting 150mm HE but with a B10.

The American set up with 10 squads, 2 HS, 4 leaders (2 with -1), a pair of HMG and a pair of bazookas.  They can also set a squad up HIP, which I didn’t do and kept my opponent looking til mid game.

The Germans have great leadership, great morale, the +1LV and the Hummel going for them.  The Americans would need to break off and head back to the village safely.   The lack of rout locations by the bocage concerned me.  I thought about largely giving up the bocage and setting up the majority of my OB in the village.  Considering the Germans should have to fight the clock as well, that seemed too much to give.  So I lined the bocage with units, put the two HMGs on the flanks in the village and the two MMGs high up in overwatch.  They had grain hindrances and better morale, but we had grain hindrances plus bocage.  We hoped to kill their timetable by breaking a few or encouraging most to Assault Move/ Advance concealed.

Advanced Squad Leader AAR

BFP23 Prelim to Death Night After Action Report (AAR) Advanced Squad Leader scenario

SS units were building a firebase on the up-slope on our right (top of map) but we drove them back with some lucky shots.  We thought of chasing after those brokies but the SS still had enough firepower to take an issue with that.  Our center was getting knocked back though, those chaps routed into the woods.  The right started to fold towards the center as well so as to get some cover when they fall back.

On our left we were able to knock back a stack of SS troopers as well.  They came through the line of orchard so as to get some cover from our MMG overwatch.  Our MMG went after the Hummel but to no avail.  As a matter of fact, I had our sniper parked right next to the Hummel but I think he’s on leave this whole game.

BFP23 Prelim to Death Night After Action Report (AAR) Advanced Squad Leader scenario

Our MMG overwatch on the right (top) kept knocking the SS brokies back, that allowed the rest time to scamper back into the village behind the woods.  We moved the HMG team up top get ready for when the SS eventually bust through those trees.

On the left (bottom), their Hummel landed a smoke round in front of our building.  While we held onto the bocage Wall Advantage, the squads filed into the building back into the village.  The Hummel (on up-slope) could see everything beyond the bocage, so there weren’t a wide choice of escape routs.  The SS has 4 MPh’s to go, we wondered if we withdrew into the village too quickly!

BFP23 Prelim to Death Night After Action Report (AAR) Advanced Squad Leader scenario

The SS spent Turn 4 regrouping and were successful enough to look menacing on my right flank.  We kept the HMG towards the middle but put our MMG out to the flank to prevent any SS men running around doing house grabs.  We envisioned two firelanes covering our right.  What’s tougher to cover would be our center, especially where the “Y” shaped wall was.   Having said that, we sent 2 HS to the left flank because the SS were already in the front building.  In retrospect, it’s probably not the smartest move.  However having done the VC count, I knew my left had more points up for grabs than my right.

On the left, we moved the MMG and HMG in from the side.  There’s still the possibility of a crazy SS run around the flank there but we would need the firepower to blow the SS away from our houses.

The Hummel moved up, threatening our right.  My opponent’s probably still wondering where my “HIP’d bazooka HS” was.

BFP23 Prelim to Death Night After Action Report (AAR) Advanced Squad Leader scenario

Axis Turn 5 was tiring!!  They opened with a big 20+4 shot to my HMG team but thankfully it didn’t work out.  The Hummel laid smoke on my right (top) and three stacks of SS men kept streaming out from behind the woods like crazy shoppers on Black Friday!  We put down residual/ firelanes the best we could.  As predicted, a big stack of SS men broke into our center and threatened to jump a couple of buildings in HtH.  Good thing our luck held, and we broke/ pinned that 9-2 stack in Defensive Final.

On our left, the SS pushed against our green wall and killed a squad in HtH.  Good thing they still had a stack of “unralliable” brokies out behind the bocage!

BFP23 Prelim to Death Night After Action Report (AAR) Advanced Squad Leader scenario

Last US turn and most of us decided to stand and shoot, which got us good results on both flanks.  We did move a 6ML squad off to the right because they wouldn’t be able to stand up to pointblank fire anyway.  It could shore up our right if anyone breaks.

The SS conceded before we advanced back into some of the “lost” buildings hexes.

Download

How’s this Scenario Interesting?

2c310027f884cc9a8b73034ed5901fb6

I honestly had the best of the dice in this whole scenario.  The Americans had high firepower but 8ML SS squads with a +1LV shouldn’t have broke as much as they did.

This was a tight little scenario where neither side could play it safe.  The SS needed to bust through the bocage quickly and the Americans needed to run away fast enough to get back into the village in force.  Had the American line at the bocage collapse one turn earlier, we would be in town doing CQB with the SS, were they would get equivalent cover and we would suffer for our lower morale.

The Hummel threatened to collapse buildings and it did put the fear of God in us.  However, I think my opponent used it smartly – primarily for Smoke.  Too bad I couldn’t come close to put it under any threat!

DB058 Vossenack Church – Advanced Squad Leader AAR

DB058 Vossenack Church – Advanced Squad Leader AAR

Scenario Background

It’s 6 November 1944, some of the Panzer Grenadiers counterattacked after a major bombardment and tried to wrestle the Vossenack Church from elements of the US 28th Division.

Yes, it’s the Vossenack Church in BFP Objective Schmidt, or really, St. Josef Church.

UntitledImage

UntitledImageUntitledImage

(The church after the war © Rureifel Tourismus e.V.)

Victory Conditions and Tactical Considerations

The Germans win at Game End by controlling the church, which is the building partially outlined in my map.  I had the 2 hexes outlined because they are treated as Factory Locations.  Of the 2 hexes outlined, the left hex has a Level 2 Steeple Location.  All hexes have Cellars. Hand-to-Hand CC may be declared in any location of the church which is scary for the Americans considering that the Germans has more than 2:1 on them in terms of bodies.  The Germans also get Winter Camo, which allows them to advance concealed.  The Germans get to setup on 3 sides of the Americans but the Americans are given control of 2 key buildings (Rear & Right) in the defense of the church.

I guess the Americans “can” kindle some of the jump off buildings but the EC is not conducive to that train of thought.  Not only that, it will be horrible if it starts snowing!

After Action Report

DB058 Vossenack Church

The Americans came under heavy attack immediately.  Folks with 8 morale are hard to content with.  The Germans on the top right advanced towards the back of the church but was largely stopped by the mortar designed to sneak shots off down that venue (top of the map).  However, my “Right” building was advanced on from both sides.  Good thing the Germans on the bottom right decided to break off and went to the left off the board instead.  On the top left, the .50 cal and the 9-1 of the HQ group kept their side of the church clean, for the moment.  The Panzer Grenadiers attempted to pushed directly towards the church’s graveyard.

DB058 Vossenack Church

The Germans got a foothold in the graveyard without breaking much of a sweat!  The Right building pushed off approaching Germans while keeping the MMG trained straight down the road to protect the front of the church.  Meanwhile the defenders tried to skulk as much as they could and kept up the volume of fire as the Germans approached.  Meanwhile the 8-1 thought it would be a good idea to hop up to the steeple with a bazooka (why, I have no clue, it’s not like he could fire the dang thing from up there without suffering backblast .. and as it turned out, there’s no cure for stupidity: the “factory floor” hexes are made for firing bazookas!). Towards the back, the Americans shot the German 8-0 on the top right but the Germans sniper took out the US 7-0 on the top left as well.  In the front, the Germans continued to pile across the road.  The Germans got a nice rally point setup in the trees behind 2 buildings which kept recycling rallied troops back towards the church. I gotta do something about that.

DB058 Vossenack Church

Sure enough our 8-1 leader in the Steeple got blown away by the evil Nazi death star!  That leaves NO leaders in the church to rally anyone.  At the same time, they were getting shot in the back as the Germans approach from the top right.  Over on the top left the MTR and the .50 of the HQ group took out the flankers.  Things got urgent as Germans broke into the church and continued to recycle rallied troops into the fray from their rally point! We were happy that the Germans were largely off our right and the rear though.

DB058 Vossenack Church

This was the last American turn.  The chaps chucked out a few smoke grenades which got the .50 cal team across the street and towards the left of the building.  We couldn’t afford to let the Germans keep streaming in!  Our mortar squad made it across the street nicely but was shot in Defensive Final.  There was no chance of getting folks from the Right building into the church so the choir boys were on their own.  Good thing that the intruding, shrek-yielding German HS was broken and designated back into the graveyard.  We got a HS with some German prisoners and some brokies in the cellar.  Leaders or not, there’s no chance of anyone getting rallied now.

DB058 Vossenack Church

The Germans made a final push into the church!!  The .50 cal was straight up scary.  The MMG in the Right building tried to setup a firelane but it cowered out of existence!  Good thing there were enough squads in the Right building to put down some residual.  The dice were BRUTAL!!  The only survivor to make it into the church (cellar) was an German 8-0.  A couple of squads were blown out of orbit at the rear of the church.  The Germans conceded.

How’s this Scenario Interesting?

This is a very nice and tight 4.5 turn scenario that plunges both players into action right off the gates. The American had to figure out a way to reinforce the church and to not loose too many bodies as they were outnumbered 2:1.  The Germans had to deal with a tight timetable and some merciless firepower.  They could use their winter camo to advance across the street concealed but they risk loosing on time if they do too much else.  Hand-to-Hand combat in the church promises a pretty decisive ending.  This is a great scenario well worth considering for inclusion to any tournaments.

This happened : AP137 Fear Naught Turn 3 of 6.5 (AAR)

AP137-003-Brits Jan 04 01 copy

AP137 Fear Naught Turn 3 of 6.5

German Turn

  • Panther G slid over into the view of my Churchill (where the 8-0 and “Motion” counter is) and stopped, spending only 2 MP in my LOS.
  • Panther G TK23 vs Churchill’s front AF14
  • Churchill crew woke up! Popped Smoke Mortar – got it. Rolled for Motion .. got that too!! Spun the tank around, ready to leave in my turn coming up.

My Turn

  • Moved a squad into the house next to the Panther, survived the vehicle MG shots.
  • Ran the 457 to the front of the Panther, the Panther shot and malf’d its MA!!
  • The panicking Churchill saw what happened, turned back around, went into bypass next to the Panther G. Rolled for ESB to stop (‘cause bogging will stop me anyway).
  • The other Churchill in Q1 went into position up on Level 0.

My Advancing Fire

  • Churchill in bypass shot and HIT! TK14 vs AF6. DUD!!!
  • Churchill on Level 0 shot, NO HIT!

Advance & CC Phase

  • Both squads passed PAATC.
  • First one went in with a Streetfight bonus, NO KILL!!
  • POW!! The German snooglewoofer got stuck!! We live!
  • Second squad attacked, NO KILL!!

FOUR ATTEMPTS AND NO KILL!!

German Turn

The dang Panther turned around.

  • Churchill in bypass went for DI shot, need a 7, NO HIT!
  • Churchill up top went for a DI shot, NO HIT!
  • Piat went for a DI shot, NO HIT!

Meanwhile 2 German snakes + a 4 on a DC toss vaporized 3 British squads and a 9-1 …

… and it’s only the fourth day of the year ..

CH18 Raging Furnace

This week we started with an old design, CH18.  The Germans have to take 2 out of 3 hilltops and earn more CVPs than the Russians.  Aside from the standard CVPs, the Germans get points for clearing out the six hexes around the hilltops.  Likewise, the Russians get (a lot more) points if they can stay around the tops.

This scenario has a very interesting simultaneous setup with a die roll deciding who’d go first.  As my opponent quipped, going last might not be a bad thing as you can simply advance onto the hilltops.  The nature of this arrangement means opposing forces might “materialise” right in front of you at game start!  There’s an SSR that gives the defender in the first Prep Fire phase the ability to Gun Duel and shoot back.

The German entry edges are the top and the left.  However, since the Russians can only setup in the red circles.  Germans can attack from the right if they like, if they are comfortable with Russian reinforcements coming in behind them from the right and the bottom of the screen.

I am very mindful of a few things when I did my Russian setup.

  • I can’t win shootouts between the Russians and the Germans AFVs.
  • I can put my AFVs in trenches and thereby HD’ing them even to same level shots but that will condemn us to doing frontal shootouts (and the lost of all mobility) when the Russians really need to get in side shots to kill the German AFVs.
  • The high ground the Germans have on the top left will be used to sweep the hill tops, especially with the Tiger + Armour Leader
  • I can use my 76L artillery gun (s8!) and a combination of the Russian .50cal, the 10-2 (aka Jedi Master), the ATR and the Hero to setup a pretty good firebase on the bottom right of the screen to contest the hill tops a little.  That’ll be -3 out to 12 hexes and -2 out to 16 hexes.

img_3122
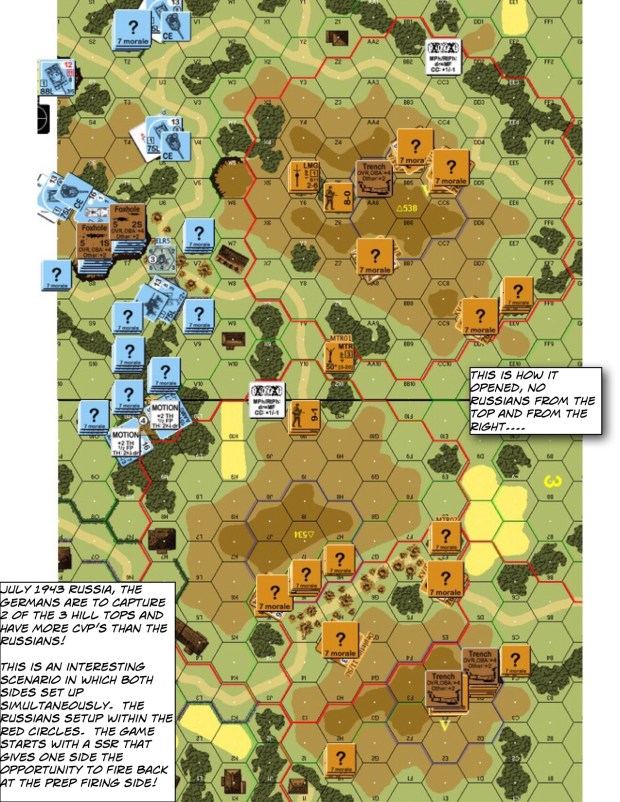
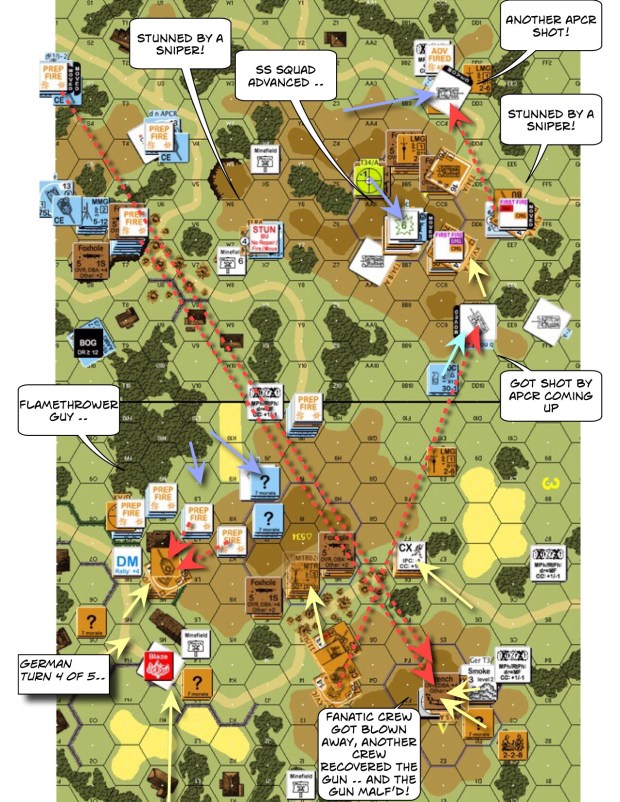
Ladies & gents – don’t be like me.  I misread the SSRs to this scenario and thought that German reinforcements can only come in from the top and to the left.  No – the German reinforcements come in from the top and the RIGHT and the Russian reinforcements come in from the bottom and the left.

Let me elaborate further.  This scenario has a rather creative SSR which allows you to purchase half your lost CVPs as reinforcements.  The restriction is that you can only purchase half the # of each unit type in your OB.

While my 76L Artillery (hill top on the bottom right) finally fixed itself and did a number on a German deathstar, my deployment was oriented towards attackers coming in from the left and not the right.  *Horror*

The Germans sent a STuG up Y9.  Since it’s bypassing the woods, it’s considered on the upper level.  Non Turreted as it is, its TH after all the modifiers was comparable to mine, even though all I had to do is to turn my slow turret.  I fired and missed, APCR and all.  He fired and connected.

The Germans then sent a STuG up “behind” us on the right, looking to take out the KV1 with the 9-2 Armor Leader.   Fortunately its’ within reach of the Hero & his ATR on the hill on the bottom right.  He directed the pinned HMG to stun the STuG crew.  The KV1 then swung his turret around and Shocked him.

Unfortunately, the Germans got rid of that Shock immediately after.  The KV1 now faced a choice : whether to run or to shoot the STuG again.  If I run, it’s quite likely that I will be shot.   If I stay and shoot, my TK is 13(+1) vs his AF of 8.  I have a 3 CVP 9-2 armor leader in this thing.

I shot, connected and killed the STuG, much to our relief ..

img_3130img_3147

One more German move to go and all three hill tops are still under Russian control, Germans resigned.