Advanced Squad Squad scenario AP139 Emergency Surgery After Action Report (AAR)
Background of the Scenario
This scenario from Action Pack 14 takes us to Chateau-Neuf, France, 4 August 1944. Patton’s Task Force A, supported by the Forces Françaises de l’Intérieur Bretagne, ran into a retreating element of XXV Armeekorps. The American cavalry units and the FFI were tasked with clearing this German blocking position.
Victory Conditions & Tactical Challenges
The Americans could win by one of two ways :
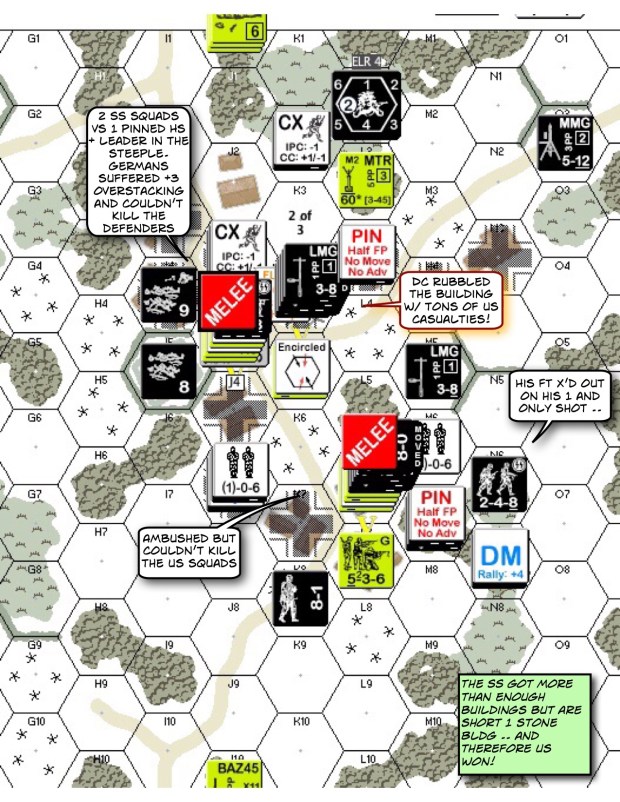
– at the end of any Game Turn: if there are more Good Order, non overstacked American infantry VP in buildings north of the river than there are Good Order German VP on the south side. Or
– at Game End: by having >= 20VP American north of the river
The Americans had 2 tank destroyers (M10), 2 armoured cars , 2 half tracks, 2 scout cars and 2 trucks. There were 3 bridges they can use: 1 Foot Bridge and 2 two-lane Stone Bridges. I decided that blocking the 2 Stone Bridges is a priority over the Foot Bridge. The Americans could still win by getting infantry over the Footbridge but there were only 6 US squads vs 10 German squads. They would have to whittle down the Germany Infantry first.
The challenging setup restraint of the day: Germans couldn’t setup on the top board, so they were all “up front”, with the Americans having the mobility advantage.
After Action Report
The fun bit about this scenario is that the Germans get to spend 15 points on Fortifications, picking from a table. I got myself 3 Road Blocks, 2 x 6 A-P mine, some Wire and a number of Trenches. The lovely bit about Trenches is that they are roadblocks to non tracked vehicles, meaning 8 out of 10 of their vehicles.
In terms of setup I located places to put the Road Blocks and situated everything else to defend the Road Blocks. Unfortunately the Americans didn’t spent much time trying to clear the Road Blocks but used their mobility to seek ways around them.

My right side was too thin and failed to muster at the buildings immediately behind them by the river. In fact, they couldn’t get out of there at all before the French maquis overwhelmed them. I made a careless move when retrograding my 9-1 MMG team and was CH’d by the M10 and vaporised. Another M10 went through the gap in the Bocage near the middle Bridge. The 7.5cm IeIG 18 (leichtes Infanterie Geschuetz: light infantry gun) appeared and killed it in a blinding flash of light but everyone then knew where it was (where the “DM” counter is amidst the red arrows). My left wasn’t touched at all and the troops started to run over towards the middle. Meanwhile my Germans on the right couldn’t make it off in time and was tied down by the maquis in melee.

The American armor broke through even though in one last act of defiance, a retreating German squad stunned an OT vehicle. The Americans in the middle started to rout the defenders and the second M10 made leaving problematic. We couldn’t make it close enough to the bridge to lay down any meaningful fire on it. (That blurb in the center meant to say “One squad here who COULDN’T find the LMG on the ground to save his life.”
The Germans conceded.
I knew backing off to the river bank is key but I couldn’t find the balance between holding the Attackers off versus withdrawing intact. That infantry gun didn’t last long either in spite of the +2 emplacement. Perhaps it’s too far forward but I couldn’t find a place (on the bottom map) where it could shoot across both stone bridges. I would have to pick one bridge and defend the other with panzerfausts and MGs. I should also have heeded the “natural” cavalry bias for open country and put more resources towards the right side of the map.
How is this Scenario Interesting?
This scenario is interesting because of the multi-faceted victory conditions that forced choices out of both the Attacker and the Defender. The Defender being given flexilibity in his fortifications made for an interesting puzzle as well. There are a range of possibilities you can try with this scenario. So folks, this is AP139 Emergency Surgery by Pete Shelling from MMP Action Pack 14 Oktoberfest XXXIV.