FT SmR1 Mired – Advanced Squad Leader AAR

FT SmR1 Mired – Advanced Squad Leader AAR

ASL Scenario Setup

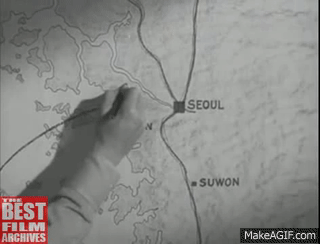
The KPA (North Koreans) wins immediately by amassing more than 30 CVP (56% of KMC CVPs / 46CVP ground forces + 8 CVP air support).

The KPA can also win at game end if they can stop the Korean Marine Corps (South Koreans) from

  • Controlling 1 or more of 3 Hilltop Defensive Perimeters (“HDP”), which are the hilltop areas outlined in color. You should see 4 outlined hilltops on the map but the 2 on the left are considered the same area.
  • Exiting over 18 Exit VPs down the bottom edge. The KMC carries 46 CVPs, which means we need to kill, break or delay 28 CVPs or 61% of the KMC OB.
  • Inflict over 30 CVP on the KPA. The KPA has 44 CVP, so 32% has to survive.

The KPA has more long-range weapons than the KMC. They have a small window (probably 3 turns) to inflict as much casualties as possible on the KMC from the start to when the KMC Air Support / OBA comes into play and when the infantry finally comes into range. The KMC has an OBA with an Offboard Observer (auto Radio Contact) at Level 5 and 4 planes with rockets, bombs & 12FP MGs for 4 turns out of 8.5. Any sort of KPA movement won’t be possible for half of the game. We expect to have to fight in place. All Fortifications would be on HDPs.

Given these factors, the KPA’s best bet seemed to be to amass all the range weapons onto the HDP Fortifications. Their goal would be to deplete the KMC numbers as quickly as possible before US Airpower and SW malfunctions wipe out their toys. They would also need to keep the KMC outside of 5 hexes for as long as possible by keeping them off Open Ground (and in Rice Paddies) where they would always be mindful of the Infiltration (HIP’d) units.

If the KMC gets to a position where it can exit 18 VPs down the bottom edge, chances are it will have captured at least one of the HDPs.

They can either hold till Game End or push ahead and exit VPs. Either way, they might continue to lose CVPs (especially if the KPA OBA remains operational). There might be KPA counterattacks, although the KMC will be in Fortifications this time. All considerations seem to point towards a HDP focused setup that puts all the KPA firepower upfront and in Fortifications since it won’t be a fighting withdrawal.

Advanced Squad Leader AAR

FT SmR1 Mired After Action Report (AAR) Advanced Squad Leader scenario

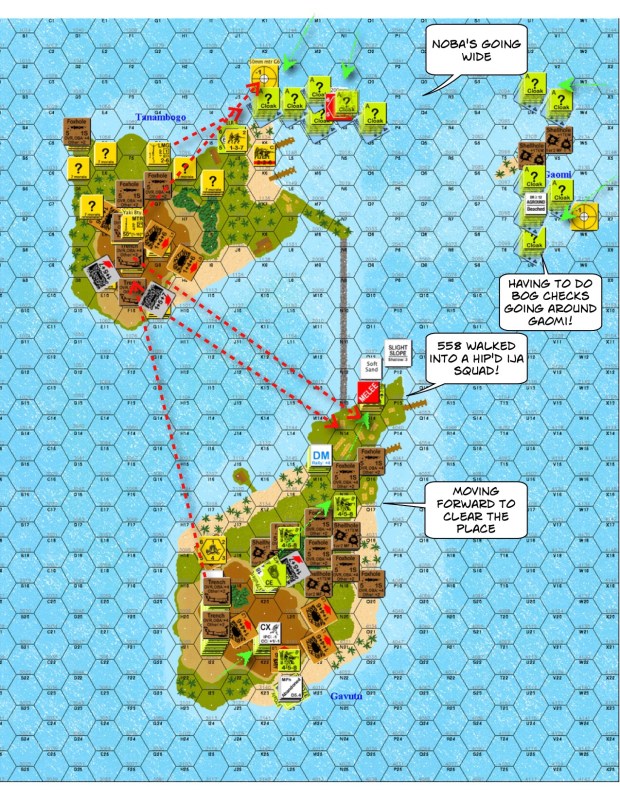
So the KPA put all the range weapons up on HDPs. The easiest HDP to take is the second (2 hex one) from the left. It has the best covered approach, and I didn’t cover that as well as I should. Our Infiltration teams were HIP’d very close to our positions. Given the lack of manpower, to use them as speed bumps would be a waste. At least this way, the KMC would look for HIP units around the rice paddies longer. Most of our Boresights were not on the elevated road/ rail, as we did not expect the KMC to use them. Our Observer was the leader from the Infiltration units so he’s HIP’d on the leftmost HDP with limited LOS to the village and to the “easy” HDP. We put our 45LL ROF 3 Gun on the right flank behind the Sparse Woods, expecting serious Pointblank shots. Unfortunately, I misunderstood Sparse Woods and thought I had LOS to the Open Ground beyond where I put its BS (illusions of ITT CH abound). That was not to be. An Infiltrating unit with an LMG held our left flank.

The KMC moved forward in a mass of HSs, putting most of its weight on the covered approach on my right. I immediately saw the errors in my ways, but there’s no second chance in ASL. Our range weapons started shooting almost immediately. It’s now or our peace would forever be held upon us.

FT SmR1 Mired After Action Report (AAR) Advanced Squad Leader scenario

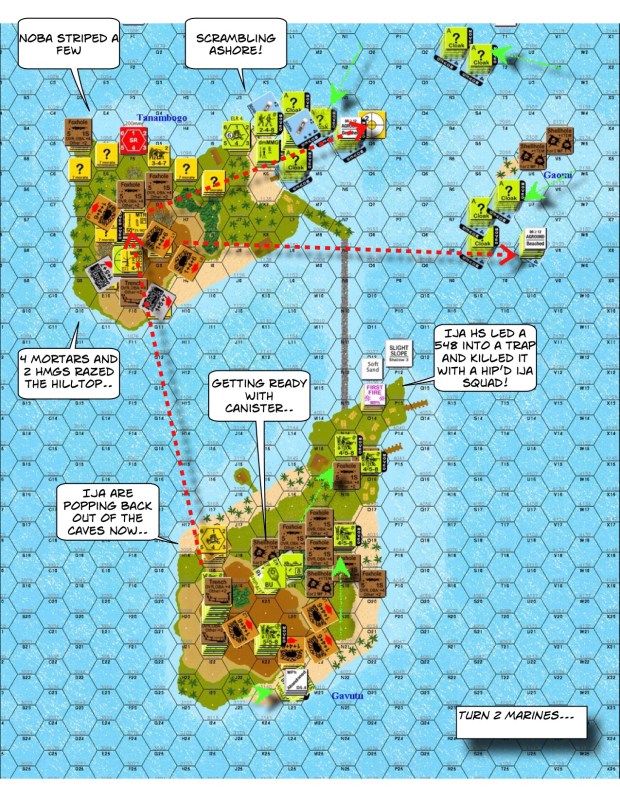
Turn 3 and “The Death Rattlers” were in the air. Two of them immediately took out our HMG. We were resisting the KMC HSs on the left and in the center. The KMC on the right was unfortunately streaming into the village, mindful only of our HIP units and our pair of mutually supporting but retreating Dummies. Our Observer called in a Harassing Fire mission on the village, which was akin to telling my opponent that there were no HIP units in the area. Our OBA was the 70mm variety, so it’s just 2+2 on the Thatched Roof Wood Buildings.  It made the KMC go around though, the dice gods were not to be tempted.

FT SmR1 Mired After Action Report (AAR) Advanced Squad Leader scenario

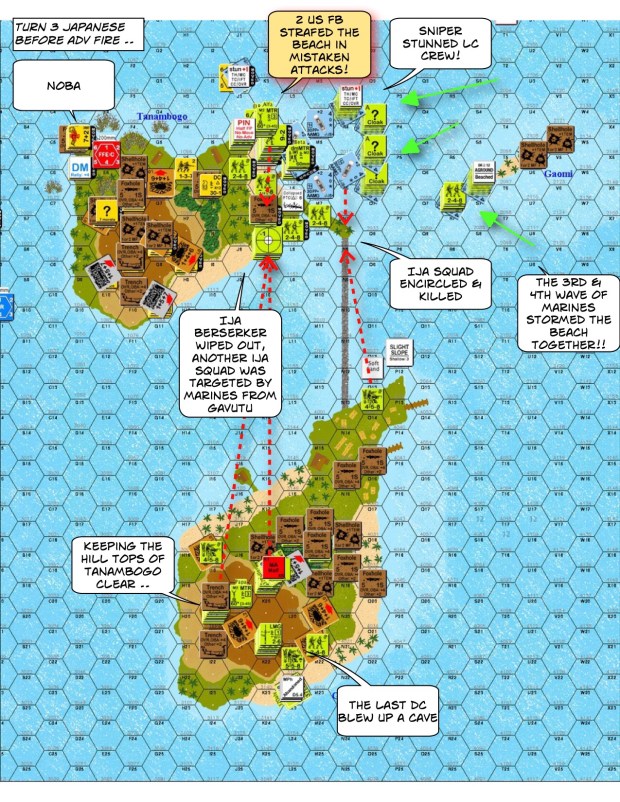
The Death Rattlers were on us both in their Prep Fire and in our Movement/ Defensive Final Phase.  Our 9-1 who had a memorable time with the HMG died of lead poisoning from a sniper. The valiant fighters on the middle two hilltops were all broken or dead. An Infiltrator at the second from the left hilltop sprang up and offered some point blank shots after the Dummy units moved (and faded away). The KMC OBA was finishing what the Corsairs started there. Our unfailing Harassing Fire missions protected our (now almost deserted) second from the right HDP. A pair of KMC HS came around from the back, unfortunately. The rightmost HDP tried to keep the wolves off them as much as they could from across the road. Our AT sprung into action, but we weren’t the best against the KMC at close quarters. The lights got dimmer.

FT SmR1 Mired After Action Report (AAR) Advanced Squad Leader scenario

KMC Turn 6 and two of The Death Rattlers had one more attack (the Strafing was worse than the Bombing / Rockets). The hilltops on the flanks were barely holding. We even had a couple of rallies for the last hurrah. The Observer, who boasted that his momma gave him no Red chits, finally lost contact with the battery. The KMC was kicking down the two hilltops in the middle.

FT SmR1 Mired After Action Report (AAR) Advanced Squad Leader scenario

The KMC broke through to our two hilltops in the middle. They broke most of our chaps at this stage and we simply didn’t have the strength to put together a counterattack to take a HDP back. The KPA conceded and the door to Seoul got kicked in at a cost of 18 KMC CVP.

PS If you are playing this as well, note that Foxholes (of which we had 6) actually offer a -1 Rallying Bonus when on HDP’s (Sm2.4). Something we missed.

FT S3 Last Stand on An-San – Advanced Squad Leader AAR

FT S3 Last Stand on An-San – Advanced Squad Leader AAR

Scenario Background

This is 26 September 1950.  Lt Col. Taplett’s (gent in the pic below) 3rd Battalion, 5th Marines fought southeastwards down the slopes of An-San/ Hill 296 towards the city (see the red circle on the map below, credit “Battle of the Barricades” by Col Alexander).  The North Korean 78th Independent Infantry Regiment and the 25th Infantry lead by Colonel Pak Han Lin put up a stout defence.

Battle of the Barricades Colonel Joseph H Alexander

Victory Conditions & Tactical Considerations

The KPA (North Koreans) started on Level 3 or above.  The Marines entered from the left of the map at or above Level 2.  In about 6 turns, the Marines should fight their way to Level 1, the KPA should fight to stay on Level 3 or above.  The KPA started with 2×447, 4×426 (conscripts), an LMG and a 8+1 Commissar.  The KPA counterattack force, comprising of 2.5×458, 2×527, 2×447, 3xLMG and 2 leaders enter from the right side of the map on Turn 3.  The Marines started strong with 4×768 3×248, 2xMMG, 1xBaz and 2 leaders.  They had a reserve platoon coming from the left on Level 5 on Turn 3 as well.  All units counted “Exit Point” style (“Good Order”) toward the Victory Condition, prisoners excluded. USMC wins on ties.

So the KPA had 31 VP vs USMC 22 VP in their OB’s.  The USMC would need to reduce the KPA force.  Soon it would mean tough decisions between putting your squads on your level to score vs going to your opponent’s level to prevent them from scoring.  The KPA had the last turn so we would have a chance to “Advance” back on Level 3.

Advanced Squad Leader AAR

BoF2 Polish Requiem After Action Report (AAR) Advanced Squad Leader scenario

The KPA was weak.  They were also forced to spread out in their setup.  The USMC could go anywhere and shoot anything.  The KPA had their Concealments easily blown, broke up by Assault Fire and Captured in CC.  Very quickly they pushed the KPA off Level 3 and took more than a few prisoners.  The area on the bottom of the map offered more cover for the counterattack, so naturally the USMC focused their forces there.

BoF2 Polish Requiem After Action Report (AAR) Advanced Squad Leader scenario

The original KPA defenders were no longer coherent as a force.  The way to Level 1 was wide open for the USMC on the top and the KPA  had only scattered remnants on the bottom.  However, the Marines weren’t on Level 1 on the bottom of the map yet.  I decided to send the stronger of my Turn 3 reinforcements to the top of the map and the weaker (and more short ranged) to the bottom of the map, just to keep the Marines off Level 1.  The boulevard’s gotta be where the Marines would make their stand with an additional -1, so we needed to cross before the Marines assemble in place.  So hopped along the river edge we did, to a point by the boulevard where there were orchard cover.  The KPA forces at the bottom of the map arrived in time to catch the defenders sent reeling by the USMC.  That (bottom, vertical) road’s where we would make our stand.

BoF2 Polish Requiem After Action Report (AAR) Advanced Squad Leader scenario

At the top of the map, we made it across the boulevard okay when the lone American squad cowered.  We decided to split into two groups and go around the USMC forces, to places where we could Advance up to Level 3.  We simply couldn’t do close range firefights with the Marines on Level 1.  The USMC would have to decide whether they would get off Level 1 where they needed to be to score in order to fight us.  At the bottom of the map we got in a few lucky shots that set some Marines back.  That probably got them more worried about the KPA making a rush for Level 3 rather than them trying to make Level 1.  Nonetheless, we would keep the line at the street.

BoF2 Polish Requiem After Action Report (AAR) Advanced Squad Leader scenario

At the top of the map, the USMC decided to keep their forces and hence their gains on Level 1.  No one’s coming after our eventual Advance onto Level 3.  We made a critical PREP at the middle of the map and broke one of the defending Fire Teams in the Woods.  That would allow at least 2 of our MMC’s to Advance up.  At the bottom of the map, our line of KPA conscripts held and so my opponent conceded.

How’s this scenario interesting?

This scenario represents an interesting problem for both sides and it really highlights the terrain in Seoul.  This is a multi-level fight amongst the Dense Urban Terrain.  If a unit’s CX’d, it won’t Advance up a level, so you have to time it right.  A KPA conscript unit has especially limited mobility in this terrain and you don’t want to be CX’d when you are Lax as a conscript (+2 Ambush).  I think USMC Fire Teams would be very useful here.  Fire Teams could block more venues up the hill and it’s not easy to break Morale 8 units in +2 TEM.  Plus each Squad, when broken into Fire Teams is worth 3 VP when it’s worth only 2 VP as a unit.  If every USMC squad’s deployed, the USMC OB is worth 28 VP (vs 22 VP undeployed) against the KPA’s 31.  Both players have to find the balance between pushing through and scoring points versus fighting the opponent on a different level to stop him from scoring.  While the KPA player has to fight uphill, there are more of them that can swamp up to Level 3.  This is a tight little puzzle of a scenario!

(Credits: Wikipedia)

FT S1 Sights on Seoul – Advanced Squad Leader AAR

FT S1 Sights on Seoul – Advanced Squad Leader AAR

Scenario Background

The time’s 25 September 1950.  The 1st Marines were to clear the massive barricade on the wide Ma Po Boulevard (left of map), the hill top (center of map) and clear the way to the rail yard on the top right of the map.

(photo credit : m1 pencil)

300px USMC 1st Battalion 1st Marines1st Marine 2nd Battalion440px USMC 3RD BN 1ST MAR 3

Victory Conditions and Tactical Considerations

This gets interesting.  There are two groups of 4 VC conditions each, you are to meet a total of 4 with at least 1 from each group.  On one hand you might feel it’s complex and it can use some good re-reads between turns, but on the otherhand, it keeps the North Koreans guessing as to what you might do next.

Group A involves taking some locations on the big hill top, controlling all 3 designated buildings on the right half of the map, exiting 10 VPs of Marines off 3 designated hexes on the top right or putting at least 28 FP on either/both of the Deep Embankment Streams (one top right and one bottom left).

Group B involves taking/eliminating the Ma Po Boulevard roadblock, some of the buildings inside the Normal School compound (left of map), capturing the Marine HQ on the hill on the bottom left and one of 2 other buildings and exiting 10 VPs of Marines off 5 designated hexes on the top left.

There’s an operational boundary down the middle of the map and left of the big hill through which the Marines can’t cross.  The Battalion Reserve shows up on Turn 4 and we have to decide which side to commit them to.  Once they enter, the Korean SAN goes up 1 level (and both sides have 2 snipers).

The Normal School sports High Walls that are 1 level high.  The North Korean’s got a secret breach in it that they could use.  The Ma Po Boulevard is a wide and dangerous place.  Units incur a -1 DRM to incoming fire on top of other modifiers.  The Deep Embankment Stream is a road + gully combo.  It’s not hard to get used to.  The Fanatic Roadblocks are massive affairs that makes North Korean units with Wall Advantage plus units in the Woods/Building on both sides Fanatic.  The brown hexes are all Steep Hills, ie they are Concealment Terrain.  Most of the little houses are Dense Urban Terrain.  They have effects on stacking & firegrouping (think Dense Jungle) and they prohibit bypass on some hex sides.  Lastly, take look at the road that on the right side of the big hill.  The back part’s (top) lower than the front part, which means it was difficult to interdict Korean units as they moved towards the Exit hexes.

The rules also introduce the use of Marine fireteams.  This became a critical element in this battle (apart from being able to swamp the defenders).

After Action Report

FT S1 Sights on Seoul After Action Report (AAR) Advanced Squad Leader scenario

The Special Rules allow 3 single hex 107mm mortar hits in the first Fire Phase.  I used them for White Phosphorus to cover the Marine’s entry onto the map.  On the left it was a quick push forward to the Ma Po Boulevard to see where the barricade was and to take the Marine HQ.  A platoon crossed the Deep Embankment Stream into the Korean Grave Yard and threatened to turn the flanks of the bridge defenders.  Unfortunately they were beaten back quickly.

On the right I planned to hit the big hill top once I get to the middle of the map where there’s much better cover.  There were a couple of squads (lower central) we bypassed and this would hurt us later.  We were already attacking one of the VC buildings.  We wanted to put some OBA on the hill top but our Spotting Rounds went very wide and in some cases out of our LOS.

FT S1 Sights on Seoul After Action Report (AAR) Advanced Squad Leader scenario

On the left, we got a spotter up on the first level (so 2 levels up including the hill) with a 60mm mortar behind.  We could see down Ma Po Boulevard and into Normal School’s compound.  We were shooting up the defenders across the stream and we spotted retreating Koreans entering the Normal School via a “secret” breach on the lower left of the High Wall perimeter.  The Marine in the graveyard on the right of the stream got shot up earlier.  I made the bonehead mistake of routing a broken guard and its prisoners together with another broken squad and broken leader.  The prisoners escaped, rearmed and CC’d the remaining brokies!  Good thing more Marines crossed the stream and bailed them out.  They started pushing up to the Korean lines in Turn 4 after much time wasted.

On the right, the North Koreans marvelled at our wandering Spotting Rounds, the boys finally kicked their radio down the hill in frustration.  The Reserves decided the right half was winning and therefore entered there to threaten the Korean’s flank.  Some of the units made it to the middle of the map but the Hill team was getting shot up and was harassed by the Koreans we bypassed earlier.

FT S1 Sights on Seoul After Action Report (AAR) Advanced Squad Leader scenario

We had 2 Movement Phases left.  On the left the team sweeping up the graveyard forced the defenders away from the stream, but it was slow going amongst the Dense Urban Terrain.  I started to have doubts as to whether we could get to the Fanatic Roadblock or exit any units in time.  A hero jumped into the Deep Embankment Stream with a DC and breached the High Wall.  Some Marines clambered into the Normal School compound and was surprised by a 45mm AT gun!  They got shot up and tumbled back out into the stream.  We were afraid that the North Koreans might counterattack back across!

On the right, the Hill team continued to get in trouble, although they did put up an amount of distraction.  The big Korean 82mm mortar blew up though!  We hit the last VC building we needed to fulfill 3 objectives.  Turned out it was a Commissar standing with a lot of mops and broomsticks behind the windows!  The man did accomplish his mission to waste our time though!  We closed in on the last Fanatic Roadblock and the 3 hex exit.

FT S1 Sights on Seoul After Action Report (AAR) Advanced Squad Leader scenario

Last turn!!  The Marines on the left return to the stream to secure 2 VCs out of 4. The Marines on the right ran towards the exit!  I got behind the Fanatic Roadblock which meant I had access to a Exit Hex.  The Korean MMG team took some casualties but when the Marines shot back, they KIA’d the stack.  There was one Korean conscript squad left from across the street and we thought we were home free.  Unfortunately these Conscripts decided it’s important to NOT cower and laid down enough residual to make the Marines 1 fireteam short of meeting it’s 4th objective!!

The North Koreans won!  Yes folks – we lost by 1 fireteam.

How’s this Scenario Interesting?

The 3rd Battalion on the left could take two VCs without crossing the stream. I decided to bypass the Normal School, leave the forces inside bottled up and make for the Ma Po Boulevard Fanatic Roadblock VC and together with it, the VC for exiting squads.  Hitting the Normal School might burn up my resources for the gain of 1 VC.  On the right, hitting the hill will no doubt give me an advantage over the whole battlefield but that’s only if I manage to take it quickly.  The “3 Building” VC required that the 1st & 2nd Battalions go all the way to the top right, which put me in reach of the Stream VC and the Exit VC.  So I decided to bypass the hill top as well especially after the big 82mm mortar blew up and we got the MMG’s smoked.  I could have done better in moving more of my troops forward, unfortunately the 2 Korean squads I bypassed earlier continued to threaten one of my VC building on the bottom right.

A thing to note is that each Marine Squad in LFT Fight for Seoul is worth 3 VPs (1 per fireteam) instead of the “standard” 2 VP per squad.  It certainly makes a difference on the exit.

This is an interesting introduction to the different terrain involved in the Fight for Seoul – Seoul map.   It’s also a good one to get your head wrapped around the use of Fire Teams.  My opponent and I are moving on to FT S2 Besting Basilone, which is a Night scenario around the Normal School, the Ma Po Boulevard and the Marine HQ on the left of the map.

Gavutu-Tanambogo, Assault Period 4

This is it!!  The last of 4 Assault Periods in the “Sand & Blood” CG.  All Marines have landed.  The Americans win by controlling all land hexes on both islands (IJA has to surface to get land hexes) and not losing more CVPs than the IJA.

img_3942

So I (as the USMC) lost the equivalence of the entire IJA OB in CVPs.  That makes it impossible for me to fulfil the 2 fold Victory Conditions : to hold all land (aboveground) hexes and to not lose more CVPs than the IJA.

I believe landing the first wave on the south part of Gavutu (bottom island) behind the hill was a good decision.  Landing all the remaining groups in Assault Period 3 was a good decision as well because that effectively overwhelmed the defenders with targets.  I was lucky in that we took out the 2 x AA guns on Gaomi early.  That took out the guns from behind our backs as we attacked Tanambogo.

I would have used my fighter bombers more effectively though, to hit the island early as the landing crafts were approaching.  Sighting on units that broke from NOBA would have brought more devastation.  Oh, DCs are precious.  Sinking a few boatloads of DCs in the first Assault Periods resulted in a lot of Close Combats and manpower wasted to guard IJA exit point.

This is a great little CG.  I learned a ton about ASL seaborne assault.

Here’s the whole series:

(Sand & Blood CG is an Advanced Squad Leader campaign about Gavutu-Tanambogo that comes with MMP Rising Sun)

Gavutu-Tanambogo CG, 3rd Assault Period

Instead of using one regiment in this Assault Period and the remaining regiment the last, I decided to go all in and land all the remaining forces in Assault Period 3.  At least the IJA won’t be able to focus their fire on either one.  Will it work?  (Losing all those demo charges in Assault Period 1 continues to hurt us .. )

img_3531

Here’s the whole series:

(Sand & Blood CG is an Advanced Squad Leader campaign about Gavutu-Tanambogo that comes with MMP Rising Sun)