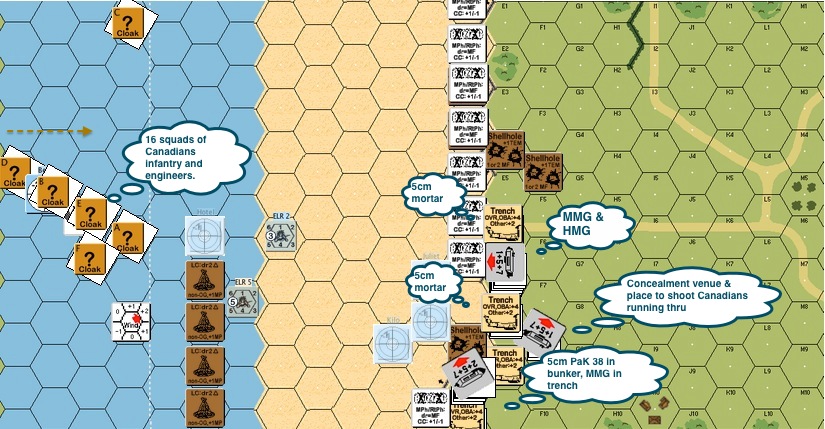
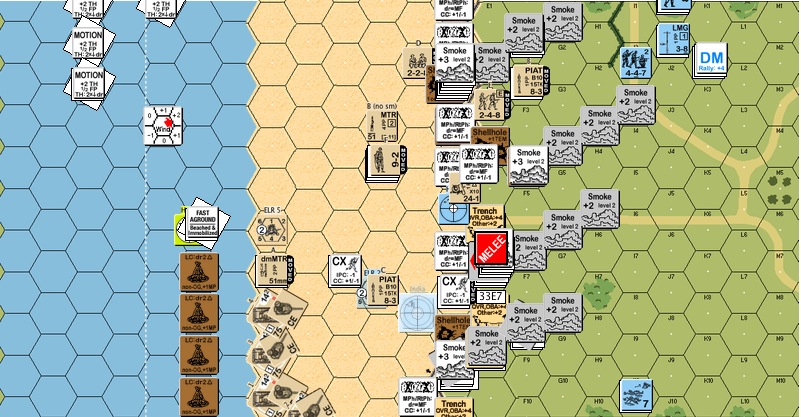
A79 Mike Red depicts the part of D-Day landings at Courseulles-sur-Mer, the most heavily fortified position – “Mike Red” – that the Anglo-Canadian forces had to face on Juno Beach.
A total of 16 Canadian squads bore down on 5 second line German squads and 6 gun crews. The crews, with their 8 morale and self rallying ability, were the backbone to the whole German defence. The Canadians win by clearing all pillboxes of good order Germans and by exiting 7 VPs of personnel in 7 turns.
The defence layout you see is actually created by my opponent. The tetrahedrons discourage landing crafts from unloading directly in front of the pillboxes. The antitank gun in the leftmost pillbox and the medium machine gun in the trench next to it covered most of the beach. The pillbox in the center housed a heavy and a medium machine gun, accompanied by an 8-1 leader. The approach to the pillbox was covered by mortars on both sides. Behind the row of wires, there was a seawall that ran all along the edge of the hinterland. The singular pillbox that pointed inland was for rallying and for concealment generation, apart from being a great position from which to shoot any Canadians who broke through.

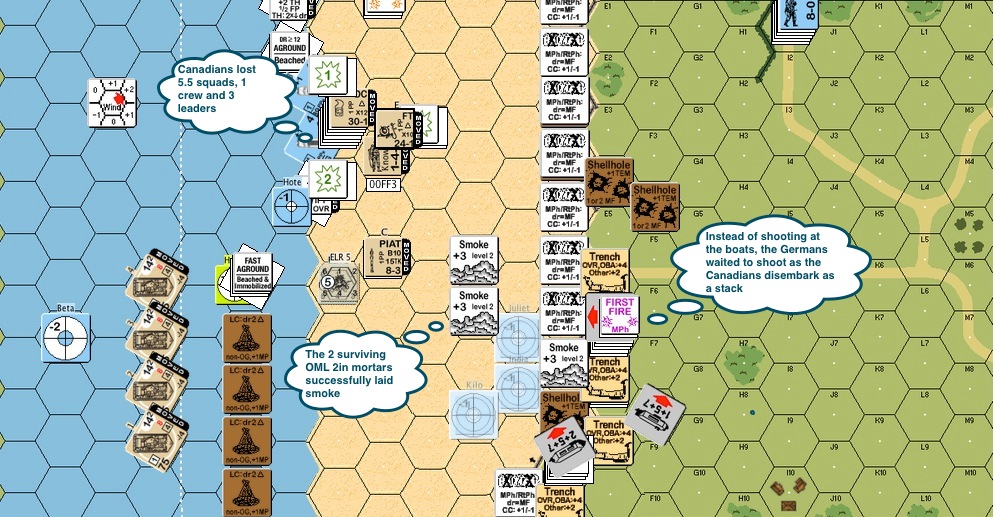
Canadian Turn 2 : The first Canadian boat beached. Two and a half squads hit the sand with their gear. They were promptly shot up by the German defenders and only 1 squad survived (note : infantry doing seaborne assaults are Fanatic on beaches, but they Casualty Reduce instead of Break). The survivors did their best to pick up the mortar and the PIAT in the meantime. The other boats kept coming in. One of the landing crafts went aground precisely where the German AT gun was bore-sighted. It was a scary moment for those involved but the Germans kept firing armour piecing shells instead of high explosive shells which were a lot more effective against landing crafts. Someone must had gotten the shells and the boxes switched!

German Turn 2 : The Germans figured this was a good time to shift their people to the right flank. The reinforcement arrived as well and positioned itself as a the “back stop” to possible breaches. A team of gun crew started moving the left most medium machine gun into the pillbox so as to cover more of the beach against the incoming Canadians. Their ability to reposition quickly was really a tribute to the top quality machine gun designs the Germans had, which made them more portable than their opponent’s MMGs.

Canadian Turn 3 : The Canadian mortars were very successful in getting off smoke shells in key places. More Canadians hit the beach. At this stage of the landing, the Canadians lost 5.5 squads, 1 crew and 3 leaders! The bright spot here was that a hero stepped up from amongst the ranks and appeared to have picked up a flamethrower ..
The German antitank gun got their ammo figured out at last. However in most cases the Germans waited for the landing infantry to step onto the sand before opening fire.

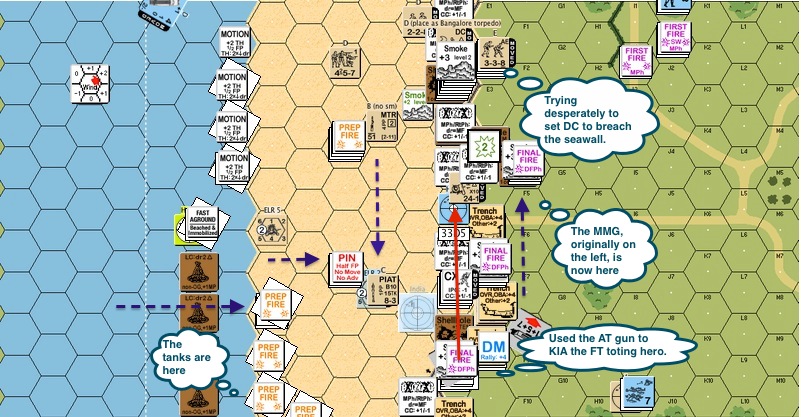
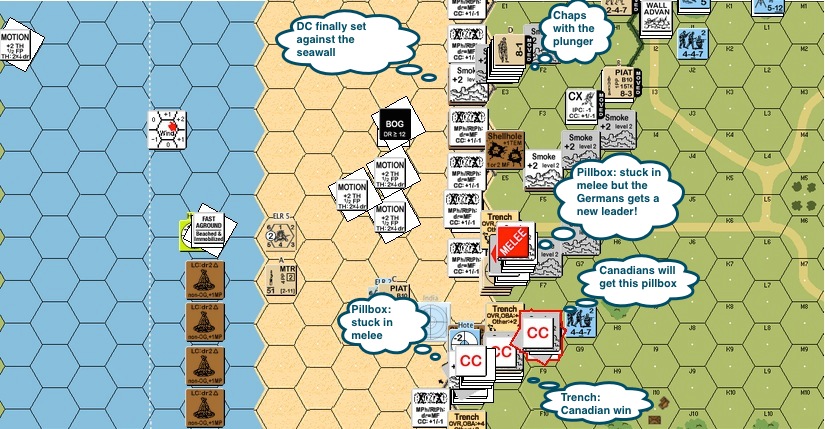
Canadian Turn 5 : The Canadians tried very hard to set a demolition pack against the seawall. Luck was simply not with them that day. The Germans had already positioned their medium machine from the left flank to one of the shell holes on the right so as to cover any breaches. You can’t see this too well but the Shermans fired off a few smoke shells already. The flamethrower wielding hero took advantage of the smoke cover, ran across the beach and got ready to roast up the center pillbox, only to be KIA’d by the antitank gun!

Canadian Turn 5 (contd) : There was a mild breeze that day and hence the smoke drift.

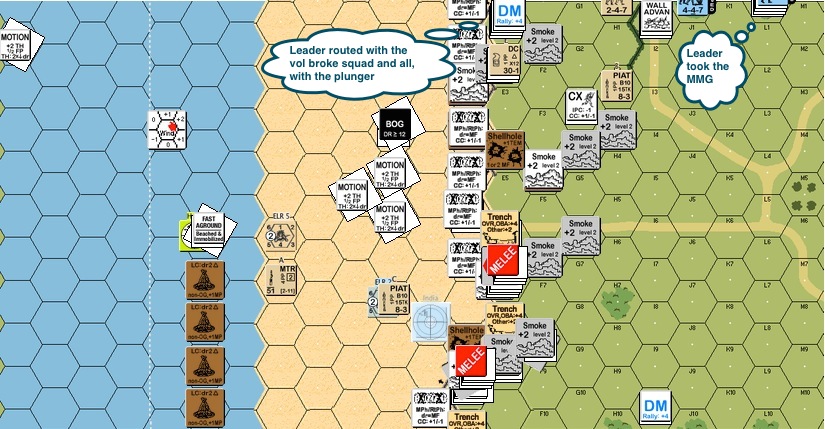
Canadian Turn 5 (contd) : This is the same view as the one above but with the smoke (mostly) deleted. What I meant to say in the diagram was that the Canadians got casualty reduced (“CR’d” not “DR’d”) in close combat. Taking advantage of the drifting smoke, the MMG crew voluntarily broke and ran towards the right flank, getting itself positioned to hinder the Canadians from exiting.

German Turn 5 : Some of the German troops went back to the pillboxes on the left flank. The Canadians need to clear the pillboxes AND to exit 7 VPs off the board, so keeping the melee going would be an important element to the German plans. The MMG crew on the right flank (top of the map) couldn’t rally though. The Germans did what they could to move some folks in and if necessary, grab the machine gun! The Canadians were not doing well with the melee at all, they got casualty reduced again!

Canadian Turn 6 : The Canadians finally managed to set demolition charges against the seawall, now they need to get away from the wall to blow it. The Canadians flung themselves onto the pillboxes in this round. They would win a couple of the close combats but they would continue fight it out at pillbox locations. The center pillbox might be the most frustrating, not only did it yield no German casualties in face of steady Canadian losses, it now sprung a new German leader!
As per my usual practise, I promptly named this rising star after my opponent.
The Shermans moved across the beach in anticipation of a successful breach in the seawall. The Canadian infantry had little chance exiting the board at this stage, but getting two Sherman’s off would make this a Canadian game, provided they were successful with the pillbox melees as well. One of the Shermans bogged.

German Turn 6 : The Germans on the top right of the map managed to join up with the MMG crew. The notable move from my opponent here was that he voluntarily broke the Canadian squad that held the detonator switch to the set DC which allowed a leader to rout with them as well. The leader would then grab the switch from the brokers in the coming rally phase.

Canadian Turn 7 : My opponent’s enterprising leader grabbed the detonator switch as planned and breached the sea wall. The Shermans started up and drove inland. The first one rolled for “excessive speed breakdown” and got off the board.
The first 6 VPs! The Canadians only need one other Sherman to get off.
The next Sherman drove across the breach and rolled for ESB. It went too fast and was immobilized. Okay, there’s still a last one. All the Canadians need was 7VPs off the board, after which it’s up to the melees.
The last one got onto the hinterland, clanked forward steadily ..
.. and broke down as well.