BFP21 Ripe for the Picking After Action Report (AAR) Advanced Squad Leader scenario

BFP21 Ripe for the Picking After Action Report (AAR) Advanced Squad Leader scenario 

Scenario Background

This was July 26 1944 in Marigny, France.  The Americans needed to capture Marigny (apart from St Gilles) so as to enter the exploitation phase of the campaign.  Combat Command B, 3rd Armored Dvision, met the SS Panzer Division 2 “Das Reich” and Infantry Divison 353 outside of Marigny.

US 3rd Armored Division353rd German Infantry Division

Combat Command B 3rd Armored Division & German 353rd Infantry Division.

Memorial Cobra @ Marigny today

This is the Memorial to Operation Cobra that stands in Marigny today (credit : Google Earth)

Victory Conditions & Tactical Considerations

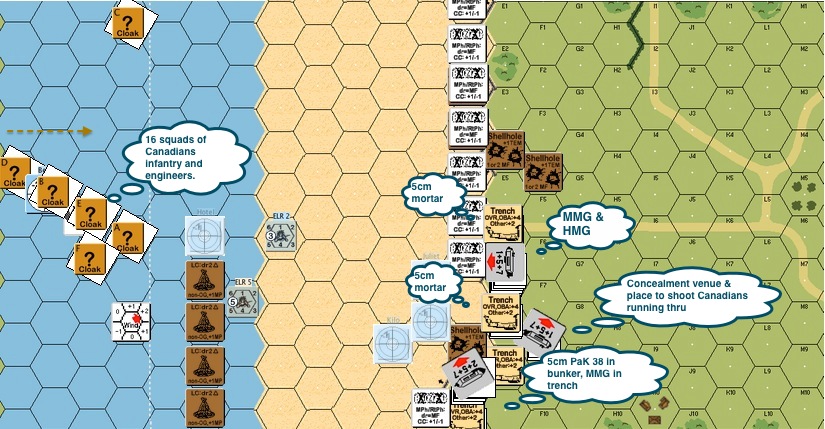
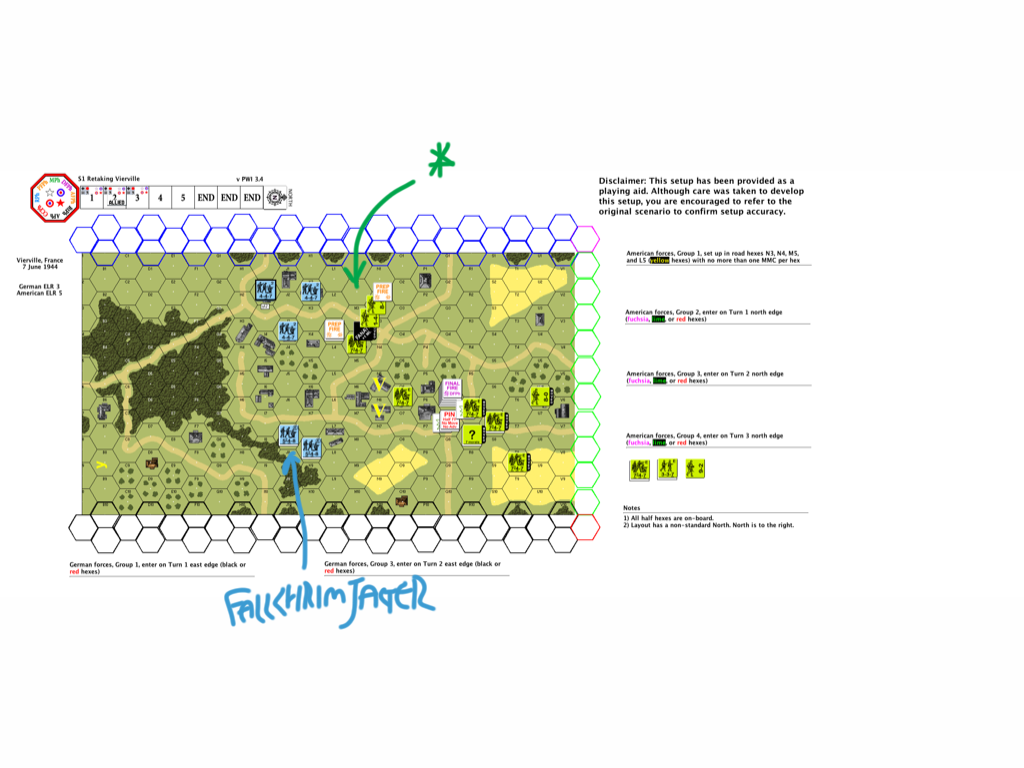
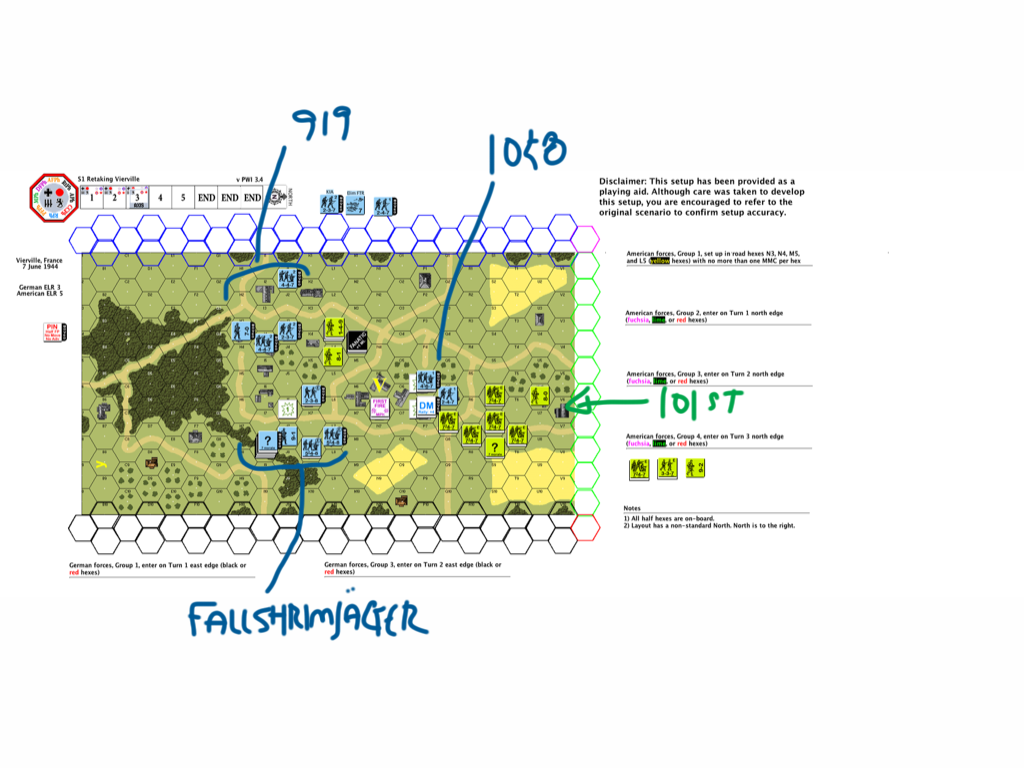
As the Americans, I needed to kill or move 100 VPs  through 3 boards from the top of the map to the bottom.  Halftracks must have a functioning MA (AAMG) or a passenger to count as Exit VP.  The top two boards are Bocage country and it’s real easy to lose time there.  Good thing the Germans were spread thin and I got 4 Culin cutters to help with landscaping.  The fastest way would be to run straight through the village but the Germans had two roadblocks to counter that.

I had two groups of units: The left group with 6 Shermans and 6 halftracks, one of which sports 2 x .30-cal 1 x .50-cal with 12 FP, the other a bazooka (M3A1).  The right group with 3 x M5A1’s, 2 x M8 HMC (SP howitzer) and 8 x halftracks (2 with bazookas).  The right side seemed to have a more open country but they carried less anti-tank assets.  On Turn 6, 2 American FB’s came into play, shortly after 4 x Pz IVH’s & a “Stummel” rushed in bearing flowers & fruit baskets.

My plan was to have the two groups stay apart at least until they reach the bottom map and not let the Germans converge.  I would avoid the road and built up areas in general.  I had the numbers to swarm whoever came our way.  Although with my numbers came traffic control issues.

After Action Report

Advanced Squad Leader BFP21 Ripe for the Picking After Action Report (AAR)

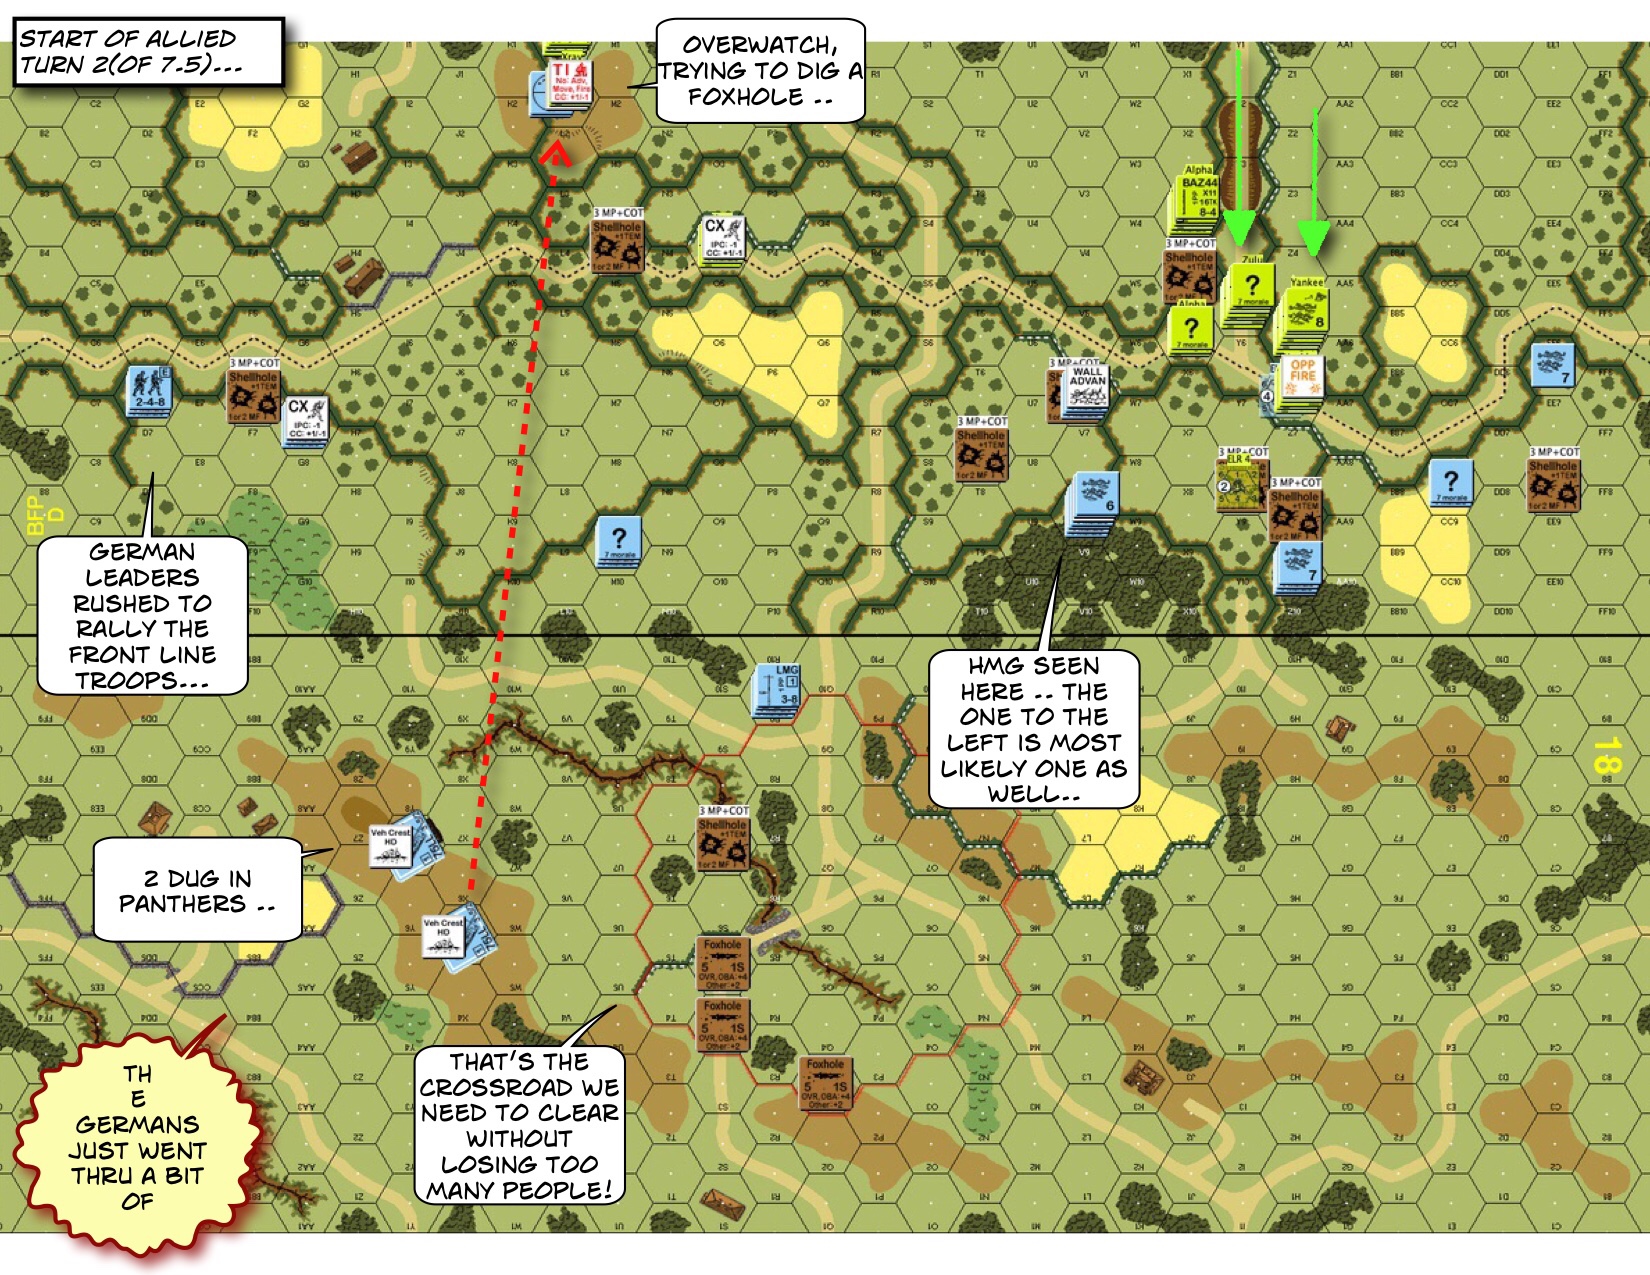
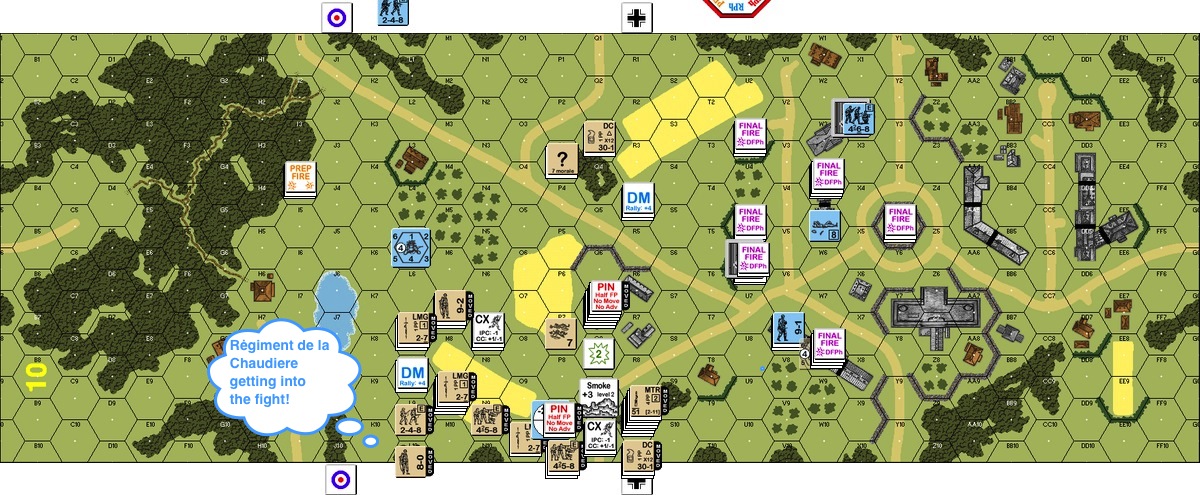
We were off to the races here.  The left group shot through an area where they thought they would be safe from a PaK.  The pair of Culin cutters worked in tandem.  A marauding halftrack dropped off its passengers by the roadside, skidded off to the middle of the map and spotted the first roadblock!  On the lower left, dismounted infantry took on a lone defender while its ride continued on and cut off all chances of escape.  The right group got itself tangled up in a perfect jam in the Woods while its cutters worked frantically to make a hole.  Vehicles stayed behind the bocage as they heard rumours of the other PaK covering the area.

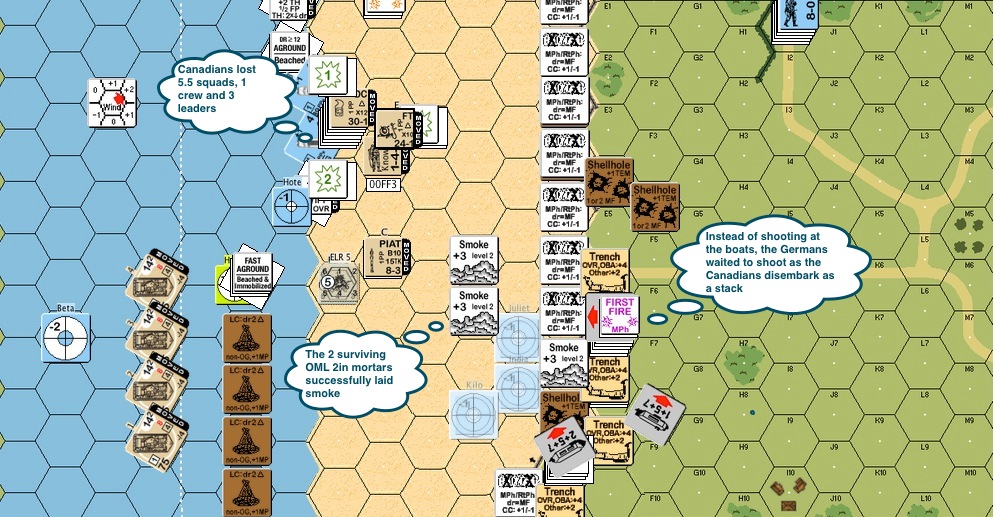
In a surprising turn of events, all Pak related uncertainties were resolved when both PaKs popped out of HIP with their crews tugging them down south towards the bottom map!
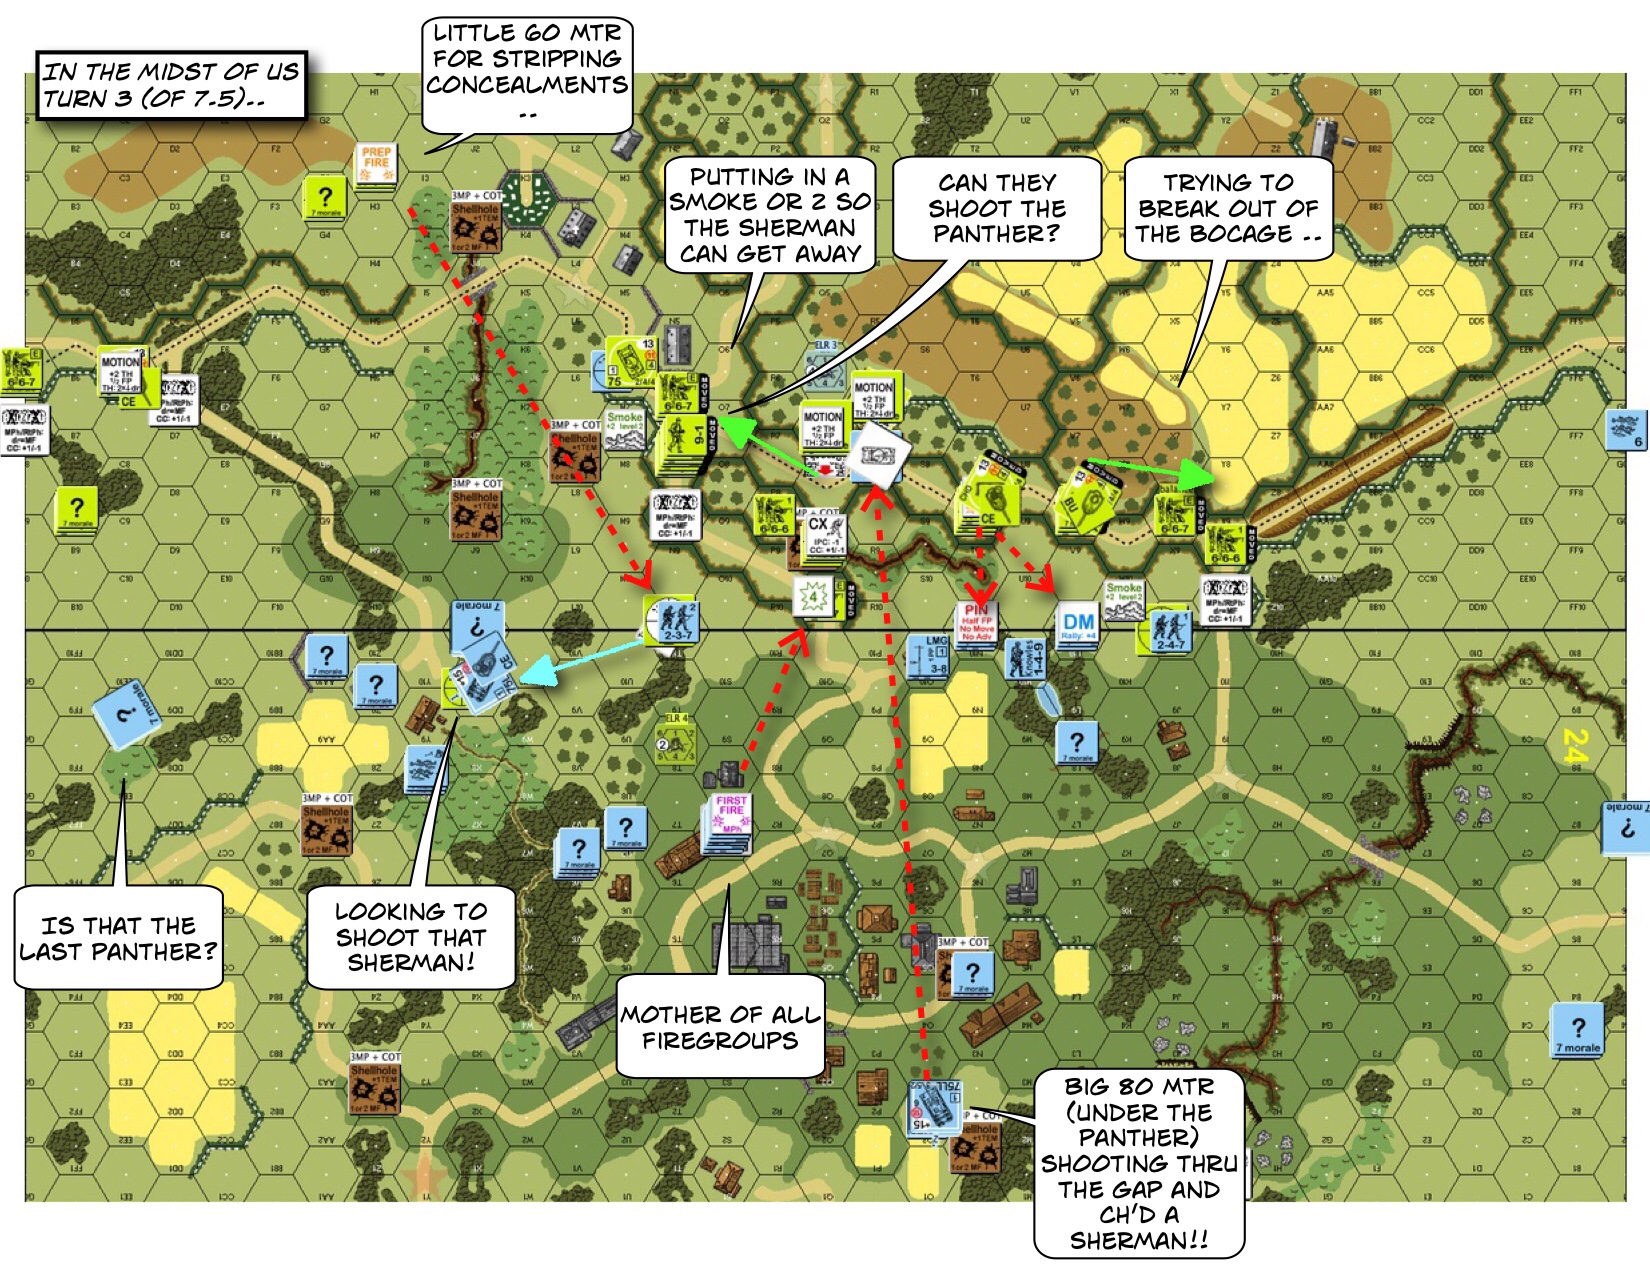
Advanced Squad Leader BFP21 Ripe for the Picking After Action Report (AAR)

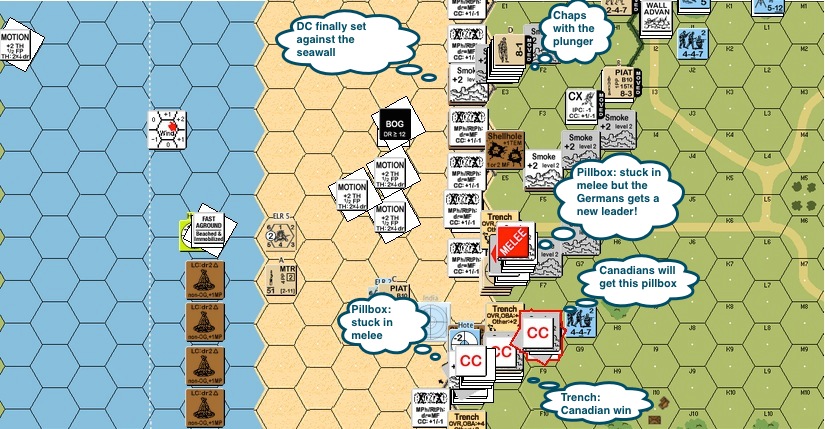
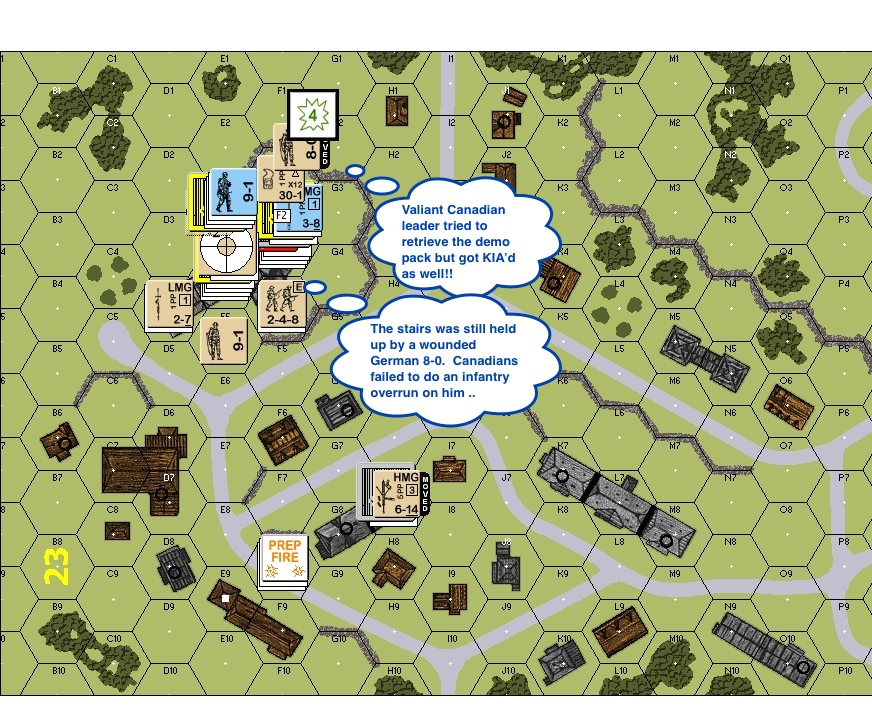
We were at the midpoint of the game.  Two halftracks in the left group caught up with the PaK in the Orchards on the bottom board!  They used their small size and speed to distract and to overrun the Gun!  We knew the Germans would show in Turn 4 and some of our elements were too far forward but the opportunity was too good to pass up.  A Sherman ran forward to help but sure enough, it was killed by a pair of PzIV’s coming in.  Tanks always operate in pairs.  My tanks get killed every time I violate that doctrine.  I thought about using that Sherman to overrun the Gun itself to take it off the board but I didn’t.  Had I done it, I wouldn’t have to fight SS troopers for the gun in the next couple of turns – another mistake.

The right group broke through to the middle map and was held up by the threat of PFs inside bocage country.  Their lack of anti-tank assets was a problem and we were hugging the last set of bocages before the Germans show on the other side of those hedgerows.

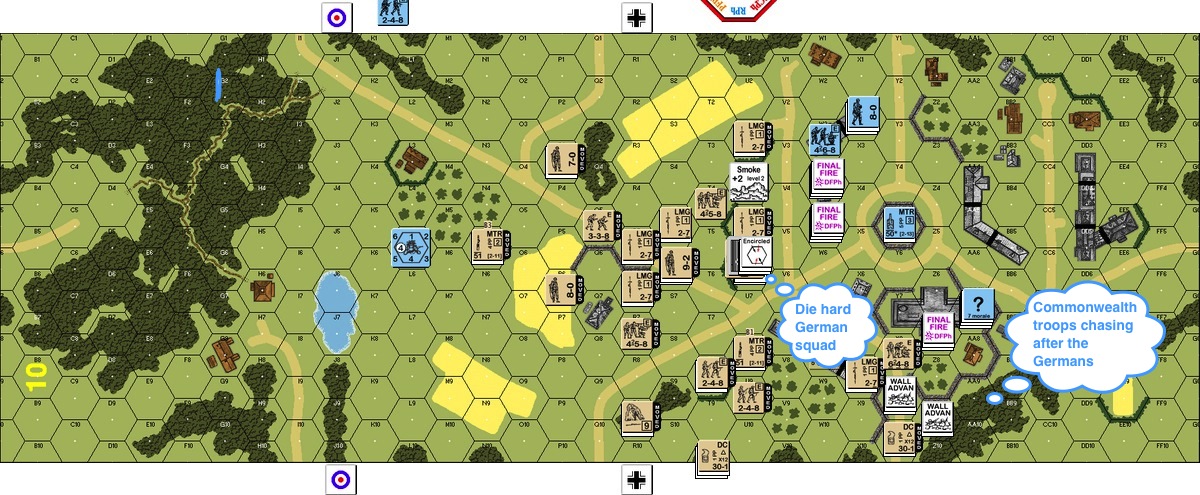
Germans in the meantime were in full retreat from the town.  The bocage protected road down the middle provided the perfect passage.  An HMG was last seen moving along.  I got to go stop that nonsense.

An M5A1 light tank and other vehicles of the 4th Armored Division An M5A1 light tank and other vehicles of the 4th Armored Division, VII. Corps, pass through the wrecked streets of the town of Coutances, north-western France; 1944. Advanced Squad Leader scenario BFP21 Ripe for the Picking After Action Report (AAR)

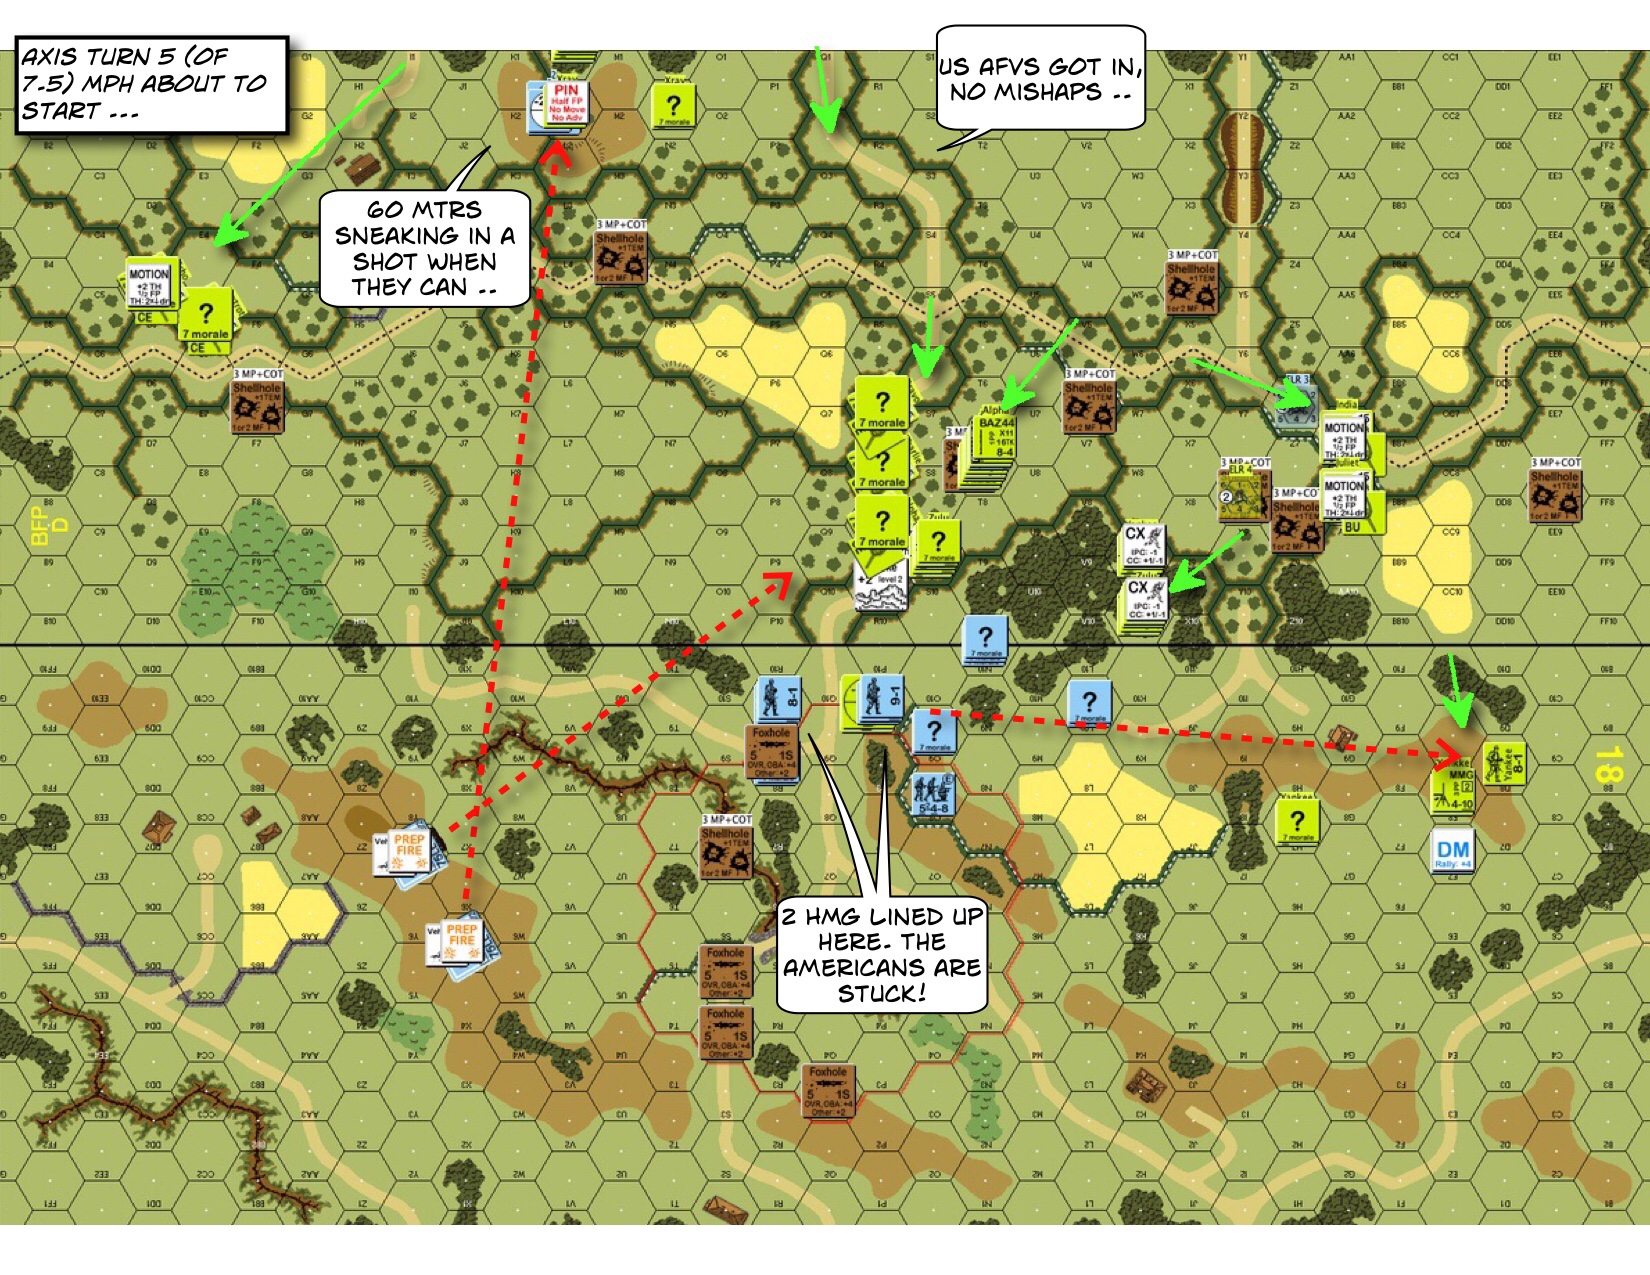
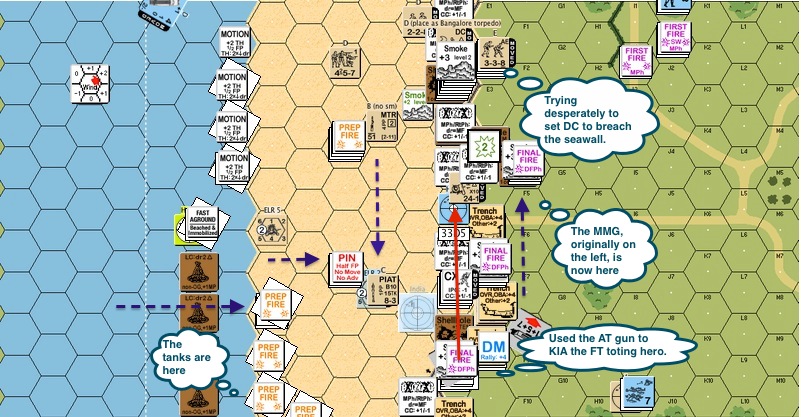
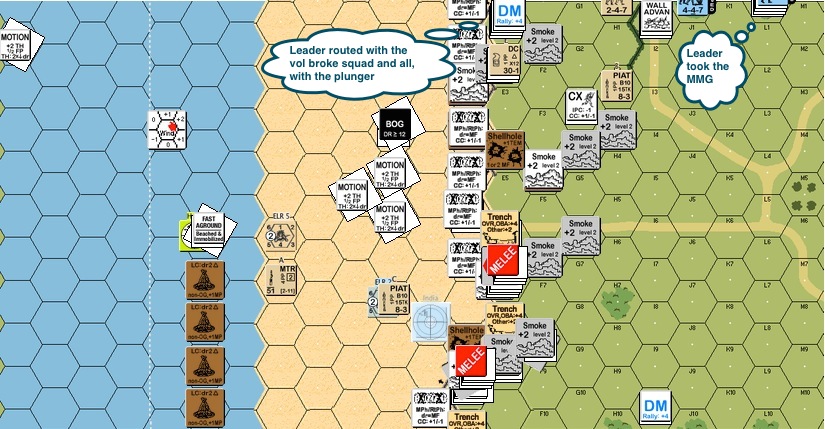
With the PzIV’s in position on the left, I didn’t want scoot all my Shermans out on the same side, plus I gotta give the dismounted troops (bottom left) some help.  We needed to get and/ or destroy that PaK gun! The SS dismounted as well.  It’s going to get busy.  I exited one of my halftracks for the points and another went off to the side.  On the right, my guys pushed through the house and were getting into the Woods while the AFVs were getting away from the PzIV’s and threatening to come off the middle instead. At least we dealt with the German 9-1 team that was blocking the way.  We also had a pair of Shermans migrating from the left side to help with the anti-tank deficit.  The Germans got the remaining PaK inside that house in the middle though.

M8 HMC, 3rd Armored Division near Marigny, France (July 28 1944) A company of M8 75mm HMCs (not a battery) from the 3rd Armored Division takes up firing positions near Marigny, France on July 28.   Advanced Squad Leader scenario BFP21 Ripe for the Picking After Action Report (AAR)

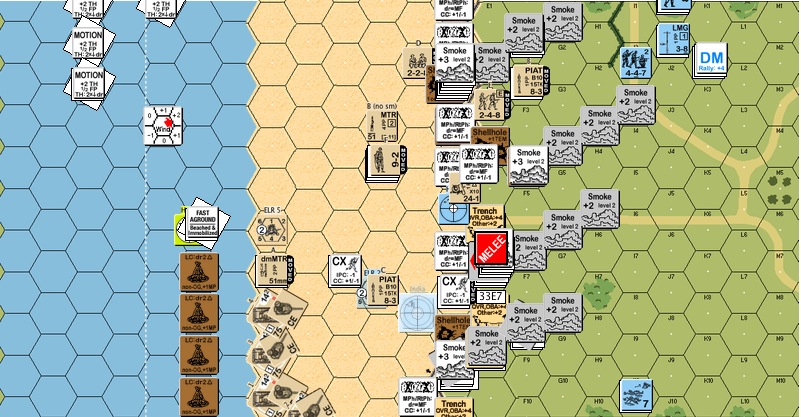
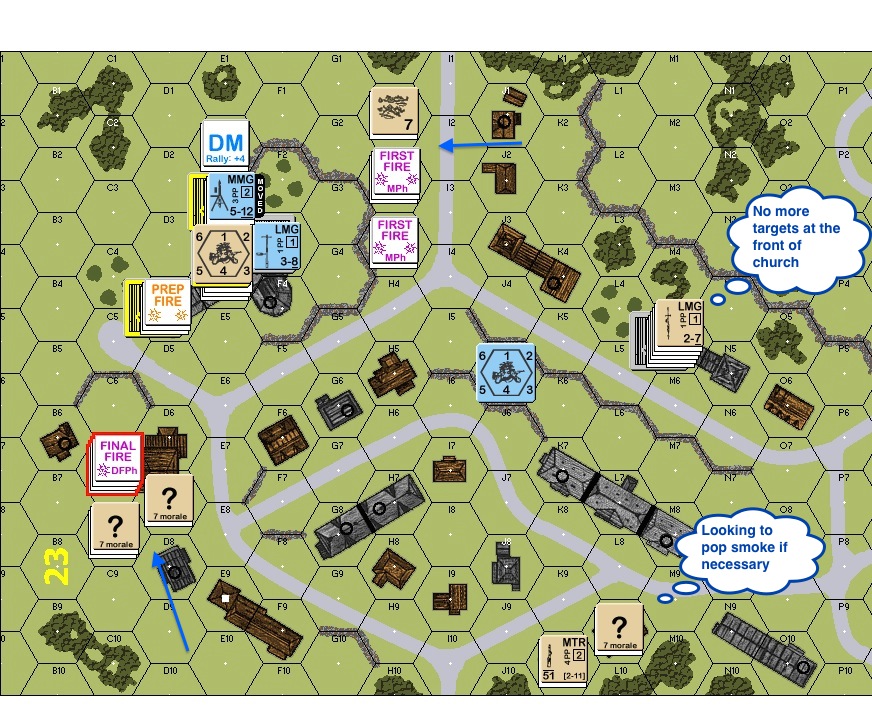
It’s Turn 7 and the Thunderbolts were in!!  The Germans had very smartly hid their people in the Orchard on the left and in the Woods & Grain fields on the right.  The M8 self propelled howitzer was vulnerable to the SS firepower but proved itself useful by getting a WP round off into the woods.  To the left, troops in the Woods made an attempt on the PaK but failed.  They did manage to rout off the SS though!  They then moved in to mess with the PzIV’s.  A pair of Shermans whipped back to the middle while other AFV’s made for the gap in the woods.  One got hit and bursted in flames, probably a good thing for the rest.  Towards the middle, the Americans managed to break the HMG team that was toting it along and another squad raced to pick up the toy before the Germans did.  A mounted halftrack raced in, tried to get a squad close to that AT gun but was shot by the German SP gun via a LOS beautifully threaded between a couple of houses. I shouldn’t have stopped there!!  Another squad stayed up in the middle board to limit the number of Germans who could join the party down south.  To the right, an M8 raced into take a shot at the PzIV in the Woods but was stunned by the enemy infantry instead.  Meanwhile a number of vehicle slipped off the side.   Two more turns and a lot of our vehicles were in range to get off the board.  The fighter bombers were definitely slowing down the German OODA loop!

P-47 Thunderbolt firing rockets P-47 Thunderbolt firing rockets! Advanced Squad Leader scenario BFP21 Ripe for the Picking After Action Report (AAR)

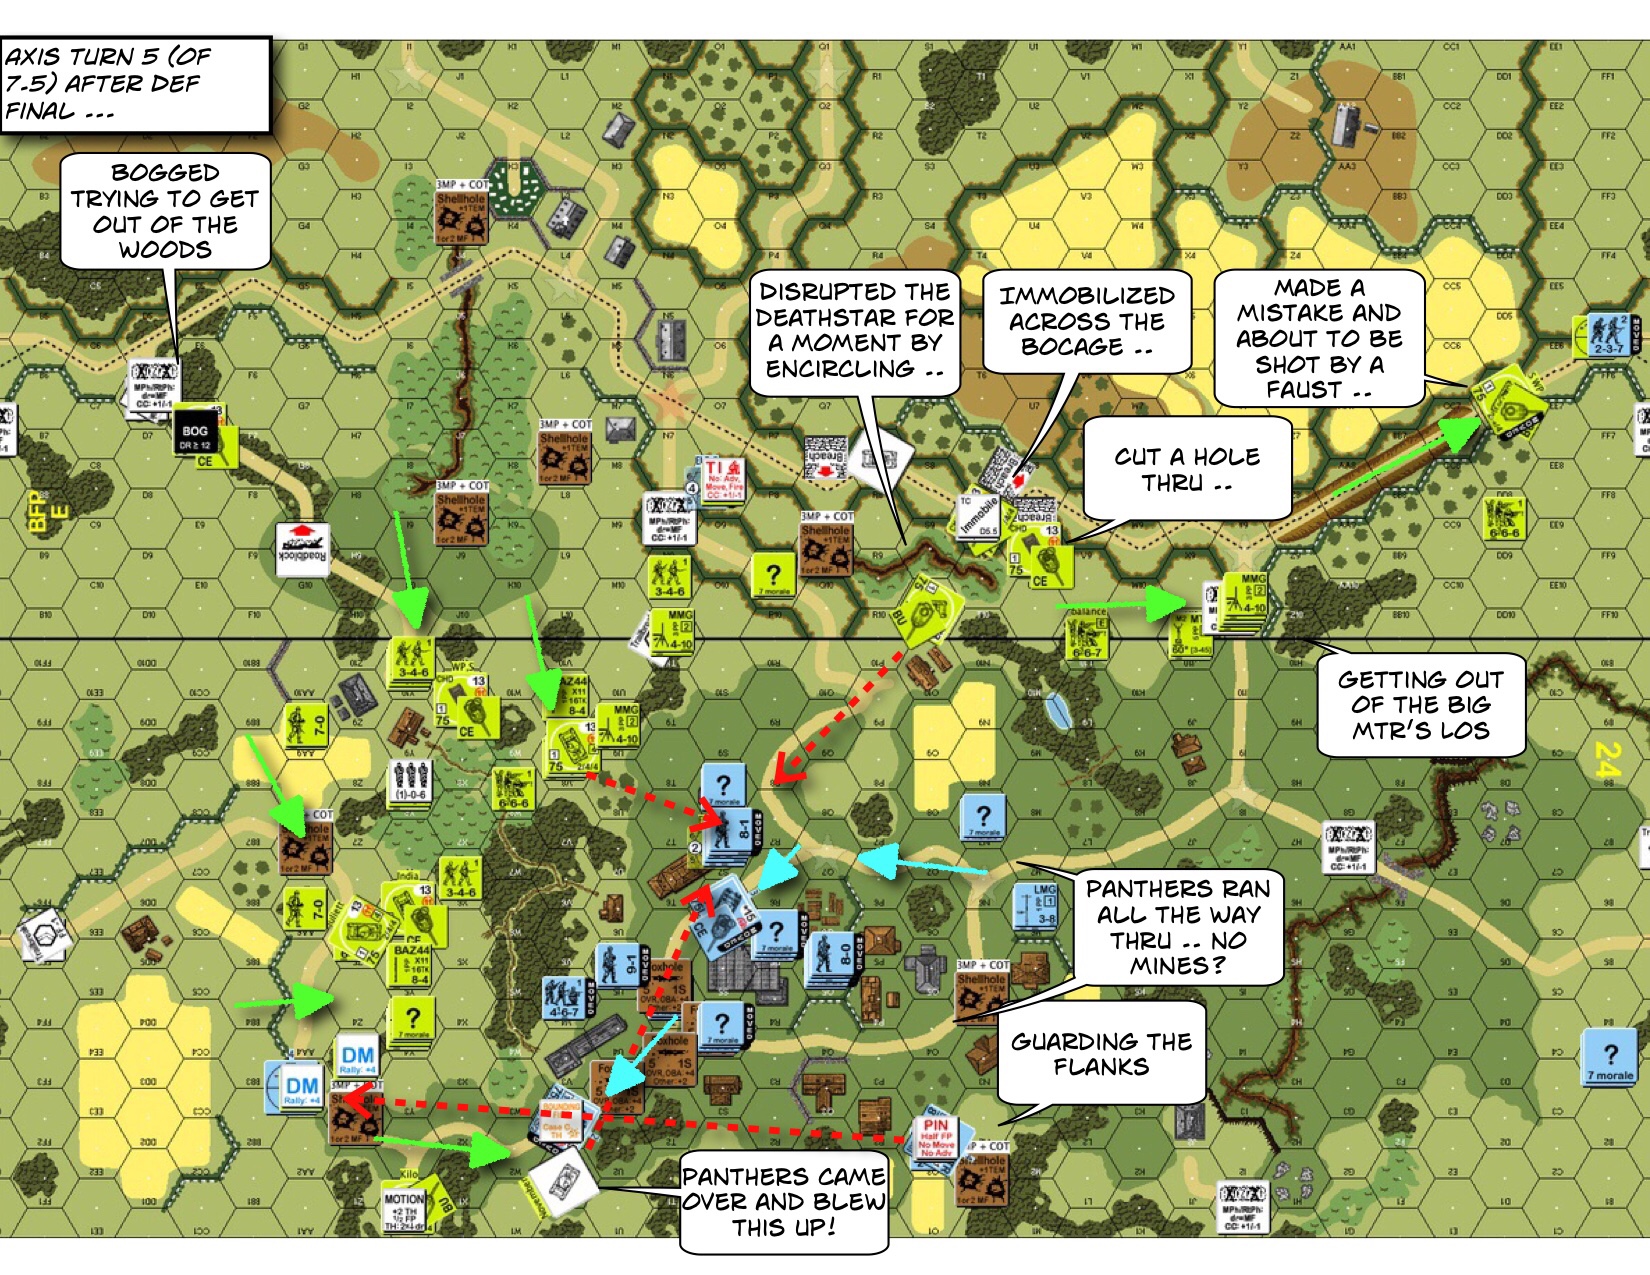
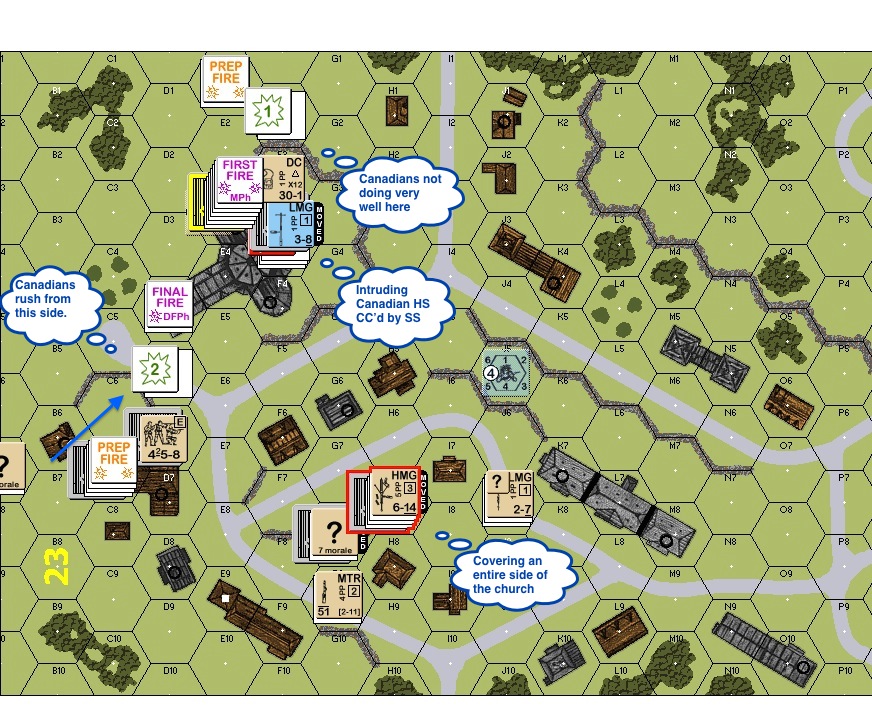
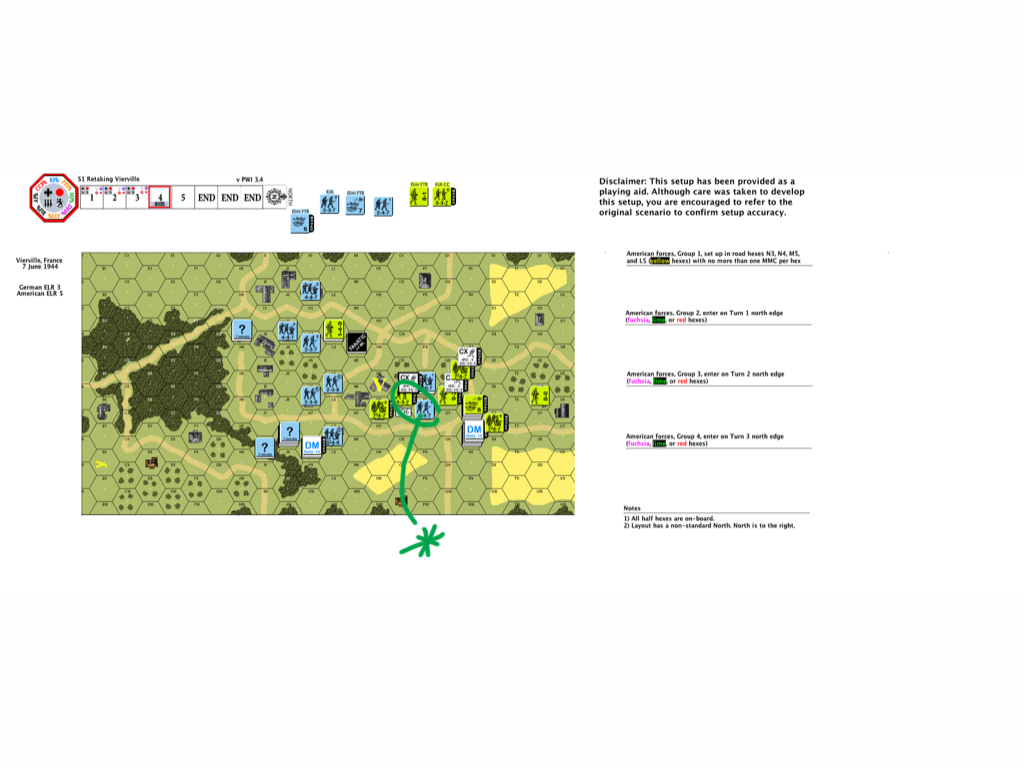
We were close to the 100 VP mark but time’s running out.  The squads on the left had both went fanatic at this stage with their repeated attempt to close with the PzIV’s.  A M5A1 sped over, toughed out a shot that went wide, spun to the back of the self propelled 75 and fired.  It promptly malfunctioned and it was M5A1’s turn to be scared!!  The commander kicked the driver to start up again.  Good thing the 3 US squads nearby stunned the German open top.  A halftrack went for the PaK gun in the middle, went right up to the house and dismounted.  The PaK had to turn but lit up the vehicle!  The troops were okay, now covered by the vehicular blaze.  The Shermans decided it’s safer to run through the middle of the map now, away from the PzIV’s under the orchard.  When the FBs lit up the second PzIV on the right, the Germans decided to concede.  There’s nothing left to stop the Americans from driving off the board now.

US halftrack in urban warfare

“US halftrack in urban warfare” Italy, late 1944

How’s this Scenario Interesting?

This was a lot of hardware for me to manage through bocage country!  The Americans needed to blaze through the bocage and their speed helped them to not get penned up by the Germans.  The US armoured infantry reminded me of the new Terminator.  Halftracks could drop off its squad, “split into two” per se and motor the vehicular “half” behind the defenders.  Heck, my halftrack surprised the gun crew of the remaining PaK (holed up in the building nicely situation in the middle of the bottom map) by dropping off a squad at their door.  Their ride got blown up but they killed the gun crew in CC.  That’s so much more effective than having to shoot it out.

Terminator Dark Fate

Once I got my vehicles down on the bottom map, it’s important to be patient and to use my superior MPs to run around to where the Germans were not.  My tanks whipped around a couple times before exiting.  I could have left more infantry mounted but halftracks were poor sanctuaries when the action got going.  Fighter Bombers were a huge help in suppressing enemy’s ability to react even if they miss all their spotting attempts.  Once I was through the bocage it was tracks and shells flying all over in the bottom map.  This is an action packed scenario!!

Other Links

US Army in World War II, ETO, Breakout and Pursuit, M Blumenson

D-Day Overlord – D-Day and Battle of NormandyMarigny (Manche)

Advanced Squad Leader scenario AP132 Night of Nights After Action Report (AAR)

Advanced Squad Leader Scenario AP132 Night of Nights After Action Report (AAR)

Scenario Background

It’s D-Day, the Deuce (502nd PIR) and the Currahees (506th PIR) did a night jump into Sainte-Marie-du-Mont!!   The reception on the ground were laid out by the Infanterie Divison 352.  The 502nd PIR and the 506th PIR were of course, part of the 101st Airborne Division (“The Screaming Eagles”).  The 352nd, according to Wikipedia, was formed in occupied France in early November 1943.  They were expected to be transferred to the Eastern front but received orders for the defence of the Atlantic Wall instead.

506th PIR Easy Company 

(“Easy Company”, 506th PIR, 101st Airborne Division, WWII in Color)

Sainte-Marie-du-Mont

502nd Parachute Infantry Regiment506th Parachute Infantry RegimentInfanterie-Division 352

Victory Conditions & Tactical Considerations

The historical background to the scenario mentioned that “the Americans quickly reformed into small units and set out in the inky summer darkness …”.  It wasn’t kidding, it was dark.  Night Visibility Range dropped to zero shortly after the game started.  That means you can’t shoot at anything that’s not illuminated.  That means you can walk right into a concealed enemy unit and chance triple pointblank fire if that’s your thing.  Convoys run slow at night anyway, but now they can’t go BU.  More on that later.  

The paras got quite a bit to do in their 8 turns.  They had to achieve at least 3 of the following:

  • Control 4 designated buildings, one of which is a church, assumed to be “Église-Notre-Dame de Sainte-Marie-du-Mont”.  
  • Capture/ Eliminate all AA Guns.
  • Exit 12 Exit VP off the North edge (stage right).
  • No German trucks have exited.

After Action Report

Advanced Squad Leader Scenario AP132 Night of Nights After Action Report (AAR)

The American drop scattered far and wide.  They went offboard to the left and to the bottom.  On top of it they needed to run around recovering support weapons.  As the Germans my setup was entirely upfront, aimed to spot a paratrooper early and lose our “No Moves”.  Anyone slightly to the back (stage right) were dummies.  I sited all my AA guns so that they could see the skies to the left as well.  My thinking was if they see the para’s floating down, they could get rid of their “No Move” counters and didn’t have to shoot and reveal their position (SSR3).  That was not to be, para’s, while under the parachute are not “known” units.  Only “known” units can help remove “No Move” counters from spectators.  We did shoot a few paras as they landed in the grain field.  The folks who dropped offboard down at the bottom were particularly troubling.  I had 2 AA guns situated there.  As they walked back onto the board they could certainly surround us on both sides.  I had only a leader, a squad and a stack of dummies behind the pair of AA guns!  

Advanced Squad Leader Scenario AP132 Night of Nights After Action Report (AAR)

The German convoy decided to run through the gauntlet on Turn 2!  See, having them enter on Turn 3 has certain merits, since that would keep the paras engaged for another turn, far away from the village and the right edge of the map.  On the other hand, they would also give them another turn to block off the road.  We decided on Turn 2 and rolled the dice.  

I put the armoured car and the halftracks up front.  If the paras wanted to block the road off, they would have to hit slightly tougher targets.  There’s an Ammo truck in the convoy.  If it burns it would explode like a Goliath – 36FP in its hex and 16FP in all surrounding hexes.  I thought about putting it upfront but that would give the para’s a level of comfort afterwards.  I put it in the back so that the explosion would only harm one other vehicle.  

Having said all that my convoy got ripped apart almost immediately.  There probably wouldn’t be any “high speed blowing through roadblock” scenarios anytime soon.  Trucks had no problems dying in the gunfire.  At the bottom of the map, my worst fears were realised.  The para’s came and start getting into Close Combat.  In the middle of the map, the Americans pushed menacingly close to one of my AA guns.   There were a lot of skirting around star shell illuminations.  Here’s the struggle: I didn’t want to try for too many star shells as such acts give away where my dummies were.  

Advanced Squad Leader Scenario AP132 Night of Nights After Action Report (AAR)

We just passed the half way point.  You can tell even by the star shells that the fighting was pushing near to Sainte-Marie-du-Mont.  My last half track was stunned (had to be “CE” to drive during NVR 0) and kiled by a well placed DC afterwards.  Funny enough my Ammo truck was disabled and its driver ran off.  The American’s CC’d and captured another one of my last trucks hoping it to be the Ammo truck (‘cause nothing else exploded), and drove off.  The Americans broke the AA gun crew in the middle of the map.  However, the scattered state of the paratroopers gave a quick chance for us to push them back further!  Unfortunately my concealed Germans couldn’t ambush them in the dark.  Towards the bottom, the Germans killed some para’s around the pair of AAs and broke the other.  They were safe for the time being.   I was very aware of the fact that my victory buildings were all defended by dummies (no offence…).  The timing of when my defenders should peel off the front line is the million dollar question, isn’t it?

Advanced Squad Leader Scenario AP132 Night of Nights After Action Report (AAR)

The para’s on the left were now running full tilt down road towards the middle of the map!  My little counterattack in the middle did push them back a bit but failed to draw any blood.  We dragged the gun back a hex towards the building but we couldn’t put it to use again, nor could the Americans capture it, yet.  The Americans were on us towards the bottom of the field.  It was time to peel back and take over key building defense from the dummies!  Towards the top of the map the AA gun crew got shot away but refused to run off too far.  The Americans didn’t have enough good order folks (it is harder to rally at night) to take that gun just yet.  

Advanced Squad Leader Scenario AP132 Night of Nights After Action Report (AAR)

Second last movement phase for the Americans!  I broke the pair of AA guns down a the bottom but the Americans still needed to capture them (note to self: stop firing at stupid targets).  A hero made a rush for it in the zero NVR darkness (to suppress further fire from the gun crew) but he was blown away in the triple point blank fire.  Another squad made contact through the gully but it ended up being held in Melee.  At the top of the map the gun crew rallied!!  It jumped back on top of the AA gun.  If it fail to man the guns again it would be left hanging in the open amidst the American firepower.  As it is always the case in these critical moments, it failed to grab the gun and take on the emplacement.  The upside is that “US firepower” weren’t forthcoming either.  

Towards the middle, the Germans packed into the VC buildings in a bid to delay an American take over.  See that “DM” AA Gun next to the green arrow at H10?  This is the one with 20FP and in the last turn it finally saw an American 9-1 and a 747 with MMG in tow walking into its bore-sighted hex.  YES!!  Then nothing happened.  The group passed their MC checks without spilling their beers.  The gun crew then broke out of frustration.  Another 9-1 took a HS in an attempt to flank the AA gun but was shot by some sneaky Germans in the dark, from the direction of Église Notre-Dame de Sainte-Marie-du-Mont.  

The paras conceded after CCPh.  

How’s this Scenario Interesting?

This scenario isn’t easy for the paratroopers.  However, as a story it’s FANTASTIC.  You see the scatter of a paradrop.  You see the Americans getting organised at night.  You see German convoys getting ambushed and killed in the dark by paratroopers who appeared out of no where.  You see groups of paratroopers coalescing around the village, its scatter posing an element of threat to the defenders.  Fighting in the dark obviously offers its own challenge as well.  Star shells give a beautiful variability to the scenario in every new turn.  I love the Night rules.  I really do.  I revel in the elegance of it.  

Plus of course, if there’s one thing you MUST do on VASL, it’s Night.  

Additional Thoughts re: the Convoy

Chris’s comments reminded me of a discussion I had with my opponent afterwards. The guys who ambushed the convoy did so brilliantly but they could barely made it to the battle area at the end. Perhaps the thing to do here is to pick up and start moving to the village after landing. The convoy’s “on rails”: it’s going to move down the road to the paratroopers anyway. That way the paras don’t end up spending too much time with it. If any of you are going to do this instead, please let me know if this is the better way to go!

Advanced Squad Leader scenario BFP20 Bypassed Lehr After Action Report (AAR)


Advanced Squad Leader scenario BFP20 Bypassed Lehr After Action Report (AAR)

Scenario Background

This scenario depicts action that happened on the same day as that of BFP19 Russian Style.  Combat Command B’s 18th Infantry Regiment ran into “a nest” of Panzer Lehr soldiers near Mesnil-Durand and proceeded to clear them out.  

Le Mesnil-Durand, France

Victory Conditions and Tactical Considerations

The Germans needed to take at least 4 buildings on the bottom map in 6 turns, which meant the Americans needed 12 out of 15 buildings.  To do their jobs, the Americans showed up with 20 squads, 4 leaders (a 9-2!) and 5 MMGs.  The Germans had 15 squads, 1 HMG 2 MMG, 4 LMG and 5 foxholes.  I looked to engage the Germans quickly in the middle with our superior firepower and put some forces around the flanks, especially when we only have 6 turns. If you are setting up for this one, keep an eye out for the “v” shape formed by two straight long lanes that converge to a point at I2 on the bottom map where my opponent put a foxhole with an HMG and an MMG.  

After Action Report 

Advanced Squad Leader scenario BFP20 Bypassed Lehr After Action Report (AAR)

On Turn Two the majority of the Americans smashed themselves against the Germans at the big stone building.  It’s a fight for Wall Advantage.  Smoke Grenades helped us get close but a lot of the troops couldn’t hold their ground against Defensive Final.  The flanking team on the left ran into the hole in the wall where a HMG+MMG combo put a fire lane through.  There’s no running past this wall, one has to Advance across.  

Advanced Squad Leader scenario BFP20 Bypassed Lehr After Action Report (AAR)

Turn 4 saw the flanking team on the left moved around the HMG+MMG firelane and scrambling in from that side.  A pair of squads realized the Germans got Dummies covering the right and was converging in as well.  In retrospect they could use more help because they were stopped every step of the way by a retreating MMG team (covered by the “Wall Advantage” counter” apart from the HMG+MMG anchor at the bottom of the “v”.  The troops in the middle caught a lucky break when an American HS who jumped into the building Ambushed the defenders and decided to infiltrate to the space behind them!  Germans started puling back but but unfortunately the Americans weren’t quick enough to stop the Germans from leaving.  The Americans started massing together for a final push down the lower middle of Map 6.  

Advanced Squad Leader scenario BFP20 Bypassed Lehr After Action Report (AAR)

The troops went for a major push down the middle of the map and was repulse in a big way.  Brokies scrambled back to the big stone building and was caught (and eliminated) by a counterattacking German squad!  The left flanking liberated more buildings but we ended up 9 buildings instead of 12 we needed.  We lost 11 squads out of the 20 we started off with and were quite frankly out of bodies to push further.  

How’s this Scenario Interesting?

This straight up infantry scenario underlined to me how much I need to spread my forces more when on the attack.  We had no one behind the big stone building as the attack developed.  The Germans never had to peel their eyes from in front of them until I got a HS who succeeded in infiltrating through the front lines.  None of the Germans were torn about whether to stand and fight or to go help somewhere else because the attackers were so focused.  The flanking team on the left did well, I should do more of that or perhaps allocate more resources to the flanks next time.  The right flank had the right idea but again, not enough bodies.  

Fix and flank.  Fix and flank .. 

We are onto BFP21 Ripe for the Picking next.  


Advanced Squad Leader scenario AP137 Fear Naught (AAR)

This is 26 June 1944 St. Manvieu-Norrey (west of Caen), France.  Kurt Meyer’s “Hitlerjugend”  met up with the 6th Royal Scotts Fusiliers advancing behind a Creeping Barrage in the rain.  The Scots need to take the multi hex buildings and kill the Panthers.  The Germans need to have MMCs surviving within a big magic circle at the end of Turn 6.5 and blow the Scots’ CVP cap of 39.  .  

https://erenow.net/ww/operation-epsom-viii-british-corps-vs-1st-ss-panzerkorps/3.phphttps://erenow.net/ww/operation-epsom-viii-british-corps-vs-1st-ss-panzerkorps/3.phphttps://erenow.net/ww/operation-epsom-viii-british-corps-vs-1st-ss-panzerkorps/3.php

As the Scots, we get two Creeping Barrages, which I did NOT manage well.  While I credit the left barrage for killing a Panther in the first turn, it crept way too slow, to the extent that it blocked our troops and hence protected the Germans!  The right one worked out okay.  You can plan for Creeping Barrages to go “forward” 2 hexes only in your player turn or on both your player turn and your opponent’s turn (Defensive Fire Phase).  An attacker should really count out where he needs to go and how quickly the Creeping Barrage would allow him to get there. A slow barrage gives defenders a good pounding (or encourage them to leave).  A fast barrage might run away from you and hop through the defending lines.  I needed the left barrage to take out the little enclave on the German left, so I made it go slow.  What I should have done is to plan for a lifting of the barrage post enclave so that my troops could hit the village.

Advanced Squad Leader scenario AAR AP137 Fear NaughtAdvanced Squad Leader scenario AP137 Fear Naught

The Churchills are great smoke machines.  Unfortunately that thing is slow and I need to be careful about not getting it in places where it could get caught by a fast moving Panther!  It can’t do anything to a Panther frontally (apart from DI shots) yet the Panther can flick a toothpick at a Churchill and it will go “Boom!”.  I lost one of the Churchills that way.  Good thing another Churchill fired off its Smoke Mortar quickly and went into motion!  That barrage on the left was totally in my way on Turn 5, my folks had to walk around it.  

Advanced Squad Leader scenario AP137 Fear Naught (AAR)

The unexpected happened!  Instead of walking away from the Panther, my infantry rushed it and the Panther malf’d it’s MA!  So one of Churchills spun back around and slid right next to the Panther in bypass.  It had to do an ESB for the extra 1 MP to stop the Churchill for the shot but since it’s a chance to bag the second Panther, we took it anyway.  The Churchill rolled and immobilized.  We then moved other assets in place around the Panther.  The Panther wasn’t able to repair it’s Gun but what followed was shots after shots from 2 Churchills, a Piat and a couple of CC attempts.  The Panther just won’t go down (DI or otherwise)!  Plus on top of it, my Piat malf’d and my Churchill’s MA malf’d!  Everything else went rapidly downhill towards the end of Turn 5.  We were absolutely blocked by our own Creeping Barrage on the left and everyone’s either malf’d or broken or straight up vaporized on the right.  The Germans must have rolled about 6 snakes.  It’s tragic!  

(A specific account on our attempt on the second Panther)

IMG 4241

In the last German turn the Panzer fixed its gun!!  It took out the immobilized Churchill sitting next to it and a shreck took out the other Churchill that was angling for a side shot.  The Germans just hit the Scots’ CVP cap!

I obviously mismanaged my Creeping Barrage but I will definitely do it better next time.  Apart from that this is quite the scenario!  There were tons of action and while I am really “hampered” by the slow Churchills, it’s a ton of fun!  

Next in Action Pack 14?  AP138 Red Horse Recon

BFP18 Necklace of Pearls

Advanced Squad Leader scenario BFP18 Necklace of Pearls

Next one up in our Bocagefest (BFP Operation Cobra) is another one by George Kelln.  The Americans were still trying to breakout of the neverending Normandy bocages.  This time they need to clear a road from the north to the south in 7.5 turns.  The difference here from the last scenario is that there are now 3 Panthers and they are mobile (*shudder*).  Oh, there’s also this big 81mm ROF3 mortar that, my opponent gleefully reminded me, can be dismantled and loaded onto a Panther.  Sure enough, the mortar scored a critical hit firing through the trees at a Sherman moving behind a Bocage!

.. and the world went quiet for a moment as it rolled slowly to a stop.

img_3945IMG_3957

BFP17 Seize that Crossroad

The designer of this scenario is George Kelln of Lone Canuck fame.  This time the Americans need to rush to secure a crossroad (big red circle) from the Panzer Lehr division in 7.5 turns.

As the 8th Regiment of the US 4th Divison, my considerations are :

  • As ever, I am in a tight race against the clock.  Even though my route might be a too oblivious I am going to try to avoid crossing too many Bocages.
  • Having said that with 2 dug-in Panthers (which turns from a large target to a small HD target) plus 2 HMGs with 2 “minus 1” leaders.   out there I can’t be avoiding so much Bocage that I will be moving in the clear.
  • Most of the Germans have better morale than mine, although I have more leaders (not more “minus’s”) and 50% more manpower.
  • I should put the mortar platoon on the only high ground I have as overwatch to interdict any lateral movements, although they can easily be attacked by the forward positioned Germans.
  • 1 pair of Culin cutters pretty much means I will be digging one path.
  • I don’t know what effect the opening bombardment will have but I need to rush as much as the board I can.  Hopefully we can make contact before the Germans recover.  The tanks won’t be available til Turn 5, so we will be legging it.

Let’s see if all this works out.

img_3848img_3875

AAR A79 Mike Red – Defense in Seaborne Assault!

A079 - 01 German-proc

A79 Mike Red depicts the part of D-Day landings at Courseulles-sur-Mer, the most heavily fortified position – “Mike Red” – that the Anglo-Canadian forces had to face on Juno Beach.

A total of 16 Canadian squads bore down on 5 second line German squads and 6 gun crews.  The crews, with their 8 morale and self rallying ability, were the backbone to the whole German defence.  The Canadians win by clearing all pillboxes of good order Germans and by exiting 7 VPs of personnel in 7 turns.

The defence layout you see is actually created by my opponent.  The tetrahedrons discourage landing crafts from unloading directly in front of the pillboxes.  The antitank gun in the leftmost pillbox and the medium machine gun in the trench next to it covered most of the beach.  The pillbox in the center housed a heavy and a medium machine gun, accompanied by an 8-1 leader.  The approach to the pillbox was covered by mortars on both sides.  Behind the row of wires, there was a seawall that ran all along the edge of the hinterland.  The singular pillbox that pointed inland was for rallying and for concealment generation, apart from being a great position from which to shoot any Canadians who broke through.

A079 - 02 Brit - LC aground DP1 LC stunned 2.5+ldr landed 1.5 squad + leader died-proc

Canadian Turn 2 : The first Canadian boat beached.  Two and a half squads hit the sand with their gear.  They were promptly shot up by the German defenders and only 1 squad survived (note : infantry doing seaborne assaults are Fanatic on beaches, but they Casualty Reduce instead of Break).  The survivors did their best to pick up the mortar and the PIAT in the meantime.  The other boats kept coming in.  One of the landing crafts went aground precisely where the German AT gun was bore-sighted.  It was a scary moment for those involved but the Germans kept firing armour piecing shells instead of high explosive shells which were a lot more effective against landing crafts.  Someone must had gotten the shells and the boxes switched!

A079 - 02 Germans - Shifting right-proc

German Turn 2 : The Germans figured this was a good time to shift their people to the right flank.  The reinforcement arrived as well and positioned itself as a the “back stop” to possible breaches.  A team of gun crew started moving the left most medium machine gun into the pillbox so as to cover more of the beach against the incoming Canadians.  Their ability to reposition quickly was really a tribute to the top quality machine gun designs the Germans had, which made them more portable than their opponent’s MMGs.

A079 - 03 Brit - Hero w FT-proc

Canadian Turn 3 : The Canadian mortars were very successful in getting off smoke shells in key places.  More Canadians hit the beach.  At this stage of the landing, the Canadians lost 5.5 squads, 1 crew and 3 leaders!  The bright spot here was that a hero stepped up from amongst the ranks and appeared to have picked up a flamethrower ..

The German antitank gun got their ammo figured out at last.  However in most cases the Germans waited for the landing infantry to step onto the sand before opening fire.

A079 - 05 Brit - Try to set DC to blow the seawall, hero with FT shot-proc

Canadian Turn 5 : The Canadians tried very hard to set a demolition pack against the seawall.  Luck was simply not with them that day.  The Germans had already positioned their medium machine from the left flank to one of the shell holes on the right so as to cover any breaches.  You can’t see this too well but the Shermans fired off a few smoke shells already.  The flamethrower wielding hero took advantage of the smoke cover, ran across the beach and got ready to roast up the center pillbox, only to be KIA’d by the antitank gun!

A079 - 05 Brit - Melee Brit CR-proc

Canadian Turn 5 (contd) : There was a mild breeze that day and hence the smoke drift.

A079 - 05 Brit - Melee Brit CR Xray view-proc

Canadian Turn 5 (contd) : This is the same view as the one above but with the smoke (mostly) deleted.  What I meant to say in the diagram was that the Canadians got casualty reduced (“CR’d” not “DR’d”) in close combat.  Taking advantage of the drifting smoke, the MMG crew voluntarily broke and ran towards the right flank, getting itself positioned to hinder the Canadians from exiting.

A079 - 05 Ger - MMG & crew broke and ran last turn .. Ger squad KIA-proc

German Turn 5 : Some of the German troops went back to the pillboxes on the left flank.  The Canadians need to clear the pillboxes AND to exit 7 VPs off the board, so keeping the melee going would be an important element to the German plans.  The MMG crew on the right flank (top of the map) couldn’t rally though.  The Germans did what they could to move some folks in and if necessary, grab the machine gun!  The Canadians were not doing well with the melee at all, they got casualty reduced again!

A079 - 06 Brit - 4 close combats-proc

Canadian Turn 6 : The Canadians finally managed to set demolition charges against the seawall, now they need to get away from the wall to blow it.  The Canadians flung themselves onto the pillboxes in this round.  They would win a couple of the close combats but they would continue fight it out at pillbox locations.   The center pillbox might be the most frustrating, not only did it yield no German casualties in face of steady Canadian losses, it now sprung a new German leader!

As per my usual practise, I promptly named this rising star after my opponent.

The Shermans moved across the beach in anticipation of a successful breach in the seawall.  The Canadian infantry had little chance exiting the board at this stage, but getting two Sherman’s off would make this a Canadian game, provided they were successful with the pillbox melees as well.  One of the Shermans bogged.

A079 - 06 Ger - Melee still on- Vol break away with the plunger-proc

German Turn 6 :  The Germans on the top right of the map managed to join up with the MMG crew.   The notable move from my opponent here was that he voluntarily broke the Canadian squad that held the detonator switch to the set DC which allowed a leader to rout with them as well.  The leader would then grab the switch from the brokers in the coming rally phase.

A079 - 07 Brit End-proc

Canadian Turn 7 :  My opponent’s enterprising leader grabbed the detonator switch as planned and breached the sea wall.  The Shermans started up and drove inland.  The first one rolled for “excessive speed breakdown” and got off the board.

The first 6 VPs!  The Canadians only need one other Sherman to get off.

The next Sherman drove across the breach and rolled for ESB.  It went too fast and was immobilized.  Okay, there’s still a last one.  All the Canadians need was 7VPs off the board, after which it’s up to the melees.

The last one got onto the hinterland, clanked forward steadily ..

.. and broke down as well.

ASL 105 Going to Church AAR

French Canadians from Les Fusiliers Mount-Royal met up with German SS troopers at St. Martin-de-Fontenay on August 1 1944.  The Canadians were to clear the SS from a church in the area.  I played the Canadians and Robert Zinselmeyer, the SS .   This was a 6 turn scenario and the Canadians win immediately when there were no unbroken SS in the church.

ASL105-CT1b-proc

This was the Canadian Turn 1 : the Canadian death star contained a heavy machine gun (“HMG”) that went on a long rate tear, obliterating the east side of the church  A team of Canadians rushed forward from the northeast.  Another team moved around to the south-west of the church to catch Germans routing to that side.

ASL105-GT2a-proc

This was the German Turn 2 : the Canadian death star continued to work on the east of the church.  Canadians move closer from the northeast and the southwest.

ASL105-GT3a-proc

This is the German Turn 3: a half squad attempted to approach the church with a demo pack earlier but was routed.  This was the first attempt to retrieve it.  The half squad (“HS”) was then KIA’d, as were a number of other Canadian units afterwards.  The Canadians never got this demo pack back.  The Canadian death star decided to relocate for lack of targets.

ASL105-CT4a-proc

This was the Canadian Turn 4 : The Canadians didn’t do very well on the east side.  The lone intruding HS crashed into the church but was immediately met with the SS in close combat!

ASL105-GT5a-proc

German Turn 5 : Even though the odds of that mêlée was turning because of reinforcing Canadians from all sides.  The Germans were still blocking one of the staircases while the rest raced upstairs.

ASL105-CT6a1 - KIA Demo-proc

Canadian Turn 6 : A valiant Canadian 8-0 made a desperate try for the dropped demo pack and was killed as well.  The mêlée hadn’t ended.  Scores of Canadians were held up by a wounded German 8-0 at one of the staircases!  Someone suggested an infantry overrun on the wounded German but the Canadians failed to act.  It was just too crowded and they were afraid that they might shoot their own.  The Canadians rushed up the other staircase in frustration.

ASL105-End-proc

Last German Turn : the Canadians were able to dispatch the wounded German 8-0 at the end of the previous turn.  All German upstairs were then immediately encircled!!  The Canadian laid heavy firepower on the Germans inside the church.  The HMG went on a rate tear as well!  However when the smoke settled, one German HS remained.

The Canadians ran out of time.

ASL102 Point of the Sword

ASL 102.Setup-procGoogle Map : Juno, Sword, Langrune-sur-mer & Caen

This is a Normandy scenario, dated 6 June 1944, D-Day. The 4th Commando Brigade moved towards Langrune-sur-Mer and into elements of a Panzer division. They radioed the French Canadians nearby for help and they joined the fight on Turn 4.

On the far north (left on-screen) of this board is a big patch of woods. As you move towards the south it’s vast tracts of open ground with little patches of grain and orchards. There’s a village on the south (right) with a lot of rowhouses and stone walls.

The commandos setup on the left at the edge of the woods. The Germans setup in the village. The commandos are assault engineers and so they get smoke grenades at 4 or less. They get some demolition charges and a 51” mortar. The French Canadians bring in a couple more mortars and heavy machine guns later on, also from the north.  The Germans get a heavy machine gun, a medium machine gun and a few light machine guns plus a 50” mortar.

The Germans have 3 fortified hexes in 3 different stone buildings. The Commonwealth wins immediately when they control 2 or more buildings that contain fortified hexes. Takezo played the Germans while I played the Commonwealth.ASL 102.1AlliedDFPh-proc

This is Allied Turn 1 :  the commandos started making the trek over the divide.  The mortar fired off a smoke round down the road where the German HMG pointed at.  I hoped to feint a left (east) and head right (west) when the French Canadians show up on Turn 4.  I made the mistake of putting the mortar too far back though.  Later on in the game it was unable to support the push.ASL 102.2AlliedMPh - -proc

Allied Turn 2 : My hero rushed up with a demolition charge to draw some fire away from his brothers.  He got than that.  He ran into a hidden German half squad in the woods and got shot by the Germans holed up in the buildings from the middle of the board.  The British sniper was very active as well, hitting the same stack of Germans at the top of the map multiple times!ASL 102.4AlliedDFPh-proc

Allied Turn 4 and the French Canadians arrived at the scene.  There were a number of German MG and a mortar (in that roundabout) to content with, hence the entry was crowded and disorganised.  The commandos threw smoke grenades to cover their approach the best they could.  The British mortar was embarrassingly out-of-place.  By this time it was quite clear that the schwerpunkt was coming from the right (bottom).ASL 102.5AxisMPh-proc

Axis Turn 5 : the Germans were moving back and to the west (bottom).  The lead Commonwealth troops moved fast enough to harassing the retreating Germans.  ASL 102.7AlliedAFPh-proc

Allied Turn 7: there was a bit of drama with the Germans holed up on level 1 of a stone building.  Earlier shots pushed them towards being fanatic.  Rounds after rounds of fire couldn’t touch them.  The French Canadians figured they would give it a last try with a feeble little 50″ mortar.  Guess what?  They rolled snake eyes and got a critical hit!!  The crowd went wild (to the extend PBeM could..).  As the dice gods would have it : they then rolled boxcars for the IFC resolution …. I swore I heard my British counters groan from their boxes.

The Commonwealth troops, close behind the retreating Germans, moved to have them encircled.
ASL 102.8AlliedMPh-proc

Allied Turn 8 DFPh and I was out of time : Tazeko revealed where the Fortified hexes were after the last Allied Movement Phase.  The Commonwealth troops would end up advancing into 1 out of 3 of the fortified buildings as opposed to the 2 required by the victory conditions.

For those of you who played this before, you are right, there’s a slight mistake here.  The 3 fortified hexes should be in 3 different stone buildings.  Oh well, a game is a game!

Going forward there are a few things I will do differently as the attacker :

  • move forward more aggressively, seek to push the boundaries and set the tempo as opposed to having the tempo dictated to by the defence.
  • have the mortars move up together with the troops.
  • if I am to play this scenario as the attacker again, my commandos will seek to push up a lot further to allow the French Canadians space and cover to get on the board easier

Any thoughts and/or advice, please comment!

Resources : Joss Attridge’s “Point of the Sword (ASL102)” in HullDown.Org

Eglise de Langrune sur Mer, Calvados, France

Eglise de Langrune sur Mer, Calvados, France (Photo credit: Wikipedia)

A German prisoner captured by Canadian troops ...

A German prisoner captured by Canadian troops at Langrune sur Mer, 7 June 1944. (Photo credit: Wikipedia)

Headquarters, 4th Special Service Brigade, mak...

Headquarters, 4th Special Service Brigade, making their way from LCI(S)s (Landing Craft Infantry Small) onto ‘Nan Red’ Beach, JUNO Area, at St Aubin-sur-Mer at about 9 am on 6 June 1944 (Photo credit: Wikipedia)

S1 (Part 1) Retaking Vierville

On June 7 1944, one day after the Normandy landings. the 101st Airborne (“Screaming Eagles”) was sorting themselves out from all over the Cotentin Peninsula and was tasked with securing the eastern approach to the American landing at Utah beach. Vierville-sur-Mer was a major traffic thoroughfare. Although the Americans secured it earlier they had to moved westwards towards the German strongpoint of St. Come du Mont (see Mission Albany).

There are three groups of symbols in this map of Normandy.  The one on the top left is Utah Beach, the one on the bottom left is St. Come du Mont which was a German stronghold.  The group to the right is Omaha beach and a bit inland from Omaha Beach is Vierville-Sur-Mer.

An assortment of German units took the opportunity to deliver a counterattack and among them, the elite 6th Fallschirmjäger Regiment. This day would see an all out brawl at Vierville-sur-Mer, paratroopers to paratroopers.

Erwin plays the Germans and I the Americans. We decided to play this Advanced Squad Leader Starter Kit Scenario with full Advanced Squad Leader rules. The Americans win if there are no “good order” German units in the four buildings marked with “V”s on the map. By the same token, the Germans need to keep a “good order” unit in at least one of the four buildings at game end (notice the Americans have the last move).

Turn 1 German - MPh

Turn 1 German Movement Phase

Some elements of the 1st Battalion, 506th Regiment of the Screaming Eagles were making their way through the center of town when German units (1058th & 919th Grenadier Regiments) appeared from different directions.   (Right edge of the map is North.)

The Americans went straight to work.  Two full squads and the  8-1 leader went to the key buildings in the southwest, the other elements went to the northeast to meet up immediately with the 1058th Grenadiers.  The southwest element could potentially be isolated and might find itself fighting a much tougher battle until  reinforcements arrive.  Their mission was to play for time.  The northeast element was to clear the way for the reinforcements and were free to play to their strength in the attack.

Turn 1 American - Close Combat Phase

Turn 1 American Close Combat Phase

Other American elements started to arrive.  They used the grain field (which is in season) to make it across the open ground, using a building for cover.  A potential danger was that new German elements might appear behind them and cut them off from their rout paths.  So one squad stayed behind in the woods as the rear guard (circled in orange on the map above).

Sketch 2013-06-22 18_27_32

Turn 2 American Movement Phase

A broken American squad on the south west decided to step it up, rallied and went fanatic (battle hardened, marked by the asterick). In their desperation, a hero arose in their midst!  The reinforcing Screaming Eagles lost no time in closing with the 1058th Grenadiers on the northeast.  Hellbent on blasting their way through, they also drew fire away from their brothers who followed.  The German paratroopers arrived from the south east as well.  They carefully made their way through the woods towards the sounds of battle.  (Right edge of the map is North.)

Sketch 2013-06-22 18_40_09

Turn 3 German Advance Fire Phase

The 919th Grenadiers crossed the street in the south-west and pressured the squads on that corner of the intersection.  At the same time the 6th Fallshirmjäger moved to slice the battlefield in half, isolating the 8-1 and his little group.  To the north (right edge of the map), the Screaming Eagles couldn’t break through the 1058th Grenadiers.  They needed to clear a way to town fast ‘cause the key buildings are falling to the Fallshirmjäger soon, which also means they and their arriving brothers would all be standing outside the grain field with no protection if they couldn’t get into town.

Sketch 2013-06-22 18_45_21-1

Turn 4 German Rally Phase

The Screaming Eagles managed to get into close combat in the north.  A half squad was killed when they went in for hand to hand with a German squad and their 8-1 leader.  On the other side of the block an American half squad ambushed their German counterpart when they broke into their building.  The Americans slipped through to the other side and met up with the American paratroopers that were holding the Fallshirmjägers at bay.  However the American’s hold on the key junction was strained as they endured volleys after volleys of German fire.

So here we are at the start of Turn 4 in a 5 turn scenario.  Will the Germans succeed in capture at least one of the buildings at the intersection and hold off American attacks?

am747Sge548S

How about coming home everyday to 30 mins of PBeM game over VASL?

Whether you are a fellow newbie who would like to learn together or an experienced ASLer who don’t mind helping me up the curve. I play to enjoy and to learn. Please message me at jackson-dot-kwan-at-gmail-dot-com!!

Google