Advanced Squad Leader Scenario AP132 Night of Nights After Action Report (AAR)
Scenario Background
It’s D-Day, the Deuce (502nd PIR) and the Currahees (506th PIR) did a night jump into Sainte-Marie-du-Mont!! The reception on the ground were laid out by the Infanterie Divison 352. The 502nd PIR and the 506th PIR were of course, part of the 101st Airborne Division (“The Screaming Eagles”). The 352nd, according to Wikipedia, was formed in occupied France in early November 1943. They were expected to be transferred to the Eastern front but received orders for the defence of the Atlantic Wall instead.

(“Easy Company”, 506th PIR, 101st Airborne Division, WWII in Color)


Victory Conditions & Tactical Considerations
The historical background to the scenario mentioned that “the Americans quickly reformed into small units and set out in the inky summer darkness …”. It wasn’t kidding, it was dark. Night Visibility Range dropped to zero shortly after the game started. That means you can’t shoot at anything that’s not illuminated. That means you can walk right into a concealed enemy unit and chance triple pointblank fire if that’s your thing. Convoys run slow at night anyway, but now they can’t go BU. More on that later.
The paras got quite a bit to do in their 8 turns. They had to achieve at least 3 of the following:
- Control 4 designated buildings, one of which is a church, assumed to be “Église-Notre-Dame de Sainte-Marie-du-Mont”.
- Capture/ Eliminate all AA Guns.
- Exit 12 Exit VP off the North edge (stage right).
- No German trucks have exited.
After Action Report
.JPG")
The American drop scattered far and wide. They went offboard to the left and to the bottom. On top of it they needed to run around recovering support weapons. As the Germans my setup was entirely upfront, aimed to spot a paratrooper early and lose our “No Moves”. Anyone slightly to the back (stage right) were dummies. I sited all my AA guns so that they could see the skies to the left as well. My thinking was if they see the para’s floating down, they could get rid of their “No Move” counters and didn’t have to shoot and reveal their position (SSR3). That was not to be, para’s, while under the parachute are not “known” units. Only “known” units can help remove “No Move” counters from spectators. We did shoot a few paras as they landed in the grain field. The folks who dropped offboard down at the bottom were particularly troubling. I had 2 AA guns situated there. As they walked back onto the board they could certainly surround us on both sides. I had only a leader, a squad and a stack of dummies behind the pair of AA guns!
.JPG")
The German convoy decided to run through the gauntlet on Turn 2! See, having them enter on Turn 3 has certain merits, since that would keep the paras engaged for another turn, far away from the village and the right edge of the map. On the other hand, they would also give them another turn to block off the road. We decided on Turn 2 and rolled the dice.
I put the armoured car and the halftracks up front. If the paras wanted to block the road off, they would have to hit slightly tougher targets. There’s an Ammo truck in the convoy. If it burns it would explode like a Goliath – 36FP in its hex and 16FP in all surrounding hexes. I thought about putting it upfront but that would give the para’s a level of comfort afterwards. I put it in the back so that the explosion would only harm one other vehicle.
Having said all that my convoy got ripped apart almost immediately. There probably wouldn’t be any “high speed blowing through roadblock” scenarios anytime soon. Trucks had no problems dying in the gunfire. At the bottom of the map, my worst fears were realised. The para’s came and start getting into Close Combat. In the middle of the map, the Americans pushed menacingly close to one of my AA guns. There were a lot of skirting around star shell illuminations. Here’s the struggle: I didn’t want to try for too many star shells as such acts give away where my dummies were.
.JPG")
We just passed the half way point. You can tell even by the star shells that the fighting was pushing near to Sainte-Marie-du-Mont. My last half track was stunned (had to be “CE” to drive during NVR 0) and kiled by a well placed DC afterwards. Funny enough my Ammo truck was disabled and its driver ran off. The American’s CC’d and captured another one of my last trucks hoping it to be the Ammo truck (‘cause nothing else exploded), and drove off. The Americans broke the AA gun crew in the middle of the map. However, the scattered state of the paratroopers gave a quick chance for us to push them back further! Unfortunately my concealed Germans couldn’t ambush them in the dark. Towards the bottom, the Germans killed some para’s around the pair of AAs and broke the other. They were safe for the time being. I was very aware of the fact that my victory buildings were all defended by dummies (no offence…). The timing of when my defenders should peel off the front line is the million dollar question, isn’t it?
.JPG")
The para’s on the left were now running full tilt down road towards the middle of the map! My little counterattack in the middle did push them back a bit but failed to draw any blood. We dragged the gun back a hex towards the building but we couldn’t put it to use again, nor could the Americans capture it, yet. The Americans were on us towards the bottom of the field. It was time to peel back and take over key building defense from the dummies! Towards the top of the map the AA gun crew got shot away but refused to run off too far. The Americans didn’t have enough good order folks (it is harder to rally at night) to take that gun just yet.
.JPG")
Second last movement phase for the Americans! I broke the pair of AA guns down a the bottom but the Americans still needed to capture them (note to self: stop firing at stupid targets). A hero made a rush for it in the zero NVR darkness (to suppress further fire from the gun crew) but he was blown away in the triple point blank fire. Another squad made contact through the gully but it ended up being held in Melee. At the top of the map the gun crew rallied!! It jumped back on top of the AA gun. If it fail to man the guns again it would be left hanging in the open amidst the American firepower. As it is always the case in these critical moments, it failed to grab the gun and take on the emplacement. The upside is that “US firepower” weren’t forthcoming either.
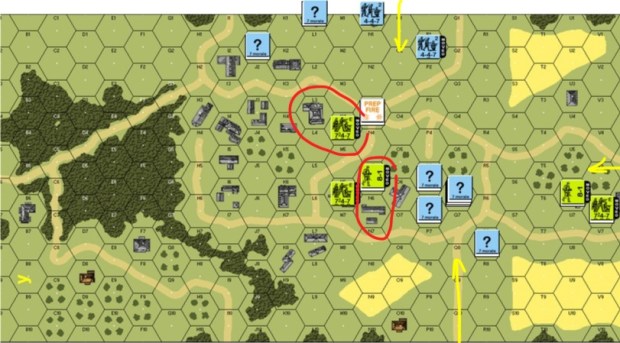
Towards the middle, the Germans packed into the VC buildings in a bid to delay an American take over. See that “DM” AA Gun next to the green arrow at H10? This is the one with 20FP and in the last turn it finally saw an American 9-1 and a 747 with MMG in tow walking into its bore-sighted hex. YES!! Then nothing happened. The group passed their MC checks without spilling their beers. The gun crew then broke out of frustration. Another 9-1 took a HS in an attempt to flank the AA gun but was shot by some sneaky Germans in the dark, from the direction of Église Notre-Dame de Sainte-Marie-du-Mont.
The paras conceded after CCPh.
How’s this Scenario Interesting?
This scenario isn’t easy for the paratroopers. However, as a story it’s FANTASTIC. You see the scatter of a paradrop. You see the Americans getting organised at night. You see German convoys getting ambushed and killed in the dark by paratroopers who appeared out of no where. You see groups of paratroopers coalescing around the village, its scatter posing an element of threat to the defenders. Fighting in the dark obviously offers its own challenge as well. Star shells give a beautiful variability to the scenario in every new turn. I love the Night rules. I really do. I revel in the elegance of it.
Plus of course, if there’s one thing you MUST do on VASL, it’s Night.
Additional Thoughts re: the Convoy
Chris’s comments reminded me of a discussion I had with my opponent afterwards. The guys who ambushed the convoy did so brilliantly but they could barely made it to the battle area at the end. Perhaps the thing to do here is to pick up and start moving to the village after landing. The convoy’s “on rails”: it’s going to move down the road to the paratroopers anyway. That way the paras don’t end up spending too much time with it. If any of you are going to do this instead, please let me know if this is the better way to go!