RbF I-4 Used and Abused – Advanced Squad Leader AAR

RbF I-4 Used and Abused – Advanced Squad Leader AAR

Scenario Background

This is the Mokmer Airstrip (today’s Frans Kaisiepo International Airport) on the island of Biak, 15 June 1944.  The IJN had 3 airfields built and captured by the US 41st Divison.  The IJA decided to recapture them, aided by the remaining 4 IJA tanks on the island.

UntitledImage

(https://upload.wikimedia.org/wikipedia/commons/a/a4/US_landings.jpg)

Google Earth: Biak

UntitledImage

(Credit: Google Earth)

(“Soldiers of the 41st Infantry Division, after emerging from the jungle, overcoming Japanese resistance, advance on an open field on the South Pacific island of Biak, off the New Guinea coast; May-August 1944.” Credit: https://www.ww2incolor.com/)

Victory Conditions & Tactical Considerations

The IJA broke out of the Dense Jungle with 12 squads and 4 leaders, which included a 10-1 and a 9-1.  They had 4 LMGs and 2 MTR that could pump WP out to 6 hexes.  There were also the 4 x Ha-Go’s described in the Historical Perspective.  The Americans had 11 squads: 3×667, 7×666 & 1×546.  They had 3 leaders, which includes a 9-1 and a 8-1, plus 1xHMG, 2xMMG, 4xBaz44 and a 60 MTR.  The IJA win at the end of any Game Turn if they have 7 CVPs or more than the Americans (unbroken) on/adjacent to any runway hex, and they had 7.5 turns to do it.

The IJA didn’t really have an advantage in manpower (so no unnecessary CC), and the Americans outranged and outgunned them.  They did have an advantage in leadership and morale, plus they could get to where they wanted to get to if they want it bad enough.  The 4 AFVs were key for preventing the Americans from backing off into the airfield.  These bazookas had a range of 4 but the Ha-Gos were small.  So TH on a moving Ha-Go is 6 @ 1 hex, 5 @2, 4 @3, 1 @4, ie they were effective at 2 hexes at best unless they catch you stopping.  The 2 knee mortars had WP and these Ha-Gos had vehicular smoke grenades, apart from being able to provide Armor Assault or vehicular hindrances if needed be.

The IJA setup on row 3 while their tanks come in from offboard.  Americans setup near the bottom edge of the top map, however in doing so, would have to retrograde across plenty of Open Ground, first to the tree line on Board 14 (bottom) and then across the airfield (where you get an additional -1 to incoming fire).  We needed to back up before the IJA tanks got behind us!

I took on Brian William’s US setup in his AAR from Jan 2000.  The idea here was to defend the left and the center where it’s closest to the airfield.  We would try to hold the line for as long as possible before backing off onto the airfield.  Having the IJA AFV hooking behind us would definitely be an issue.  Hopefully our bazooka’s would deter some of that.   The HMG (plus 9-1) and the 60 MTR were in the trees located in the center of the board.  One MMG was in the middle with the 8-1 and the other MMG guarded the left side.

After Action Report

RbF I-4 Used and Abused After Action Report (AAR) Advanced Squad Leader scenario

The IJA wasted no time moving in.  Too fast perhaps, they already made me felt like I’d made a mistake and gave them too much ground upfront.  On the left, they prodded my lone squad (which promptly broke and ran) and was well on their way hooking around to the airfield.  In the middle, an IJA tank ran into the dense jungle in a bid to freeze my MMG.  We killed it in CC.  Slightly to the left of it, another IJA tank did the same with another MMG team and was unfortunately bogged in the jungle which only made it easier to kill.  Its partner AFV pivoted and stopped right in front of a HS bearing a Baz but they wouldn’t be able to hit a thing this whole game.  A couple of squads came through the middle with their knee mortars.  They weren’t able to do much damage to the HMG-Mortar team but they laid down smoke for their comrades to the right.  On the right, a body of IJAs came through the dense jungle unmolested.  That gully in middle of the field would be an ideal jump off point.

RbF I-4 Used and Abused After Action Report (AAR) Advanced Squad Leader scenario

In the middle, the concealed units that sat behind the MMG team were in fact, a Baz team!  They slid up under the wreck, shot the other AFV and immobilised it.  Given where it was, we figured an immobilisation was as good as a kill.  The remaining IJA tank (that stopped in front of the Baz team) started up!  The Baz team immediately fired but missed again.  The other Baz team fired but couldn’t connect either!  That Ha-Go waltzed all the way down to the HMG team (with 2×666 and a 9-1, no less!).  The HMG fired and got snakes!!  Pity you can’t CH with a 50 cal.  However, the TK’s 7 (AF1) at that range and the last AFV was put down as well.  The hoard of IJA on the right decided not to wait and did 2 Banzai’s (over OG!).  Meanwhile on the far left, the IJA platoon continue to make their way down south.  The Americans were fortunate enough to keep a team in front of them.  We couldn’t win most standing gunfights though, we had to always try to get the first shot in.

RbF I-4 Used and Abused After Action Report (AAR) Advanced Squad Leader scenario

We were able to decimate enough IJA troops to be able to pull a big withdrawal on the right.  We ran to the end of the airfield and hoped to advance across the runway (add’l -1 to incoming fire).  The IJA tried another Banzai on the far right but some pretty heavy firepower got in the way (and killed the IJA 9-1).  The IJA pulled another Banzai through the kunai on the left towards our MMG as well.  We had a flanker harassing that Banzai but it got hit by the IJA sniper halfway through.

Jungleers on Biak by Keith Rocco COMMENT

(“Jungleers on Biak by Keith Rocco”, https://www.militaryimages.net/)

RbF I-4 Used and Abused After Action Report (AAR) Advanced Squad Leader scenario

IJA Turn 6 – they had lost a good number of troops to the Banzai’s already.  The broken MMG HS from our first position finally managed to self rally!  So even though the IJA tried to run some troops up from the back, they didn’t get too far.  They did a final Banzai attack to get to the edge of the airfield, and lost their 10-1 in the process.  This was when they decided to call it quits and started pulling out RbFI-5 (ATF1) Paper Line ..

(“1944 Biak- Japanese Prisoners being fed” https://www.ww2incolor.com/)

How’s this Scenario Interesting?

I think movement across Open Ground was key for both IJA and US troops.  The IJA had 4 tanks to help hook around and to interdict American movement (their 4 LMGs would have extended the 4 hex IJA range nicely).  Plus their cover / smoke grenades should have provided protection for IJA troops in the face of heavy US firepower.  The Americans couldn’t win standing firefights and as I mentioned before, we had to always get the first shot in.  We would have a very hard time with our low morale if we had to retreat through opposing fire.  We lucked out early on when the first couple of Banzai’s didn’t leave the IJA with enough troops to see beyond the tree line, thus allowing US escapes.  Once we settled into the buildings around the airfield it’s all open ground for the IJA, those AFVs would have been helpful.

I really like Brian William’s setup.  The bazooka teams in particular were looking over the narrowest places (and/ or where those AFVs had to turn).  I couldn’t have done something as good as that.  I might have made the mistake of setting up a little to forward, increase the difficulty of my retreat and enabling Banzai’s through those jungles.
RbF I-3 South Park After Action Report (AAR) Advanced Squad Leader scenario

RbF I-3 South Park After Action Report (AAR) Advanced Squad Leader scenario 

Scenario Background

It’s December 22 1944 in Senonchamps (Belgium), not too far from Bastogne.  According to the scenario’s “Historical Perspective”, this was a lightly defended American artillery park.  


(Photo : ASLScenarioArchive.com)

(“The Ardennes, 1944-1945: Hitler’s Winter Offensive”)

Victory Conditions and Tactical Considerations

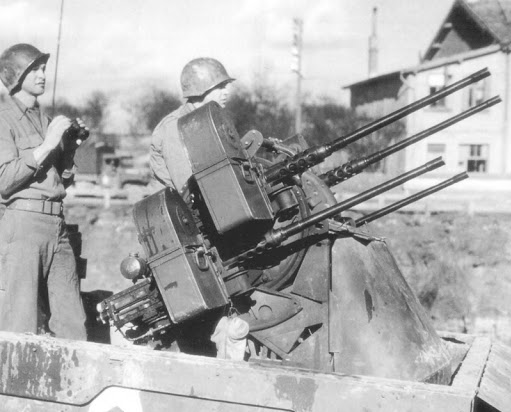
The Americans started the game with 3 HS and 2 crews but a lot of hardware : an MMG, a baz, 2 x M55 (quad .50-cal carriage with 24FP), 2 Stuarts, 1 Sherman and 2 jeeps (with MMGs).  They have 1x M1A1 “Long Tom (155L) and 2 x M1 (155) howitzers.  Getting tagged by a “One-Five-Five” means 30FP.  The good thing is that they start unmanned.  They would remain so until they got LOS to known German units.  7 US squad would show up on Turn 4 as reinforcements along with 2 leaders and more toys.  

“Kampfgruppe Kunkle” showed up with 6×548, 6×447 with 3 leaders.  They got a STuG and a STuH42 (105) backing them up as well.  

EC’s Wet with Heavy Falling Snow.  So the Americans could try torching some of the buildings but it wouldn’t be the easiest with the lack of personnel and the Wet EC.  Heavy Falling Snow means a +1 LV that would get worse with an additional +1 LV from Turn 5.  There’s however, no Ground Snow, so Smoke is in play.  The Stuarts can’t do much to a STuG front but I would have the STuH or a panzerschreck covering the flanks at all times.  The Quad .50-cal with its ROF3 is probably great for DI shots. We need to be careful about the Sherman with its fast turret and TK14.  Bazookas have TK16, we should stay away from those as well.  We would use assault guns as assault guns as much as we could.  I wondered what he planned to do with those jeeps, ie for mobility or (scrounged) firepower?  They wouldn’t be able to cross those bocages though.  

The Germans have two ways to win: 

* Win immediately if they capture/destroy all 3 of the guns
* Win at Game End if they hold onto the 4 VC buildings

StuH 42 from 242 StuG Abt

After Action Report

Advanced Squad Leader scenario RbF I-3 South Park

I decided to NOT engage the Artillery pieces until we absolutely had to.  The alternative was to “race” down the hill and across the open field with bocages in the way and in the face of heavy US firepower.  The first problem was one of the Quads.  It ripped squads off our OB through +1 Heavy Falling Snow and smoke we laid down.  We finally got to rush it and kill it in CC.  The STuG got out on the flank to keep the 17MP Stuart from squirrelling around our left.  I made sure it’s covered by the STuH from behind.  The Americans decided to abandon their jeeps and ripped off the MMGs.  I wanted to kill one of the Jeeps but the Stuart was a priority.  The other Stuart went around the back into my axis of attack.  The Sherman moved into.  My right’s got panzerschrecks lined up but they didn’t have to know that, did they?  

Advanced Squad Leader scenario RbF I-3 South Park

I had one more turn before proper Americans show up so I was racing those units down the street.  Their Stuart got a little too close and so I stopped the STuH in front of it and shot it with a HEAT round.  The Sherman decided to back off and got immobilised by an ESB roll.  However it’s right next to the last VC building so it was a good place to be!  I fought the urge to make my STuG “more useful” but kept to the discipline of covering the STuH.  Oh, my 9-1 went heroic.  Not sure if it’s a good thing ‘cause hero’s don’t break, they wound and they die.  The units with the US “Baz 44” and the “MMG” right of center were in fact, German.  The other Quad realised it’s going to be out of the game and the gun crew tried desperately to drag it along.  I got to keep this Quad out of play.

Contrary to what you see in the picture, the guns hadn’t yet seen us, and were not crewed yet.  

Advanced Squad Leader scenario RbF I-3 South Park

We sneaked up on the immobilised Sherman with a shreck but it took us 2 phases to shoot it pointblank.  Some pretty ominous ginormous American stack moved up to our last VC building though.  The mods were +5 but we took no comfort in light of the 36FP.  The STuH pumped rounds into the stack but was ineffective.  The big US stack broke our occupant of the last VC building and put us into a position of having to win it back.  Meanwhile squads rushed the middle One Five Five.  Miraculously, it broke the 2 squads but left an 8-0, the heroic 9-1 and a captured bazooka in front of the howitzer.  The STuG went wide, decided that shooting in the +2 LV environment was no longer ideal, prepped itself for a final Overrun of the leftmost (top of the map) gun.  

Advanced Squad Leader scenario RbF I-3 South Park

The heroic 9-1 led the final attack with a +6 shot that connected with the One Five Five.  The IFT effects shot vaporised the crew and the random destruction roll vaporised the gun as well.  Two more to go!  The STuH opt’d for a HEAT shot against the Americans inside the last VC building.  That shot connected as well but it only succeed in breaking the leader and pinning the squad!  We would have to do it the bloody way.  The Americans couldn’t crew the leftmost gun (top of map)!  Feeling luck on its side, the STuG proceeded to overrun the left gun not once but twice!  Unfortunately It only succeeded in breaking its main gun.  Folks did managed to rush up to the 2 remaining guns without a scratch.  Things looked as if they might work out in close combat.  

But it was not to be.  We had a 2:1 attack on one of the Guns but boxcar’d the roll.  All eyes then turned to the last VC building.  3 squads and a concealed leader ambushed the pinned US squad.  Unfortunately we rolled a 5,6 which couldn’t evict the occupants.  The Germans lost.

How’s this Scenario Interesting?

This is a very tight scenario that offers a number of tactical choices.  If I play it again, I might well try a run down the left and go for the 3 guns through the bocage.  The other Quad will be just as tough to content with and I can’t leave it on my flank.  The Germans had a tight schedule to meet.  The two sides had very different forces to play with, which makes it very interesting also.  I really have to give it to my opponent though for hanging tough through it all.  Once reason why the Germans lost is that it couldn’t push past the last VC building before the American reinforcements entered on Turn 4.  

I really like this scenario.  
Advanced Squad Leader scenario RbF I-3 South Park After Action Report (AAR)

Advanced Squad Leader scenario RbFI-1 Weather the Sturm After Action Report (AAR)

Advanced Squad Leader scenario RbFI-1 Weather the Sturm After Action Report

Scenario Background

We are going OLD SCHOOL baby!!  Rob and I want to take a crack at the HOB Recon by Fire series of scenarios.

We are talking Dubrovno Russia on June 23 1944.  The Germans got a double row of mines laid out to keep the Russians away from the Moscow-Minsk highway.  The Russians come in with 6 tanks, a pair of fighter bombers, 15 squads and 4 leaders.

As the Russians, I have three IS-2 or the Iosef Stalin heavy tanks and an ISU-122 assault gun which used the same chassis.  Both had limited ammunition storage (circled 11) but the assault gun had smoke rounds (S8).  Five squads of assault engineers and a couple of PT-34 minerolling tanks round up this special assault group.  The Germans have a Nashorn sporting an 88LL plus two STuG IIIGs (small targets with 75L’s and plenty of smoke) working together with an 88LL Pak 43 (ROF2) to discourage the neighbours from scratching their minefield.

Victory Conditions and Tactical Considerations

The Russians win by exiting 20 EVPs off the west (left) edge or by inflicting 38 CVPs on the Germans in 7.5 turns.

The initial problem here is to decide which part of the mine belt to work on.  Looking at this from the Russian point of view, the middle part provides a wide playing area for the Russians to bring their arms to bear and eventually no where for the Germans to rout.  Operating there will also offer some measure of cover against the German offboard observer.  The downside about the middle patch is that there’s not a lot of Woods for the Russians to established a beachhead into.  Plus I’d expect the Germans to put wire on the right tip of the Woods to deny places for broken Russians to rout back into.  The Woods on the right flank (top of the map) offer quite a bit more cover for the Russian Breaching team.  Unfortunately we have very short ranged weapons and won’t be able to fight the Germans in the middle patch of Woods as we race through.  Plus the right flank is open to the German offboard observer.

The After Action Report

Advanced Squad Leader scenario RbF1-1 Weather the Sturm After Action Report (AAR) Russian 1

Our Support team came under heavy fire from their Nashorn and 88 FlaK gun immediately.  We expected them to be there but made a conscious choice to have the Breach team enter right (top).  Hopefully the Support team would survive long enough to keep their Nashorn & 88 occupied.  Our armor stand a decent chance again the STuGs.  We noticed the Nashorn’s OT and in Woods.  That could get pretty nasty with Air Burst if we could get a shot off!  Our Breach team went to work right away under an OBA smoke cover.  The Assault team laid in wait.  They might be able to sneak past the German HMG’s (pillbox) CA.  Having said all that, our ISU122 was the only AFV that had smoke and it was the first to go.  I didn’t like my chances running down those Woods (there’s a 2nd Pillbox) since the German reach was longer than mine.

Advanced Squad Leader scenario RbF1-1 Weather the Sturm After Action Report (AAR) German 4

All Russian armor apart from an IS-2 were shot by Turn 4 but we vaporized the 88 and airbursted the Nashorn.  It’s now the IS-2 vs two STuGs.  They didn’t have a good chance against the IS-2’s armor but the IS-2 couldn’t hit the side of a barn.  The German 100mm OBA then came down on the Woods right over my chaps!  We made a decision to bank on our 8 morale and push through so as to not lose time.  The Germans then drew a RED card which was a welcomed break.  We made several trails through the minefield but we spent too much time there.  One of our fighter bombers caught a STuG in the open and stunned the commander but its bombs missed and disappeared into thin air.  We would have to get as close to the Nazis as possible.  HUG THE ENEMY!!  Perhaps that would save us from their OBA.

Advanced Squad Leader scenario RbF1-1 Weather the Sturm After Action Report 03

By Turn 6 it’s quite apparent that we might not be able to exit 20 EVPs (so we start counting CVPs).  The Germans made a bid for my IS-2 while my infantry hid deep in the Woods to avoid the OBA.  Thank goodness for those fighter bombers!  I was just waiting for one of these to miss its Sighting DR and finish off the last tank on the board.  Two German leaders got to the wrong side of my IS-2, one of these guys’ got to have brought a Panzerfaust along.  The world’s going to turn into a giant fireball at any moment.  I laid harassment fire on my IS-2 to give it some cover.

Advanced Squad Leader scenario RbF1-1 Weather the Sturm After Action Report (AAR)

That German MMG team up (top) in the Woods really did a number on my Russians.   A squad placed a DC on them but it didn’t do a thing, nor did the flamethrower.  So a HS enthusiastically jumped in so as to hold them for another turn.  My Russians light up the Melee again (who needs friends?) and broke everyone in the brawl (K/4 the German).  I was counting on capturing the HS for my last CVP.

Advanced Squad Leader scenario RbF1-1 Weather the Sturm After Action Report (AAR)

Last Allied turn. we didn’t think we would but we drew a black chit for our OBA.  We requested for the OBA to be moved on top of the wounded German 8-0 who was still frantically padding his pockets for a Panzerfaust …

The OBA came down, rolled snakes, vaporized the 8-0 and gave the Russians their last CVP!

How is Scenario Interesting?

As the Russians, we got two problems to work on and at least two approaches to take.  Reading Chas Smith’s article “Breaching Operations” in Recon by Fire #2 helped me get things organized.  That ferocious gun fight with the Nashorn and the 88 luckily resulted in (with a lot of help from the fighter bombers) the Russians having the only AFV on the board.  We lost every other tank but that gave the Breaching team enough time to work through the mines and let the Assault team through.  The German OBA almost ended it right there in the Woods.  The battle turned when the Russians realized they could no longer get off the board and hence didn’t have to care about casualties as long as they could take enough Germans down with them.

I wonder still as to whether I should have went down through the clump of Woods in the middle of the board instead.  It’s there that Russians can fight with their short ranges (high firepower) and numerical superiority.  We lucked out.