J116 Brigade Hill AAR, a PTO classic!


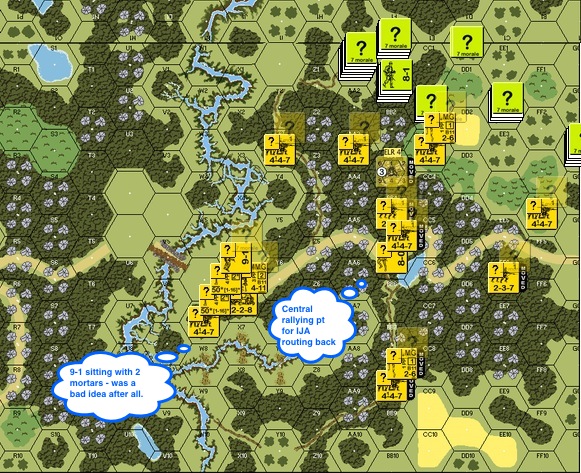
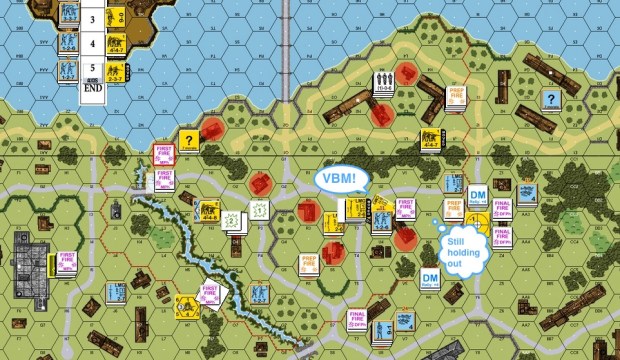
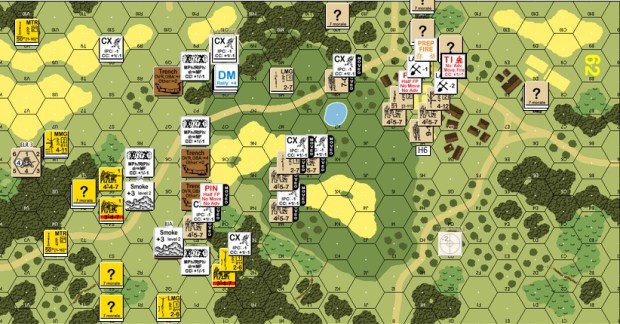
J116 - Setup-procThis is a game that I setup earlier in the year when I found that J116 Brigade Hill was going to be one of the scenarios in the Malaya Madness tourney.  Erwin & I managed to do a few turns before the Malaya Madness and sure enough, Brigade Hill was my last game at the tourney.

The Battle for Brigade Hill was part of a campaign where the IJA pushed the Australians along the Kokoda trail towards Port Moresby, Papua New Guinea, during the Second World War.  The IJA setup a blocking force between the Australian brigade headquarters and its forward battalions.  The cutoff Australians were therefore asked to reestablish contact with their headquarters.

I played the IJA and my buddy Erwin from Belgium, the Australians.  The Australians had to take 3 or more of the hill tops marked with “V”s.  The fourth “V” that you can’t see from the map above was under the foxhole on the top right.  This setup is taken from Chris Doary (of BattleSchool).  The Australians came in from the right.  The big hill was tough to defend apart from a reverse slope setup.  In this instance the big hill was left bare and covered by 2 medium machine guns from the hill on the top left and a mortar from the bottom left.  This channelled the Australians through the jungles on both sides of the big hill, ideal IJA country.  I put a HIP (“hidden initial placement”) in the second most likely frequented clump of jungle on the big hill.

J116 - T2 IJA - End Vol Breaks-proc

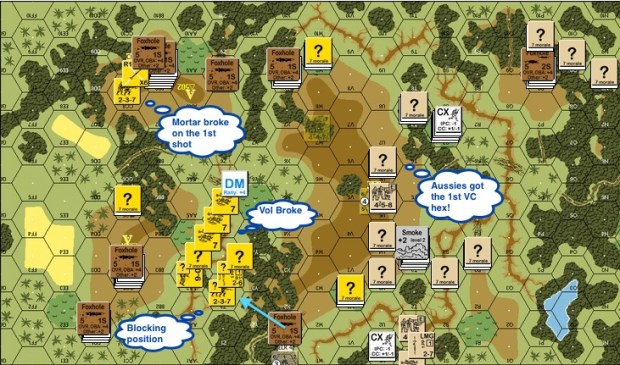
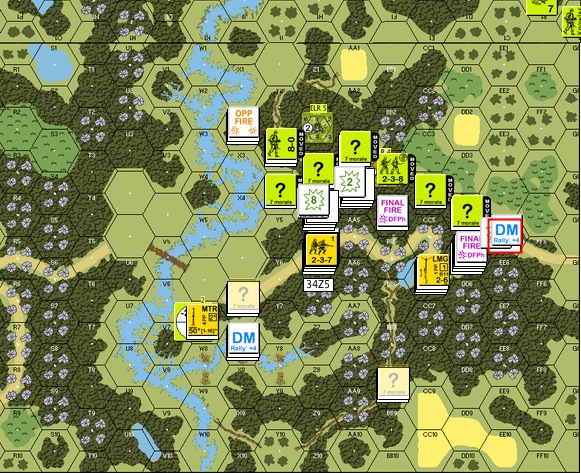
End of IJA Turn 2 : The Australians advanced carefully to their first VC position and probed the right IJA flank.  The mortar from the top right hill opened fire but it broke on the first shot.  The IJA chucked it down the hill in frustration.  The IJA on the right flank voluntarily broke and melted away into the jungle, looking to use the gully as the second line.

J116 - T3 IJA - Blocking on right Shoot Brits off Hill top Reinforcement entered 02-proc

End of IJA Turn 3: Guns and mortar from both of the small hills start shooting Australians off the big hill-top.  Reinforcements from both combatants entered.  The IJA chose to enter in the “back field” to help defence on the left flank and to tie some Australian units down.  The units on the right flank got into a blocking position and would gain concealment before the turn was over.

J116 - T4 IJA - ? 237 ambush 458 squad-proc

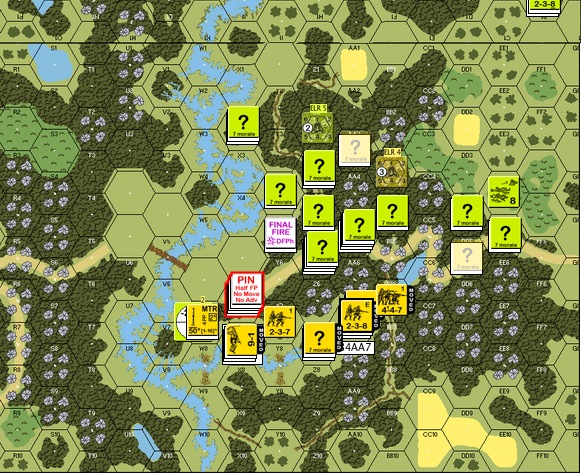
End of IJA Turn 4: The IJAs got aggressive on the right flank.  An IJA half squad was sent to unconceal an Australian squad.  It was killed in the process but the Australian squad was ambushed and killed in the subsequent close combat when a concealed IJA half squad moved in.  The IJA was pressured on the left flank however, the forward units pulled back and the reinforcement group pushed forth to the Australian hilltop.

J116 - T5 Bri - Mortars fight Leader wounded berserk-proc

Australian Turn 5: The opposing mortars continued to duke it out, the IJA finally caught a lucky shot that wounded its leader and made a half squad go berserk!

J116 - T5 Bri - HIP-proc

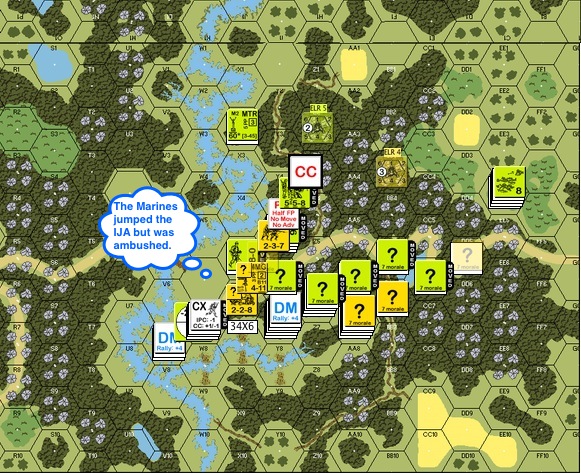
Australian Turn 5 (still): The IJA revealed a previously HIP’d unit in hex W7 when an Australian squad left its 9-2 leader behind.  We didn’t do this correctly though as the HIP’d unit should have appeared concealed.  Either way as such, the adjacent Australian squad piled in (which I was happy about) but they managed to roll an ambush against the IJA (which I was less delighted about).  The Australians decided to take their leader and withdrew.

J116 - T5 IJA after MPh-proc

IJA Turn 5: The last Australian turn put the IJA left flank under pressure.  The IJA reinforcement group decided to shift back to threaten the Australian rear.  The previously HIP’d IJA squad continued to pursuit the escaped Australian 9-1 (and the 458).  See that stack I noted as “Dummies” in the foxhole?  That hill would have been Australian quickly had Erwin know this.  The IJA stepped up their counterattack on their right flank.  The IJA broke the other Australian squad on the lower left of the map and the berserker piled in!

J116 - T5 IJA CC Entire Stack killed-proc

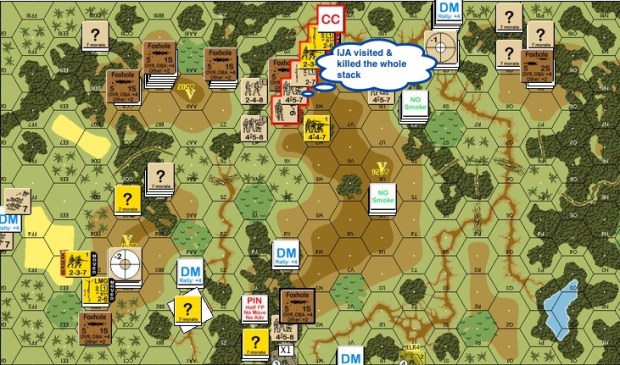
IJA Turn 5 (still): An  IJA HS jumped back into the 9-1 & 458 stack and managed to annihilate everyone in the hex.  The brokie routed away from the berserker on the bottom left at the moment, for a little while longer.

J116 - T6 Bri Mortar + Snakeeyes killed 8-1 breaks squad .. both MMGs broke-proc

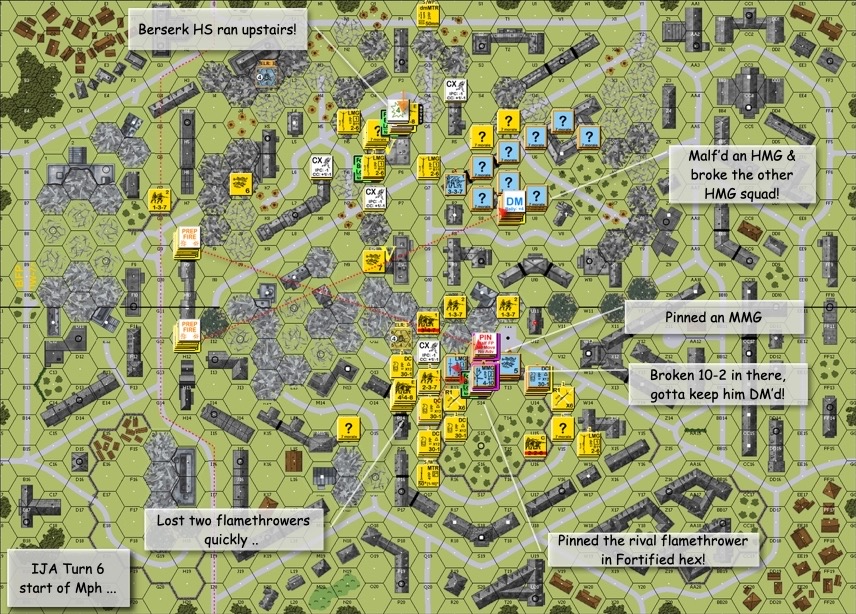
IJA Turn 6: The hill on the bottom left was threatened by a slow-moving concealed Australian stack up the middle.  The wounded 8-0 in the lonely foxhole decided to grab the mortar himself and took a shot at the approaching Australians.  A snake eyes shot along with fire from the previously HIP’d IJA squad on the big hill broke the Australian squad and killed a leader.  This squad would then be eliminated for failure to rout.  Our death star on the top left tried to hold off the hoards and broke BOTH MMGs together!  Baadddd timing …

J116 - T6 IJA CCPh -procIJA Turn 6 (still): This was the last IJA turn before the final Australian onslaught.  The IJA made an unsuccessful effort to take the Australian fox hole on the top right.  The IJA berserker chased down and killed an Australian brokie on the far left.  A concealed IJA squad, determined to clear the field, advanced onto and killed a half squad in the middle right.  The MMG crews and some half squads stacked up on the top left hill.  Since IJA crew stripes instead of breaks, one round of gun fire would not be able to push them out of the hex.  If the Australian half squad moved up the hill and engaged the stack in close combat, the Australians wouldn’t be able to own the top left VP hex without another squad stepping in.  The IJA right flank resumed its blocking position.

J116 - T7 Bri End CC-proc

Australian Turn 7: On the top left of the map, the Australian half squad refused to be broken by IJA gun fire. It advanced up and engaged the IJA stack in close combat.  Since Hand to Hand combat is not an option for the Australians, the likely outcome here was that the units would be locked in a perpetual mêlée.

We rolled.  The Australians failed the “To Kill” number by 1!

The IJA got a Critical Reduction result, thereby killing the Australian half squad.

The IJAs won.

Other AARs:


HS8 Bailey’s Demise AAR – fighting the Marines in the jungle

JT1a-proc

Learning jungle terrain in ASL153 Totsugeki is one thing.  Learning about Marine Raiders in the dense jungles of Guadalcanal is another matter entirely.

This is HS8 Bailey’s Demise, from MMP’s Operational Watchtower Historical Study.  The date is September 26 1943.  This scenario as with the whole History Study, is centered around Guadalcanal.  The river depicted on the map represents the Matanikau river.  The Marine Raiders were looking to cross the river to the west bank to complete an encirclement.  Unbeknownst to the Marines, the IJA had crossed the river and was on the east bank when the engagement occurred.

The Marine Raiders came in from the top left into a wholly hidden (HIP) deployment of IJA troops.  The Marine Raiders, like the IJA 1st-liners, were also stealthy.   They were to cross at least 6 CVP (3 squads or other combinations) to the west bank of the river in 7.5 turns.

All interior jungle hexes are dense jungle.  All jungle hexes next to non jungle hexes are light jungles.  The difference being while light jungle are similar to woods, dense jungle has a terrain effect modifier (TEM) of 2, does not permit fire groups and allows a stacking limit of only two.  This map’s marked with “crags” (4 point stone formations) merely to remind ourselves that the marked hexes were dense jungles.

The map above was my IJA setup, units unhidden for your perusal.  The mortar team down on the bottom left was largely ineffectual against American counter-battery fire.  I should have spread them out.

AT2b-proc


This was the Marine Turn 2.  The Marine made contact with the defenders and withstood IJA fire rather well.  Taking the risk to move in stacks (given the +2 cover of the dense jungle) their Advance Fire was devastating round after round for the IJA.  The IJA looked to block the Marines as much as possible, rout back (squads breaking “automatically” into half squads in the process) when in doubt and take advantage of their leader’s “Commissar-like” ability to rally them without (DM) penalty.

As I expected, the Marines avoided the bamboo patches on the right and came in from the top down.

Please keep in mind that IJA counters in faded yellow were hidden units that the Marine player couldn’t see.

JT2b - After MPh-proc

This is the IJA Turn 2.  Some of the frontline IJA routed back.  The IJA mortar team on the left was completely shot up.

AT3c After MPh-proc

American Turn 3.  The rallied IJA put up a fight in face of the advancing Raiders.

JT3c After MPh-proc

IJA Turn 3.  The IJA rallied and reconstructed a respectable line of defence.  In retrospect this approach didn’t work well.  The IJA, even concealed, could hardly withstand the withering Marine gunfire.  Perhaps a better strategy is to pair up the half squads.  One half squad would go aggressive, knocking off US concealment counters and drawing fire.  The other concealed half squad will close and either hope for an ambush in close combat.

JT3c HIP CC-proc

Talking about close combat, the Marines with their overwhelming firepower are deadly in normal CC (plus the IJA has no favorable modifiers).  Here you have a HIP squad that sprung out in the hopes of assassinating the Marine 8-0, they were promptly killed in CC.

I should have avoided normal CC with Marines to start with.  Hand to Hand (HtH) combat, when done with sufficiently lopsided odds (IJA half squad vs one or two Marines squads) offer a good trade for the IJA since the results of most are mutual annihilation!  Other than that, I should have ran!

AT4a Ambush by IJA-proc

Marine Turn 4 : here you can see how the Marines were already crowding the last passage way towards the river.  A Raider squad jumped a concealed IJA half squad and was ambushed and killed.  That was unfortunately the only time when close combat went happily for the IJA in this game!

JT4b Am Vol Rout-proc

IJA Turn 4 : The situation doesn’t look good for the IJA but they were still fighting hard.  Here you can see a Marine stack breaking voluntarily and routing away from possible IJA close combat.  Here’s a thought : had I not used the hidden IJA units in close combat, they could have sprung up now and kill the whole stack!

AT5a MG-proc

Marine Turn 5: the Marines started to cross the river!!  A repositioned IJA machine gun put the west end of the bridge squarely in its sights but it couldn’t stop the flow.

JT6a End-proc

IJA Turn 6: This was how it ended for the IJA, decimated and encircled.

The next time I play as the IJA against Marines, I will try :

  • Using my HIP units largely for cutting rout paths.
  • Pair up units (half squads), keep one concealed and use one for knocking off enemy concealment, with the hope of trading half squads for bigger stacks of Marines in hand-to-hand combat.
  • Rush IJA squads through openings created by successful hand-to-hand combat and go for encirclement
  • I thought of stacking IJA units to give them heavier fire power since I can’t create fire groups in dense jungles but I think that will just create bigger targets for blistering Marine firepower.
  • While retreating and blocking as the IJA might be a good idea at times, I should keep at least a 1 hex distance from the Marines.  That way the Marines would need to use advancing fire against my concealed units.
  • What happened to Banzai charges?

What’s your experience with fighting cardboard Marines in the jungles?  What are your thoughts?


AP54 800 Heroes AAR

AP54 800 Heroes is the second scenario I played that is designed around the Battle for the Sihang Warehouse in Shanghai.  The first one I played was A110/ASL13 Shanghai in Flames.  I believe there’s at least one more : BFP31 Chinese Alamo that covers the same battle.  The subject matter’s the same but the scenario designer’s treatment is very different.

The date was 29 October 1937.  The Imperial Japanese Army (“IJA”) had made successful incursions into Shanghai.  Most Chinese units had retreated and the western powers were uninvolved at this stage.  Chiang Kei Shek (the Generalissimo) was determined to keep the battle in world’s view and hence decided to keep the fighting in Shanghai which was already an international city at that time.  Sihang Warehouse had the distinction of being right across a stretch of water from Shanghai’s International Concessions.

It was  the place where Chiang wanted to bring China’s struggle to the world’s attention.  A battalion from the 88th Division, a German trained élite unit was hence given the task and so the name “the lost battalion” as they were the last to leave.

AP 54 Setup

Witchbottles played the Chinese defenders and I the IJA.  This was a training game and the great tactics on both sides were his and the bad ones mine.

This was the setup.  The IJA were free to setup certain units to the right of the map or enter via the North (top) or the East(right).  IJA tankettes didn’t have radios and were therefore setup in platoon formations.  The building to the lower left of the map was the warehouse (factory) and was fortified.  The red ring denotes the area where Chinese units were fanatic.

This is a 5.5 turn game.  The victory conditions for the IJA were either to control the warehouse or to control 3 or more hexes of the warehouse plus all other buildings in the Chinese setup area.

AP54-JT1a

IJA Turn 1, the first thing the IJA needed to deal with was the heavy machine gun (“HMG“) sitting on the top of the warehouse.  After laying down white phosphorus and smoke, two tankettes started coming in from the north.  After bypassing some buildings, the world exploded around one of the tankettes.  It was a set demolition charge!  What both sides didn’t realize at the time was that set DCs don’t affect AFVs (armored fighting vehicle).

Suddenly, an IJA soldier in the woods to the right yelled :

BANZAAAAAAI!!!

The IJA worked out an Armour Assault together with a Banzai charge out of the woods.  The IJA thought if they could cut off the line of trenches from the base they might get a chance to stop the Chinese squads from retreating back into the warehouse.  An 8-0 IJA leader and his squad wandered out of the smoke cover and were the first to be met with a hail of bullets from HMG on the roof.  The group disintegrated on open ground.  The rest of the charge hug closer to the tankettes and kept on.

AP54-JT1b

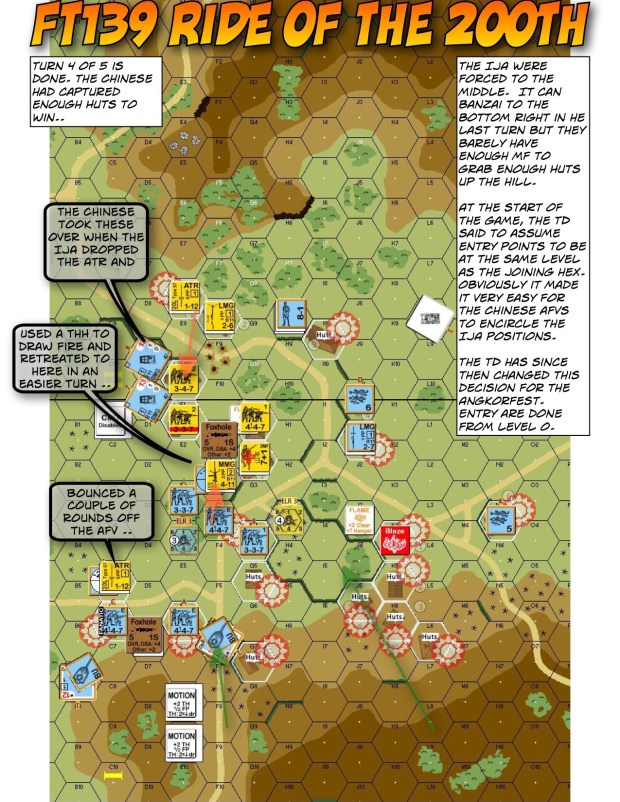
A tankette overran a Chinese trench, and a IJA squad piled in.  The tankette bogged but the Chinese squad was pinned from the shock.  Pinned as they were, they survived the overrun attack and shot at the rear of the attacking tankette.  The LMG broke and so did the men, the Chinese squad broke and ran towards the warehouse.

AP54-CT2a

This was the end of the Chinese Turn 2.  The defenders took advantage of the IJA smoke.  A Chinese squad ran across the warehouse floor and threw out a demolition charge.  “CANDYGRAM!!” they yelled.  The explosion striped the approaching IJA squad who caught a DC on their laps a moment ago.

AP54-JT3a tanks went in on both sides-proc

Turn 3 IJA saw a half squad going berserk on the top left of the warehouse perimeter.  It drew fire well but got blown promptly out of existence.  An IJA tankette then smashed into the fortified warehouse on the left flank.  It was greeted by a squad on the warehouse floor.  An 8-1 leader stood a little way off.  He waved at the IJA tank and smiled, pointed at the squad and said …

“Meet my Dare Death squad.”

The Dare Death squad went berserk (PAATC free), slammed a DC charge onto the IJA tankette and set it off with maniacal grins.  BOOOMMM!!  The Dare Death squad survived but so did the tank.  The dust settled and the 8-1 leader was still there.  He said

“I am happy you survived, because I also prepared this for you entertainment pleasure.”

A little way behind him was a medium machine gun squad, and they blazed away.  On the third shot the IJA tankette exploded.  Another IJA tankette slammed into the right of the warehouse as well, one tankette in the face of 3 machine guns.  Please do not for a second mistook my blissful ignorance of tank rules for bravery though.

Nonetheless, two breaches were made in the fortified warehouse and close combat ensured on the right of the warehouse after the defenders immobilised the tankette.

The Chinese piled a hero and a berserker into the melee.  Another squad tried to creep up on the IJA tankette sitting outside so that they can blow it up before it too slams into the building.  Unfortunately the squad was shot in the rubble outside.

AP54-JT4a

IJA Turn 4 got even more intense.  The tankette on the right make another breach in the warehouse.  The tankette to the north was shot and killed by an MMG before it could hit the warehouse walls.

IJA troops from the north finally made it to the perimeter.  At Witchbottles’ suggestion, they decided that a Banzai charge was in order!!

AP54-JT4b

This was the situation after the Close Combat phase.  The IJA killed all defenders in 2 out of 3 hand to hand combats inside the warehouse.

AP54-CT4a

Chinese Turn 4!  The reserve unit that slipped outside earlier tried to make its way back into the warehouse.  Unfortunately it broke under a hail of IJA gun fire and was pinned outside.

This is where the story ends as the Chinese didn’t have enough bodies to take the warehouse back.

In reality, the 423 Chinese defenders held out for another two days.  They succeeded in winning international attention to the Sino Japanese war.  The British allowed them to retreat across the New Lese Bridge into the International Concessions.

The Sihang Warehouse still stands today.

What thoughts do you have?  What would you have done?  What are your experiences playing this scenario?

Please comment!

Sihang Warehouse looking from the other side o...

Sihang Warehouse looking from the other side of the Suzhou River. October 2006 (Photo credit: Wikipedia)

RPT72 Yangtze Doodle AAR

Same Setup on VASLRPT72 Yangtze Doodle is a scenario from the latest Rally Point pack – “Sons of the Rising Sun”.  It presents a rather interesting layout between the Imperial Japanese Army (“IJA”) and the Chinese.  The date’s Oct 5 1937.  The IJA had crossed the Wusong Creek (also known as the Suzhou Creek).  Wusong Creek is a river that cuts across Shanghai from the west to east which, in 1937, divided Shanghai up into the Japanese concession and the International Concession (Americans and British).  Tangbeizhai was one of the Chinese garrisons that stood between IJA and a new line the IJA wanted to establish from the river crossing.

North is to the left of the map.  The Chinese squads in the little village in the middle were elements of the 3rd Battalion, 467th Regiment, 78th Division that were surrounded by the IJA.  The Chinese squads on the far left were the 2nd Battalion sitting in reserve.  The IJA would get reinforcements coming in from the far right.  Chinese were 4-4-7s, IJA were 4-4-8s except for the two stacks you see on the right on the map.  Both the Chinese and the IJA would have to fight in two directions.  The IJA winning conditions were to control the bridge hex (which could be on the bridge or under the bridge, see A26.131) and to clear the village buildings in the middle of the map of any good order Chinese squads in 5 turns.

This was a “face to face” game, with me being the IJA and a visiting friend “John Doe” who wants to remain anonymous.

RPT72 End of C T1

The IJA moved first and this was the end of the Chinese Turn 1.  If you noticed the two hidden (“HIP”) IJA half squads deployed as speed bumps on the left of the map, you know I wasted  an opportunity.  The better use of HIP would have been to put the in the hamlet to the left of the stream and jump the Chinese while in concealment.  Anyway, since the “hidden” IJA half squads were not in concealment terrain, they were spotted immediately and overran.  The IJA LMG malfunctioned on the first shot (a common affliction for the IJA) but the IJA sniper broke a Chinese squad in the village to the right of the stream.

RPT72 End of C T2

This was the Chinese Turn 2.  In the preceding IJA turn, an IJA half squad tried to move to the bridge hex but was broken on the way.  The Chinese rushed head-on to the hamlet from the left.  I made the mistake of leaving an IJA 9-1 leader by himself with the enemy in close proximity.  While two out of the three incoming Chinese squads were pinned on the left, the Chinese 8-0 slipped through and swung around to the IJA leader.  See that smoke counter?  The IJA mortar smoked out the Chinese medium machine gun (“MMG”) and the Chinese hero dropped the gun and rushed in to kill the IJA leader from the right.  The striped squad you see would eventually ran off and dived under the bridge.  In the ensuring close combat, the IJA 9-0 was wounded and killed by the 8-0 and hero tag team.  However the half squad under the malfunctioned LMG would withdraw from close combat (Chinese rolled boxcars) and killed the Chinese 8-0 and hero in hand-to-hand during the following IJA turn!

RPT72 End of J T3

This was a shot of the cleared hamlet in IJA Turn 3.  The striped IJA squad mentioned in the earlier turn survived defensive fire and dove under the bridge.  This IJA half squad just avenged their 9-1 leader with their bayonets.  (Yes, all my counters have four healthy corners.)

RPT72 J T4 Banzai

This was the IJA Turn 4.  The IJAs on the right had to break into the village before the Chinese on the left cross the bridge and link up with the surrounded garrison.  Since the IJA sniper broke another Chinese squad in the village (he’s really earning his pay today), it’s time for a Banzai attack!

RPT72 J T4 Banzai after

Three IJA squads got reduced into 2 half squads (they do a great podcast by the way) but where they pointed, they reached.

RPT72 J T4 Banzai Took All

Hence in turn 4, the IJA sniper, a Banzai attack and a separate close combat took the Chinese garrison!

RPT72 J T5 Rush Bridge

The Chinese to the left however, wiped out the avenging IJA and took the bridge hex.  Hence in the last IJA turn, the situation called for another Banzai charge into the stream.  All IJA personnel within running distance piled in.  The other IJA squads and the MMG crew occupied key buildings in the village to prevent a Chinese counterattack in the last turn.

So one striped squad and one half squad made it through the enemy fire and piled in on 2 Chinese squads.  And do you know what I rolled?

RPT72 J T5 CC roll

SNAKES!!

Two Chinese squads got wiped out in an automatic ambush.  The bridge hex went back to IJA hands!

In the last Chinese turn, a Chinese squad piled in after some ineffective preparatory fire.  They had to kill all Japanese units in the bridge hex to retake it.

So it all boiled down to the last Close Combat die roll.

When the chatter in the dice tower died, the IJA won!!

Looking back at this,  we have a few thoughts:

  • the IJA sniper played a key role in breaking two squads in choice locations today.
  • as mentioned before, I wasted my HIP option via improper use.  A better use would be to put them in the hamlet on the left of the stream and jump the incoming Chinese while concealed.
  • I should have CX’d the IJA reinforcement coming in from the far right.  I was struggling to get enough IJA to rush the bridge at the end.  Had the IJA reinforcement got on the scene earlier, I wouldn’t have this issue.
  • On the last IJA turn I could have run another Banzai attack on the other side of the village, making it two parallel Banzai attacks for the bridge.  That would give me enough mileage to hit the bridge hex and a heightened morale level to do it with.  However that could also open the village to counterattack.

Any thoughts?  Comments?  Suggestions?   Happy to hear from you as always!!

Suzhou Creek

Suzhou Creek (Photo credit: Wolfgang Staudt)

BoF1 The Marco Polo Bridge Incident AAR

Manchuria

This was 1937.  Since the first Sino Japanese war in 1894-1895 fought over the control of Korea, Japan had since shown astonishing successes in modernising their armed forces, cumulating in the defeat of the Russian navy in the Battle of Tsushima strait.  By 1937 Japan was in control of the vast natural resources in Manchuria and sat at the gates of Beijing.  Engagements between China and Japan so far had been isolated incidents.

Until the Marco Polo Bridge.

Marco Polo Bridge was “Lugouqiao” in Chinese.  Since it happened on July 7 and opened China to eight years of hell that was the Second Sino-Japanese war, every Chinese kid learned of this incident as the “Seven Seven Lugouqiao Incident“.

Marco Polo Bridge

There are two scenarios called “Marco Polo Bridge”  according to ASL Scenario Archive  one of which is BPF28 included in “Blood & Jungle”.  The one I played with Takezo was BoF1 The Marco Polo Bridge Incident.

IJA Turn 1

North is to the right of the map.  This scenario started with the Imperial Japanese Army (“IJA”) setting up within a 2 hex radius of the east end (“bottom side”) of the bridge.  The Chinese (“KMT” or “Nationalists”) got some token troops but reinforcements enter rapidly on Turn 1.  The IJA got 2 tankettes and a couple of squads on Turn 3 coming down the bridge.

The IJA wins by taking at least 12 buildings within a 7 hex radius (thin red line) of the east end (“bottom” side) of the bridge.  Every prisoner the IJA captured lessens the victory requirement by 1 building.  Every tankette the Chinese destroyed increases the victory condition by 2 buildings.

Chinese Turn 2

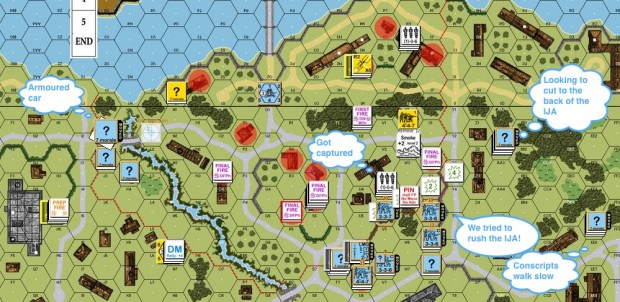
Anyone who read Ramón Real Bernal’s AAR Marco Polo Bridge Incident BoF1 vs Pakko Belmonte (IJA) will recognise my Chinese setup.  The IJA would no doubt be grabbing as many buildings as possible on the first turn.  The Chinese need to hold out until their reinforcements arrive, which was tough considering a third of the reinforcements were conscripts and they marched slow.  The Chinese need to limit the IJA land grab and yet not get close enough to be captured.  The above picture was the Chinese Turn 2.  The Chinese got a medium machine gun (“MMG”) setup with a leader on the 2nd level in the big stone building on the left.  The intention was to limit IJA movements.  However as it turned out, it was too far from most of the action and there were too many blind hexes among the buildings.  The Chinese armoured car sporting two coaxial machine gun turrets arrived at the bridge over the stream.  The Chinese squad in the big “T” shaped wooden building was already captured by Turn 2.  Chinese reinforcements attempted to rush a couple of the IJA buildings but were beaten back.  On the far right you can see two stacks making their way to the river hoping to hook around the rear of the IJA positions.

IJA Turn 3

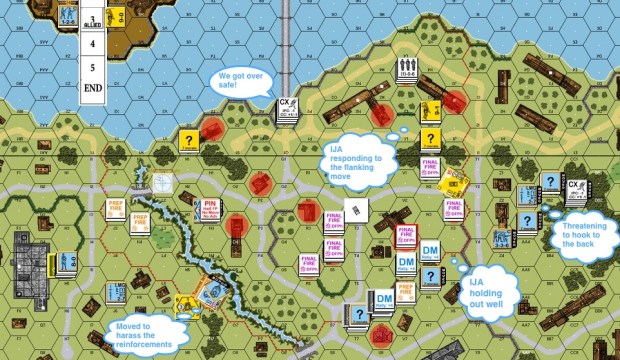
This was IJA Turn 3.  The IJA reinforcement came over the bridge.  The MMG perched on the stone building to the left opened fire but to no avail.  The IJA tankettes rolled into town, seeking to plug what my opponent saw as a crisis point : where my Chinese reinforcements threaten to hook around on the far right.

The lead IJA tankette rolled into view around the woods and the LMG squad at the end of the street threw off their concealment, opened fire, got a side shot and blew it up!  (See “A Moment in ASL : LMG vs Tankette”)

Chinese Turn 3

In the next Chinese turn, the IJA continued to hold out well.  Chinese squads kept breaking before they could be productive.  My brains must have frozen because I should have conducted an armoured assault from the left with the armoured car to distract and to encircle the IJA.  Meanwhile the squads to the far right were more successful in drawing IJA forces off the center.  The armoured car had instead moved to stop the IJA reinforcements from joining the fight in the middle.  I was hoping to risk bogging, run the armoured car across the stream and “freeze” some of the guns in the middle clump of buildings so that Chinese squads could cross the street.  That never happened since the crew, lacking a radio, didn’t want to move again before the game ended.

Chinese Turn 4

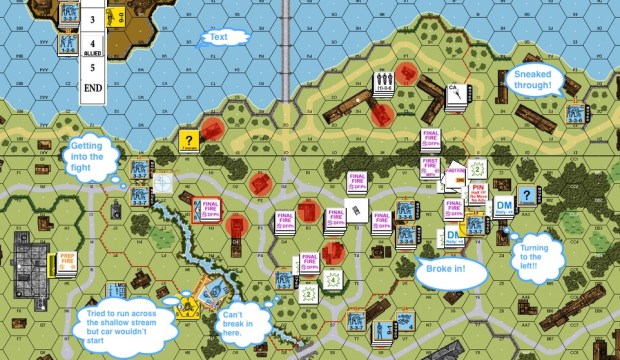
The Chinese went all out in Turn 4.  They finally started moving in cautiously from the left as well.  They couldn’t make any inroads to the semi circular clump of buildings in the center but they managed to break into the “T” shaped wooden building.  May be now the Chinese could cut into the woods, cut off the IJA on the top of the map and get to the prisoners held by the river?  The Chinese squads on the far right ended the charade and turned left, looking to capture the little stone building to the right of the “T” shaped wooden house.

IJA Turn 5

This was the last IJA turn.  The IJA reinforcements, although harassed by the armoured car, managed to get into the wooden buildings to the left of the IJA perimeter.  The IJA in the middle counterattacked, assisted by a “vehicular bypass freeze” of the occupying Chinese squads.

Chinese Turn 5

This was the last Chinese turn.  The Chinese needed to either kill the tank or to take two more IJA buildings to win.  The Chinese conscripts in the “T” shaped building hopped upstairs to avoid gunfire and to deny the IJA control of the building. The squads on the right used some conscripts and a leader to distract the IJA MMG while the rest rushed the little stone house again. They were unsuccessful, and their compatriots on the far left was broken crossing the street, not being able to capture the other building needed to snatch a Chinese win.

So here we were, truthful to the historical turn of events, the IJA gained a beachhead on the east side of the Marco Polo Bridge and marked the start of the Second Sino Japanese war.

If I were to play this scenario again I would move the MMG from the big stone building (building H4) on the left to the big stone building on the bottom of the map (building W8). Having it in “building H4” gives you opportunities to snapshot at the IJA as they go from building to building. However it was out of normal range to most of the buildings in the zone of contest. Putting the gun in “building W8” would put it in play for most of the game.  I would also use the armoured car more along with a couple of squads from the left side of the map.

I am sure some of you must have played this before, or have thoughts about what you would have done.

Please leave me your thoughts!

DB099 The Gin Drinker’s Line AAR

During the night of 9 Dec, Japanese troops mounted a massed attack on the western portion of the defensive line, and the Gin Drinkers’ Line collapsed by 10 Dec. On 11 Dec, as Japanese troops advanced southward along the Kowloon Peninsula, Maltby ordered the evacuation of all troops to Hong Kong Island.

– C. Peter Chan, Battle of Hong Kong, World War II Database

The Gin Drinker’s Line

This latest scenario is from Dispatches from the Bunker, dated Dec 10 1941 and centered around the breakthrough of the western part of the “Gin Drinker’s Line” which led to the siege of Hong Kong island.  (Hong Kong surrendered on Christmas Day, 1941.)

British Turn 1

Erwin played the Imperial Japanese Army (IJA) and I the Rajputs of the British Indian Army.  The above illustration is the British Turn 1.  The IJA had already initiated their advance from the west.  The IJA’s winning condition was to amass more “victory points” (ie kill more) than the British and to occupy 5 or more huts (“the village”) on the top right of the map.  The two “TI” units you see are a mortar unit and a medium machine gun (‘MMG’) unit trying to dig foxholes in a grain field, looking to dominate the depression and to slow the IJA advance to the huts.  You can see also where the mortar bore-sighted  (the semi-transparent marker on the top left) and where the MMG bore-sighted (bottom right).  The IJA could choose to have reinforcements coming in from the top left of the map in Turn 2 or from the bottom right of the map in Turn 3.  In retrospect I should have weighted my defence more toward the top of the map where the approach to the huts was shorter.

IJA Turn 2

This is IJA Turn 2.  The IJA was already rushing the Rajput trenches.  There was a Banzai attack on the top left of the map where 2 IJA squads and a leader ran through all defensive fire and into a trench with a solitary Rajput squad.  These Rajputs fought valiantly and with their last gasp took ALL the offending IJAs with them in brutal hand to hand combat.  (Note to self: never put too many squads into a HtH, kill odds for BOTH sides are good.)

British Turn 2

The British Turn 2.  The IJA had already crumbled the top side of the Rajput trench defence but now it was clear that the IJA reinforcements would not be coming from the top left but from the bottom right on Turn 3.  The Rajput mortar squad fired off a smoke round to block the IJA mortar crew and the MMG crew on the opposite side of the depression.  The Rajputs from the trench line were in full retreat, desperately running across the depression.  The orchards in the depression provided a fair bit of cover.  The MMG squad was still trying to dig their fox holes amidst all the action upfront.  You should also see a British squad pinned on the bottom left before it could get into the depression.  These guys won’t survive the engagement.

JT3a-proc

IJA Turn 3 : The IJA was going for blood!  The IJA reinforcements appeared on the bottom right of the map.  The orchards provided good hindrance for them. In the meantime, the mortar and the MMG squads were busy firing away, as did the retreating squads in the depression.  The IJA arrived at the edge of the depression.  They were also on the verge of overrunning the routing Rajputs in the woods on the top of the map.

IJA Turn 4

IJA Turn 4 : the Rajput mortars took out an IJA 9-1 leader and a crew in the preceding British turn from across the depression with an airburst and so the IJA decided that it was time to lay a smoke round on them.  The MMG squad finally got their foxholes in the preceding turn.  You can see the IJA reinforcements coming to the woods line immediately south of the village (on the right of the map) where the IJA sniper broke the LMG crew in the hut on the south-eastern tip.

British Turn 4

British Turn 4 : this was the last chance for the Rajputs to prepare for the inevitable IJA onslaught.  The game teetered on a balance at this point.   In the middle of the village, the IJA smoke round actually protected the Rajput mortar as it relocated to prepare for a last turn IJA rush.  The MMG in the foxhole kept the 3-hut cluster relatively clean (it would kill the injured IJA leader).  You can also see the IJA already moved into the Rajput LMG position on the south end of the village.

IJA Turn 5

Final IJA Turn : The good news from the last British turn was that the IJA fired at the broken stack in the hut on the north-west tip of the village and granted the Rajputs a battle hardened élite squad!  In this last IJA turn you can see all the residual fire on that corner of the village, evidence of the élite Rajputs (and the mortar squad) fighting hard.  The IJA broke into the south side of the village unfortunately.  Even though the Rajputs routed some broken squads forward in the last turn as speed bumps, they weren’t much good in the IJA Advance Phase (having routed off already).   The IJA won this scenario when the dust settled with a 1 point lead in VP and five huts secured.

To be honest, I didn’t read and understand the Victory Conditions properly.  I thought the IJA had to get more than 5 huts so I biased my defence towards the northwest of the village.  I was going to let the IJA have five huts but deny him the rest.  I succeed at that but unfortunately all they needed was 5.

If I play this scenario again, I will bias my trench line defence to the top of the map.  It’s also important that the trench line Rajputs retreat as fast possible to help with the village defence.

This was a tight scenario all the way to the end.  The action was brutal, the fight was desperate and the body count high.  For those who wants to experience PTO without the PTO terrain, this is a top notched scenario.

By 13 December, the 5/7 Rajputs of the British Indian Army commanded by Lieutenant Colonel R. Cadogan-Rawlinson, the last Commonwealth troops on the mainland, had retreated to Hong Kong Island.

– “Battle of Hong Kong“, Wikipedia

jaL80

English: Entry of the galleries from Shing Mun...

English: Entry of the galleries from Shing Mun Redoubt, part of the Gin Drinkers Line in Hong Kong Français : Entrée de l’une des galeries souterraines de la Shing Mun Redoubt qui faisait partie de la ligne fortifiée Gin Drinkers de Hong Kong (Photo credit: Wikipedia)

Rajput Regiment

Rajput Regiment (Photo credit: Wikipedia)

A Moment in ASL: Imperial Japanese Army in Hand-to-Hand Combat

Dead Japanese personnel lie where they fell on...

Dead Japanese personnel lie where they fell on Attu Island after a final “banzai” charge against American forces on May 29, 1943 during the Battle of Attu. (Photo credit: Wikipedia)

So here we were, right at the opening of DB99 The Gin Drinker’s Line. Indian troops were sitting in trenches on a windy mountain pass, staring down advancing IJA troops bent on breaking through the last defence line between them and the capture of the entire Kowloon peninsula (Hong Kong).

At a particular trench, defensive fire broke and routed two Indian squads from the trenches. A squad nearby advanced into the trench hex. IJA troops kept moving in and it was too late to get into the trench. One IJA squad broke through the grain fields straight up front, our squad pinned it down with First Fire. Good. Another IJA half squad raced by to the right and Subsequent First Fire failed to bring them down. The Indian squad was now out of guns and wishing for the enemy Movement Phase to end.

From the swirling mist to the left, an IJA 8-0 leader at the tree line thrust his sword into the air and screamed : BAAAANNNNZZZZZZZAAAAAAAAAIIII!!!

Two IJA squads pour out of the forest with the 8-0, running straight for our Indian squad.  Staring Death in the eye, the Indians invoked Final Protective Fire, survived the Morale Check but failed to knock back the IJA horde.

The Indians were locked in Close Combat with two IJA squads and a 8-0. With 2-1 Hand-to-Hand odds and the IJA -1 DRM, a DR of 10 would wipe the Indians out (92% probability). Sure enough, IJA rolled a 7.

With death being a certainty, the Indians decided to take on all comers. Hand-to-Hand combat at 1-2 odds calls for a dice roll of 6. Since they were fighting the IJA, they needed a 5.

Our squad rolled 1 & 3. 

They took the 2 IJA squads and the 8-0 leader down with them.

Brian Youse pointed out the dangers of Hand-to-Hand (HtH) combat in his article “The Case for Infiltration” (ASL Journal 3).

It is not a good idea to commit too many IJA troops to a HtH combat because of the high chance of mutual destruction. In our case H-t-H allowed the “dying” Indian squad to take out 1 IJA squad with a die roll of 6 (42% probability) vs 4 in normal close combat (17%), or 2 IJA squads with a die roll of 5 (28%) vs 3 in normal close combat (8%).

This is an important note to self.

jaL80


A Moment in ASL: LMG vs Tankette

Type 94 TK tankette captured at Battle of Okinawa

Type 94 TK tankette captured at Battle of Okinawa (Photo credit: Wikipedia)

So I perched on the side of a skating rink today, returning a PBeM log on BoF01 The Marco Polo Bridge Incident.

Two IJA (Imperial Japanese Army) tin cans drove down the bridge on Turn 3 to stop the Chinese from threatening their rear. As the lead tin cans drove around the woods, a Chinese squad unconcealed and started up with their light machine gun (LMG).

The range was 6 hexes.  I needed to roll a 10 to hit. Moving target and the brief appearance added 4 to the dice roll (Case J), the size of the tiny Type 94 tank added 2 (Case P) .. I needed a 4 and I rolled 2,2!  PPOONGGGGGGGGG!!!

So I got a hull side hit where the armour’s zero. I needed another 4 or less to kill it (2 rolls of 4 or less is a 2.9% probability).

It was a 1,2 – BOOM!  The Chinese LMG took out a Japanese tankette!!

JUST HOW COOL IS TTTHATTTT?