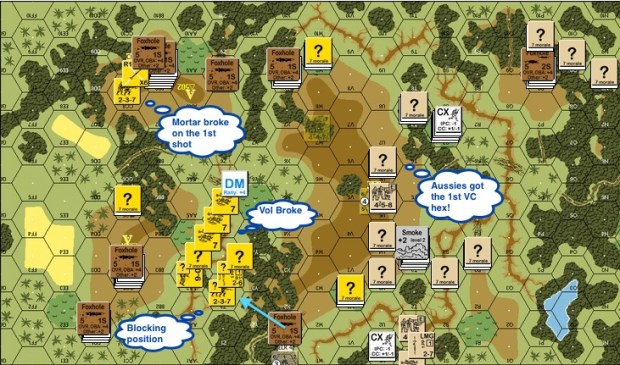
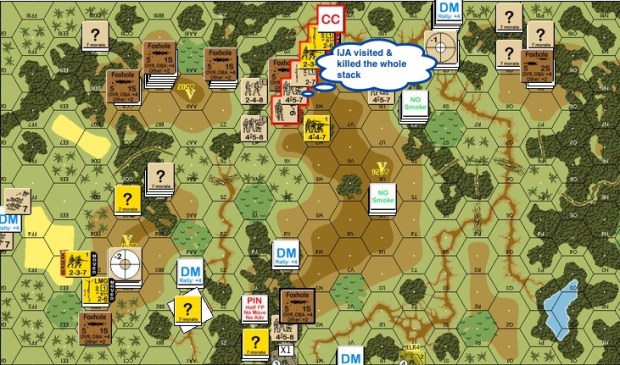
 This is a game that I setup earlier in the year when I found that J116 Brigade Hill was going to be one of the scenarios in the Malaya Madness tourney. Erwin & I managed to do a few turns before the Malaya Madness and sure enough, Brigade Hill was my last game at the tourney.
The Battle for Brigade Hill was part of a campaign where the IJA pushed the Australians along the Kokoda trail towards Port Moresby, Papua New Guinea, during the Second World War. The IJA setup a blocking force between the Australian brigade headquarters and its forward battalions. The cutoff Australians were therefore asked to reestablish contact with their headquarters.
I played the IJA and my buddy Erwin from Belgium, the Australians. The Australians had to take 3 or more of the hill tops marked with “V”s. The fourth “V” that you can’t see from the map above was under the foxhole on the top right. This setup is taken from Chris Doary (of BattleSchool). The Australians came in from the right. The big hill was tough to defend apart from a reverse slope setup. In this instance the big hill was left bare and covered by 2 medium machine guns from the hill on the top left and a mortar from the bottom left. This channelled the Australians through the jungles on both sides of the big hill, ideal IJA country. I put a HIP (“hidden initial placement”) in the second most likely frequented clump of jungle on the big hill.
End of IJA Turn 2 : The Australians advanced carefully to their first VC position and probed the right IJA flank. The mortar from the top right hill opened fire but it broke on the first shot. The IJA chucked it down the hill in frustration. The IJA on the right flank voluntarily broke and melted away into the jungle, looking to use the gully as the second line.
End of IJA Turn 3: Guns and mortar from both of the small hills start shooting Australians off the big hill-top. Reinforcements from both combatants entered. The IJA chose to enter in the “back field” to help defence on the left flank and to tie some Australian units down. The units on the right flank got into a blocking position and would gain concealment before the turn was over.
End of IJA Turn 4: The IJAs got aggressive on the right flank. An IJA half squad was sent to unconceal an Australian squad. It was killed in the process but the Australian squad was ambushed and killed in the subsequent close combat when a concealed IJA half squad moved in. The IJA was pressured on the left flank however, the forward units pulled back and the reinforcement group pushed forth to the Australian hilltop.
Australian Turn 5: The opposing mortars continued to duke it out, the IJA finally caught a lucky shot that wounded its leader and made a half squad go berserk!
Australian Turn 5 (still): The IJA revealed a previously HIP’d unit in hex W7 when an Australian squad left its 9-2 leader behind. We didn’t do this correctly though as the HIP’d unit should have appeared concealed. Either way as such, the adjacent Australian squad piled in (which I was happy about) but they managed to roll an ambush against the IJA (which I was less delighted about). The Australians decided to take their leader and withdrew.
IJA Turn 5: The last Australian turn put the IJA left flank under pressure. The IJA reinforcement group decided to shift back to threaten the Australian rear. The previously HIP’d IJA squad continued to pursuit the escaped Australian 9-1 (and the 458). See that stack I noted as “Dummies” in the foxhole? That hill would have been Australian quickly had Erwin know this. The IJA stepped up their counterattack on their right flank. The IJA broke the other Australian squad on the lower left of the map and the berserker piled in!
IJA Turn 5 (still): An IJA HS jumped back into the 9-1 & 458 stack and managed to annihilate everyone in the hex. The brokie routed away from the berserker on the bottom left at the moment, for a little while longer.
IJA Turn 6: The hill on the bottom left was threatened by a slow-moving concealed Australian stack up the middle. The wounded 8-0 in the lonely foxhole decided to grab the mortar himself and took a shot at the approaching Australians. A snake eyes shot along with fire from the previously HIP’d IJA squad on the big hill broke the Australian squad and killed a leader. This squad would then be eliminated for failure to rout. Our death star on the top left tried to hold off the hoards and broke BOTH MMGs together! Baadddd timing …
 IJA Turn 6 (still): This was the last IJA turn before the final Australian onslaught. The IJA made an unsuccessful effort to take the Australian fox hole on the top right. The IJA berserker chased down and killed an Australian brokie on the far left. A concealed IJA squad, determined to clear the field, advanced onto and killed a half squad in the middle right. The MMG crews and some half squads stacked up on the top left hill. Since IJA crew stripes instead of breaks, one round of gun fire would not be able to push them out of the hex. If the Australian half squad moved up the hill and engaged the stack in close combat, the Australians wouldn’t be able to own the top left VP hex without another squad stepping in. The IJA right flank resumed its blocking position.
Australian Turn 7: On the top left of the map, the Australian half squad refused to be broken by IJA gun fire. It advanced up and engaged the IJA stack in close combat. Since Hand to Hand combat is not an option for the Australians, the likely outcome here was that the units would be locked in a perpetual mêlée.
We rolled. The Australians failed the “To Kill” number by 1!
The IJA got a Critical Reduction result, thereby killing the Australian half squad.
The IJAs won.
Other AARs:


Nice AAR as always. Looked fairly bloody as well. How did you manage to break both MMG’s? isn’t it random selection if you roll 11+ firing both or were you firing both separately and rolled high twice..
Doh! Should have realised that was the most likely…
Great AAR. Thanks
As usual, an excellent recap Jackson. Erwin is a great playing opponent!
That 447 squad in W7 cannot keep hiding for that long. According to A11.19, HIP unit must be revealed at start of CCPh. G.4 does not supersede this rule.