During the night of 9 Dec, Japanese troops mounted a massed attack on the western portion of the defensive line, and the Gin Drinkers’ Line collapsed by 10 Dec. On 11 Dec, as Japanese troops advanced southward along the Kowloon Peninsula, Maltby ordered the evacuation of all troops to Hong Kong Island.
– C. Peter Chan, Battle of Hong Kong, World War II Database
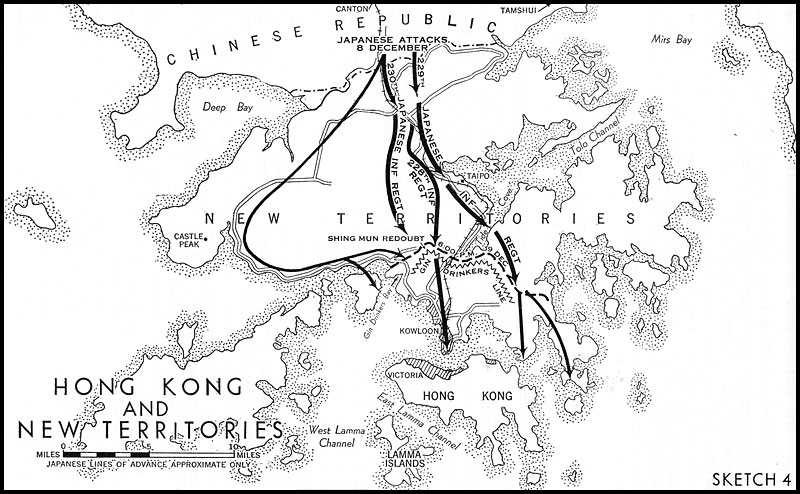
The Gin Drinker’s Line
This latest scenario is from Dispatches from the Bunker, dated Dec 10 1941 and centered around the breakthrough of the western part of the “Gin Drinker’s Line” which led to the siege of Hong Kong island. (Hong Kong surrendered on Christmas Day, 1941.)

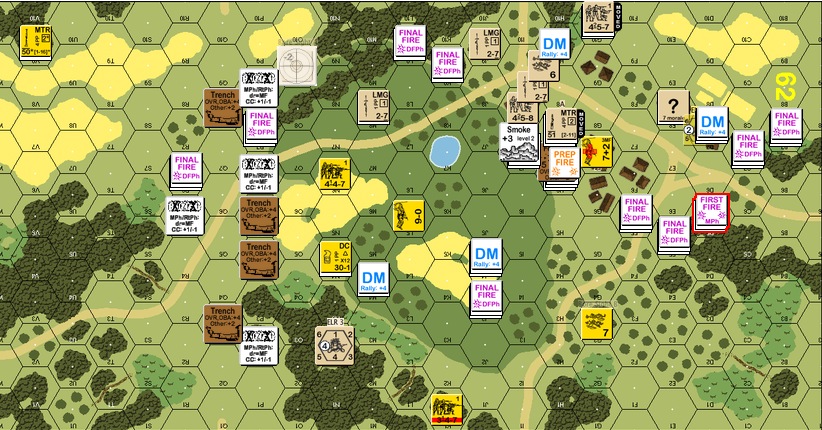
Erwin played the Imperial Japanese Army (IJA) and I the Rajputs of the British Indian Army. The above illustration is the British Turn 1. The IJA had already initiated their advance from the west. The IJA’s winning condition was to amass more “victory points” (ie kill more) than the British and to occupy 5 or more huts (“the village”) on the top right of the map. The two “TI” units you see are a mortar unit and a medium machine gun (‘MMG’) unit trying to dig foxholes in a grain field, looking to dominate the depression and to slow the IJA advance to the huts. You can see also where the mortar bore-sighted (the semi-transparent marker on the top left) and where the MMG bore-sighted (bottom right). The IJA could choose to have reinforcements coming in from the top left of the map in Turn 2 or from the bottom right of the map in Turn 3. In retrospect I should have weighted my defence more toward the top of the map where the approach to the huts was shorter.

This is IJA Turn 2. The IJA was already rushing the Rajput trenches. There was a Banzai attack on the top left of the map where 2 IJA squads and a leader ran through all defensive fire and into a trench with a solitary Rajput squad. These Rajputs fought valiantly and with their last gasp took ALL the offending IJAs with them in brutal hand to hand combat. (Note to self: never put too many squads into a HtH, kill odds for BOTH sides are good.)

The British Turn 2. The IJA had already crumbled the top side of the Rajput trench defence but now it was clear that the IJA reinforcements would not be coming from the top left but from the bottom right on Turn 3. The Rajput mortar squad fired off a smoke round to block the IJA mortar crew and the MMG crew on the opposite side of the depression. The Rajputs from the trench line were in full retreat, desperately running across the depression. The orchards in the depression provided a fair bit of cover. The MMG squad was still trying to dig their fox holes amidst all the action upfront. You should also see a British squad pinned on the bottom left before it could get into the depression. These guys won’t survive the engagement.

IJA Turn 3 : The IJA was going for blood! The IJA reinforcements appeared on the bottom right of the map. The orchards provided good hindrance for them. In the meantime, the mortar and the MMG squads were busy firing away, as did the retreating squads in the depression. The IJA arrived at the edge of the depression. They were also on the verge of overrunning the routing Rajputs in the woods on the top of the map.

IJA Turn 4 : the Rajput mortars took out an IJA 9-1 leader and a crew in the preceding British turn from across the depression with an airburst and so the IJA decided that it was time to lay a smoke round on them. The MMG squad finally got their foxholes in the preceding turn. You can see the IJA reinforcements coming to the woods line immediately south of the village (on the right of the map) where the IJA sniper broke the LMG crew in the hut on the south-eastern tip.
British Turn 4 : this was the last chance for the Rajputs to prepare for the inevitable IJA onslaught. The game teetered on a balance at this point. In the middle of the village, the IJA smoke round actually protected the Rajput mortar as it relocated to prepare for a last turn IJA rush. The MMG in the foxhole kept the 3-hut cluster relatively clean (it would kill the injured IJA leader). You can also see the IJA already moved into the Rajput LMG position on the south end of the village.

Final IJA Turn : The good news from the last British turn was that the IJA fired at the broken stack in the hut on the north-west tip of the village and granted the Rajputs a battle hardened élite squad! In this last IJA turn you can see all the residual fire on that corner of the village, evidence of the élite Rajputs (and the mortar squad) fighting hard. The IJA broke into the south side of the village unfortunately. Even though the Rajputs routed some broken squads forward in the last turn as speed bumps, they weren’t much good in the IJA Advance Phase (having routed off already). The IJA won this scenario when the dust settled with a 1 point lead in VP and five huts secured.
To be honest, I didn’t read and understand the Victory Conditions properly. I thought the IJA had to get more than 5 huts so I biased my defence towards the northwest of the village. I was going to let the IJA have five huts but deny him the rest. I succeed at that but unfortunately all they needed was 5.
If I play this scenario again, I will bias my trench line defence to the top of the map. It’s also important that the trench line Rajputs retreat as fast possible to help with the village defence.
This was a tight scenario all the way to the end. The action was brutal, the fight was desperate and the body count high. For those who wants to experience PTO without the PTO terrain, this is a top notched scenario.
By 13 December, the 5/7 Rajputs of the British Indian Army commanded by Lieutenant Colonel R. Cadogan-Rawlinson, the last Commonwealth troops on the mainland, had retreated to Hong Kong Island.
– “Battle of Hong Kong“, Wikipedia


English: Entry of the galleries from Shing Mun Redoubt, part of the Gin Drinkers Line in Hong Kong Français : Entrée de l’une des galeries souterraines de la Shing Mun Redoubt qui faisait partie de la ligne fortifiée Gin Drinkers de Hong Kong (Photo credit: Wikipedia)

Rajput Regiment (Photo credit: Wikipedia)
Related articles
- A Moment in ASL: Imperial Japanese Army in Hand-to-Hand Combat (hongkongwargamer.com)

Any game that finishes so close is a good scenario. You seem to be PTO heavy at the moment which is nice to see. Do you own Blood and Jungle? A very good pack from Bounding Fire.
Worth trying Brigade Hill from one of the Journals, finished playing that recently
Ian
Thanks for the AAR!
Great write up as always. Ones that are so even too the last turn are often the most enjoyable for both players…
Yes, I was the one who plotted the ‘Italian invasion of China’ (hint). This is my G-mail account only used for commenting on blogs. Keep battling!