
Manchuria
This was 1937. Since the first Sino Japanese war in 1894-1895 fought over the control of Korea, Japan had since shown astonishing successes in modernising their armed forces, cumulating in the defeat of the Russian navy in the Battle of Tsushima strait. By 1937 Japan was in control of the vast natural resources in Manchuria and sat at the gates of Beijing. Engagements between China and Japan so far had been isolated incidents.
Until the Marco Polo Bridge.
Marco Polo Bridge was “Lugouqiao” in Chinese. Since it happened on July 7 and opened China to eight years of hell that was the Second Sino-Japanese war, every Chinese kid learned of this incident as the “Seven Seven Lugouqiao Incident“.

There are two scenarios called “Marco Polo Bridge” according to ASL Scenario Archive one of which is BPF28 included in “Blood & Jungle”. The one I played with Takezo was BoF1 The Marco Polo Bridge Incident.

North is to the right of the map. This scenario started with the Imperial Japanese Army (“IJA”) setting up within a 2 hex radius of the east end (“bottom side”) of the bridge. The Chinese (“KMT” or “Nationalists”) got some token troops but reinforcements enter rapidly on Turn 1. The IJA got 2 tankettes and a couple of squads on Turn 3 coming down the bridge.
The IJA wins by taking at least 12 buildings within a 7 hex radius (thin red line) of the east end (“bottom” side) of the bridge. Every prisoner the IJA captured lessens the victory requirement by 1 building. Every tankette the Chinese destroyed increases the victory condition by 2 buildings.

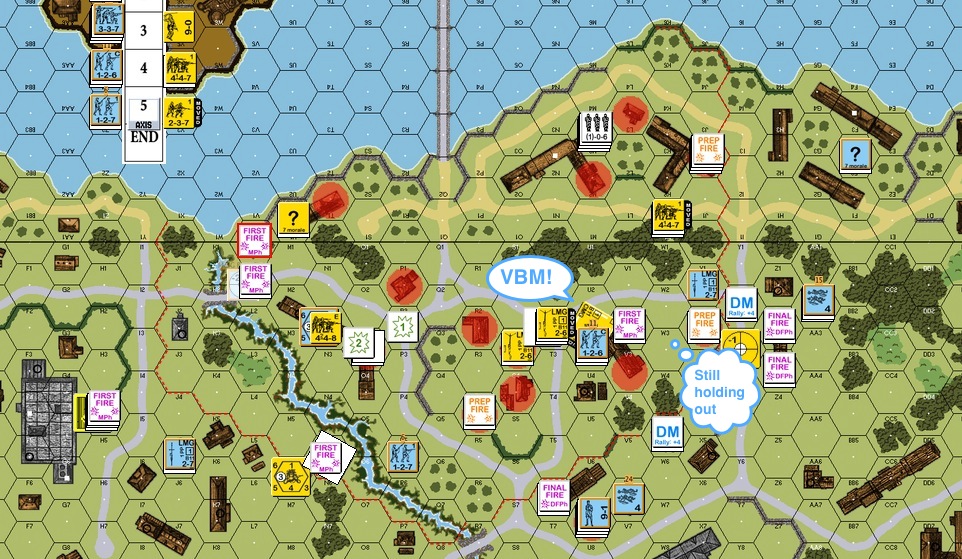
Anyone who read Ramón Real Bernal’s “AAR Marco Polo Bridge Incident BoF1 vs Pakko Belmonte (IJA)“ will recognise my Chinese setup. The IJA would no doubt be grabbing as many buildings as possible on the first turn. The Chinese need to hold out until their reinforcements arrive, which was tough considering a third of the reinforcements were conscripts and they marched slow. The Chinese need to limit the IJA land grab and yet not get close enough to be captured. The above picture was the Chinese Turn 2. The Chinese got a medium machine gun (“MMG”) setup with a leader on the 2nd level in the big stone building on the left. The intention was to limit IJA movements. However as it turned out, it was too far from most of the action and there were too many blind hexes among the buildings. The Chinese armoured car sporting two coaxial machine gun turrets arrived at the bridge over the stream. The Chinese squad in the big “T” shaped wooden building was already captured by Turn 2. Chinese reinforcements attempted to rush a couple of the IJA buildings but were beaten back. On the far right you can see two stacks making their way to the river hoping to hook around the rear of the IJA positions.

This was IJA Turn 3. The IJA reinforcement came over the bridge. The MMG perched on the stone building to the left opened fire but to no avail. The IJA tankettes rolled into town, seeking to plug what my opponent saw as a crisis point : where my Chinese reinforcements threaten to hook around on the far right.
The lead IJA tankette rolled into view around the woods and the LMG squad at the end of the street threw off their concealment, opened fire, got a side shot and blew it up! (See “A Moment in ASL : LMG vs Tankette”)

In the next Chinese turn, the IJA continued to hold out well. Chinese squads kept breaking before they could be productive. My brains must have frozen because I should have conducted an armoured assault from the left with the armoured car to distract and to encircle the IJA. Meanwhile the squads to the far right were more successful in drawing IJA forces off the center. The armoured car had instead moved to stop the IJA reinforcements from joining the fight in the middle. I was hoping to risk bogging, run the armoured car across the stream and “freeze” some of the guns in the middle clump of buildings so that Chinese squads could cross the street. That never happened since the crew, lacking a radio, didn’t want to move again before the game ended.

The Chinese went all out in Turn 4. They finally started moving in cautiously from the left as well. They couldn’t make any inroads to the semi circular clump of buildings in the center but they managed to break into the “T” shaped wooden building. May be now the Chinese could cut into the woods, cut off the IJA on the top of the map and get to the prisoners held by the river? The Chinese squads on the far right ended the charade and turned left, looking to capture the little stone building to the right of the “T” shaped wooden house.
This was the last IJA turn. The IJA reinforcements, although harassed by the armoured car, managed to get into the wooden buildings to the left of the IJA perimeter. The IJA in the middle counterattacked, assisted by a “vehicular bypass freeze” of the occupying Chinese squads.
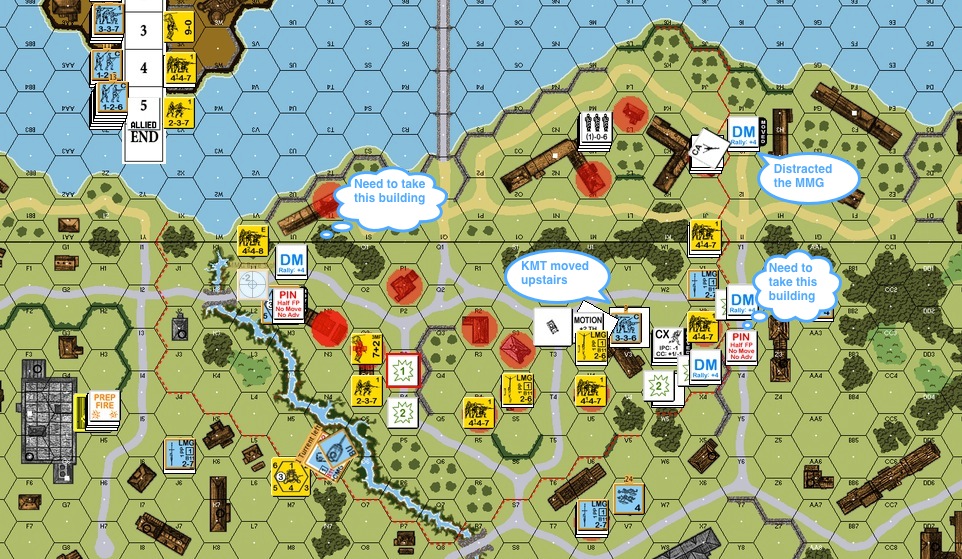
This was the last Chinese turn. The Chinese needed to either kill the tank or to take two more IJA buildings to win. The Chinese conscripts in the “T” shaped building hopped upstairs to avoid gunfire and to deny the IJA control of the building. The squads on the right used some conscripts and a leader to distract the IJA MMG while the rest rushed the little stone house again. They were unsuccessful, and their compatriots on the far left was broken crossing the street, not being able to capture the other building needed to snatch a Chinese win.
So here we were, truthful to the historical turn of events, the IJA gained a beachhead on the east side of the Marco Polo Bridge and marked the start of the Second Sino Japanese war.
If I were to play this scenario again I would move the MMG from the big stone building (building H4) on the left to the big stone building on the bottom of the map (building W8). Having it in “building H4” gives you opportunities to snapshot at the IJA as they go from building to building. However it was out of normal range to most of the buildings in the zone of contest. Putting the gun in “building W8” would put it in play for most of the game. I would also use the armoured car more along with a couple of squads from the left side of the map.
I am sure some of you must have played this before, or have thoughts about what you would have done.
Please leave me your thoughts!

Related articles
- 1937 Battle of Shanghai, Japan’s Brutal Attack on China (warhistoryonline.com)

Not played this one yet but it’s on the list.
Sounds a good game that was fairly close and the good luck of taking out the tankette was balanced by the inability to get into the middle buildings in the earlier turns
Ian
Those Dare Deaths can be critical. Always best if you can give them a hand via smoke or use your vehicle in the street to cancel the -2 moving in the open shot etc.
I’m playing ITR-1 Debacle at Sung Kiang as the Japanese and by use of limited small Banzai and smoking target hexes I have almost turned the flank and trapped a large force in one of the stone buildings. My opponent is not well versed with the Chinese and it makes it much harder for him
Ian
Chinese vs IJA is a good matchup. I am sorting out a new year KMT vs IJA game for early next year so your AAR has proved timely!
Pingback: AFV NEWS » IJA Colors 1939-1945 – Vallejo
Pingback: Double One 2014 Part Four: Marco Polo Bridge Incident | Hull Down