Fumbling in the Night

Photo by Raul Tskrialashvili on UnsplashI have been playing a lot of Night scenarios (especially) lately.  Yet, I was thoroughly thrashed again in my last game, you wouldn’t bear to see the AAR.  Instead, I decided to write down my thoughts so as to do better next time!

  • You can generally expect Attackers to follow Gullies, Streams, Roads, the edges of Illuminated locations etc.  Until you let them see an unconcealed or a broken unit, either within NVR (Night Vision Range) or Illuminated.  The moving unit will otherwise likely need to roll for Straying.  
  • Whether to try for Star Shells is a tricky business.  The upsides are:
    • you can shoot Illuminated units and you might lose some of your “No Move” counters,
    • you can prevent them from moving Cloaked/ Concealed inside illuminated areas
    • you can “blind” KEU so they can’t see you (except your Gun Flashes)
    • and you can prevent KEU from gaining Concealment.  
  • The downside is that:
    • you might blind your own units,
    • allow enemy units to shoot you without losing Concealment,
    • you provide a nice edge around which they can move without straying,
    • you illuminate your own units for them to put more accurate Method 2 Star Shells on you (as opposed to Method 3).  
  • If you think since KEU’s are within NVR and you can do without Star Shells, think again.  Having no Illumination allows Cloaked/ Concealed units to come right up to you without losing cover.  They can Ambush you on a difference of 2 in the dark (along with the -2 Concealed modifier).    Method 1 Star Shell is generally a great thing.
  • You can target Gun Flashes for a Method 2 Star Shell.  That generally means you should keep some Leaders (hexes) from doing Star Shells at the start of your opponent’s Movement Phase.  Don’t forget you can target your own Gun Flash – ie your unit some distance away First Fired, your Leader can Method 2 on that Gun Flash so everyone else can fire at the same target as well.
  • PRC should be aware that because of NVR differences, an enemy unit can shoot a vehicle at 1.5 the NVR (or 2x vs tracked vehicles) without the PRC/vehicle being able to “see” it back.
  • Jungles & Bamboo are great: they can’t be Illuminated (until someone fish out a Trip Flare).  So they can do a Method 1 on themselves and shoot OUT of a Jungle/Bamboo hex without losing Concealment.   All good unless the KEU is within NVR and also in Jungle/Bamboo.  
  • As an attacker, stay with Cloaking for as long as possible.  You can break off Concealed units from Cloaked units but those with Cloaking gets 6 MPs and no penalties moving into Concealment Terrain (and in Korea, Steep Hills are Concealment Terrain).  

What are your thoughts? Practises? Tactics?

Advanced Squad Leader as a Window into Military History

An ASL newbie (but a veteran wargamer) from Taiwan shares his newfound love for ASL

Author: TouMu / Translator: Hong Kong Wargamer (The original in Chinese starts at the bottom of the translation.)

I’d like to share how I see Advanced Squad Leader (‘ASL’) as a vehicle to gain better insights to military history

First, let’s take a look at ASL’s shortcomings as such a vehicle:  

1. Each scenario generally portrays 12 to 20 mins of fighting, offering only a glimpse into the whole battle. 

2. Unless it’s a HASL (Historical ASL) module.  Geomorphic maps used in most scenarios offer only an impressionistic approximation of the actual terrain.  

3. Scenarios generally involve elements from actual fighting forces and not the whole.  

With these in mind, let’s talk about how ASL offers a great window (translator: a “Hollywood version” notwithstanding) into historical events.  

Allow me to build on the aforementioned “shortcomings”:

1. Precisely because generally each scenario involves less than 20 minutes of the most intensive fighting, ASL puts you right in the midst of the fighting.  You get better insights into the actual conditions facing frontline units.

For example: We all read about the intensity at Stalingrad, but how miserable was it?

Operational / strategic games give you stacks of counters that represents thousands/hundreds of people, which gets quickly decimated.  

ASL makes you learn what it means to have to battle for the first room and then having to regroup to clean up the next.

2. Yes, ASL scenario terrains are largely a combination of (translator: a huge number of) geomorphic boards and overlays (cost considerations?).  However, like miniatures, terrain features are meaningful. Hexes are not all generically designated “Movement +1” or “Defense +3” etc. It’s important therefore to consider your routes in both assault and retreat (translator: routs).  

You will also understand why it’s difficult to rally broken troops in the open and why it’s easier to gather your wits in woods and buildings.  

3. Although only elements of certain units participate in our cardboard battles, determination of unit combat power reference their real world counterparts. Ordnance and vehicles are also based on real world parameters.  

Perhaps ASL is a key to deeper insights into World War II battles.

Look  and you might gain better appreciation for the nameless heroes therein – a window into their bloodshed and sacrifices.

Yes, I don’t like being Eisenhower but I really appreciate heros like Major Dick Winters (translator: of “Band of Brothers” fame).   

If you hope to play ASL as “Eisenhower”, perhaps this game is not for you.  If you look to play ASL as “Winters” or thousands of other unnamed heroes, then ASL is your game.  

Here’s another thought: all war games are “simulations”, ie not real (translator: not even close simulations in most cases).

Real wars can’t be played.  Only games can be played.

Play ASL as a game, with all that it brings.  

War is not a game.  (Translator: and ASL is not war.)

Find a game that suits you and have fun playing it.  If nothing else, it’s a great platform to make friends all around the world.  

ASL is not for everyone but I hope this will give new players proper expectations for what ASL will bring.  

Note : Author TouMu is a leading member in the Taiwan ASLer Club, you can find their group on Facebook.  

(以下是原稿)

分享一下我怎麼從ASL學到歷史

先說它一般的缺點:

1、幾分鐘的戰鬥,無法一窺全貌。

2、除非是史實模組,否則地圖是用拼的,接近而非真實樣貌。

3、參戰只有某部分單位,而非全部。

有了這些先備知識,進一步來談,怎麼從「毛線棋」學到東西。

一樣是從缺點去思考

1、因為是幾分鐘的戰鬥,當你不是坐在後方,看著投影銀幕決定策略時,你更能體會前線士兵的真實感覺。

例如:我們都耳聞史達林格勒的慘烈,但怎麼慘?

戰略棋的呈現方式:就是投入了好幾萬人的算子

然後丟棄很快。

可是,ASL會讓你體會:才剛佔領客廳,卻又要清理廚房,那種寸土不讓的激烈。

2、雖然地圖是拼的(成本考量),但跟微縮模型一樣,地形是有意義的,不是抽象的移動力花費+1,防禦+3這樣而已

你的進攻與撤退,都是要考慮路線的。

你也會明白:為何潰散士兵,士氣很難重整,但在樹林與建築物,為何可以冷靜下來。

3、雖然是部分單位參戰,但戰力的設計,卻是有參考真實世界,武器、載具,也都是完全參照史實去設計。

而這一切,不妨想成是一把鑰匙,幫你打開通往該次戰鬥的故事大門。

去查,就會發現更多我們不知道的無名英雄事蹟。

而戰爭,正是他們去打,流血犧牲的。

所以,我不愛艾森豪。

我很敬重溫特斯。

當然,如果你是喜歡當將軍的,那麼,這遊戲也不太適合你就是。

還有一個很深刻的體會:所有的戰棋,都只是「模擬」,假的。

真實的戰爭,是不能玩的。只有「遊戲」才可以玩。

所以,就當遊戲去玩,其他,都是附加的。

戰爭的本質,不是遊戲。

找到適合自己的遊戲,開心的去玩它,並非勸退。

不玩,一樣可以是朋友聊天啊!

我是會希望留下來的人,知道自己在玩什麼遊戲,就不會用錯誤的想法,去要求它給你的感覺。

Things I’m noticing the ‘experienced’ players doing more than me…

On March 14 2015, Ken Knott aka “esprcorn” started a genius of a thread on Gamesquad : “Things I’m noticing the ‘experience’ players doing more than me …”.  The response was overwhelming.

I went through 11 pages of posts, extracted what was said (newbies and grognards allke), applied some basic categorisation and present them to you for your reading enjoyment.  These snippets are simply TOO good be left in Forum Purgatory.

Attacking

  • During APh, advance ADJACENT to the enemy in different Locations, including Open Ground, to force tough choices. (Swiftandsure)
  • Prep should ALWAYS be used to launch Smoke before the MPh (witchbottles)
  • Use the “amoeba assault” with low quality troops / low ML troops. (witchbottles)

Firing

  • The rule of thumb is if you have positive DRM, combine the FP; if you have zero or negative DRM, divide it. (von Marwitz)
  • I think a lot depends on WHY you are shooting, rather than the DRM itself. (witchbottles)
  • It is wise to go through all the shots you plan on making and decide on an order. (Tater)
  • Firing the units with the most important targets first .. lessen the risk of an untimely enemy Sniper negating that attack. (klasmalmstrom)
  • ALWAYS FPF if the unit is a : fanatic; b : Japanese squad; c : a squad in a beach location during Seaborne assault (witchbottles)
  • Not enough Op Fire counters placed (aneil1234)
  • Use Firelanes a LOT (aneil1234)
  • Spraying Fire is another underrated form of fire .. the real art is the use of Spraying Fire during DFF. (BattleSchool)
  • A more frequent use of Snapshots (Bill Cirillo)
  • Fire discipline (RevJJ)
  • Always look for ways to use Firelanes and Residual FP on defence.  Never First Fire on the adjacent Half Squad, First Fire on the bigger stack moving later and then Final Fire on the adjacent HS. (Hubbs5)
  •  You can opportunity fire units with SCW or potentially with SCW in a building. You then wait to fire, presumably on an AFV taeget, but maybe not, until the advancing fire phase. You take no back blast penalty AND you avoid the normal +2 for firing SCW from the ground floor of a building to avoid the bb penalty. (Carl Nogueira)

Movement

  • If you are wondering if you should pull back, pull back (it even may be too late) (Swiftandsure)
  • Thinking about order of movement is very important. By moving units in the “right” order you can force your opponent to have to make really difficult choices with Defensive First Fire. (jrv)
  • First moves should be those designed to draw fire where you wish to draw fire. The immediate moves should be those which are designed to restrict enemy fire opportunity, and the last moves those designed to displace enemy positions. (witchbottles)
  • Move to cover your units in “bounding overwatch” .. accept that losses to front line units will occur. You win or lose by influencing those categories a combined arms commander has full control over : the terrain to attack (or defend), the force development at the point of attack, the provision and location or reserve units brought into support the attack (or defense). “Action”, not inaction. Reinforce success (as the attacker) or weak points (as the defender). (witchbottles)
  • Try to avoid encirclement and leave rout paths. Wherever you are planning to go in, make sure you can come back in a hurry. (Carln0130)
  • Use a Banzai / Human Wave to cut off forward enemy units and force them to die or to surrender rather than rout. (witchbottles)
  • New players have to learn to move quicker .. they don’t get anywhere NEAR where they have to be to win. (aneil1234)
    Just because you are defending, doesn’t mean you shouldn’t be moving. Skulk ‘em guys if nothing else (aneil1234)
  • Use of Encirclement and moving units in a way that result in elimination for Failure To Rout. (Paul _RS)
  • If you are not moving, you are dying. (Mr. Incredible)
  • They are not afraid of Open Ground. New players have ‘hug the building’ syndrome, so in urban fights they never get across the street because they are so worried about staying in +TEM. When you have a superior position and can back it up and with superior FP, advance your MMC into the street adjacent to defending units. Many times if forces the defender to abandon that position and retreat to the next set of buildings behind the next road because the position is now too hot to stay and/or skulk back into. (RobZagnut)
  • Move more than shoot (Jazz)
  • Moving more often and more aggressive than me (ecz)

Smoke

  • Smoke smoke WP and smoke some more (aneil1234)
  • Not smoking may be a health hazard (Mr. Incredible)
  • SMOKE, SMOKE, smoke, WP and more smoke (Jazz)
  • Using a lot of Smoke, trying smoke also with squads having “1” exponent (ecz)
  • I ALWAYS say at the beginning of the PREP fire phase…onboard smoke, off board artillery…even if I don’t have it JUST to remind myself… (Mark De Vries)

AFVs

  • One should take care not to move vehicles into hexes where a defender can make a To Hit DR with his MGs and more easily lay down a Fire Lane that could impede infantry movement later. (klasmalmstrom)
  • Use a fully tracked AFVs to generate “instant” fortified building location breaches. (witchbottles)
  • Always rush armour from outside CA, then go CE when point blank from behind to win Gun Duels (Westy)
  • Setup AFVs behind walls with TCA towards the enemy and VCA pointing towards a quick getaway without reversing. (Mr. P)
  • Motion attempt (Jazz)
  • Moving AFVs while BU most of the time, going CE only if absolutely necessary (ecz)
  • Using MGs (usually) to position AFV armoured facing for free after the use of the MA in another direction. (esprcorn)
  • Here’s a creative use to a captured AFV : line up your Russian squads to “auto-deploy” as crew.  You can create enough HSs for a more “economical” Human Wave!  (Simon Lai)

Concealment

  • Don’t attack in CC to retain concealment, then move away or TPBF in Prep Fire. (Westy)
  • Using lots of dummies is not dumb. (Mr. Incredible)
  • Using OB designated dummy counters as 5/8” dummies (esprcorn)

HIP

  • HIP Guns .. Russ Bunten .. stated (HIP Guns) should be placed first and then your defence created around it. (RobZagnut)
  • HIPs .. you should only be surprised by its appearance once. Then it gets death by fire and/or manoeuvre. Then you learn to cover the likely spots with overwatch units while moving along.. a great way to do this is with light AFVs that are not critical to achieving the VCs. Park them in motion bypass of likely spots – which the HIP GUNs appear as you announce the end of that AFV’s MPh. Then knockout said Gun with follow on units. (RobZagnut)
  • HIP Ignorance – Not knowing potential HIP sites before and during play is not good. (RobZagnut)
  • Face the HIP – take the inevitable loss it will bring, and use those overwatch forces you positioned for that eventuality to then eliminate the HIP position or at least neutralize it with fire. (witchbottles)

Guns

  • HIP Guns .. Russ Bunten .. stated (HIP Guns) should be placed first and then your defence created around it. (RobZagnut)

Fortifications

  • Have minefields and wire covered by fire (Swiftandsure)
  • Have units in trenches and/or pillboxes in mutually supporting positions (Swiftandsure)
  • Place minefields in one hex buildings (Swiftandsure)

OBA

  • Use your OBA SR to indefinitely hover over enemy positions to make him shift around (Swiftandsure)
  • Odds against that are so high that allowing OBA to determine your play is what is the most damaging. (Tater)

Prisoners

  • Stack as many prisoners as you can….. they are excellent bulletproof devices when your enemy score KIA results on the guard….. (Simon Lai)
  • Speaking of prisoners. The Russian prisoner hot potato trick is a great way to deploy squads from a nationality that normally does not deploy. You just transferred the prisoners around to different units until you are satisfied (Carl Nogueira)
  • Yuh, a single prisoner in the same location with your Death Star can feed and pull back all your berserkers in this location, just in case your 10-3 of the Death Star goes berserk…… (Simon Lai)
  • Always take prisoners when you must capture buildings, for if you invoke No Quarter you cannot Mop Up. (Justiciar)

Wisdom

  • Shoot BEFORE the AFV moves in to cause VBM freeze (leave residual in the entry hex to deter followup infantry). (witchbottles)
  • Deploy lots (Westy)
  • Use Foxholes to create rout paths in Open Ground between buildings (Swiftandsure)
  • SAN – don’t let it stop you doing things (MrP)
  • Give DCs & FTs to -0 or +1 leaders (Swiftandsure)
  • Use and abuse skulking, VBM freeze and all legal recourses without scruples. (Swiftandsure)
  • Expect to lose troops (MrP)
  • Don’t check ROAR or read an AAR on a scenario before you play it. (RobZagnut)
  • Know when to move in deliberate, well-planned, and coordinated sequence and when to “bum rush ‘em”. (G.L.O.A.T.)
  • Use spotted mortar lots (Westy)
  • Use dummies with elevation to deny concealment at setup (Westy)
  • Deploy on attack to scout and to draw fire. Deploy on defense to cover more ground. (aneil1234)
  • Deploy on the first RPh (dspurlock)
  • Reading the Victory Conditions (Jazz)
  • Reading the Vehicle Notes (jrv)
  • Full utilisation and mastery of their OB. Every unit has a job. They know exactly what needs to be used when and what needs to support what. (RevJJ)
  • Timed aggression. They mitigate their risk until it’s time to go for it (RevJJ)
  • LOS mastery – this is huge. (RevJJ)
  • They play their game, not yours. (RevJJ)
  • Setup stacks out of all LOS then gaining concealment with the leader possessing the SW on the bottom of the stack, then followed up with an out-of-LOS Support Weapon transfer in the first RPh – leaving the otherside clueless as to the leader and Support Weapon placements. (witchbottles)
  • Deploy HS on the first RPh in addition to the allowed set up limits, and send them scouting and swamping the defence. (Swiftandsure)
  • If you stack it, you might stack (lose?) it (Mr. Incredible)

.. and this is from Jim “Sparafucil3” Bishop, Master Yourself

I play Fort a lot. I have had the pleasure of playing Pleva, JR Tracy, Paul Sidhu, Toby Piling, Lars Thuring, Bob Bendis, and many other “top-notch” ASL players. What I notice they do better than anyone is not letting the bad luck get to them. They accept it and move on. It’s like the game starts over again right at that point, as if it never happened. When they are ahead, they are willing to take a few more chances to go for the kill. When they are behind, they tighten up and look for better opportunities. Anyone can read the rules, learn the tactics, study the odds tables, etc to find a way to play more effectively. The true champions are masters of themselves first and foremost. My best ever run at ASLOk (last year, three mini wins and 3rd overall in the GROFAZ), this is what I worked on more than anything else. Master your own emotions and you’ll often find that things eventually break your way and its your opponent who will be tested by his. If he can’t pass that, you have him where you want him. — jim (still a struggle to master myself consistently)

See also ::

PBP02 The RHA at Bay AAR – a fighting withdrawal!!

This was May 27 1940.  German mechanised units chased Allied forces through Belgium and northern France.  A detachment of the 5th Royal Horse Artillery found themselves to the immediate south of Dunkirk with 80 men from a searchlight unit and Germans units threatening to overrun. PBP02 is part of a scenario pack created by the Paddington Bear ASL Club in Australia.  I had a look through them, there are good number of PTO scenarios that never fails to draw my interest but overall the Paddington Bears often portray interesting tactical situations. PB2 Start-proc This was the setup. The German wins if both British guns were eliminated and more than 10 CVPs of Good Order Germans exit off the east edge (right edge of the map). It’s a draw if both guns were eliminated without the requisite exits. There were two nice locations to where the guns could be emplaced : both were orchards with stone walls. I had the two ATRs positioned to not take immediate fire but to be where they would cause the most delay. Their threat was more powerful than their actual effectiveness against German tanks. So here we are: eight British second liners (they were search light operators) and two guns against ten German élite and first liners plus five tanks. Turn 2 Ger 02 - EoT Berserk Germans Brit Right Wing collapse-proc German Turn 2: The British reserves moved up to front line positions after seeing how the Germans commit. The British right flank got shot up pretty bad. All that was holding that side up was a British second liner. The Germans used smoke and cover well but a squad got tired of the searchlight operators shooting back and promptly went berserk. Turn 3 Ger 01 - ATR Left bounced Berserker died Folks keeping huns at bay while comrades rally-proc German Turn 3: The berserkers charged! You can see how they made their way straight into the first stone building only to be cut down when they got to the house. The single British second liner continued to hold up the right flank while their compatriots were busy rallying. The first German tank rounded the corner on the British left flank and the ATR team got to work, only to bounce a round off the tank. German tanker: “That wasn’t even scary.” Turn 3 Brit 01 - Units fall back left Greenies in front.-proc

British Turn 3: The British were in general retreat .. erm .. retrograde.  The idea here was to stay ahead of the Germans and get to the next building before the Germans get their guns on and to keep the inside lines open.  On the right, a rallied British green squad switched a second liner out as the rear guard.  These guys would see a few medals before the day is over.  

Turn 4 Ger 01 - tank bounce off ATR shot but got nailed by gun-proc

German Turn 4: The action heated up on German Turn 4. On the British left, a German tank tried to get to the back field. The British ATR team held their shot until the tank went to the other side of the building. However they bounced a second round off the German tanks even when they had a side shot. The 18 pounder (typo in the picture) on the British right “appeared” and wrecked the German tank in the Defensive Fire Phase.

Turn 4 Bri 03 - G folks killed Ger 1st line-proc

British Turn 4: The British green squad on the right dispatched the German first liners who held them in melee!! The rest of the British squads got to the last line of buildings. They cut it quite close, as the Germans shot some of them between the gaps. The British continued to get to positions that were a little out-of-the-way but cover grounds the Germans would move into.

Turn 5 Bri 01 Gun appears WP ne.  fire & fun, concript died earlier-proc

British Turn 5: The Germans started building a death star on the British left and the left British gun appeared!!  It promptly put a round of white phosphorous into the building. The British ATR teams repositioned towards buildings where they could prevent the German tanks from exiting. On the right, the malfunctioned British gun couldn’t be fixed and was eliminated from the game. The Germans sent another squad in on the right flank and killed the pesky British green squad that was holding up traffic but these heroes had already saved their brothers.

Turn 6 Ger EoT-proc

German Turn 6: The Germans were almost of top of the British now. A German tank got inside the British lines but one ATR team was broken and the other one couldn’t get close enough.  Good thing the white phosphorous forced the German death star to move.

Turn 7 Ger MPh-proc

Turn 7 Ger CC Got the gun!!-proc

German Turn 7: The Germans got up to the right ATR team and was wrecked at pointblank range! The Germans rushed up on the British left as well. They advanced up and captured the gun hex in the CC phase!!

Turn 7 Brit End .. KIA'd-proc

British Turn 7: The British couldn’t let the Germans have a fire phase to spike the left gun.  The British squad fired pointblank and KIA’d the squad!  This led to an interesting revelation after a few rounds of discussions on the forums.  There’s no way to kill the gun by small arms fire without a crew / possessing infantry (A9.74) present!  So the only chance of the Germans getting a tie is to kill it with the tank ordnance. 

We never got to that so here we go.  It’s a three hex range with an infantry target.  The base TH is 8.  The gun was emplaced, so there’s a +2 DRM. 

snakes

SNAKES!!  The Modified TH# is 8 .. rolled a 2+2 which is not less than half but it’s an original 1,1 nonetheless.. so we need a subsequent roll ..   subsequent That’s equal to half the Modified TH# of 8!!  CRITICAL HIT!!!

As AZslim pointed out to me on GameSquad, guns (and crew) are automatically destroyed on Critlcal Hits.  So both British guns were gone.  This game went all the way to the last roll – and it’s a DRAW!!

Gotta admit, this is some finish!!  Witness the narrative power of an ASL game – and that’s why we love it.

AP90 Smashing The Hook (an AP9 “To The Bridge!” scenario)

I was chatting online about Gary Fortenberry’s new Advanced Squad Leader Action Pack “ASL Action Pack 9: To The Bridge!” when Sam Tyson offered to play.  The next thing I knew, I was experiencing a truly action packed scenario, well designed and well “interpreted” by Sam. This was February 1942 in Burma.  Patrols from the King’s Own Yorkshire Light Infantry discovered IJA roadblocks around Danyingon.  So elements from the King’s Own Yorkshire Light Infantry and the 1/7th Gurkha Rifles set out to evict the IJA from the area.

There were 2 roadblocks in predestinated positions on the map.  The British goes from the bottom of the map to the top.  They get an instant win when they clear both roadblocks or if there are no good order IJA troops around either roadblock after five and a half turns.  The British got a mix of armoured cars and (scary) Gurkha ladened carriers.  The IJA got to hide (always good) plus a Mountain Gun. 001 AP90 BT1 Start-proc

British Turn 1 : You can see where the IJA gun was hidden and where it was bore-sighted.  There was an MMG on the hill to the top left bore-sighted to a path through the jungle.  There was an IJA half squad hidden in the brush hoping that the British would pass him by and another IJA half squad near the first roadblock in the middle of the map.  There’s a scenario special rule that requires all hidden IJA to reveal themselves via Banzai attacks in Turn 4.  I figured that might be where the British would be by then.  The British were very aggressive in their first move given the short time frame.  My foxhole on the hill on the bottom of the map was immediately overran.  Nothing but a human speed bump!  The carrier hooked around the foxhole and made sure there was no escape for the IJA half squad therein. 003 AP90 BT2 AFPh Start-proc

British Turn 2 : The British methodically beat down the brush and found our first hidden IJA half squad.  A British armoured car headed straight for the defending IJA at the roadblock.  IJA’s LMG scored a hit and a lucky kill.  The IJA started backing off. 004 AP90 BT2 RtPh Vol Break-proc

British Turn 2 Rout Phase : The IJA started melting away before the British could engage them in close combat.  The IJA looked to delay and to collapse into the last roadblock gradually.  They formed a line right before the tree line where the hidden IJA half squad was. 005 AP90 JT3 DFPh Cleared Roadblock-proc

IJA Turn 3 : The end of the turn saw the IJA melting away again, collapsing towards the last roadblock.  Before the MMG team on the hill on the middle of the map did, they vaporized a British half squad coming down the jungle path.  The Brits then decided to use a carrier to create a trail break in the jungle nearby.

006 AP90 JT3 CCPh Jumped the Brits-proc IJA Turn 3 : The IJA MMG team from the middle of the map repositioned to around the last roadblock, MG trained onto the road.  A big stack of British troops successfully removed the first road block.  A British 9-1 and a Gurkha squad walked into the hidden IJA half squad in the last turn.  The half squad should have popped up in the earlier British Turn when this happened.  Hand to hand fighting nonetheless ensured immediately and they were all killed. 007 AP90 BT4 Gun appears carrier immo-proc

British Turn 4 : The Brits were out to chase down the routing IJA squads.  The first carrier sped down the road and the IJA gun roared from behind the second roadblock.  The carrier was hit and immobilized.  Meanwhile the hidden stack on the bottom of the map tried to get the British armoured car’s attention by slowly creeping towards the British backfield. 008 AP90 BT4 MG hit but bounced Int Gun kill carrier-proc

British Turn 4 still : The action heated up as the second carrier comes running down the path.  The MMG managed to score a hit but the bullets bounced off.  This carrier managed to hook around and cut off the IJA brokies’ rout path.  The third carrier went straight for the roadblock!  The gun crew intensive fired  and killed that one too.  The rest of the British troops moved in quickly.  This was Turn 4, the British had 2 more Movement Phases to go.

009 AP90 JT4 WP and formed a line-proc IJA  Turn 4 : The IJA mortar crew laid a white phosphorous (WP) round on the carrier but the Gurkhas were too tough for it.  The WP round did allow the IJA troops to slip by and escaped back to around the second roadblock.  The IJA gun killed the immobilised carrier, taking more of an interest in its Gurkha crew.   However, I should have left the gun pointing towards the right for the next British round. The British were consistently great at cutting rout paths and taking prisoners.  The IJA realised they need to stop the British from getting behind them if they were to survive – hence the line. 010 AP90 BT5 IJA Vol Break-proc

British Turn 5 : While their comrades held the line, the IJA on the left melted away so they could counter attack against the British troops at the roadblock.  The armoured car on the bottom of the map finally verified that we had a moving stack of dummies.  It was a miracle that the IJA kept this armoured car out of the battle for so long! 011 AP90 BT5 CC 2 Melees Big stack on Roadblock-proc

British Turn 5 still : The British were unlucky in that all four close combats started with IJA ambushes.  However the IJAs were killed around the gun and 2 of the fights resulted in melees.  Only on the right did we see a solitary but concealed leader slaughtered a British half squad and slipped deeper into the jungle. 012 AP90 JT5 Counter Attack!!-proc

IJA Turn 5 : The routed IJA again rallied and attacked towards the roadblock.  The British were assembling around the roadblock at this stage.  If they manage to clear the roadblock, they get an instant win but if not, they would need to makes sure there were no good order IJA troops around the area marked with a big red hexagon. 013 AP90 JT5 -9 Roadblock Clear mod-proc IJA Turn 5 – Game End : The close combat phase was a good one for the IJA, they reclaimed two of the hexes around the last road block.  However, the British were able clear the roadblock by rolling less than 10.  (You need to roll 2 or less on a pair of dice, but the Brits had enough people to get a -7 modifier.)

Mr. Sam Tyson won!!

FE27 The Bravest Thing I Ever Saw

This scenario from Fanatic Enterprises describes a situation in Bataan in January 6 1942.  The Americans fought a delaying action that saw the gunners from both sides exchange shells for shells.  Carl Nogueira played the defending American and I the attacking IJA in this after action report (AAR).  We actually exchanged sides and played this twice, with me getting my teeth kicked in both times.  This is already the less ugly version, rated PG-13.

The side that gained the most Victory Points (VP) wins.  You can gain Casualty Victory Points normally and you gain 1 VP for controlling each Level 2 hill hexes on your opponent’s side.  The Americans set up on the bottom of the map and the IJA on the top.  We get 5 and a half turns.

01 FE27 JT2 02 CC Kill-proc

IJA Turn 2 : You can see where the IJA guns were.  Line of sight (LOS) to the American hill tops were limited due to jungle terrain.  You can also see two hidden 2nd liners to slow down any sort of American counterattack.  The big stack in the middle of the top map were two IJA medium machine gun (MMGs), but their leader, a 9-1 who’s also the best leader in the IJA order of battle (OB) was killed by a sniper early in the game.  You can see the 3 lines of IJA advance on the American side.  The left most IJA rush would have been the most threatening but I failed to capitalise on the situation properly before they got wiped out.  The middle advance would be stuck for a while and in retrospect I should have strike out through the swamp towards the right to put the squeeze on the Americans on the hill on the right of the American positions.  On the right, the IJA caught and took an American 8-0 and a squad together with it in a flurry of hand-to-hand action.  At this point I expected the American guns to be towards the bottom of the map.

02 FE27 AT3 01 Start-proc

American Turn 3 : The IJA found the first American gun on the left by walking straight into it.  There was nothing left of the squad.  The attack on the left was also wiped out and the Americans started moving towards the right.  The attack in the middle was floundering as well.  The IJA on the right kept pushing towards the bottom of the map, fully expecting to find the second American gun there.

03 FE27 AT4 01 Start-proc

American Turn 4 : The American gun on the left malfunctioned!  The IJA forced their way through the bamboo to kill the gun crew before they had a chance to fix the infernal contraption.  You can see a blotch of red on the hilltop to the right where once again, the IJA found the other American gun the wrong way.  You can also see the pair of IJA MMGs moving in during the last turn as it didn’t look like the Americans were going to make a push to the north.

04 FE27 JT5 02 CC IJA dead US CR-proc

IJA Turn 5 : The IJA troops surrounded an American 8-0 and a 2nd liner in a 3 point stance.  The IJA were of course, feeling very pleased with themselves.  There was an IJA demolition charge laying on the ground in the middle.  That was the aftermath of an IJA half squad’s attempt to blow up the American MMG stack.  On the right, the IJA made another attempt up the hill and caught more Americans in close combat.  Unfortunately this IJA half squad could only take half of the American squad with it.  On the bottom right of the map you can see the Americans on a reverse slope defence configuration, looking to get the first shot in if any IJA pop over the crest line.  The probing stack of IJA troops however decided to move back up to their leader for a last push as time was running out.

05 FE27 AT5 01 Ring of Fire-proc

American Turn 5 : The “ring of fire” on the left broke the American squad but they failed to encircle the Americans properly.  Apparently you need to fire at the target sequentially for encirclement to happen (A7.7, note to self).

06 FE27 AT5 02 Ops-proc

American Turn 5 (still) : On the left, the broken American squad surrendered and the IJA picked the weakest (a 1-2-7) amongst the trio to be the guard.  That was the last mistake they would ever make.  The American 8-0 promptly jumped on the otherwise occupied IJA half squad in close combat …

07 FE27 AT5 02 Counter Capture-proc

American Turn 5 (aftermath) : The American 8-0 singlehandedly killed the IJA guards, rescued his men and found enough weapons to rearm half of his squad.  (Note to self : encircle properly & be mindful about who’s to play guards).

08 FE27 JT6 02 Banzai DC Hero-proc

Final IJA Turn : The IJA decided that they wouldn’t go down without a proper Banzai charge.  Therefore they targeted the gun crew who ventured out to retake a hill hex.  Just to be professional about it, they even short-strawed a poor chap to be a DC hero as well!  He was well perforated, his DC satchel went flying but he drew enough fire from his “friends” for them to jump on the American gun crew.

09 FE27 JT6 03 Wounded Leader-proc

Final IJA Turn (still) : An IJA leader in the middle rushed in and tried to grab the DC pack.  He got shot and was wounded as he picked it up and he never managed to place it.

10 FE27 JT6 04 CC again-proc

Final IJA Turn (almost done) : An MMG crew from the original “Ring of Fire” caught up with the American leader and squad on the left, knives drawn …

11 FE27 JT6 05 End-proc

Final : The banzai’ing IJA came victoriously out of the close combat on the right.  The folks on the left however would be locked in perpetual mêlée.  You would know I lost the game a long time ago if you can see the huge stack of IJA casualties.  Carl was nice enough to play this through to the bitter end!!

Lessons learned:

  • When playing against the Americans, the IJA needs to make good use of the Advance Phase.  Try to move into American Line Of Sight only in the Advance Phase, and if you can stay concealed, even better.  This way the IJA don’t have to take high American firepower with “First Fire Movement in Open Ground” (FFMO) and “First Fire Non Assault Move” (FFNAM) modifiers.  If the Americans fire in the following Prep Fire, they don’t get to move away and the IJA will have a chance to fire against their low morale (US Marines excepted).
  • Don’t give prisoners to someone who might not fare well in (close) combat.
  • Encirclement : remember to fire on the target sequentially.
  • Use 7 as a gauge, if you can get a result on a 7, it’s a good choice.  Alternatively, try to move in routes that stack so much DRMs on your opponent’s shot that he/she can’t get results on a 7.
  • Don’t spread your forces too thin.  There should be reserves behind an attack to exploit results.

Other thoughts?

HS8 Bailey’s Demise AAR – fighting the Marines in the jungle

JT1a-proc

Learning jungle terrain in ASL153 Totsugeki is one thing.  Learning about Marine Raiders in the dense jungles of Guadalcanal is another matter entirely.

This is HS8 Bailey’s Demise, from MMP’s Operational Watchtower Historical Study.  The date is September 26 1943.  This scenario as with the whole History Study, is centered around Guadalcanal.  The river depicted on the map represents the Matanikau river.  The Marine Raiders were looking to cross the river to the west bank to complete an encirclement.  Unbeknownst to the Marines, the IJA had crossed the river and was on the east bank when the engagement occurred.

The Marine Raiders came in from the top left into a wholly hidden (HIP) deployment of IJA troops.  The Marine Raiders, like the IJA 1st-liners, were also stealthy.   They were to cross at least 6 CVP (3 squads or other combinations) to the west bank of the river in 7.5 turns.

All interior jungle hexes are dense jungle.  All jungle hexes next to non jungle hexes are light jungles.  The difference being while light jungle are similar to woods, dense jungle has a terrain effect modifier (TEM) of 2, does not permit fire groups and allows a stacking limit of only two.  This map’s marked with “crags” (4 point stone formations) merely to remind ourselves that the marked hexes were dense jungles.

The map above was my IJA setup, units unhidden for your perusal.  The mortar team down on the bottom left was largely ineffectual against American counter-battery fire.  I should have spread them out.

AT2b-proc


This was the Marine Turn 2.  The Marine made contact with the defenders and withstood IJA fire rather well.  Taking the risk to move in stacks (given the +2 cover of the dense jungle) their Advance Fire was devastating round after round for the IJA.  The IJA looked to block the Marines as much as possible, rout back (squads breaking “automatically” into half squads in the process) when in doubt and take advantage of their leader’s “Commissar-like” ability to rally them without (DM) penalty.

As I expected, the Marines avoided the bamboo patches on the right and came in from the top down.

Please keep in mind that IJA counters in faded yellow were hidden units that the Marine player couldn’t see.

JT2b - After MPh-proc

This is the IJA Turn 2.  Some of the frontline IJA routed back.  The IJA mortar team on the left was completely shot up.

AT3c After MPh-proc

American Turn 3.  The rallied IJA put up a fight in face of the advancing Raiders.

JT3c After MPh-proc

IJA Turn 3.  The IJA rallied and reconstructed a respectable line of defence.  In retrospect this approach didn’t work well.  The IJA, even concealed, could hardly withstand the withering Marine gunfire.  Perhaps a better strategy is to pair up the half squads.  One half squad would go aggressive, knocking off US concealment counters and drawing fire.  The other concealed half squad will close and either hope for an ambush in close combat.

JT3c HIP CC-proc

Talking about close combat, the Marines with their overwhelming firepower are deadly in normal CC (plus the IJA has no favorable modifiers).  Here you have a HIP squad that sprung out in the hopes of assassinating the Marine 8-0, they were promptly killed in CC.

I should have avoided normal CC with Marines to start with.  Hand to Hand (HtH) combat, when done with sufficiently lopsided odds (IJA half squad vs one or two Marines squads) offer a good trade for the IJA since the results of most are mutual annihilation!  Other than that, I should have ran!

AT4a Ambush by IJA-proc

Marine Turn 4 : here you can see how the Marines were already crowding the last passage way towards the river.  A Raider squad jumped a concealed IJA half squad and was ambushed and killed.  That was unfortunately the only time when close combat went happily for the IJA in this game!

JT4b Am Vol Rout-proc

IJA Turn 4 : The situation doesn’t look good for the IJA but they were still fighting hard.  Here you can see a Marine stack breaking voluntarily and routing away from possible IJA close combat.  Here’s a thought : had I not used the hidden IJA units in close combat, they could have sprung up now and kill the whole stack!

AT5a MG-proc

Marine Turn 5: the Marines started to cross the river!!  A repositioned IJA machine gun put the west end of the bridge squarely in its sights but it couldn’t stop the flow.

JT6a End-proc

IJA Turn 6: This was how it ended for the IJA, decimated and encircled.

The next time I play as the IJA against Marines, I will try :

  • Using my HIP units largely for cutting rout paths.
  • Pair up units (half squads), keep one concealed and use one for knocking off enemy concealment, with the hope of trading half squads for bigger stacks of Marines in hand-to-hand combat.
  • Rush IJA squads through openings created by successful hand-to-hand combat and go for encirclement
  • I thought of stacking IJA units to give them heavier fire power since I can’t create fire groups in dense jungles but I think that will just create bigger targets for blistering Marine firepower.
  • While retreating and blocking as the IJA might be a good idea at times, I should keep at least a 1 hex distance from the Marines.  That way the Marines would need to use advancing fire against my concealed units.
  • What happened to Banzai charges?

What’s your experience with fighting cardboard Marines in the jungles?  What are your thoughts?


Journey to a Tourney, Part 3 : The Aftermath

M36 JacksonI never expected this, but there IS an “aftermath” to having done a tourney for the first time :

  • Having prepared for all 25 tourney scenarios, I read a lot more of the rulebook and the scope of scenarios I can play expanded.
  • I met some great folks around the region as well.  I have a few more regular “Live” games now on VASL apart from my usual stable of PBeM (“Play By eMail”).
  • I play a little faster.
  • I play differently too, having seen different styles of play.  For example :
    • I know I should be more aggressive with my movements.  Moving and encircling is way more effective (and time efficient “turn wise”) than sitting and shooting.
    • I know what establishing a tempo as an attacker feels like.
    • I don’t care about the die rolls anymore.  “Reversion to Mean” dictates that it will all even out at the end.  Good decisions win the game not die rolls.
    • I overheard Ian Percy and George Bates said (and this is far from an exact quote) : “it’s not so much about what you do, it’s more about presenting your opponent with a serious of tough decisions and one way or the other, he’s going to mess a few up.  Make him do all the work.”
    • It’s important to plan out where you should be on the map and also when you should be where on the map especially as the attacker so you don’t run out of time.
    • There was an earlier poll on GameSquad asking whether folks are more comfortable attacking or defending in a scenario.  I can’t find it now but someone said “Is there a defence?”.  This thought rang in my head during my last round as the IJA (Imperial Japanese Army) defender in J116 Brigade Hill.  The IJA were infiltrating and cutting the attacker’s rout paths.  My understanding of Book VI (“Defence”) in Clausewitz’s “On War” echoes the thought : defence is just a different form of offensive action – counterattack!
  • Now I am getting ready to support the Hong Kong Society of WargamersAdvanced Squad Leader Tournament this year!!

Lastly I want to share something from the tourney with everyone.  John Charles Knowles, who’s teaching me jungle warfare through Operation Watchtower at the moment, wrote a cheat sheet for the PTO for our benefit.  Here we are :

Malaya Madness Chapter G Cheat Sheet

Cpl Kwan 7-0

Journey to a Tourney, Part 2: The Battles

Round 1: AP8 A Bloody Harvest

Maik Brinkmann

Maik Brinkmann

Maik Brinkmann

Maik Brinkmann is a methodological player with a great personality.  He stores his counters in boxes of little white envelopes which hints at an equally efficient and practical mind.  We decided on playing  A Bloody Harvest through email correspondence before I arrived at Singapore.

Bloody Harvest - old VASL setup for illustration only.

Bloody Harvest – old VASL setup for illustration only.

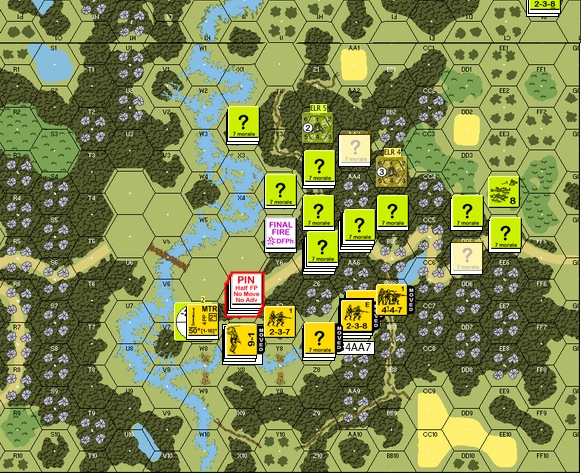
Germans started from the top of the board and their goal was to clear the area I got marked at the bottom of the board clear of “good order” Poles.

I played the Poles.  I decided to place my medium machine gun on the 1st level of the stone building that faced the grain field.  From the Pole’s angle there were three possible approaches.

There was the right side that is heavily lined with trees where the German could very well approach.  I placed 2 trenches within those woods to delay the Germans.  I made sure that the two trenches upfront can support each other (and not be able to shoot at each other).

There was the grain field in the middle that my medium machine gun (MMG) covered from the first level of the stone building.  I also had a squad in a trench that covered the road leading up to the grain field.

There’s also the left side that’s less wooded and was the longer way around.  I had a trench with a squad on the immediate left of the village, plus another squad in a stone building on the left covering that approach.  If needed, they could move back to the village to help.

Maik divided up the Germans and attacked down both flanks.  He was bogged down on my right as the Poles withdrew into the village.  He made better progress on my left but couldn’t converge onto the village in time.

The funny part was a stubborn Polish half squad that kept running retreating through the grain fields while harassing the Germans on the left.  It absolutely refused to be broken.

It was a great game that introduced me to a new friend.

Round 2: J103 Lenin’s Sons

Mark Humphries

Mark Humphries

Mark Humphries

Mark Humphries need no introduction in Asia or globally in the ASL world.  He runs the ASL Ladder from the Philippines.  We decided on Lenin’s Sons and he gratefully allowed me to play the defending Russians.

Lenin's Sons - old VASL setup for illustration only.

Lenin’s Sons – old VASL setup for illustration only.

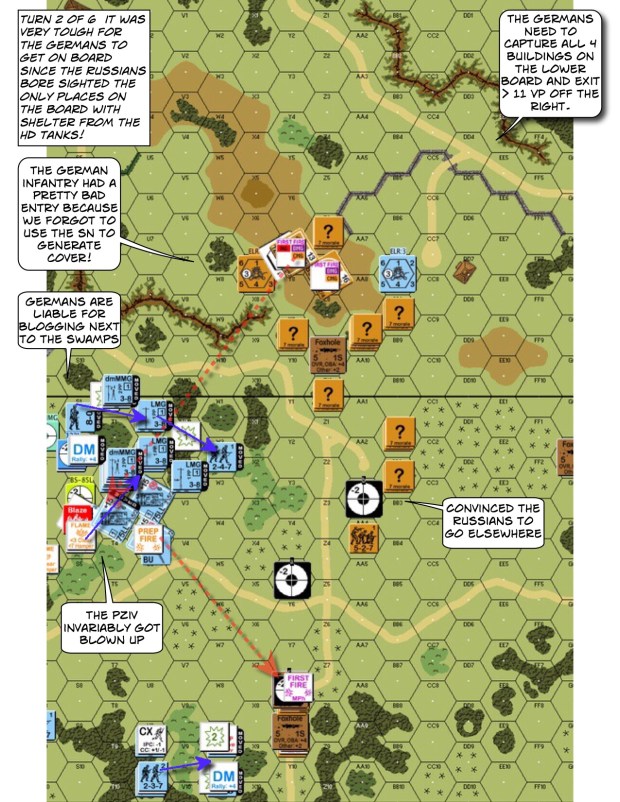
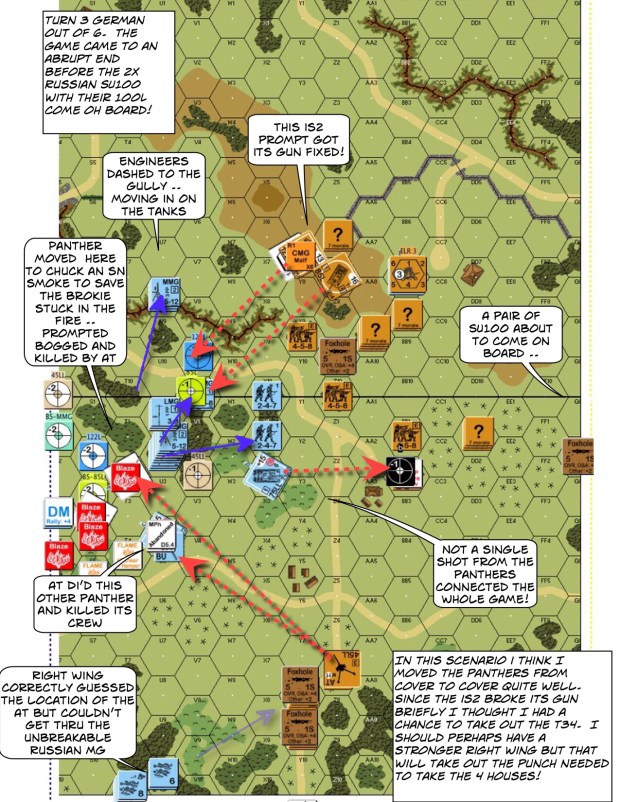
The Germans attacked down the length of the board looking to capture most the buildings on the bottom of the board.  From the Russian point of view, the left side of the board is open ground.  The German had a big wooden building at their jump off point.  The Russians had a hedge and an orchard in front of the buildings they are to defend.  On the right side were the woods.

From Mark I could see how ASL is really a game of movement.  The Germans would always move forward in every turn.  I failed to create a cross fire on the left and the SS was able to process across the open ground without breaking much until their rifles came into range.

In the woods on the right side Mark was constantly looking to encircle the retreating Russian troops.  The Russian had a demolition squad hidden in the woods and were able to channel a leader and a squad towards them but my timing was wrong.  The demolition squad sprung out, got shot,  and the demolition pack went flying harmlessly through the air.

It was a slow game but Mark made progress in every turn.  By mid game he was already in the orchards  in front of my buildings.

Another great game!  Mark showed me how it’s done : attacking in open ground and in the woods alike.

(PS : if I play this scenario again, the 10-0 commissar will go into the woods and the Russians will do a fighting retreat like IJA in the jungles.)

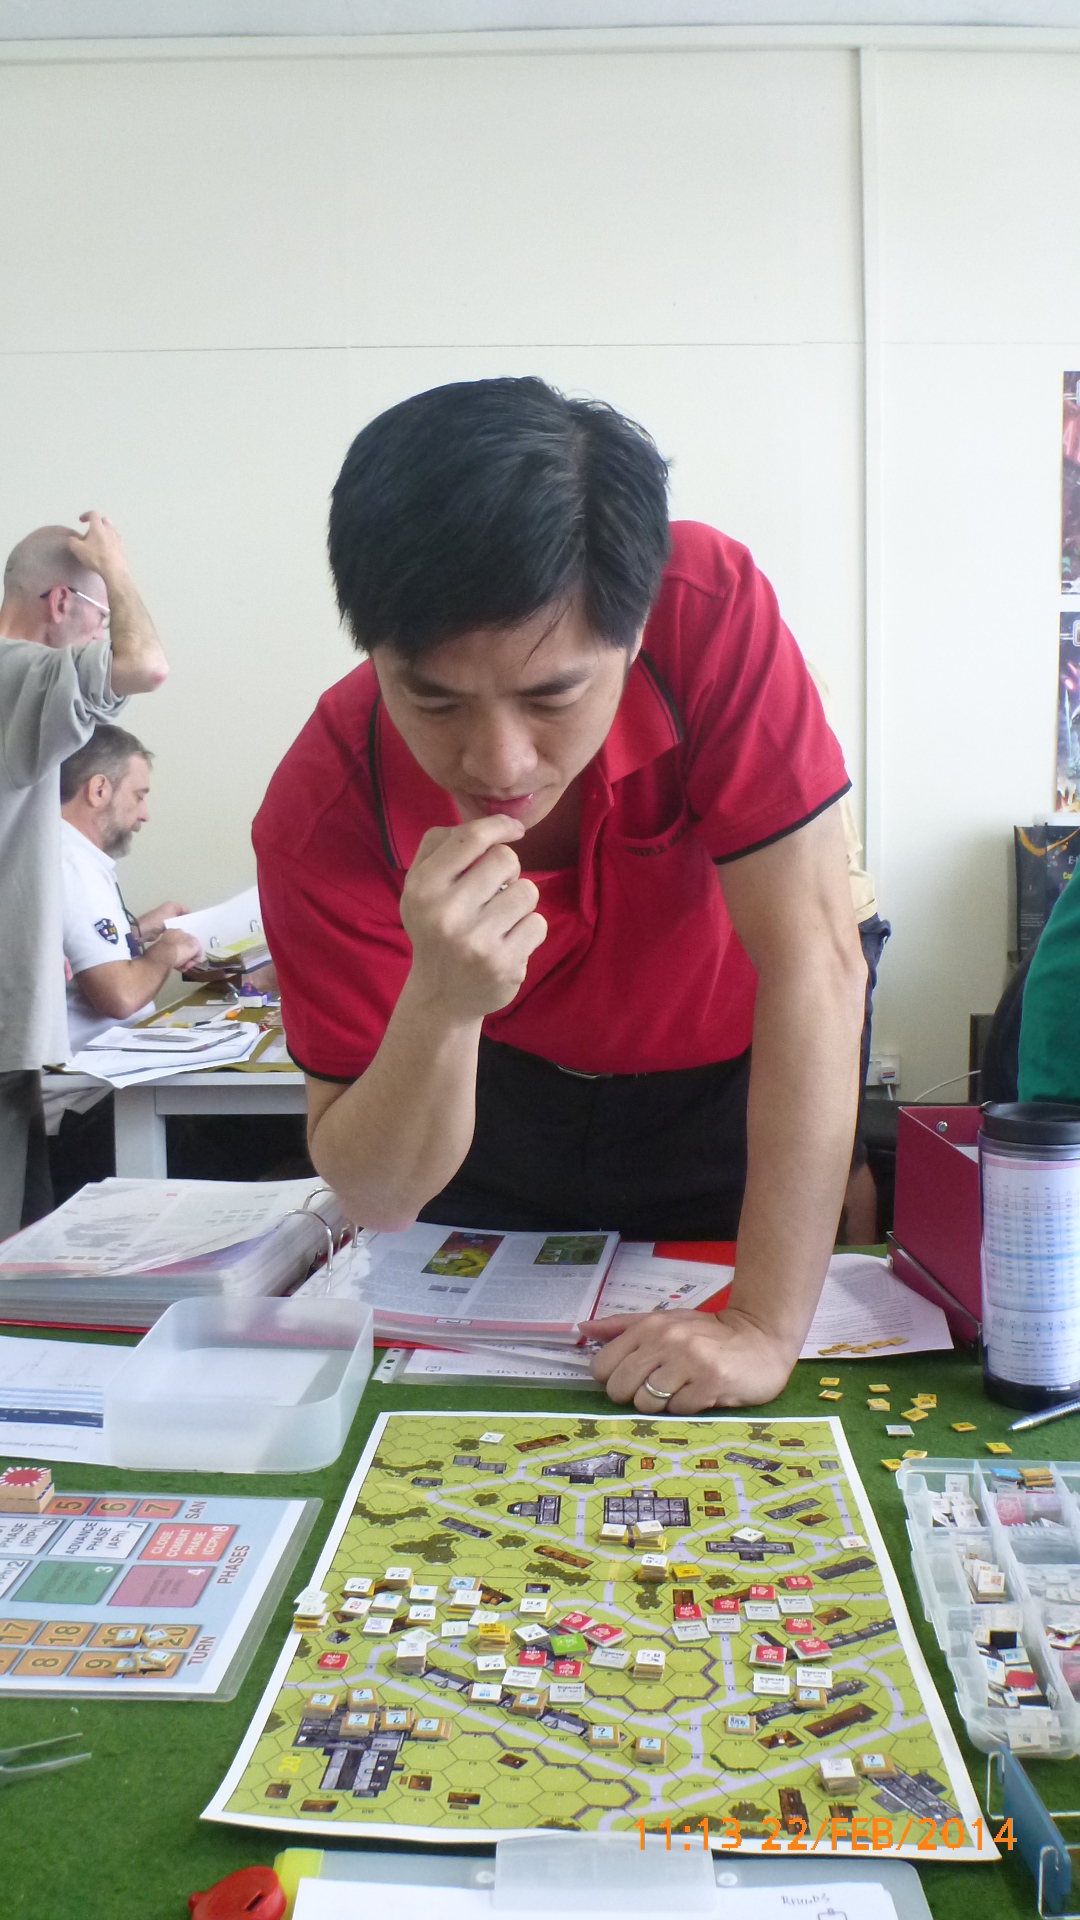
Round 3: ASL145 Shanghai in Flames

Jamie Lee

Jamie Lee

Jamie Lee

Jamie Lee is an experienced war gamer who is a newbie with ASL rules but is very well versed tactically.  The Singapore ASL’rs warned me about him.  On the other hand, he’s very unassuming and can easily disarm the unwary.

The scenario was Shanghai in Flames and I played the Chinese.  I played this a while back with Erwin Langlois before and I enjoyed it immensely.

Shanghai in Flames - old VASL setup for illustration only.

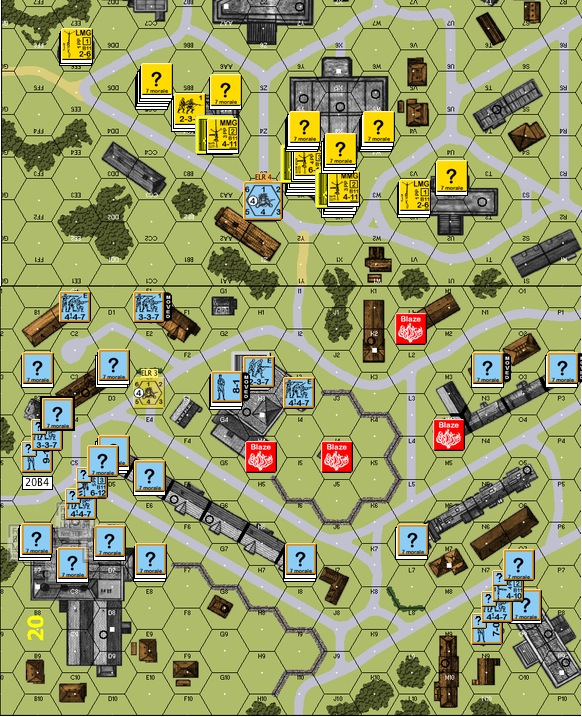
Shanghai in Flames – old VASL setup for illustration only.

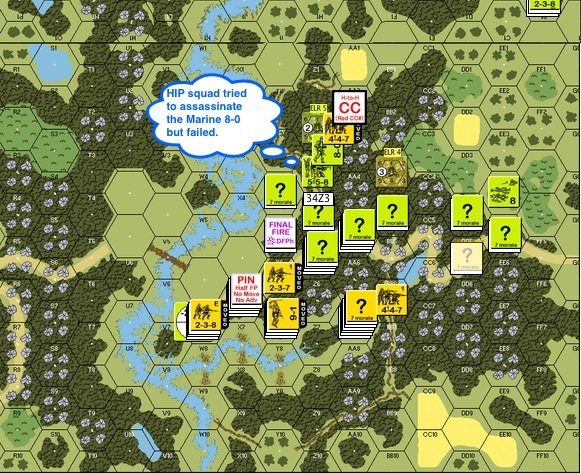
The large building on the bottom left of the map was the Sihang Warehouse (factory).  The IJA were to clear the factory of all “good order” Chinese squads.  Squads in the factory were fanatic (a point I forgot at the tourney).

From the Chinese point of view, the likely angle of Japanese attack would be down the left side of the board along the line of buildings.  The big stone building in the middle of the board was a good jump off point for the final attack as well.

The row house along the right of the factory was an important landmark.  As long as it stayed in Chinese hands, it allowed them skulk and to rout safely.  Once it fell into Japanese hands it became a beautiful fire base for the IJA

The Chinese got 3 fortified hexes and instead of fortifying the 3 top hexes of the factory to prevent the Japanese from charging directly in, I only fortified the middle hex the hex to it’s right.  With the risk I took from not fortifying the left, I exchanged that for a tunnel that linked the building on the left to the row house on the right in front of the building.

My plan was to fight a delaying retreat down the left side while a leader and a squad start a fire on the building to the left in front of the factory.  They could use the tunnel and go to the row house on the right and start fires there too, thereby denying the IJA of jump off points.

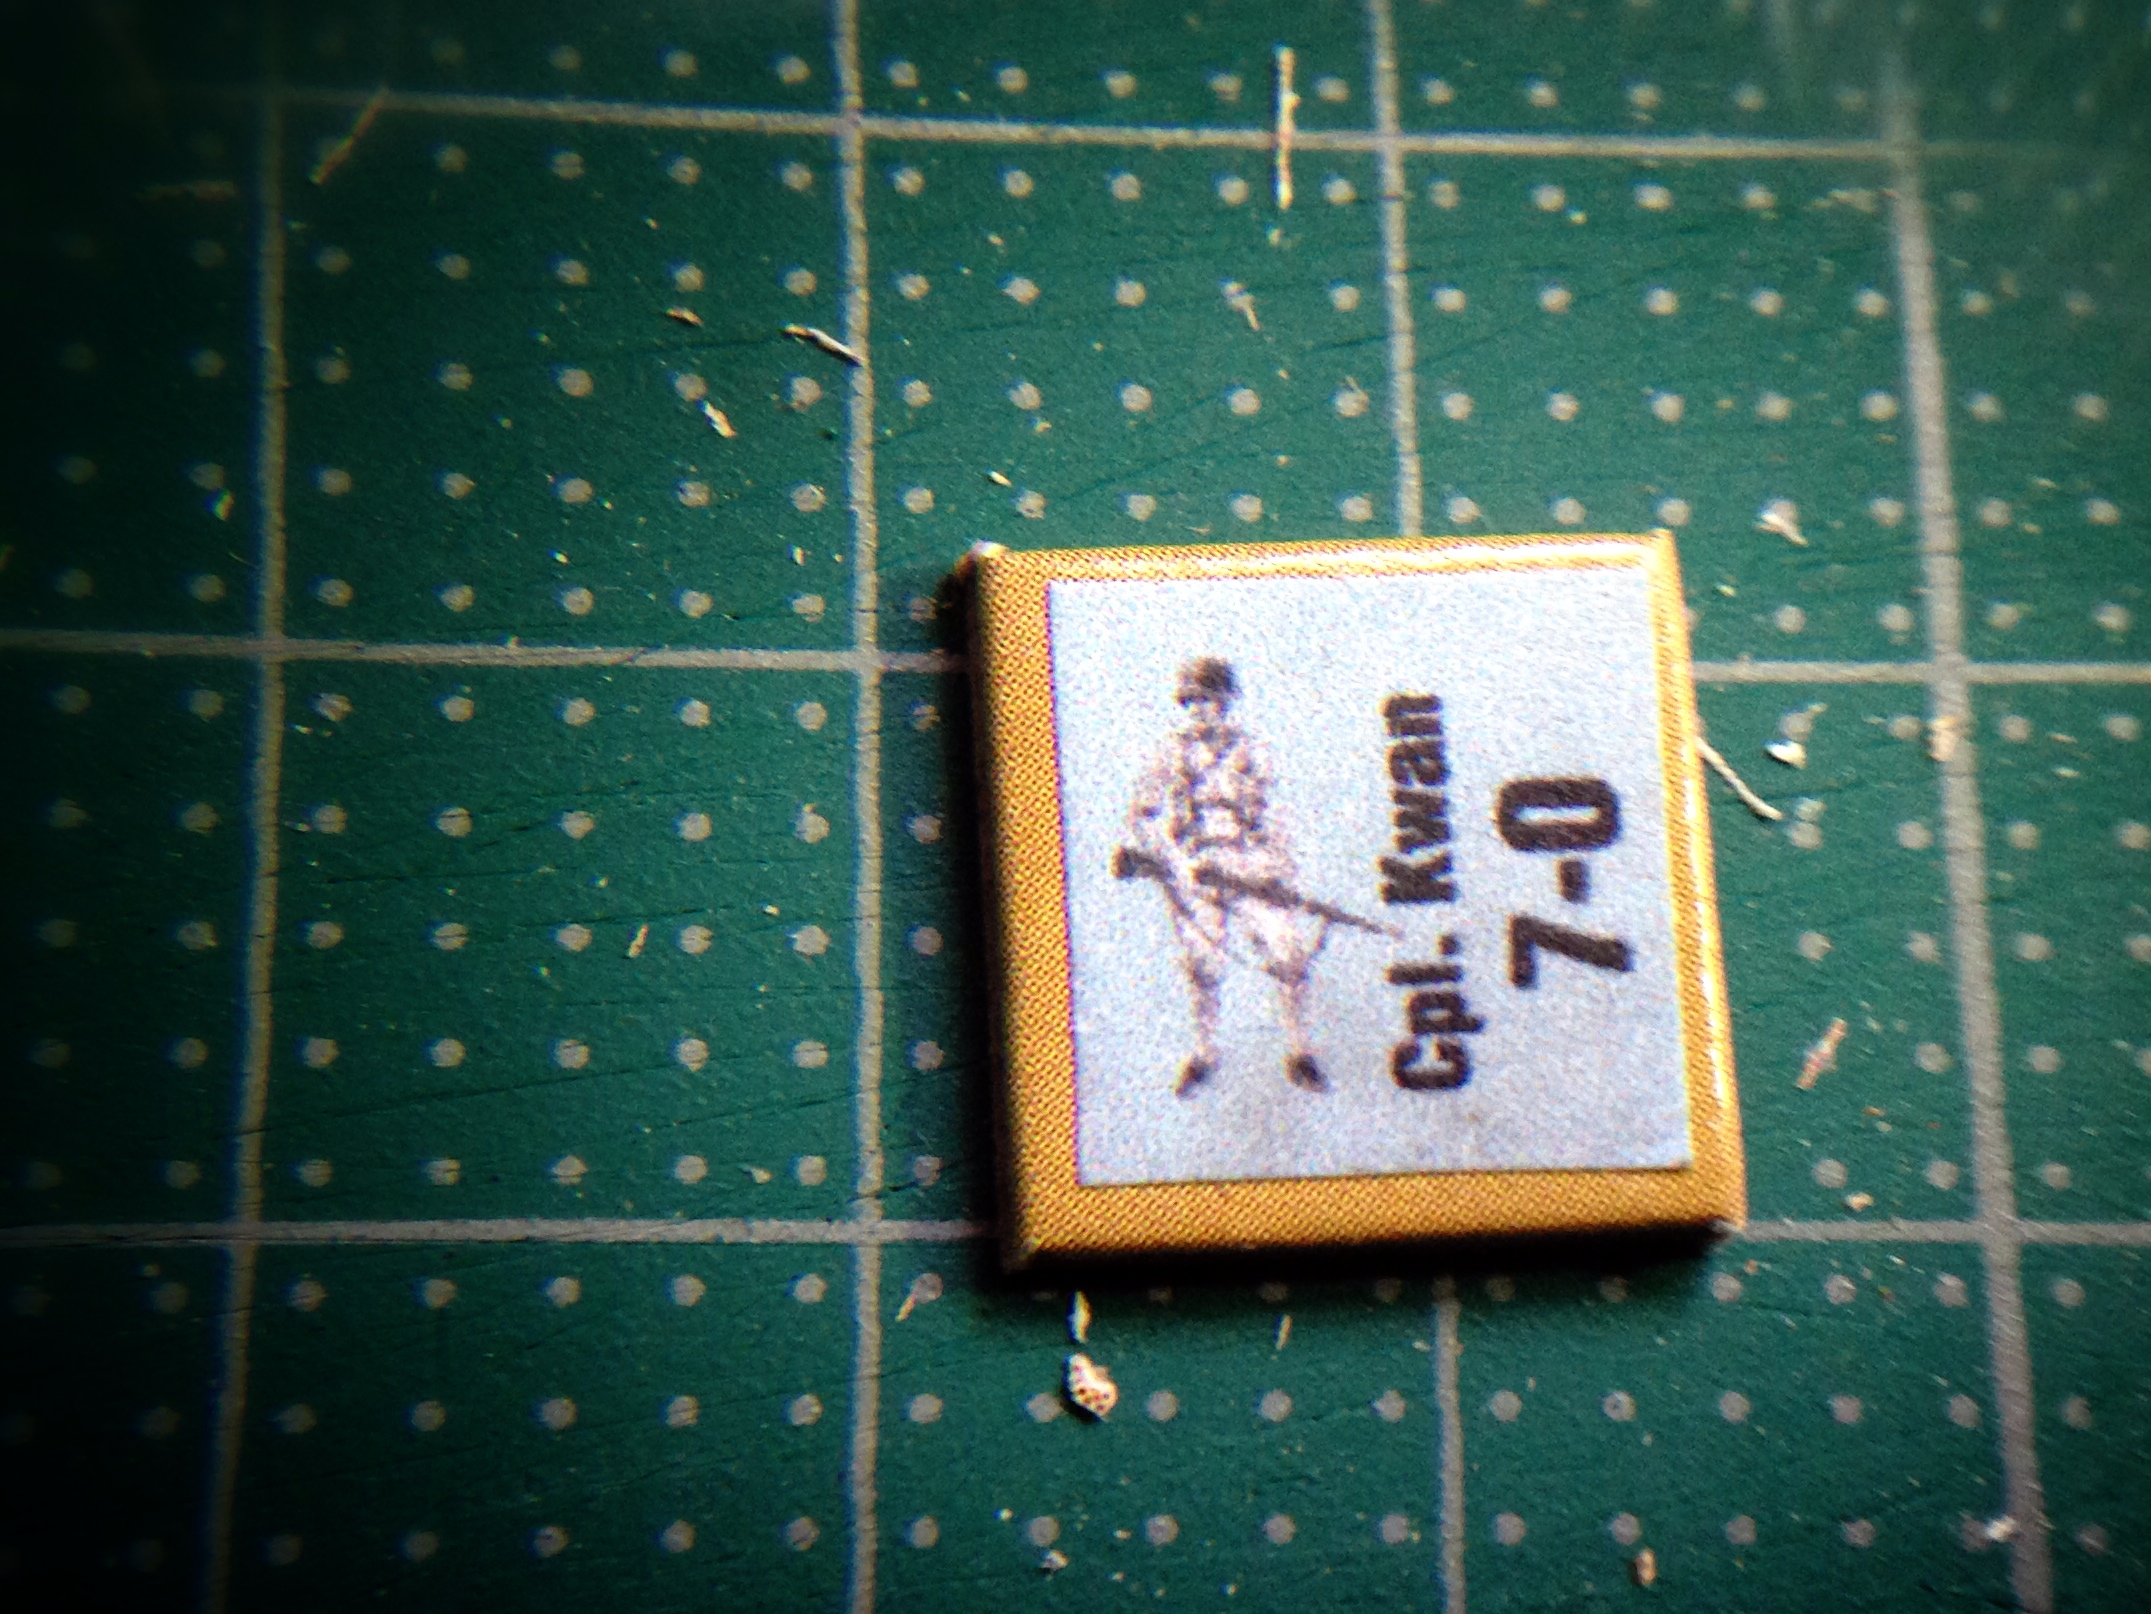
There was also a Chinese MMG team together with a protective squad and a 7-0 leader all the way down the street on the right side of the board.  Given there were two long streets, I plan to cover the first with a long fire lane, and move to the street closer to the factory when the IJA broke through.  Guess what?  The 7-0 overseeing the operation was none other than “Corporal Kwan” recently designed by the talented Sava Toufexis.

photo

Chinese GMT 7-0, “Cpl Kwan”

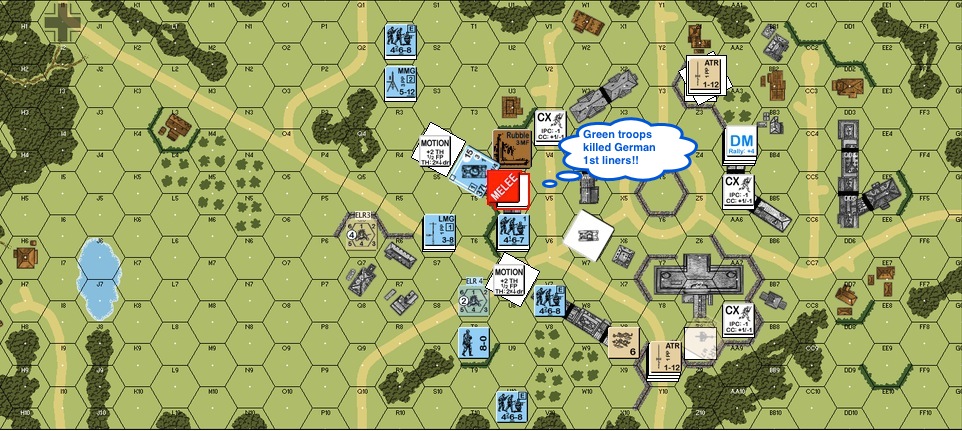
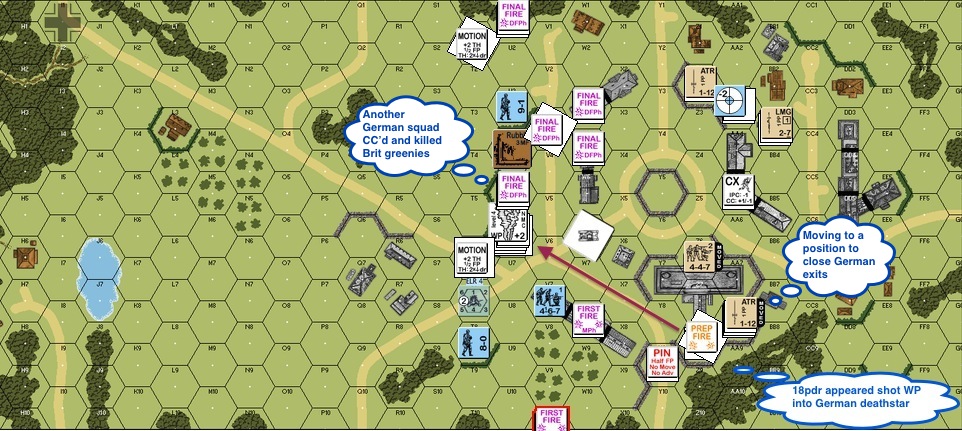
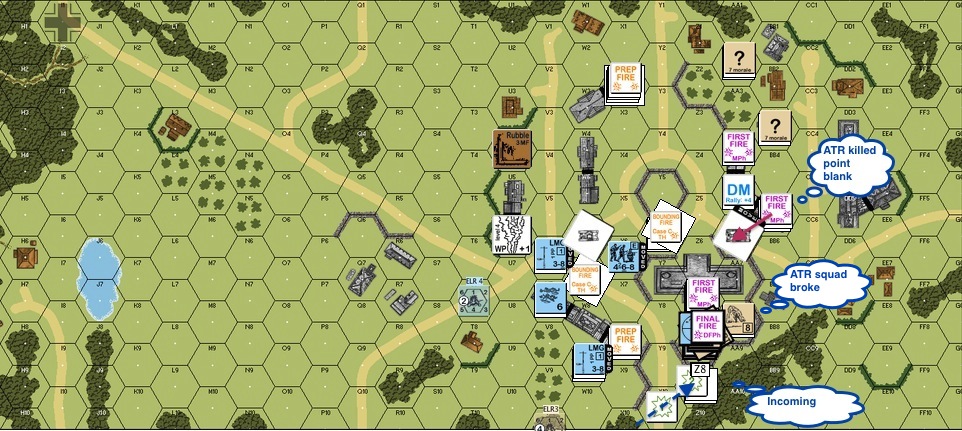
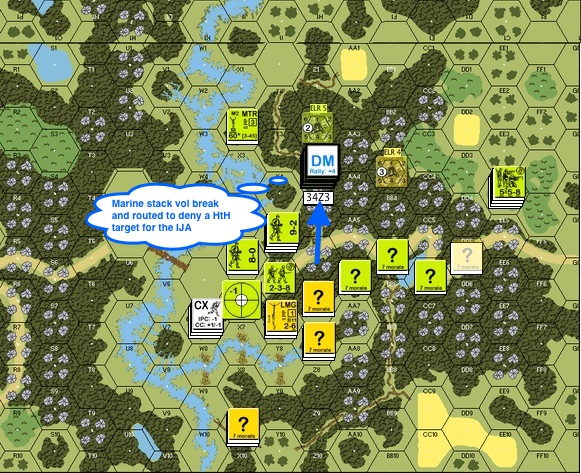
As it turned out Jamie was a lot faster than I expected in fighting through my retreating squads on left flank.  A dare death half squad made its début by playing dead for a while and finally snapping off its concealment and delivering point-blank fire into a stack of passing IJA squads and a 10-0 leader.  The shot wounded the 10-0 and decimated the IJA squads.  Another volley from a squad between building killed the 10-0 and further amplified the misery.  The Chinese managed to set fires to the building and woods on their left flank and routed to the row house on the right.  By that time the IJA forces had already arrived to prevent further acts of vandalism.

By mid game the IJA was in the row house along the right of the factory.  I lucked out in that the building to the left of the factory was on fire, denying its use to the IJA and making my unfortified left factory hex less of an issue.  After a few turns the IJA broke through into the factory from the right but the Chinese squads had spread themselves out on the factory floor, promising another 2 to 3 turns of close combat.  The IJA simply ran out of time.

Jamie is very strong tactically.  He’s also very fluid in his thinking, making him a very tenacious opponent.  This scenario went for 7 hours before we called it.

Round 4: J116 Brigade Hill

Vladimir See

Vlad has been ASL’r for a while.  He was one of the first guys I came into contact with when I got into ASL.  I remember one of my first chats with him was about how he felt about his Kampfgruppe Scherer purchase.

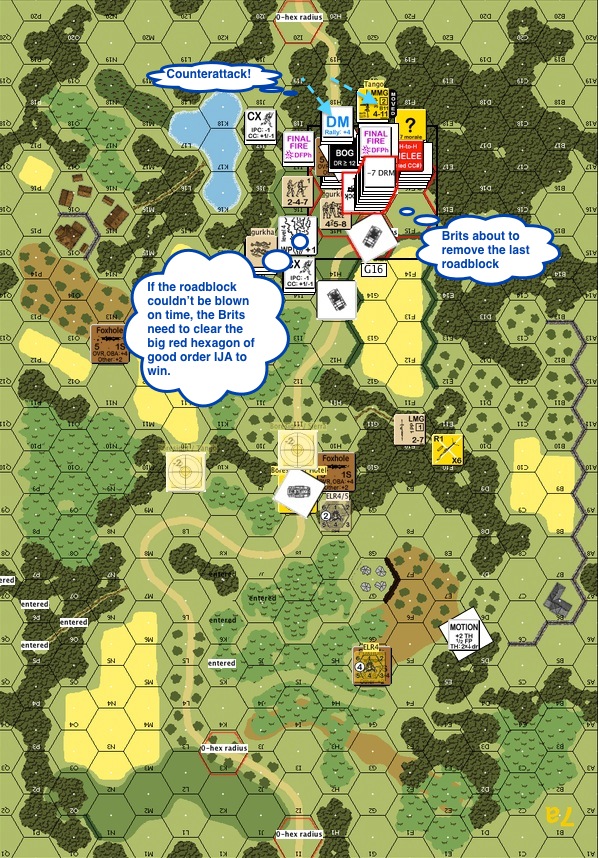
We agreed to Brigade Hill with me being the IJA.

I adopted Chris Doary’s setup.  (Erwin: Spoiler Alert .. we still got a game going, if you look you will ruin our game!  🙂 )

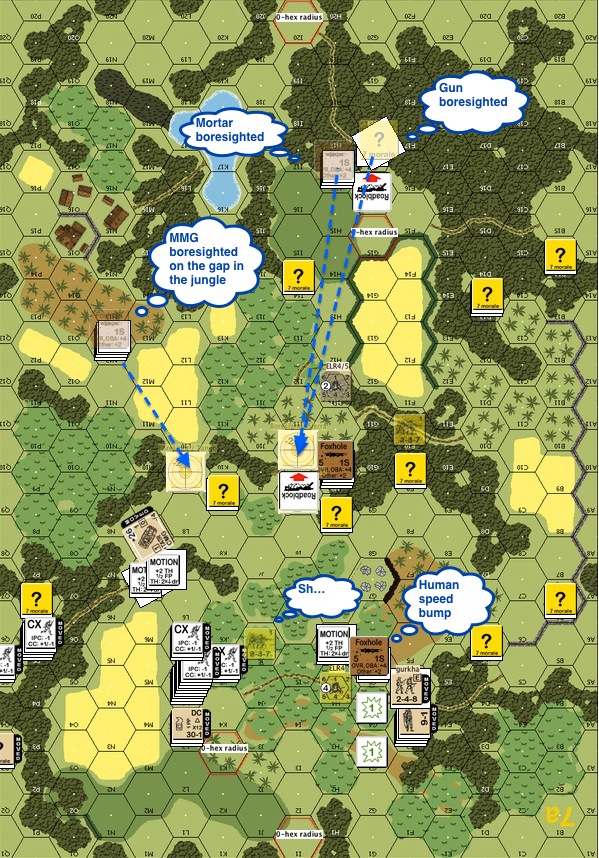
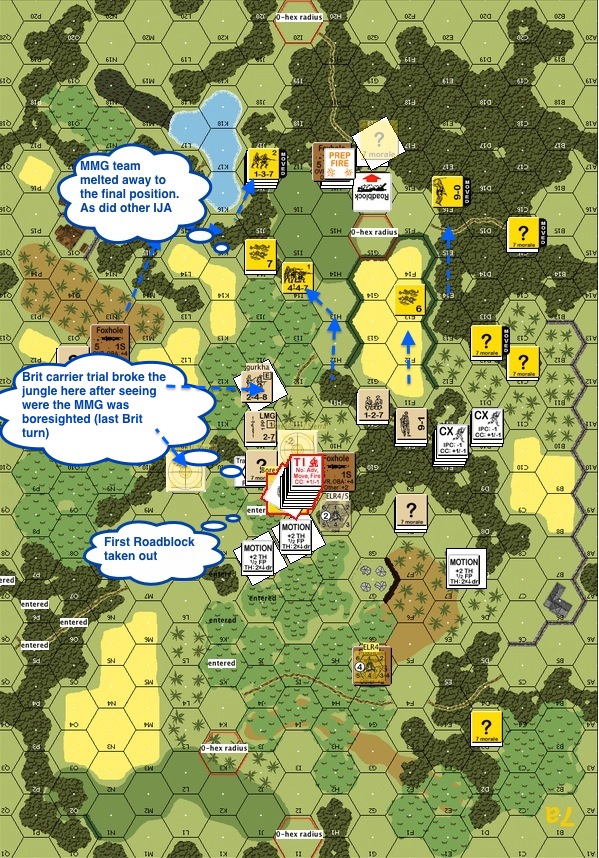
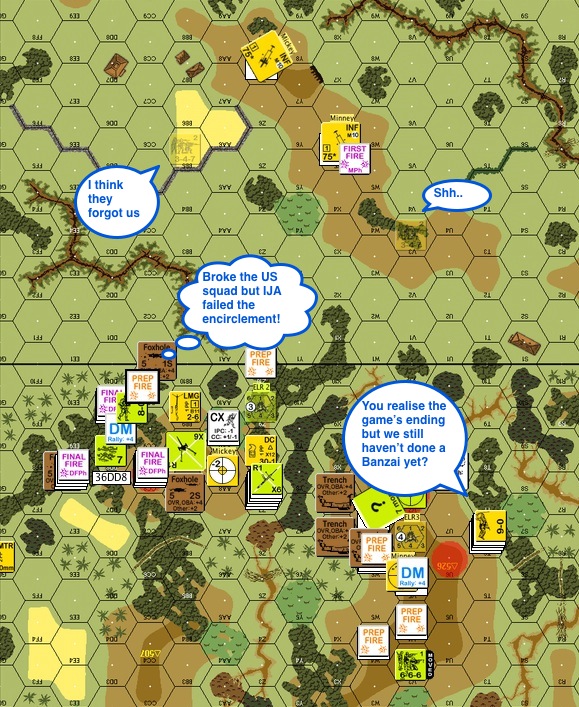
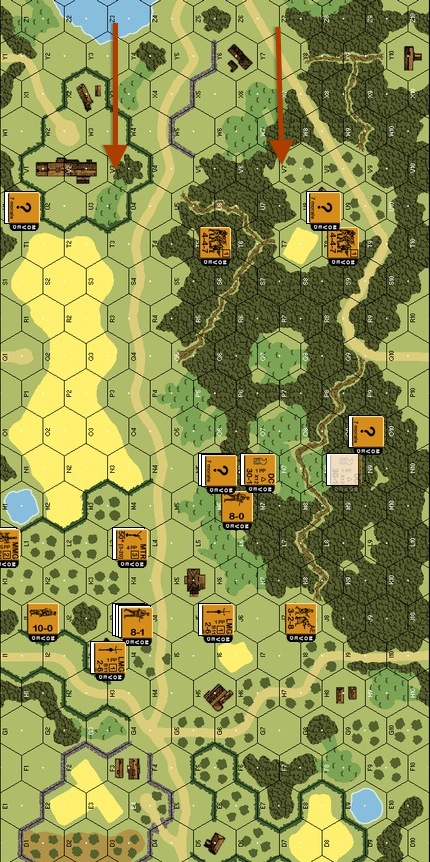
There were four hill tops on the map.  The Australians started the scenario owning the hill-top on the top left of the map (approached by concealed IJA at the time of the photo).  They were to control, three or more hill tops out of the possible four.

Brigade Hill

Brigade Hill

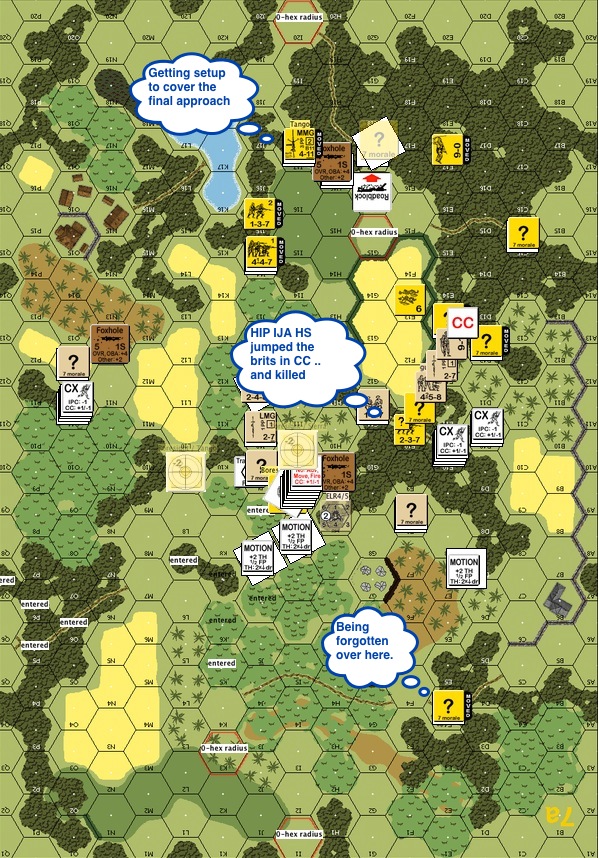
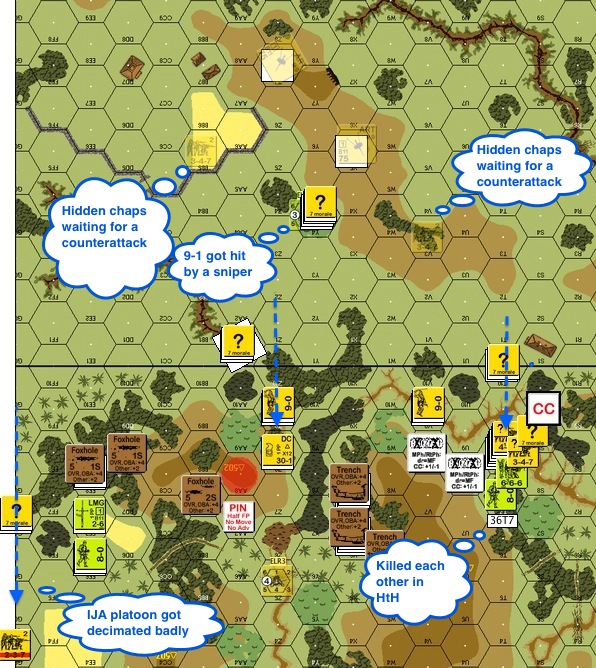
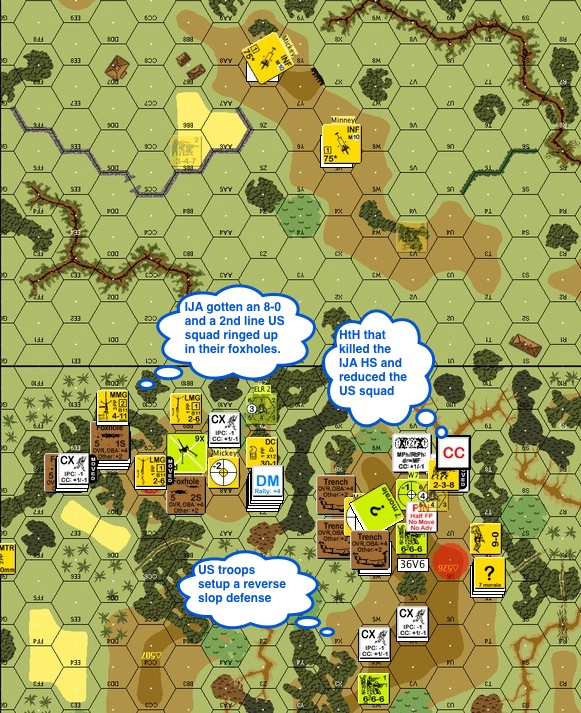
Starting from the general direction from the foxhole on the top left of the map, the Australians probed both sides of the big hill before moving onto the first hill top.  That might have burned more time than the Australians could afford.  While I had the hill top bore sighted, I forgot to use the die roll modifier in the excitement.  However when an Australian half squad, a squad, a leader and a machine gun moved into a nice clump of woods to set up a fire base on the hill-top, I remembered to spring forth a hidden IJA squad!  The IJA initial triple point-blank fire on the stack didn’t have any effect but the Australian advance fire striped the IJA.  They reduced the Australians in the mêlée and ultimately killed them all in the next close combat phase.

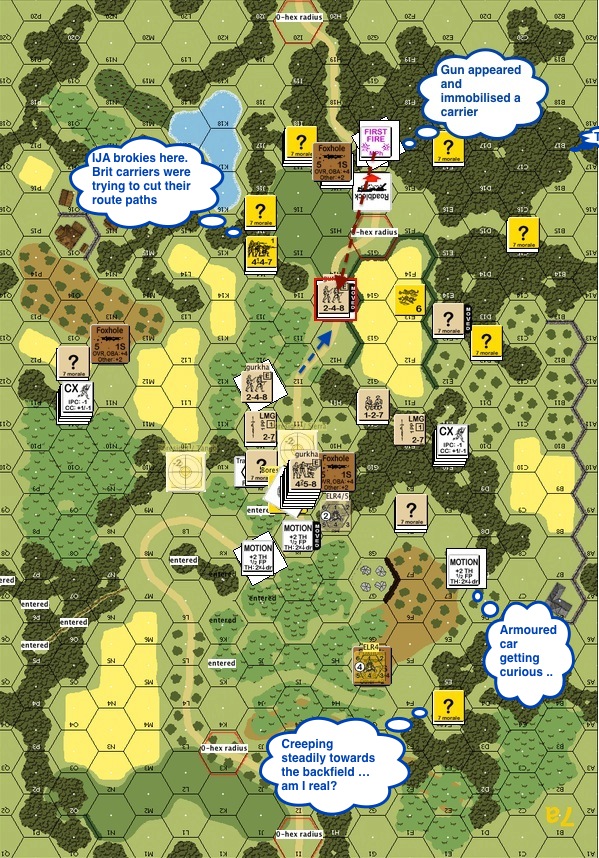
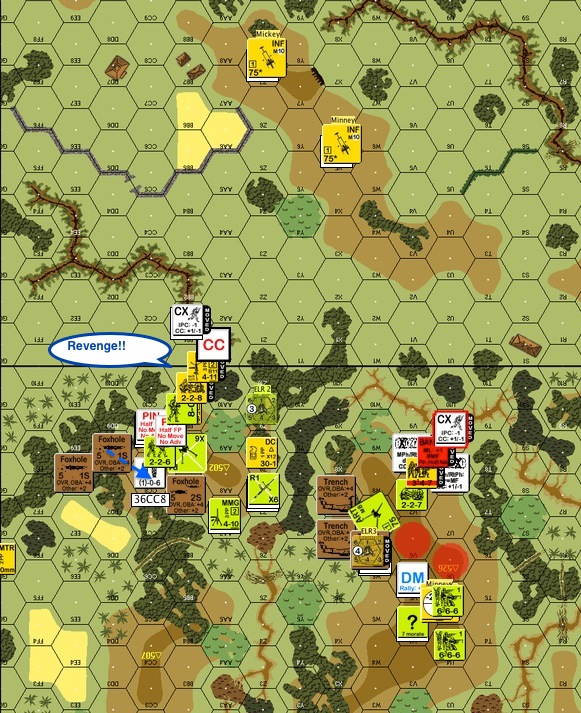
The Australians made a bit of headway chasing a mop of IJA half squad rabble through the woods on the right flank beyond the first big hill.  They cornered and killed off a half squad and the 9-0 IJA leader and one of the Aussie half squads went fanatic.  When the Aussie reinforcements appeared from the bottom right encircling the “bottom right hill” it looked bleak for the IJA.  The Australians who killed the IJA leader jumped another IJA half squad in close combat and got ambushed instead.  The Aussie half squad got slaughtered and I was going to infiltrate the victorious IJA half squad back closer to the “bottom right hill” but suddenly I had a thought.

I moved the IJA half squad behind the pursuing Australians.

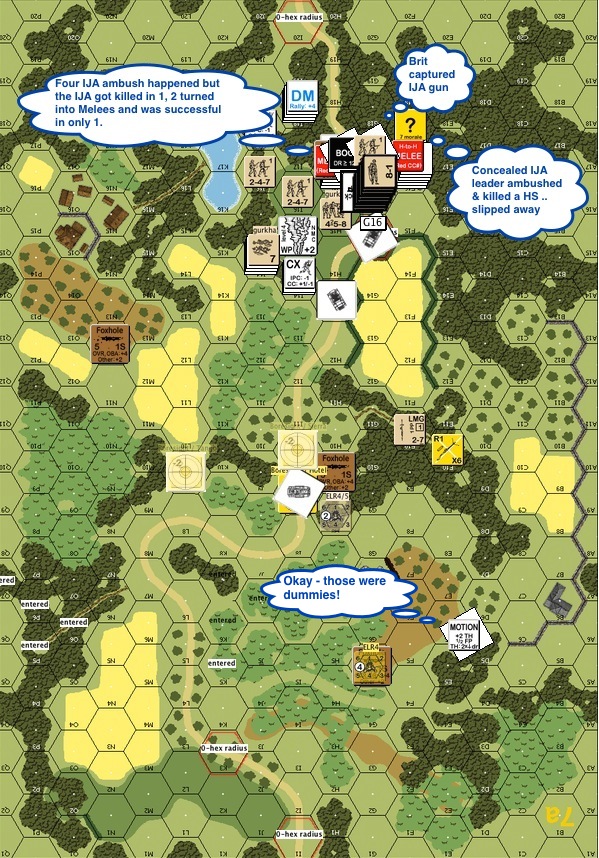
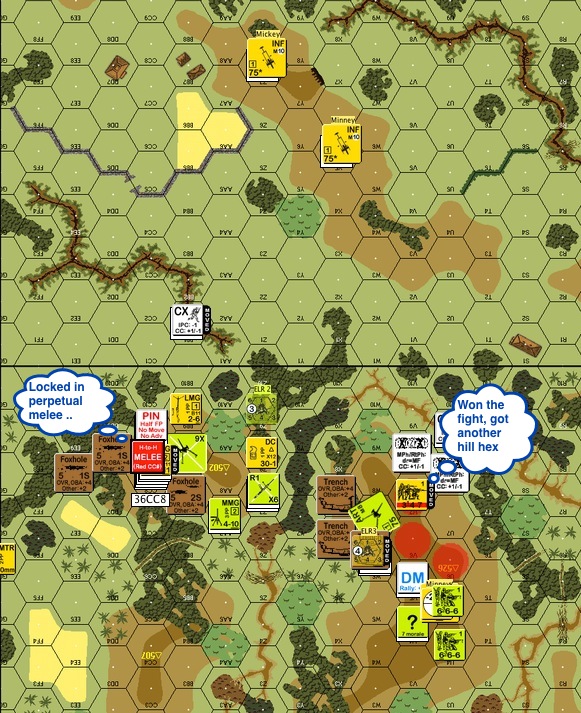
That IJA half squad then eliminated a stack of routing Aussies!!  When the leader and a squad among the incoming Australian reinforcement broke, I double-timed a squad of IJA through the orchard behind them as well, a lone surviving Aussie squad defensive fired through the orchards but IJA squads had ever been stopped from going wherever they wanted to go.  The IJA squad was in a position to eliminate the routing Aussies against the board edge in the following turn.

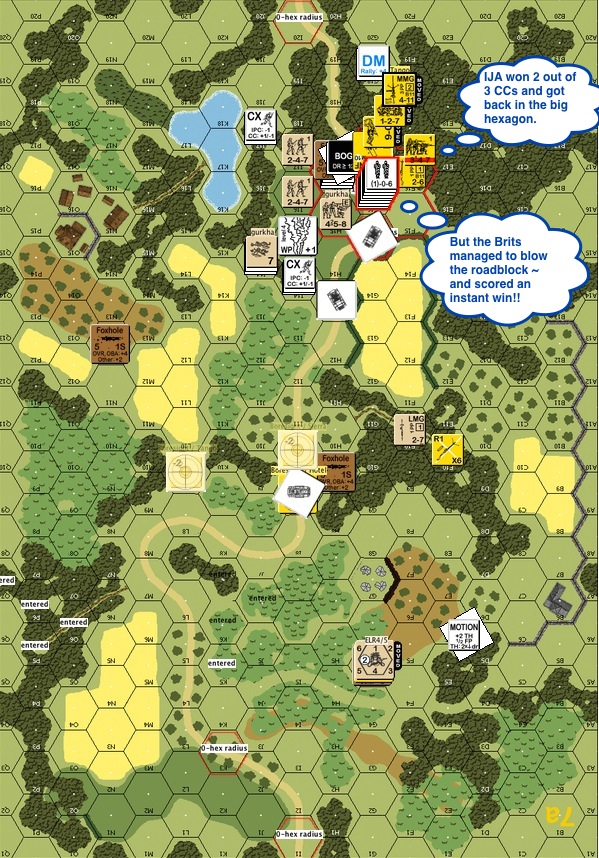
The small IJA reinforcement found the Aussie foxhole on the top left guarded by a lonely squad.  They advanced up the hill and did a one hex banzai charge into the foxhole.  The “score” between the IJA and the Australians went back to 3 hill tops to 1.  The Australians had two more turns left and decided to concede.

Vlad is a meticulous and a very fair player.  Throughout the game he kept reminding me of repairs, missed negative die roll modifiers (on my shots) and (my) SAN etc.  It is an honor to play him.

(PS Vlad reminded me that I can’t boresight if the attacker didn’t start offboard.)

Later at Singapore Changi’s Airport

I wrote Don Lazov and Witchbottles, my two ASL mentors from the airport.  Don wrote back and said:

“I sincerely hope you not only had a lot of fun, learned a bunch of new things, ideas and concepts, but most important (beside/or next to having fun) made some new friends, and many memories. To me that is what ASL is really all about. Playing a great game but playing that game with great friends and making memories.”

I had seen a lot of new tactics.  Whether I had truly internalized them remains to be seen:

  • Jamie Lee’s aggressive and effective use of half squads
  • Mark Humphries’s constantly flowing half squad amoeba attack through the woods
  • Vladimir See’s tactical planning and creative movements that made great use of available cover
  • Ian Percy’s comment I overheard about him not “doing things” to his opponents but “constantly presenting tough choices to the opponent” and “making HIM do all the work”.  Given enough choices his opponent is bound to make the wrong choice and choke.
  • The power of IJA behind the enemy and the horrific efficiencies of eliminating the stacks of enemy squads for failure to route.

Quick Note to Fellow Newbies

"The Malaya Madmen" - Perry Cocke

“The Malaya Madmen” – Perry Cocke

I wasn’t going to pay for a plane ticket to go to Singapore for the Malaya Madness.  The thought of putting up the time and the expense to go to Singapore to play ASL when I can play games with anyone over VASL was simply too crazy to consider.  However, my two mentors : Don & Witchbottles both advised me to go see for myself.  My family, surprisingly was easier to convince than I myself.

My initial thoughts were :

  • I don’t know anyone there but a lot of the ASL’rs must know each other already.  They are just going to talk and to play with each other.
    NEVER HAPPENED.
  • I am just a newbie.  What’s the fun in losing all my games?
    The Tourney Director matched players based on their skill levels.  Besides, everyone I  met are a total pleasure to play with or without the competition.  
  • I played quite a few people around the world too on VASL.  I can lose games equally well on VASL without having to travel, thankyou.
    Face to Face games carries a dynamic that just doesn’t exist via other mediums.  The chatter, the shrieks, the comments, the groans and screams of delight over die rolls, make FtF experiences second to none.  Besides, it’s even more fun to play people over VASL (afterwards) when you know who they are.  

There are a lot of ASL tourneys every year.  If it’s within your realm of possibility to go, go.  Go at least once.  

And tell me how you feel.  It might just change your ASL life too.

(Journal to a Tourney, Part 1 : Decisions)

Cpl Kwan 7-0