This scenario from Fanatic Enterprises describes a situation in Bataan in January 6 1942. The Americans fought a delaying action that saw the gunners from both sides exchange shells for shells. Carl Nogueira played the defending American and I the attacking IJA in this after action report (AAR). We actually exchanged sides and played this twice, with me getting my teeth kicked in both times. This is already the less ugly version, rated PG-13.
The side that gained the most Victory Points (VP) wins. You can gain Casualty Victory Points normally and you gain 1 VP for controlling each Level 2 hill hexes on your opponent’s side. The Americans set up on the bottom of the map and the IJA on the top. We get 5 and a half turns.
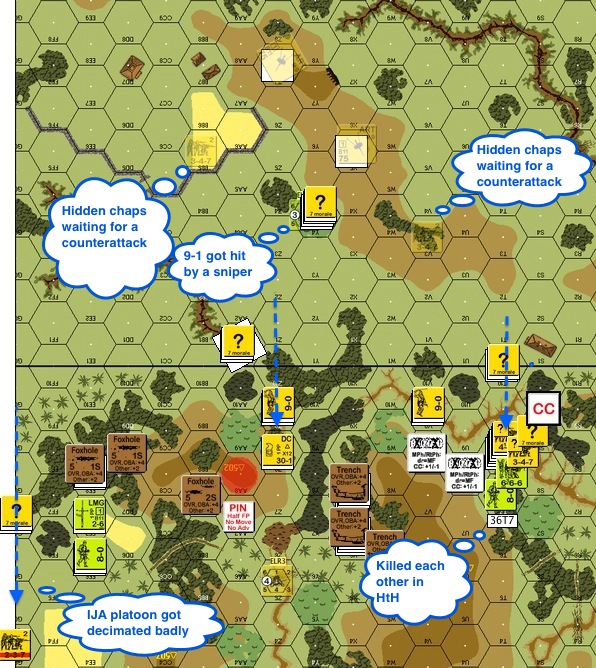
IJA Turn 2 : You can see where the IJA guns were. Line of sight (LOS) to the American hill tops were limited due to jungle terrain. You can also see two hidden 2nd liners to slow down any sort of American counterattack. The big stack in the middle of the top map were two IJA medium machine gun (MMGs), but their leader, a 9-1 who’s also the best leader in the IJA order of battle (OB) was killed by a sniper early in the game. You can see the 3 lines of IJA advance on the American side. The left most IJA rush would have been the most threatening but I failed to capitalise on the situation properly before they got wiped out. The middle advance would be stuck for a while and in retrospect I should have strike out through the swamp towards the right to put the squeeze on the Americans on the hill on the right of the American positions. On the right, the IJA caught and took an American 8-0 and a squad together with it in a flurry of hand-to-hand action. At this point I expected the American guns to be towards the bottom of the map.

American Turn 3 : The IJA found the first American gun on the left by walking straight into it. There was nothing left of the squad. The attack on the left was also wiped out and the Americans started moving towards the right. The attack in the middle was floundering as well. The IJA on the right kept pushing towards the bottom of the map, fully expecting to find the second American gun there.

American Turn 4 : The American gun on the left malfunctioned! The IJA forced their way through the bamboo to kill the gun crew before they had a chance to fix the infernal contraption. You can see a blotch of red on the hilltop to the right where once again, the IJA found the other American gun the wrong way. You can also see the pair of IJA MMGs moving in during the last turn as it didn’t look like the Americans were going to make a push to the north.
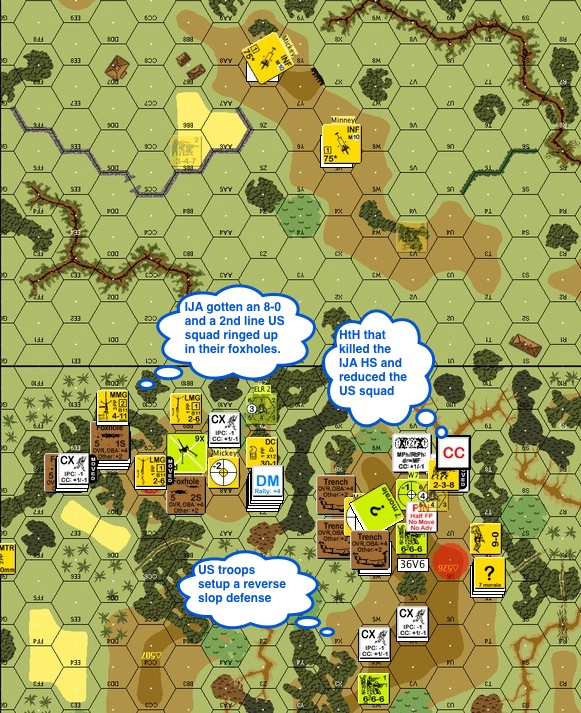
IJA Turn 5 : The IJA troops surrounded an American 8-0 and a 2nd liner in a 3 point stance. The IJA were of course, feeling very pleased with themselves. There was an IJA demolition charge laying on the ground in the middle. That was the aftermath of an IJA half squad’s attempt to blow up the American MMG stack. On the right, the IJA made another attempt up the hill and caught more Americans in close combat. Unfortunately this IJA half squad could only take half of the American squad with it. On the bottom right of the map you can see the Americans on a reverse slope defence configuration, looking to get the first shot in if any IJA pop over the crest line. The probing stack of IJA troops however decided to move back up to their leader for a last push as time was running out.
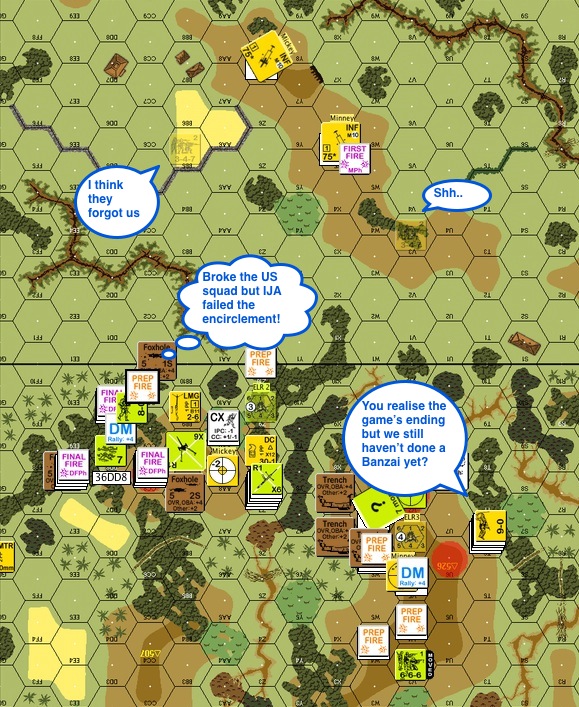
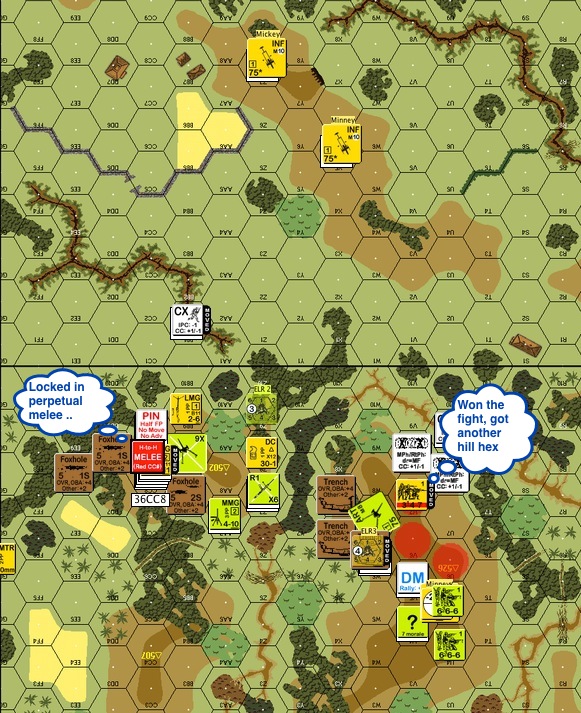
American Turn 5 : The “ring of fire” on the left broke the American squad but they failed to encircle the Americans properly. Apparently you need to fire at the target sequentially for encirclement to happen (A7.7, note to self).

American Turn 5 (still) : On the left, the broken American squad surrendered and the IJA picked the weakest (a 1-2-7) amongst the trio to be the guard. That was the last mistake they would ever make. The American 8-0 promptly jumped on the otherwise occupied IJA half squad in close combat …

American Turn 5 (aftermath) : The American 8-0 singlehandedly killed the IJA guards, rescued his men and found enough weapons to rearm half of his squad. (Note to self : encircle properly & be mindful about who’s to play guards).

Final IJA Turn : The IJA decided that they wouldn’t go down without a proper Banzai charge. Therefore they targeted the gun crew who ventured out to retake a hill hex. Just to be professional about it, they even short-strawed a poor chap to be a DC hero as well! He was well perforated, his DC satchel went flying but he drew enough fire from his “friends” for them to jump on the American gun crew.

Final IJA Turn (still) : An IJA leader in the middle rushed in and tried to grab the DC pack. He got shot and was wounded as he picked it up and he never managed to place it.
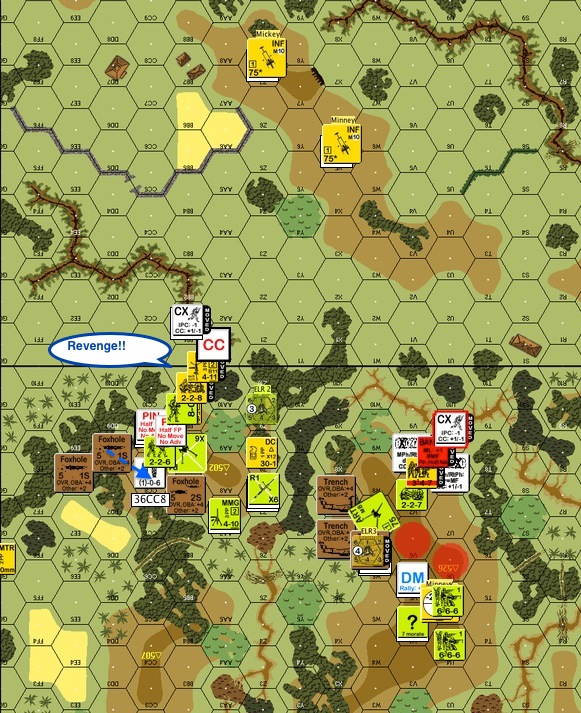
Final IJA Turn (almost done) : An MMG crew from the original “Ring of Fire” caught up with the American leader and squad on the left, knives drawn …
Final : The banzai’ing IJA came victoriously out of the close combat on the right. The folks on the left however would be locked in perpetual mêlée. You would know I lost the game a long time ago if you can see the huge stack of IJA casualties. Carl was nice enough to play this through to the bitter end!!
Lessons learned:
- When playing against the Americans, the IJA needs to make good use of the Advance Phase. Try to move into American Line Of Sight only in the Advance Phase, and if you can stay concealed, even better. This way the IJA don’t have to take high American firepower with “First Fire Movement in Open Ground” (FFMO) and “First Fire Non Assault Move” (FFNAM) modifiers. If the Americans fire in the following Prep Fire, they don’t get to move away and the IJA will have a chance to fire against their low morale (US Marines excepted).
- Don’t give prisoners to someone who might not fare well in (close) combat.
- Encirclement : remember to fire on the target sequentially.
- Use 7 as a gauge, if you can get a result on a 7, it’s a good choice. Alternatively, try to move in routes that stack so much DRMs on your opponent’s shot that he/she can’t get results on a 7.
- Don’t spread your forces too thin. There should be reserves behind an attack to exploit results.
Other thoughts?

The Americans are never as brittle as when playing the Japanese, though their high firepower makes them tough for taking those 6FP hits and close combat. The Japanese fade away faster against American’s than any other troops
Ian
Looks like if a couple of things had been done differently then you would have won…
Another well done AAR. Good job, Jack!