 This was the setup. The German wins if both British guns were eliminated and more than 10 CVPs of Good Order Germans exit off the east edge (right edge of the map). It’s a draw if both guns were eliminated without the requisite exits. There were two nice locations to where the guns could be emplaced : both were orchards with stone walls. I had the two ATRs positioned to not take immediate fire but to be where they would cause the most delay. Their threat was more powerful than their actual effectiveness against German tanks. So here we are: eight British second liners (they were search light operators) and two guns against ten German élite and first liners plus five tanks.
  German Turn 2: The British reserves moved up to front line positions after seeing how the Germans commit. The British right flank got shot up pretty bad. All that was holding that side up was a British second liner. The Germans used smoke and cover well but a squad got tired of the searchlight operators shooting back and promptly went berserk.
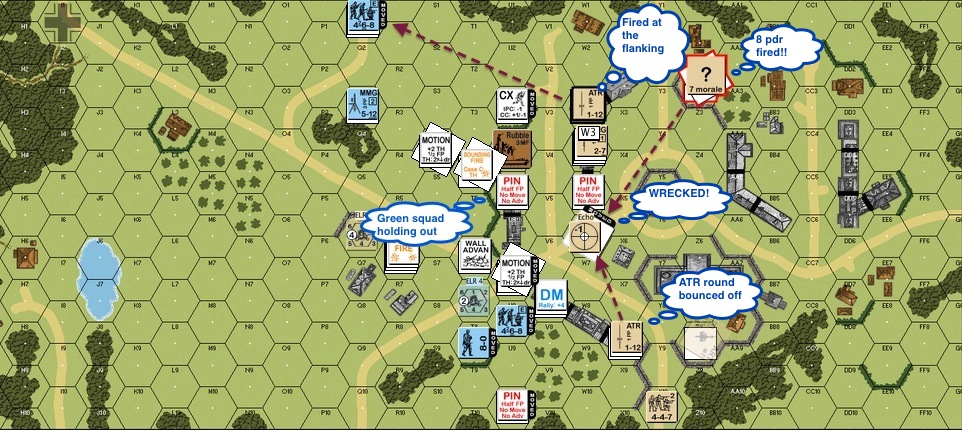
  German Turn 3: The berserkers charged! You can see how they made their way straight into the first stone building only to be cut down when they got to the house. The single British second liner continued to hold up the right flank while their compatriots were busy rallying. The first German tank rounded the corner on the British left flank and the ATR team got to work, only to bounce a round off the tank. German tanker: “That wasn’t even scary.”
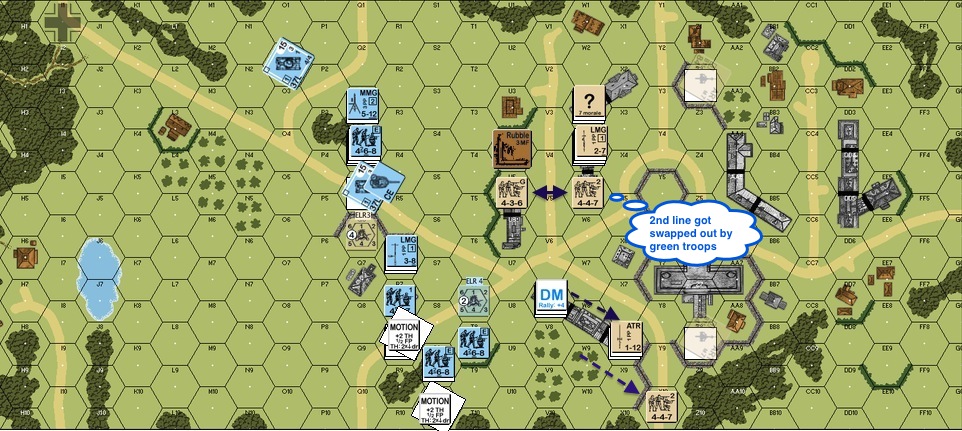
British Turn 3: The British were in general retreat .. erm .. retrograde. The idea here was to stay ahead of the Germans and get to the next building before the Germans get their guns on and to keep the inside lines open. On the right, a rallied British green squad switched a second liner out as the rear guard. These guys would see a few medals before the day is over.
German Turn 4: The action heated up on German Turn 4. On the British left, a German tank tried to get to the back field. The British ATR team held their shot until the tank went to the other side of the building. However they bounced a second round off the German tanks even when they had a side shot. The 18 pounder (typo in the picture) on the British right “appeared” and wrecked the German tank in the Defensive Fire Phase.
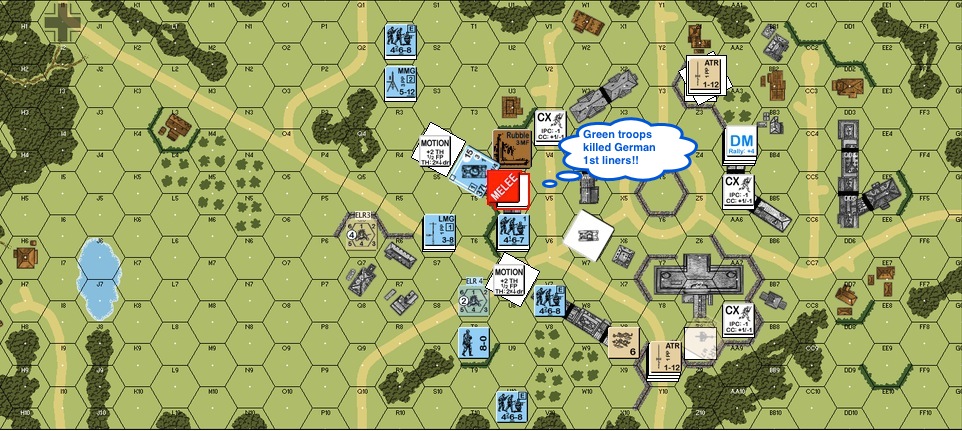
British Turn 4: The British green squad on the right dispatched the German first liners who held them in melee!! The rest of the British squads got to the last line of buildings. They cut it quite close, as the Germans shot some of them between the gaps. The British continued to get to positions that were a little out-of-the-way but cover grounds the Germans would move into.
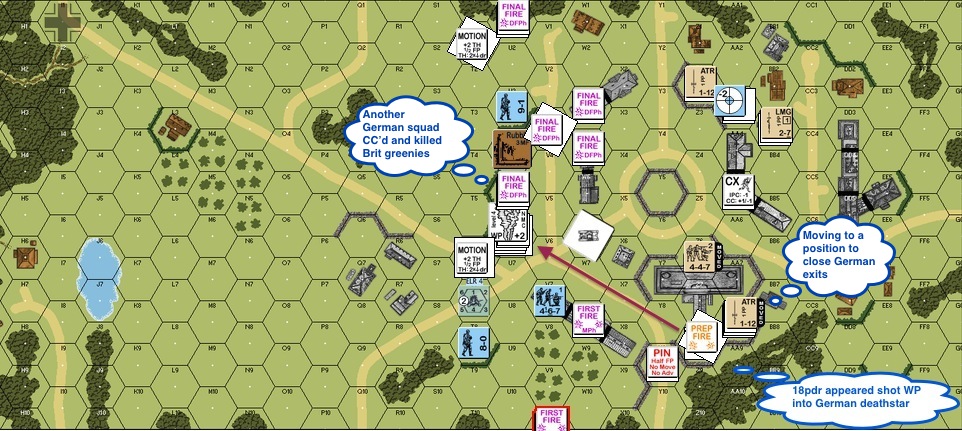
British Turn 5: The Germans started building a death star on the British left and the left British gun appeared!! It promptly put a round of white phosphorous into the building. The British ATR teams repositioned towards buildings where they could prevent the German tanks from exiting. On the right, the malfunctioned British gun couldn’t be fixed and was eliminated from the game. The Germans sent another squad in on the right flank and killed the pesky British green squad that was holding up traffic but these heroes had already saved their brothers.

German Turn 6: The Germans were almost of top of the British now. A German tank got inside the British lines but one ATR team was broken and the other one couldn’t get close enough. Good thing the white phosphorous forced the German death star to move.
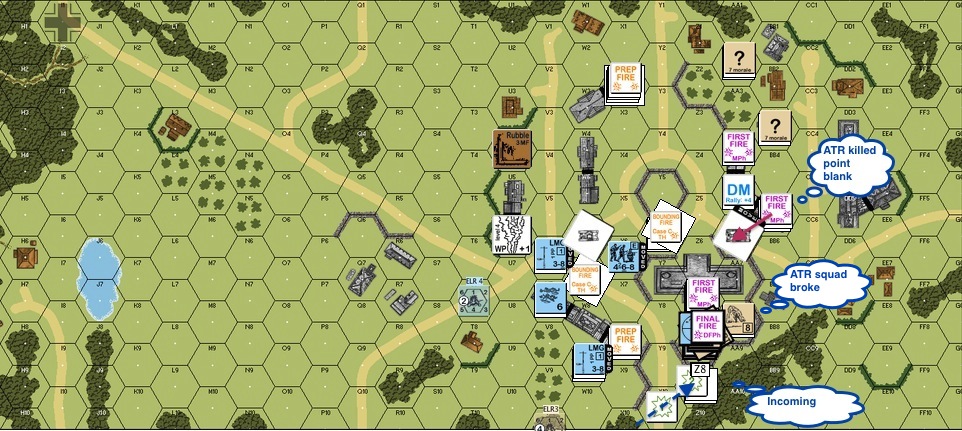

German Turn 7: The Germans got up to the right ATR team and was wrecked at pointblank range! The Germans rushed up on the British left as well. They advanced up and captured the gun hex in the CC phase!!

British Turn 7: The British couldn’t let the Germans have a fire phase to spike the left gun. The British squad fired pointblank and KIA’d the squad! This led to an interesting revelation after a few rounds of discussions on the forums. There’s no way to kill the gun by small arms fire without a crew / possessing infantry (A9.74) present! So the only chance of the Germans getting a tie is to kill it with the tank ordnance.
We never got to that so here we go. It’s a three hex range with an infantry target. The base TH is 8. The gun was emplaced, so there’s a +2 DRM.

SNAKES!! The Modified TH# is 8 .. rolled a 2+2 which is not less than half but it’s an original 1,1 nonetheless.. so we need a subsequent roll ..  That’s equal to half the Modified TH# of 8!! CRITICAL HIT!!!
As AZslim pointed out to me on GameSquad, guns (and crew) are automatically destroyed on Critlcal Hits. So both British guns were gone. This game went all the way to the last roll – and it’s a DRAW!!
Gotta admit, this is some finish!! Witness the narrative power of an ASL game – and that’s why we love it.

So near yet so far, it is amazing the German player almost pulled a win out of the bag with those odds…
Looks like it was a good game. Nice to see that old chestnut getting played. IIRC the designer is my regular FTF opponent. Note that you could have guaranteed elimination of the gun by overrunning it with a tank.
Also I’m not sure if WP is available in 1940.
I really just want to play a PBEM against you so that I can be immortalized on your blog… I’ll take victory or defeat… 😉