FT S4 Dilemma at Ma Po Boulevard – Advanced Squad Leader AAR
Scenario Background
It’s September 26 1950, Captain Stanford’s Marine’s fought to clear Ma Po Boulevard. Upon meeting a North Korean roadblock at a junction, he had to decide on whether to run straight up and clear the way to Deoksu Palace or to take the right fork and clear that road instead.

“M26 number B32 in action on a street in Seoul.” Mike’s Research
Victory Conditions & Tactical Considerations
We have three North Korean (Fanatic) Roadblocks in 3 specified locations. The main one is located at the fork of the road, where a 45LL AT Gun gets matched up with 2 medium machine guns and a Pillbox with an ultra wide CA. The North Korean player gets a choice between a second 45LL AT Gun or a 76L ART. There are 15 NK squad equivalents of various descriptions, managed by 2 commissars and 2 other leaders. They have an ATR, 6 Minefield factors and 2 Fortified Locations.
Against this the Marines have a forward team of 3 squad equivalents (one being an Assault Engineer with a Smoke Factor of 5). This is followed by 10+ squads, a M26A1 Pershing, a M4A3 Tank Dozer and a POA-CWS-H5 Flamethrower tank that I was last playing with in Okinawa scenarios!
The Americans have 7.5 turns to take one Roadblock and exit 12 VP (4 squads) or take two Roadblocks and exit 9 VP (3 squads) or take three Roadblocks. The North Koreans can stop the game when they kill or immobilise two out of three AFVs. To do that, the NKs have the aforementioned guns, as well as an ATR and 6 Suicide Heros (read: THH) that can setup HIP somewhere or bust out of a squad when the mood strikes. The confining terrain in this scenario definitely doesn’t make it tank country. The NK’s can also stop an USMC victory by taking out 19 CVP, which in this case is 6 squads + 1 fire team.
Having said all that, the BBQ tank doesn’t have to stop moving. The tankdozer has a blade that adds a +2 on a Hull Hit. The Pershing is impervious to most shots on the battlefield but can still be DI’d.
Advanced Squad Leader AAR
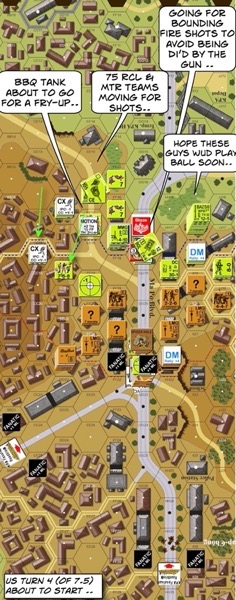
 From the left of the map, F Company immediately started to setup their MMG and got their fire teams to probe NK concealments. The E Company came up from behind and a bit more than half went for the right of the map. The AFVs rolled down the road but the higher level Burning Wreck that’s there on setup made it a little hazardous to roll up in front of a ROF3 AT gun. Plus it’s impossible to be on the boulevard without being in DI’able range. I thought the right of the map would be a more straightforward travel but it’s confining nature made it easier for the NK defenders and didn’t facilitate armour support. By Turn 4 it’s evident that the NK’s were very effective there. A large number of broken fireteams routed towards the rear. The BBQ tank and the tank dozer lend their support on the left and found they could safely sneak shots into the boulevard. The left side met some initial set backs but were able make better progress. The AFV’s were making Bounding Fire shots where possible but they couldn’t bring it up close in most cases because of the chance of meeting Suicide Heros in Street Fighting. The strategy was to try to flank the NK’s down both sides while putting AFV fire to defenders down along the boulevard.

 Three MPh’s left and things were going okay. We were taking out a good number of NK units. We hadn’t met any HIP’d Suicide Heros yet but the Marines kept the tracks well protected. The AT gun at the center Roadblock was sending shots after shots at the Pershing. It can’t kill it but a Deliberate Immobilisation was as good as a kill. There’s no sign of the other AT gun yet.
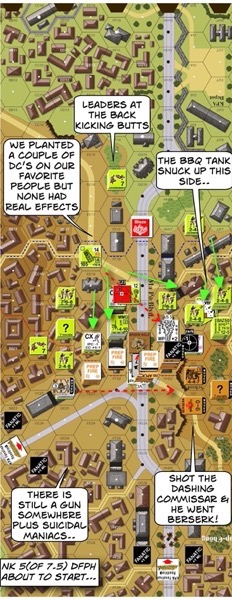
We proceeded to flank the NK’s down both sides of the boulevard. Given our schedule, we were quite liberal in using our DC’s, although in hindsight we should have kept them for the 2 Fortified Buildings which had yet to appear. None of them had any real effect. The BBQ tank KIA’d a NK position on the left, which allowed more progress on that side. A pair of leaders managed to rally a number of units on the right though, and we were pushing against the terrain bottleneck next to the Roadblock. I snugged the BBQ tank up the right side of the boulevard to help out.
The NK Commissar tried to run back but the Marines already had guns behind the center roadblock. We shot him, he went berserk and was on his way back to us. I was almost thinking that the NK’s positioned themselves too far forward and there won’t be anyone left to defend past the fork in the road. It’s then a matter of whether my units were close enough to get off the board.
But I counted my chickens too early.
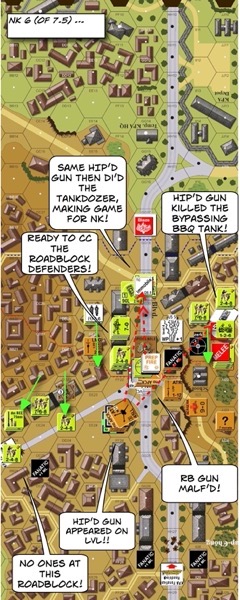
 Two more MPh’s left and my Marines were surprised to find an undefended Roadblock on the right fork (left of map)! We took it and planned to plant our recoilless rifle there and point it back to the center Roadblock. Meanwhile, some of the Marines on the left were ready to fire on/ CC the center Roadblock. Would I get enough squads off in the last 2 turns?
The BBQ tank on the right moved up the hill intending to light up some of the last NK units. As the tank came around the side, a HIP gun opened fire from Level 1 of the building at the fork! It had it’s turret turned towards the gun but the shot hit its hull and it’s gone!! The crew scrambled out to find that building fortified on both levels.
Come NK Turn 6, I had the other 2 tanks parked on the boulevard. We got to clear the roadblock (with the tankdozer) and drive off the board! The center NK AT open fired and malfunctioned! There was a wave of cheers up and down the boulevard.
Then the upper level AT opened fire. The LOS came through the vertex of the Partial Orchard hex and hence wasn’t blocked. The DI shot went through (the dozer blade providing no protection via higher level shots) and immobilised the tankdozer. That’s two tanks down and we LOST the game!!
How’s this scenario interesting?
My NK opponent should be commended for not losing his PMC (Personal Morale Check) when the Marines were blasting folks away with their insane firepower. Bleak as it might look for most of the game, the NK’s could and did win the game by killing or immobilising two of the three tanks. I was expecting the Partial Orchard to offer some cover and I was wrong. The Marines had to push hard against the schedule and the NK’s had to be good at identifying terrain where they could offer enough friction. The placement of the Level 1 AT gun was fantastic. I expected that gun to be at the last Road Block (bottom of the map). As it was, I didn’t have the time to bust into the fortified building but would have to run the gauntlet and face rear shots as I run my tracks down the boulevard. This is an outstanding game!

A Pershing and the tankdozer, from Mike’s Research