FT114 Yellow Extract After Action Report (AAR) Advanced Squad Leader scenario

Victory Conditions


Every once in a while, you encounter a scenario so cinematic that both players collaborate to see the ‘movie’ unfold. This is one such scenario. No. 3 Commando was onshore in support of the Dieppe attack. They were discovered and had to evacuate.

I hope scenarios like this expand what the average ASL player thinks a scenario can be. The Allies had 8 VPs worth of personnel in the Grain Field on the left and 11 VPs of personnel on the right. The Allies win by gaining more VPs than the Germans. The Allies on the left gain points every player turn they remain in the Grain Field. They also earn EVP for infantry units exited or within 5 hexes of the upper edge. The Germans win VP by capturing or killing Allied infantry units.

The scenario features 11 German squads with 2 mortars and 3 LMGs against 5 Allied squads (with low ammunition), 4 damaged Higgins boats, 1 MGB, and 1 additional Higgins boat coming in. My plan was for the left group to stay and for the right group to run. The 4 damaged Higgins boats had 3 facing landside and 1 facing seaward for a quick getaway. We needed to eliminate the 2 German mortars as they posed the biggest threat to the boats.


After Action Report


FT114 Yellow Extract After Action Report (AAR) Advanced Squad Leader scenario

(… chirp, chirp, chirp ….)

FT114 Yellow Extract After Action Report (AAR) Advanced Squad Leader scenario

The Germans appeared! The Germans on the left advanced into the Grain Field. Two conscript squads and two mortars ran straight past us towards the shore. Our mortar was boresighted to where we expected them to bypass the Woods, but we missed that shot anyway! It’s rare that I could square up this opponent of mine in my sights, but the dice is the ultimate boss.

On the right side, the Germans got the entrance hex to the gully lined up. The Allied troops fought all temptations to run and edged carefully towards the Gully entrance. Note that we couldn’t possibly get into a crest position in the Gully because of an SSR specifying “Cliff sides.” We scored 7 VPs by staying vertical in the Grain Field on the left.

FT114 Yellow Extract After Action Report (AAR) Advanced Squad Leader scenario

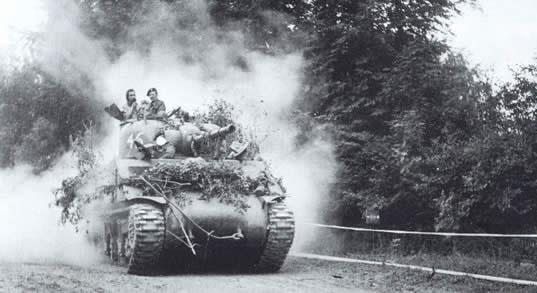
The MGB swept in! The waiting Germans opened fire and scored 2 DP (out of 5) on the MGB, almost setting it on fire! The troops in the Grain Field were skulking where possible but shot back when they couldn’t. We reaped 10 VPs at the end of the last turn. The troops on the right continued to edge towards the gully entrance. The teams already at the Wire tried to remove it but to no avail.

FT114 Yellow Extract After Action Report (AAR) Advanced Squad Leader scenario

The troops on the left moved off the Grain Field towards the middle clump of trees. We needed to keep a portion of the Germans tied down, even if we couldn’t stay in the Grain Field for more VPs. The German conscripts on the left were digging foxholes for the mortars but kept getting shot up by the MGB. A commando 9-1 and a half-squad rallied and dove back into the Grain Field, but it was not to be!

Over on the right, the big German 9-1 stack broke cover and ran for the shore after the escapees. The 338 rearguard had one shot, and it connected! The 9-1 was killed, and everyone was broken! One of the German conscripts went berserk and started charging the woods in the middle of the board since they couldn’t see the fellows slipping off in the gullies. We were now at 16 VP, which was the VPs the Germans would get if they captured everyone on the left.

FT114 Yellow Extract After Action Report (AAR) Advanced Squad Leader scenario

Our 8-1 and a half-squad in the (middle) Woods rallied and started waving the berserker over. We planned to lead them into the melee so that the Germans couldn’t go for a capture and earn double VP. The commando half-squad kept the fight going as the Germans piled in! The MGB kept the pair of mortars suppressed on the left. The DM’d German stack at the bottom of the map would rally and make a desperate last move. Meanwhile, the units on the left were about to board a Higgins boat, the one with the bow facing seawards.

FT114 Yellow Extract After Action Report (AAR) Advanced Squad Leader scenario

A German team with a last-minute hero, a 447, an LMG, and a leader ran towards the shore for a final hit on the departing Allies. The MGB took them out as well, leaving the troops on the right to board and depart Fortress Europa.

Thoughts

There are a good number of issues to consider when playing this scenario

* When to go slow and when to run – it took a while to go through the Gully and into the boats and about 2 turns for the boats to get past the VC line.  You really need to get your timing straight as the British.  We figured boats don’t have to Beach with their bow.  I had 3 beached with their bows, so that their armoured sides faced the continent and the other one with its stern so it could make a quick getaway.  

* The pair of German mortars were the most serious threats to the boats.  

* Should we run the Grain Field forces off?  Should they go into the Woods in the middle and help out the right?  Should they fight to the last man so as to get as many points as possible?  We got lucky, we got the full 16 VPs to breakeven with the Germans should the whole Grain field team’s captured.  

* How much troops should you allocate each side as the Germans?

* The Commandos could climb.  Should we entertain that notion?  The Hinterland stops with a 4 level Cliff side to the beach.  That’s 4 turns of Hazardous Movement to get down.  We only have 7 turns in the game.  

* We got lucky in that the 338 rearguard on the right was able to shoot up most of the pursuing Germans.  We were also lucky in that the pair of German mortars was only able to take 2 DPs off the MGB’s 5 and didn’t set it on fire.  

* The Melee’ing HS (in the Woods) was magnificent turn after turn.  The Germans were hindered by their desire to capture and not to kill.  


A: Guards Counterattack After Action Report (AAR) Advanced Squad Leader scenario

Victory Conditions

We all know this one.  I want to do an AAR on it because this is the first time I played this scenario since my Squad Leader days.  The Russians win if they get 2 more buildings than they lose of their own initially-held stone buildings and/or have a 3:1 unbroken squad equivalent, in 5 turns.  If you find yourself yelling at your screen here, note that I played an early stage player.  

After Action Report

A: Guards Counterattack After Action Report (AAR) Advanced Squad Leader scenario

For those who are familiar with this scenario, you know most of the setup is ‘predesignated’.  Where possible, I readied myself for those terrorising Russian Human Waves, especially from the mass of 628’s on the left.  

A: Guards Counterattack After Action Report (AAR) Advanced Squad Leader scenario

The Russians decided to neutralise some of the German firepower first with their 18FP per hex firegroup(s) on the left.  A couple of the German units in building F5 broke, leaving parts of it unsecured.  In the middle our 9-2 LMG DeathStar (I7) managed to break the MMG crew!  The action on the right was also intense, with firefights erupting across the streets. There’s a Commissar lurking in the back of the building there. I realized I had a problem—I couldn’t see the back of that building!

A: Guards Counterattack After Action Report (AAR) Advanced Squad Leader scenario

Seeing that the MMG team is down, the Germans in K5 dashed across the street and made it into building J5!  (See top right)  With the LMGs in building K5 (center) no longer watching the street on the left, the 37th Guards seized the opportunity!  The 10-2 struck a heroic pose and nonchalantly waved the mass of 638’s forward in a human wave!  Casualties were considerable, with a couple of KIA’s.  Meanwhile, a lone squad scrambled towards the rightmost buildings (bottom right), trying to get some visibility at the back of building N4 where the Commissar rallied broken units.

A: Guards Counterattack After Action Report (AAR) Advanced Squad Leader scenario

The defenders of building F5 died heroically along with their 9-1.  Hopefully they took a chunk of the Guards with them!  The 8-1 moved his HMG team from the bottom right to the bottom left, anticipating the next Human Wave on building I7 (where the 9-2 and dual LMGs were stationed).  The LMG in building K5 got ready as well.  Unfortunately the Commissar & the 308th Rifles in N4 (right) also looked a little too eager.  Hmm… 

A: Guards Counterattack After Action Report (AAR) Advanced Squad Leader scenario

This next Human Wave struck from the right!  The Commissar led the 308th Rifles into building K5 (center)!!  The fire from building L6 up the street to hex L1 was awesome but one of the Russian units got into building K5 all the same.  The Guards on the left headed towards the 9-2 and the dual LMGs in I7 as well as the left side of building K5!  Casualties were high but this might just get the Russians two more buildings than what the Germans got.  

A: Guards Counterattack After Action Report (AAR) Advanced Squad Leader scenario

When the dust cleared the Russians captured two more buildings than they initially held vs one for the Germans (hence one more).  The Germans counterattacked by dashing the unit from the Russian MMG (building J2) into H2, then advanced to G3 to take the building.  The Germans also moved into building N4 (right) but the Russian brokies were right at the stairwell and could rout upstairs.  Instead of fighting it out in the recently ‘human-waved’ building K5, a HS went to capture M2 from the Russians instead.  

ITR15 Tractor Factory 137 After Action Report (AAR) Advanced Squad Leader scenario

ITR15 Tractor Factory 137 After Action Report (AAR) Advanced Squad Leader scenario

Victory Conditions

It was March 1943 and the SS Panzergrenadiers looked to take 4 factories in 7 MPh’s from the Soviets in Kharkov.  The Soviets had 20 squads & 4 leaders (1 commissar) with 4 AFVs and 3 Guns.  Kindling was NA and the EC’s Wet.  Factory had Roofs and the Russians had 3 Fortified Locations, plus MOL Capability.  The SS had 22 squads (3 of them 838 AE) with 5 leaders (1 10-2), 3 PzIIIL, 1 StuG and 2 Tigers.

After Action Report

ITR15 Tractor Factory 137 After Action Report (AAR) Advanced Squad Leader scenario

As the SS, we didn’t have much time, so we needed to hit all 4 factories concurrently.  At the advice of my opponent, I divided my troops to teams of 20FP firebase plus deployable 548s assault units, with 1 team of DC & FT guys and the 838 AE’s dispersed as the ‘smokers’.  The AFVs were to provide Smoke (didn’t get much), to provide street cover, to neutralise Soviet AFVs, to push to the back row and to finally help breach buildings (Fortifications).  The 2 Factories on the left would be hit head on.  The 2 Factories on the right would be hit head on AND flanked in case we couldn’t push through the front one quickly.

ITR15 Tractor Factory 137 After Action Report (AAR) Advanced Squad Leader scenario

On the right, we pushed across the first street quickly, with the enemy on the flank collapsing.  The Russians had an ATR in the Factory that threatened DI shots.  The Russians did MOL attacks whenever they could in a bit to start fires.  My Tiger with the 9-1 armor leader pushed down the middle a little slowly.  The opposing T-34 got a chance to get in motion.  The resistance in the middle was tougher as well for the infantry.  The Russians had their MGs and their best leaders lined up there, with another T-34 behind a wall.  We edged our Flamethrower team closer to it.  On the left, there were a few Russians on the 1/F designed to mess with my routing (and to waste my time).  Whilst the folks on the left pushed into the street, it’s not without difficulty ‘cause the two blocks on the left were mutually supportive.  My other Tiger slid to the left, the T-34 tried but couldn’t get away.  The one big thing we got going for the SS was their remarkable rallying ability, which was often a 6 while DM’d but in a building, before leadership’s applied.  Our ‘recon by walking around’ found the Russian 76* (not 76L in the following diagram) on the left flank.

ITR15 Tractor Factory 137 After Action Report (AAR) Advanced Squad Leader scenario

That T-34 in the middle that went into motion did a master move: it went to the right and threatened a PzIIIL!  We were relieved when it burned on a lucky CH.  The STuG decided to move over and offer it support nonetheless.  AFVs should never fight alone.  A wandering 548 ‘found’ their 45L that decided it was a worthwhile target.  Our mighty 10-2 led 20FP stack, bolstered by a Hero (20-3!!) moved into a target factory.  The stack moved right in front of a ROF3 45L Gun but it was a risk it had to take.  In the middle the FT folks got shot up and dropped their toys on the street.  The other 76* popped smoke which makes the 2 ‘stacked’ factories on the right harder to take but it did cover us from their MG death stars as well.  The T-34 on the left got chased off (helped by a Smoke round from their 76*) but our AFVs focused on helping our troops cross the street.  We got to the smoking 76*.  Still, there seemed to be too many Russians anywhere!

ITR15 Tractor Factory 137 After Action Report (AAR) Advanced Squad Leader scenario

The Russians never stopped trying for MOLs.  Thanks to the Wet EC, buildings didn’t all brew up in flames!  The nightmare scenario happened: our 20-3 Jedi stack broke under attack from the 45L. The Russians closed in from all directions and a T-34 crashed into the building behind it.  Our 2 AFVs couldn’t kill the offending T-34.  Our teams on the right looked tattered.  The news stunned all the SS troops on the board.   The troops in the middle looked to cross the street intact when T-70 whizzed by on their left.  It stopped behind a PzIIIL but forgot to Bounding Fire.  The targeted PzIIIL spun around.

ITR15 Tractor Factory 137 After Action Report (AAR) Advanced Squad Leader scenario

Our Jedi stack routed up to the Roof but it’s already dead.  The flankers took the opportunity to run down the right.  Unfortunately the Gun on the STuG malfunctioned while trying to shoot the moving (zigzagging?) T-34.  The Tiger in the middle decided to push up behind the T-34 (and over the dropped FT) and German troops went into CC with the same T-34.  Our folks in the middle crossed the street!  Our PzIIIL burned the T-70 on the left.  Our guys were done with that factory (yes, there’s a Fanatic 838 AE) and was ready to move out (it was Blazing up too).  The Tiger went after the T-34.

ITR15 Tractor Factory 137 After Action Report (AAR) Advanced Squad Leader scenario

The STuG fixed its gun in the nick of time and shot the T-34, which tried to move around it through a building.  The flankers on the right gathered to hit the ‘back’ factory building when the STuG then went straight to the back row and started taking shots from their remaining 76* Gun.  The Tiger in the middle started putting rounds into the ‘front’ factory and found a Fortified location.  A PzIIIL went to back it up while an 8-0 dived under it to retrieve the dropped FT.  The teams in the middle was making progress and the teams on the left was moving to the left flank to help them out.  The Tiger shot the T-34 and the AFVs moved to the back row on the left as well.

ITR15 Tractor Factory 137 After Action Report (AAR) Advanced Squad Leader scenario

The Russians were consolidating and getting concealed were possible.  The fact was, I couldn’t stop that nonsense until I break into the Factories!  The STuG’s dueling with the 76* Gun while the Tiger’s sending shots to it from the other side.  Shooting wasn’t going to get rid of the Russians.  We gotta breach.

ITR15 Tractor Factory 137 After Action Report (AAR) Advanced Squad Leader scenario

We didn’t forget about the front Factory on the right.  A PzIIIL moved over, popped Smoke to help people cross the street.  We tried getting into the back Factory but troops broke under the insane firepower from the 8-1 stack.  The Tiger in the middle kept shooting at the 76* Gun and would later CH that hex (bye bye Gun).  Other AFVs moved to the back to prevent concealments.  All the Russans on the left were now squeezed into a Factory by two teams of SS.

ITR15 Tractor Factory 137 After Action Report (AAR) Advanced Squad Leader scenario

AFV’s crashed into Factories from all directions (red arrows)!  A Tiger was killed and 2 PzIIIL were immobilised, but we should have done this earlier.  We took Factory number 2 (the ‘front’ Factory).  We breached the Fortified location on the left but the Defensive Fire broke all of the assaulters at the breach.  That location would potentially cost us the game.

ITR15 Tractor Factory 137 After Action Report (AAR) Advanced Squad Leader scenario

And it did.  Assault Fire from the unbroken SS stack in the left Factory failed to break the Russians in the Fortified location.  There’s no way we could take all 4 factories.  The SS lost.

FT109 Hitler’s Lost Iron After Action Report (AAR) Advanced Squad Leader scenario

FT109 Hitler’s Lost Iron After Action Report (AAR) Advanced Squad Leader scenario

Victory Conditions

This is the first of a series of thrilling Motor Gun (Torpedo) Boat scenarios that are part of LFT St Nazaire, reflecting action around the world. The ocean’s at level 0, so a beached MGB, bristling with weapons, poses an exciting situation for garrison units with a taste for adventure. All houses are wooden and ground level only apart from the building at the top left that’s highlighted in orange. These MGBs have 14PP rubber rafts to ferry tourists to shore, but if MGBs are willing to risk going aground in the shallows, they can unload directly onshore.

This was Norway 1943, and the Norwegians were conducting a Commando Raid at Strød Island. As such, their 8 morale was fanatic on Ocean-Hinterland hexes. They win in 6.5 turns if they can successfully exit two DCs toting 338s via the space marked on the top of the map with the British roundels.  There’s a +1 LV and Moderate Mist to help those on the move.  

The Strød Island Garrison, who must have thought they pulled a nice assignment on the island in 1943, were 8 2nd-line half squads with 2 LMGs. Plus they had a pair of 105mm ART guns on the stone pier that the Norwegians already knew about!

After Action Report

FT109 Hitler's Lost Iron After Action Report (AAR) Advanced Squad Leader scenario

I pointed my 105mm guns each to a side.  The +1 LV hindrance and the Moderate Mist will at least a +2 to all shots.  However, if they hit, the Norwegians run the risk of drowning half their OB.  So I didn’t think they would come up the middle where the gun(s) need to make a +3 turn to shoot (a flat shot in reality since the boats were -3 targets).  My weak OB and the the MGB’s awesome firepower convinced most of the German Garrison to stay away from LOS to the waterline.   

Act of Valor movie

I had most of my garrison on the left of the map.  I figured the right of the map wasn’t as easy to get through, plus it was more of an Open Ground for commandos to cross from there to the exit space.  I had both of my LMGs and a 7-0 in the middle of the map as a backstop.  They had a stone wall that shield them from those MGBs but turned out the hindrances from Moderate Mist kept them well protected anyways.  

FT109 Hitler's Lost Iron After Action Report (AAR) Advanced Squad Leader scenario

As I suspected, the pair of MGB crashed into shore right away and offloaded their commandos!  My 105mm fired but missed (LOS blocked and Gun malf’d).  One of the MGBs went aground (loud expletives) with a Gun tagging on Acquisitions, a gunfight ensured.  We got a hit but couldn’t get an effect apart from claiming one HS.  Since the commandos went ashore, the Germans wasted no time running backwards from the shore.  

FT109 Hitler's Lost Iron After Action Report (AAR) Advanced Squad Leader scenario

Whilst the right 105mm and the stuck MGB traded shots, the left MGB went for the stone pier since the Germans couldn’t fix the right 105mm.  At 4 hexes, a torpedo splashed into the water and scored a direct hit on the pier!!  Both guns disappeared in a shower of rocks.  

FT109 Hitler's Lost Iron After Action Report (AAR) Advanced Squad Leader scenario

With half the MPh’s left, the Norwegian on the left made it to the top of the map.  The Germans fought to stay in front of them, with the LV & the Mist helping both sides.  One of the LMGs in the middle thought they would go to the big wooden building to help but quickly realised that the battle would move too fast for that.  One HS and three dummies on the right would keep the other half of the Norwegian OB delayed.  Meanwhile the two MGBs tried to find useful purchases.  The hindrances made it impractical to shoot at that distance.  They were there largely to strip German concealment.  

FT109 Hitler's Lost Iron After Action Report (AAR) Advanced Squad Leader scenario

The ‘VC’ stack on the left, with a leader and two DCs toting 338s, was almost at the end zone! The Germans made a dash for it too, with their LMG’s moving into place. The Norwegians on the right moved freely as well, since it was clear that most of the German garrison were on the left. We had to keep any DC toting 338’s at bay for two MPh!!

FT109 Hitler's Lost Iron After Action Report (AAR) Advanced Squad Leader scenario

The left VC stack was 2 hexes from the exit.  The German garrison crowded up that space.  However in the meantime, the right VC stack arrived at the scene.  

FT109 Hitler's Lost Iron After Action Report (AAR) Advanced Squad Leader scenario

There was a lot of movement and loud bangs, but when the action subsided, the Norwegians were still on board! An attempt on the left was thwarted for now, but the Norwegians were still in the thick of it! The right VC stack got closer to the exit, and things were really heating up! 

FT109 Hitler's Lost Iron After Action Report (AAR) Advanced Squad Leader scenario

The Germans made a valiant effort to stack up their two LMGs, but it was for nought. The Norwegians on the left were stopped, but they got the right VC stack off the board! What an incredible game!

Tenor

ITR13 To the Last Bullet After Action Report (AAR) Advanced Squad Leader scenario

ITR13 To the Last Bullet After Action Report (AAR) Advanced Squad Leader scenario

Victory Conditions

This is the summer of 1942 and the Germans are on the march! They’re looking to clear the NKVD headquarters at Rostov.  They’ll win in 8 turns, if they control both buildings K8 and L12.  You can see the two buildings marked with big yellow ‘V’s on the map.

The Russians have eleven 8 morale squads, mostly 628’s, so they’re ready for the fight! These are supported by a 10-0 commissar and a 9-1 plus an 8-0. They come with four Fortified Locations, twenty Mine Factors, an ATR, a MMG and a Flamethrower. The Germans have sixteen squads, four of them 548 with 3 smoke. They have 5 leaders with a total of -4 modifiers amongst them, four MMGs and 4 tanks. I knew these buildings would take forever to clear, but I was excited to see how quickly my squads could work together to overcome the challenge.

After Action Report

ITR15 TO the Last Bullet After Action Report (AAR) Advanced Squad Leader scenario

The Germans were situated directly across the street. We spotted a rout trap protecting the top (west) building and so we decided to focus our forces on the bottom (east) building. We wanted to get behind these two buildings as well because if the Russians get to rotate concealed units out, we would never win this battle. For the time being, we would ignore but isolate the three Russian stacks in that building on the top of the Russian deployment. We had four MMGs distributed between the 9-1 and the 9-2 stacks as deathstars to support the assault troops moving across the street. The 548’s would provide smoke (& close up assault fire) and the 467’s would deploy where possible. We would have to note the hexes the Russians step into if we want to avoid the mines. They would undoubtedly withdraw into the top victory building (west), so we’ll have to be quick!

ITR15 TO the Last Bullet After Action Report (AAR) Advanced Squad Leader scenario

In a stunning turn of events, the Russian flank guard melted away in an unexpected blaze of glory (a break and then Fate). The Deathstars tried to stop the Russians from moving up to the middle and the top building. We were moving troops to the left (south) side of the buildings, and it was going great! The four tanks arrived on the scene, ready to provide smoke and armour cover to those crossing the streets. We made it through the first of the Russian fortified positions! There were three more to go!

ITR15 TO the Last Bullet After Action Report (AAR) Advanced Squad Leader scenario

The Russian 10-0 commissar kept putting brokies back in circulation, which was a great move! We had to move the AFVs to put a stop to the unacceptable situation. One of the AFVs moved too close and got destroyed (fine, I wasn’t paying attention), though it became a nice crossing point. The Germans blew through the second Fortified location, yeah! The deathstars started moving to support the attack on the top (west) building, although I have to admit, I wasn’t covering them from Russian sniper well.  At this point in the game, both the Russian ATR and the flamethrower malfunctioned, which was a real shame.

ITR15 TO the Last Bullet After Action Report (AAR) Advanced Squad Leader scenario

We had no choice but to stack ourselves up to the often 12+3 or more firepower from Russian 628’s.  We had to keep up the pressure!!  The 9-2 broke trying to organise his men at the new deathstar position.  An 8-1 dived through his own lines and tried to deliver a DC to the Russians, he got killed for his efforts.  I had to move a wounded 7-0 to that center building to keep the attack going.  There’s a Russian 9-1 nursing a broken MMG on the corner of the last VC building.  We had to move the AFVs in to mess with that rout as well.  

ITR15 TO the Last Bullet After Action Report (AAR) Advanced Squad Leader scenario

We got the Russian hemmed into a corner of the top VC building! The two Russian leaders are in the hex with the last Fortified Location, and they’ve got all the brokies! The tank I dispatched to keep the brokies away from the Russian 9-1 was killed by a LMG from the 8-0 stack we tried to isolate in the building at the top of the Russian layout. But that just made the rest of us more determined to get the job done! In a bold move, they then tried to dash across the street to join the fight! Unfortunately, they got pinned in the street, and I sent a tank through and overran the stack! My 9-2 was shot by the Russian sniper, but that allowed his machinegunners run across the street to help! It was after the German AFPh that the Russians finally gave in in disgust.

I think the one thing this scenario taught me is to target one bit of the puzzle at a time and focus all your firepower, assault troops and AFVs on it.  It’s basic tactics but it’s one that I failed to get my head around in execution till now!  On the otherhand, this seems to be a scenario that’s tilted to the German side.  Perhaps those of you who played this will share your thoughts?

ITR12 Sosabowski Slapdown After Action Report (AAR) Advanced Squad Leader scenario

ITR12 Sosabowski Slapdown After Action Report (AAR) Advanced Squad Leader scenario

Victory Conditions

The game features several buildings that grant Victory Points (VP). Additionally, there are two roadblocks in the game that, if cleared by the Germans, are worth 5 VPs each. To win, the Germans must accumulate 22 or more VPs. The Poles begin with a weak force that includes several dummy units and an AT gun. However, they receive reinforcements in the form of a much stronger force at Turn 4 of 8. The Poles also have the ability to HIP 2 squads (+ SMC/SW) and throw MOLs, although this was not utilized during the game. Both sides have the option to declare HtH combat.

After Action Report

ITR12 Sosabowski Slapdown After Action Report (AAR) Advanced Squad Leader scenario

The above was the German view of the Polish setup. Reinforcements could arrive from the right, top, or bottom of the map, and the preferred strategy was to hold the right  side firmly, delay the Germans in the middle, and use SW to prevent the Germans from traveling on the left through Open Ground.

ITR12 Sosabowski Slapdown After Action Report (AAR) Advanced Squad Leader scenario

On the right, the Polish first liners guard two 3VP buildings with a 9-1 and an AT bore-sighted to a ‘bottleneck’ building that can also provide cover for enemy clearing the right Roadblock. The two vertical rows of buildings to its immediate left are defended by green troops, Dummies, and a 10-0. A pair of HIP’d HMG and the 10-3 provide overwatch from a level two building at the back, covering both Roadblocks and also guarding the approach to the 10 VP building on the top right. My opponent might be wary of my AT Gun covering the vertical street on the far left or the diagonal street off from the 10 VP building.  

I do not have enough personnel to defend all of my buildings. My only hope is to force the Germans to waste time and to not lose all 22 victory points before reinforcements arrive. I considered stationing four HIP HS’s in various victory point buildings. This will force the Germans to conduct more searches and mop ups. At the end, I prefer not to reveal the location of my Death Star, as the Germans might target it with their 4 x MMGs. ITR12 Sosabowski Slapdown After Action Report (AAR) Advanced Squad Leader scenario

In just two German Movement Phases, they have quickly advanced up the board. The MMGs on the two vertical lanes to the left have successfully prevented the Germans from using the street, but only slowed them down slightly. We were able to reduce a sapper squad with a bore-sighted hex, which is fantastic. The Germans conducted extensive searches but ultimately resorted to running through the buildings in the middle when they realised they were all dummies. During the battle, my hidden Jedi death-star, decided to reveal itself and attack a flamethrower bearing 8-0 leader stacked with a squad. However, the attack missed, telling the Germans that there were no HIP’d HS lurking in the VP buildings. The green squads who were protecting the right ‘outer’ buildings were slow to retreat and would be captured or killed. On the other hand, their 10-0 leader managed to cross the street and fought until the end. The soldiers on the right skulked and cycled concealed units to the front. The squad on the third level did well in disrupting German movements behind their lines.

ITR12 Sosabowski Slapdown After Action Report (AAR) Advanced Squad Leader scenario

Both Polish MMG teams ran! At first, it seemed impossible to escape, but the 10-3 HMG death star maintained its dominance over the battlefield. At this point we lost 11 VP, including all buildings except the right flank. The Germans attempted to clear the left Roadblock, but the HMG decimated the squads. Had they cleared both, they would have gained 21 VP. The Berserker seen here would eventually be destroyed on the street. The Germans were closing in on the death star from the left. Firepower were moving continuously towards the top (as indicated by the 10-2 stack). The squads in the buildings on the right side kept rotating Concealed units forward.

Fortunately, the Polish reinforcements arrived, and they occupied the 10 VP building on the top right. The 4-5-8 troopers boosted the last line of buildings (2 x 3 VP), and Concealed Polish stack advanced onboard into a German MMG team, causing it to voluntarily break and rout. A Polish Hero was positioned to prevent that rout. However, the Germans soon realized this and all guns converged onto the brave man and killed him. He took most of the defensive fire off the desperate defenders for a round.

ITR12 Sosabowski Slapdown After Action Report (AAR) Advanced Squad Leader scenario

The German heavy weapons teams broke my Jedi death-star!!  The two MMG teams fought to hold off the attackers from the left.  The issue here was that all the Polish SWs were more than 3 PP, meaning if they break, they abandon their SWs.  Meanwhile the Germans on the right threatened to cross the street, and to clear the right (with other team on the left) Roadblock.  Fortunately, it got pinned and the team on the left failed the Clearing roll (for lack of a sapper squad).  The 4-5-8 Poles (bottom left) continued to push up against the German flank.  

ITR12 Sosabowski Slapdown After Action Report (AAR) Advanced Squad Leader scenario

The 10-3 Jedi didn’t rally! On top of that, the lone Polish HMG squad broke and joined their brothers at the backstairs. One of the guarding MMG teams broke and the Germans rushed in. One German 8-0 with a flamethrower got into a position to re-DM the 10-3 but a lucky shot from a HS downstairs broke him. The 10-3 will get another chance to self rally (on a 11). Meanwhile over on the right flank, a Polish green squad braved rounds after rounds of German Prep Fire and delivered the first of an encircling fire over two German sappers at the right Roadblock. With the completing fire from the Polish squad coming from the bottom, the Germans broke and Fate reduced those two sappers to 1 HS. My opponent conceded.

My opponent conceded.  Clearing the two Roadblocks would only give him 22 VPs.  He would need to clear one of the two 3 VP buildings.  

I mentioned earlier that I didn’t use MOLs.  Apart from potentially increasing firepower by 4 FP, there’s a 1 in 6 chance of starting a fire in the hex.  Having the ‘jump off’ buildings to the right on fire might be a rather good thing to protect the right most VP buildings.  

BFP25 From Villebaudon to Valhalla After Action Report (AAR) Advanced Squad Leader scenario

BFP25 From Villebaudon to Valhalla After Action Report (AAR) Advanced Squad Leader scenario

(Sorry about the small images – the map’s wide!  Please Right-Click on an image to open it in a new tab to make it bigger.)

Victory Conditions

The Germans, with 10 Panthers (and four AA AFVs plus a slew of assets), had to break out into the left mapboard, killed enough Americans (10 CVPs per pt) and/or occupy enough of 4 VC hexes (2 pt per hex) to get 9pts in 9 turns.  To be honest, I didn’t think the Americans had a chance at all.  Those Panthers had front armors that none of us could touch (18 AF vs the three TDs with APCR of 20TK).  They could just drive over, occupy all four VC hexes, kill two US AFVs and win the game.  However we did have two tank busting fighter bombers and an 100mm OBA that could keep the infantry at bay.

My opponent advised that the Panthers couldn’t ignore American armor (or bazooka teams).  They couldn’t allow to them to get in close and (God forbid) get a side shot.  The Americans had to use their gyros and their fast turrets (on most) to keep the threat alive.  We had to keep the German armor chasing after us. It’s a strategy I stuck to on one flank but not the other during this game.

Before we begin, if you look for combined arms and bocage action, this scenario delivered nine turns of nonstop carnage for both sides.  It’s a glorious mess!

After Action Report

BFP25 From Villebaudon to Valhalla After Action Report (AAR) Advanced Squad Leader scenario

The Germans were making their way through the bocage.  We couldn’t see them, given the height of the bocage.  We did land a Harassing Fire OBA in the place where they needed to get out.  We had a few front line units threatening bazooka shots.  They would have little or no chance to escape back into the village.  The majority of our armor is on our left flank.  It threatened hits on German flanks but could also slip back into the middle or even to the right.  The problem was that our frontmost M10 (with the armor leader) and the Sherman couldn’t hulldown on the hill at all for any sort of staying power.  The Germans unloaded their infantry in the bocage corridor.  They also moved their heavy weapons team up the hill to deal with the M10.

Meanwhile back at the village, we were digging foxholes at a few choice places and the cutters were busy opening up some bocages.  We had our AT Gun in the bocage on our right, pointing straight down the road.  A cutter’s opening up a path for the Meatchopper to join it as well.

BFP25 From Villebaudon to Valhalla After Action Report (AAR) Advanced Squad Leader scenario

The Germans were forced to go over bocages to avoid the OBA.  Two Panthers went up a Level 1 hill which prompted most of our Shermans to exit the left flank into the middle.  Our escaping M10 couldn’t escape a shot that came right through the side of a bocage and a building!  Fireball!  The dual Panthers then focused their attention on the church steeple.

BFP25 From Villebaudon to Valhalla After Action Report (AAR) Advanced Squad Leader scenario

The radio malfunctioned and our Harassing Fire was no more!  Our valiant front line teams were still holding the Panthers back as they dare not show their sides.  Shermans shot smoke rounds to help an M10 hop back down the central corridor.  Meanwhile, a stack of Germans decided to jump the bocage on the right.  Our deadeye M10 stationed there fired the first of its killer shots and broke everyone!

BFP25 From Villebaudon to Valhalla After Action Report (AAR) Advanced Squad Leader scenario

The dual Panthers on the hill kept the radio guy pinned while he desperately tried to fix his radio.  Germans poured out of the bocage but then the first of our fighter bombers appeared and fired down a bocage corridor.  It killed a Panther and immobilised another.  German AA unfortunately damaged the plane and it was recalled.  Our bazooka teams ran in desperation, the team on the right made it and the one of the left had less of a chance.  A Panther sneaked up on our right!  Our Shermans shot a few smoke rounds & backed away.

The German infantry was getting closer, and with them panzerfausts!

BFP25 From Villebaudon to Valhalla After Action Report (AAR) Advanced Squad Leader scenario

The dual Panthers kept up the pressure on the church steeple.  Radio guy managed to lay OBA on a Panther in spite of that but didn’t do much damage.  Our pair of spotted mortars worked to keep the Germans off the hill on the left flank so that our M7 howitzers could see them.  Deadeye M10 on the right scored a critical hit on a Panther!  Unfortunately the other fighter bomber had to leave after German AA shot it when it was trying to lay a Fire Lane.  The hide and seek in the centre corridor intensified.

Three Panthers down, two Panthers shooting on the hill, that left five Panthers barrelling down the highway …

BFP25 From Villebaudon to Valhalla After Action Report (AAR) Advanced Squad Leader scenario

The Germans moved an AA tank up the right to deal with our open top M10 but our MVP burned it as well!  (You should hear the cursing.)  German soldiers were now picking their way through the woods in the middle of the map.  They were definitely getting into panzerfaust range.

BFP25 From Villebaudon to Valhalla After Action Report (AAR) Advanced Squad Leader scenario

Urgh!!  A Sherman was burned by a faust.  That, however, allowed US armor to form a new line behind the bocage on the right, along with an escaping bazooka team.  The M7 howitzers were feeling the stress.  The two shooting Panthers on the hill moved forward, but a German spotting round landed in a curious place in front of the church steeple.

BFP25 From Villebaudon to Valhalla After Action Report (AAR) Advanced Squad Leader scenario

A smoke OBA landed in front of the church!  The breeze proceeded to make it worse.  The M7’s on the left are now feeling the presence of German combined arms although the spotted mortars still managed to break a stack of Germans on the hill.  The American’s in the village braced for contact.  The line of American armor on the right fired everything they got but they weren’t deterring these Germans anytime soon.

BFP25 From Villebaudon to Valhalla After Action Report (AAR) Advanced Squad Leader scenario

The Meatchopper covering the final approach to the village made its presence felt, bocage or not!  The Germans shot and burned it, creating issues for the AT gun.  One M7 on the right was lost to a Panther and a Sherman lost to a faust.  Only one M7 survived and ran to the village.  Meanwhile, the folks in the church steeple relocated to the right.  A panzerfaust on the right burned a M10 but the rest hopped over another line of bocage, and so the game continued.

BFP25 From Villebaudon to Valhalla After Action Report (AAR) Advanced Squad Leader scenario

A Panther on the right got tired of these bocage hopping Americans and started driving over itself.  Two AFV’s immediately went for my first career underbelly shot and one of them connected!!  A Panther bulldozed into the first VC hex in the village and caught the M7 in the middle of the street.  It couldn’t move away, it would have to fight it out.

BFP25 From Villebaudon to Valhalla After Action Report (AAR) Advanced Squad Leader scenario

A German AA AFVs got too close, trying to bust open a path through the American infantry.  It was shot and burned.  So was our M7, right in the middle of the street.  On the right, the last of our M10s got burned by panzerfausts.  The last of the American armored moved to their final positions (or out of the way).  Our spotting round just landed somewhere random … (sigh)

BFP25 From Villebaudon to Valhalla After Action Report (AAR) Advanced Squad Leader scenario

The was a huge fight going on at the front of the village as the Germans tried to reduce the possibility of a last turn American counter attack.  Our AT gun stopped some infantry but couldn’t do a thing about Panthers driving in and sitting on VC hexes.  We stunned a Panther coming by on the left but the second got through.  We did make a mistake on the right and let a Panther in on the deep right VC hex as well.

BFP25 From Villebaudon to Valhalla After Action Report (AAR) Advanced Squad Leader scenario

We had to take back 3 VC hexes!!!  We tried to reposition our spotting round and it landed an immediate OBA squarely on the Panther in the deep right VC hex!!  Unfortunately that didn’t even scratch the paint.  We tended tried for shots on another VC hex Panther from our AT gun.  That failed to deliver as well.  The Americans conceded.

I looked up the rules on Vehicular Control afterwards.  What I should have done with my remaining AFVs was to occupy the VC hexes with them.  The Panthers would then have to get into the hex and to shoot them in hex to gain control.

I lost the game but it’s a frightful carnage of a scenario nonetheless – FUN!

BFP24 Death Ride of the Das Reich – Advanced Squad Leader AAR

BFP24 Death Ride of the Das Reich – Advanced Squad Leader AAR

Scenario Background

This scenario is set on 30 July 1944 southwest of Notre-Dame-de-Cenilly, France.  The SS Panzer Division 2 (“Das Reich”) started to realise it’s in danger of being encircled.  They therefore looked to withdraw remaining units southwards towards Brehal.  The stretched out 2nd Armoured Division (“Hell on Wheels”) caught wind of it and moved to foil the German plan as their vehicles appeared before dawn.

Victory Conditions & Tactical Considerations

This scenario has a real interesting setup.  The three boards represents three venues through which Germans tried to escape the American dragnet.  They operate separately from each other like three separate but concurrent games.  The Germans had to divvy his forces up into three groups.  Each group would enter their designated board using Convoy movement.  The Americans had to divide his forces into four groups, one being a reinforcement that enters on Turn 4.  Again, the three boards represents three separate venues that doesn’t affect or crossover to each other, so once forces were committed to a board, they were committed to that board.  The Germans can win via one of two ways: by exiting >= 44 VP (ex prisoners) off the east (right) edge of any one board or by exiting >=110 VP off the east (right) edge of all three boards.  Proper force allocation is very important for both players.  There are parameters to curb either player from heavily slanting his forces on one or more boards, but we also know he who defends everything defends nothing!  It’s also important to know that those bocages you see are Light Bocages.  Light Bocages, as defined by the BFP Beyond the Beachhead rules, are 1/2 level obstacles, don’t create any blind hex and allow LOS along hex spine.  It costs vehicles 1/4 of their MP allotment (instead of 1/2) to cross and Bogs with no additional DRM’s apart from the usual.

The top board has the second most restrictive terrain.  The German convoy enters via a restrictive channel for a third of the board and the terrain opens up before leading into bocage country again for the last half of the board.  The temptation is to start shooting at the Germans as they come out of the first third of the board but the openness will allow their guns to gang up against our tiny blocking force.  I decided to duck further into the bocage with a HIP’d baz team, a Sherman and an MMG.  Hopefully the choices for the Germans are either to come through to us one at a time down the channel or risk bogging and underbelly shots crossing the bocages to flank us.  Forces were deployed along the road and a HIP’d baz team is on the bottom of the map since I suspected the Germans would be tempted to flank us along there.

The middle board is the most open.  The Germans start by coming down a channel for a third of the board, then it’s the village for the second third before closing off into bocage country on the last third.  I put the roadblock where the bocage opens up into the second third.  That’s covered by a Sherman and the 9-2 HMG team in the church steeple.  The M1 57mm AT Gun (TK15, ROF3, HE4 & APDS4 w/ TK18) sits behind a ring of bocage on the left (map bottom) of the Germans’ axis of advance, closing off that half.  Once the fighting happen, I would bring a M2 mortar to the back to provide some defence depth.

The bottom board is the most restrictive.  On one hand, not breaking up the German convoy make it slow(er) going for them, on the other hand, I can’t cede too much ground.  I put the second roadblock shortly past the first half of the board, covered by a Sherman, an MMG behind it and a HIP’d baz team on the side of the road covering the small opening past the crossroads.

Oh, those Roadblocks are only “hasty” Roadblocks, they don’t allow Hull Down’s, can be crossed by a vehicle at half of it’s MP allotment and a Bog Check (+drm) but leaves a Trail Break behind for other AFV’s.  There’s also a +1 LV when you think about your covering your Roadblocks (this action’s at dawn).

Note also that there are no restrictions against Kindling in this scenario.  Some of those grain on the latter bits of the map might be good candidates, particularly in the top board if the Germans decide to do an end run on the right of the road.

Advanced Squad Leader AAR

BFP24 Death Ride of the Das Reich After Action Report (AAR) Advanced Squad Leader scenario

We opened with German Turn 3 (of 7.5).  All three convoys had now been broken up.  On the top board, an armoured car arrived at the bend in the road where the Sherman bore-sighted.  The Sherman open fired and missed!  It then tried popping Smoke and turned tail.  Halftracks started unloading people immediately.  A couple of tanks went to our left (bottom) down the Road to see if they could get at our Sherman.  I imagined they might be tempted to cross the bocage after I take my Sherman out further to the back.  An M2 mortar team hopped over a bocage on the back.

We shot 1 halftrack at the Roadblock on the middle board.  Again, Germans infantry started unloading from their halftracks.  An armoured car went to our left (bottom) to check out that side of the board (like they are paid to).  Our AT Gun torched it at the intersection.  German tanks jump the bocages and went to our right to get at Sherman parked in a stone building.  Our M2 mortar team sprinted backwards as planned.

In the bottom, our Sherman shot the leading armoured car and the HIP’d baz team popped up and shot an halftrack from the side.  What I should have done though was to wait for the German armour to jump the bocage in an attempt to flank the Sherman.  My intention was to increase the MP cost for German traffic as quickly as possible but that didn’t make a material impact on the game. 01 notre dame de cenilly 1944 1

BFP24 Death Ride of the Das Reich After Action Report (AAR) Advanced Squad Leader scenario

Download  1On the top board, our Sherman backed off into the sunken road, escaping the 2 German AFV’s sitting behind the bocage.  Unfortunately, they decided against coming over to chase after our lone Sherman!  The sheer weight of the incoming halftracks/ armoured cars got our infantry on the hill to start thinking about heading back.  They did have a few open top vehicles in the proximity so we tried to light up a few more.

In the middle board, we were still fighting in the first half of the board.  The 9-2 HMG team fired on and stunned another AFV (subsequently recalled) before moving off the church steeple!  The German infantry had yet to close in.  Our Sherman backed off into a bypass along a Stone Wall and sped backwards.  Our gun crew on the left (bottom) broke out a few MRE’s waiting for the next German to arrive.

On the bottom map three AFVs got busy trying to snuff out our baz team.  They survived the first barrage and took a second shot at one of them in hex!  Unfortunately they missed and were all sent to a better place.  On the far side, an M2 mortar team persuaded the Germans to not run any other halftracks down the road.  The Sherman drew back to the next firing position but the MMG team (erroneously) stayed on.  (Note to self: folks can’t outrun AFVs on foot.)

BFP24 Death Ride of the Das Reich After Action Report (AAR) Advanced Squad Leader scenario

Allied Turn 4, and this was where I had to decide on which board to reinforce with 2 Shermans (w/ hedgerow cutters) and infantry.  Normal practice dictates that we reinforce successes but here we need to plug holes.  In this case I sent my reinforcements to the top board since it had yet to claim any enemy kills.  I immediately regretted the decision when I pulled back my Sherman on the bottom board and immediately bogged on at the bocage!  BOGGED!  German AFV surfed up and down those bocages all game and my Sherman bogged on its second attempt!  Having said that, it would help if I pick the bocage crossing location with the awareness that I might bog there.

My infantry was broken and was on the run as well.  Repent!  The end’s near!

However on the top board, folks are backing off nicely to the right. The Germans decided to have their halftracks double back and mill about around my HIP’d baz team so as to not give me a cheap kill.  One even bypassed the Woods the baz team was hiding in but since the halftrack didn’t end its turn in its hex it didn’t have to reveal.

In the middle board, the Sherman worked well with the 9-2 HMG team in keeping the Germans on the right (top).  The 2 concealed squads (one’s a dummy) kept my HMG shielded off. I had to think that the “missing” baz team (in the top board) kept my opponent wary.

BFP24 Death Ride of the Das Reich After Action Report (AAR) Advanced Squad Leader scenario

On the top board, the long HIP’d baz team threw off their invisibility cloak (“taaaddaaaaaaaaaaaaaa”) in slow motion and fired pointblank at one of the halftracks so as to minimise the returning fire group!!  Unfortunately the shot went wide and the team was snuffed out in the return fire.  The 3 Shermans now on board open fired together with the M2 mortar.  None connected but we thought that might give them something to think about.

On the middle board, the Germans were determined to stick to the right (and away from the AT Gun).  Our Sherman backed off to its final firing position but our screen for the 9-2 HMG started to crack.

However on the bottom board, our bogged Sherman got burned and the Germans were in a position to exit >=44 VPs off.  This was game.

How’s this scenario interesting?

I lost this scenario badly.  Considering that I lost it after Axis Turn 5 (out of 7.5).  My Turn 4 reinforcement was definitely misplaced.  However, this should be an interesting read not because of my sub par tactics but because of the unique mechanism this design introduce and the interesting considerations extending from it.  I don’t tend to play scenarios over (except when playtesting) but this is definitely one that invites repeated attempts.  The mental sparing starts at force allocation and it definitely tests the defender’s ability to harmonise his assets with the terrain.  It tests the attacker’s ability to respond to ambushes and to turn the tables.  The multitudes of paths one could take to get off these boards exercise one’s risk management skills.

I imagine this scenario can be played as a 3×3 team game with asset allocation negotiated between teammates.  Has anyone tried that?

BoF4 About His Shadowy Sides – Advanced Squad Leader AAR

BoF4 About His Shadowy Sides – Advanced Squad Leader AAR

Scenario Background

The date was 24 June 1941, the place was the west of Dubysa (a stream), Lithuania.  Russian units debuted their new KV-2 the day before and shocked the Germans.  Another attack hit Panzer-Abteilung 65 by surprise and neighbouring units were called in to prevent a penetration.

Victory Conditions & Tactical Considerations

The Russians win at game end by controlling 9 or more building hexes and/or by eliminating 3 or more AFVs than the Germans eliminated.  The first part of the Victory Conditions means I have to take 9 building hexes and hold them til game end.  The second part means if I lose 1 KV-2, I have to kill all the German AFVs.  The Russian forces enter from the right on Turn 1. The Germans have some units onboard but they have 8 squads with 2 minus 1 leaders entering from the top on Turn 2, 4 PzIVDs on Turn 3 from the left.  There are 13 building hexes below the water bodies on Board 17 (lower board).  These I would have to take and hold against the German counter attack.

KV-2The Russians have 8 Movement Phases.  They will have to do 5 hexes per phase for 4 phases to put them in the vicinity of the 2 hex Wooden building on the left half of Board 17.  That leaves them 4 turns to fight.  The KV-2, on the hand, is a real monster.  It is big enough to give a -2 to any TH for size.  It spots an armor factor of 8 all around, 11 if you hit that turret from the front.  Its 152mm gun dishes 30 IFT / TK21 (AP9 & no IF).  On the otherhand, it can only turn it’s turret by paying NT penalties (we played it wrong: we played it as if it’s an NT), goes 9 MP per turn and that’s only if you pass the Mechanical Reliability DR.  The PzIVD offers fantastic mobility [amended, see footnote 1].  It packs a good set of MGs (totalling 8 IFT) but it’s 75* (short barrel) with a TK of only 10 (AP7).  It’s hard to kill a KV-2 with anything less than a swarm but all you need is to kill one and scatter (the remaining Russian tank will have to kill all the PzIVDs to win via that route).  The Germans can also immobilise one first (net +3 and a hull hit), hopefully in some awkward position/location.  Their smoke dischargers (s9) can help the German reinforcements cross all that open ground from the top to the middle of the map!

My KV-2’s have to cover each other’s blind spots, It’s best to stick to congested areas where it’s harder for the nimble PzIVD to get around.  We also need to keep them away from Deliberate Immobilisation shots.  I am tempted to have them keep the PzIVDs from helping the German reinforcements but that will open them up to being swamped and killed.  I decided to have them operate strictly in the village (bottom map, ie Board 17).

Advanced Squad Leader AAR

BoF4 About His Shadowy Sides After Action Report (AAR) Advanced Squad Leader scenario

I had about 4 turns to get in position, so all Russian units rushed in from the right.  We got lucky when we knocked out the Level 1 MMG perched up on that two hex Wooden building in the middle of board #17.  Up in the woods in the middle of the map, we situated our range weapons – our MMG and our MTR.  Their job was to stop/ delay the German reinforcements.  A couple of other squads were there to pick up the 2 buildings nearby.  The KV-2’s quickly reached the stone wall from which we wanted to fight from (good defence against Deliberate Immobilisation).

BoF4 About His Shadowy Sides After Action Report (AAR) Advanced Squad Leader scenario

The Russians made great progress by the start of Turn 5.  We were closing in on the 2 hex wooden building on the left of Board 17.  We picked up 7 building hexes at this stage.  However the team on our Northern flank’s getting crushed by the 3 PzIVD’s (CH’s in Advancing Fire helped) and the German regulars.  They were cowering in a big broken heap near the pond.  We moved the KV-2 up to the left to help our flank out and to keep the German tanks away from our last building objective.  A 152mm HE shot sent some of the Germans flying back for a bit but that won’t last.  We need to get (and hold) 9 buildings before the German reinforcements come through to the village (Board 17)!

BoF4 About His Shadowy Sides After Action Report (AAR) Advanced Squad Leader scenario

The Germans got through!  Worse, they came in from behind us with 2 PzIVDs and recaptured one of the buildings.  Our northern flank recovered somewhat but so did the Germans in that 9-1 stack.  We could see them getting ready for another go.  Our KV-2’s decided to relocate but one of them promptly broke down!  Fortunately the crew decided to stayed with the biggest chunk of metal on the field.  The other KV-2 had no choice but to break formation and go right up to the stone wall in full view of the pair of PzIVD’s (right of map).  That would give them something to think about.  Both the main assaulting team and the flank protection team were told that no help was coming.  Our captured buildings were defended by Disrupted units but that would have to do!

BoF4 About His Shadowy Sides After Action Report (AAR) Advanced Squad Leader scenario

The 9-1 Germans indeed had another go at the second building in the Woods (middle of the map).  Most broke through the Russian fire but one unit survive to recapture another of our buildings!  The Russians were now down to 8.  The PzIVD on the left tried its luck but was the first to brew up by the immobilised KV-2.  Both PzIVDs on the right tried motion & smoke but had no luck with the dice.  One of them did fled but the one remaining was hit and burned as well!  If the Russian hit another PzIVD we might win the game.  The German infantry was coming in from the rear and I couldn’t spare any of the men to keep them away!

BoF4 About His Shadowy Sides After Action Report (AAR) Advanced Squad Leader scenario

To my surprise the “escaped” PzIVD didn’t go far.  It kept after the Russian flank.  The KV-2 decided to hop the stone wall and go after it.  To be honest, I was wary of having this last KV-2 immobilise as well but the VC was on the line!  Meanwhile the main assault team made for the “Alamo” on the bottom map.  We had 3 squads against 1 German squad and a wounded 10-2 (how hard can that be?).  Well, it was hard.  The Germans broke 2/3 of the assaulting teams.  The good news was that the guys on the North flank crawled back up, encircled and recaptured one of the buildings!  We got 9 and would had to keep it that way for the remaining turn.

BoF4 About His Shadowy Sides After Action Report (AAR) Advanced Squad Leader scenario

I expected a mad dash from the Germans (from the left) for some of the center buildings.  I had a squad of conscript and a rear facing MG in the KV-2 to counter that.  That didn’t materialise.  One of the PzIVD came around the left and took a shot at my immobilised KV-2.  We both forgot that the KV-2 turret could in fact turn, albeit with a NT penalty.  The Northern flank held onto their recaptured building (we got 9), even though the 7-0 who had the MMG to himself jammed it in a live demonstration of what not to do with a Maxim!  The PzIVD on the left gunned its engines in a bid to pull off another escape but was hit and killed.  The Germans conceded.
BoF4 About His Shadowy Sides After Action Report (AAR) Advanced Squad Leader scenario

How’s this scenario interesting?

KV-2Both sides had a chance to attack and to defend.  There’s a lot of force allocation decisions to be made especially for the Russian player.  The Germans couldn’t afford to be distracted by buildings on the fringes, they had to make it to the village on time in order to disrupt the Russian attack.  The KV-2’s were a real challenge.  Nothing short of a nice “dance of death” would do (with the survivors running off to the far corners of the map).  Then if that’s the case, they wouldn’t be helping their reinforcements cross that vast Open Ground on the top half of the map.  Typical of the best scenarios, there are a good number of what-if’s and tradeoffs to be made.  I thought I was on track for an easy win but my opponent obviously proved me wrong.

[Footnote 1] I previously said the PzIVD is a “small” target.  It’s not.  Thanks to Michael Rodgers for pointing it out.  You can read Michael’s blog on https://lowammo.ca/

BFP23 Prelim to Death Night – Advanced Squad Leader AAR

BFP23 Prelim to Death Night – Advanced Squad Leader AAR

Scenario Background

The 2nd Armor Divison “Hell on Wheels” broke through to the Germans’ rear in Operation Cobra and put the German 84th Corps in a pocket.  The Germans
started to disengage and to withdraw.  The 17th SS Panzergrenadier “Götz von Berlichingen” was one such unit that ran into an American blocking position held by the 41st Armored Infantry Regiment at St Martin de Cilly at around 0430 on 29th July 1944.

Victory Conditions & Tactical Considerations

Stabswache de Euros Waffen SS NormandyThe Germans need to get at at least 12VP at Game End to win.  VPs are earned by occupying buildings on the right half of the map.  Each VP corresponds to the # of ground hex locations a building occupies, the exception being the long wooden rowhouse which is only 3VP and not 5.  This being early in the morning, there’s a +1LV for the entire game.  The bocages are Light Bocages, meaning they are half height obstacles, don’t throw a blind hex behind and are not as onerous to cross.  A particular evil element to note are the few Up-Slope hexes in the German setup area that allows them to look beyond the Light Bocages.

The Germans set up with 15 squads, 4 leaders (3 with -1) and a Hummel sporting 150mm HE but with a B10.

The American set up with 10 squads, 2 HS, 4 leaders (2 with -1), a pair of HMG and a pair of bazookas.  They can also set a squad up HIP, which I didn’t do and kept my opponent looking til mid game.

The Germans have great leadership, great morale, the +1LV and the Hummel going for them.  The Americans would need to break off and head back to the village safely.   The lack of rout locations by the bocage concerned me.  I thought about largely giving up the bocage and setting up the majority of my OB in the village.  Considering the Germans should have to fight the clock as well, that seemed too much to give.  So I lined the bocage with units, put the two HMGs on the flanks in the village and the two MMGs high up in overwatch.  They had grain hindrances and better morale, but we had grain hindrances plus bocage.  We hoped to kill their timetable by breaking a few or encouraging most to Assault Move/ Advance concealed.

Advanced Squad Leader AAR

BFP23 Prelim to Death Night After Action Report (AAR) Advanced Squad Leader scenario

SS units were building a firebase on the up-slope on our right (top of map) but we drove them back with some lucky shots.  We thought of chasing after those brokies but the SS still had enough firepower to take an issue with that.  Our center was getting knocked back though, those chaps routed into the woods.  The right started to fold towards the center as well so as to get some cover when they fall back.

On our left we were able to knock back a stack of SS troopers as well.  They came through the line of orchard so as to get some cover from our MMG overwatch.  Our MMG went after the Hummel but to no avail.  As a matter of fact, I had our sniper parked right next to the Hummel but I think he’s on leave this whole game.

BFP23 Prelim to Death Night After Action Report (AAR) Advanced Squad Leader scenario

Our MMG overwatch on the right (top) kept knocking the SS brokies back, that allowed the rest time to scamper back into the village behind the woods.  We moved the HMG team up top get ready for when the SS eventually bust through those trees.

On the left (bottom), their Hummel landed a smoke round in front of our building.  While we held onto the bocage Wall Advantage, the squads filed into the building back into the village.  The Hummel (on up-slope) could see everything beyond the bocage, so there weren’t a wide choice of escape routs.  The SS has 4 MPh’s to go, we wondered if we withdrew into the village too quickly!

BFP23 Prelim to Death Night After Action Report (AAR) Advanced Squad Leader scenario

The SS spent Turn 4 regrouping and were successful enough to look menacing on my right flank.  We kept the HMG towards the middle but put our MMG out to the flank to prevent any SS men running around doing house grabs.  We envisioned two firelanes covering our right.  What’s tougher to cover would be our center, especially where the “Y” shaped wall was.   Having said that, we sent 2 HS to the left flank because the SS were already in the front building.  In retrospect, it’s probably not the smartest move.  However having done the VC count, I knew my left had more points up for grabs than my right.

On the left, we moved the MMG and HMG in from the side.  There’s still the possibility of a crazy SS run around the flank there but we would need the firepower to blow the SS away from our houses.

The Hummel moved up, threatening our right.  My opponent’s probably still wondering where my “HIP’d bazooka HS” was.

BFP23 Prelim to Death Night After Action Report (AAR) Advanced Squad Leader scenario

Axis Turn 5 was tiring!!  They opened with a big 20+4 shot to my HMG team but thankfully it didn’t work out.  The Hummel laid smoke on my right (top) and three stacks of SS men kept streaming out from behind the woods like crazy shoppers on Black Friday!  We put down residual/ firelanes the best we could.  As predicted, a big stack of SS men broke into our center and threatened to jump a couple of buildings in HtH.  Good thing our luck held, and we broke/ pinned that 9-2 stack in Defensive Final.

On our left, the SS pushed against our green wall and killed a squad in HtH.  Good thing they still had a stack of “unralliable” brokies out behind the bocage!

BFP23 Prelim to Death Night After Action Report (AAR) Advanced Squad Leader scenario

Last US turn and most of us decided to stand and shoot, which got us good results on both flanks.  We did move a 6ML squad off to the right because they wouldn’t be able to stand up to pointblank fire anyway.  It could shore up our right if anyone breaks.

The SS conceded before we advanced back into some of the “lost” buildings hexes.

Download

How’s this Scenario Interesting?

2c310027f884cc9a8b73034ed5901fb6

I honestly had the best of the dice in this whole scenario.  The Americans had high firepower but 8ML SS squads with a +1LV shouldn’t have broke as much as they did.

This was a tight little scenario where neither side could play it safe.  The SS needed to bust through the bocage quickly and the Americans needed to run away fast enough to get back into the village in force.  Had the American line at the bocage collapse one turn earlier, we would be in town doing CQB with the SS, were they would get equivalent cover and we would suffer for our lower morale.

The Hummel threatened to collapse buildings and it did put the fear of God in us.  However, I think my opponent used it smartly – primarily for Smoke.  Too bad I couldn’t come close to put it under any threat!