
Lt General Hans von Tettau
A33 Tettau’s Attack puts us right back into Arnhem, 18 September 1944. The Red Devils had landed and various German units were on the counter attack. Lt General Hans von Tettau and his hastily gathered battle group was tasked with attacking the British drop zones.
The Germans got a mix of conscripts, a big lot of second line squads, a first line squad and 3 leaders. They were SS but was in reality a group of camp guards and depot troops(ELR:2). The Scots got only 4 elite squads, 3 leaders, a medium machine gun (“MMG”) and some LMGs.
The Germans win by exiting 3 victory points worth of units to the right of the map in 11 turns. A squad is 2 points, a half squad 1, a leader 1 and each leadership modifier exited is 1 (hence a 9-1 leader is 2 points).

I played the Germans against a gentlemen who’s recently coming back to Advanced Squad Leader (“ASL”). The superior troops and machines of the Scots were deadly over that much open ground. I split the Germans into two. The regulars were to make their way across the grain field to the left where the woods offer cover down most of the map. The MMG went into the wooden building to suppress the Scot MMG and to hinder the Scots from shifting their troops to the left. The conscripts were on the right and their goal was to draw fire as I was not optimistic about them moving down the right in time with their movement rate of 3.

This was the German Turn 1. The regulars dashed over to the far left of the field (top of the map). The Scot MMG went on a horrifying rate tear. The Germans kept their heads down and ran. When it’s all over, the Germans KIA’d 2 squads with another squad broken.

German Turn 2 : The survivors on the left flank (top of the map) pushed into the Scot LMG team. One German half squad got too close and was vaporised. The conscripts on the right (bottom) got a lucky break when the Scot 9-2 with the MMG team broke.
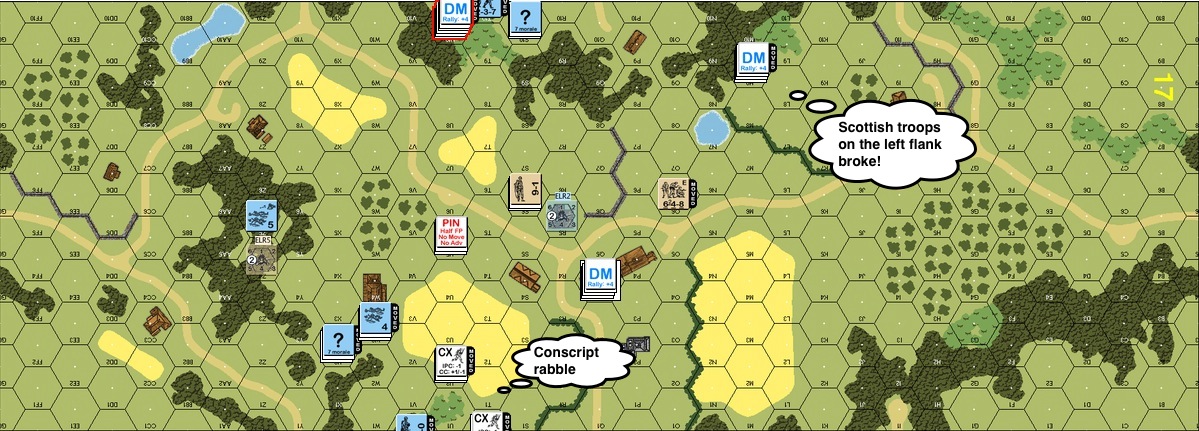
British Turn 3 : More lucky breaks for the Germans!! The fire group formed by the surviving Germans broke the Scot LMG team on the left! The conscripts rabble on the right made very little progress through grain field. However they served their purpose by drawing the Scot’s attention.

German Turn 3: The Germans were not going to let the Scots on rally on the left flank. They shot and they ran after the routing Scots on the left flank. The Scot 9-2 (MMG team) rallied and the grain field on the right was covered with German conscripts too scared to run. However, the Scots started to realise something was not quite right.

German Turn 4: the Germans on the left flank caught up with the routing Scots and killed them. A German 8-0 with a LMG decide to stay back, scrambled into the wooden house and lay fire lanes to hinder the pursuing Scots. The rest of the Scots started running back and the German on the right flank tried to slow them down with long-range shots. Meanwhile a pair German leaders on the right broke off and started running toward the right of the map for a few more Victory Points.

British Turn 5 : the German 8-0 with LMG was a rather effective rearguard. The running Germans focused on putting walls and hedges behind them as the Scots couldn’t see over unless they came right up against these structures.

German Turn 5 : the Germans need to get at least a squad and a half over the wall before the Scots recover. The German leaders on the right flank were also scrambling for the exit just to make sure.
The closest Scot units were broken up against the wall. All hopes were lost for the Scots as another two German units jumped over the wall after their friends.
Or was it?

British Turn 6: A Scot 9-1 leader rallied! He dusted himself off and clambered over the hedge after the Germans. His sights were on the LMG the German left behind. Yes, that German 8-0 with the LMG just made it over the far wall. May be he won’t turn around …
But he did. The German 8-0 turned around and slammed the LMG on the wall he just jumped over. He took a shot through the orchard hex which hindered his sight. He had to make this shot because otherwise the Scot leader would dive into the woods behind the building with the LMG.
He rolled snake eyes ..
And the valiant Scot leader failed his morale check and hit the dirt.
The Germans ran off.

![]()

Cool, though I personally am less keen on the ‘exit this amount of VP scenarios’ they do give a very different feel to a scenario
Personally, I like these type of scenarios as much as the other types. They usually signify desperate retreats and reinforcement attempts.
That being said, I think your best move was leaving behind the LMG rearguard; it more than served its purpose. I hadn’t played this one in years, so your replay provided some nice nostalgia!
Played this one a few years ago I was the attacking Germans as well though we did not quite finish it but it was in the bag for me.
I am not a huge fan of these types of VC’s as a rule though they can work well
Ian