S14 88s at Zon – a real nail biter!!

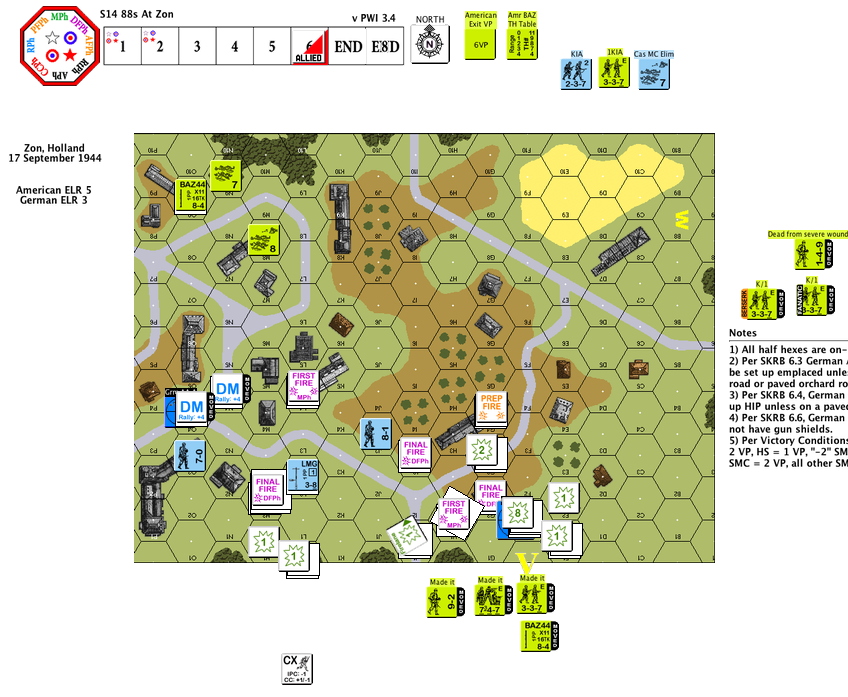
S14 88s at Zon is a starter kit scenario about the 101st’s run-in to a number of 88mm guns by the Zonsche Forest near the bridges over the Wilhelmina Canal. These bridges were vital to the British tanks that needed to dash through to Arnhem in Operation Market-Garden.

Turn 1 German Setup revealed

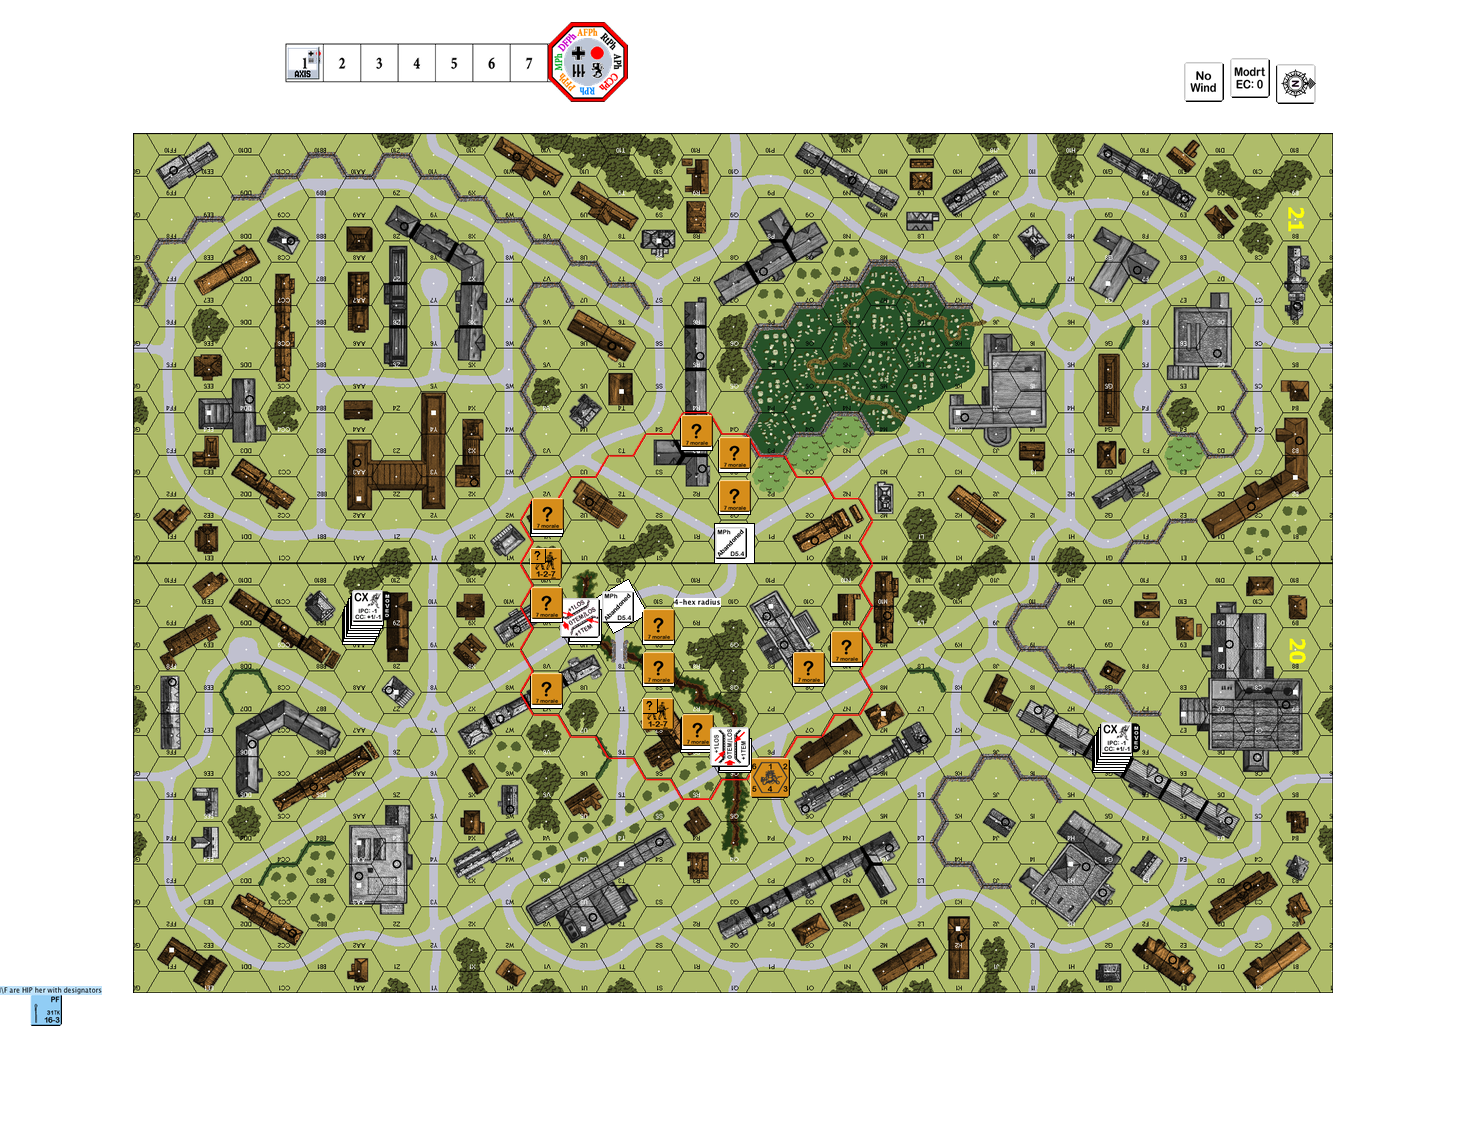
This is a 5 and half turn scenario that uses half of board w. There’s a hill in the middle of the board that leans towards the right. The right (east) part of the board is open ground and the left (west) is a little village with a meandering road going from north to south. The Screaming Eagles come in from the north and have to exit a certain number of units to the south (presumably where the bridge was). The Germans have 2 x 1st line squads, 4 x 2nd line squads and 2 x 88mms. I situated the 88mm guns at M2 and H1. The Americans have 11 squads of 7-4-7 firepower goodness, an MMG and 2 x bazookas.

The American push through the village to the west was slow. Time in time again, the use of spraying fire and fire lanes show its effectiveness even at low firepower when coupled with FFMO & FFNAM modifiers. The German tried to skulk as much as possible during their turns but once when they got careless and the Americans shot clean through four buildings (M7 to L3) and broke their HS in the open ground beyond.

The 88s were scary. Most shots they did had a base hit of 8 and when the hits land, it’s a FP16 flat shot all around for the whole squad.

The American did better for the most of the scenario in the open grounds to the right (west). However they found themselves running out of time towards the end and most squads got shot in their rush towards the entrance.

The Most Epic Moment goes to the Close Combat round when a paratrooper squad jumped a German 2nd line squad. The Germans got Ambush so they started cheering their lungs out. Then they rolled boxcars which started the Americans cheering! The Americans figured they were there to clean house so they stayed and looked to kill the German squad once and for all.

Then the Americans rolled boxcars as well. (*gasp*)

The Germans decided that’s already enough fun and so they infiltrated their butts out.

The most True To Real Life award goes to the American 8-1 leader who ran past Subsequent First Fire and through residual fire unscathed only to be shot in the back by a LMG 5 hexes away and broke at the exit hex.

End game revealed

The Most Heroic award though goes to the German 7-0 leader who stood his ground, concealed for most of the game pretending to be a squad at O3 (in the building to the lower left where you see him now).

Erwin is a great opponent to play against and I learned a bit more about guns and about laying residual fire in this scenario. 

Now for the next one, any recommendations?

Grognards Speaks : Advanced Squad Leader Articles That Change Their Lives

Detail: Espinoza Tawed Skin/Parchment model

If you are a Advanced Squad Leader player and you are not on online forums such as GameSquad yet, I suggest you do. You will find a terrific community of ASL’ers discussing rules, giving their reviews on scenarios and products. You will find a lot of support and from time to time, a better alternative to eBay in acquiring Advanced Squad Leader modules and Third Party Products.

Lately the grognards discussed ASL training articles that changed their (ASL) lives. This is obviously too good of a thread to pass up, so here it is:

This is the original thread on GameSquad forums.  I hope this helps you as much as it helps me!

Do let me know however of articles that helped you!

G15 Bone of Contention – Partisans vs Retreating German SS

On 31 August 1944, the SS-Panzer Abteilung 102, Waffen SS’s heavy tank division retreated towards Germany after a 20 day stand at Hill 112 near Caen (see Operation Jupiter).  In the map above the left most marker is Utah, second one from the left is Omaha, Hill 112 is the 2nd from the left and Rouen is the one to the left.

The division was almost destroyed by the heavy fighting and had to abandon their tanks at Rouen by the shore of the Seine.  On the night of August 31, a team of soldiers, mechanics and tankers crossed back to the western shore of the Seine to destroy the abandoned tanks.  Amongst the wrecks they found two abandon Panthers sitting immobile, with  local partisans trying to figure out the mechanical beasts.

The German’s mission was to destroy the two Panther’s and the partisans, the BCRA Maquis de Rouen, were to protect their prizes at all costs.

Witchbottles played the Germans and I the partisans.  We got German conscripts and self rallying crew pitted against partisans who couldn’t form fire groups, has low ammo and tend to break toys easily.

This is the initial setup, and the north is on the right.  The partisans couldn’t stack and couldn’t be more than four hexes away from a specified hex.  I looked to use the gully as a protected passage between the forces to the east (bottom of the map) and their comrades on the south side (left of the map).  The Germans enter from the left and the bottom of our screen.  As it turns out, the Germans from the left took the direct route but the Germans from the bottom took a long detour around the partisans to the north.

As the turns progress, this flanking move would take the northern defenders off their prepared positions.

Over to the south (left), an all out street fight ensured.  The partisans tried to stay concealed for protection but took every opportunity to snapshot the Germans between the one hex buildings.

photo 2-2

To the north (right) the Germans outflanked the partisans and started to make their way to the Panthers, darting between the tombstones.

After the game, Witchbottles observed that he would have rushed forward to occupy the large stone structure to the upper right of the northern partisan forces, to the right of the graveyard (dark green).  That would have secured the partisan’s northern flank, no doubts.

The German unit I marked off with a yellow circle and an arrow was the unit who managed to put a panzerfaust into the side of the Panther.  The partisans I marked off with rough dotted lines in the middle was the partisan squad that killed a German half squad with gunfire but attracted a sniper shot to the Panther on the top right (to the lower left of the dark green graveyard).  The shot that killed the partisan commander stunned the crew and they promptly abandoned their big toy.  One Panther burning, one Panther abandoned.

Turn 6 Axis AFPh - Killed Panther

A partisan squad managed to run to the graveyard walls and took a couple of shots at the approaching tank crew and promptly ran out of ammo.  The mechanics and crew realized they couldn’t get a good shot at the Panther from the graveyard and so they came over the walls.  In the German Turn 6 the game ended at the Advanced Fire Phase when the Germans nailed the second Panther.

In retrospect aside from moving to occupy the big stone building to the north and thus securing my northern flanks like Witchbottles advised, I should make better use of fire lanes and residual fire.  Next time!  You live and learn.

A big THANKYOU to Witchbottles for a very interesting game!

RPT1 (Finale) Ferenc Jozef Barracks – A View of Advanced Squad Leader Scenarios

Painting depicting Greek soldiers on bayonet c...

Painting depicting Greek soldiers on bayonet charge. (Photo credit: Wikipedia)

We picked the game back up at the start of the Hungarian Turn 3.  For those readers who just picked this up: the Hungarians are the ones with the pretty blue rim and the Romanians are the ones without.  The Hungarians were doing a fighting retreat from the bottom right of the map to the upper left.  The Romanians were hot in pursuit, racing the Hungarians through the city blocks and tried to stop them from ever reaching the barracks.

Two of the pursuing Romanian squads were ambushed by the retreating Hungarians.  Luckily the Hungarians weren’t looking for a fight but took the chance to slip away instead.  One of the escaping Hungarian squad even ran through a semicircle of gunfire to pull off their Houdini like escape!

Towards the end of the Romanian Turn 4, the Romanians caught up with a few Hungarian squads again but the preference was to position themselves to cut off the Hungarians from crossing the street back into the barracks.  Two of the Romanian half squads managed to slip through the Hungarians and took up a position on the side of street.  The other Romanian squad locked a Hungarian squad in melee, stopping them from running back in time.

T5 Romanian RPh - Start of the last turn

This is the start of the last Romanian turn, the last chance for the Romanians to get into, to clear and to hold onto the barracks.  Some of the Hungarian troops were held back, but some managed to cross back into the barracks in spite of Romanian gunfire in the open streets.  There was some pretty vicious hand to hand combat going on towards the top right of the map (“Melee”), strangers joint by an encounter by Chance and locked in perpetuity by Fate.

Sketch 2013-07-01 11_24_12

The Romanian 9th Cavalry poured into the streets amidst a wave of bloodcurdling screams.   The heavy machine gun (under the “9-1” leader counter) was a primary concern.   Some men ran to draw fire, others raced towards the barracks from all sides.  A Romanian 9-2 leader and a pair of half squads managed to run six hexes through the open streets and gun fire, jumped into the barracks and killed the defenders!!

T5 Romanian - CC end moment when Romanians has possession

Unfortunately their sacrifices were for nought as too many of their brothers had fallen.  The Hungarians folded back into the barracks in the last turn and negated the Romanian victory conditions of having to clear the structure of good order Hungarian troops.  Below is the Hungarian endgame.

T5 Hungarian End Game

A couple of thoughts for the Romanian player:

  • Your FP (of 3) is useless in cities. If you don’t have support weapons (most of mine malfunctioned), engage the Hungarians in CC.
  • Manage your schedule, if you can’t hold the Hungarians before the barracks you need to run up there quick and have at least 2 turns to battle through the barracks. Take a count of the hexes and you will realize the Romanians truly does not have time.
  • I suppose there are two approaches to this –
    • Move fast and try to make the retreating Hungarian units run through streets of fire
    • Go full contact and engage the Hungarians before they can break off towards the barracks.

If you happen to play this scenario as well, I’d appreciate it if you drop me a note to let me know how it went for you, especially if you played Romanian and you won!!

hu347Sax347S