ITR19 The Narrow Front After Action Report (AAR) Advanced Squad Leader scenario

Victory Conditions

The Americans had to take all 3 VC buildings in 8 turns (those marked with a ‘V’).  They had 2 Shermans, 4 Stuarts and one module of 100mm OBA.  They had a 10-2 armor leader who could pop out and turn into a Hero radio guy and Gyros in every tank.  The Germans had a Dug-In Panther which started HIP, 2 Pz IV that came in on Turn 4, a 75L AT and a 80mm OBA.

Let me state up front that I made a mistake in my setup.  The 10-2 armor leader could only be placed in a Stuart, which, had I noticed, made for a deadly combination with its gyro & 17 MP.  Unfortunately I didn’t notice.  I had the 10-2 in a Sherman and when we realised the error, allocated the 10-2 to a dead Stuart.

It’s HORRIBLE.  Which other scenario gives you a zippy gyro Stuart with a 10-2 that can stick his head out most of the time?

After Action Report

ITR19 The Narrow Front After Action Report (AAR) Advanced Squad Leader scenario

We smoked the streets like there’s no tomorrow.  We also made some bold moves that teased out the Dug In Panther.  We moved across the street largely intact.  The Stuarts kept beyond the 2 hex PF range but stayed with in 3 to threaten Cannister shots.  We wanted to provoke some German reaction so our OBA had targets to zero in on.  The 75L AT Gun hadn’t made it on board yet, but we expected it down the aisle on the left.  Our Sniper helped out by taking out the MMG squad who ruled a diagonal street.  We would have to smoke the Panther, who ruled the other diagonal.

ITR19 The Narrow Front After Action Report (AAR) Advanced Squad Leader scenario

The German OBA landed on our right flank!  Not much damage apart from a slew of broken American units which would come back quick.  We continued to push down our right edge (screen left), which didn’t offer much response.  We wanted to hit the left VC building from the flank and not having to push down slowly from the top.  Plus we wanted to see that 75L AT.

We repositioned some units towards a push to the middle VC building though.  Meanwhile the Germans on our left flank had retreated to the second line.  Similarly, we would have to find a flank to hit the right VC building with.

ITR19 The Narrow Front After Action Report (AAR) Advanced Squad Leader scenario

A major disaster came upon the Americans in the form of a Mild Breeze blowing from the bottom of the map to the top!  We could no longer use our smoke (or WP) grenades forward.  Our guys had to risk units Assault Moving into open streets.  A 747 Assault Engineer got K/ on our left when doing that.  German OBA came crashing down on the guys in the middle.  A Stuart ended up in flames and a stack of Leader+Hero+Squad got killed & broken.  A FT HS nonetheless pushed to the flank of the middle VC building to keep them engaged.  Our push up our right flank was more successful, along with a Stuart.  We still expect an AT down Column EE, we just want to get our infantry close to it.  The shreck’s probably somewhere around here …

ITR19 The Narrow Front After Action Report (AAR) Advanced Squad Leader scenario

The guys on our left flank (picture right) is now trying hard to get a toehold into the second line of German defensive buildings!  We crept forward into the Debris on the flank of the right VC building in the hopes of not having to push slowly through piles of rubble.  We finally got our SR down on the middle VC building.  This was after that radio malf’d and got fixed!  There were a ton of concealed units in that building but we had the Black chits to risk the extra draw.  The troops in the meantime was trying to rally into some sort of fighting force again.  Our right flank (picture left) was doing the best.  There’s the full frontal slow push towards the left VC building.  We were also good headway down our extreme right.  The Shreck team decided to run back into the left VC building good thing we got them pinned on the street.

ITR19 The Narrow Front After Action Report (AAR) Advanced Squad Leader scenario

We decided it’s time to hit the left VC building!  The 10-2 DeathStar in FF13 broke the German MMG team.  Our squads rushed the left VC building!  Our intrepid Stuart crossed the street and sure enough, the 75L AT appeared where we expected it to be.  We managed to duck in behind the VC building but the darned German squad managed to fish out a PF and burned it!  We would have to rely on a bazooka to keep our right flank Panzer-free.  We broke the Shreck team in the street though.  We got a Sherman between the left and the middle VC building, just to keep that lane Panzer-free as well.A 9-1 MMG team managed to ripped us up badly as well.  We finally got a grip on the second line of defensive buildings on our left (picture right).  It seemed like our tanks would have to brave the Debris to help people move down the flank of that right VC building.  American OBA came down on our own folks as we struggled to bring to play.

ITR19 The Narrow Front After Action Report (AAR) Advanced Squad Leader scenario

The truth is, the OBA had little ‘real’ effect on the Germans as they get +3 or +4 cover in those stone buildings.  Perhaps I should smoke the Dug-in Panther instead but I hope that the OBA would at least unconceal some of the defenders in the middle VC building.  I was about to make a BAD mistake on screen right through.  Instead of moving the 9-1 Death Star sideways for better shooting angles (and continue to melt away the defenders).  I rushed them forward into enemy gun range and those guys got seriously shot up!  In the meantime, the Pz IVs arrived on scene.  The AT gun crew Advanced out and recovered the Shreck.  We pushed those Germans down the map.  We would have to keep these folks occupied.  We were now flanking the middle VC building.

See those drifting smoke?  The Mild Breeze was still on, preventing us from using Smoke Grenades forward and generally making a mess of things.

ITR19 The Narrow Front After Action Report (AAR) Advanced Squad Leader scenario

Yup, the bad mistake was made on screen right.  We lost the power to melt the defenders away.  The survivors routed back while a squad rushed to recover the HMG.  We had to send some management types towards that side of the map.  Those AFVs now risk bogging in the Debris to help flank the right VC building. A WP round in the middle building still didn’t do much damage.  We rushed guys towards it.  On screen left, the Germans routed across the street, we had to keep enough squads nearby to keep them there.  Those PSK guys were firing off rockets from the street!  Meanwhile our guys on the extreme left struggled to pull themselves together.

ITR19 The Narrow Front After Action Report (AAR) Advanced Squad Leader scenario

On of the Pz IVs appeared from behind the middle VC building!  Our Stuart went into motion immediately.  That WP OBA didn’t do much apart from keeping all the defenders covered (and give them a Hero).  We would have to crowd the middle VC building quickly and get rid of that nonsense.  The German OBA was done a little while back and we could see the artillery observer leader rushing from the bottom right to the left to rally defenders around the AT Gun.  Meanwhile a 8-0 was busy giving motivational talks on screen right to get that attack going again!

ITR19 The Narrow Front After Action Report (AAR) Advanced Squad Leader scenario

Things got especially busy on screen right as the lone 8-0 was frantically turning broken units back into the fight.  The tanks were helping some, a WP CH killed a 548, a clear case of smoking being hazardous to your health.  We were squeezing the Germans towards the back of the house but not quick enough.  Germans were stacking higher and higher into less hexes in the middle VC building but they were still holding on, even as more Americans crossed from the left VC building.  We tried shooting at the German 8-0 trying to cross into the left but nobody could hit the little bugger. On screen left, we tried to allocate just enough troops to top a German counterattack.  It’s getting worrying as the crew who retrieved the PSK tried to fix the AT Gun.  Meanwhile a smoke round from the PzIV stopped us from being able to re-DM the broken Germans behind the AT Gun.

ITR19 The Narrow Front After Action Report (AAR) Advanced Squad Leader scenario

We were now rounding the back of the middle VC building.  One of the Pz IV drove itself INTO it to give us more to deal with.  Germans on the left are rallying on screen left but thank God they hadn’t fix that AT Gun yet.  The Sherman kept shooting at the middle VC building when it should just rammed itself into the last hexes where Germans were crowding.  We were failing to increase our contact area with the enemy!  On screen right, we continued to eat away at the defenders.  A smoke mortar round from the Sherman and a smoke grenade from the Stuart helped it back off from another Pz IV.  Though, trying to put a Cannister round into the middle VC, it malfunctioned its gun.

ITR19 The Narrow Front After Action Report (AAR) Advanced Squad Leader scenario

A Stuart finally woke up to doing what a Stuart does!  It ran from the right, around the middle VC building and send a shot to the back of that Pz IV in the building while on the move (light grey arrows).  It missed by ONE!  That sure made me miss that 10-2 armor leader.  That is what I should have done with Stuarts (and the 10-2 armor leader and Gyro) from the start.  Meanwhile that building seemed to be catching fire rapidly.  A sapper tried to place their DC to one of the German stacks and was shot.  An 8-0 came by, grabbed the DC from the quivering troops and tried to place it, and even he got pinned!  No more help was coming from the Artillery since they seemed to have hung up.  There would be no German counter attack from the left.

The other Pz IV crashed into the right VC and promptly crashed into the cellar.  The US AFVs tried their luck too often and were stuck in the Debris, though they were in good positions.

ITR19 The Narrow Front After Action Report (AAR) Advanced Squad Leader scenario

On the right, we made it to the back of the VC building!!  Hellish firepower poured towards the remaining Germans.  We couldn’t kill them all at the end and we didn’t put a unit on Level 1 to prevent their rout (another lesson here).  In the middle, the Pz IV burned the marauding Stuart.  That Pz IV was in turn killed by an MMG at Point Blank range.  The 10-2 stack wiped out the Pz IV hex but we couldn’t get to the W12 hex and hence we couldn’t fulfil the VC requirement.

The mild breeze kept blowing.

A: Guards Counterattack After Action Report (AAR) Advanced Squad Leader scenario

Victory Conditions

We all know this one.  I want to do an AAR on it because this is the first time I played this scenario since my Squad Leader days.  The Russians win if they get 2 more buildings than they lose of their own initially-held stone buildings and/or have a 3:1 unbroken squad equivalent, in 5 turns.  If you find yourself yelling at your screen here, note that I played an early stage player.  

After Action Report

A: Guards Counterattack After Action Report (AAR) Advanced Squad Leader scenario

For those who are familiar with this scenario, you know most of the setup is ‘predesignated’.  Where possible, I readied myself for those terrorising Russian Human Waves, especially from the mass of 628’s on the left.  

A: Guards Counterattack After Action Report (AAR) Advanced Squad Leader scenario

The Russians decided to neutralise some of the German firepower first with their 18FP per hex firegroup(s) on the left.  A couple of the German units in building F5 broke, leaving parts of it unsecured.  In the middle our 9-2 LMG DeathStar (I7) managed to break the MMG crew!  The action on the right was also intense, with firefights erupting across the streets. There’s a Commissar lurking in the back of the building there. I realized I had a problem—I couldn’t see the back of that building!

A: Guards Counterattack After Action Report (AAR) Advanced Squad Leader scenario

Seeing that the MMG team is down, the Germans in K5 dashed across the street and made it into building J5!  (See top right)  With the LMGs in building K5 (center) no longer watching the street on the left, the 37th Guards seized the opportunity!  The 10-2 struck a heroic pose and nonchalantly waved the mass of 638’s forward in a human wave!  Casualties were considerable, with a couple of KIA’s.  Meanwhile, a lone squad scrambled towards the rightmost buildings (bottom right), trying to get some visibility at the back of building N4 where the Commissar rallied broken units.

A: Guards Counterattack After Action Report (AAR) Advanced Squad Leader scenario

The defenders of building F5 died heroically along with their 9-1.  Hopefully they took a chunk of the Guards with them!  The 8-1 moved his HMG team from the bottom right to the bottom left, anticipating the next Human Wave on building I7 (where the 9-2 and dual LMGs were stationed).  The LMG in building K5 got ready as well.  Unfortunately the Commissar & the 308th Rifles in N4 (right) also looked a little too eager.  Hmm… 

A: Guards Counterattack After Action Report (AAR) Advanced Squad Leader scenario

This next Human Wave struck from the right!  The Commissar led the 308th Rifles into building K5 (center)!!  The fire from building L6 up the street to hex L1 was awesome but one of the Russian units got into building K5 all the same.  The Guards on the left headed towards the 9-2 and the dual LMGs in I7 as well as the left side of building K5!  Casualties were high but this might just get the Russians two more buildings than what the Germans got.  

A: Guards Counterattack After Action Report (AAR) Advanced Squad Leader scenario

When the dust cleared the Russians captured two more buildings than they initially held vs one for the Germans (hence one more).  The Germans counterattacked by dashing the unit from the Russian MMG (building J2) into H2, then advanced to G3 to take the building.  The Germans also moved into building N4 (right) but the Russian brokies were right at the stairwell and could rout upstairs.  Instead of fighting it out in the recently ‘human-waved’ building K5, a HS went to capture M2 from the Russians instead.  

ITR15 Tractor Factory 137 After Action Report (AAR) Advanced Squad Leader scenario

ITR15 Tractor Factory 137 After Action Report (AAR) Advanced Squad Leader scenario

Victory Conditions

It was March 1943 and the SS Panzergrenadiers looked to take 4 factories in 7 MPh’s from the Soviets in Kharkov.  The Soviets had 20 squads & 4 leaders (1 commissar) with 4 AFVs and 3 Guns.  Kindling was NA and the EC’s Wet.  Factory had Roofs and the Russians had 3 Fortified Locations, plus MOL Capability.  The SS had 22 squads (3 of them 838 AE) with 5 leaders (1 10-2), 3 PzIIIL, 1 StuG and 2 Tigers.

After Action Report

ITR15 Tractor Factory 137 After Action Report (AAR) Advanced Squad Leader scenario

As the SS, we didn’t have much time, so we needed to hit all 4 factories concurrently.  At the advice of my opponent, I divided my troops to teams of 20FP firebase plus deployable 548s assault units, with 1 team of DC & FT guys and the 838 AE’s dispersed as the ‘smokers’.  The AFVs were to provide Smoke (didn’t get much), to provide street cover, to neutralise Soviet AFVs, to push to the back row and to finally help breach buildings (Fortifications).  The 2 Factories on the left would be hit head on.  The 2 Factories on the right would be hit head on AND flanked in case we couldn’t push through the front one quickly.

ITR15 Tractor Factory 137 After Action Report (AAR) Advanced Squad Leader scenario

On the right, we pushed across the first street quickly, with the enemy on the flank collapsing.  The Russians had an ATR in the Factory that threatened DI shots.  The Russians did MOL attacks whenever they could in a bit to start fires.  My Tiger with the 9-1 armor leader pushed down the middle a little slowly.  The opposing T-34 got a chance to get in motion.  The resistance in the middle was tougher as well for the infantry.  The Russians had their MGs and their best leaders lined up there, with another T-34 behind a wall.  We edged our Flamethrower team closer to it.  On the left, there were a few Russians on the 1/F designed to mess with my routing (and to waste my time).  Whilst the folks on the left pushed into the street, it’s not without difficulty ‘cause the two blocks on the left were mutually supportive.  My other Tiger slid to the left, the T-34 tried but couldn’t get away.  The one big thing we got going for the SS was their remarkable rallying ability, which was often a 6 while DM’d but in a building, before leadership’s applied.  Our ‘recon by walking around’ found the Russian 76* (not 76L in the following diagram) on the left flank.

ITR15 Tractor Factory 137 After Action Report (AAR) Advanced Squad Leader scenario

That T-34 in the middle that went into motion did a master move: it went to the right and threatened a PzIIIL!  We were relieved when it burned on a lucky CH.  The STuG decided to move over and offer it support nonetheless.  AFVs should never fight alone.  A wandering 548 ‘found’ their 45L that decided it was a worthwhile target.  Our mighty 10-2 led 20FP stack, bolstered by a Hero (20-3!!) moved into a target factory.  The stack moved right in front of a ROF3 45L Gun but it was a risk it had to take.  In the middle the FT folks got shot up and dropped their toys on the street.  The other 76* popped smoke which makes the 2 ‘stacked’ factories on the right harder to take but it did cover us from their MG death stars as well.  The T-34 on the left got chased off (helped by a Smoke round from their 76*) but our AFVs focused on helping our troops cross the street.  We got to the smoking 76*.  Still, there seemed to be too many Russians anywhere!

ITR15 Tractor Factory 137 After Action Report (AAR) Advanced Squad Leader scenario

The Russians never stopped trying for MOLs.  Thanks to the Wet EC, buildings didn’t all brew up in flames!  The nightmare scenario happened: our 20-3 Jedi stack broke under attack from the 45L. The Russians closed in from all directions and a T-34 crashed into the building behind it.  Our 2 AFVs couldn’t kill the offending T-34.  Our teams on the right looked tattered.  The news stunned all the SS troops on the board.   The troops in the middle looked to cross the street intact when T-70 whizzed by on their left.  It stopped behind a PzIIIL but forgot to Bounding Fire.  The targeted PzIIIL spun around.

ITR15 Tractor Factory 137 After Action Report (AAR) Advanced Squad Leader scenario

Our Jedi stack routed up to the Roof but it’s already dead.  The flankers took the opportunity to run down the right.  Unfortunately the Gun on the STuG malfunctioned while trying to shoot the moving (zigzagging?) T-34.  The Tiger in the middle decided to push up behind the T-34 (and over the dropped FT) and German troops went into CC with the same T-34.  Our folks in the middle crossed the street!  Our PzIIIL burned the T-70 on the left.  Our guys were done with that factory (yes, there’s a Fanatic 838 AE) and was ready to move out (it was Blazing up too).  The Tiger went after the T-34.

ITR15 Tractor Factory 137 After Action Report (AAR) Advanced Squad Leader scenario

The STuG fixed its gun in the nick of time and shot the T-34, which tried to move around it through a building.  The flankers on the right gathered to hit the ‘back’ factory building when the STuG then went straight to the back row and started taking shots from their remaining 76* Gun.  The Tiger in the middle started putting rounds into the ‘front’ factory and found a Fortified location.  A PzIIIL went to back it up while an 8-0 dived under it to retrieve the dropped FT.  The teams in the middle was making progress and the teams on the left was moving to the left flank to help them out.  The Tiger shot the T-34 and the AFVs moved to the back row on the left as well.

ITR15 Tractor Factory 137 After Action Report (AAR) Advanced Squad Leader scenario

The Russians were consolidating and getting concealed were possible.  The fact was, I couldn’t stop that nonsense until I break into the Factories!  The STuG’s dueling with the 76* Gun while the Tiger’s sending shots to it from the other side.  Shooting wasn’t going to get rid of the Russians.  We gotta breach.

ITR15 Tractor Factory 137 After Action Report (AAR) Advanced Squad Leader scenario

We didn’t forget about the front Factory on the right.  A PzIIIL moved over, popped Smoke to help people cross the street.  We tried getting into the back Factory but troops broke under the insane firepower from the 8-1 stack.  The Tiger in the middle kept shooting at the 76* Gun and would later CH that hex (bye bye Gun).  Other AFVs moved to the back to prevent concealments.  All the Russans on the left were now squeezed into a Factory by two teams of SS.

ITR15 Tractor Factory 137 After Action Report (AAR) Advanced Squad Leader scenario

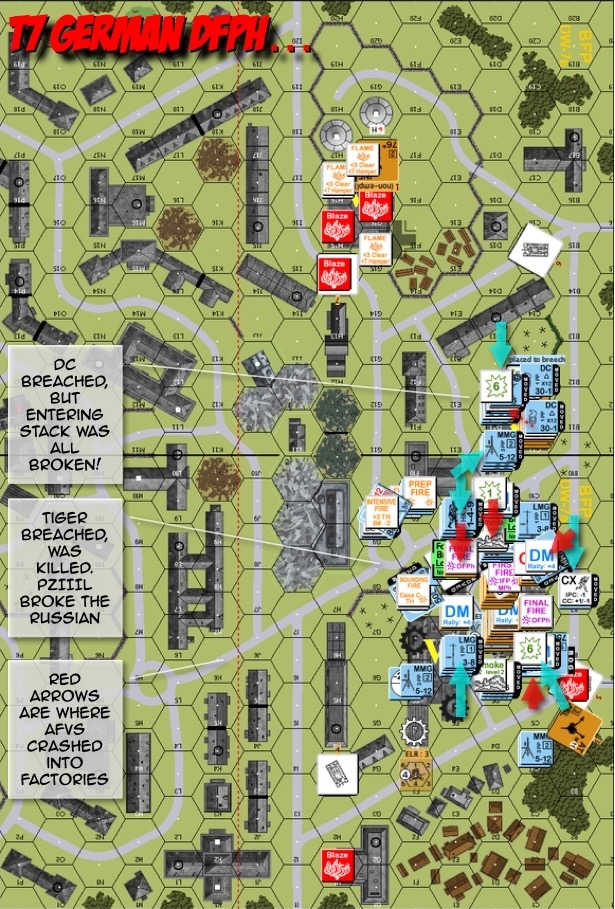
AFV’s crashed into Factories from all directions (red arrows)!  A Tiger was killed and 2 PzIIIL were immobilised, but we should have done this earlier.  We took Factory number 2 (the ‘front’ Factory).  We breached the Fortified location on the left but the Defensive Fire broke all of the assaulters at the breach.  That location would potentially cost us the game.

ITR15 Tractor Factory 137 After Action Report (AAR) Advanced Squad Leader scenario

And it did.  Assault Fire from the unbroken SS stack in the left Factory failed to break the Russians in the Fortified location.  There’s no way we could take all 4 factories.  The SS lost.

ITR14 Between Rockets and a Hard Place After Action Report (AAR) Advanced Squad Leader scenario

ITR14 Between Rockets and a Hard Place After Action Report (AAR) Advanced Squad Leader scenario

Victory Conditions

I played this scenario wrong. 

I misread the victory conditions and played this scenario incorrectly as a defender. However, it’s still an epic scenario.  Just note that I essentially defended while short one tank and two guns.  This is Stalingrad around the Tractor Works. The Germans win by capturing all the (Russian) buildings on the right half of the map AND have 24 “Exit VP” of Good Order Germans on the left half of the map. The Germans also get double EVP’s for leaving the left edge. I was thrown off by the use of the term “Exit VP”, as I thought the Germans HAD to exit. They didn’t. All the Germans had to do was be in Good Order on the left half of the map. The railway in the middle of the map (horizontal) is an Embanked Railway (half height), we put in the ‘funky’ overlay to make it more visible.

Both sides can declare Hand to Hand.  The Russians are Fanatic in Factories and Rooftop are in effect for Factories.  The Germans have a Stuka and the Russians have 120mm Rocket OBA with error DR halved.  

After Action Report

ITR14 Between Rockets and a Hard Place After Action Report (AAR) Advanced Squad Leader scenario

The Germans led with an abundance of Half Squads. They did a lot of searching for HIP’d guns and dug-in tanks, and threatened Hand to Hand with full Russian squads. On the German left, they hit us with a larger-than-expected force (I expected them to have to exit, but they didn’t), and were channeled by the placement of two 8-factor AP mines (which don’t go boom if you come through another building hex). On the German right, the Russian MMG & mortars were laying down long range fire on the attackers, but soon one of the squads in the factory went berserk!  We really couldn’t afford to have our manpower running off.  A particularly good tactic the Germans used was to have Half Squads on the roofs, which stopped most of our concealment. This of course worked well with the Stuka circling overhead.

ITR14 Between Rockets and a Hard Place After Action Report (AAR) Advanced Squad Leader scenario

As more German tanks approached, the Russian HMG stack on the Embanked Railway retreated, but was pinned by the Stuka and later broken by a tank. This left the Russians free to move around the rest of the map in an attempt earlier to draw them away. In an effort to NOT get into HtH with German Half Squads, we kept Vol Breaking and routing away on the Russian right. The Commissar ELR’d half the squads we had him work on, but rallied the rest to keep the fight going. The HIP’d ATR team on the Russian right thought they caught a marauding German HS in the open, but failed to fish out a Molotov! The HIP’d ATR team in the middle had the right idea, but only saw their round bounce off the side of a German tank on the Embanked Railway. If only I had read the VC rules correctly and got my AFVs and guns in front! The MMG in the back field also came into play to protect the Russian right flank.

ITR14 Between Rockets and a Hard Place After Action Report (AAR) Advanced Squad Leader scenario

The Russian MMG on the left broke for a while, but was fixed. Then position was smoked and the MMG Squad went berserk! The mortar crew had to drop their toys and move over, as did one of the squads on the Russian left. All the while, the Russians moved back to cause the Germans more delay. The Vol Breaking with your “friendly” Commissar tactic somehow worked on the Russian left, but we had to feed the Stuka tempting targets before the rest of the team could move freely. My HIP’d (and Dug-In) tank forgo’d some infantry targets (and I shouldn’t have) – see green dotted arrow. Meanwhile, the Germans were in no hurry, trundling slowly towards the left half of the board. The Russians held back their famously inaccurate rocket OBA until they had less to lose than the Germans (and kept the Germans honest).

ITR14 Between Rockets and a Hard Place After Action Report (AAR) Advanced Squad Leader scenario

Since our HIP’d Dug-In tank forgo’d a couple of juicy infantry targets, a German tank came down the road on the Russian right to FTR our guys.  “AH HA!” the Russian tank crew went, looking at the side shot and the Russian tank promptly malf’d its gun.  The ATR a Russian 7-0 held onto did nothing with the Point Blank shot either.  Seeing that, the Russians threw their DC at the German 8-1 stack but succeeded in breaking itself instead.  (Story of my life.)  The Russian right still had a line but was obviously letting too many Germans on the left half of the board (once again, read the VC wrong).  We spotted a big German 9-2 stack in the open and we decided to chuck in the Rocket OBA.  It didn’t land on us but it didn’t land on too many Germans on the left half of the map either.  We broke the 9-2 stack and killed a tank (the other Bogged a while back).

ITR14 Between Rockets and a Hard Place After Action Report (AAR) Advanced Squad Leader scenario

We couldn’t fix that tank gun whilst the German tank still had its side to us!  We went into CC, now that we realised our VC mistake and that we had less to lose in HtH.  The concealed Russians on the Russian left advanced into a big German stack happily and got Ambushed and killed instead!  The folks on the Russian right fared better but didn’t kill enough Germans to make a difference.

ITR14 Between Rockets and a Hard Place After Action Report (AAR) Advanced Squad Leader scenario

As we look at the start of the last German turn, there were too many Good Order Germans sitting on the left half of the map for the Russians to make a difference.  We conceded.  This picture is just to show the other HIP’d Russian units we took out of the game because we read the VC wrong.  I bet Germans would be in more of a rush and won’t search concealed terrain so thoroughly as they exit towards that latter part of game.  Of course, they didn’t need to exit.  Anyway, will read VCs better going forward.  

FT110 PT-59 (PT-109) After Action Report (AAR) Advanced Squad Leader scenario

FT110 PT-59 (PT-109) After Action Report (AAR) Advanced Squad Leader scenario

Victory Conditions

The scenario was originally titled “PT109,” but the designer recently clarified on a GameSquad thread that one of the PT boats involved should have been PT-59, which was commanded by the future President John F. Kennedy.

The Marines were racing through the jungle in the Solomon Islands towards the river. They had just blown up an IJA fuel and ammo dump and were running towards their extraction point with Japanese shipping clerks in pursuit. This is a rare ‘seaborne evacuation’ scenario. The Marines win immediately by exiting at least 12 EVP along the bottom of the map in 8 turns.

The Marines has a ‘Beach Guard’ who will call in the Landing Crafts when they hear gunfire on/after Turn 2. Two US Navy PT boats will come in to help out on Turn 5.

The IJA has a dozen squads entering on Turn 1 and a party entering anywhere on the left and/or the right of the map on Turn 2.

After Action Report

FT 110 T2 IJA DFPH

A platoon of IJA went directly after the retreating Americans on the hill, while the rest of them ran straight ahead towards the shore. The IJA deployed as much as they could, in light of US firepower. The IJA reinforcements went straight to the river shore to flush out the HIP’d Beach Guards and that they did.  The beachgoers on the right rammed straight into an American ambush and lost 2 HS’s. The waiting landing crafts added to the firepower.

FT 110 T3 IJA RtPh

The foot race between the Marines and the IJA shipping clerks continued.  Some of the clerks made the mistake of assembling their knee mortars (and getting delayed) when they thought they need smoke cover but the Marines were really just interested in making it to the water’s edge.  The surviving IJA at the river shore routed the Beach Guards but the guards managed to call the landing crafts in.  The landing crafts came to shore and fired on the clerks stopping at the tree line.  The IJA looked for good positions to setup their mortars, as they would be the biggest threat to departing landing crafts.  

FT110 PT-59 (PT-109) After Action Report (AAR) Advanced Squad Leader scenario

The Marines & the IJA were both at the treeline!  One of the IJA mortars was already pumping out rounds behind the marsh.  BOOM!!  First damage to one of the landing crafts!  

FT110 PT-59 (PT-109) After Action Report (AAR) Advanced Squad Leader scenario

Whilst the IJA were assembling at the treeline, they didn’t have a clear shot to the water’s edge.  The Marines took the opportunity to voluntary break and routed into the waiting landing crafts!  The two PT boats arrived and provided overwhelming firepower to cover the evacuation.  They had twin .50 cals (16FP) on each side which could both fire through the stern (hence the two PT boats backed into ‘Beaching’).  The IJA could literally feel vegetation getting ripped apart around them!

FT110 PT-59 (PT-109) After Action Report (AAR) Advanced Squad Leader scenario

The IJA surged forward to get better shots at the departing landing crafts!  It’s now a matter of whether the unbreakable IJA sink a couple of the landing crafts with three mortars and an MMG before they wear down to nothing by American firepower.  It’s pretty nerve wracking for the two of us as the Marine OB was bundled up into three neat targets!

FT110 PT-59 (PT-109) After Action Report (AAR) Advanced Squad Leader scenario

The American PT boats remembered their Smoke Layer ability!  (First time MGB players, us two.) A smoke screen went up to shield the boats from three mortars and an MMG.  Some shots landed but apart from reducing some of the passengers, we couldn’t sink any of the landing crafts.  The Marines got away!

FT109 Hitler’s Lost Iron After Action Report (AAR) Advanced Squad Leader scenario

FT109 Hitler’s Lost Iron After Action Report (AAR) Advanced Squad Leader scenario

Victory Conditions

This is the first of a series of thrilling Motor Gun (Torpedo) Boat scenarios that are part of LFT St Nazaire, reflecting action around the world. The ocean’s at level 0, so a beached MGB, bristling with weapons, poses an exciting situation for garrison units with a taste for adventure. All houses are wooden and ground level only apart from the building at the top left that’s highlighted in orange. These MGBs have 14PP rubber rafts to ferry tourists to shore, but if MGBs are willing to risk going aground in the shallows, they can unload directly onshore.

This was Norway 1943, and the Norwegians were conducting a Commando Raid at Strød Island. As such, their 8 morale was fanatic on Ocean-Hinterland hexes. They win in 6.5 turns if they can successfully exit two DCs toting 338s via the space marked on the top of the map with the British roundels.  There’s a +1 LV and Moderate Mist to help those on the move.  

The Strød Island Garrison, who must have thought they pulled a nice assignment on the island in 1943, were 8 2nd-line half squads with 2 LMGs. Plus they had a pair of 105mm ART guns on the stone pier that the Norwegians already knew about!

After Action Report

FT109 Hitler's Lost Iron After Action Report (AAR) Advanced Squad Leader scenario

I pointed my 105mm guns each to a side.  The +1 LV hindrance and the Moderate Mist will at least a +2 to all shots.  However, if they hit, the Norwegians run the risk of drowning half their OB.  So I didn’t think they would come up the middle where the gun(s) need to make a +3 turn to shoot (a flat shot in reality since the boats were -3 targets).  My weak OB and the the MGB’s awesome firepower convinced most of the German Garrison to stay away from LOS to the waterline.   

Act of Valor movie

I had most of my garrison on the left of the map.  I figured the right of the map wasn’t as easy to get through, plus it was more of an Open Ground for commandos to cross from there to the exit space.  I had both of my LMGs and a 7-0 in the middle of the map as a backstop.  They had a stone wall that shield them from those MGBs but turned out the hindrances from Moderate Mist kept them well protected anyways.  

FT109 Hitler's Lost Iron After Action Report (AAR) Advanced Squad Leader scenario

As I suspected, the pair of MGB crashed into shore right away and offloaded their commandos!  My 105mm fired but missed (LOS blocked and Gun malf’d).  One of the MGBs went aground (loud expletives) with a Gun tagging on Acquisitions, a gunfight ensured.  We got a hit but couldn’t get an effect apart from claiming one HS.  Since the commandos went ashore, the Germans wasted no time running backwards from the shore.  

FT109 Hitler's Lost Iron After Action Report (AAR) Advanced Squad Leader scenario

Whilst the right 105mm and the stuck MGB traded shots, the left MGB went for the stone pier since the Germans couldn’t fix the right 105mm.  At 4 hexes, a torpedo splashed into the water and scored a direct hit on the pier!!  Both guns disappeared in a shower of rocks.  

FT109 Hitler's Lost Iron After Action Report (AAR) Advanced Squad Leader scenario

With half the MPh’s left, the Norwegian on the left made it to the top of the map.  The Germans fought to stay in front of them, with the LV & the Mist helping both sides.  One of the LMGs in the middle thought they would go to the big wooden building to help but quickly realised that the battle would move too fast for that.  One HS and three dummies on the right would keep the other half of the Norwegian OB delayed.  Meanwhile the two MGBs tried to find useful purchases.  The hindrances made it impractical to shoot at that distance.  They were there largely to strip German concealment.  

FT109 Hitler's Lost Iron After Action Report (AAR) Advanced Squad Leader scenario

The ‘VC’ stack on the left, with a leader and two DCs toting 338s, was almost at the end zone! The Germans made a dash for it too, with their LMG’s moving into place. The Norwegians on the right moved freely as well, since it was clear that most of the German garrison were on the left. We had to keep any DC toting 338’s at bay for two MPh!!

FT109 Hitler's Lost Iron After Action Report (AAR) Advanced Squad Leader scenario

The left VC stack was 2 hexes from the exit.  The German garrison crowded up that space.  However in the meantime, the right VC stack arrived at the scene.  

FT109 Hitler's Lost Iron After Action Report (AAR) Advanced Squad Leader scenario

There was a lot of movement and loud bangs, but when the action subsided, the Norwegians were still on board! An attempt on the left was thwarted for now, but the Norwegians were still in the thick of it! The right VC stack got closer to the exit, and things were really heating up! 

FT109 Hitler's Lost Iron After Action Report (AAR) Advanced Squad Leader scenario

The Germans made a valiant effort to stack up their two LMGs, but it was for nought. The Norwegians on the left were stopped, but they got the right VC stack off the board! What an incredible game!

Tenor

ITR13 To the Last Bullet After Action Report (AAR) Advanced Squad Leader scenario

ITR13 To the Last Bullet After Action Report (AAR) Advanced Squad Leader scenario

Victory Conditions

This is the summer of 1942 and the Germans are on the march! They’re looking to clear the NKVD headquarters at Rostov.  They’ll win in 8 turns, if they control both buildings K8 and L12.  You can see the two buildings marked with big yellow ‘V’s on the map.

The Russians have eleven 8 morale squads, mostly 628’s, so they’re ready for the fight! These are supported by a 10-0 commissar and a 9-1 plus an 8-0. They come with four Fortified Locations, twenty Mine Factors, an ATR, a MMG and a Flamethrower. The Germans have sixteen squads, four of them 548 with 3 smoke. They have 5 leaders with a total of -4 modifiers amongst them, four MMGs and 4 tanks. I knew these buildings would take forever to clear, but I was excited to see how quickly my squads could work together to overcome the challenge.

After Action Report

ITR15 TO the Last Bullet After Action Report (AAR) Advanced Squad Leader scenario

The Germans were situated directly across the street. We spotted a rout trap protecting the top (west) building and so we decided to focus our forces on the bottom (east) building. We wanted to get behind these two buildings as well because if the Russians get to rotate concealed units out, we would never win this battle. For the time being, we would ignore but isolate the three Russian stacks in that building on the top of the Russian deployment. We had four MMGs distributed between the 9-1 and the 9-2 stacks as deathstars to support the assault troops moving across the street. The 548’s would provide smoke (& close up assault fire) and the 467’s would deploy where possible. We would have to note the hexes the Russians step into if we want to avoid the mines. They would undoubtedly withdraw into the top victory building (west), so we’ll have to be quick!

ITR15 TO the Last Bullet After Action Report (AAR) Advanced Squad Leader scenario

In a stunning turn of events, the Russian flank guard melted away in an unexpected blaze of glory (a break and then Fate). The Deathstars tried to stop the Russians from moving up to the middle and the top building. We were moving troops to the left (south) side of the buildings, and it was going great! The four tanks arrived on the scene, ready to provide smoke and armour cover to those crossing the streets. We made it through the first of the Russian fortified positions! There were three more to go!

ITR15 TO the Last Bullet After Action Report (AAR) Advanced Squad Leader scenario

The Russian 10-0 commissar kept putting brokies back in circulation, which was a great move! We had to move the AFVs to put a stop to the unacceptable situation. One of the AFVs moved too close and got destroyed (fine, I wasn’t paying attention), though it became a nice crossing point. The Germans blew through the second Fortified location, yeah! The deathstars started moving to support the attack on the top (west) building, although I have to admit, I wasn’t covering them from Russian sniper well.  At this point in the game, both the Russian ATR and the flamethrower malfunctioned, which was a real shame.

ITR15 TO the Last Bullet After Action Report (AAR) Advanced Squad Leader scenario

We had no choice but to stack ourselves up to the often 12+3 or more firepower from Russian 628’s.  We had to keep up the pressure!!  The 9-2 broke trying to organise his men at the new deathstar position.  An 8-1 dived through his own lines and tried to deliver a DC to the Russians, he got killed for his efforts.  I had to move a wounded 7-0 to that center building to keep the attack going.  There’s a Russian 9-1 nursing a broken MMG on the corner of the last VC building.  We had to move the AFVs in to mess with that rout as well.  

ITR15 TO the Last Bullet After Action Report (AAR) Advanced Squad Leader scenario

We got the Russian hemmed into a corner of the top VC building! The two Russian leaders are in the hex with the last Fortified Location, and they’ve got all the brokies! The tank I dispatched to keep the brokies away from the Russian 9-1 was killed by a LMG from the 8-0 stack we tried to isolate in the building at the top of the Russian layout. But that just made the rest of us more determined to get the job done! In a bold move, they then tried to dash across the street to join the fight! Unfortunately, they got pinned in the street, and I sent a tank through and overran the stack! My 9-2 was shot by the Russian sniper, but that allowed his machinegunners run across the street to help! It was after the German AFPh that the Russians finally gave in in disgust.

I think the one thing this scenario taught me is to target one bit of the puzzle at a time and focus all your firepower, assault troops and AFVs on it.  It’s basic tactics but it’s one that I failed to get my head around in execution till now!  On the otherhand, this seems to be a scenario that’s tilted to the German side.  Perhaps those of you who played this will share your thoughts?

CH97 Final Crisis at Blackpool – Advanced Squad Leader AAR

CH97 Final Crisis at Blackpool – Advanced Squad Leader AAR

Scenario Background

It’s 24 May 1944 near Namkwin, Burma.  “Blackpool” was the hill in the scenario that served as a blocking position against the Japanese.  The 111th Indian Infantry Brigade constructed an airfield against it.  However on this day in the Monsoon rain, the IJA cut inside the perimeters of Blackpool.  Elements of the King’s Own Royal Regiment, the King’s Scottish Rifles and the 3/9th Gurkha Rifles mounted a counterattack in the torturous terrain, dense jungle and heavy rain.

Physical Map of NamkwinPhysical Location Map of Namkwin
Physical Location Map of Namkwin
Physical Map of Namkwin

Victory Conditions & Tactical Considerations

The IJA wins at game end if they have Good Order units who can lay down >= 4FP on the Flooded Pool you can see on the top right of the game map.

IJA 01The IJA starts in two groups.  The first group of 6 squads setup in the airfield (no Smoke in the rain) in the face of a 75* Artillery, a murderous Bofors AA (IFE 8 ROF 2) and a leader who can make it rain 70mm OBA.  The second group of 9 squads setup on the east side (lower side on the map) of the hill.  To counter that group, the King’s Own Royal Regiment and the King’s Own Scottish Rifles setup on the hill top.  A group of Gurkhas setup within 3 hexes of the Flooded Pool.

The IJAs in the airfield have a short trip over Open Ground, barely protected by the falling rain drops.  So I had them spread out as much as possible.  The biggest task was to guess at where those ordnance were.  Their task was to not have British ordnance shooting at the back of the group of IJAs making their way up the hill.  The group of IJAs on the hill had a tough time ahead of them still.  Going up the hill is 5MF per hex.  Unless they were with a leader, that would make them go CX, which of course prevents them from Advancing further.  Of course, if they managed to go 1 hex per turn they would theoretically make it to the Bamboo on the west (top) side of the hill.  (Note: going downhill is 3MF, but there are Abrupt Elevation Changes which takes 5MF.)

On the other hand, there were concealed Scotsmen on the top of the hill and Gurkhas moving up the path.  Being CX’d wasn’t the best thing to do, considering concealed Scotsmen would get -1 vs 0 on the CX’d IJA’s on Ambush rolls (+1 for non first line troops).  Concealed Gurkhas would do -2. (Assuming the CX’d IJA would get advanced on.).

I thought about having a band of IJA making an end run around the hill long the path on the left, but they won’t come into play until Turn 3 or after.  I set that aside as an option.

Advanced Squad Leader AAR

CH97 Final Crisis at Blackpool After Action Report (AAR) Advanced Squad Leader scenario

The Bofors went on a rate tear and wiped out half the IJAs (and their 8-0) down at the airfield.  As a matter of fact, it tore up folks on one side, turned CA and continued to tore up folks on the other side!  Their 7-0 got so emboldened that he ran out with his radio to get a better view of the IJAs going up the hill.  The 75* ART came out on the left and shot at the IJA coming down the field.  That prompted one of the squads from the hill to come down behind to help kill the crew.  We killed the gun as well so as not to have a gun shoot us in the back later.  The folks on the hill started to head up the path on the left, pushing some of the concealed enemies to respond.  We hoped to get into the jungle before the Indian units in the airfield free themselves up.

CH97 Final Crisis at Blackpool After Action Report (AAR) Advanced Squad Leader scenario

The Gurkhas went up the west side of the hill path and really started shooting the IJA up with their heavy inherent firepower (12 pointblank!), HMG & MMG.  Heavy Rain started which gave an addition +1 to the Dense Jungle’s +2 but the IJA forces kept shedding away.  The Scotsmen on the left came into contact with IJA units and gave the CX’d IJA units an excuse to Banzai up another level!  We needed to hit the Scotsmen on the flank quickly before our troops melt away like ice cream.  Down in the field, we decided against making an end run around the hill but instead, move to tie down the Indian assets in the airfield.  The Brit with the radio went into the Jungle after an IJA brokie, so we went after him and send a squad after the Bofors, which decided to move into the airfield for a better shot up the hill.

CH97 Final Crisis at Blackpool After Action Report (AAR) Advanced Squad Leader scenario

It’s Turn 4 and we were getting shot up at every fire phase.  This could not be allowed to continue!!  The Commonwealth troops were in contact still, so we triggered off 2 Banzai’s to propel IJA forces up the hill.  The Commonwealth line was still holding.  Three more MPh’s to go and their HMG/ MMG teams were still intact.

Down at the airfield we caught and killed the radio guy (no OBA!), meanwhile the Bofors moved further into the airfield.

CH97 Final Crisis at Blackpool After Action Report (AAR) Advanced Squad Leader scenario
The Commonwealth forces got smart and studiously avoided contact with our folks, so as not to trigger off more Banzais.  At this point, I was pretty sure the defenders had more people than we do.  We kept their brokie stacks under pressure but continuing to bash ourselves up against the Gurkha wall didn’t seem viable at this point.  Things were not going well, the Indian troops even ambushed and killed our mortar team and stole our toys – the NERVE!  Our folks at the airfield rushed up the hill in a bid to keep some of the Commonwealth forces on the airfield (east) side of the hill.

We realised however, that we didn’t have to get up close.  We could bring our MMG/ LMG to the right side down the road and hit that pond (Flooded, hence at Level 0) with 4FP from a distance!  (Credit goes to my opponent.  We have been playing regularly for years.  He’s the smart one.)

At this point, I told the scenario designer – Joe Leoce – that the IJA’s getting wiped out and that the Gurkha HMG & MMG were still there.  He answered “you know where they are”.

CH97 Final Crisis at Blackpool After Action Report (AAR) Advanced Squad Leader scenario

We started to slide towards the left with our 2 leaders escorting our MMG & LMG squads.  Other full squads piled in as well but half squads stayed on the ridge (abrupt elevation in a lot of places) to screen the Commonwealth off.  We maintained a continuous line so as to threaten a massive Banzai.  Some of the enemy forces filed down the hill path, looking to shoot us down on the road no doubts.  We stripe but not break so we should be okay but hey, that’s what half of the dead on the airfield thought.

CH97 Final Crisis at Blackpool After Action Report (AAR) Advanced Squad Leader scenario

We moved onto the road with our 2 leaders.  The Gurkhas opened fire in their last Prep while our folks closed their eyes and cringed!!  They wounded the 9-1 and striped the crew but the MMG remained operational.  With 10 FP on the pool, the Commonwealth conceded.

How is this scenario interesting?

We got tired just thinking of the 4 level hill, the Dense Jungle and the Heavy Rain!!  Both sides battled the terrain as much as each other.  As unforgiving as the terrain was, once you are committed to one course of action, there’s hardly any turning back.  Sure, playing against the IJA can be nerve wrecking but so’s the IJA player’s need to manage his rate of attrition as the turns roll by.  Putting the Gurkhas on the field also give the IJA something to be scared about.  I think this scenario showcases the best elements in the ASL PTO experience.  The IJA 28 vs Brit 25 scoring on ROAR suggests I am not alone.

This is a great scenario done by a talented designer no doubt: Joe Leoce.  I met Joe back in 2014 when I dropped by the Albany tournament for a day.  He took such great care of me that it shaped how I feel about the whole global ASL community to this day.  Here’s a video I cut from that beautiful day:

Bishop: Stop and Go Traffic: A Synopsis


Royalty free HD Battle of the Bulge photos | Pikrepo

Author: Jim Bishop

Recently, players have posted questions surrounding Moving, Motion, Starting, Stopping and how these interact with C6 Target-Based To Hit DRM. These questions appear cyclically and I can recall answering them for as long as I have played ASL. Much of the information in this article appeared in Ole Boe’s Stop and Go Traffic article which originally appeared in the ‘96 ASL Annual. These old Annuals are available as PDF files or can be picked up used, through all the usual outlets. I highly recommend you read the original as it is still informative but for those who can’t, I offer this summary of that article here.

Moving and Vehicular Target:

To properly apply all the DRM it is important to first understand the difference between Moving and Moving Vehicular Target. Moving Vehicular Target, sometimes referred to as Moving Target, is defined in C.8. Any vehicle currently in Motion is a Moving Vehicular Target. In addition, any vehicle which starts ITS MPh in Motion, has entered a new hex, or bypassed a new hexside in its current hex during ITS MPh is a Moving Vehicular Target during Defensive First Fire or Final Fire. The key here is the vehicle either started in Motion or has moved to some new position on the board.

Moving is slightly harder. Not only is it not defined in the Index, it is never well defined in the ASLRB. In ASL, Moving means the unit is currently conducting ITS MPh. There can only ever be ONE moving thing. That thing can be a single unit, multiple units moving as a stack, a Human Wave or some other Impulse-based movement, etc. The unit or units actively spending MFs/MPs are Moving regardless of how many units are doing it or if they successfully use the MF/MP(e.g., failed Smoke Attempt DR/dr). Even though Moving, a unit which doesn’t spend MP/MF’s cannot be fired upon unless they actually spend the MP/MF. The closest the ASLRB comes to stating this is in A8.1: “… The portion occurring during the enemy MPh is called Defensive First Fire and can be used only vs a moving unit(s)…” It would eliminate a lot of player confusion if such a key concept was in the Index.

Stopped and Non-Stopped:

The Index defines a Non-Stopped vehicle as one which has not expended a Stop Movement Point (MP) since its last Start MP expenditure during ITS MPh. This should sound a lot like the earlier definition of Moving. That’s because it is. A vehicle can only ever be Stopped or Non-Stopped while it is conducting ITS MPh, i.e., Moving as defined earlier. Knowing what Non-Stopped is, we can surmise a Stopped vehicle is one which has spent a Stop MP or somehow become Immobilized/Bogged while Moving. This is covered in C.8.

Motion Status:

A Moving vehicle, i.e., one conducting ITS MPh, cannot be in Motion status. It is either Stopped or Non-Stopped. A vehicle which ends ITS MPh without spending a Stop MP is covered with a Motion counter to reflect its Motion status and is treated as a Moving Vehicular Target. A vehicle which begins ITS MPh covered with a Motion counter has the counter removed and the begins ITS MPh as a Non-Stopped, Moving Vehicular Target. A vehicle not covered with a Motion counter begins ITS MPh as a Stopped, non-Moving Vehicular Target.

From all of this, it should be clear a vehicle can be Stopped but still qualify as a Moving Vehicular Target. Conversely, it is possible a vehicle can be Non-Stopped and not qualify as a Moving Vehicular Target. A vehicle under a Motion counter is ALWAYS a Moving Vehicular Target. In all cases, Moving, Moving Vehicular Target, Motion, and Stopped/Non-Stopped represent different states. Understanding those states along with a careful perusal of the various charts will make it easier to correctly apply DRM when the time comes.

With this as background, we are ready to explore how all these rules interact and how they are properly applied. Knowing the correct application of these DRM is among the first steps to better combined arms and AFV play. Onward.

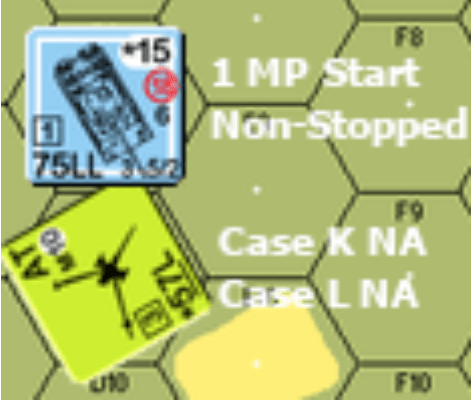
EX 1: An AFV begins ITS MPh NOT in Motion and spends 1 MP to Start. This AFV is now conducting ITS MPh (i.e., it is Moving). Since it spent a Start MP it is now Non-Stopped but not yet a Moving Vehicular Target. Looking at the C6 Target-Based TH DRM Table, we see Case L would be NA (the AFV is a Non-Stopped target). Additionally, Case J would be NA (the AFV does not qualify as a Moving Vehicular Target). For the purposes of CC Reaction Fire or CC, the AFV is Non-Stopped so a +2 DRM would apply (A11.51). If the AFV survives all in-coming fire on the Start MP, it may enter a new hex or bypass a new hexside. Once it has done this, it qualifies as a Moving Vehicular Target, but not before. This has some serious implications. If you start for 1 MP and change the VCA 2 hexspines before entering a new hex or hexside, that would be three potential shots before Case J DRM applied.

EX 2: An AFV begins ITS MPh in Motion. As it is conducting ITS MPh, the Motion counter would come off and the AFV is considered Non-Stopped and Moving (i.e., conducting \ITS MPh). All fire against it during Defensive First Fire and Final Fire suffer Case J DRM. If it spends 1 MP to Stop, it becomes a Stopped vehicle but would still be considered a Moving Vehicular Target. As such, Case J DRMs would still apply but Case L could now also apply making it possible for an AFV to be both Point Blank and a Moving Vehicular Target. Also, once the AFV becomes Stopped, there is no +2 DRM in CC/CC Reaction Fire against that AFV even though it is still considered a Moving Vehicular Target.

EX 3: An AFV is covered by a Motion Counter outside ITS MPh. Case J would apply to all shots as the AFV is a Moving Vehicular Target. Case L would be NA as the AFV is In Motion. All CC would suffer a +2 DRM for attacking an AFV in Motion. The AFV is Non-Stopped.

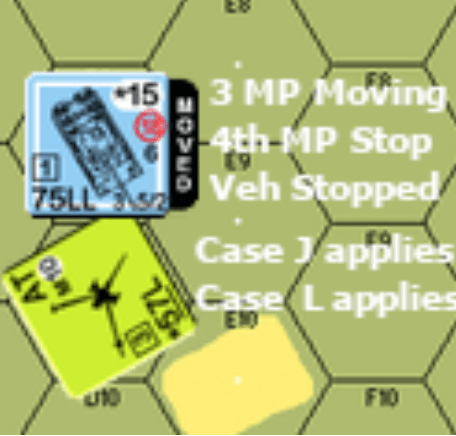
EX 4: This is an extension of EX 2. The AFV survives all fire on the Start MP and moves 3 MP to a hex adjacent to an enemy AFV. Surviving all incoming fire, the AFV Stops for 1 MP. The enemy AFV could shoot at the Moving AFV. If it does so, it would pay +2 Case J but also qualify for a -2 Case L since the Moving AFV is now Stopped having spent a Stop MP.

EX 5: An AFV starts adjacent to an enemy AFV. The Moving AFV spends 1 MP to Start. The enemy AFV elects to shoot. It would not qualify for Case L (the target is Non-Stopped) but it would also not be hampered by Case J as the target does not qualify as a Moving Vehicular Target yet.

I have not covered Motion attempts in this briefing but from the last few examples you should be able to extrapolate how powerful it can be to save your AFV. If an AFV is being attacked by an enemy, making a successful Motion attempt instantly qualifies your AFV for Case J and negates any potential for Case L, a +4 DRM in favor of survival. Combine this with a free CA change as part of the Motion Attempt and you can point your thickest armor to the threat. In your friendly fire phase, freely change your VCA to point in a direction where cover is hopefully available, saving the AFV from destruction.

I hope this brief article is useful and if you find any errors, please let me know and I will correct them. Thanks and go read Stop and Go Traffic. It’s worth your time. — jim

(Carried with Jim Bishop’s permission)

Original posted here : https://jekl.com/2021/09/09/stop-and-go-traffic-a-synopsis/

BFP21 Ripe for the Picking After Action Report (AAR) Advanced Squad Leader scenario

BFP21 Ripe for the Picking After Action Report (AAR) Advanced Squad Leader scenario 

Scenario Background

This was July 26 1944 in Marigny, France.  The Americans needed to capture Marigny (apart from St Gilles) so as to enter the exploitation phase of the campaign.  Combat Command B, 3rd Armored Dvision, met the SS Panzer Division 2 “Das Reich” and Infantry Divison 353 outside of Marigny.

US 3rd Armored Division353rd German Infantry Division

Combat Command B 3rd Armored Division & German 353rd Infantry Division.

Memorial Cobra @ Marigny today

This is the Memorial to Operation Cobra that stands in Marigny today (credit : Google Earth)

Victory Conditions & Tactical Considerations

As the Americans, I needed to kill or move 100 VPs  through 3 boards from the top of the map to the bottom.  Halftracks must have a functioning MA (AAMG) or a passenger to count as Exit VP.  The top two boards are Bocage country and it’s real easy to lose time there.  Good thing the Germans were spread thin and I got 4 Culin cutters to help with landscaping.  The fastest way would be to run straight through the village but the Germans had two roadblocks to counter that.

I had two groups of units: The left group with 6 Shermans and 6 halftracks, one of which sports 2 x .30-cal 1 x .50-cal with 12 FP, the other a bazooka (M3A1).  The right group with 3 x M5A1’s, 2 x M8 HMC (SP howitzer) and 8 x halftracks (2 with bazookas).  The right side seemed to have a more open country but they carried less anti-tank assets.  On Turn 6, 2 American FB’s came into play, shortly after 4 x Pz IVH’s & a “Stummel” rushed in bearing flowers & fruit baskets.

My plan was to have the two groups stay apart at least until they reach the bottom map and not let the Germans converge.  I would avoid the road and built up areas in general.  I had the numbers to swarm whoever came our way.  Although with my numbers came traffic control issues.

After Action Report

Advanced Squad Leader BFP21 Ripe for the Picking After Action Report (AAR)

We were off to the races here.  The left group shot through an area where they thought they would be safe from a PaK.  The pair of Culin cutters worked in tandem.  A marauding halftrack dropped off its passengers by the roadside, skidded off to the middle of the map and spotted the first roadblock!  On the lower left, dismounted infantry took on a lone defender while its ride continued on and cut off all chances of escape.  The right group got itself tangled up in a perfect jam in the Woods while its cutters worked frantically to make a hole.  Vehicles stayed behind the bocage as they heard rumours of the other PaK covering the area.

In a surprising turn of events, all Pak related uncertainties were resolved when both PaKs popped out of HIP with their crews tugging them down south towards the bottom map!

Advanced Squad Leader BFP21 Ripe for the Picking After Action Report (AAR)

We were at the midpoint of the game.  Two halftracks in the left group caught up with the PaK in the Orchards on the bottom board!  They used their small size and speed to distract and to overrun the Gun!  We knew the Germans would show in Turn 4 and some of our elements were too far forward but the opportunity was too good to pass up.  A Sherman ran forward to help but sure enough, it was killed by a pair of PzIV’s coming in.  Tanks always operate in pairs.  My tanks get killed every time I violate that doctrine.  I thought about using that Sherman to overrun the Gun itself to take it off the board but I didn’t.  Had I done it, I wouldn’t have to fight SS troopers for the gun in the next couple of turns – another mistake.

The right group broke through to the middle map and was held up by the threat of PFs inside bocage country.  Their lack of anti-tank assets was a problem and we were hugging the last set of bocages before the Germans show on the other side of those hedgerows.

Germans in the meantime were in full retreat from the town.  The bocage protected road down the middle provided the perfect passage.  An HMG was last seen moving along.  I got to go stop that nonsense.

An M5A1 light tank and other vehicles of the 4th Armored Division An M5A1 light tank and other vehicles of the 4th Armored Division, VII. Corps, pass through the wrecked streets of the town of Coutances, north-western France; 1944. Advanced Squad Leader scenario BFP21 Ripe for the Picking After Action Report (AAR)

With the PzIV’s in position on the left, I didn’t want scoot all my Shermans out on the same side, plus I gotta give the dismounted troops (bottom left) some help.  We needed to get and/ or destroy that PaK gun! The SS dismounted as well.  It’s going to get busy.  I exited one of my halftracks for the points and another went off to the side.  On the right, my guys pushed through the house and were getting into the Woods while the AFVs were getting away from the PzIV’s and threatening to come off the middle instead. At least we dealt with the German 9-1 team that was blocking the way.  We also had a pair of Shermans migrating from the left side to help with the anti-tank deficit.  The Germans got the remaining PaK inside that house in the middle though.

M8 HMC, 3rd Armored Division near Marigny, France (July 28 1944) A company of M8 75mm HMCs (not a battery) from the 3rd Armored Division takes up firing positions near Marigny, France on July 28.   Advanced Squad Leader scenario BFP21 Ripe for the Picking After Action Report (AAR)

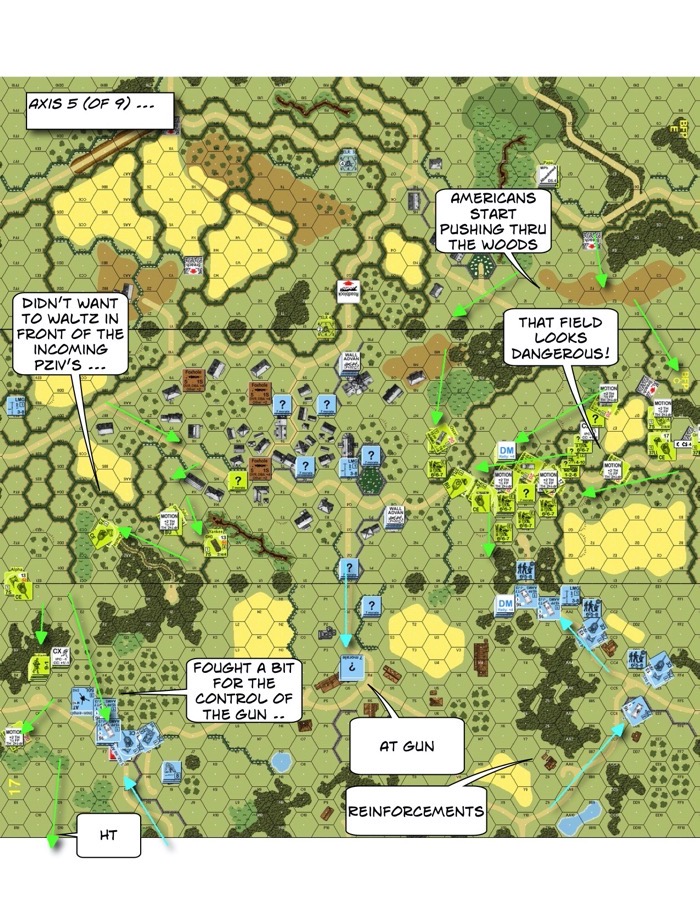
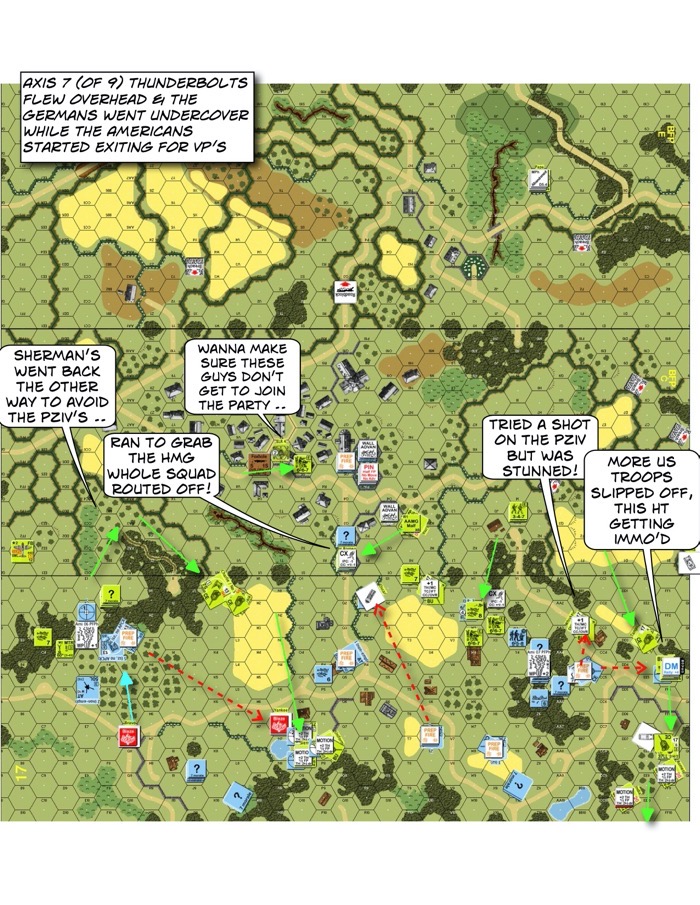
It’s Turn 7 and the Thunderbolts were in!!  The Germans had very smartly hid their people in the Orchard on the left and in the Woods & Grain fields on the right.  The M8 self propelled howitzer was vulnerable to the SS firepower but proved itself useful by getting a WP round off into the woods.  To the left, troops in the Woods made an attempt on the PaK but failed.  They did manage to rout off the SS though!  They then moved in to mess with the PzIV’s.  A pair of Shermans whipped back to the middle while other AFV’s made for the gap in the woods.  One got hit and bursted in flames, probably a good thing for the rest.  Towards the middle, the Americans managed to break the HMG team that was toting it along and another squad raced to pick up the toy before the Germans did.  A mounted halftrack raced in, tried to get a squad close to that AT gun but was shot by the German SP gun via a LOS beautifully threaded between a couple of houses. I shouldn’t have stopped there!!  Another squad stayed up in the middle board to limit the number of Germans who could join the party down south.  To the right, an M8 raced into take a shot at the PzIV in the Woods but was stunned by the enemy infantry instead.  Meanwhile a number of vehicle slipped off the side.   Two more turns and a lot of our vehicles were in range to get off the board.  The fighter bombers were definitely slowing down the German OODA loop!

P-47 Thunderbolt firing rockets P-47 Thunderbolt firing rockets! Advanced Squad Leader scenario BFP21 Ripe for the Picking After Action Report (AAR)

We were close to the 100 VP mark but time’s running out.  The squads on the left had both went fanatic at this stage with their repeated attempt to close with the PzIV’s.  A M5A1 sped over, toughed out a shot that went wide, spun to the back of the self propelled 75 and fired.  It promptly malfunctioned and it was M5A1’s turn to be scared!!  The commander kicked the driver to start up again.  Good thing the 3 US squads nearby stunned the German open top.  A halftrack went for the PaK gun in the middle, went right up to the house and dismounted.  The PaK had to turn but lit up the vehicle!  The troops were okay, now covered by the vehicular blaze.  The Shermans decided it’s safer to run through the middle of the map now, away from the PzIV’s under the orchard.  When the FBs lit up the second PzIV on the right, the Germans decided to concede.  There’s nothing left to stop the Americans from driving off the board now.

US halftrack in urban warfare

“US halftrack in urban warfare” Italy, late 1944

How’s this Scenario Interesting?

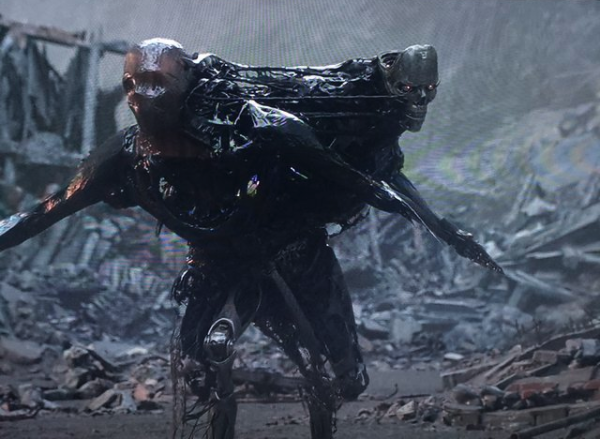
This was a lot of hardware for me to manage through bocage country!  The Americans needed to blaze through the bocage and their speed helped them to not get penned up by the Germans.  The US armoured infantry reminded me of the new Terminator.  Halftracks could drop off its squad, “split into two” per se and motor the vehicular “half” behind the defenders.  Heck, my halftrack surprised the gun crew of the remaining PaK (holed up in the building nicely situation in the middle of the bottom map) by dropping off a squad at their door.  Their ride got blown up but they killed the gun crew in CC.  That’s so much more effective than having to shoot it out.

Terminator Dark Fate

Once I got my vehicles down on the bottom map, it’s important to be patient and to use my superior MPs to run around to where the Germans were not.  My tanks whipped around a couple times before exiting.  I could have left more infantry mounted but halftracks were poor sanctuaries when the action got going.  Fighter Bombers were a huge help in suppressing enemy’s ability to react even if they miss all their spotting attempts.  Once I was through the bocage it was tracks and shells flying all over in the bottom map.  This is an action packed scenario!!

Other Links

US Army in World War II, ETO, Breakout and Pursuit, M Blumenson

D-Day Overlord – D-Day and Battle of NormandyMarigny (Manche)