RPT1 (Part 3) Ferenc Jozef Barracks – A View of Advanced Squad Leader Scenarios

Turn 2 Hungarian - PFPh

Turn 2 Hungarian – PFPh

We are back on RPT1 Ferenc Jozef Barracks.  Just so everyone remembers, the Romanian 9th Cavalry were the attackers and the Hungarian 1st Tank Division were the defenders.  This engagement was part of the horrendous 100 day siege of Budapest.  The Hungarians were fighting along Nazi Germany and the Romanians were Russian allies.  The goal of the scenario is for the Romanians to capture the barracks (marked with a yellow “V” by Don) seen on the top left of the map within a 5 turn (10 mins in real world) time frame .

Turn 2 Hungarian

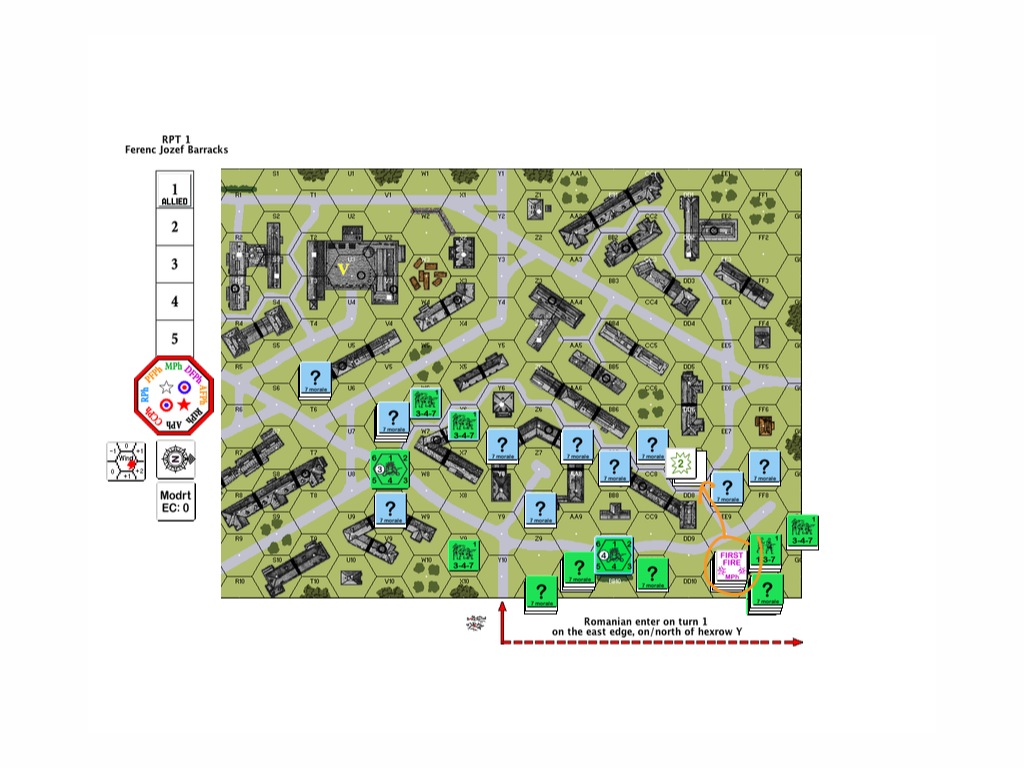
The above was what it looked like at the start of the Hungarian Turn 2.  The Hungarians started moving back towards the barracks while keeping their guns pointed to areas where their Romanians pursuers would need to cross.

Turn 2 Hungarian DFPh

Turn 2 Hungarian DFPh

The Romanian 9-2 squad leader hiding all along together with a squad and a shiny new medium machine gun (in the middle on the bottom, circled in orange) decided it was the best time to come out of concealment and open fire at the Hungarians who came into sight.  Unfortunately the MMG went the way of the flamethrower and clonked out on the first volley!  Apart from making a mental note to launch a complaint against the armoury after the engagement there wasn’t a lot he could do.  The other chaps in the building to the bottom right heard the ruckus and joined in as well but they then realised they no longer had line of sight.

The Hungarian defenders did a beautiful job slipping away towards the barracks whilst staying in concealment.  (Note to self : watch & learn)

Turn 3 Romanian

Turn 3 Romanians DFPh

Turn 3 Romanians DFPh

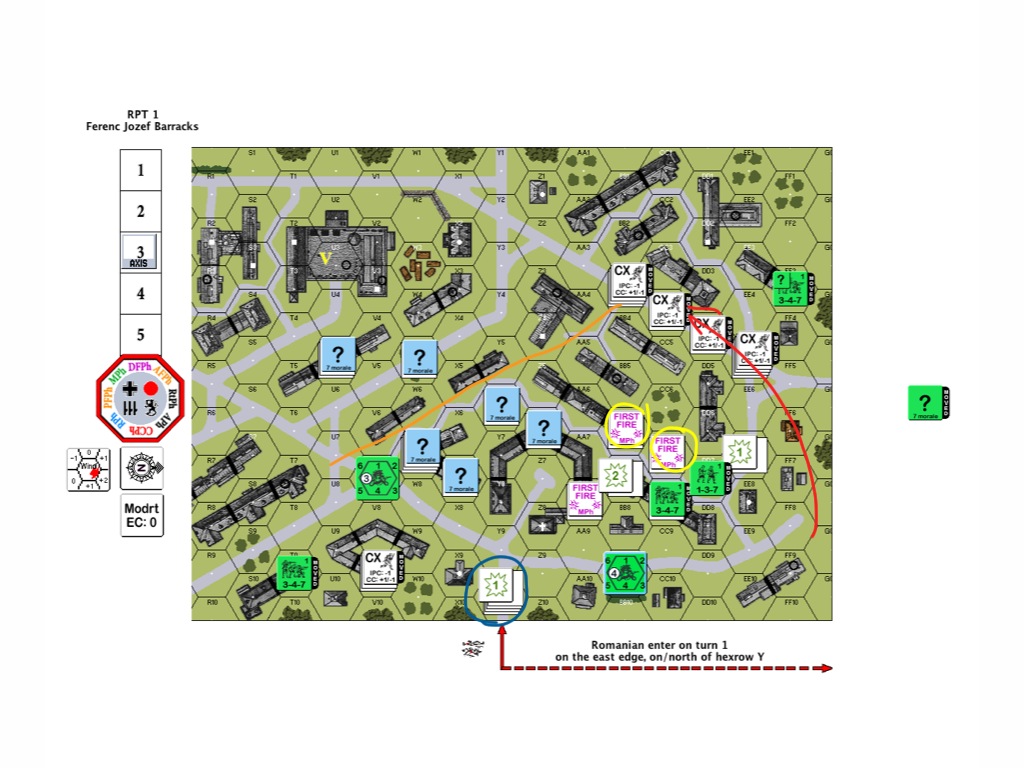
The Romanians orchestrated a series of moves in the hopes of stopping the bulk of the Hungarians from reaching the barracks.  On the righthand side of the map, the Romanians successfully kept the 2 Hungarian squads (circled in yellow) distracted while they double-timed a number of squads up the boulevards to the west.  They also intended to engage and even kill a few of the Hungarian squads by hand to hand combat where they could.

On the bottom of the map, the fuming 9-2 squad leader and his squad (circled in blue) who were dragging their broken MMG across the street (Note to self: use “Dash” next time) got pinned under heavy fire.  So there they were, hugging the ground and cursing up a storm in the middle of the street.

The orange line through the street on top was where the Romanians planned to shoot at the Hungarians who would need to cross over to the next building on their way to the barracks.

Turn 3 Hungarian RPh

Turn 3 Hungarian RPh

The Romanians (circled in red) tried to grab a couple of the escaping Hungarians, but in both instances they were ambushed instead!  The Hungarians decided to withdraw and slipped away while the Romanian attackers were still hugging their guns in fright.

So here we are at the start of the Hungarian Turn 3.  The Romanians have only 2 turns left and the Hungarians has done an elegant job in slipping away intact as a force while mostly staying under concealment.

Will the Romanians catch up to the Hungarian masters of defence?  Keep an eye out for Part 4 of RPT Ferenc Jozef Barracks!

hu347Sax347S


How about coming home everyday to 30 mins of PBeM game over VASL?

Whether you are a fellow newbie who would like to learn together or an experienced ASLer who don’t mind helping me up the curve. I play to enjoy and to learn. Please message me at jackson-dot-kwan-at-gmail-dot-com!!

Google

RPT1 (Part 2) Ferenc Jozef Barracks – A View of Advanced Squad Leader Scenarios

Don and I waded a little into scenario RPT1 Ferenc Josef Barracks this week. The Romanians got on the board intact. Most of them manage to keep their concealment. I will need to rely on the buildings for cover going forward because I simply don’t have the time to retain concealment / to assault move. The only squad with smoke grenades is the one 4-4-7 holding the flamethrower and that’s only with a die roll of 1 (17% chance). As an attacker with a short schedule, I have to balance the urge to rip up the streets against taking stupid risks and losing the bulk the Romanian force before getting to the barracks. From the way Don was setup, the Hungarians are looking to do a fighting withdrawal back to the barracks. It’s therefore going to be a running street battle all the way back.

Guys with low firepower like the 3-4-7s are simply ineffective against defenders concealed in stone buildings. For my shooting to be effective, I need die rolls so low that will trigger the snipers in most cases. I only have 2 leaders in the pack so I need to avoid low probability shots.

Turn 1 Romanian

Turn 1 Romanian, end of MPh

What you are looking at here (blue marking) is two of the Hungarian squads who came out of concealment and took a shot at the Romanian 3-4-7 assaulting up into the road hex in Y10. I expected a good number of Hungarians to be staring at that road hex all day. They would open up and the residual fire would rip up anyone else coming after, pretty nasty on an open road hex! This Romanian squad got lucky though and no one else was going to come through.

On the other hand  the elite Romanian 4-4-7 squad in building F9 (orange marking – underneath the 1-3-7) was eager to unleash their flamethrower on the concealed Hungarians in DD8 they caught a glimpse of when they ran up. Unfortunately flamethrower FP is halved at 2 hexes and halved again versus concealed targets. FP 6 flat is still a good shot  though considering the alternative but the Hungarians escaped a fiery fate for now.

Turn 1 Hungarian

Turn 1 Hungarian MPh

Don executed the time-honored strategy of skulking. He assault-moved all of his squads from concealment territory to concealment territory and in most cases out of my line of sight.  (Note: this denied me the opportunity to fire at them in the Defensive Fire Phase and they would advance back into their original position at the end of this turn, ready to stop my next advance!)

The Romanians in EE10 decided to come out of concealment and took a FP4 +3 shot at the folks skulking off at DD7 (orange marking). The Romanians needed a die roll of 4 or below (17% chance) to have any effect but that was the one chance where they could disrupt the Hungarians in preparation for the coming Romanian Turn 2. Again, the Hungarians were well concealed and the stones protected them well – no effect.

Turn 2 Romanians

Turn 2 Romanians end of Defensive Fire Phase

It was time.

The Romanian management said it was time to go out there and do some business. The elite 4-4-7 squad decided to give their toy another try. They looked to roast the Hungarian squad that spotted them on the open ground coming over. Another FP6 flat shot across the street – and the big toy broke with a “clunk”. They carried their flamethrower all the way over and it spluttered on the second shot!

Anyway, it was time to reach out and touch someone. The Romanian squads and half squads assaulted out into the street, trying to spread out as much as they could. This is a picture of the Romanians in the street and getting fired on. The gods are with them as only 2 of the squads/half-squads were pinned and the rest were unscathed.

You can see also where the Romanians pushed two squads into GG7 and GG8 (orange markings on the right), running over open ground and risking -2 shots. They saw their compatriots before them being relatively unharmed and hence they took the chance to flank the Hungarians.

The Romanians piled into the concealed Hungarian positions in the buildings across the street (DD8, EE8, FF7) and on the left of the map, into V9 – the one concealed position that was blocking the way.

Turn 1 Romanian Close Combat Phase

SURPRISE!!!  All positions except DD8 (marked “CC”) came up empty. The good news was that the Romanians uncovered all the fake Hungarian positions. The bad news was that they failed to catch the bulk of the Hungarian forces.

The same Hungarian squad that survived two roasting attempts decided to hold their ground and fight. The Romanians weren’t going to let them get away this time either and so they went for a bloody hand to hand combat. It was over quickly with the Romanians taking some losses and the stubborn Hungarian squad finally eliminated.

Turn 2 opens for the Hungarians. Will they be able to retreat safely? Will they be able to delay the Romanian hordes?

hu347Sax347S

How about coming home everyday to 30 mins of PBeM game over VASL?

Whether you are a fellow newbie who would like to learn together or an experienced ASLer who don’t mind helping me up the curve. I play to enjoy and to learn. Please message me at jackson-dot-kwan-at-gmail-dot-com!!

Google

RPT1 (Part 1) Ferenc Jozef Barracks – A View of Advanced Squad Leader Scenarios

Siege of Budapest

Historical Background

This battle is part of what’s considered one of the bloodiest city fight ever – the 102 day siege of Budapest between December 1944 to February 1945. Soviet & Romanian troops laid seige to Budapest in their drive towards Berlin. Hitler declared the city “Festung Budapest” (“Fortress Budapest”) and so it was to be defended to the last man by German and Hungarian troops. This battle was particularly vicious in that its inhabitants were never evacuated and their suffering continued long after the city’s surrender on February 13 1945.

Scenario “RPT1 Ferenc Jozef Barracks” took place on Jan 12 1945 at the Ferenc József Barracks which is located between Kerepesi Road, Hungária Boulevard and Pongrác Road. I tried to locate the area on Google Map. To those of you who are more adept in the subject: I’ll be very appreciative if you will correct me on the matter.

Initial Setup

Initial Setup

The Setup

Romanian 9th Cavalry enter the board from the north-eastern side (botton right) of the map. Their goal is to clear the barracks (marked with a “V”) on the south-western side (upper left) of the map of any good order Hungarian units within five turns. Considering the 2 mins turns in Advanced Squad Leader, this exchange allows the Romanians 10 mins to meet their objectives. Each hex in Advanced Squad Leader represents about 40 meters. The Romanians need to go about 10 hexes (400 meters) straight up the street from middle of the map up towards the left just to get into a position where the they can attack the barracks. That’s 2 turns of out of 5. Considering the first turn is for entry and for trying not to get killed over open ground (off-board is open ground), the Romanians has only two turns left for fighting. This will have to be a maneuver war.

The Hungarian 1st Tanks Division start the scenario concealed in concrete buildings. Somewhere among the open windows there is a heavy machine gun pointing at the open ground below.

In real life the battle was so savage that all the officers and the NCOs of the attacking Romanian companies were killed but they did capture the barracks.

I hope I can do the same.

This is my first ASL game with an opponent (“PBeM” – Play by Email).  I am really appreciative of the tutorage of my good friend Don “Zovs” Lazov. Zovs’s a terrific teacher who’s  bringing the ASL rules to life for me. As you can see, he opts for a forward defense. This allows him to take out some of the Romanians right at the start.  As I am on a tight schedule, Zovs doesn’t have to kill me, he only need to delay my advance while he backs off into the barracks itself.

How do I beat this defense and clear the barracks in 5 turns?

How do I even engage the Hungarians without getting mauled over the open ground?

More on this later.

ax347Shu347S

How about coming home everyday to 30 mins of PBeM game over VASL?

Whether you are a fellow newbie who would like to learn together or an experienced ASLer who don’t mind helping me up the curve. I play to enjoy and to learn. Please message me at jackson-dot-kwan-at-gmail-dot-com!!

Source used 

See also

Google