


Sam Belcher’s Handcrafted Dicetowers
PP08 No Simple Victory is from the ASL March Madness Partisan Pack , produced by the Kansas City Irregular ASL Club for the March 13-15 2009 March Madness tournament. According to Mark Pitcavage’s Desperation Morale site, only 75 copies were made. I am lucky to have access to one and let me tell you, the storylines therein FASCINATE me.
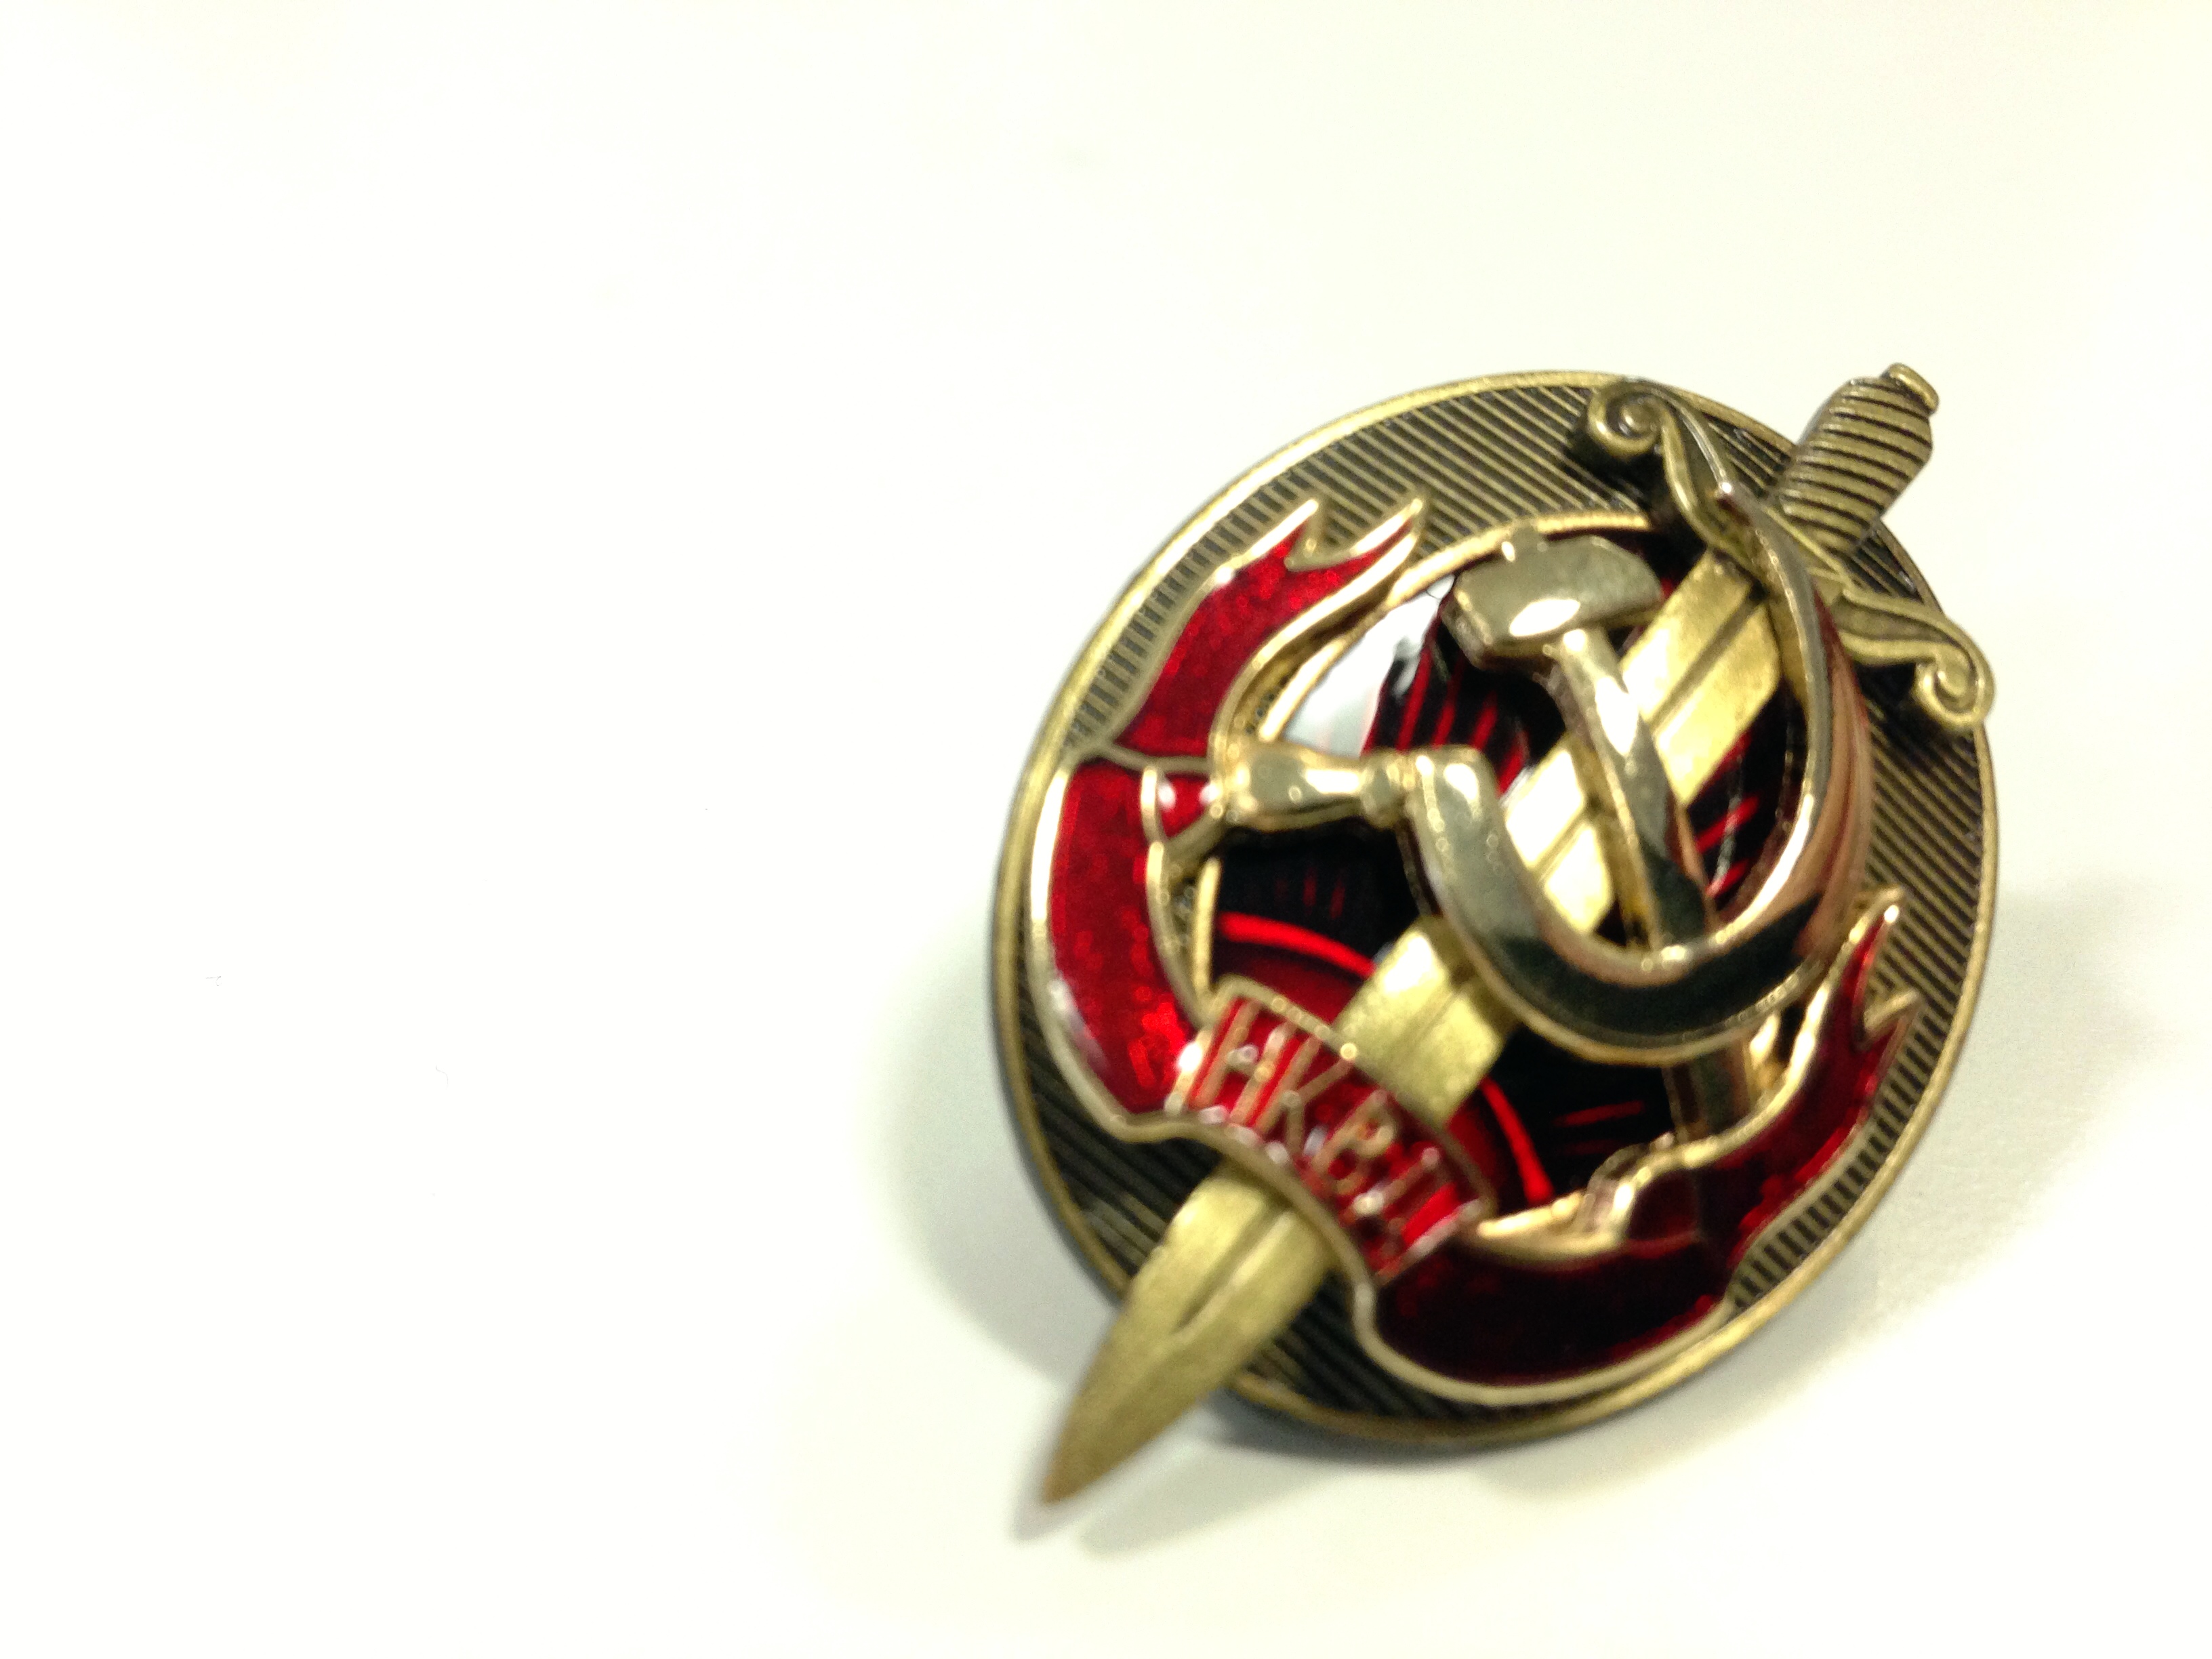
An NKVD badge replica
A number of anti-communist partisan groups sprung up. One such group was the National Military Alliance or the “NZW” and one of their biggest battles happened here. The NZW prevailed, but the NKVD returned the next day and burned the village of Kurylowka to the ground.

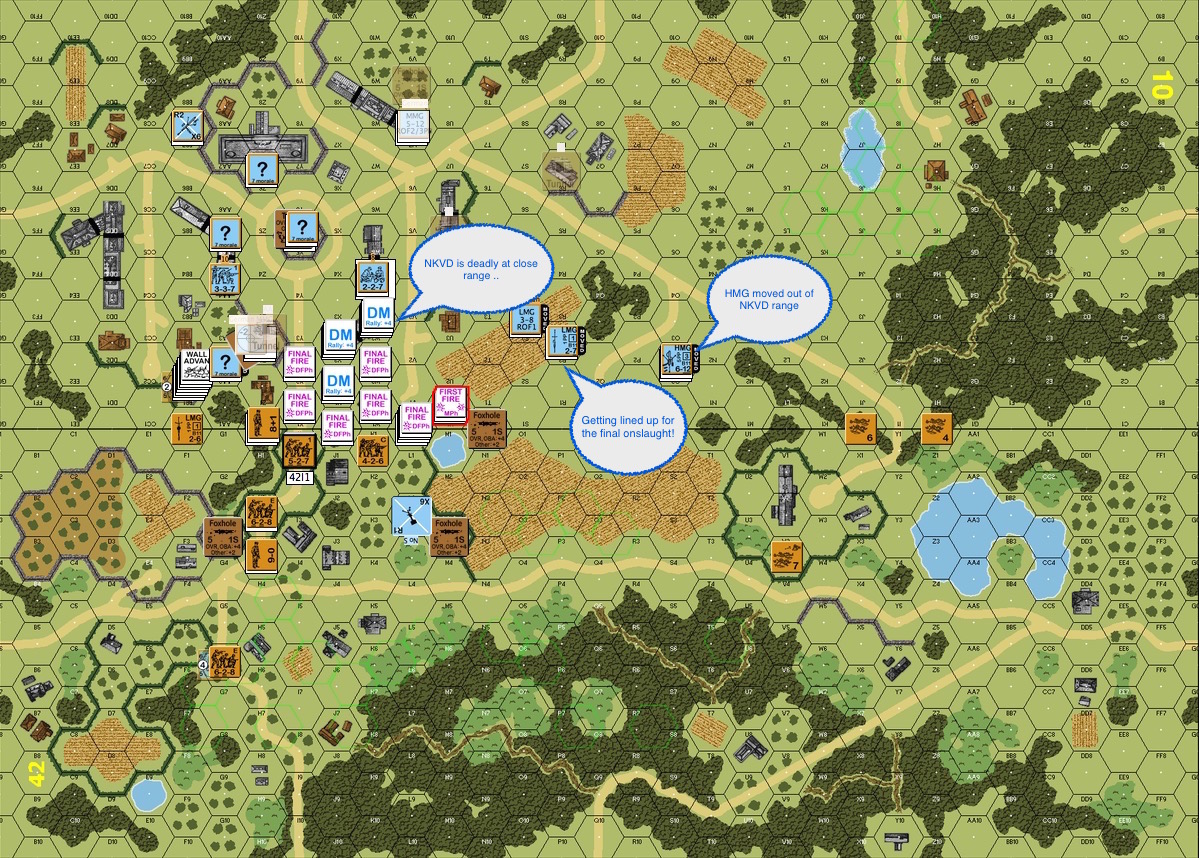
Introduction and Setup : The NKVD officers are all Commissars. The Poles on the other hand have 5 MPs instead of the usual 4. The NKVD enters from the right and a trench in the middle of the village square is the “Victory Condition” hex. I was the Partisans and Carl Nogueira the NKVD (Carl’s analysis of the scenario is at the bottom of this post). I made a number of mistakes in this scenario. One of which was putting my SSR given Set DC in the VC hex. Since the NKVD wins immediately upon seizing that hex, blowing them up subsequently really doesn’t help. I elected to exchange my 2 Fortified Location into 2 tunnels : one leading to the pillbox that oversee the VC hex and another leading from small clump of buildings to the right of the village so that units could rout back.
There are two approaches to the village. One is to take the long way through the Forest on the bottom of the map. That burns a lot of time. The other way is to move through the open ground from the right to the left. That carries a much higher risk of casualties which the NKVD player has to mindful of. One of the SSRs states that the NKVD is subjected to BATTLEFIELD INTEGRITY (A16). There’s a number on the broken side of each counter. The NKVD starts up with a Battlefield Integrity score of 260. When the NKVD takes casualties a running total of the number on the back of the counters is taken. The NKVD is then subjected to an Integrity Check every 10% (or 26 in this case) of the starting score. Fail it once, and the NKVD has their ELR reduced. Fail it twice and the NKVD pack up and go home.
I assumed Carl would take a frontal approach through the scant cover the open ground offers (the NKVD had no smoke). The Partisans had Molotovs though. I tried to use Molotovs frequently early game (couldn’t be used inside the forest though) in the hope of setting something on fire “accidentally” but I completely forgot to use it late game when it really counted.

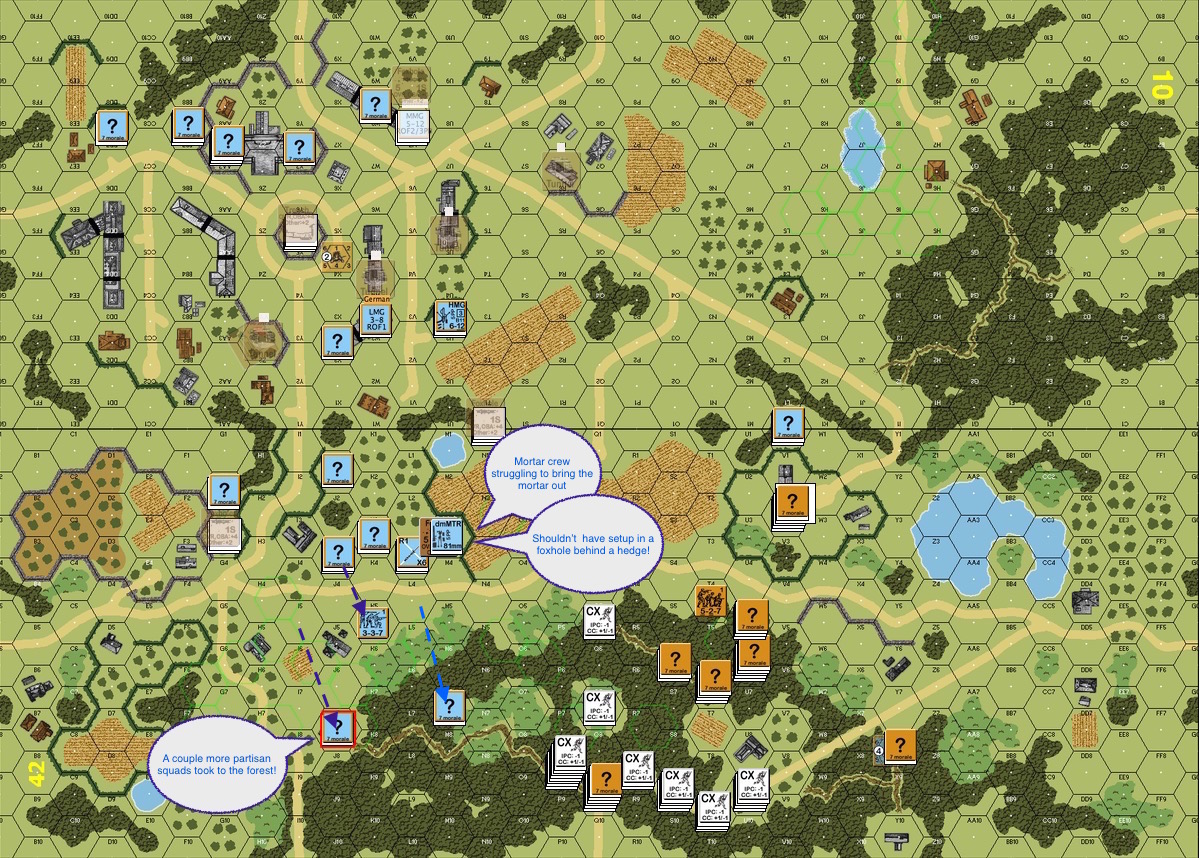
Turn 1 Russian : The Russians, I mean ALL the Russians headed for the forest! I started thinking about how I could redeploy to a completely different angle of attack.

Turn 1 Partisans : The Partisans had to redeploy to a very possible attack through the forest and from the bottom of the village! My tunnels and my pillbox were rendered useless. A few units had to come out of HIP to redeploy. Anyway, it was what it was – a new game. Good thing our Partisans had 5 MF instead of 4!

Turn 2 Russian : The Partisans in the forest had to do the best they could now. I didn’t move far enough from the NKVD and therefore got my units surrounded a few times. The NKVD was of course deadly at close range. Concealment didn’t offer enough protection.

Turn 2 Partisans : The three Partisan squads in the forest were of course completely outnumbered. I hope to delay the NVKD as much as possible by using brokies to block the way as they rout. I moved an LMG squad out to the clump of trees to help protect the “heavies” in case the Soviets change their mind and decide to skip long the edge of the forest instead.

Turn 3 Russians : The Russians came in strong. The Partisans were quickly surrounded and destroyed. The Russians tested the scene at the edge of the forest. The Partisan HMG appeared to convince them otherwise.
Turn 3 Partisans : The NKVD needed to be contained in the forest. A few more Partisan squads were sent in there to rack up more casualties if they could. At this point, I was a little reluctant to send even these folks. The NKVD had an advantage up close while the Partisans were better in open area because of their enhanced mobility and longer range. Molotovs couldn’t be used in forests either. Kindling is NA for this scenario but I certainly hoped to set a few structures on fire “accidentally”.
Here’s also where I realised my next stupid move : I got my mortar (ideal against folks trying to come out of the forest, no?) in a trench BEHIND a hedge. They couldn’t see anything. The gun crew had to scramble to re-situate the mortar now. Could they do it in time?

Turn 4 Russian : This was an epic turn. The NKVD studiously picked a spot to come out of the woods that avoided the HMG. So an LMG unconcealed to plug the gap. Did it ever! That residual where the path open up from the forest saw a good number of casualties. A few came forth nonetheless, led by a 9-0 Commissar, and rushed the mortar crew. One of the partisan squads was met by a number of NKVD and was presented with a DC pack as well ..

Turn 4 Russian still : Our partisan squad survived all Advance Fire AND a DC blast!! NKVD fixed bayonets and looked to move in ..

Turn 4 Russian Close Combat : The NKVD squads moved in and even managed to ambush our partisan squad! Fortunately they rolled infiltration for our brave partisan squad. While the partisans were pinned and couldn’t move, the NKVD squads thought better of it and moved off.
On the far side of the open ground, the Russians wrestled with a partisan squad sent to mess with them. The partisans got the ambush here and decided to move off to the Russian rear.

Turn 4 Partisan : Our brave partisan squad moved off to another position where the NKVD might decide to emerge. The other partisan decided to back off to get some distance between them and the short range Russian bear. On the other hand, the HMG crew grabbed their toy and ran off to the woods to get a better angle at the emerging NKVD.
The mortar crew couldn’t get away with their toy unfortunately, they were broken by fire from pursing NKVD.

Turn 5 Russian : At this point the NKVD had already breezed right through their first Battle Integrity check. Two partisan squads fought hard at the edge of the forest the best they could.
Russians on the far right decided to rush the HMG in the woods as well. Thank goodness to mutually supporting positions they would all eventually be broken.

Turn 5 Partisans : The partisans sent another squad to the far right to go after the broken NKVD squads. Who knows? May be they will force another Battle Integrity check!
Partisans were trying hard to back off into the clearing before the roads lead into the village – but it was hard.
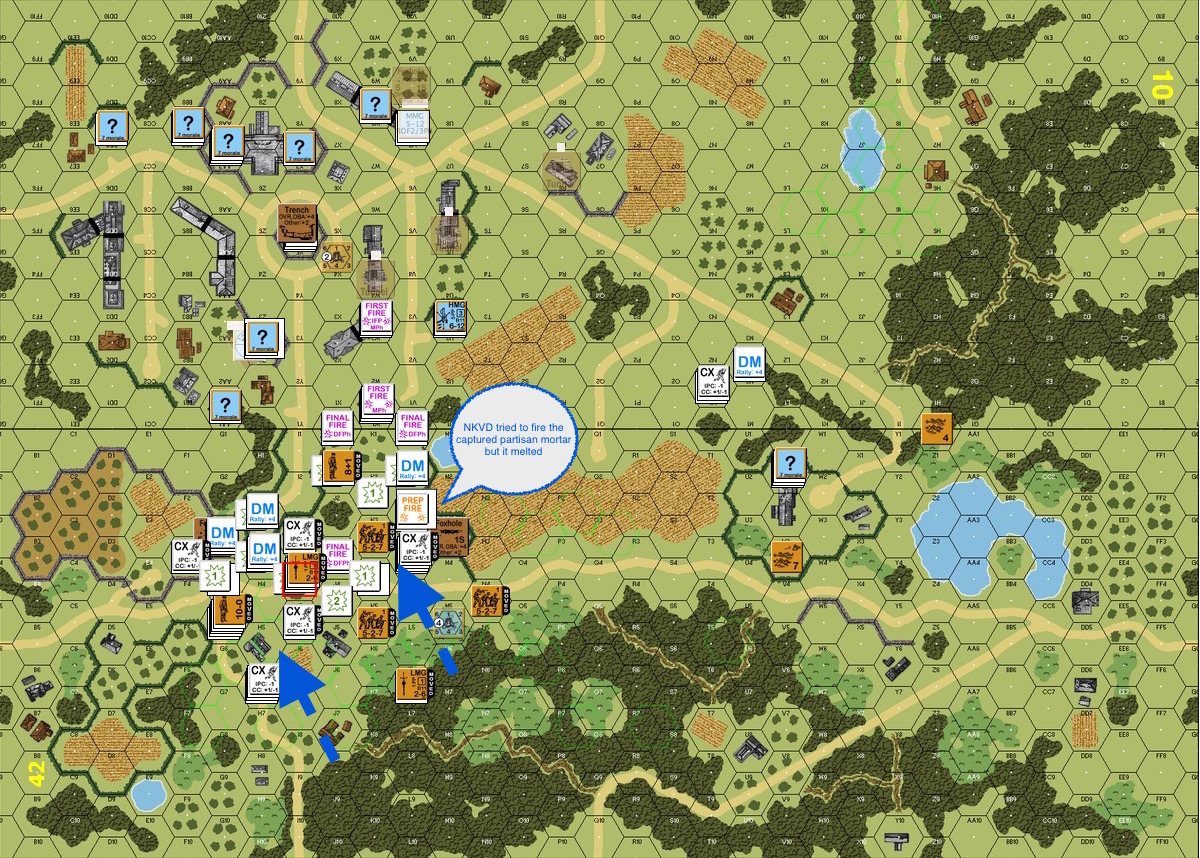
Turn 6 Russian : The Russians tried the captured Polish mortar, hoping to get smoke for the final attack. Fortunately it melted in their hands rather patriotically
The Poles kept backing off and putting residual on open ground. I was also starting to think that I should bring the partisan squads on the far right back into the village for the final fight.

Turn 6 Partisan : I saw the left side of the village as being particularly vulnerable. I moved a few more squads up from the back to cover that. The HMG and 2 LMGs were moved to the open so they could take advantage of their range. The Russians would have to decide whether to divert squads to them or let them be.

Turn 7 Russians : The BPV was now at 88. The Russian passed the last 3 Battle Integrity Check without breaking a sweat. The next one’s going to be 16 BPV off – which meant 3 or 4 squads, depending on what they were.
Fire lanes were deployed where possible to wear the NKVD down – but they kept coming. When they got adjacent, the Partisans knew they wouldn’t last much longer. An MMG deployed on the left opened up as well. Unfortunately it broke down almost immediately.
Turn 7 Partisans : We ran out of room to back off now. The front row of NKVDs got too close and the Partisans got blown away, firing squad style.
Getting folks in their final position ..

Turn 8 Russian : So this is just a shot of the start of the final turn. There’s still an MMG that remained “HIP” on the (hopefully) more vulnerable looking side.

Turn 8 Russian, after the Movement Phase : Carnage! The Russian kept running squads though the gauntlet, even tried to place a DC on the squad in the target hex. After they got a few in for the ensuring Close Combat phase, they ran the rest of the NKVD away from village to avoid more casualties!

Turn 8 Russians – the end : Then it happened – the Russians fired into the concealed partisan squad in the target hex. They got a morale check even with the +2 TEM.
Box cars.
The partisan squad reduced and broke. The Russians were therefore in a position to advance in.
The Russians won.
Here’s the Analysis from Carl Nogueira :
It was a pretty intense game. I looked for opportunities to launch a human wave, to try and close up the ground needed to be crossed faster. However, that was of course not possible in the woods. Once out of the woods, I had a chance to do it, but I was not happy with the preparation of the defense. I had been unable to soften him up/draw off enough shots with the non-human wave crowd. It looked like the boys would be heading into a meat grinder and these guys don’t do meat grinder with the BPV rules. Not to mention the last sentence of A9.222. This makes human waves suicidal if the opponent has the ability to lay down several firelanes. Jackson had that opportunity. Human wave called off. Of course with these clowns, it was more of a sub-human wave anyway.
As Jackson alluded to, I initially went through the forest on the bottom board. It appeared to be lightly defended and it afforded me the ability to shoot back at his forces. Something my short range and lack of long range SW didn’t afford in the open. That combined with the Battlefield Integrity made my NKVD boys “vulnerable” in the open. (I always wanted to use NKVD and integrity in the same sentence. It’s a lot tougher than it looks.) The forest looked lightly defended to boot, so I was hoping to blow through there as fast as possible.
In the even, it took about turns, using my best Tampa style tactics to whip Igor forward. The attempt to put pressure on the Koresh compound and use those forces to be a diversion against the center, failed spectacularly. Fortunately, they graced me by not dying in the process. If there is one lesson that Jackson will take with im from this game, it is entrenched units behind a wall/hedge only see adjacent to the wall/hedge. No farther. His mortar was positioned under a foxhole thusly. As was a flanking squad and the VC hex guard. It didn’t cost him the game, but it did cost some opportunities.
I popped out of the woods and headed up the road, mostly to the right of the road, straight for the VC hex. Jackson’s units are quite fleet of foot by ssr in this, so they easily repositioned and got in front of us. Their mf base of 5 for MMC making that easily possible. After some early success heading up the road, I determined I was a turn behind. As a result I really took some chances. Even running some units into hexes I knew they couldn’t rout out of to try and force the pace. I was soon dissuaded. However, Jackson did decline a surrender which enforced NQ for my boys surrendering. That was more blessing than curse for me as I was able to have more liberal rout routes after that, FTR not withstanding.
I had to change the axis of attack to straddle the road more, as he had too many fire lanes to the right of the road. I was able to ooze out over the road and get enough fire down to open a path through the stone building that guarded the VC buildings left flank, but only on the next to last turn. That meant running through the open to try to get to the last VC hex.
It had looked really grim since Jackson had a 4.35 average DR over 7 key shots to start Russian turn 7. As a result, I had to take two tests for BI. I passed the first but failed the second. If it happened one more time, he gets the win. Fortunately, as is wont to happen, the dice turned back the other way. My boys discovered their meat sacks and my morale check DR improved drastically at just the right time. One 5-2-7 went berserk and tied up a key piece on the approach march. We were able to survive a nice fire lane Jackson laid from a HIP unit leading to the VC hex. Finally, I was able to get a G/O 5-2-7 and two 3-2-8 HS, one of which had a DC, ADJACENT to the VC hex. The 5-2-7 fired at his concealed unit in the trench, a 4+2, to try and strip him of concealment. The thought being it would make the thrown DC that much more effective done in that order. I lucked out with a 3-1 for a NMC. Jackson boxed the NMC and that was the game.
We discussed later and both felt the scenario is rough on the Russians. That said, the ROAR record now has it 3-2, pro-Russian. Still, I think the Russians have the longer road. That low ELR and short range for their force are real handicaps. Combined with needing to keep an eye out for the battlefield integrity makes it tough. As for the Partisans, they have typical partisan issues. The 5 mf rule for the MMC is a real nice touch. One thing the scenario is though is fun. All in all, it was a very enjoyable time and game.

Map of Poland from 1944
 ESG6 Clean Up Crew is the first round scenario of the Asia Pacific VASL tourney, Deathwish 777. This is the first Eastside Gamers scenario I have ever played. This is also the first time I played Will Fleming.
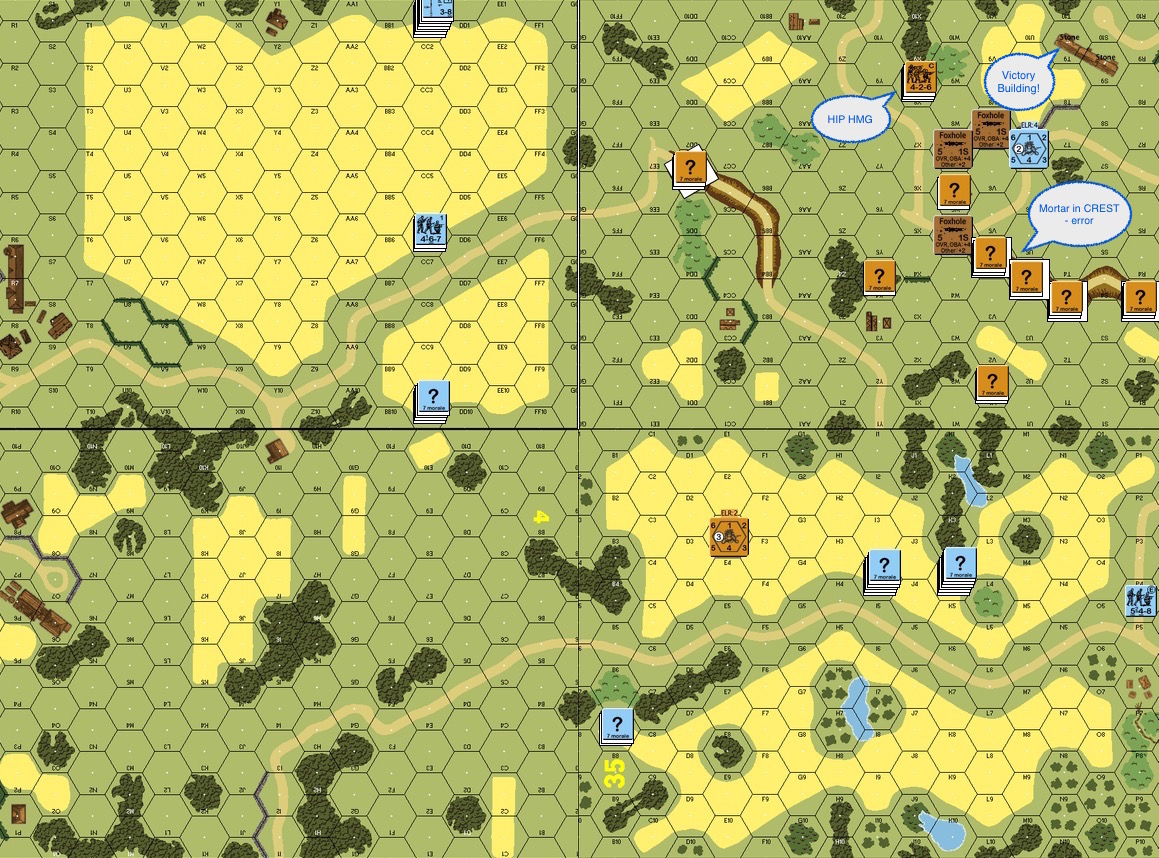
This is an interesting situation. The 2 hex building on the top right is considered ground level only stone while all other buildings are wooden. The German wins at Game End if they control this building. If you look at the map in quarters, Germans setup on the top left and bottom right. A Russian patrol comes in on Turn 1 from either the left edge or the bottom edge of the bottom left quadrant. Both sides get to attack and to defend, the 6 turn limit on this scenario promised rapid and violent action!
The Germans have a mix of elite and first liners. The Russians have a mix of first liners and conscripts (one elite squad too) but unfortunately an ELR of 2. They get 2 leaders on board, an 8-1 and a 7-0. A 9-1 comes in with the patrol later on from the lower left board. There was a bit of a debate as to whether to switch the 8-1 out for a 10-0 Commissar or not. Bruce Probst cautioned against the idea on GameSquad, stating that there really is no where for the Russians to properly rout to and that they should take the -1 Leadership from a fighting 8-1 instead. In hindsight, he’s right (no surprise). At the time, I swapped the 8-1 for a 10-0 in the hopes of cycling whimpering conscripts back into the fight again.
German Turn 1 : The Germans were on the move. The Russians looked to reveal as little information as possible until the Germans came within their (largely) 2 hex range, less when negative modifiers were in play. There wasn’t much action apart from the outer ring of “speed bump” conscripts. They didn’t expect to survive the slightest German fire and so their first shot needed to count.

Russian Turn 2 : The Germans built a deathstar with a 9-2 in the left sunken road. Our HMG team had to relocate. Will Fleming also pointed out that mortars cannot fire from CREST positions so the mortar team had to figure out a plan B. One of the “speed bump” conscripts broke another German unit instead of running but got disrupted and was captured in the return fire. The rescuing Russian patrol had entered the map but not the fray at this point from the left edge.

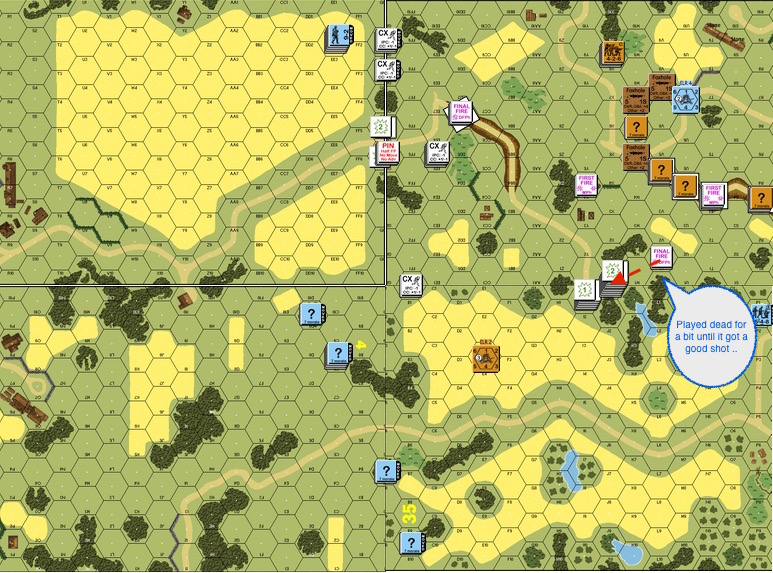
German Turn 3 : The Russian HMG went on a hellish rate tear in Defensive Fire, they KIA’d 2 German squads and broke the rest in the open!! The Russian prisoners found their guards killed and started eyeing the German DC laying in the grass…

Russian Turn 3 : The rearmed prisoners (Conscript HS) grabbed the German DC. There was a German DC HS on the left end of the sunken road to the right. A Russian squad assault moved away to draw fire in the safest way possible but was disrupted anyway. The rearmed Russian HS then rushed down the sunken road with their captured DC!! They survived the Final Fire from the “targeted” German DC HS, threw their DC and broke that HS. Unfortunately it was pinned itself and couldn’t advance to rout the broken Germans out of the foxhole. The Russian commissar decided to vol break and head towards THE house as Russian troops around him were either disrupted as conscripts or ELR’d into being conscripts.

German Turn 4 : The Germans moved towards the house and the Russians didn’t have too many live units left around the target building. A German MMC on the left put a fire lane down through the grain fields and made it tough for the rescuing patrol getting into the fight on time.
Then a horrible thing happened.
A German stack Adv Fired into the Russian HMG team through the brush – and rolled snakeeyes. The random selection that followed slated the full Russian squad for destruction, leaving a broken 7-0 with the gun. There was pretty much no one, save the routing commissar and a solitary conscript squad, in the target building.
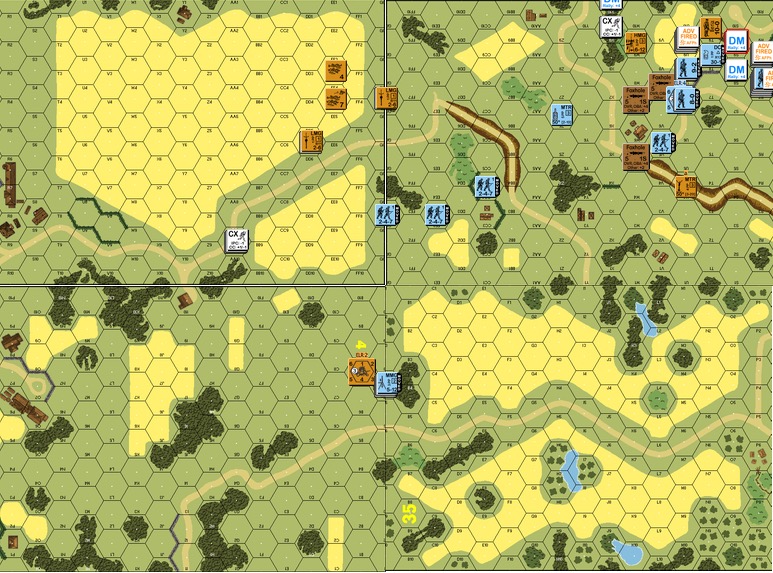
German Turn 5 : The Commissar finally pulled himself together and joined the conscripts in the stone building. Between stacking up for better mutual support or spreading out to keep the Germans out of the building, they chose the former. The conscripts dutiful fired at the incoming Germans and did brilliantly well for the most part but things came apart at the end when the Germans rolled another snakeyes in the Adv Fire and broke the squad.

German Turn 5 (contd) : The commissar found himself the sole defender of the house when the German broke through the windows and doors. The ensuring close combat was 6-1. For a moment I had hope that the commissar would roll snakeeyes as well to kill off the entire German stack but it was not to be! The hardy commissar got wounded and finally succumbed to his wounds into the long quiet night.
A number of thoughts after the game :
Thoughts? Comments? Alternate strategies? Additional thoughts on 10-0 commissar vs 8-1?

Art by Rodger MacGowan, Photo by Jackson Kwan
Mr. Patrick LeBeau sent a beautiful message to the “Squad Leader PreASL” YahooGroup to remember John Hill. I asked and he kindly gave his permission to republish it here, for all of us whose memories Lt. Hill will forever be a part of.
Farewell fearless leader
The original John Hill Squad Leader counter: Lt. Hill, a modest 9-1 leader.
When I purchased the famous purple edition of John Hill’s 1977 Avalon Hill game, Squad Leader, at the Origins held in Ann Arbor, Michigan that same year, I and many others were immediately hooked on the game system and ease-of-play. We attended all of John’s lectures and in a day or so mastered the game. By the end of the convention many of us were combining our game boards and units to play monster self-designed scenarios after having played all 12 scenarios in one long weekend.
Squad Leader would also win the title of Best Tactical/Operational Game of 1977
This was not my first encounter with John or his many excellent board and miniature games. Most notably in the mid 1970s was Johnny Reb, now known as Johnny Reb One. I still have the original mimeographed legal size cheat sheet printed on both sides, which was all you needed to play the first iteration of the Johnny Reb system. In that playtest addition, resolution used a single 12-sided die.
I mention these two games and I call them systems because they have an incredible longevity through continuous reprints, revisions and new editions, including new games derivative of earlier manifestations. Although the 1977 edition of Squad Leader is my all time favorite, the game would generate many supplements, which would lead to the development of Advanced Squad Leader. The whole Squad Leader family of games has sparked a gamer following that keeps the game alive (SL or ASL) to this day after almost all of the SL and ASL games are long out of print. ASL is directly responsible, I believe, to the development of the online VASSAL game engine for playing board/miniature games virtually.
Johnny Reb would lead to JRII and JRIII. From my perspective, I see Across the Deadly Field as John’s Opus Majus and final version of the Johnny Reb system. From my point of view, I believe ADF is his finest version and I hope it will emerge as his most popular American Civil War gaming system. I spent the entirety of 2014, from Fall In 2013 to Historicon 2014, and all those conventions in between, promoting ADF.
This brings me back to Lt. Hill, the U.S. 9-1 leader counter of the original Squad Leader. Many of us literally wore out our original counters due to continuous game play and finger handling. We of course replaced them by purchasing new games. This is not true with 99% of the board games I own. Further, in 1977, we understood the game as cardboard version of a miniatures game. Today I play the game using 15mm figures and terrain. My point is that as long as gamers continue to play John’s games he lives on.
In untold thousands of games, his old Lt. Hill counter has often suffered a KIA result or has broken under fire. At times it has conducted heroic acts, or has rallied squads at critical times. Whatever the outcome, Lt. Hill reemerges game after game to fight on and on to the enjoyment of the table top gamer whose only purpose is to have fun, learn history, study tactics, engage in competitive play and build friendships.
John was a good friend and his games build many life-long friendships.
I will miss him. We will miss him. However, as Lt. Hill, he will always be in our games, not only as a counter, a figure, a GM, a moderator, a game designer, a human, a man, and as one of the greatest game designers of all time.
Patrick LeBeau
January 13, 2015

John Knowles and I recently purchased the few “Into the Rubble” packs (Bounding Fire Productions) that Sam Tyson found laying around. So we decided to play the pack out one by one over the next year or however long it takes. The first one in the pack is Scott Holst’s “Debacle at Sung Kiang“. There are a few places called 松江, but since Scott mentioned “the city of Sung Kiang”, I take this as the area to the southwest of present day Shanghai. This scenario takes from a battle on November 8th 1937 when the Chinese GMT still had their German trained & equipped elite troops. As with all the scenarios in the “Into the Rubble” pack, it’s all about city fights. What I didn’t realise until the first Prep Fire was how unversed I am with city fights – I have definitely been running around jungles too long!
So here’s an account of my miserable loss (not an infrequent experience for me of course, but I don’t blog about my losses often enough) :
There are 16 multi hex buildings on the map. The IJA’s task is to capture 11 or more of them with 16 first liners, 2 elites, 4 leaders and 3 armoured cars in 6.5 turns. The Chinese fielded 9 elites, 7 first liners, 3 leaders, 2 76 guns and 2 of their funky Type 22 dual MG armoured trucks.
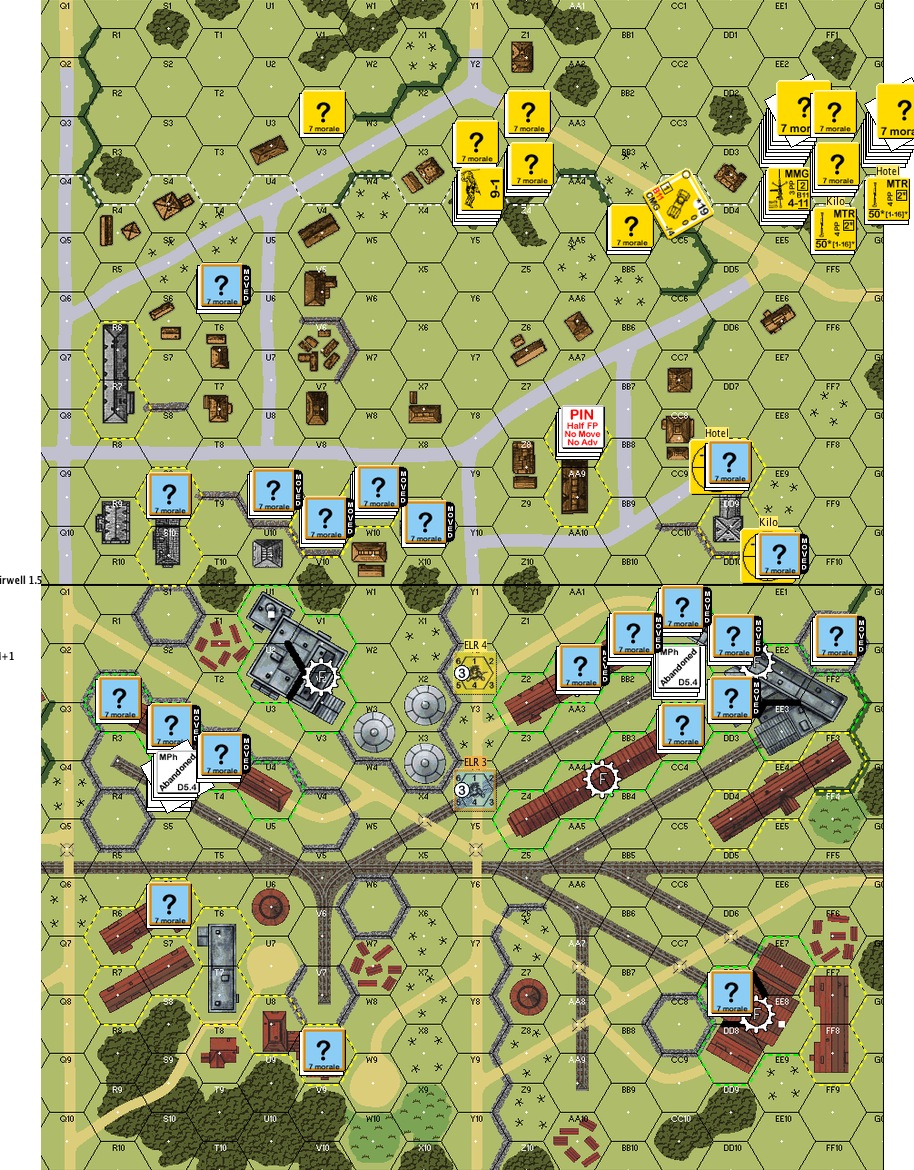
Chinese Turn 1 : This is what it looked like at the end of the first Chinese turn. The Chinese decided to use their “armoured” trucks a different way. Instead of running the trucks around with “0” armour, they decided to rip the 2 LMGs and the crews off them. That’s 4 new LMGs with 2 elite units that self rallies. The Chinese now have 8 LMGs, fantastic news to the IJA I am sure.
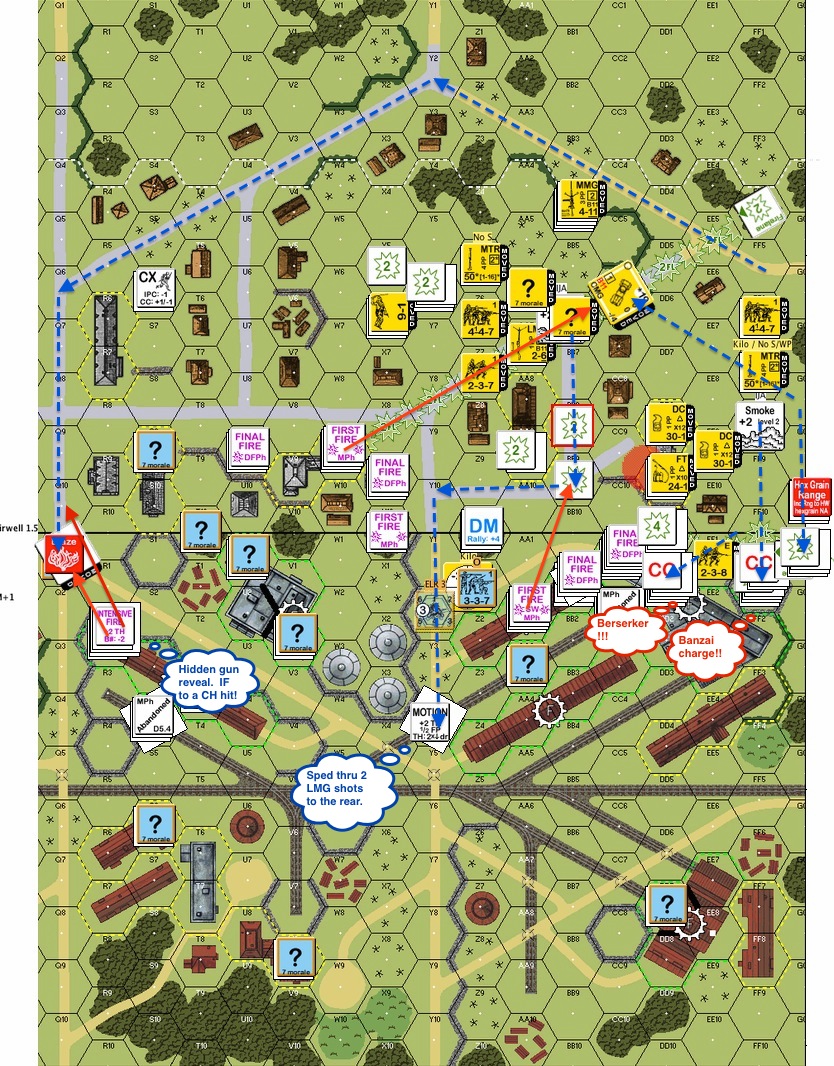
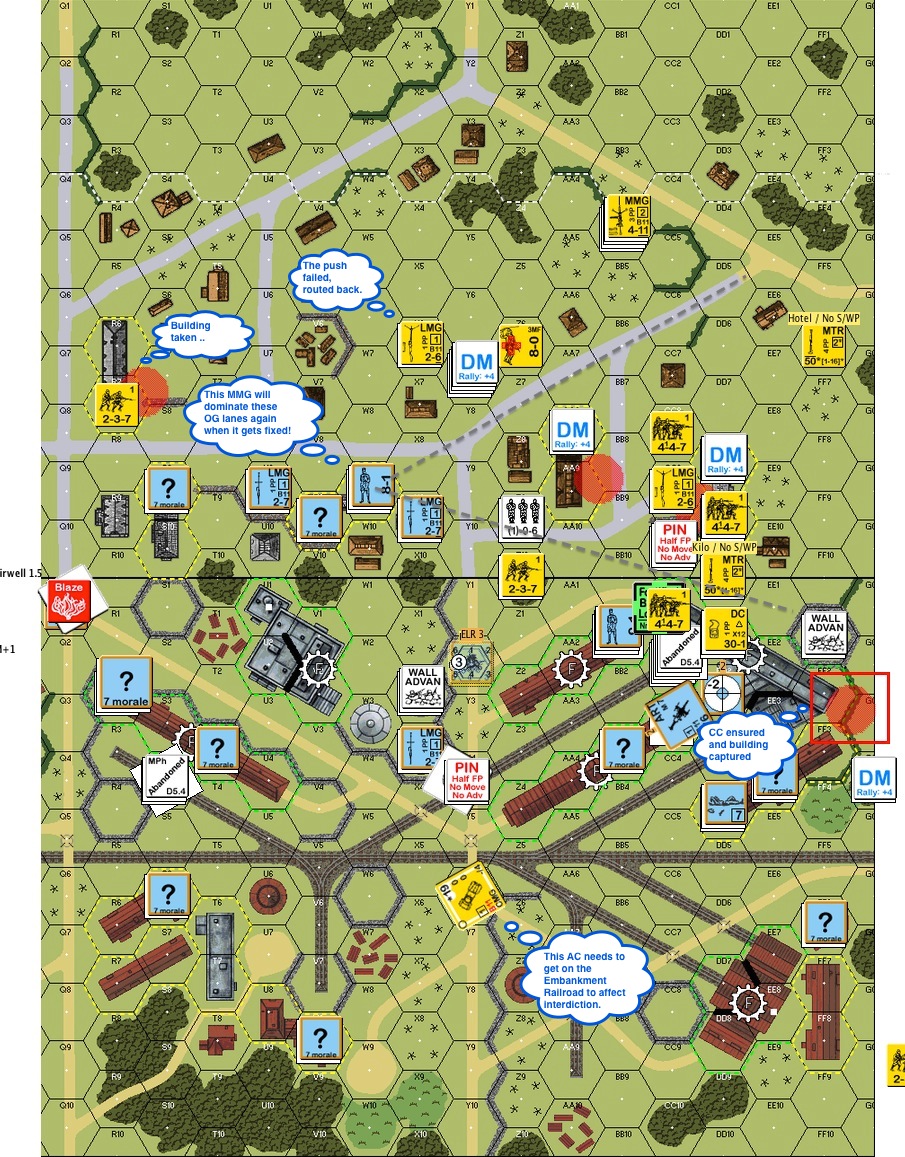
IJA Turn 3: The action exploded. First the IJA Banzai’d down the left edge of the board. Several fire lanes sprang up but the IJA made it across the open ground at acceptable losses. I then figured this was going to take too long : I should have an armoured car behind the Chinese lines to interdict routs and to limit Chinese movement. Therefore I ran an armoured car down the streets (just follow the blue dotted arrow that emanated from the concealed counter on the top left quadrant of the map). It survived one shot from the Chinese MMG that laid down a fire lane. Then the AC sped due south and made a right turn, surviving another LMG shot at close quarters. It then arrived at the center of the map. Another AC decided to do the same but via another route. This is the blue dotted arrow that encircled the top part of the map from right to left. Unfortunately it discovered one of the Chinese 75’s the wrong way. It was still hoping that its speed was going to save it. Boom – no hit, it laughed. The gun then went for Intensive Fire as the car came closer. Boom – Critical Hit!! The AC bursted into flames as car parts careened down the middle of the street!!
Chinese Turn 3: The Chinese moved folks over from the left, one of which CC’d my AC. The IJA uncovered a fortified position and strangely, a 75 gun popped up in the middle of the building complex on the right. That, together with the interior wall in the stone factory (see the hex side on the hex in “direction 2” of the gun) made it a little difficult to clear it out. The Chinese sped a unit to the far right to close the flanks.
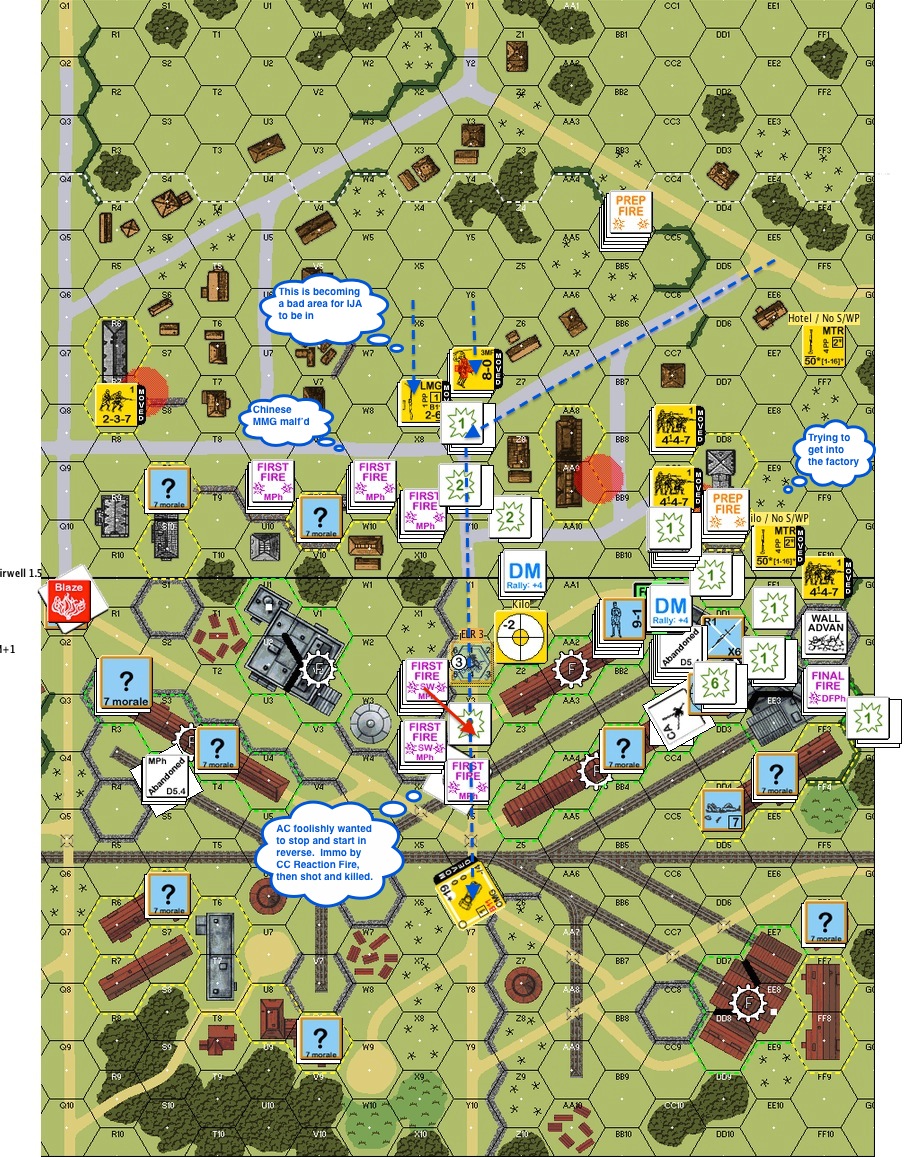
IJA Turn 4: Check out the middle of the board – here’s one of my extreme moments of stupidity: with a Chinese squad in the hex, I decided that it would be good idea to back the AC up to the Embankment Railroad. So I stopped the car meaning to go in reverse. The Chinese folks promptly declared CC Reaction Fire and disabled the car. A subsequent LMG shot killed it. *Brilliant*
All the action on the right were the IJA trying to pile more troops into the factory. The Chinese started shooting a lot better than they did a turn before unfortunately. The good bit was that the IJA finally broke the folks in the Fortified hex. The IJA folks in the top part of the map were starting to appreciate how exposed their positions were. Having said that, the Chinese MMG malfunctioned the turn before and so they were having a go at crossing the street.
The IJA then ran the last of their armoured cars down the middle of the street to help take the building complex on the right.
Meanwhile on the quiet left side, a couple of Chinese troopers pulled out a bag of marshmallow and strolled over to the bonfire ..
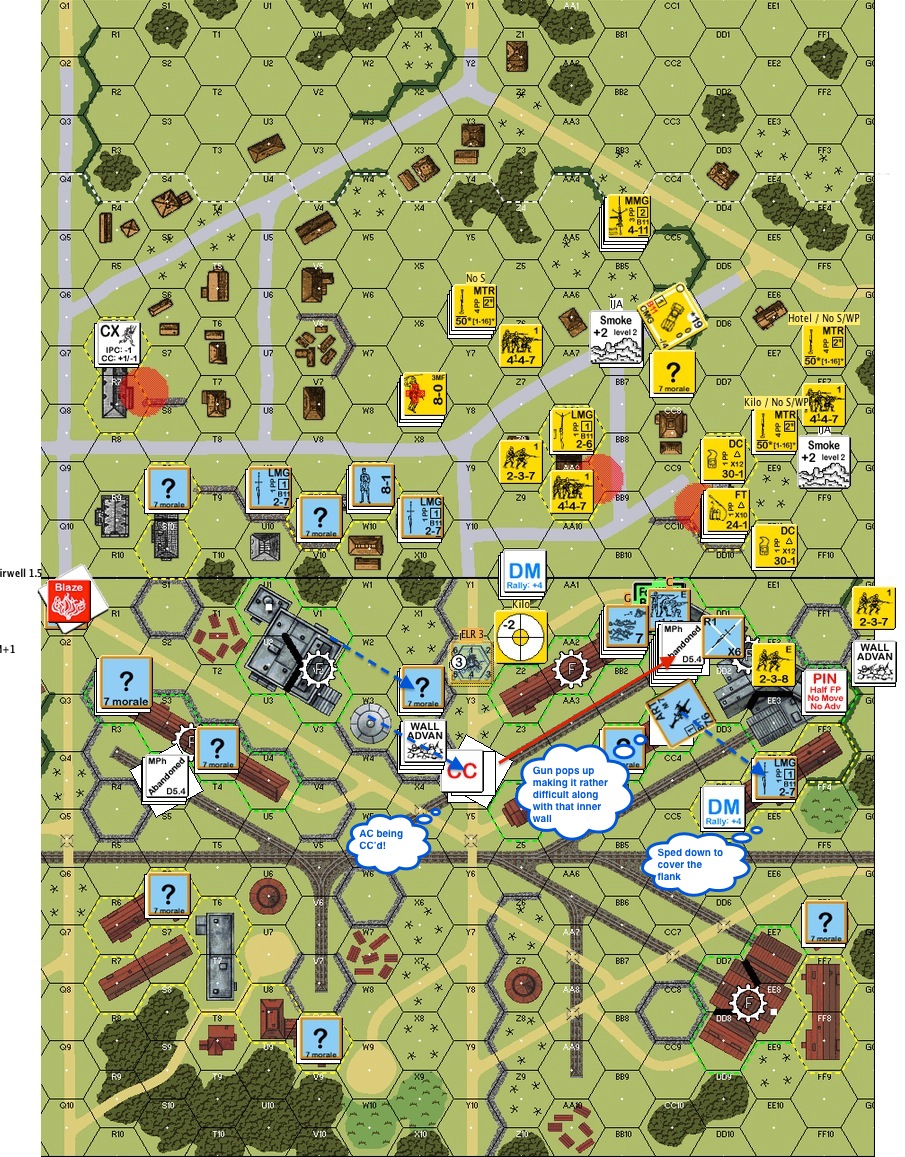
IJA Turn 4 : This is end of IJA Turn 4. IJA managed to capture the big factory on the right. In retrospect I should then have “spilled” more forces down the right edge to turn the Chinese flank. That would perhaps take me to the buildings to the lower half of the board. The folk in the center had to rout back. The MMG that malfunctioned was fixed prompted in the next Rally Phase. Meanwhile, the AC got into a threatening position but it had to get on an embankment to interdict any Chinese movements.
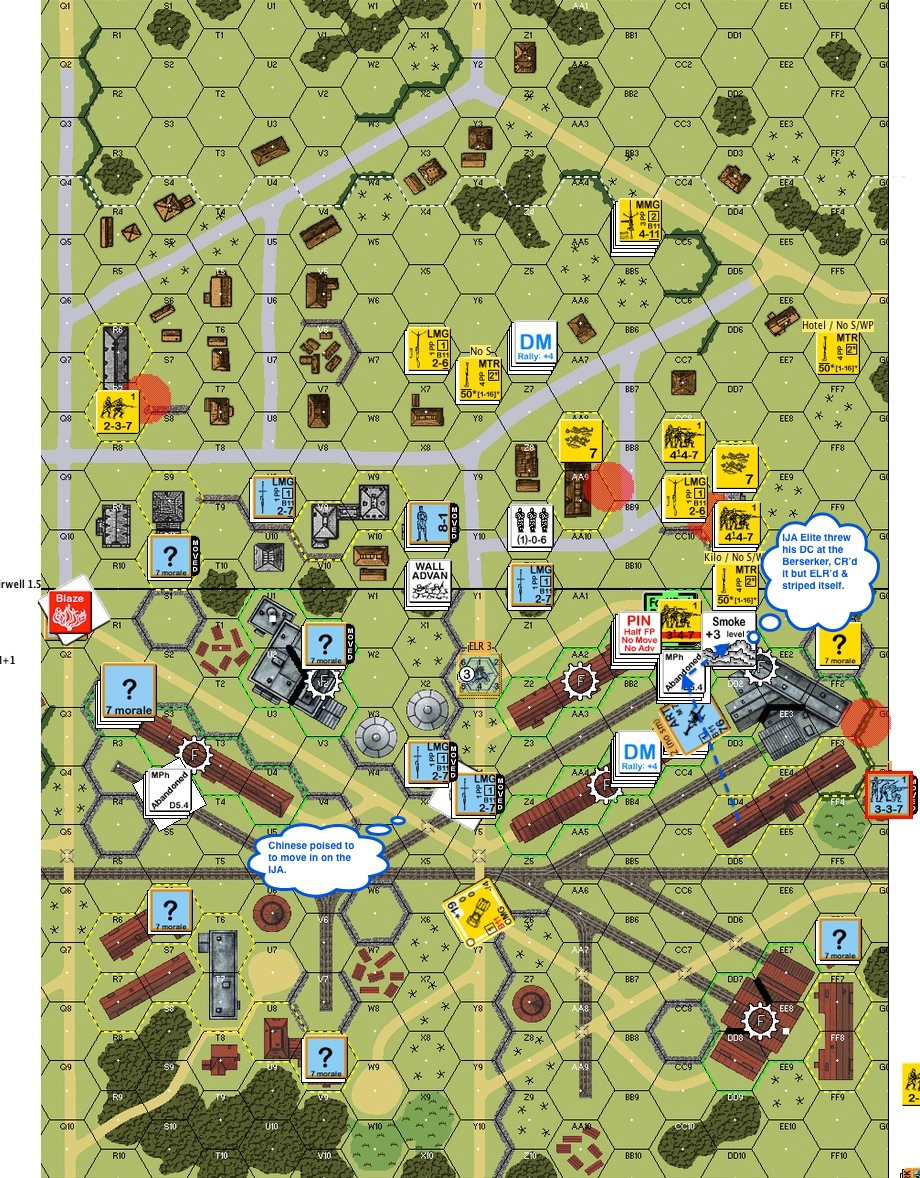
Chinese Turn 4 : Two Chinese squads went berserk and both targeted the striped IJA squad sitting in the Fortified hex on the right. One of the berserkers was underneath the Pinned squad next to the green Fortified hex so you can it imagine it doing the zombie dance against the wall. The other Chinese berserker rushed up (blue dotted arrow), spotted the IJA elite through the smoke to the right and switched directions. The IJA elite squad threw their DC at the crazies but only managed to CR the berserkers while ELR’ing itself to a first liner. The berserkers rushed in and got wasted by gunfire but it caused enough damage by taking the one squad the IJA had with a decent smoke component plus used up their DC!
The Chinese shifted their forces to the right as other sectors were not under threat (a street party was in progress around the bonfire by now). Notice also the 2 LMG squads closing in on the lone AC sitting in the middle of the board.
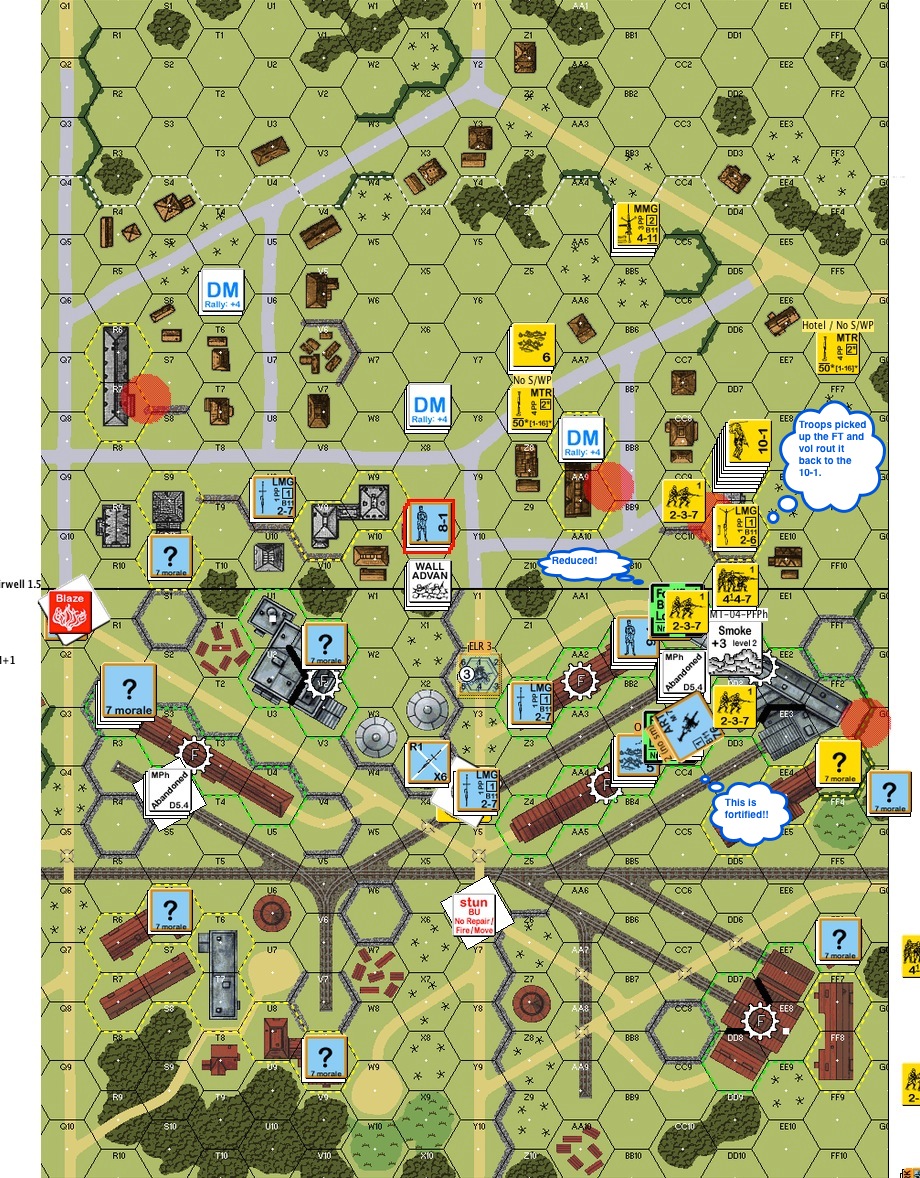
IJA Turn 5 : With all 3 mortars out of smoke and the one elite squad ELR’d to a first liner, the IJAs were not able to put more troops into the factory on the right as the Chinese had an MMG under an 8-1 in the middle of the map. Tried as they might, the IJA group in the middle couldn’t put much pressure on that MG, apart from discouraging it from putting up a fire lane. This is the end of IJA’s Turn 5. The troops inside the IJA’s hard won Fortified hex was steadily reduced. The fact that it should have advanced into the HMG squad (with the 9-1) long time ago to take them out by CC only occurred to me now. (Urgh..) Meanwhile, the 10-1 came forward to rally the troops. The 1st liners grabbed the flamethrower they recovered, vol broke and routed it back to the 10-1 in the hopes that the 10-1 would know how to use it.
I was definitely not at my best!
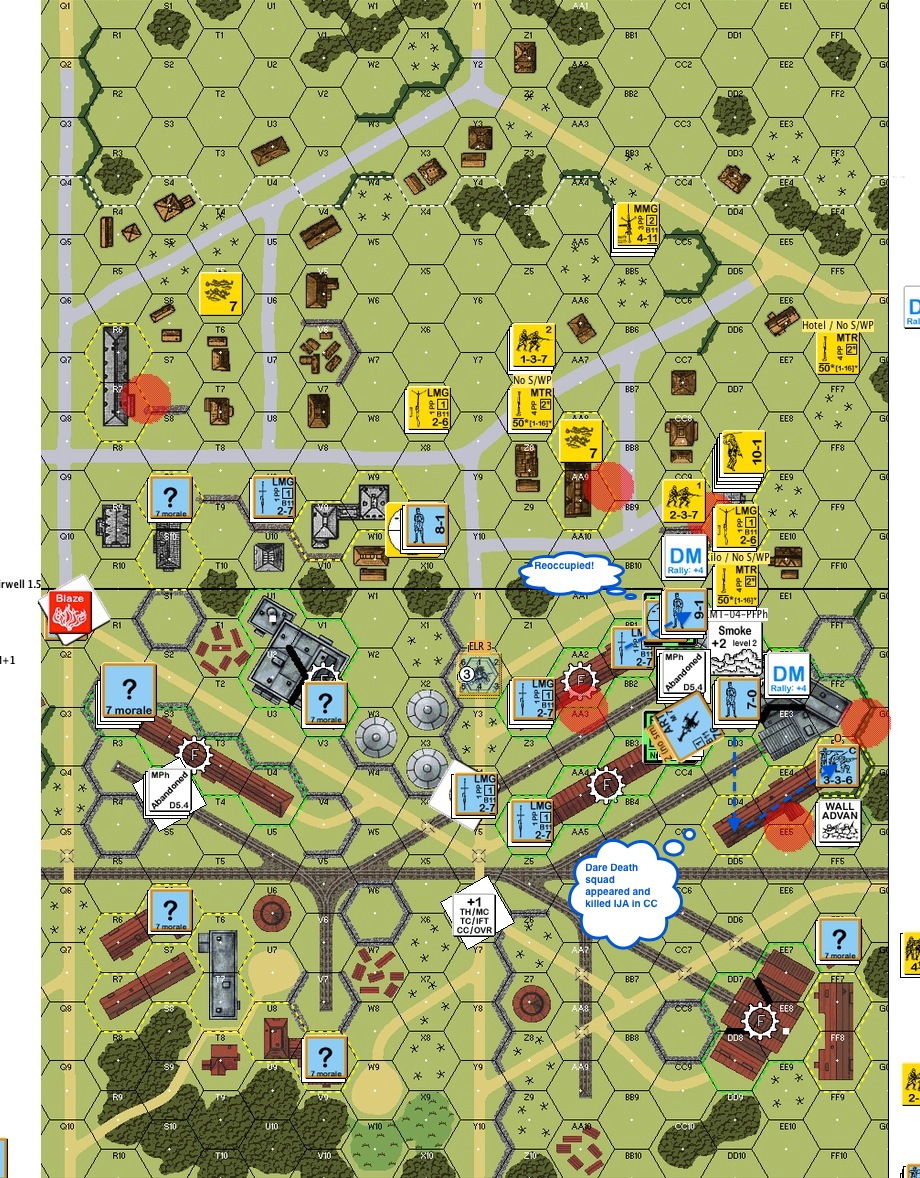
Chinese Turn 5 : It’s increasingly evident that the IJA were getting bogged down at the first factory. The Chinese reoccupied the Fortified hex and a Dare Death squad successful took back another building. While the retaking of the occupied hex didn’t mean immediate reversion of control, it did pretty much put the IJA at where they started with a lot less troops and only 2 Movement Phases to go.
This was where I conceded.
Review :
These are some of the major points I should have done better. In real life the IJA prevailed (and the ROAR was 15:11 Japanese:Chinese). As with real life, this is how much damage a bad leader (yours truly) can do!
What else could I have done better? What are your thoughts? Please comment.


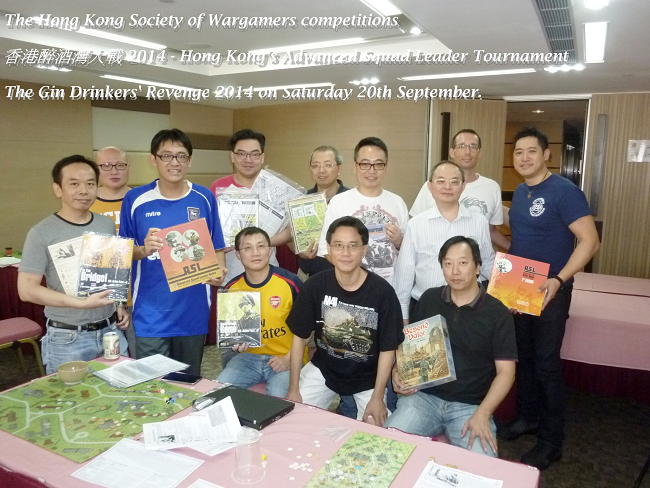
 Saturday, Sept 20 2014. I found the corner table just like George Bates did when he was the tourney director for the Malaya Madness tourney in Singapore and I set my bag down. The Hong Kong Society of Wargamers has 2 rooms booked at the KITEC (Kowloon International Trade & Exhibition Center) regularly for their meetings. Today, however is unlike any other day.
Today is the day for the Gin Drinkers’ Revenge 2014.
Twelve arrived. We had them divide up into three categories :
We had 8 hours, 2 rounds, single elimination, 4 hours per game. We wasted no time in deciding on scenarios and bidding for sides.

My first round was played against Aris Avi from Greece. He lived in Hong Kong for a little while and will be going back to Greece shortly after the tournament. He said however, that whilst he used to play Squad Leader, he’s more into miniatures back home.
I was hoping for J12 Jungle Fighters as some folks here are less versed with (or are even adverse to) PTO. We decided on J59 Friday the 13th instead. I have never played this but Aris said since he played the defenders last time, he would like to be the attackers.
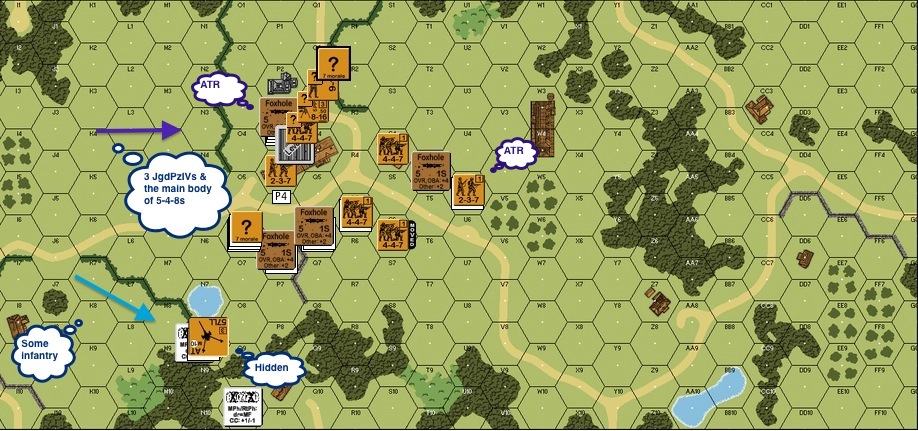
If you would ignore the blue arrows for a moment, this was my defensive setup. The Germans had 3 JgdPzIVs that came in with 10 5-4-8 paras and 3 leaders from the left. The objective was for the Germans to capture all buildings around where you see the Russians concentrated. The Germans had 6 turns. I had my antitank gun (57LL with ROF3) pointed at where it could most likely take a side shot on the Jagdpanzers.
Aris opened up with an armour assault on the top part of the board. He had a small contingent heading towards where my AT gun was emplaced together with some wire. My AT gun fired during the Defensive Final phase, got a hit even though I lost ROF. YES! I will take one out of three. Side shot, TK looked great, I rolled.
BOXCARS – BOOOOOIINNKKKKKKKKKKK!!!
The round glanced off the Jagdpanzer closest to me and then of course the entire German force was then aware of our gun’s presence. Too late now, the paras closest to the AT Gun started to move towards it. On the top side of the board the Germans started getting shot up by the Russian HMG on the first level of the big house. The Russian HMG team held out moderately well and when it broke the half squad on the ground level advanced up to help, except that it couldn’t find the HMG of course (“What do you mean you can’t find the gun?? We left it standing by the WINDOW!!!”)
The Germans para were unable to reach the hedge. At one point most of them even low crawled back to the tree line. On Turn 3 or 4 two Jagdpanzers decided to jump the hedge. Believe it or not, I planned for it. That’s why I had a squad in a fox hole with an ATR looking for an underbelly shot when Jagdpanzers jump the hedge. However as the Jagdpanzer rolled over, I forgot. The first Jagdpanzer overran the foxhole. The good news was that Jagdpanzers with FP1 bow machine guns don’t offer much fireworks. The better news was the squad survived and killed the tank hunter in close combat. At this point, I started to move my Russian infantry up for a counter attack.

I was in a bit of danger on my left flank (bottom) though as the Germans killed the gun crew. One German squad was however caught in the wire and my opponent wasn’t sure whether my other wire was some where in the woods as well. The Germans stopped coming through the Russian left flank. Katya (the Russian sniper) once again came by and broke the remaining German squad for me.
The second JagdPanzer that jumped the hedge stopped with its gun pointed at the HMG farmhouse. I got it caught between two ATR squads as shown and blew it away from behind as my opponent was perhaps too focused on taking out the big farmhouse to let the German paras in. There were no survivors.
My opponent conceded.
My next opponent was Ted Kwong. Ted said he bought his Advanced Squad Leader modules a long time ago. It’s only recently that he started learning the system. He told me how terrific a teacher Erwin Lau is. Erwin is a local grognard who plays a variety of games and has been winning (multiple?) championships in past Advanced Squad Leader tournaments held by the Hong Kong Society of Wargamers. As a testament to how much Erwin has done in pushing ASL locally, Ted is the third person who told me recently as to how immensely patient Erwin is as a teacher.

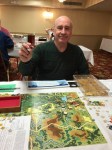
Here you can see Ted Kwong on the left after rolling a pair of snake eyes on his opponent in ASL126 Commando Schenke.
We decided on T4 Shklov’s Labors Lost (Ted didn’t want to do PTO, so no AP84 Double Trouble). I would be the attacking Germans. JR Tracy told he they used to call this scenario “Gandalf vs the Balrog” because each side gets a 10-3.

This was the setup from memory. I got the Germans who had 9 4-6-8s with a star-studded leadership team : 10-3, 9-2, 8-1 with 2 armor leaders 9-1, 8-1. There were also 2 STuGIIIB to help them with taking 5 designated Russian buildings in 6 turns. The Russians had 7 and a half 4-5-8s led by a 10-0 and a 10-3.
The placement of the Russian 10-0 made me wonder if they had their MMG up front. The HMG was probably with the 10-3.
Ted just won his last game against Christopher Chu and he was in a pretty good mood. We shook hands and the game got underway.

First matter of the day : the Germans prep’d their deathstar – FP16 flat versus the commissar stack.
Snake eyes.
We opened the game with a 2KIA! Great omen I’d say, I gripped a little tighter my pair of lucky dice that saw me through Malaya Madness as well. The commissar stack vaporised before the commissar had a chance to rub his eyes. The STuGs led the way with armoured assault, chucking smoke out of their smoke dischargers at key points down the left and the right. The Germans had no intention of doing frontal attacks. The Germans entered the commissar building from the Russian right flank and went slightly behind the first building on the Russian left flank. The STuG from the Russian right came across, discharged smoke immediately before reaching the MMG building and did a bypass freeze on the MMG hex (froze the ground level only). The Germans then piled in through the front and from the side under the cover of a timely smoke grenade.
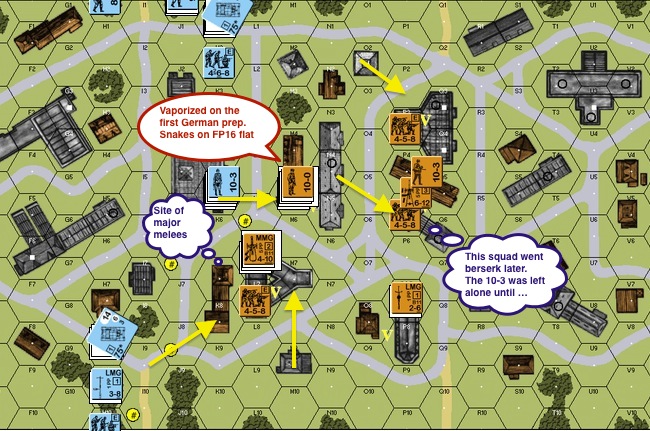
The German deathstar later moved into commissar building and joined the 9-2 and his team. At around Turn 3 the Russian 10-3 was pinned and the Russian HMG squad went berserk!! They dropped the HMG, ran into the street and the berserkers were UNSTOPPABLE. All the heavy German firepower had assembled in the commissar building at that point but apart from bring critically reduced, the Russian berserkers made its way across. It was only when the deathstar final fired at it from an adjacent hex.
The Germans then looked up and met the eyes of the lonely Russian 10-3. The Russian quickly grabbed the HMG, admirable but futile. The STuG rode by and put down smoke from its dischargers. The Germans 9-2 led 2 squads across the street into the Russian 10-3 hex. The STuGIIIB continued its way and got behind the VC buildings. Four buildings down and I would take the Russian HMG as well after we shoot the 10-3.
Ted gracefully conceded.
So here we go. We have a front runner from each of the 3 groups :
There will be games arranged at a later date to determine the final rankings amongst these three, subject to Hong Kong Society of Wargamers’ scheduled events and venue availability.
Watch the video!!
http://www.youtube.com/watch?v=RnqXRFauZFA


Jon H, aka “witchbottles”, the editor for the top notched Advanced Squad Leader newsletter “Point Blank!” gave me the following advice when I first join the GameSquad forums.
It’s only after a month later when I realize the true value of his words. I went back to him and he gratefully gave me the permission to repost what he told me for the benefit of all.
So here we go …
The Best advice garnered from many an ASL’r much better than I:
- Read the rules, pick one chapter every month and read front to back, including footnotes. (Credited to Carl Noguiera)
- Follow the time-honored “programmed instruction” (“Eight steps to ASL – A programmed instruction approach”, The General, v30n1) Basic infantry; MGs and SW; terrain variations; guns and mortars; Vehicles and AFVs; Climate changes; Air support; then paras and gliders; night ; then PTO; finally DTO . The system was designed by Jim Stahler, and it works! (Jim Stahler – remember that German 9-2 counter?)
- Read EVERYTHING you can get your hands on about ASL:
- all the play aids at Desperation Morale;
- all the View from the Trenches issues, ( they are free);
- all the old The General articles ( likewise, same place);
- the old At the Point ASL rag ( at the same place).
- Get Banzai ( free from the Texas ASL club); then use the Texas ASL club,
- Wall Advantage at blogspot;
- the SoCal ASL club websites to look at AARs on any scenarios you are planning to play for the first time.
- Use ROAR to understand play balance; use the ASL Scenario Archive advanced search routines to find scenarios to fall into the above mentioned order of learning.
- It will go quick if you used to play Squad Leader. Big changes are in the vehicles, Guns, and defensive fire and support weapon mechanics. Walking in with Squad Leader – GI Anvil of Victory you have about 10% learned. ( the rest will be no longer used).
- Play, play, and oh yeah …. PLAY. the more the merrier, and the most diff opponents you can find! (Credited to Gary “Fort” Fortenberry and many, many others!)
KRL, Jon H

Whether you are a fellow newbie who would like to learn together or an experienced ASL’r who don’t mind helping me up the curve – please message me at jackson-dot-kwan-at-gmail-dot-com. I play to enjoy and to learn!!

German Tiger I of the 501st heavy tank battalion in Tunisia. (Photo credit: Wikipedia)
I am in trouble!
I just found myself regular face-to-face (“FtF”) games with the good people of the Hong Kong Society of Wargamers who, when they are not playing miniatures, meet regularly to play Advanced Squad Leader games.
I thought I would just drop by, watch and learn how ASL rules come alive in FtF play. It’s my first meeting with these folks (names withheld since I didn’t ask for their permission) and I was determined not to be too much of a disruption. I mean these are very experienced players who carry all the ASL tables in their heads, surely they don’t have time for newbies …
They would have none of that.
Before I knew it I was taking part in a scenario “S21 Clash at Borisovka“. This scenario depicts a situation on March 14 1945, in Borisovka, where the German Grossdeutschland Division had penetrated deep into Russian lines and elements of the 3rd Guard Tanks Corps was sent to stop them. It’s a tank on tank scenario where the Russians has 10 T-34s and the Germans has 4 Mark IVs and 2 Tigers. I haven’t yet read Chapter D but soon after they took the time to explain gameplay to me, I was running a T-34 from behind the woods, speeding through open ground and ramming up against the side of a row of Mark IVs on our flanks and took two of them out!
The Tigers were much harder to deal with. We were trying to run T-34s around them and even got some rammed up their sides but to no avail. We though things were going downhill for the Russians when one of the Tiger’s gun malfunctioned!
You should have heard the screams!
At the end the Russians won, befitting the engagement’s historical ending. If you saw the level of engagement (Advanced Squad Leader is a VERY interactive game), it’s not hard to understand how some folks devote a lifetime to playing it.
To my fellow newbies : It’s true – the best way to learn Advanced Squad Leader is to have seriously experienced players to play with you. You’ll be amazed how quickly everything fall into place!
(If the above sounds fantastic, you should know that I was learning more than playing .. a couple of grognards did all the moves!!)
Whether you are a fellow newbie who would like to learn together or an experienced ASLer who don’t mind helping me up the curve. I play to enjoy and to learn. Please message me at jackson-dot-kwan-at-gmail-dot-com!!
Mostly Stories about American Marines
Blogging Advanced Squad Leader AAR After Action Reports since 2013
Advanced Squad Leader Scenario After Action Reports
Blogging Advanced Squad Leader AAR After Action Reports since 2013
History and Hardware of Warfare
ASL & The Path To Redemption
Comprehensive Resource for Advanced Squad Leader
Washington DC Area Advanced Squad Leader Game Club
Blogging Advanced Squad Leader AAR After Action Reports since 2013
Blogging Advanced Squad Leader AAR After Action Reports since 2013
Blogging Advanced Squad Leader AAR After Action Reports since 2013
Advanced Squad Leader (ASL) Tournament
Blogging Advanced Squad Leader AAR After Action Reports since 2013
Blogging Advanced Squad Leader AAR After Action Reports since 2013
RitterKrieg Home
"A15.1 The cauldron of battle, which destroyed so many units that failed the test of arms, could also forge better soldiers and/or acts of desperation borne of heroism or despair."
An ASL Tournament held in West Dover, VT October 29-November 1, 2026
