S1 (Part 1) Retaking Vierville

On June 7 1944, one day after the Normandy landings. the 101st Airborne (“Screaming Eagles”) was sorting themselves out from all over the Cotentin Peninsula and was tasked with securing the eastern approach to the American landing at Utah beach. Vierville-sur-Mer was a major traffic thoroughfare. Although the Americans secured it earlier they had to moved westwards towards the German strongpoint of St. Come du Mont (see Mission Albany).

There are three groups of symbols in this map of Normandy.  The one on the top left is Utah Beach, the one on the bottom left is St. Come du Mont which was a German stronghold.  The group to the right is Omaha beach and a bit inland from Omaha Beach is Vierville-Sur-Mer.

An assortment of German units took the opportunity to deliver a counterattack and among them, the elite 6th Fallschirmjäger Regiment. This day would see an all out brawl at Vierville-sur-Mer, paratroopers to paratroopers.

Erwin plays the Germans and I the Americans. We decided to play this Advanced Squad Leader Starter Kit Scenario with full Advanced Squad Leader rules. The Americans win if there are no “good order” German units in the four buildings marked with “V”s on the map. By the same token, the Germans need to keep a “good order” unit in at least one of the four buildings at game end (notice the Americans have the last move).

Turn 1 German - MPh

Turn 1 German Movement Phase

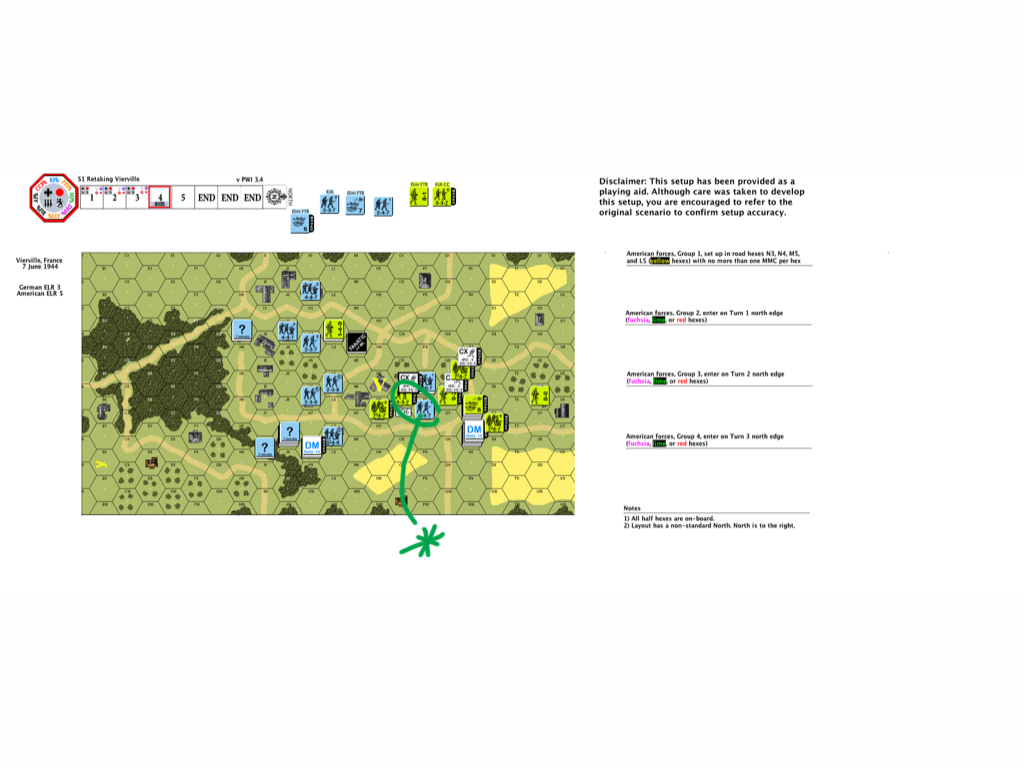
Some elements of the 1st Battalion, 506th Regiment of the Screaming Eagles were making their way through the center of town when German units (1058th & 919th Grenadier Regiments) appeared from different directions.   (Right edge of the map is North.)

The Americans went straight to work.  Two full squads and the  8-1 leader went to the key buildings in the southwest, the other elements went to the northeast to meet up immediately with the 1058th Grenadiers.  The southwest element could potentially be isolated and might find itself fighting a much tougher battle until  reinforcements arrive.  Their mission was to play for time.  The northeast element was to clear the way for the reinforcements and were free to play to their strength in the attack.

Turn 1 American - Close Combat Phase

Turn 1 American Close Combat Phase

Other American elements started to arrive.  They used the grain field (which is in season) to make it across the open ground, using a building for cover.  A potential danger was that new German elements might appear behind them and cut them off from their rout paths.  So one squad stayed behind in the woods as the rear guard (circled in orange on the map above).

Sketch 2013-06-22 18_27_32

Turn 2 American Movement Phase

A broken American squad on the south west decided to step it up, rallied and went fanatic (battle hardened, marked by the asterick). In their desperation, a hero arose in their midst!  The reinforcing Screaming Eagles lost no time in closing with the 1058th Grenadiers on the northeast.  Hellbent on blasting their way through, they also drew fire away from their brothers who followed.  The German paratroopers arrived from the south east as well.  They carefully made their way through the woods towards the sounds of battle.  (Right edge of the map is North.)

Sketch 2013-06-22 18_40_09

Turn 3 German Advance Fire Phase

The 919th Grenadiers crossed the street in the south-west and pressured the squads on that corner of the intersection.  At the same time the 6th Fallshirmjäger moved to slice the battlefield in half, isolating the 8-1 and his little group.  To the north (right edge of the map), the Screaming Eagles couldn’t break through the 1058th Grenadiers.  They needed to clear a way to town fast ‘cause the key buildings are falling to the Fallshirmjäger soon, which also means they and their arriving brothers would all be standing outside the grain field with no protection if they couldn’t get into town.

Sketch 2013-06-22 18_45_21-1

Turn 4 German Rally Phase

The Screaming Eagles managed to get into close combat in the north.  A half squad was killed when they went in for hand to hand with a German squad and their 8-1 leader.  On the other side of the block an American half squad ambushed their German counterpart when they broke into their building.  The Americans slipped through to the other side and met up with the American paratroopers that were holding the Fallshirmjägers at bay.  However the American’s hold on the key junction was strained as they endured volleys after volleys of German fire.

So here we are at the start of Turn 4 in a 5 turn scenario.  Will the Germans succeed in capture at least one of the buildings at the intersection and hold off American attacks?

am747Sge548S

How about coming home everyday to 30 mins of PBeM game over VASL?

Whether you are a fellow newbie who would like to learn together or an experienced ASLer who don’t mind helping me up the curve. I play to enjoy and to learn. Please message me at jackson-dot-kwan-at-gmail-dot-com!!

Google

DASL1 The Schoolhouse – Team Play

Photo taken early game

Last Sunday I spent the afternoon playing DASL1 The Schoolhouse.  I was thankfully partnered up with an experienced ASL’r, Simon, as the Russians.

This engagement took place on July 9 1943 at a Russian village at the Kursk salient called Ponyri.  The scenario card described this as “the most intense street fighting since Stalingrad“.  This engagement also saw the huge Ferdinand tank destroyer (aka “Elefant “or “Porsche Tiger”) in action.

I got to say : this is a VERY interesting scenario. The Germans (Lawrence, Erwin & Wah) had limited time before a whole new Russian army piled in. On one hand they needed to be aggressive as they were under time pressure, although they couldn’t be too aggressive as they had to be able to fall back to proper defensive positions when the Russian counterattack arrived.

My partner Simon did a terrific job defending the stone building (marked in yellow) to the immediate north of the intersection on board d. His use of  tunnels (one of them marked with yellow dotted line) to the two buildings behind (forfeited fortified buildings) as rout paths and to gain concealment was a beautiful thing to see. Too bad the Germans lost their flamethrower early in the game!!

The Russian defence involved the use of set demolition charges as well. The Russians fell back when necessary but did everything to delay the Germans until the counterattack arrived. One of the Elephants was torched with Molotov Cocktails when it tried to rush a killer stack. Two of the remaining three Elephants were immobilized but were in great positions. It didn’t look easy for the counterattacking Russian tanks if they want to hit back through the narrow streets.

The Germans tried rushing the street (marked with the wavy red line) in front of the stone building but was wiped out by spraying fire.  At one point the Germans got that stone building encircled, rush the ground floor and was in the process of destroying one end of the tunnels.

That was precisely when the counterattack showed on Turn 7 (marked with the blue arrow).

The lead tanks and the elite troopers of the 1st Battalion 1032nd Rifles helped defend the tunnels together with the 307th Rifles coming back through. I had to run at that point but my friends told me there was a human wave on the German’s left flank and Germans conceded on Turn 8.

How about coming home everyday to 30 mins of PBeM game over VASL?

Whether you are a fellow newbie who would like to learn together or an experienced ASLer who don’t mind helping me up the curve. I play to enjoy and to learn. Please message me at jackson-dot-kwan-at-gmail-dot-com!!

Google

RPT1 (Part 3) Ferenc Jozef Barracks – A View of Advanced Squad Leader Scenarios

Turn 2 Hungarian - PFPh

Turn 2 Hungarian – PFPh

We are back on RPT1 Ferenc Jozef Barracks.  Just so everyone remembers, the Romanian 9th Cavalry were the attackers and the Hungarian 1st Tank Division were the defenders.  This engagement was part of the horrendous 100 day siege of Budapest.  The Hungarians were fighting along Nazi Germany and the Romanians were Russian allies.  The goal of the scenario is for the Romanians to capture the barracks (marked with a yellow “V” by Don) seen on the top left of the map within a 5 turn (10 mins in real world) time frame .

Turn 2 Hungarian

The above was what it looked like at the start of the Hungarian Turn 2.  The Hungarians started moving back towards the barracks while keeping their guns pointed to areas where their Romanians pursuers would need to cross.

Turn 2 Hungarian DFPh

Turn 2 Hungarian DFPh

The Romanian 9-2 squad leader hiding all along together with a squad and a shiny new medium machine gun (in the middle on the bottom, circled in orange) decided it was the best time to come out of concealment and open fire at the Hungarians who came into sight.  Unfortunately the MMG went the way of the flamethrower and clonked out on the first volley!  Apart from making a mental note to launch a complaint against the armoury after the engagement there wasn’t a lot he could do.  The other chaps in the building to the bottom right heard the ruckus and joined in as well but they then realised they no longer had line of sight.

The Hungarian defenders did a beautiful job slipping away towards the barracks whilst staying in concealment.  (Note to self : watch & learn)

Turn 3 Romanian

Turn 3 Romanians DFPh

Turn 3 Romanians DFPh

The Romanians orchestrated a series of moves in the hopes of stopping the bulk of the Hungarians from reaching the barracks.  On the righthand side of the map, the Romanians successfully kept the 2 Hungarian squads (circled in yellow) distracted while they double-timed a number of squads up the boulevards to the west.  They also intended to engage and even kill a few of the Hungarian squads by hand to hand combat where they could.

On the bottom of the map, the fuming 9-2 squad leader and his squad (circled in blue) who were dragging their broken MMG across the street (Note to self: use “Dash” next time) got pinned under heavy fire.  So there they were, hugging the ground and cursing up a storm in the middle of the street.

The orange line through the street on top was where the Romanians planned to shoot at the Hungarians who would need to cross over to the next building on their way to the barracks.

Turn 3 Hungarian RPh

Turn 3 Hungarian RPh

The Romanians (circled in red) tried to grab a couple of the escaping Hungarians, but in both instances they were ambushed instead!  The Hungarians decided to withdraw and slipped away while the Romanian attackers were still hugging their guns in fright.

So here we are at the start of the Hungarian Turn 3.  The Romanians have only 2 turns left and the Hungarians has done an elegant job in slipping away intact as a force while mostly staying under concealment.

Will the Romanians catch up to the Hungarian masters of defence?  Keep an eye out for Part 4 of RPT Ferenc Jozef Barracks!

hu347Sax347S


How about coming home everyday to 30 mins of PBeM game over VASL?

Whether you are a fellow newbie who would like to learn together or an experienced ASLer who don’t mind helping me up the curve. I play to enjoy and to learn. Please message me at jackson-dot-kwan-at-gmail-dot-com!!

Google

“The Best Advice Garnered From Many An ASL’r Much Better Than I”

Iwo Jima

Jon H, aka “witchbottles”, the editor for the top notched Advanced Squad Leader newsletter “Point Blank!” gave me the following advice when I first join the GameSquad forums.

It’s only after a month later when I realize the true value of his words.  I went back to him and he gratefully gave me the permission to repost what he told me for the benefit of all.

So here we go …

The Best advice garnered from many an ASL’r much better than I:

  • Read the rules, pick one chapter every month and read front to back, including footnotes.  (Credited to Carl Noguiera)
  • Follow the time-honored “programmed instruction” (“Eight steps to ASL – A programmed instruction approach”, The General, v30n1) Basic infantry; MGs and SW; terrain variations; guns and mortars; Vehicles and AFVs; Climate changes; Air support; then paras and gliders; night ; then PTO; finally DTO . The system was designed by Jim Stahler, and it works!  (Jim Stahler – remember that German 9-2 counter?)
  • Read EVERYTHING you can get your hands on about ASL:
  • Use ROAR to understand play balance; use the ASL Scenario Archive advanced search routines to find scenarios to fall into the above mentioned order of learning.
  • It will go quick if you used to play Squad Leader. Big changes are in the vehicles, Guns, and defensive fire and support weapon mechanics. Walking in with Squad Leader – GI Anvil of Victory you have about 10% learned. ( the rest will be no longer used).
  • Play, play, and oh yeah …. PLAY. the more the merrier, and the most diff opponents you can find!  (Credited to Gary “Fort” Fortenberry and many, many others!)

KRL, Jon H

Kwan01

How about coming home everyday to 30 mins of PBeM game over VASL?

Whether you are a fellow newbie who would like to learn together or an experienced ASL’r who don’t mind helping me up the curve – please message me at jackson-dot-kwan-at-gmail-dot-com.  I play to enjoy and to learn!!