In this scenario, the Russians win if they control the GPU prison (see the cluster of German concealment counters around KK35) and/or Block 31 (marked on the Map) in 5 turns. Historically Block 31 was notorious for being sniper infested, so any Sniper that situates in Block 31 Pins on a dr of 2 AND 3.
Tag Archives: ETO
J188 Grab and Go
I am the German defenders. While I believe in bringing all my guns up front, I am not backing up fast enough. I am not happy about exchanging casualties with the Russians at the present ratio (slight more than 1:1) since there are twice as many Russians as the Germans! Even though the Russians are spread out, they have 5 leaders in this scenario (these are the Guards Para!).
ETO & PTO graphics
A few minutes at RB3 Bread Factory #2
ITR5 Fire Teams AAR

“Catalina Kid,” a M4 medium tank of Company C, 745th Tank Battalion, drives through the entrance of the Aachen-Rothe Erde railroad station during the fighting around the city viaduct on Oct. 20, 1944. Courtesy of First Division Museum
It’s Oct 1944. The Americans were about to engage the Germans in what was to be their largest urban fight in the Second World War. Aachen was also to be the first German city captured by the Allies.
In this “BFP Into the Rubble” scenario, 10 elite & 12 US 1st line squads teamed up with 3 Shermans and 2 tank destroyers faced off against a mix of 18 German squads with mostly 2nd liners, a pair of AA guns and 2 Hetzers. The Germans also had 21 concealment counters, 8 Fortified locations and sewer movement capabilities.
There was a lot of rubble.
The Americans were to capture 7 buildings in 8 turns.
American Turn 2 about to start : The German Fortress troops had a surprise for me. They stacked a few Fortified counters on each other and brought the 37L AA gun onto the 2nd level! This flak gun didn’t have the 2cm FlaKvierling’s “20” firepower but it did have Stielgranate 41 ammo which offered TK# 26 within 11 hexes. The high rate of fire from both AA guns were particularly disconcerting if only for Deliberate Immobilizations. I am quite the novice with AFVs. I decided to keep my tanks together in mutually supporting roles. My AFVs would stick with the infantry (panzerfausts abound) and we would use MGs (and not tanks) against ordnance.
There were a couple more tactical things I wanted to do / get into the habit of doing:
- Place a squad on high ground. If nothing else to make it harder for my opponent to gain concealment. Squads in high places could interdict as well.
- Get to the center building (where the malfunctioned Flak gun was). My opponent observed that the center building was the ideal jump off point to the latter portion of the American attack.
- The German SAN was 5 and I got open top tank destroyers. I got to make sure we got dedicated sniper shielding for our key units!
Credit : Photo Gallery of World War 2
I was on a tight schedule here as the Americans. I pushed on, using smoke whenever possible, dummies or not. One of the first things we found was of course the Flak tower my opponent constructed on my right flank (top of the map). My AFVs then slid towards the middle of the map.
End of German Turn 2 : The Americans managed to push to the middle of the board. The AA Gun commanding the middle of the street immobilized one of the Shermans. The American 10-2 (aka Jedi) Deathstar got taken out as well. However while the other AFVs spun towards the middle of the board to avoid the Steilgranate wielding Flak tower, a lone Sherman remained to provide smoke cover for the infantry (Errata : The 37L AA gun’s actually on the 2nd level, not the 3rd).
The Americans deployed 4 half squads towards the back to screen off the German sniper, and they took a few hits. Unfortunately the German sniper killed 2 out of 7 American leaders, something the Americans could ill afford with their lower morale. The American sniper relocated to the vicinity Before the game is up, the Germans would see their SAN reduced from 5 to nothing by Sniper-on-Sniper action!
In the midst of American Turn 4 : The Americans pushed forward and captured the lone AA gun in the middle of the board. American leaders continue to be shot by the German sniper. The latest victim was the radio guy who was in the midst of relocating this radio. The Jedi Master and his HMG team took the chance to rush past the sniper. Towards the sound of gunfire!
The Americans took the center building, we just needed to remember to get guys upstairs. Towards the bottom of the map, the infantry continue to lead the way with AFVs coming in as support.
End of American Turn 6 : Two more turns to go and the Americans still got 2 or 3 buildings to take. We were definitely running tight on time.
From the right flank (top of map), the American OBA put the Flak tower’s stairwell on fire! The gun crew was therefore encircled. The German brokies were blocking the approach from the American forces though.
On the left, a Sherman got blown up by a German squad who found a panzerfaust. An American flamethrower squad hopped by and broke the half squad involved. That gave the other American AFVs time to push the wreck out of the way and to get into position for an assault on the final VP building on the left flank (bottom of map).
The German Hetzers were about to enter from the left of the board.
After American Turn 7 : Encircled as it might be, the German Flak tower was still in the fight. It blew up the TD that rushed over to help! Nearby MGs were engaging it, as was the captured AA gun from the middle of the board. We got a little thin on our right but the lay of the rubble made it hard for us to rebalance.
The wounded artillery observer brought fire down on the left flank target building to good effect. The Americans on the left flank got ready to hit the building in the last turn.
End Game : The OBA on the left flank (bottom of map) broke some German units and even killed a Hetzer as it tried to move towards the Americans.
On the American right (top of map), the US forces had nothing but open ground to traverse unfortunately. We tried to shift as much forces as possible to the right but having to get around the German brokies proved to be fatal!! The Americans therefore lost this scenario by one VC building!
Thoughts? What would you have done better? What do you think of the tactical choices? Would you try this scenario Please comment!
Dinant : Chasseurs on the Meuse AAR

Notre Dame de Dinant & the Citadel. Source : Wikipedia
Calm down, you didn’t miss it. Dinant is not out yet.
Dinant is a project in development. Dan Dolan’s the designer, Nadir Elfarra did the map and Carl Nogueira, the campaign game. Stanley Neo and I have been playtesting the Dinant scenarios, so this perhaps one of the rare times when you see an AAR on a product not released.
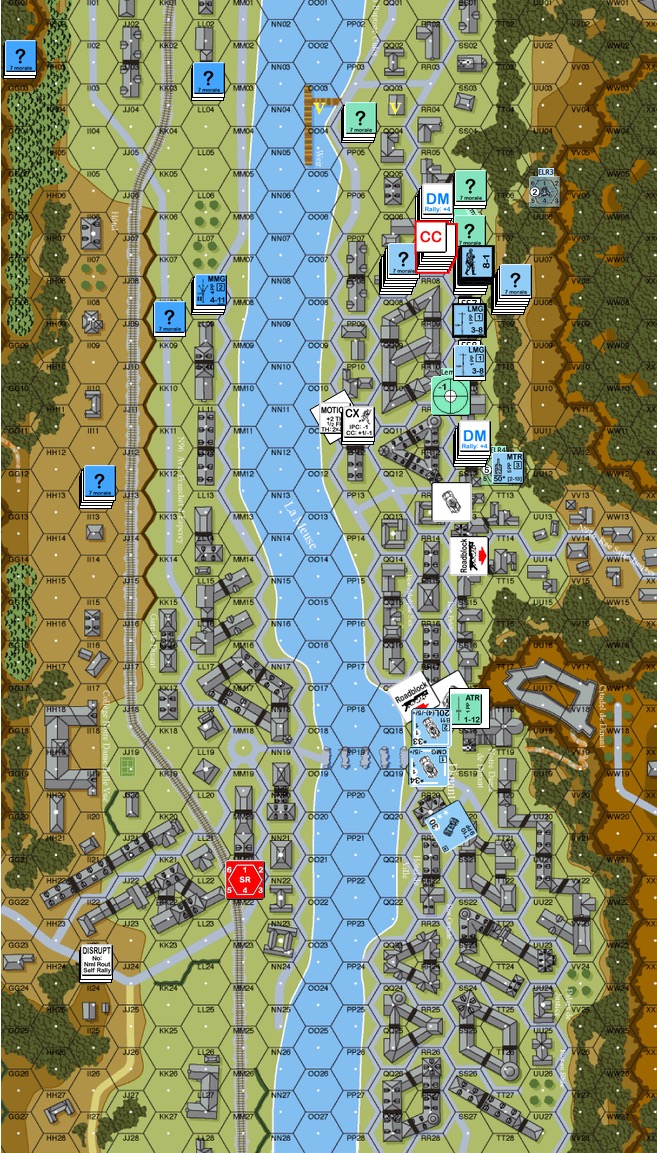
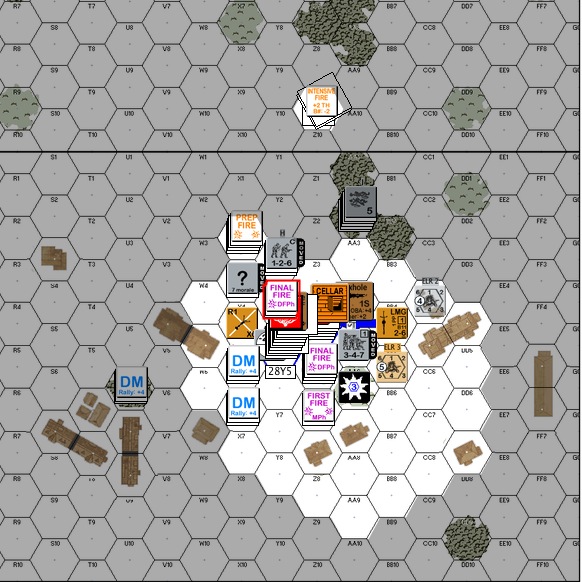
This scenario, “Chasseurs on the Meuse”, depicts an action that took place on May 13 1940. The Belgian 8th Chasseurs de Ardennais, fighting a series of delaying actions, was chased all the way up to the edge of the Meuse by Rommel’s Ghost Divison (7th Panzer). The French arrived at the west shore and did their best to help out. The Germans are to seize the victory locations marked on the top of this map within 7 turns. The German Recon company can choose to come in from the marked locations on the right side of the map. Their HQ and Armoured Car platoons can come in from the south (bottom of the map) as well.
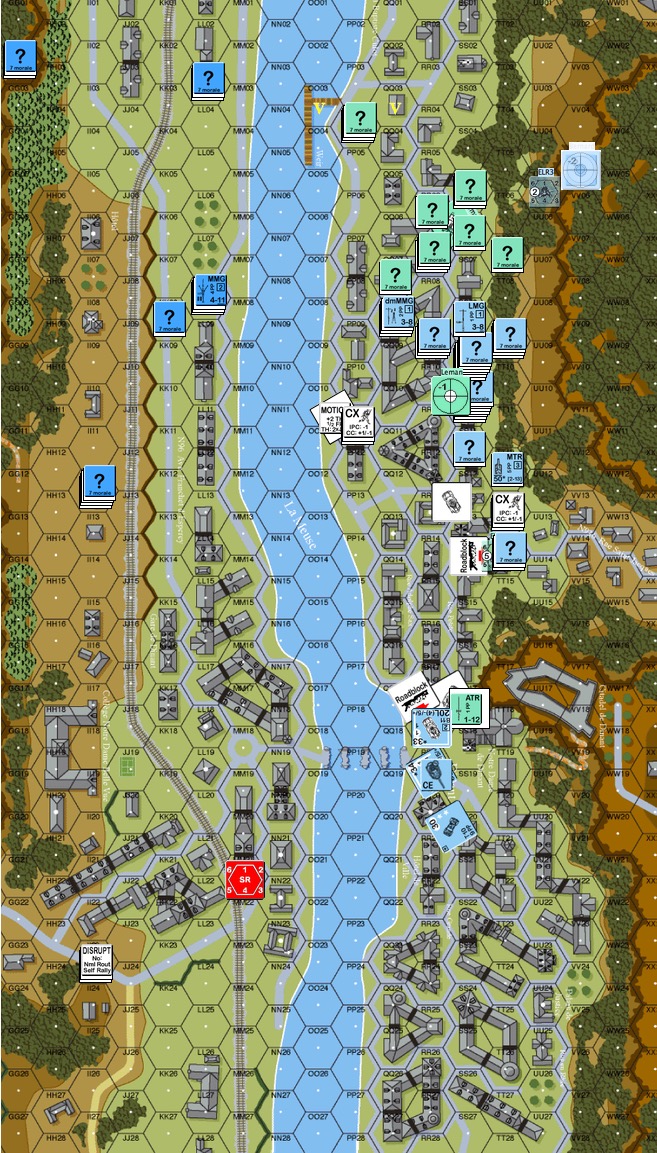
This was my Belgian/French setup. The three VC locations were on the top part of the map. One of the VC hexes was under the stack of Belgians to the right of the VC stone building. The Germans start with 13 elite squads, 5 leaders, 4 armoured cars and a host of motorcycles. . The Belgians fields 9 first liners and the French, 3 first liners immediately and 3 on Turn 3. The Allies have 6 leaders, 2 self propelled guns and a module of OBA with scarce ammunition.
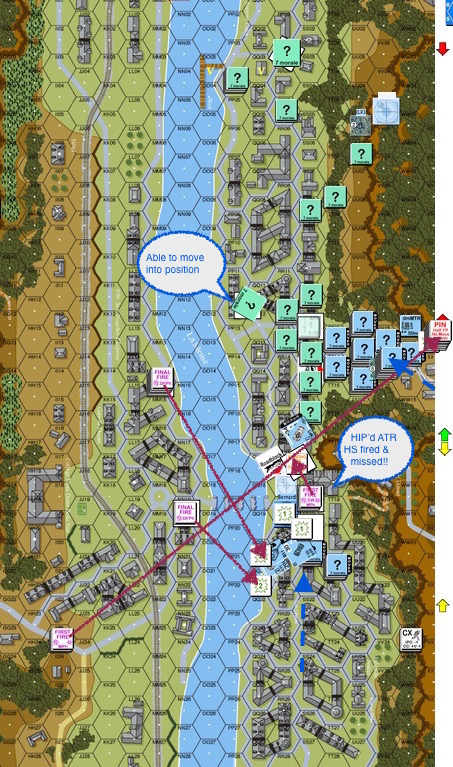
The Belgians had 2 HS HIP’d with ATRs around Rue Saint Jacques (the road through the valley from the right) and one on the first level of Notre Dame de Dinant. The big set of concealment counters in front of the roadblock at Place Reine Astrid (in front of Notre Dame de Dinant and the Citadel was a decoy to turn enemy AFVs that way.

Place Reine de Astrid. http://www.citadellededinant.be

Citadel de Dinant. http://www.citadellededinant.be
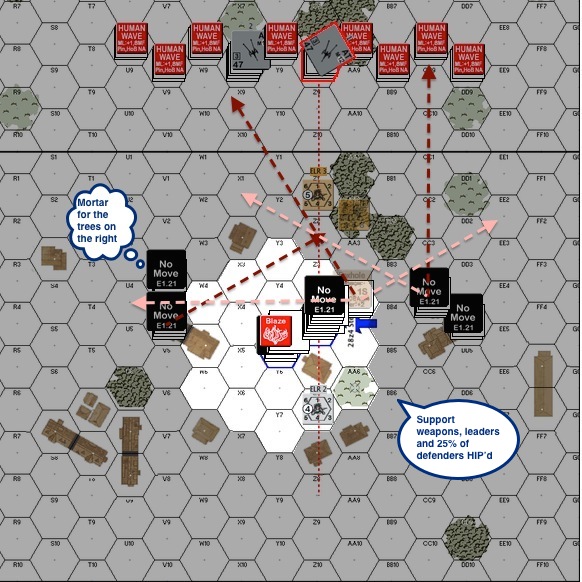
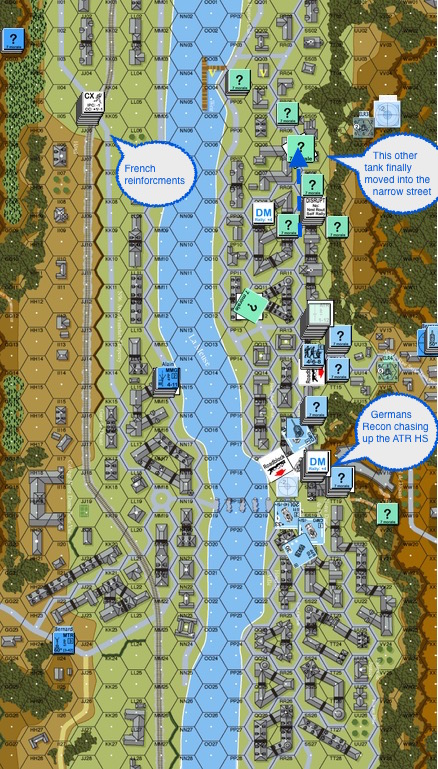
Turn 2 Germans : The German infantry decided to heap through the Rue Saint Jacques en masse. The French mortar managed however, to catch their counterparts from across the Meuse. The armoured cars got a bit of harassing fire from the French across the river.
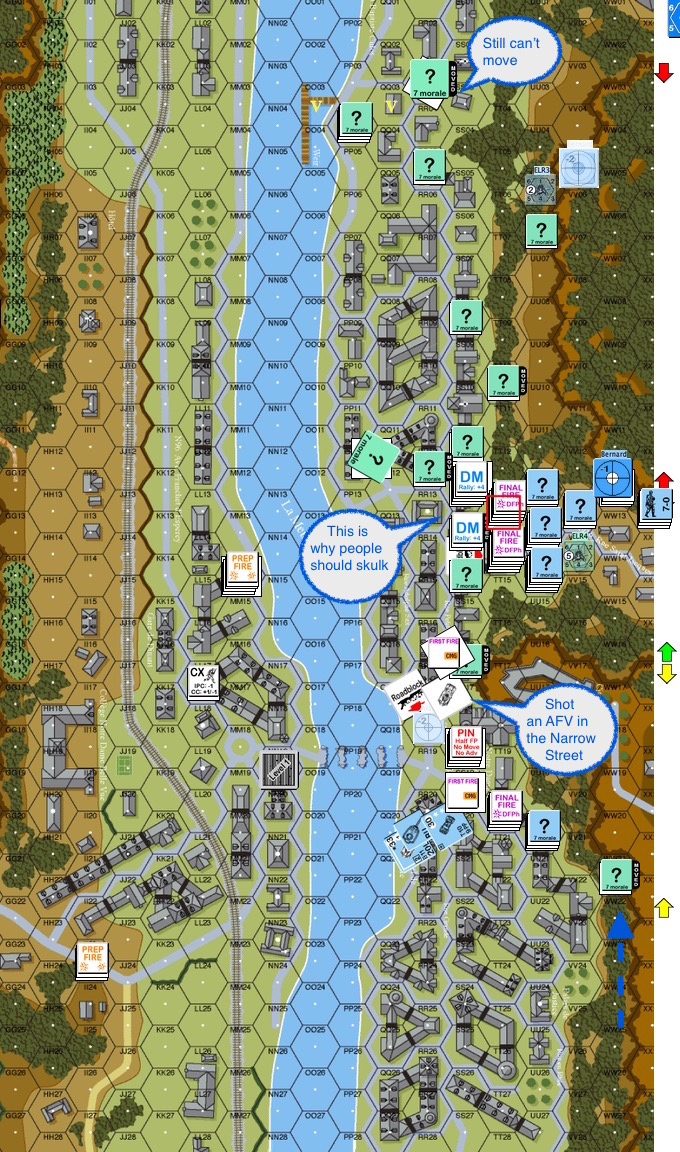
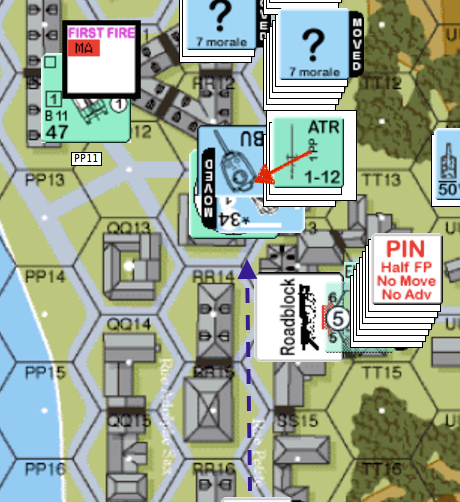
Hearing the Germans in the Plaza outside, the Belgian HS in the Notre Dame threw off their cover and went to the windows with their ATR. One entrance to the narrow streets was blocked but the other one needed to be sealed as well, best with a wreck. The first armored car passed by and was about to turn into the narrow streets to the north.
Boom!! The anti tank grenade missed,
The targeted AC continued to speed away and the second followed suit. The other ACs started firing into the church and the German infantry got the headsup about Notre Dame.
Turn 2 Belgians : The intrepid ATR team survived the initial German fire. It now sounded like half the German army was running for the church. The Belgians went to the windows again and fired. This time wrecking the 2nd armored car and therefore successfully blocked the armoured car platoon from the action to the north!
In the north, the Belgians were nervous about all the Germans coming down the valley but they felt a little too smug about lying concealed in stone buildings. They decided not to skulk.
Big mistake. The Belgians in the first 2 building hexes got blown away by the massed German firepower.
While one of the Belgian self propelled guns moved into place. The one to the north refused to budge without their partner and a radio to contact them with.
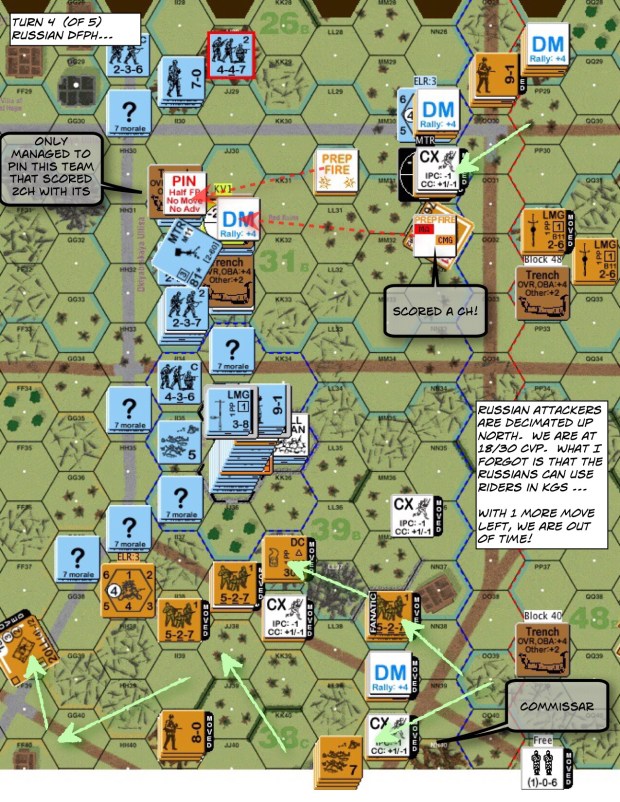
Turn 3 Germans : The Belgians to the north were simply not retreating fast enough. The Germans caught them in 3 locations where Close Combat killed 2 Belgian squads.
Turn 3 Belgians : Hey! The French reinforcement arrived, together with a radio to call down the artillery. Yes, ammunition was scare but it’s something. Given the rowhouse configuration, the French could only look for line of sights through the gaps they could find.
The other Belgian self propelled gun was touched by the change in sentiment and moved into one of the narrow streets to cover the German advance.
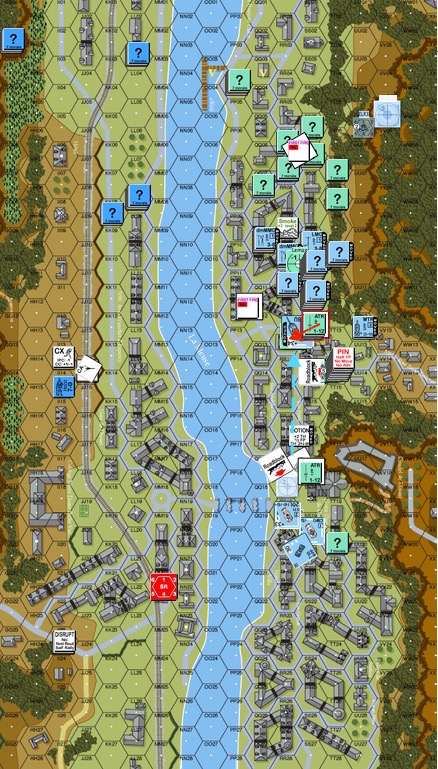
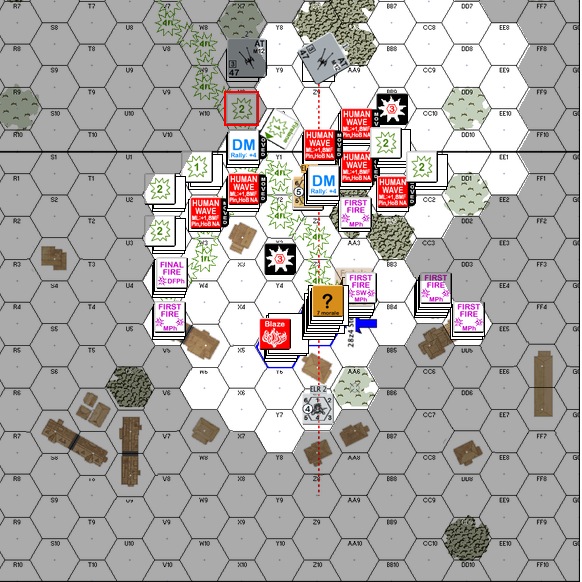
Turn 5 Germans : The Belgians finally got the hang of just how far to move back and how to shoot the Germans in bypass.
The Belgian SPG closer to the river was shooting at the Germans moving through the little plaza. When it Firist Fired, the lead German AC moved forward, turned and faced it.
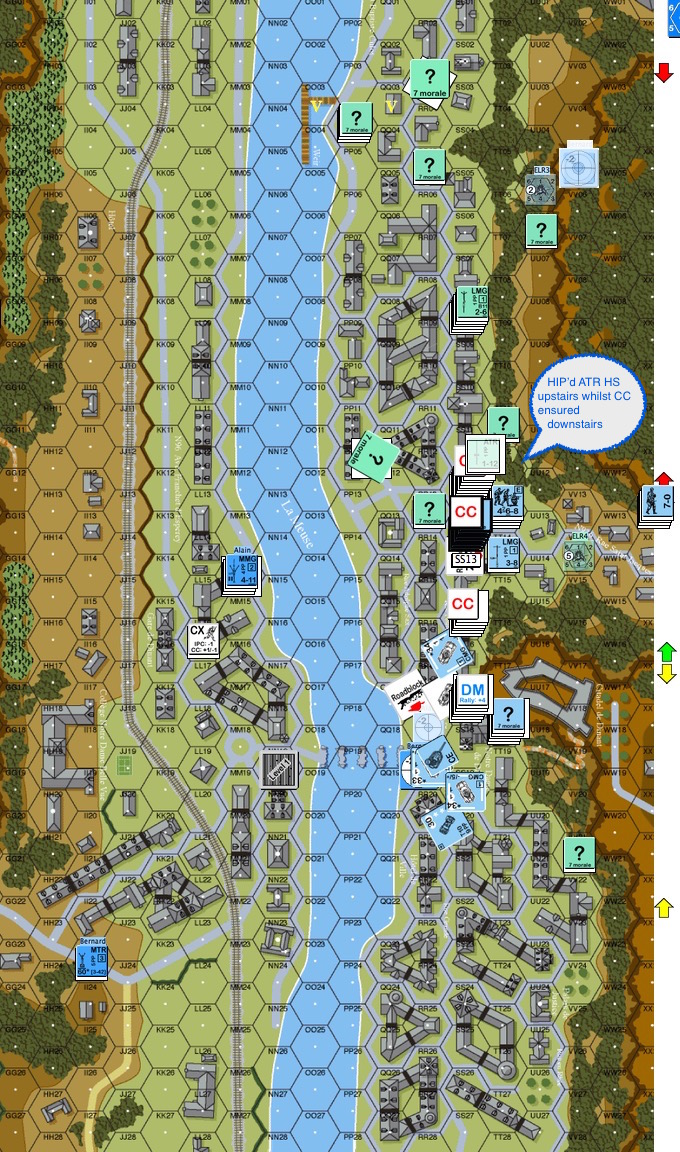
The other HIP’d HS ATR team who sat through the Close Combat downstairs sprung out of hiding.
They shot and killed the lead AC!
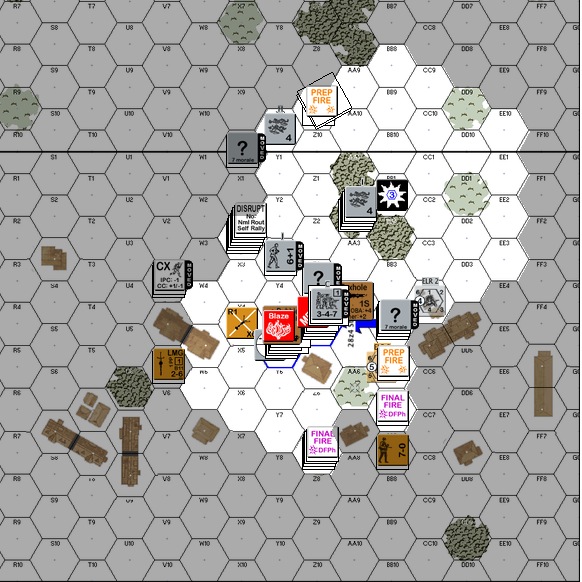
Turn 6 Germans : The Belgians continued to back off just enough to shoot at the Germans in bypass. The French OBA was of no help whatsoever. By the time they got a response from obliging French gunners their radio went dead.
Our second Belgian ATR HS managed to run away though!
The Germans, running out of the time, got even more aggressive and jumped onto a concealed Belgian stack. The Belgians chose NOT to unconceal and NOT to fight. To the German’s disappointment, Belgians survived the German attack and retained the option of moving away in the next Belgian turn, blocking the Germans for another round.
Seeing the distance between themselves and the VC building, the Germans decided that they won’t be able to make it to the VC objectives in time.
Overall : I think the long lines of rowhouses presented an interesting problem. The Belgians had to be far enough to not invite close combat given the German superiority in numbers and to not be shot in their retreat. However they needed to be close enough to in turn shoot the Germans in bypass. This is especially important when they do not have enough firepower to take the Germans inside the stone buildings.
The mass of Germans was unnerving but had some of the Germans came in further to the north and down the cliffs, they would have been a handful.
Trying to get the French to help from across the Meuse is a problem as well. Finding gaps between buildings though you can shoot was tough. The OBA was practically useless in my game.
Thoughts from Stanley Neo : I packed the Germans’ entries via the XX13-XX16 while 3 choices were given. After some thoughts, I should have spread the force into two groups, one taking the top XX03-XX13 and the other remaining in XX13-XX16 to put more pressure on the Allies that is on the same side. At least some Germans would then be able to attempt to climb down and do a flank from the North.
Germans on the East were stuck around the entry zone for too long and should have pushed more aggressively. LoS study of the terrain may eliminate issues of troops getting pinned or broken by Mortar fire from the West.
The roadblocks were wisely placed at a chockpoint around QQ17/RR17 with ATR. This effectively blocked out the rest of the German’s AFV support making it harder for the Germans coming from the East to push.
Overall the scenario is relatively great to play. Would be interesting to replay the scenario with the afterthoughts built into the attack plan.
What are your thoughts with regards to this module? Are you looking forward to it?
G38 Castello Fatato – Extreme Winter at Night
It was December 20 1942. The Italian Bersaglieri Regiment approached the Russian town of Meshkov in their retreat. The Russians got there ahead of them and used its “fairy tale castle” ie. catello fatato cathedral as a strongpoint. It was dark, it was extremely cold and yet the cathedral was illuminated by a portion of the building that was on fire.
The scenario opened with 20 squads of Italians doing a human wav across the snow towards 2 squads of Russian SMG units plus 6 rifle squads of the Russian 1st Guards Army. The above is my defensive layout and where my machine guns were positioned. Typically in a night scenario, support weapons and leaders are HIP’d (“hidden initial placement”) as are 25% of the defenders. The Italians win when they control the cathedral (the hex with the “Blaze” counter and the hex to the upper right of it. )
Italian Turn 1 After the Movement Phase : The NVR (“Night Vision Range”) was 5, so the screaming Italians were spotted. The Russians tried to break as many Italian squads as they could. Italian squads have a moral level of 7 and a broken side morale of 6. At night, units don’t get to remove their “DM” status until they roll less than its current printed morale. Running with 4 leaders (2 of them 6+1), these Italian should be very hard to rally once they break. Turns out it was the Russians who couldn’t rally for most of the game. The Italian 6+1’s were rather successful in convincing their troops to get back into the fight.
Russian Turn 1 After Advance Fire Phase : The Russian should perhaps have skulked at least part of their forces but I was determined to break a few more Italian squads. The Italians fired their Austrian made Cannone da 47/32 (ROF3), broke a squad on the ground level of the church and the heavy machine gun (“HMG”) team in the trench next to it. The HMG was later lost to the Italians and never served under Russian use again.
Katya, our Russian sniper did miracles though! She identified an 8-1 leader from a stack of brokies and put a hole through his head. He was the highest ranking leader the Italians had and the only one with a negative modifier!
Italian Turn 3 : The Russian couldn’t find any star shells!! Since illuminated units cannot see into the darkness outside the zone of illumination, it was safe for the Italians to move around the rim of blaze illumination and sneak an Italian squad into the cathedral. The Italians had also jumped both of my flanks and tied them down in mêlée. Given the huge disparity inmanpower, the Russians should have done a fighting retreat and leverage on their advantage in troop quality. Once the Italians closed, the difference in morale level was gone and they could keep reinforcing any mêlée.
Case in point : the Russian’s right flank got a little agitated and turned fanatic along with the production of a hero (I promptly named him after my esteemed opponent .. heh heh), the Italians jumped on them immediately in the Close Combat phase, nullifying their qualities.
Russian Turn 3 Close Combat Phase : There wasn’t a lot to do in this Russian turn. The fellas steadfastly refused to be rallied. Since one of the Italian guns malfunctioned and the Russian SMG squads hid in fortified cellars, there wasn’t much damage. One of those Russian SMG squad decided to come out of hiding however, advanced up to see if it can ambush the Italian squad up top. It didn’t, but it took out the Italian squad anyway in close combat. In face of all the firepower and the important job it had to do, advancing up was a risk. However the act might burn more time from the Italians.
The sparky Katya (sniper) continued to work hard, she found a 7-0 in another big stack of brokies and wounded him. The Italians had 2 healthy 6+1’s left. Both of the Russian flanks continued to be tied down in mêlée.
Italian Turn 4 After the Movement Phase : There were only 3 functional Russian squads left : 1 rifle squad and 2 SMG squads in the cellars. The rifle squad spit out a fire lane with the Italian Breda M30 LMG, just to deter the Italians from rounding the building on the right. As luck would have it, the Italian squad on the lower right in the dark would be hit and broken by Katya, who was obviously making it a late night tonight.
Italian Turn 4 later in Close Combat : Two Italian squads made it into the left side of the cathedral. There’s still a concealed SMG squad in the left cellar. Since the cellars were fortified, they would need to pin or to break the Russian SMG squads before they could go in for close combat!
Russian Turn 4 : The Italians continued to rally quite well, although they had some casualties from the cold (Extreme Winter E.3.742). The Russians on the hand were still hanging on with a few squads. To make matters worse, the German sniper showed up an pinned the fanatic Russian squad in the midst of their mêlée on the right. Fortunately they survived and the fight continued, tying down that flank still for the Russians.
Italian Turn 5: Again, the Russians had no luck with star shells, and the Italians moved in. The Italians managed to pin the Russian SMG squad in the cellar on the right and so two Italian squads advanced downstairs to say hello. The mêlée on the far right was hit by German snipers again! The Russian fanatic squad was broken and they were all killed when the hero found himself fighting the Russians alone. The Russians outside were beginning to rally but listening to the sounds around them, SMG squad in the cellar on the left felt the darkness rolling rapidly in.
Russian Turn 5 : The Italians got star shells in some choice positions! Nonetheless the rallied Russian troops started to move back. Fortunately, the other Italian gun broke as well, adding to the Russians’ fighting chance.
Italian Turn 6 : GUSTS!! The burning first floor of the cathedral collapsed! Good thing it didn’t crash into the cellar.
The Italians had to think defence now. The Russians were getting back into the fight from the lower left of the map. The Italians had to get into blocking positions while continuing to reinforce the mêlée. The Russians couldn’t do much about stopping the Italians from reinforcing the cathedral. You might also notice that the remaining Italian gun was operational now and again tried pounding the cellars.
Russian Turn 6 : The Russians plodded towards the sounds of gunfire inside the cathedral. First up was the 7-0 who looked to pop into the church hex on the left. The choice for the Italians was either to spend firepower on him or to let him get into the ground floor and make the Italians do a +3 task check for “Infantry Overrides” in next turn to get in. They shot him. Next up is a Guards rifle squad that broke against the fire lane on the far left.
It looked even tougher on the right.
One squad got pinned and finally the last squad moved in with the 8-1. Russians elites are stealthy and Italians are lax. If the Russians could get an ambush they could infiltrate into the cathedral. Unfortunately, it was the Russians who got ambushed, and the Italian squad withdrew into the cathedral.
At this moment, the cathedral cellar on the left was held by a good order Russian SMG squad and in the right, there was a mêlée raging on between a Russian squad and two Italian squads. The Russian counterattack could only watch from outside the cathedral.
Italian Final Turn : It all went down to one question (read : dice roll) – whether the Italians could break or pin the Russian SMG squad holding out in the left cellar so that the Italians have a chance in close combat.
The Italians moved, trying to focus more fire power into the cellar during advancing fire. The Russians outside managed to pin one of the 3 squads that got into the cathedral, directly above the stubborn Russian SMG squad. The Italians mustered up a firepower of 6, so that was a FP6+4 shot.
The Italians rolled an 11.
The Russians won.
“Crossing the Moro” by Lone Canuck, Pictorial
Got up on this fine Saturday morning after two days on the road and decided to give the mailbox a peep … found this delivered by Helen & Chris at BattleSchool today! George Kelln’s (Lone Canuck) description of the scenarios therein.