FT111 Ghosts of the Danube After Action Report (AAR) Advanced Squad Leader scenario

Victory Conditions

In 1944, partisans discerned that a HQ unit of the Russian Liberation Army (defectors) were in Golubats, on the shore of the Danube.  Russian units were sent to kidnap them with partisan help under the cover of darkness.  The Russians win in 5.5 turns if they exit ≧ 2 EVP of the RLA HQ unit.  The setup of the RLA units were mostly predesignated.  The partisans setup HIP and there’s a Russian MGB that came to support the exfiltration to the south (left) of the map.  This is a Night scenario and there’s fog (+1 per hex) on the lower board.  

After Action Report

FT111 Ghosts of the Danube After Action Report (AAR) Advanced Squad Leader scenario

One quiet late October evening … 

FT111 Ghosts of the Danube After Action Report (AAR) Advanced Squad Leader scenario

Partisans appeared from out of the darkness and surrounded the HQ unit!  The folks desperately fired into the shadows but no one could be seen.  The HQ unit dug through their desk drawers but couldn’t find a single star shell.  The unit camped up the street didn’t hear anything either.  The Russians on the assault boat moved quickly through the fog and subdued the LMG team by the shore.  

FT111 Ghosts of the Danube After Action Report (AAR) Advanced Squad Leader scenario

Close Combat at the HQ was over quickly.  The HQ unit was bounded and dragged down the streets towards the river bank!  A broken RLA 6+1 seemed to be spared, but a Russian 6+1 watched from the shadows.  The RLA rescue team ran in via the top left of the map.  The retreating partisans ran into some HIP’d RLA units.  A few RLA units were therefore freed from ‘No Move’ counters.  Someone surely forgot to bring star shells along.  The LMG team on the other side of the river decided to move down and to the left.  The hope was that it would reach the river bank to lay down firelanes across the (4 hex) river exit (firelanes work better in fog).  

FT111 Ghosts of the Danube After Action Report (AAR) Advanced Squad Leader scenario

The rescue units made it to the edge of the open area on the left where the Russian kidnappers were likely to disembark.  All RLA units were now on the move and pushing to the left, blocked by the bodies of Russians in the open.  The Russian gunboat (green ‘cause the brown (VASL) VFS Motor Gun Boat is unusable) came in and shot up the LMG unit on the other river bank!  We laid out ‘WP’ overlays on the bottom half of the map as a reminder about the +1/hex fog.  The Night LV & the fog made shooting quite impractical.  But of course, once you are broken at Night, you might as well be dead (game-wise) ‘cause you probably won’t rally in time (and the Russians had higher firepower).  

FT111 Ghosts of the Danube After Action Report (AAR) Advanced Squad Leader scenario

The Russians were just body blocking venues of approach as the MGB chugged towards the shore.  The RLA rescuers on the left couldn’t get much effect with their firing.  They did however dispatched the pesky Russian 6+1.  The RLA units in the Woods on the right jumped into Close Combat in the hopes of clearing that side quickly (or even getting an ambush and therefore infiltration).  It was not to be.  Reduced that Russian squad as we might, Melee ensured and that approach was blocked.  The kidnapped units got dragged out to the shore.  

FT111 Ghosts of the Danube After Action Report (AAR) Advanced Squad Leader scenario

The RLA units tried to surge through the gaps!  The 447 on the far left made it through and approached the riverbank.  The Russian prisoners were dragged onboard the MGB.  One last chance to shoot that boat up?

FT111 Ghosts of the Danube After Action Report (AAR) Advanced Squad Leader scenario

Here we go.  The prisoner-ladened MGB moved into sight from behind the trees.  It was a +4 shot for the 447 through the fog but we couldn’t even kill our own people on board!  The HQ unit was taken into the darkness.

FT110 PT-59 (PT-109) After Action Report (AAR) Advanced Squad Leader scenario

FT110 PT-59 (PT-109) After Action Report (AAR) Advanced Squad Leader scenario

Victory Conditions

The scenario was originally titled “PT109,” but the designer recently clarified on a GameSquad thread that one of the PT boats involved should have been PT-59, which was commanded by the future President John F. Kennedy.

The Marines were racing through the jungle in the Solomon Islands towards the river. They had just blown up an IJA fuel and ammo dump and were running towards their extraction point with Japanese shipping clerks in pursuit. This is a rare ‘seaborne evacuation’ scenario. The Marines win immediately by exiting at least 12 EVP along the bottom of the map in 8 turns.

The Marines has a ‘Beach Guard’ who will call in the Landing Crafts when they hear gunfire on/after Turn 2. Two US Navy PT boats will come in to help out on Turn 5.

The IJA has a dozen squads entering on Turn 1 and a party entering anywhere on the left and/or the right of the map on Turn 2.

After Action Report

FT 110 T2 IJA DFPH

A platoon of IJA went directly after the retreating Americans on the hill, while the rest of them ran straight ahead towards the shore. The IJA deployed as much as they could, in light of US firepower. The IJA reinforcements went straight to the river shore to flush out the HIP’d Beach Guards and that they did.  The beachgoers on the right rammed straight into an American ambush and lost 2 HS’s. The waiting landing crafts added to the firepower.

FT 110 T3 IJA RtPh

The foot race between the Marines and the IJA shipping clerks continued.  Some of the clerks made the mistake of assembling their knee mortars (and getting delayed) when they thought they need smoke cover but the Marines were really just interested in making it to the water’s edge.  The surviving IJA at the river shore routed the Beach Guards but the guards managed to call the landing crafts in.  The landing crafts came to shore and fired on the clerks stopping at the tree line.  The IJA looked for good positions to setup their mortars, as they would be the biggest threat to departing landing crafts.  

FT110 PT-59 (PT-109) After Action Report (AAR) Advanced Squad Leader scenario

The Marines & the IJA were both at the treeline!  One of the IJA mortars was already pumping out rounds behind the marsh.  BOOM!!  First damage to one of the landing crafts!  

FT110 PT-59 (PT-109) After Action Report (AAR) Advanced Squad Leader scenario

Whilst the IJA were assembling at the treeline, they didn’t have a clear shot to the water’s edge.  The Marines took the opportunity to voluntary break and routed into the waiting landing crafts!  The two PT boats arrived and provided overwhelming firepower to cover the evacuation.  They had twin .50 cals (16FP) on each side which could both fire through the stern (hence the two PT boats backed into ‘Beaching’).  The IJA could literally feel vegetation getting ripped apart around them!

FT110 PT-59 (PT-109) After Action Report (AAR) Advanced Squad Leader scenario

The IJA surged forward to get better shots at the departing landing crafts!  It’s now a matter of whether the unbreakable IJA sink a couple of the landing crafts with three mortars and an MMG before they wear down to nothing by American firepower.  It’s pretty nerve wracking for the two of us as the Marine OB was bundled up into three neat targets!

FT110 PT-59 (PT-109) After Action Report (AAR) Advanced Squad Leader scenario

The American PT boats remembered their Smoke Layer ability!  (First time MGB players, us two.) A smoke screen went up to shield the boats from three mortars and an MMG.  Some shots landed but apart from reducing some of the passengers, we couldn’t sink any of the landing crafts.  The Marines got away!

FT SmR6 Fox’s Fretful Night After Action Report (AAR) Advanced Squad Leader scenario

FT SmR6 Fox’s Fretful Night After Action Report (AAR) Advanced Squad Leader scenario

Victory Conditions

Eleven squads of North Koreans got 5 turns to clear 4.5 squads of Marines off 7 hill top hexes.  All Marines setup HIP’d and had Trip Flares and a 100+mm OBA with Variable Time (VT) Fuses.

After Action Report

FT SmR6 Fox's Fretful Night After Action Report (AAR) Advanced Squad Leader scenario

So the North Koreans had 5 turns to push the Marines off 2 hilltops. The Marines looked very understaffed at first glance but my opponent is never deterred by odds, big or small. I look at terrain differently at Night. Open Ground offers +1 LV straight up especially when most Marines should be on hilltops (equivalent to having Woods everywhere). Walking into Concealment Terrains required +1 MF though which made Open Ground more appealing. This was especially significant when you look at the hilltops. Getting onto a hilltop Brush costed 5 MFs, same of course for Woods. Five of the seven hilltop hexes were covered with Brush or Sparse Woods. So  getting into CC in most cases meant going in CX’d. While it’s harder to rally at Night, Marine squads self rally at 3 and get rid of their DM counter at 8.

Running around in the open when a Star Shell was overhead means certain death against Marine firepower. The threat of Proximity Fuses in the Marine OB is a big cause for concern. We needed to fish out the radio guy as quickly as we can.

We approached the left hilltop from both sides. The way we setup, it would be tough for Korean leaders to get to everyone, but we only have 5 MPh’s to get things done. Not many Americans popped out of HIP but we broke the Marine MMG team early on.. We surrounded the left hilltop but we were too relaxed about the broken MMG team wandering about. No Hipped unit popped up the top though.

We approached the left hilltop from the bottom with the other half of the force coming in from the right. Marine firepower broke up our initial entry but the sunken road offered the Commissar a safe space to talk sense into the chaps.

Two turns down. Marines were not going to show themselves unless we get even more aggressive.

FT SmR6 Fox's Fretful Night After Action Report (AAR) Advanced Squad Leader scenario

We ran NK squad up the hilltops to see if there’s anyone there.

NK piled into the left hilltop CX’d and commenced Close Combat!! We kicked off some wires for trip flares but nothing flared up. We had the left hilltop almost cleared apart from a fireteam taking us into Melee. 

The bad news was that we allowed the broken MMG team to self rally and join the right hilltop defence! The good news was the Marine radio malfunctioned and was inadvertently pushed off the Steep Hills without a shot! The Koreans kept close with the Marines but their concealment were getting rapidly stripped by the insane firepower.

FT SmR6 Fox's Fretful Night After Action Report (AAR) Advanced Squad Leader scenario

The Koreans reinforced the Melee on the left hilltop but that fight continued. Well placed Marine star shells prevented us from getting too feisty in the open when the Marines had -1 leaders in choice places.

The right hilltop unfortunately saw the Americans got their act together and blew some of our troops away now that most of the sticks and branches we held up for concealment were decimated.

FT SmR6 Fox's Fretful Night After Action Report (AAR) Advanced Squad Leader scenario

The left hilltop finally got that Melee over with. The star shell situation convinced the North Koreans to stick with their Concealments as they pushed to the right. It was a mistake as I have only 1 MPh left.

Over on the right, the shot up Koreans were rallied by their fearless Commissar to have one last go. We finally had a DC bearing squad in position to launch a DC hero but the union cited personal safety concerns (the boys sat back down for more tea and cake). The Marines consolidated into solid chunks. We got a Melee going anyway which kept some of them from shooting.

FT SmR6 Fox's Fretful Night After Action Report (AAR) Advanced Squad Leader scenario

Bob came back from his bio-break and the chaps quickly volunteered him to be the next DC hero. Someone suggested the moniker ‘The Flash’ but they decided that might not be entirely auspicious. So Bob went off screaming, the Marines opened up and Bob was practically doing the Matrix bullet time all the way up the hill!  He was about to dive into the Marine foxholes when he tripped on an empty coke can, smacked his head against a rock and died. Bob did cause enough distraction for the rest of the band to move up to CC position though! Some of the Koreans got close enough on the left side of the hilltop as well when CC time comes around. 

We couldn’t clear ALL the HDPs at the end though. Plus you know what? It wouldn’t have mattered. A HIP’d fireteam popped up from a hex the left NK team never checked and reoccupied the left hilltop.

`Ah well.

FT S10 Liberté Call – Advanced Squad Leader AAR

FT S10 Liberté Call – Advanced Squad Leader AAR

ASL Scenario Setup

The USMC/KMC wins at game end if they control the French Embassy (EE32) and can apply more FP/MG FP vs the City Wide Boulevard (that cuts diagonally across the top of the map ie “Uiju Boulevard”) than the KPA.  For both sides, only Good Order units that are on/adjacent to the CWB hexes count.  Double / Triple Pointblank doesn’t come into play. SMC’s count as 1 FP.

To Apply More FP than the KPA on the CWB

  • Kill/ Break/Capture enough KPA units
  • Get units to the CWB Good-Ordered in 6 Movement Phases
  • Stop KPA from reaching the CWB Good-Ordered

To Capture the French Embassy

  • Focus firepower on the French Embassy (stone building)
  • Encircle defenders

It appeared that we need to take control of the Sunken Railroad as fast as we could.  We would also need to capture GG30 which was the only 2 level (plus rooftop) building on the map, so as to interdict KPA troops crossing north.  The left flank would have to do that as well as capture the French Embassy so they would have the majority of the force.  The right side would try to push through to the Sunken Railroad if in case the KPA had less defenders deployed there because of its isolated position.  The right side was also closer to the CWB.  I would use the only range weapon I had (MMG) to isolate the right side.  The USMC/ KMC would be on the watch out for Dense Urban Terrain (“DUT”) buildings so as to position optimally for massive fire groups where possible.  We would also be using a lot of bypasses.  SS2 gave us a NY Time correspondent, Richard Johnston, who knew the back alleys.  The USMC would use him to navigate otherwise un-bypassable DUT hexsides, with the added bonus of a +1 TEM while breezing through.

Advanced Squad Leader AAR

FT S10 Liberté Call After Action Report (AAR) Advanced Squad Leader scenario

We massed up on the left and went straight after the 2 Level GG30 building.  The defenders routed towards the French Embassy and we stationed a squad up on Level 2 to cover a 6 hex perimeter. The team in the middle was thin but we would be fine as long as the KPA don’t call our bluff.  They had 10 dummies, so they might well be thin as well.  We didn’t want to move that MMG but we did because we didn’t want to be too far from the top of the map at game’s end.  Things did not go well with the Korean Marines on the right.  We kept getting jammed in by conscripts.  We needed to be able to reach behind the KPA lines.  No joy yet.

FT S10 Liberté Call After Action Report (AAR) Advanced Squad Leader scenario

We hit Turn 3 (of 5.5) and the KPA were already crossing the Sunken Railroad! The Level 2 USMC squad couldn’t shoot everyone.  Those walls to the north of the French Embassy gave the runners some cover as well.  We knocked defenders inside the French Embassy a bit but they were still holding on.  Meanwhile, our MMG’s going out of position allowed KPA troops on the right to slip out.  The Korean Marines were still stuck.  We couldn’t afford the time we were spending on the French Embassy!  Four Movement Phases left.

FT S10 Liberté Call After Action Report (AAR) Advanced Squad Leader scenario

Like mama always say: shooting don’t work no matter how high up you stand. The KPA reformed their lines to the North of the Sunken Rail Road.  We were now looking at the prospect of crossing that gully under fire.  We finally managed to put a USMC into the Sunken Railway to interdict the last of the stragglers.  With 2 Movement Phases to go, the USMC’s started to shift their forces to the right.  I wish I had the USMC in one big stack so that NY Times could take them through the back alleys like cash through my pockets.  That was not to be.  The (underperformed) overwatch would also need to get going soon.  Meanwhile the Korean Marines on the right made little progress.  However, they were at the Hedge, so the possibility of flanking the defenders loomed.

FT S10 Liberté Call After Action Report (AAR) Advanced Squad Leader scenario

This was towards the end of USMC Turn 5.  The overwatch team was out of the tower but were pinned before it could dive into the Sunken Rail Road.  The Assault Engineer squad crested on the north side to harass the KPA some but got their heads shot off.  The rest of the Marines gathered in one giant stack together with NY Times.  The KPA defence on the right crumbled as well.  The CWB was just within reach on the left.  That’s of course if the very nice KPA would us slide gingerly by on Open Ground.

FT S10 Liberté Call After Action Report (AAR) Advanced Squad Leader scenario

Fire teams after fire teams tried to run the gauntlet.  You can see where most of them broke in one big stack (aside from a couple KIA’d).  The KPA fired til their LMG barrel melted and a couple of them FPF broke in our slow motion awesomeness.  One intrepid fire team broke through and even succeeded in doing an Infantry Overrun on a 8-1 that was standing on the road!  The leader couldn’t be pushed into Open Ground so the 2 available choices were “straight ahead” where we would have to CC him or “to the side” with some brokies.  If we CC him, we would have to win the CC ‘cause we need to be Good Order.  The choice was even less attractive considering the KPA had two units adjacent to the CWB.  So we pushed him to the KPA brokies, which led to other issues.

In the Rout Phase, the slightly ruffled 8-1 was able to move to the CWB with the routing brokies!  Turned out one of the 2 KPA units already at the CWB were dummies, so the 7-0 yielded 1 VP.  The KPA 8-1 scored another 1 VP.  That came up 2:2 against our marauding fire team – which lost us the game (we had to have more VPs than the KPA).

Lost by One.

Link to the NY Times article from 1986 “Richard Johnston is Dead at Age 76″

FT S4 Dilemma at Ma Po Boulevard – Advanced Squad Leader AAR

FT S4 Dilemma at Ma Po Boulevard – Advanced Squad Leader AAR

Scenario Background

It’s September 26 1950, Captain Stanford’s Marine’s fought to clear Ma Po Boulevard.  Upon meeting a North Korean roadblock at a junction, he had to decide on whether to run straight up and clear the way to Deoksu Palace or to take the right fork and clear that road instead.  

“M26 number B32 in action on a street in Seoul.” Mike’s Research

Victory Conditions & Tactical Considerations

We have three North Korean (Fanatic) Roadblocks in 3 specified locations.  The main one is located at the fork of the road, where a 45LL AT Gun gets matched up with 2 medium machine guns and a Pillbox with an ultra wide CA.  The North Korean player gets a choice between a second 45LL AT Gun or a 76L ART.  There are 15 NK squad equivalents of various descriptions, managed by 2 commissars and 2 other leaders.  They have an ATR, 6 Minefield factors and 2 Fortified Locations.  

Against this the Marines have a forward team of 3 squad equivalents (one being an Assault Engineer with a Smoke Factor of 5).  This is followed by 10+ squads, a M26A1 Pershing, a M4A3 Tank Dozer and a POA-CWS-H5 Flamethrower tank that I was last playing with in Okinawa scenarios!

The Americans have 7.5 turns to take one Roadblock and exit 12 VP (4 squads) or take two Roadblocks and exit 9 VP (3 squads) or take three Roadblocks.  The North Koreans can stop the game when they kill or immobilise two out of three AFVs.  To do that, the NKs have the aforementioned guns, as well as an ATR and 6 Suicide Heros (read: THH) that can setup HIP somewhere or bust out of a squad when the mood strikes.  The confining terrain in this scenario definitely doesn’t make it tank country. The NK’s can also stop an USMC victory by taking out 19 CVP, which in this case is 6 squads + 1 fire team.  

Having said all that, the BBQ tank doesn’t have to stop moving.  The tankdozer has a blade that adds a +2 on a Hull Hit.  The Pershing is impervious to most shots on the battlefield but can still be DI’d.  

Advanced Squad Leader AAR

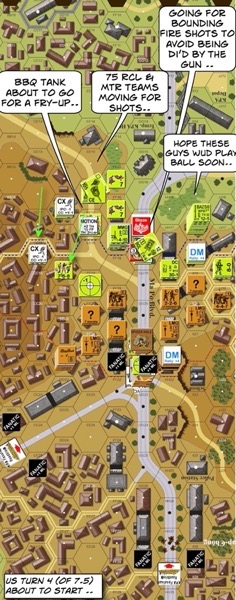
FT S4 Dilemma at Ma Po Boulevard After Action Report (AAR) Advanced Squad Leader scenarioFrom the left of the map, F Company immediately started to setup their MMG and got their fire teams to probe NK concealments.  The E Company came up from behind and a bit more than half went for the right of the map.  The AFVs rolled down the road but the higher level Burning Wreck that’s there on setup made it a little hazardous to roll up in front of a ROF3 AT gun.  Plus it’s impossible to be on the boulevard without being in DI’able range.  I thought the right of the map would be a more straightforward travel but it’s confining nature made it easier for the NK defenders and didn’t facilitate armour support.  By Turn 4 it’s evident that the NK’s were very effective there.  A large number of broken fireteams routed towards the rear.  The BBQ tank and the tank dozer lend their support on the left and found they could safely sneak shots into the boulevard.  The left side met some initial set backs but were able make better progress.  The AFV’s were making Bounding Fire shots where possible but they couldn’t bring it up close in most cases because of the chance of meeting Suicide Heros in Street Fighting.  The strategy was to try to flank the NK’s down both sides while putting AFV fire to defenders down along the boulevard.

Continue reading

FT S3 Last Stand on An-San – Advanced Squad Leader AAR

FT S3 Last Stand on An-San – Advanced Squad Leader AAR

Scenario Background

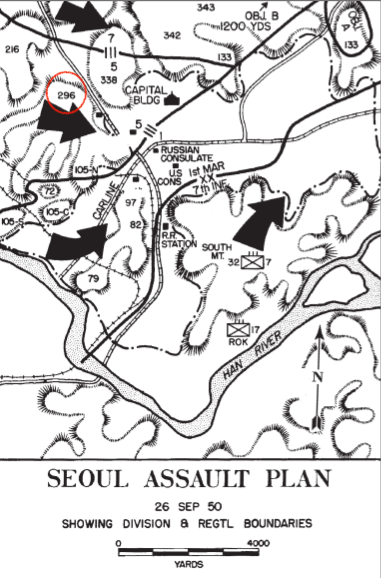
This is 26 September 1950.  Lt Col. Taplett’s (gent in the pic below) 3rd Battalion, 5th Marines fought southeastwards down the slopes of An-San/ Hill 296 towards the city (see the red circle on the map below, credit “Battle of the Barricades” by Col Alexander).  The North Korean 78th Independent Infantry Regiment and the 25th Infantry lead by Colonel Pak Han Lin put up a stout defence.

Battle of the Barricades Colonel Joseph H Alexander

Victory Conditions & Tactical Considerations

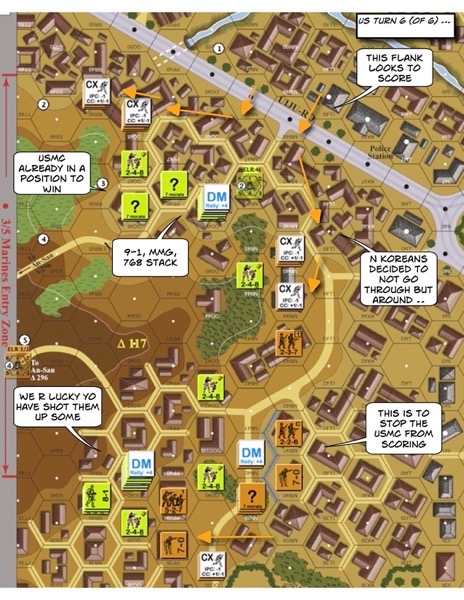
The KPA (North Koreans) started on Level 3 or above.  The Marines entered from the left of the map at or above Level 2.  In about 6 turns, the Marines should fight their way to Level 1, the KPA should fight to stay on Level 3 or above.  The KPA started with 2×447, 4×426 (conscripts), an LMG and a 8+1 Commissar.  The KPA counterattack force, comprising of 2.5×458, 2×527, 2×447, 3xLMG and 2 leaders enter from the right side of the map on Turn 3.  The Marines started strong with 4×768 3×248, 2xMMG, 1xBaz and 2 leaders.  They had a reserve platoon coming from the left on Level 5 on Turn 3 as well.  All units counted “Exit Point” style (“Good Order”) toward the Victory Condition, prisoners excluded. USMC wins on ties.

So the KPA had 31 VP vs USMC 22 VP in their OB’s.  The USMC would need to reduce the KPA force.  Soon it would mean tough decisions between putting your squads on your level to score vs going to your opponent’s level to prevent them from scoring.  The KPA had the last turn so we would have a chance to “Advance” back on Level 3.

Advanced Squad Leader AAR

BoF2 Polish Requiem After Action Report (AAR) Advanced Squad Leader scenario

The KPA was weak.  They were also forced to spread out in their setup.  The USMC could go anywhere and shoot anything.  The KPA had their Concealments easily blown, broke up by Assault Fire and Captured in CC.  Very quickly they pushed the KPA off Level 3 and took more than a few prisoners.  The area on the bottom of the map offered more cover for the counterattack, so naturally the USMC focused their forces there.

BoF2 Polish Requiem After Action Report (AAR) Advanced Squad Leader scenario

The original KPA defenders were no longer coherent as a force.  The way to Level 1 was wide open for the USMC on the top and the KPA  had only scattered remnants on the bottom.  However, the Marines weren’t on Level 1 on the bottom of the map yet.  I decided to send the stronger of my Turn 3 reinforcements to the top of the map and the weaker (and more short ranged) to the bottom of the map, just to keep the Marines off Level 1.  The boulevard’s gotta be where the Marines would make their stand with an additional -1, so we needed to cross before the Marines assemble in place.  So hopped along the river edge we did, to a point by the boulevard where there were orchard cover.  The KPA forces at the bottom of the map arrived in time to catch the defenders sent reeling by the USMC.  That (bottom, vertical) road’s where we would make our stand.

BoF2 Polish Requiem After Action Report (AAR) Advanced Squad Leader scenario

At the top of the map, we made it across the boulevard okay when the lone American squad cowered.  We decided to split into two groups and go around the USMC forces, to places where we could Advance up to Level 3.  We simply couldn’t do close range firefights with the Marines on Level 1.  The USMC would have to decide whether they would get off Level 1 where they needed to be to score in order to fight us.  At the bottom of the map we got in a few lucky shots that set some Marines back.  That probably got them more worried about the KPA making a rush for Level 3 rather than them trying to make Level 1.  Nonetheless, we would keep the line at the street.

BoF2 Polish Requiem After Action Report (AAR) Advanced Squad Leader scenario

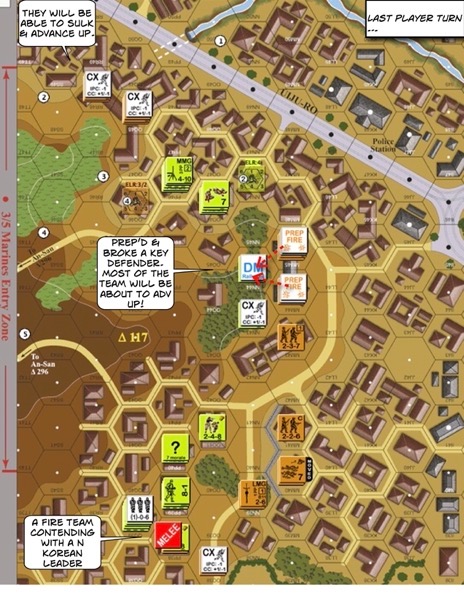
At the top of the map, the USMC decided to keep their forces and hence their gains on Level 1.  No one’s coming after our eventual Advance onto Level 3.  We made a critical PREP at the middle of the map and broke one of the defending Fire Teams in the Woods.  That would allow at least 2 of our MMC’s to Advance up.  At the bottom of the map, our line of KPA conscripts held and so my opponent conceded.

How’s this scenario interesting?

This scenario represents an interesting problem for both sides and it really highlights the terrain in Seoul.  This is a multi-level fight amongst the Dense Urban Terrain.  If a unit’s CX’d, it won’t Advance up a level, so you have to time it right.  A KPA conscript unit has especially limited mobility in this terrain and you don’t want to be CX’d when you are Lax as a conscript (+2 Ambush).  I think USMC Fire Teams would be very useful here.  Fire Teams could block more venues up the hill and it’s not easy to break Morale 8 units in +2 TEM.  Plus each Squad, when broken into Fire Teams is worth 3 VP when it’s worth only 2 VP as a unit.  If every USMC squad’s deployed, the USMC OB is worth 28 VP (vs 22 VP undeployed) against the KPA’s 31.  Both players have to find the balance between pushing through and scoring points versus fighting the opponent on a different level to stop him from scoring.  While the KPA player has to fight uphill, there are more of them that can swamp up to Level 3.  This is a tight little puzzle of a scenario!

(Credits: Wikipedia)

FT S1 Sights on Seoul – Advanced Squad Leader AAR

FT S1 Sights on Seoul – Advanced Squad Leader AAR

Scenario Background

The time’s 25 September 1950.  The 1st Marines were to clear the massive barricade on the wide Ma Po Boulevard (left of map), the hill top (center of map) and clear the way to the rail yard on the top right of the map.

(photo credit : m1 pencil)

300px USMC 1st Battalion 1st Marines1st Marine 2nd Battalion440px USMC 3RD BN 1ST MAR 3

Victory Conditions and Tactical Considerations

This gets interesting.  There are two groups of 4 VC conditions each, you are to meet a total of 4 with at least 1 from each group.  On one hand you might feel it’s complex and it can use some good re-reads between turns, but on the otherhand, it keeps the North Koreans guessing as to what you might do next.

Group A involves taking some locations on the big hill top, controlling all 3 designated buildings on the right half of the map, exiting 10 VPs of Marines off 3 designated hexes on the top right or putting at least 28 FP on either/both of the Deep Embankment Streams (one top right and one bottom left).

Group B involves taking/eliminating the Ma Po Boulevard roadblock, some of the buildings inside the Normal School compound (left of map), capturing the Marine HQ on the hill on the bottom left and one of 2 other buildings and exiting 10 VPs of Marines off 5 designated hexes on the top left.

There’s an operational boundary down the middle of the map and left of the big hill through which the Marines can’t cross.  The Battalion Reserve shows up on Turn 4 and we have to decide which side to commit them to.  Once they enter, the Korean SAN goes up 1 level (and both sides have 2 snipers).

The Normal School sports High Walls that are 1 level high.  The North Korean’s got a secret breach in it that they could use.  The Ma Po Boulevard is a wide and dangerous place.  Units incur a -1 DRM to incoming fire on top of other modifiers.  The Deep Embankment Stream is a road + gully combo.  It’s not hard to get used to.  The Fanatic Roadblocks are massive affairs that makes North Korean units with Wall Advantage plus units in the Woods/Building on both sides Fanatic.  The brown hexes are all Steep Hills, ie they are Concealment Terrain.  Most of the little houses are Dense Urban Terrain.  They have effects on stacking & firegrouping (think Dense Jungle) and they prohibit bypass on some hex sides.  Lastly, take look at the road that on the right side of the big hill.  The back part’s (top) lower than the front part, which means it was difficult to interdict Korean units as they moved towards the Exit hexes.

The rules also introduce the use of Marine fireteams.  This became a critical element in this battle (apart from being able to swamp the defenders).

After Action Report

FT S1 Sights on Seoul After Action Report (AAR) Advanced Squad Leader scenario

The Special Rules allow 3 single hex 107mm mortar hits in the first Fire Phase.  I used them for White Phosphorus to cover the Marine’s entry onto the map.  On the left it was a quick push forward to the Ma Po Boulevard to see where the barricade was and to take the Marine HQ.  A platoon crossed the Deep Embankment Stream into the Korean Grave Yard and threatened to turn the flanks of the bridge defenders.  Unfortunately they were beaten back quickly.

On the right I planned to hit the big hill top once I get to the middle of the map where there’s much better cover.  There were a couple of squads (lower central) we bypassed and this would hurt us later.  We were already attacking one of the VC buildings.  We wanted to put some OBA on the hill top but our Spotting Rounds went very wide and in some cases out of our LOS.
FT S1 Sights on Seoul After Action Report (AAR) Advanced Squad Leader scenario

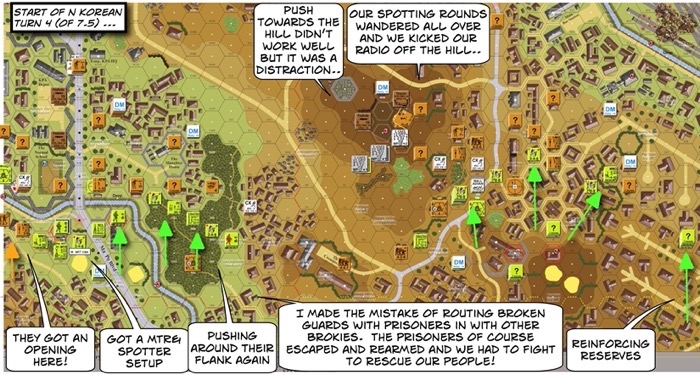
On the left, we got a spotter up on the first level (so 2 levels up including the hill) with a 60mm mortar behind.  We could see down Ma Po Boulevard and into Normal School’s compound.  We were shooting up the defenders across the stream and we spotted retreating Koreans entering the Normal School via a “secret” breach on the lower left of the High Wall perimeter.  The Marine in the graveyard on the right of the stream got shot up earlier.  I made the bonehead mistake of routing a broken guard and its prisoners together with another broken squad and broken leader.  The prisoners escaped, rearmed and CC’d the remaining brokies!  Good thing more Marines crossed the stream and bailed them out.  They started pushing up to the Korean lines in Turn 4 after much time wasted.

On the right, the North Koreans marvelled at our wandering Spotting Rounds, the boys finally kicked their radio down the hill in frustration.  The Reserves decided the right half was winning and therefore entered there to threaten the Korean’s flank.  Some of the units made it to the middle of the map but the Hill team was getting shot up and was harassed by the Koreans we bypassed earlier.

FT S1 Sights on Seoul After Action Report (AAR) Advanced Squad Leader scenario

We had 2 Movement Phases left.  On the left the team sweeping up the graveyard forced the defenders away from the stream, but it was slow going amongst the Dense Urban Terrain.  I started to have doubts as to whether we could get to the Fanatic Roadblock or exit any units in time.  A hero jumped into the Deep Embankment Stream with a DC and breached the High Wall.  Some Marines clambered into the Normal School compound and was surprised by a 45mm AT gun!  They got shot up and tumbled back out into the stream.  We were afraid that the North Koreans might counterattack back across!

On the right, the Hill team continued to get in trouble, although they did put up an amount of distraction.  The big Korean 82mm mortar blew up though!  We hit the last VC building we needed to fulfill 3 objectives.  Turned out it was a Commissar standing with a lot of mops and broomsticks behind the windows!  The man did accomplish his mission to waste our time though!  We closed in on the last Fanatic Roadblock and the 3 hex exit.

FT S1 Sights on Seoul After Action Report (AAR) Advanced Squad Leader scenario

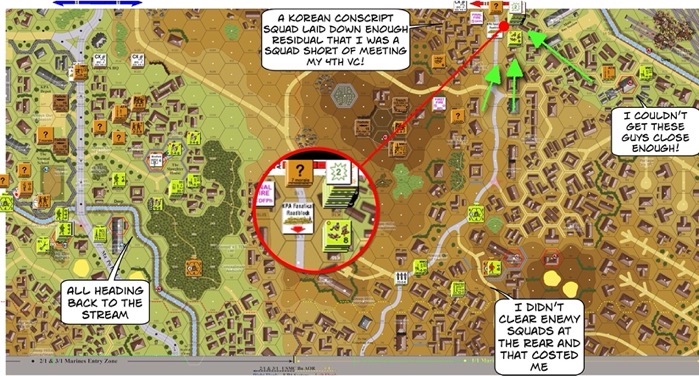
Last turn!!  The Marines on the left return to the stream to secure 2 VCs out of 4. The Marines on the right ran towards the exit!  I got behind the Fanatic Roadblock which meant I had access to a Exit Hex.  The Korean MMG team took some casualties but when the Marines shot back, they KIA’d the stack.  There was one Korean conscript squad left from across the street and we thought we were home free.  Unfortunately these Conscripts decided it’s important to NOT cower and laid down enough residual to make the Marines 1 fireteam short of meeting it’s 4th objective!!

The North Koreans won!  Yes folks – we lost by 1 fireteam.

How’s this Scenario Interesting?

The 3rd Battalion on the left could take two VCs without crossing the stream. I decided to bypass the Normal School, leave the forces inside bottled up and make for the Ma Po Boulevard Fanatic Roadblock VC and together with it, the VC for exiting squads.  Hitting the Normal School might burn up my resources for the gain of 1 VC.  On the right, hitting the hill will no doubt give me an advantage over the whole battlefield but that’s only if I manage to take it quickly.  The “3 Building” VC required that the 1st & 2nd Battalions go all the way to the top right, which put me in reach of the Stream VC and the Exit VC.  So I decided to bypass the hill top as well especially after the big 82mm mortar blew up and we got the MMG’s smoked.  I could have done better in moving more of my troops forward, unfortunately the 2 Korean squads I bypassed earlier continued to threaten one of my VC building on the bottom right.

A thing to note is that each Marine Squad in LFT Fight for Seoul is worth 3 VPs (1 per fireteam) instead of the “standard” 2 VP per squad.  It certainly makes a difference on the exit.

This is an interesting introduction to the different terrain involved in the Fight for Seoul – Seoul map.   It’s also a good one to get your head wrapped around the use of Fire Teams.  My opponent and I are moving on to FT S2 Besting Basilone, which is a Night scenario around the Normal School, the Ma Po Boulevard and the Marine HQ on the left of the map.
LFT Rat Pocket Charts 3rd Edition

I have been a faithful user of Le Franc Tireur’s Rat Charts since the first edition. This is easily the most used item I have on my desk apart from my laptop. You can therefore understand how I excited I am about version 3. We are talking checking my mailbox once or twice a day excited. (I hardly deal with my metal mailbox otherwise.)

It’s here along with my daughter’s Taylor Swift Special Edition CD!! For while, I can’t honestly tell you which one of us squealed the loudest.

Le Franc Tireur Rat Pocket Charts 3rd Edition (WW2 & FW)
To Hit To Kill Charts

Flipping open the chart, I am delighted to see that the To Hit To Kill charts are now moved from the middle of the pack in ed2+ to the front. There are so many more tabs down on the bottom! They have added charts for Molotov Cocktails and for Sewers.

National Capabilities Charts

The National Capabilities Charts are so much richer! The Italians are beefed up with the “new joiners” from LFT14 : Folgore, X-MAS …etc. The Spanish volunteers for the Wehrmacht – División Azul – are here. The French now has the Foreign Legions, Colonial Troops, Corps Francs and the Free French.

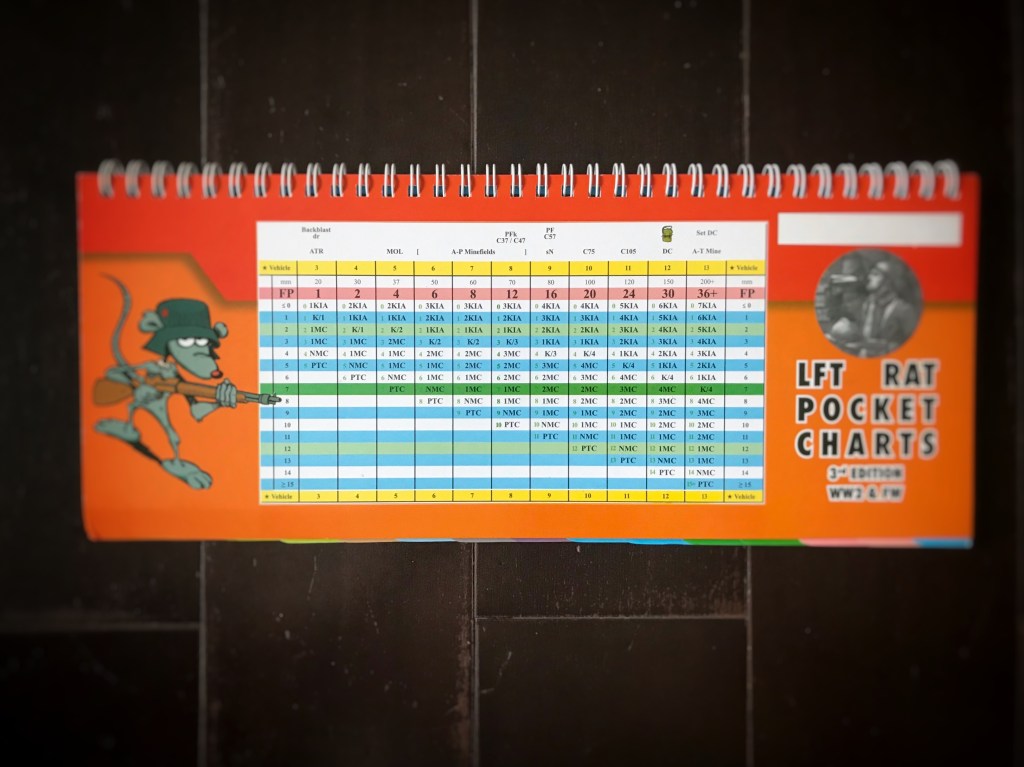
“Chapter D” now includes a “STUN/Stun/RECALL & SHOCK/ UNCONFIRMED KILL chart, together with a small but rather handy chart for AFV Phase/ Motion Fire Modifiers.

A brand new Weather Chart!

There’s a brand new Weather Chart for Fog, Mist, Gusts, Rain, Mud (I got a question on that just yesterday) and Snow. The top right corner there in the lower chart is the Desert (DTO) Low Visibility DRM chart (Sun Blindness, Heat Haze & such).

Landing Craft Attack Tables

What makes me REALLY happy are the 4 pages of Landing Craft related charts : LC Attack Tables, Damage vs LC and the Collateral Attack Effects. These will really speed things up on the approach in a Seaborne Assault!

Preview(opens in a new tab)

One of two non-Cartoon Rat characters in the Charts

Last but not least are the charts for Forgotten War (Korean War)! From the Terrain to the Nationality Characteristics, from Searchlight Sightings to Variable Time Fuzes, the Korean War is given a full treatment and will never be forgotten!

Rat Chart 2nd Ed+ has served me well as did all the preceding versions, but I am happily switching this out for the 3rd Ed now, in that slot in the bookshelf I got 1.5 feet to the left of my head.

You never know when you’ll need it. (Okay you do, I am just trying to do a dramatic ending.)

Le Franc Tireur Rat Pocket Charts 3rd Edition WW2 & FW

Advanced Squad Leader scenario FT227 Damsels in Distress After Action Report (AAR)

Advanced Squad Leader scenario FT227 Damsels in Distress After Action Report (AAR)

Scenario Background

This is November 19 1940.  The Greeks were counterattacking and the Italians were on the retreat towards Albania.  In a village close to the Albanian border, the Italian 23d Divisione Fanteria “Ferrara” kidnapped some school girls and so a Greek elite light infantry unit (2/39th Evzone Regiment) as well as the local villagers went on a desperate rescue mission.  (The map above is from “Battle of Greece” in Wikipedia.)

Victory Conditions & Tactical Considerations

school girls prisonersThe Greeks need to clear two specific buildings of unbroken Italian MMC and make sure 2 (of 3) OB given Prisoner counters are not stacked with Italian Guards in 6.5 turns.  There’s an interesting wrinkle in this scenario as well : when any of the Greek Evzone reaches level 3 terrain and have LOS to any building on Overlay 6 (that sits on board 42), Greek partisans appear in building hexes not in/adjacent to Italian units.  The type of units that appear is random and  while these partisan units can’t form multi location firegroups and cower like Green troops, they can self rally and declare Hand-to-Hand (“axes & pitchforks”, according to the Historical Result.)

Ground Snow’s in effect so going up / down the hill costs an MP extra per level.  The Greeks can bypass the board 58 hill entirely and rush straight to the village but they won’t get the partisans (villagers) to show up.  They can attack up the hill to get to level 3 but that will take time out of the 6.5 turn limit.  The Italians has a 2 pt difference in morale to the elite Greek troops and are unlikely to stand up to a standing gunfight.  If they can keep all the Greeks on the proper side of the board 58 hill by long range support weapons and keep the villagers from appearing til Turn 4, they can relocate the school girls.  They can’t unfortunately, bring them off the board.  I am curious about the way the Victory Condition is written though : “.. if >= 2 OB-given Prisoner squad counters are not stacked with Italian Guard(s).”  Perhaps if all the Prisoner squads are eliminated by the Greeks, this VC can be met for they are indeed “not stacked with Italian Guard(s)”?

After Action Report

Advanced Squad Leader scenario FT227 Damsels in Distress After Action Report (AAR)

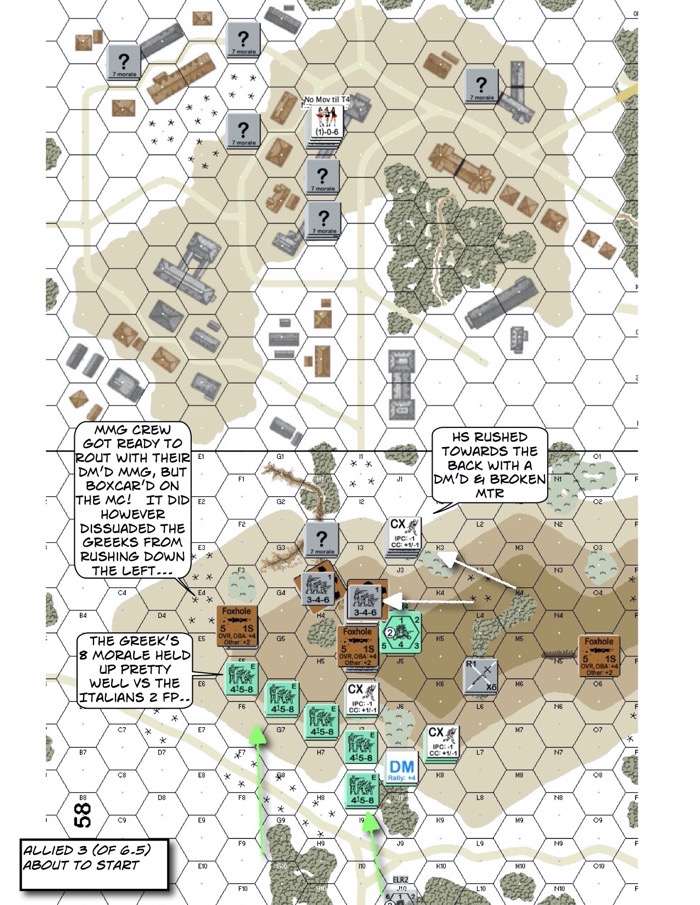
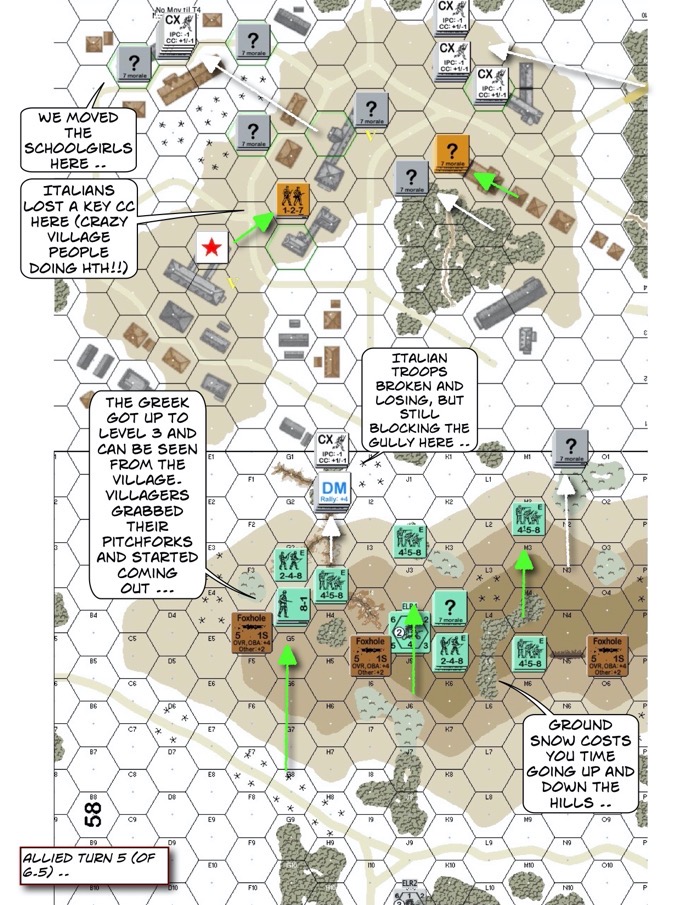
The Greeks showed no signs of wanting to do an end run around the hills!  By the neat row of Greek troops you can see the 2-2 from Italian defenders weren’t even a distraction for these gallant men.  Meanwhile we broke our mortar and our LMG.  Our MMG didn’t do much either and so we dismantled them in case they need to rout.  But you know what?  Our elite 2-4-7 didn’t break, it boxcar’d during Rally.  So we left the Greek a nice MMG, neatly folded, inside a foxhole.  We made sure we ducked into the gully so we could rout along the gully.  We thought it’s high time that the Greeks leave us behind and head for the village.  There’s not much we could do from there anyway.  We maintained minimal firepower above ground and so we were pleased that the Greeks came in after us.  See where that gully goes into?  Woods-Gully.  That would cost the Greeks when they come through.  

Advanced Squad Leader scenario FT227 Damsels in Distress After Action Report (AAR)

A Greek squad reached level 3, had LOS into the village, and .. 

(Getty images)

.. the Village People appeared!!  They went into a few HtH and the results weren’t pretty for the Italians (pitchforks ARE pointy).  The problem also was that the more hexes the Italians vacate, the closer new village people appeared.  The hill top Italians were now “gully bottom” Italian but they still had the Greeks in front of them, paying extra to get down the hills. 

If you notice, we relocated the school girls to the top left of the map.  One of the VC building was already cleared of Italians.  The other one had a concealed 7-0 standing in the corner pretending to be a full squad.  While all that’s going on, the Italian reinforcements appeared and sneaked to the west edge (top) of the map.  They need to get to the target building ASAP.  

More village people appeared!

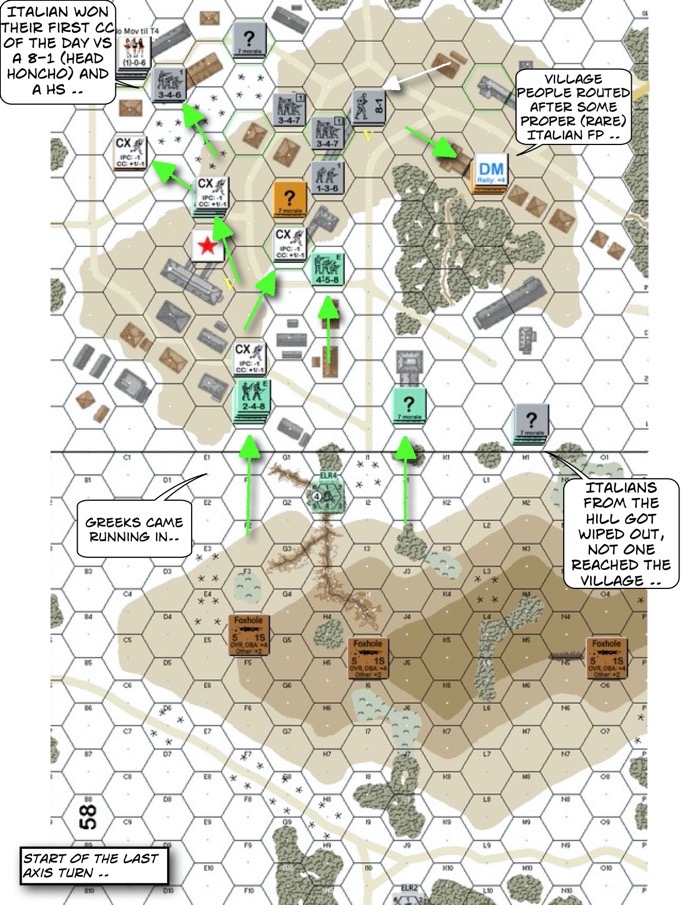
Advanced Squad Leader scenario FT227 Damsels in Distress After Action Report (AAR)

As we open up the last of the Italian turn, the Italians won one significant CC near the schoolgirls, killing off the village elder and a HS of peasants.  Other villagers made a bit for the last VC building but got repulsed by a show of rare Italian firepower (it went above 2!). The Greeks streamed towards the village but it’s apparent it would be tough to free the school girls and break / CC the Italians in the last VC building.  

The Greeks conceded.  

How’s this Scenario Interesting?

There are quite a few tactical choices for both the Greeks and Italians.  The Greeks had to be mindful of the extra MF’s Ground Snow burns off their time table if they elect to take the hill en masse.  The mechanism by which the villagers appear was interesting as well.  The Italians had to spread out to stop them from spawning in certain places but in doing so, couldn’t mass their firepower to break the Partisans before they get into CC (which they don’t want). 

FT230 Italian Behemoth is next.  

Advanced Squad Leader scenario FT228 Last Charge at Umbrega (AAR)

Advanced Squad Leader scenario FT228 Last Charge at Umbrega After Action Report (AAR)

Background of the Scenario

This is another scenario from Le Franc Tireur 14 Italians.  It’s 2 January 1941 on the Umbrega Plateau, Eritra.  Le Franc Tireur’s designs often bring you to rather exotic locations.  

The 1er Régiment de Spahis Marocains ran into an Italian bivouac on the Umbrega Plateau and commenced attacks.  That was to be the last French cavalry charge of the war.  

As such this scenario features the Italian cavalry against the French cavalry on a fairly open terrain where where Woods is Brush and all buildings are Collapsed Huts.  Brush is Woods for Rally/Rout pupose.  (ASL Zen : Woods is Brush and Brush is Woods)

Victory Conditions and Tactical Considerations

The French wins immediately if they control 3 out of the 4 hexes identified as Italian campsites.  One campsite is on the lower left of the map around the depression.  Two campsites are on the top right and the last one is half way down the map from these two.  A French group enters/setup on the left and the rest can enter anywhere along a “C” shaped arc on the right board edge.  All units are Fanatic when Mounted/Bailing Out.  

The bit we forgot when we play was that any unmounted Italians must take a PTC at the start, but it didn’t affect the game too much.  

Cavalry in ASL

This is the first time I played with Cavalry rules.  Horses are a great way to extend your mobility in ASL.  They also carry with them a “permanent” -2 DRM when mounted, so you need to be mindful of the hindrance between you and any enemy units.  The Italians can setup 2 squads HIP’d in this scenario which further exacerbates the situation.  Cavalry charges however, allows the mounted unit to deliver Triple Point Blank Fire (Mounted Fire NA) into a target hex and render any defensive shooting Final Protective Fire.  So conceivably a Defender can break when forced into the FPF and break again when the charging unit fires!  There’s a great article regarding Cavalry units in Advanced Squad Leader Annual 1997 “A Cavalry Primer for Neighsayers” by Michael Puccio.  I know all of you got the official PDF version, now is the time to break it open if you still haven’t yet!  

After Action Report

IMG 4293

My French units started onboard to the left, with only a couple of half squads and a Hero mounted.  I figured the Hero might be a particularly powerful weapon since he sports a morale level of 10 when mounted!  I was also mindful that small arms can lit huts on fire especially when the EC is very dry but that didn’t happen.  I wondered about the significance of the Collapsed Huts until I reallized Cavalry can’t enter buildings but can ride through Collapsed Huts.  Most of my units moved forward on foot but when an Italian squad pin a mounted HS charged through a few collapsed huts and broke it!  Another French unit scored a KIA on a mounted Italian squad but the rest of them started moving away.

The rest of my French units moved in from the north from a point closest to two Italian campsites.  With only 5 turns, I figured we didn’t have much time to mess about.  Again, most of them were on foot, forcing the lower morale and lower firepower Italians into a shooting battle.  A couple of HS’s stay mounted on the far right, just close enough to be threatening.  

IMG 4294

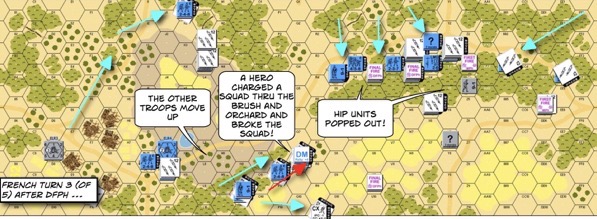
I put my 9-1 LMG team into a position where they could interdict most of the open area in the middle of the map.  I wasn’t going to let the Italian units join up without a challenge.  Short with time, I had my mounted Hero earn his pay by charging through some orchards into a rather isolated Italian squad on the middle of the map.  If it fail to KIA my Hero, it would be tied down allowing my other mounted units to pass.  The one man charge was a success as the 2 down 1 fire in-hex broke that Italian squad as well.  

Meanwhile the French units on the upper right closed in on the Italians, KIA’d another unit and broke others.  HIP’d Italian units popped out of the ground but the French managed to pass MCs after MCs.  

The Italians conceded.  

The presence of LMGs and HIP’d Italian squads made mounted squads a decidely unattractive option for the French.  Throughout the game one need to suppress the desire  to ride your enemy down because even fire from PIN’d squads can be deadly with the permanent -2 DRM.  However, you do need to keep a few units on horsebacks just to keep your opponent uncomfortable and to mess with his routing.  

How is this Scenario Interesting?

This is a playground made for Cavalry.  Both sides have a choice of how aggressive (and hence how mobile) he wants to be.  The Italians got the short end of the morale and the firepower stick and I am not sure if their advantage in squads : 15 vs 10 balance it out.  The 2 HIP’d Italian squads definitely kept the French honest.  I’d say: play this for the Cavalry!  My thanks to Lionel Colin who designed this fun introduction to Cavalry rules for me.  I look forward to the next scenario in LFT14, FT229 A Push in the Bush by Philippe Naud & Jean Devaux.