FT196 Spittelmarkt

IMG_2526(1)

I am not confronting any defenders directly but relentlessly seek to push deep and to constantly flank while the tanks followup to deliver the head on blow.

IMG_2548

The Russians only have two turns left to crush everyone in the little yellow circle.  My opponent think his defenders are falling apart but I think the reinforcing German conscripts will take a while to clear just by standing around.

Feels like fine time to up the ante.

IMG_2563

How to Watch Live ASL Games on VASL & the Code of Conduct

Image from page 5 of "The Life of Christopher Columbus, the discoverer of America" (1840)I watch live ASL games on VASL like people watch TV.  There’s almost always something going on and it’s a good way for new folks to get some context for understanding the ASL Rulebook or simply to see how they can expand their opponent horizon from local to global.

Von Marwitz” on GameSquad recent wrote a great “Step by Step” to do just that.  So the following is posted with his permission.

#1. Don’t be afraid to try. Only the question that is not asked is dumb.

#2. To find an opponent, you can post in the “Opponents Wanted” section of this forum:
http://forums.gamesquad.com/forumdisplay.php?42-ASL-Opponents-Wanted
Describe your situation and chances are that you will find someone to play with in short order.  (Hong KongWargamer : plus the ASL Groups on VASL – https://www.facebook.com/groups/advancedsquadleader/https://www.facebook.com/groups/vaslmeetup/, https://www.facebook.com/groups/27083456599

#3. If you log on to the VASL server, you will find yourself in the “Main Room”. The actual playing goes on in the other rooms, often titled by the name or ID of the scenario. You can join a room by syncronizing with one of the players in it. Personally, I send a short Personal Message to ask if it is ok to sync before I do so. Usually I get a “Yes, sure.” in short order. Once synced, you will see the playing area, the log and counters moving about. Common etiquette is not to move their counters (you can do a mouse-over to expand stacks depending on your settings which they will not see on their screen). You do not hit any dice-roll buttons etc. Normally, you would not type anything into their log unless you previously by Private Message inquired if it is ok to do so. This is the basic etiquette.

Most VASL-players use a combination of VASL and Skype because communication is quicker. As an observer, this makes it a bit more difficult to follow the game, especially as a newbie, because you might not be able to glean what the reason for some dice rolls in the log were. If players don’t use skype, they will (necessarily) type that into the log. Sometimes, people are willing to add observers to their Skype call so that you can listen in (which you could find out by inquiring via private message). If they do, usually you would listen and not take part in the conversation. This might be different if you have become familiar with the players.

While being an observer, regardless whether via log or Skype, you do not give tactical tips to the players in an ongoing game. Usually, I would not point out rules mistakes to the players either unless I know they do not mind. And even then I would point out an illegal move via PM only to the player that just got a rule wrong.

In case you do not “see” the maps, then you might not have them in your “boards” folder and need to download them first (and resync). Same is true for overlays. Then there are some “extensions”, that might expand VASL with some extra counters or gadgets. Most of this stuff can be found in the downloads section of the vasl.info website.

ITR5 Fire Teams AAR

“Catalina Kid,” a M4 medium tank of Company C, 745th Tank Battalion, drives through the entrance of the Aachen-Rothe Erde railroad station during the fighting around the city viaduct on Oct. 20, 1944. Courtesy of First Division Museum

It’s Oct 1944.  The Americans were about to engage the Germans in what was to be their largest urban fight in the Second World War.  Aachen was also to be the first German city captured by the Allies.

In this “BFP Into the Rubble” scenario, 10 elite & 12 US 1st line squads teamed up with 3 Shermans and 2 tank destroyers faced off against a mix of 18 German squads with mostly 2nd liners, a pair of AA guns and 2 Hetzers.  The Germans also had 21 concealment counters, 8 Fortified locations and sewer movement capabilities.

There was a lot of rubble.

The Americans were to capture 7 buildings in 8 turns.

1

American Turn 2 about to start : The German Fortress troops had a surprise for me.  They stacked a few Fortified counters on each other and brought the 37L AA gun onto the 2nd level!  This flak gun didn’t have the 2cm FlaKvierling’s “20” firepower but it did have Stielgranate 41 ammo which offered TK# 26 within 11 hexes.  The high rate of fire from both AA guns were particularly disconcerting if only for Deliberate Immobilizations.    I am quite the novice with AFVs.  I decided to keep my tanks together in mutually supporting roles.  My AFVs would stick with the infantry (panzerfausts abound) and we would use MGs (and not tanks) against ordnance.

There were a couple more tactical things I wanted to do / get into the habit of doing:

  • Place a squad on high ground.  If nothing else to make it harder for my opponent to gain concealment.  Squads in high places could interdict as well.
  • Get to the center building (where the malfunctioned Flak gun was).  My opponent observed that the center building was the ideal jump off point to the latter portion of the American attack.
  • The German SAN was 5 and I got open top tank destroyers.  I got to make sure we got dedicated sniper shielding for our key units!

Credit : Photo Gallery of World War 2

I was on a tight schedule here as the Americans.  I pushed on, using smoke whenever possible, dummies or not.  One of the first things we found was of course the Flak tower my opponent constructed on my right flank (top of the map).  My AFVs then slid towards the middle of the map.

2End of German Turn 2 : The Americans managed to push to the middle of the board.  The AA Gun commanding the middle of the street immobilized one of the Shermans.  The American 10-2 (aka Jedi) Deathstar got taken out as well.  However while the other AFVs spun towards the middle of the board to avoid the Steilgranate wielding Flak tower, a lone Sherman remained to provide smoke cover for the infantry (Errata : The 37L AA gun’s actually on the 2nd level, not the 3rd).

The Americans deployed 4 half squads towards the back to screen off the German sniper, and they took a few hits.  Unfortunately the German sniper killed 2 out of 7 American leaders, something the Americans could ill afford with their lower morale.  The American sniper relocated to the vicinity  Before the game is up, the Germans would see their SAN reduced from 5 to nothing by Sniper-on-Sniper action!

4

In the midst of American Turn 4 : The Americans pushed forward and captured the lone AA gun in the middle of the board.  American leaders continue to be shot by the German sniper.  The latest victim was the radio guy who was in the midst of relocating this radio.  The Jedi Master and his HMG team took the chance to rush past the sniper.  Towards the sound of gunfire!

The Americans took the center building, we just needed to remember to get guys upstairs.  Towards the bottom of the map, the infantry continue to lead the way with AFVs coming in as support.

6

End of American Turn 6 : Two more turns to go and the Americans still got 2 or 3 buildings to take.  We were definitely running tight on time.

From the right flank (top of map), the American OBA put the Flak tower’s stairwell on fire!  The gun crew was therefore encircled.  The German brokies were blocking the approach from the American forces though.

On the left, a Sherman got blown up by a German squad who found a panzerfaust.  An American flamethrower squad hopped by and broke the half squad involved.  That gave the other American AFVs time to push the wreck out of the way and to get into position for an assault on the final VP building on the left flank (bottom of map).

The German Hetzers were about to enter from the left of the board.

7

After American Turn 7 : Encircled as it might be, the German Flak tower was still in the fight.  It blew up the TD that rushed over to help!  Nearby MGs were engaging it, as was the captured AA gun from the middle of the board.  We got a little thin on our right but the lay of the rubble made it hard for us to rebalance.

The wounded artillery observer brought fire down on the left flank target building to good effect.  The Americans on the left flank got ready to hit the building in the last turn.

End game

End Game : The OBA on the left flank (bottom of map) broke some German units and even killed a Hetzer as it tried to move towards the Americans.

On the American right (top of map), the US forces had nothing but open ground to traverse unfortunately.  We tried to shift as much forces as possible to the right but having to get around the German brokies proved to be fatal!!  The Americans therefore lost this scenario by one VC building!

Thoughts?  What would you have done better?  What do you think of the tactical choices?  Would you try this scenario  Please comment!

BPF30 Melee Near The Coast AAR – the superior mobility of the IJA

The time was 25 August 1937.  This was the second time the IJA attacked Shanghai.  The IJA Shanghai Expeditionary Forced landed troops around Liuhe (浏河), Wusong (吳淞) and Chuanshakou (川沙口) as a diversionary to draw GMT troops away from Shanghai.  This scenario depicts an engagement where the IJA troops pushed rapidly inland to encircle Shanghai.

This was a 7 turn scenario in which the IJA needed to control 10 or more buildings at the end.  The GMT (Chinese) had 13 first liners, 1 MMG and 1 LMG led by an 8-1 and an 8-0.  They were reinforced by 4 elite squads with 2 other leaders on Turn 4.  The IJA started with 13 first liners led by 3 leaders.  They were reinforced by a platoon of elite squads plus another leader on Turn 3.

There was an eastern approach for the IJA (top of the map).  That approach led through jungles paths and onto a hill before a group of target buildings.  There was also a western approach where the IJA had to navigate across a shallow stream and fight their way out of a depression.  I guessed the eastern approach would be guarded heavier as the trek was slightly easier and targets richer.

I deployed with 60% of the IJA troops on the east side and 40% on the west with 2 squads HIP’d.  Hopefully that would cause the GMT to lean a little towards the east.

IMG_1089

Chinese Turn 1: Calamity hit the attackers almost immediately.  An observant GMT sniper seek out the highest ranking (10-0) IJA officer amidst a concealed stack and put a round through his head.

Not that it bothered the troops too much, they stayed out of sight a little and continued moving on.

IMG_1090

Chinese Turn 2: As the IJA approached the Chinese forces, an IJA HS was indignant that these brothers of the Greater Asia Co-prosperity Sphere shot at them.  They went berserk but their target GMT squad routed away.  A concealed GMT squad then moved in but failed to ambush the fuming mad IJA berserkers.

IMG_1091

IJA Turn 3 : The IJA decided to Banzai through the bottleneck on the left flank around the lake.  They almost immediately ran into a dangerous “Banzai” trap – a previously concealed stack of high fire power GMT that killed the led Banzai troops and threaten to suck in more.  Good thing I was able to avoid having an IJA leader sucked into that hex.

IMG_1092IJA Turn 3 still : The IJA on the right flank begin the second Banzai to motor across the shallow stream!

IMG_1093

IJA Turn 4 : The turn would see the right flank of the IJA banzai the rest of their troops over the shallow stream.

IMG_1094

IJA Turn 4 still: The left flank answered with a Banzai to the center of the board and not directly up the hill itself.  This was where I channelled my inner IJA and looked to infiltrate!

IMG_1095

IJA Turn 5 (errata – picture is wrong): The right flank banzai’d over the hill and looked to encircle the GMT defenders.  Unfortunately it didn’t quite work out.  Always an issue banzai’ing in the open.

On the otherhand, the left flank got up (and around) the hill and encircled the defenders there.

IMG_1096

Chinese Turn 6 (errata -picture is wrong) : Quick as you might think the IJAs were, I began to run out of time. I shift the IJA troops from the right to the left in preparation for the final push.

But look – the GMT ran a couple of squads and a leader around the IJA right flank and threatened to reclaim the buildings again!

IMG_1097

IJA Turn 7 (errata again!) : The IJA did a massive Banzai charge on the left flank into the cluster of target buildings behind the bamboo forest.  GMT troops in the jungle to the west put up a ferocious volume of fire! The IJA couldn’t get into all of those buildings (missed 1, IJA pinned).

IMG_1098

The End : At the close of IJA Turn 7 – the IJA got 9 buildings but stood to lose a few more in the counter attack – plus looked to lose 2 to 3 more to the GMT troops reclaiming buildings to the north (left of board).

It was a great game played with Peter-James Palmer in Australia.

PBP02 The RHA at Bay AAR – a fighting withdrawal!!

This was May 27 1940.  German mechanised units chased Allied forces through Belgium and northern France.  A detachment of the 5th Royal Horse Artillery found themselves to the immediate south of Dunkirk with 80 men from a searchlight unit and Germans units threatening to overrun. PBP02 is part of a scenario pack created by the Paddington Bear ASL Club in Australia.  I had a look through them, there are good number of PTO scenarios that never fails to draw my interest but overall the Paddington Bears often portray interesting tactical situations. PB2 Start-proc This was the setup. The German wins if both British guns were eliminated and more than 10 CVPs of Good Order Germans exit off the east edge (right edge of the map). It’s a draw if both guns were eliminated without the requisite exits. There were two nice locations to where the guns could be emplaced : both were orchards with stone walls. I had the two ATRs positioned to not take immediate fire but to be where they would cause the most delay. Their threat was more powerful than their actual effectiveness against German tanks. So here we are: eight British second liners (they were search light operators) and two guns against ten German élite and first liners plus five tanks. Turn 2 Ger 02 - EoT Berserk Germans Brit Right Wing collapse-proc German Turn 2: The British reserves moved up to front line positions after seeing how the Germans commit. The British right flank got shot up pretty bad. All that was holding that side up was a British second liner. The Germans used smoke and cover well but a squad got tired of the searchlight operators shooting back and promptly went berserk. Turn 3 Ger 01 - ATR Left bounced Berserker died Folks keeping huns at bay while comrades rally-proc German Turn 3: The berserkers charged! You can see how they made their way straight into the first stone building only to be cut down when they got to the house. The single British second liner continued to hold up the right flank while their compatriots were busy rallying. The first German tank rounded the corner on the British left flank and the ATR team got to work, only to bounce a round off the tank. German tanker: “That wasn’t even scary.” Turn 3 Brit 01 - Units fall back left Greenies in front.-proc

British Turn 3: The British were in general retreat .. erm .. retrograde.  The idea here was to stay ahead of the Germans and get to the next building before the Germans get their guns on and to keep the inside lines open.  On the right, a rallied British green squad switched a second liner out as the rear guard.  These guys would see a few medals before the day is over.  

Turn 4 Ger 01 - tank bounce off ATR shot but got nailed by gun-proc

German Turn 4: The action heated up on German Turn 4. On the British left, a German tank tried to get to the back field. The British ATR team held their shot until the tank went to the other side of the building. However they bounced a second round off the German tanks even when they had a side shot. The 18 pounder (typo in the picture) on the British right “appeared” and wrecked the German tank in the Defensive Fire Phase.

Turn 4 Bri 03 - G folks killed Ger 1st line-proc

British Turn 4: The British green squad on the right dispatched the German first liners who held them in melee!! The rest of the British squads got to the last line of buildings. They cut it quite close, as the Germans shot some of them between the gaps. The British continued to get to positions that were a little out-of-the-way but cover grounds the Germans would move into.

Turn 5 Bri 01 Gun appears WP ne.  fire & fun, concript died earlier-proc

British Turn 5: The Germans started building a death star on the British left and the left British gun appeared!!  It promptly put a round of white phosphorous into the building. The British ATR teams repositioned towards buildings where they could prevent the German tanks from exiting. On the right, the malfunctioned British gun couldn’t be fixed and was eliminated from the game. The Germans sent another squad in on the right flank and killed the pesky British green squad that was holding up traffic but these heroes had already saved their brothers.

Turn 6 Ger EoT-proc

German Turn 6: The Germans were almost of top of the British now. A German tank got inside the British lines but one ATR team was broken and the other one couldn’t get close enough.  Good thing the white phosphorous forced the German death star to move.

Turn 7 Ger MPh-proc

Turn 7 Ger CC Got the gun!!-proc

German Turn 7: The Germans got up to the right ATR team and was wrecked at pointblank range! The Germans rushed up on the British left as well. They advanced up and captured the gun hex in the CC phase!!

Turn 7 Brit End .. KIA'd-proc

British Turn 7: The British couldn’t let the Germans have a fire phase to spike the left gun.  The British squad fired pointblank and KIA’d the squad!  This led to an interesting revelation after a few rounds of discussions on the forums.  There’s no way to kill the gun by small arms fire without a crew / possessing infantry (A9.74) present!  So the only chance of the Germans getting a tie is to kill it with the tank ordnance. 

We never got to that so here we go.  It’s a three hex range with an infantry target.  The base TH is 8.  The gun was emplaced, so there’s a +2 DRM. 

snakes

SNAKES!!  The Modified TH# is 8 .. rolled a 2+2 which is not less than half but it’s an original 1,1 nonetheless.. so we need a subsequent roll ..   subsequent That’s equal to half the Modified TH# of 8!!  CRITICAL HIT!!!

As AZslim pointed out to me on GameSquad, guns (and crew) are automatically destroyed on Critlcal Hits.  So both British guns were gone.  This game went all the way to the last roll – and it’s a DRAW!!

Gotta admit, this is some finish!!  Witness the narrative power of an ASL game – and that’s why we love it.

AAR A79 Mike Red – Defense in Seaborne Assault!

A079 - 01 German-proc

A79 Mike Red depicts the part of D-Day landings at Courseulles-sur-Mer, the most heavily fortified position – “Mike Red” – that the Anglo-Canadian forces had to face on Juno Beach.

A total of 16 Canadian squads bore down on 5 second line German squads and 6 gun crews.  The crews, with their 8 morale and self rallying ability, were the backbone to the whole German defence.  The Canadians win by clearing all pillboxes of good order Germans and by exiting 7 VPs of personnel in 7 turns.

The defence layout you see is actually created by my opponent.  The tetrahedrons discourage landing crafts from unloading directly in front of the pillboxes.  The antitank gun in the leftmost pillbox and the medium machine gun in the trench next to it covered most of the beach.  The pillbox in the center housed a heavy and a medium machine gun, accompanied by an 8-1 leader.  The approach to the pillbox was covered by mortars on both sides.  Behind the row of wires, there was a seawall that ran all along the edge of the hinterland.  The singular pillbox that pointed inland was for rallying and for concealment generation, apart from being a great position from which to shoot any Canadians who broke through.

A079 - 02 Brit - LC aground DP1 LC stunned 2.5+ldr landed 1.5 squad + leader died-proc

Canadian Turn 2 : The first Canadian boat beached.  Two and a half squads hit the sand with their gear.  They were promptly shot up by the German defenders and only 1 squad survived (note : infantry doing seaborne assaults are Fanatic on beaches, but they Casualty Reduce instead of Break).  The survivors did their best to pick up the mortar and the PIAT in the meantime.  The other boats kept coming in.  One of the landing crafts went aground precisely where the German AT gun was bore-sighted.  It was a scary moment for those involved but the Germans kept firing armour piecing shells instead of high explosive shells which were a lot more effective against landing crafts.  Someone must had gotten the shells and the boxes switched!

A079 - 02 Germans - Shifting right-proc

German Turn 2 : The Germans figured this was a good time to shift their people to the right flank.  The reinforcement arrived as well and positioned itself as a the “back stop” to possible breaches.  A team of gun crew started moving the left most medium machine gun into the pillbox so as to cover more of the beach against the incoming Canadians.  Their ability to reposition quickly was really a tribute to the top quality machine gun designs the Germans had, which made them more portable than their opponent’s MMGs.

A079 - 03 Brit - Hero w FT-proc

Canadian Turn 3 : The Canadian mortars were very successful in getting off smoke shells in key places.  More Canadians hit the beach.  At this stage of the landing, the Canadians lost 5.5 squads, 1 crew and 3 leaders!  The bright spot here was that a hero stepped up from amongst the ranks and appeared to have picked up a flamethrower ..

The German antitank gun got their ammo figured out at last.  However in most cases the Germans waited for the landing infantry to step onto the sand before opening fire.

A079 - 05 Brit - Try to set DC to blow the seawall, hero with FT shot-proc

Canadian Turn 5 : The Canadians tried very hard to set a demolition pack against the seawall.  Luck was simply not with them that day.  The Germans had already positioned their medium machine from the left flank to one of the shell holes on the right so as to cover any breaches.  You can’t see this too well but the Shermans fired off a few smoke shells already.  The flamethrower wielding hero took advantage of the smoke cover, ran across the beach and got ready to roast up the center pillbox, only to be KIA’d by the antitank gun!

A079 - 05 Brit - Melee Brit CR-proc

Canadian Turn 5 (contd) : There was a mild breeze that day and hence the smoke drift.

A079 - 05 Brit - Melee Brit CR Xray view-proc

Canadian Turn 5 (contd) : This is the same view as the one above but with the smoke (mostly) deleted.  What I meant to say in the diagram was that the Canadians got casualty reduced (“CR’d” not “DR’d”) in close combat.  Taking advantage of the drifting smoke, the MMG crew voluntarily broke and ran towards the right flank, getting itself positioned to hinder the Canadians from exiting.

A079 - 05 Ger - MMG & crew broke and ran last turn .. Ger squad KIA-proc

German Turn 5 : Some of the German troops went back to the pillboxes on the left flank.  The Canadians need to clear the pillboxes AND to exit 7 VPs off the board, so keeping the melee going would be an important element to the German plans.  The MMG crew on the right flank (top of the map) couldn’t rally though.  The Germans did what they could to move some folks in and if necessary, grab the machine gun!  The Canadians were not doing well with the melee at all, they got casualty reduced again!

A079 - 06 Brit - 4 close combats-proc

Canadian Turn 6 : The Canadians finally managed to set demolition charges against the seawall, now they need to get away from the wall to blow it.  The Canadians flung themselves onto the pillboxes in this round.  They would win a couple of the close combats but they would continue fight it out at pillbox locations.   The center pillbox might be the most frustrating, not only did it yield no German casualties in face of steady Canadian losses, it now sprung a new German leader!

As per my usual practise, I promptly named this rising star after my opponent.

The Shermans moved across the beach in anticipation of a successful breach in the seawall.  The Canadian infantry had little chance exiting the board at this stage, but getting two Sherman’s off would make this a Canadian game, provided they were successful with the pillbox melees as well.  One of the Shermans bogged.

A079 - 06 Ger - Melee still on- Vol break away with the plunger-proc

German Turn 6 :  The Germans on the top right of the map managed to join up with the MMG crew.   The notable move from my opponent here was that he voluntarily broke the Canadian squad that held the detonator switch to the set DC which allowed a leader to rout with them as well.  The leader would then grab the switch from the brokers in the coming rally phase.

A079 - 07 Brit End-proc

Canadian Turn 7 :  My opponent’s enterprising leader grabbed the detonator switch as planned and breached the sea wall.  The Shermans started up and drove inland.  The first one rolled for “excessive speed breakdown” and got off the board.

The first 6 VPs!  The Canadians only need one other Sherman to get off.

The next Sherman drove across the breach and rolled for ESB.  It went too fast and was immobilized.  Okay, there’s still a last one.  All the Canadians need was 7VPs off the board, after which it’s up to the melees.

The last one got onto the hinterland, clanked forward steadily ..

.. and broke down as well.

A55 The Cat Has Jumped – AAR on Seaborne Assault!!

This scenario reflects the seaborne assault by the IJA on a relatively lightly held beach in the Philippines. The landing took place on Dec 22 1941, shortly after the attack on Pearl Harbour. Conditions were not ideal on this beach – the wind’s heavy and so’s the surf. The Japanese launched their attack on these “shohatsu’s” (or “LCs” for landing crafts) which were really big steel boats.

Shohatsu

As such, neither the crew nor the passengers get to button up.  They were therefore subjected to a +2 CE DRM (Crew Exposed DR modifier) at all times.  The Filipino defenders had problems of their own as well : they were using MGs that were stored since the 1920’s.  The defenders’ machine guns were therefore a lot less reliable than usual (X11 instead of B12).

The IJA wins immediately if they manage to exit 25 or more VPs (“victory points”) off the right edge of the map and/or gain that number in CVPs (“casualty victory points).  The entire IJA force had 22 squads, 3 crews and 5 leaders – a total of 58 VPs which meant they needed to exit half.  The entire Philippines force was 29 CVPs should the IJA decides to focus on CVPs instead.

A55 Start-proc

IJA Turn 1 : This was a humid day at a peaceful beach.  I could almost see people frolicking in the shallow waters (almost).

The terrain on the top of the map was very restrictive, especially compared to the bottom of the map.  It would be difficult for the IJA to exit the map via there.  The terrain was more ideal on the bottom half of the map.  The orchards provided a degree of hindrance whilst requiring only 1 MF per hex to move through.  Defence looks pretty sparse on the bottom of the map and I suspect that’s because the Filipinos stationed their 4 squad equivalents there.  The way this was setup, the bottom of the map looked too inviting for me.  I therefore aim the IJA landing forces towards the top part of the map.  My opponent had gracefully given me the balance, so there were 2 MMGs and 1 HMG instead of 3 MMGs and 1 HMG, but those MGs still encouraged me to head for the jungle. Jungles are ideal banzai terrain after all.

A55 PT2 Prep - Lose both MMGs-proc

Philippines Turn 2 : The 9 IJA boats were still coming in okay.  None of the boats were lost in the heavy surf yet.  The Filipinos started shooting at the incoming LCs.  Stunning the LC crew would cause the boats to flounder and throw the IJA off their landing schedule.  Unfortunately both MMG clogged up and random selection designated both for the junk heap (and there was much cursing).

A55 JT3 MPh - Broached No Survivors-proc

IJA Turn 3 : It was difficult to beach the LCs properly in the heavy surf.  One LC was swamped and ran aground.  One LC’s crew struggled hard with the waves and wasn’t able to do much.  One LC broached against the swells and was destroyed, no survivors.  One LC got shot up bad and was floundering in the shadow seas.  The 5 that beached okay, started to unload its passengers.  Infantry on the beach are fanatic.  However, if they fail morale checks they casualty reduce.

The 5 LCs that beached, started to unload.  However being a first time seaborne assaulter I was concerned about pushing entire stacks out on the beach risking -2 shots on everyone.  So I decided to offload the heavy weapons first, those chaps would need to assemble their toys on the beach away.  This decision would cost the IJA a few more platoons as more LCs got broached in the heavy surf.

I asked my mentor Witchbottles about it afterwards, and he said to get off the boat absolutely as fast as we can!

A55 PT4 End - P moving into blocking positions-proc

Philippines Turn 4 : The IJA got inland on the left flank.  It’s great news apart from the fact that they could get boxed in with a few Filipino squads against the board edge especially with this terrain.  The remaining  Filipino MG, the heavy machine gun expired as well.  The defenders were caught with a beach full of fanatic IJAs and no high rate of fire weapon to do anything about it.  However, they had moved inland methodically to key locations.  The IJA got a bad feeling about what was to come as they couldn’t stop the Filipinos from slipping away.

A55 JT5 Another boat broached 11 squads 10-2 10-1 9-0-proc

IJA Turn 5 : The IJA got another LCs broached!!  The IJA had lost a total of 11 squads and the best 3 of the 5 leaders.  Considering that the IJA started with 22 squads 5 leaders ad 3 crews, that was almost half of the force!

A55 JT6 Banzai 02-proc

IJA Turn 6 : This is Turn 6 and the IJA just got off the beach.  Witchbottles’ advice to always read the scenario victory conditions at the start of every turn definitely helped here.  The IJAs couldn’t move fast enough to get 25 VPs off the board, especially not with the Filipinos shooting at their backs.  The IJAs decided to change tack and to round them up in the jungle instead.

BAAAAANNNZZZAAAAAAAAIIIIIIIIIIIII!!!!!!!!

This was the second banzai attack of the game.  The first one was almost exploratory.  The aim ws to catch and kill the blocking force in front.

A55 JT6 Banzai 03-proc

IJA Turn 6 (contd.) : This is the third banzai to catch the bulk of the Filipinos in the woods.  The jungle was just perfect banzai country!

A55 JT6 End CVP16 IJA 13 sqs 4 ldrs-proc

IJA Turn 6 : This was the aftermath of Turn 6.  The IJA lost a total of 13 squads and 4 leaders but have scored 16 CVPs in total.  They needed 9 more to win the game.  The Filipinos were wiped off the top of the map.  However, there were still enough Filipino troops retreating into blocking positions.

A55 PT6 Using FLs to stop the P from retreating-proc

Philippines Turn 6 : The IJAs used fire lanes to delay the Filipino retreat.  Meanwhile, the left flank looked to be clear all the way to the goal line!

A55 JT7  Banzai 04 IJA 13 Ldr 4 CVP 18-proc

IJA Turn 7 : The IJA sprung their 4th banzai.  It was a big decision considering they had only 1 leader (8+1) left.  However the way he was positioned he definitely didn’t need to get too intimately involved.  You can see by the red arrow, how the IJA looked to catch the rest of the defenders.  The IJA now had 18 CVPs.

A55 PT7 Firelane Hero-proc

Philippines Turn 7 : The Filipinos got themselves a hero!  The hero, when coupled with the remaining 8-1 produced a fairly respectable stack with a HS and an IJA LMG.  Either way, the IJA moved into positions where they could lay down fire lanes to delay the Filipino retreat.  My opponent had already seen the bottleneck on the top right of the map where there was a lake.  To get to the board edge, the IJAs on the left flank had to run through the one hex that was 4 hexes from the top and 2 hexes from the right.

A55 JT9  Banzai 05 Need 5 more CVPs stop FL-proc

IJA Turn 9 : The Filipino leader / hero / HS / LMG stack got into a position to lay a fire lane down on the IJA exit.  The first fire striped the lead IJA squad.  The IJA had about 7 VPs worth of squads who could exit off in this very turn and we needed only 5. We had to get rid of that fire lane and one good way was to force the enemy squad into Final Protective Fire.  The Filipino leader-hero stack’s collective hearts must had skipped a beat when they looked away from their gleefully laid fire lane and saw the bunch of IJAs looking menacingly at them from their left.

Uh oh.

The fifth banzai attack had no problems crashing through the open  and into the fire lane stack.  There was nothing the Filipinos could do.   The fire lane stopped after a quick struggle and the 7 VPs worth of IJA squads exited at their leisure.

A55 JT9 Ends-proc

IJA Turn 9 : This was the end of the game as the IJA killed and exited more than 25 VPs.

As my opponent warned me, seaborne assaults are not for the faint of heart.  The attackers should expect to lose more than half the force to the elements and to casualty reduction until his troops hit the hinterland.  For the IJAs, only 4 LCs managed to head back to the ships.  4 others were wrecked and 1 went aground.  Half the force was dead at turn 6, mostly to broaching LCs.

I got to remember to get EVERYONE off the LCs immediately next time.


G38 Castello Fatato – Extreme Winter at Night

G38 - Starting-proc

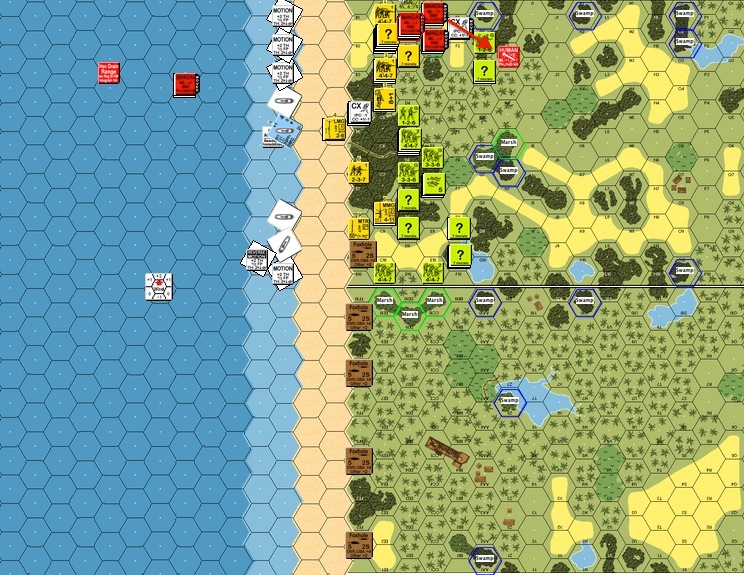
It was December 20 1942.  The Italian Bersaglieri Regiment approached the Russian town of Meshkov in their retreat.  The Russians got there ahead of them and used its “fairy tale castle” ie. catello fatato cathedral as a strongpoint.  It was dark, it was extremely cold and yet the cathedral was illuminated by a portion of the building that was on fire.

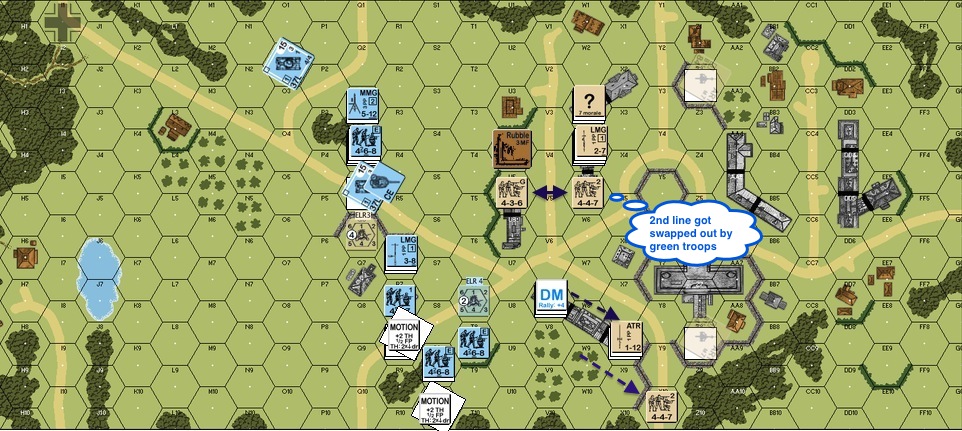
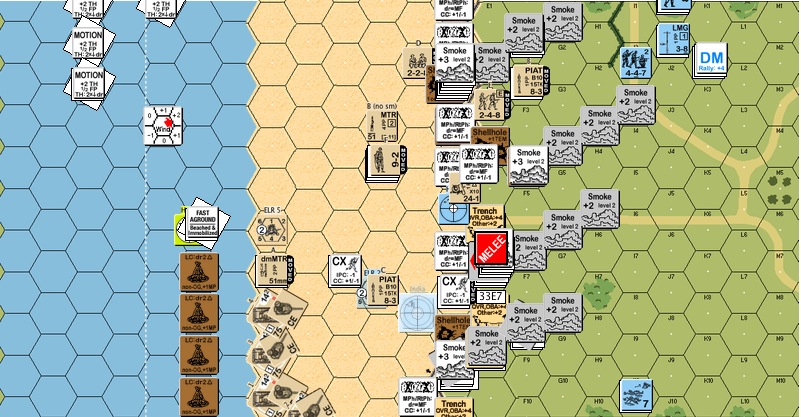
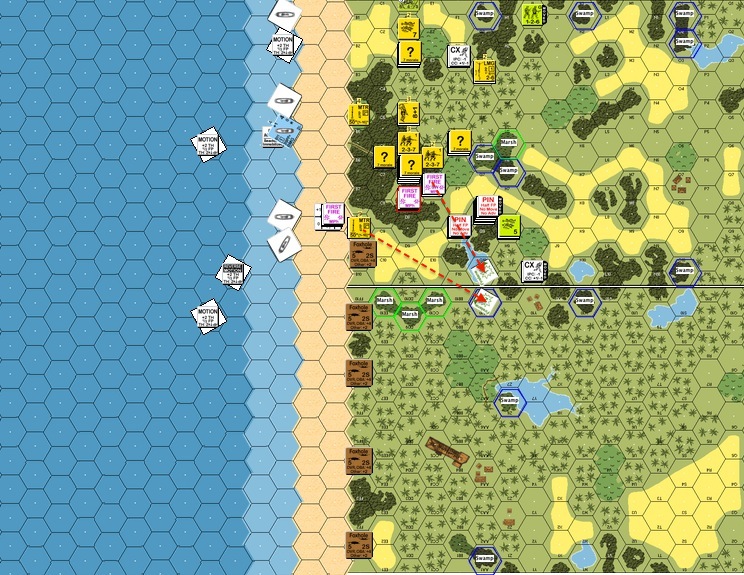
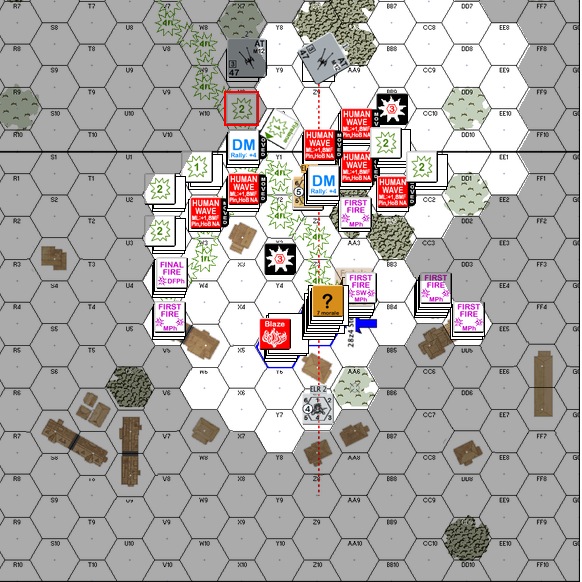
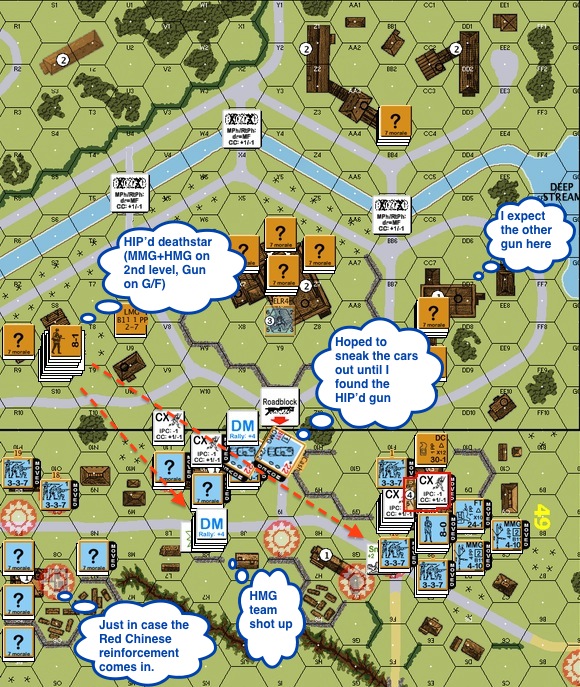
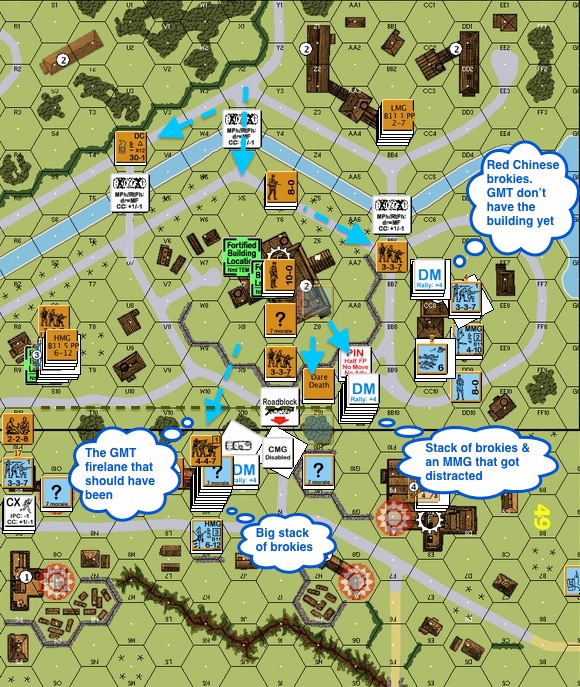
The scenario opened with 20 squads of Italians doing a human wav across the snow towards 2 squads of Russian SMG units plus 6 rifle squads of the Russian 1st Guards Army.  The above is my defensive layout and where my machine guns were positioned.  Typically in a night scenario, support weapons and leaders are HIP’d (“hidden initial placement”) as are 25% of the defenders.  The Italians win when they control the cathedral (the hex with the “Blaze” counter and the hex to the upper right of it. )

G38 - IT01 - Defensive FF Fire Lanes-proc

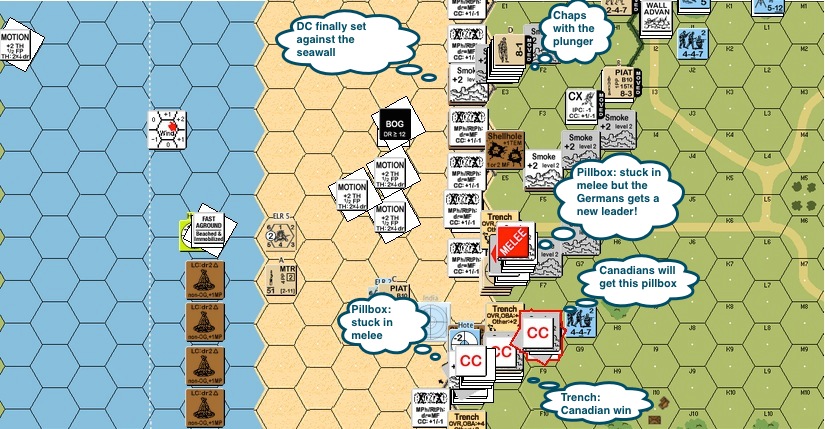
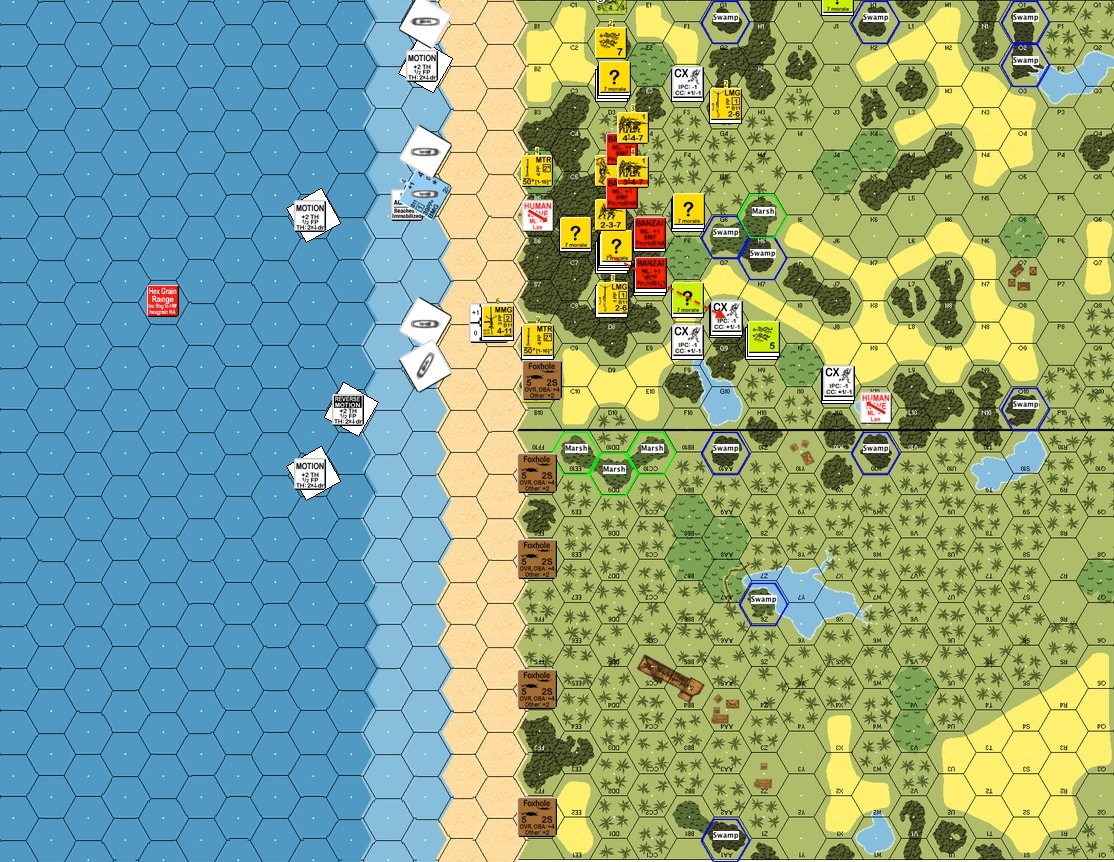
Italian Turn 1 After the Movement Phase : The NVR (“Night Vision Range”) was 5, so the screaming Italians were spotted.  The Russians tried to break as many Italian squads as they could.  Italian squads have a moral level of 7 and a broken side morale of 6.  At night, units don’t get to remove their “DM” status until they roll less than its current printed morale.  Running with 4 leaders (2 of them 6+1), these Italian should be very hard to rally once they break.  Turns out it was the Russians who couldn’t rally for most of the game.  The Italian 6+1’s were rather successful in convincing their troops to get back into the fight.

G38 - RT01 - After AF - Sniper, Gun hits Church .. choice between hitting and skulking sniper knocks off 8-1-proc

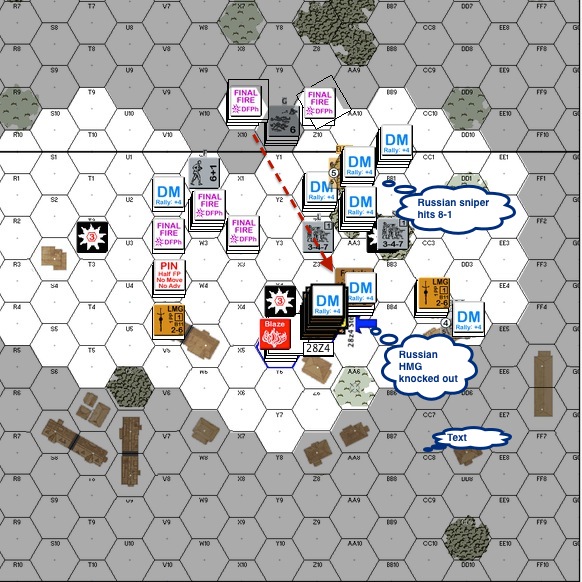
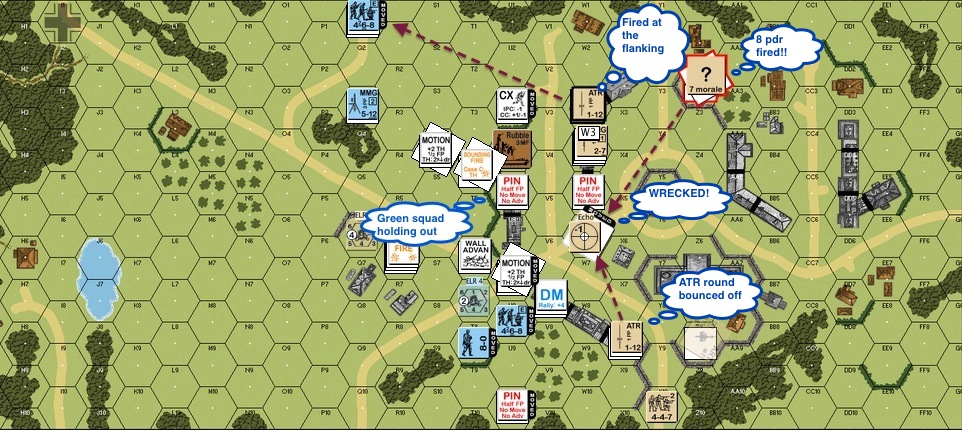
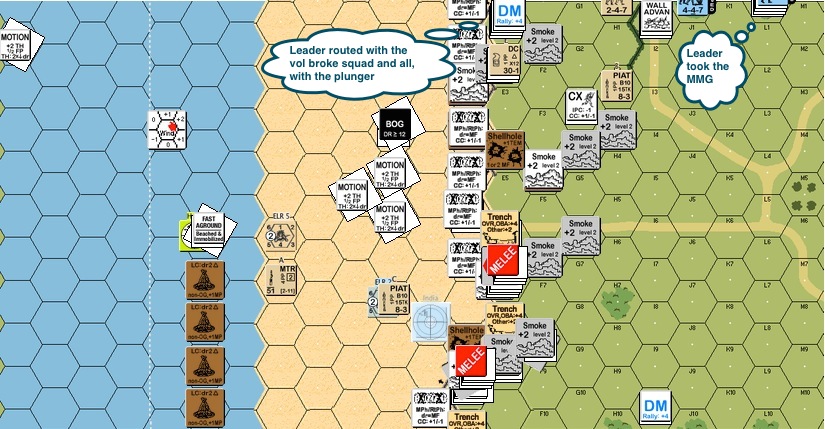
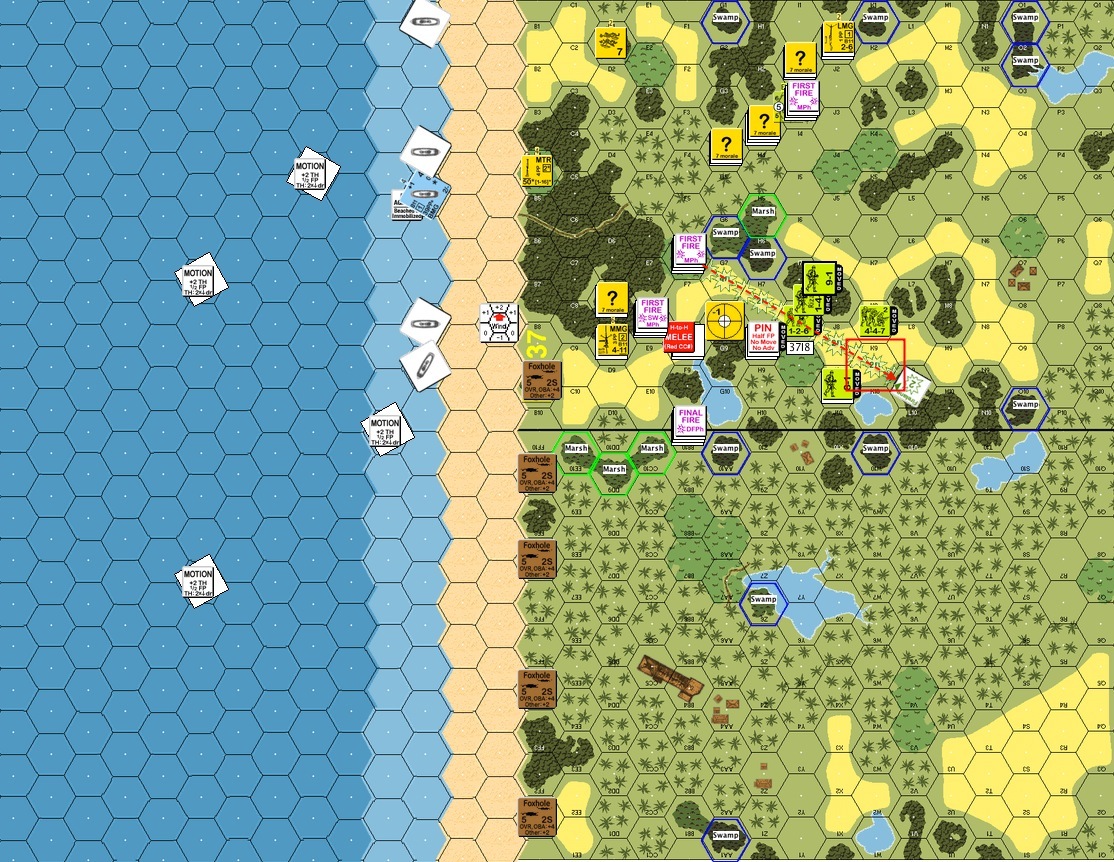
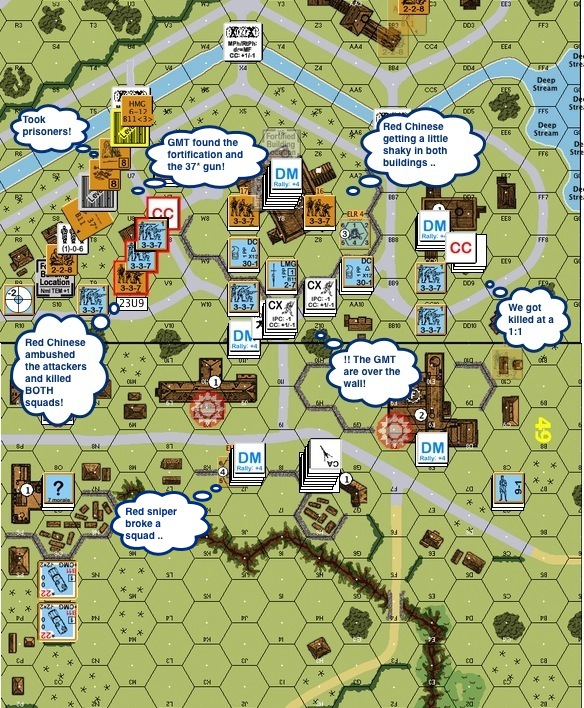
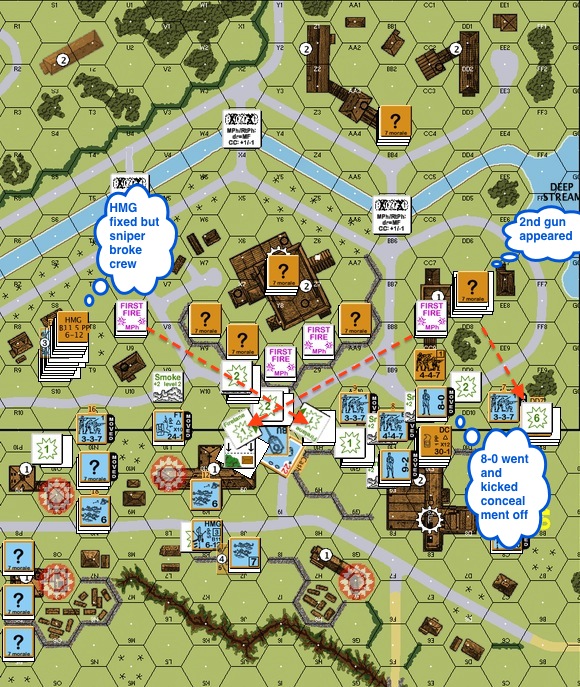
Russian Turn 1 After Advance Fire Phase : The Russian should perhaps have skulked at least part of their forces but I was determined to break a few more Italian squads.  The Italians fired their Austrian made Cannone da 47/32 (ROF3), broke a squad on the ground level of the church and the heavy machine gun (“HMG”) team in the trench next to it.  The HMG was later lost to the Italians and never served under Russian use again.

Katya, our Russian sniper did miracles though!  She identified an 8-1 leader from a stack of brokies and put a hole through his head.  He was the highest ranking leader the Italians had and the only one with a negative modifier!

G38 - IT03 - End - It got in, melee, tieup, one gun down-proc
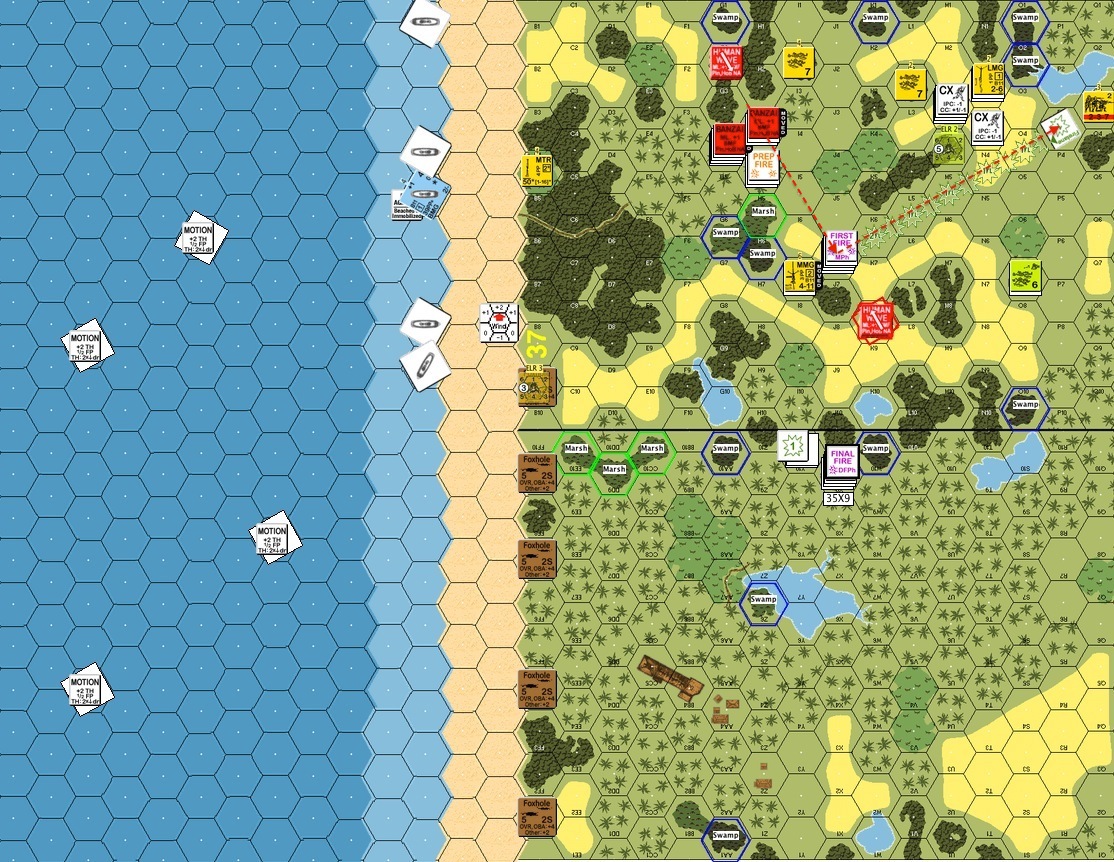
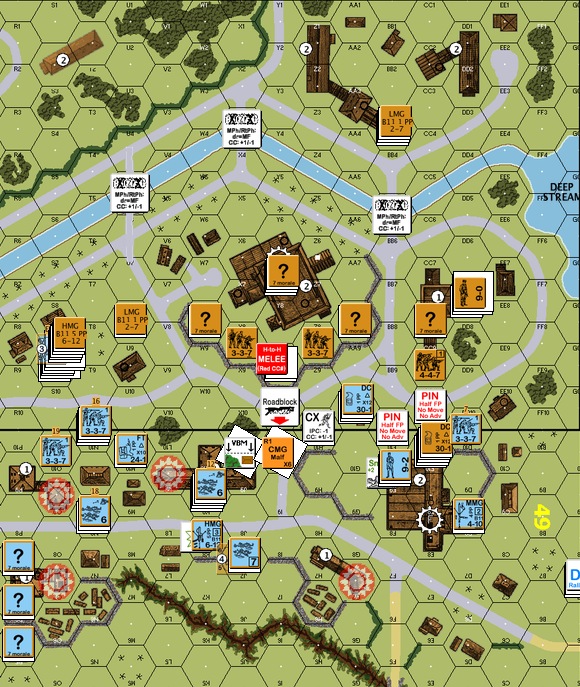
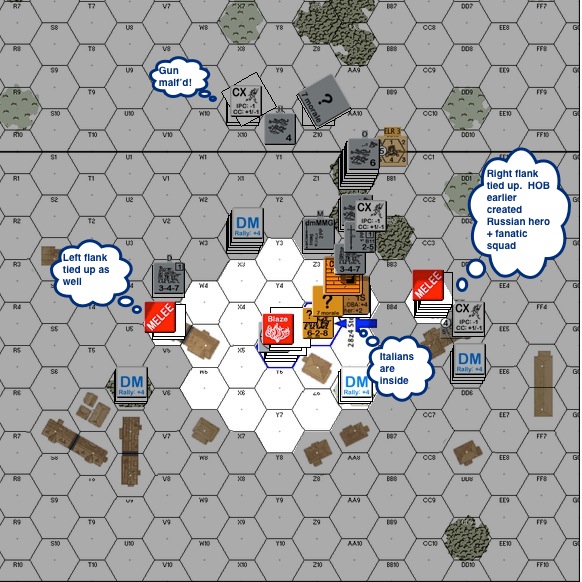
Italian Turn 3 : The Russian couldn’t find any star shells!!  Since illuminated units cannot see into the darkness outside the zone of illumination, it was safe for the Italians to move around the rim of blaze illumination and sneak an Italian squad into the cathedral.  The Italians had also jumped both of my flanks and tied them down in mêlée.  Given the huge disparity inmanpower, the Russians should have done a fighting retreat and leverage on their advantage in troop quality.  Once the Italians closed, the difference in morale level was gone and they could keep reinforcing any mêlée.

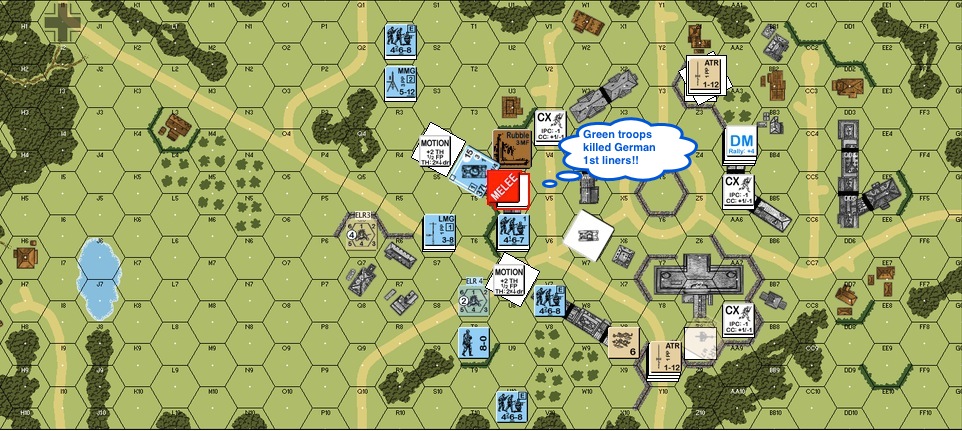
Case in point : the Russian’s right flank got a little agitated and turned fanatic along with the production of a hero (I promptly named him after my esteemed opponent .. heh heh), the Italians jumped on them immediately in the Close Combat phase, nullifying their qualities.

G38 - RT03 - End - 8-1 dead sniper wnd 7-0 cellar 628 cc kill IT-proc

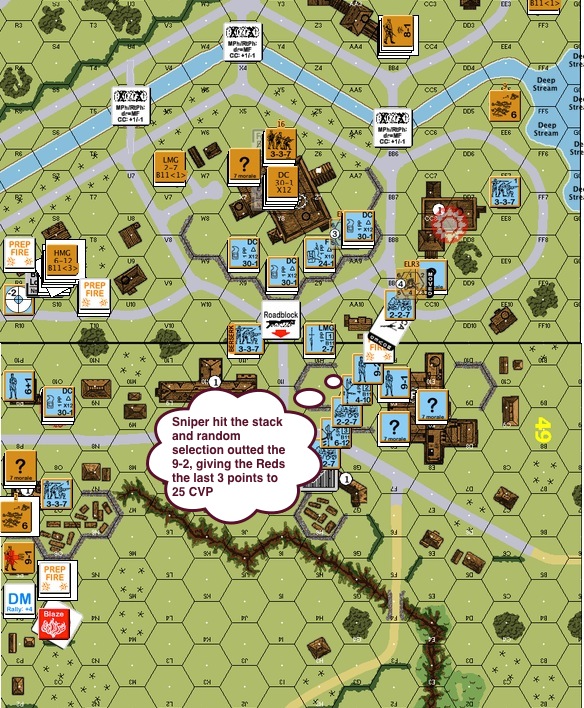
Russian Turn 3 Close Combat Phase : There wasn’t a lot to do in this Russian turn.  The fellas steadfastly refused to be rallied.  Since one of the Italian guns malfunctioned and the Russian SMG squads hid in fortified cellars, there wasn’t much damage.  One of those Russian SMG squad decided to come out of hiding however, advanced up to see if it can ambush the Italian squad up top.  It didn’t, but it took out the Italian squad anyway in close combat.  In face of all the firepower and the important job it had to do, advancing up was a risk.  However the act might burn more time from the Italians.

The sparky Katya (sniper) continued to work hard, she found a 7-0 in another big stack of brokies and wounded him.  The Italians had 2 healthy 6+1’s left.  Both of the Russian flanks continued to be tied down in mêlée.

G38 - IT04 - After MPh-proc

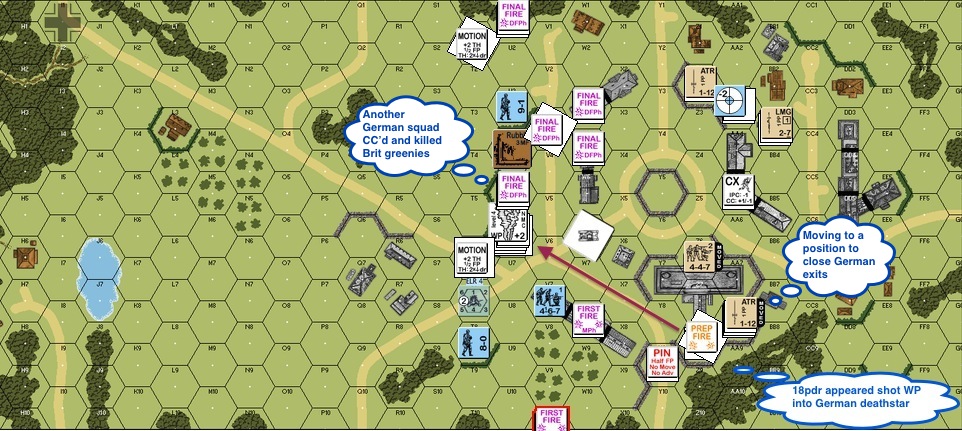
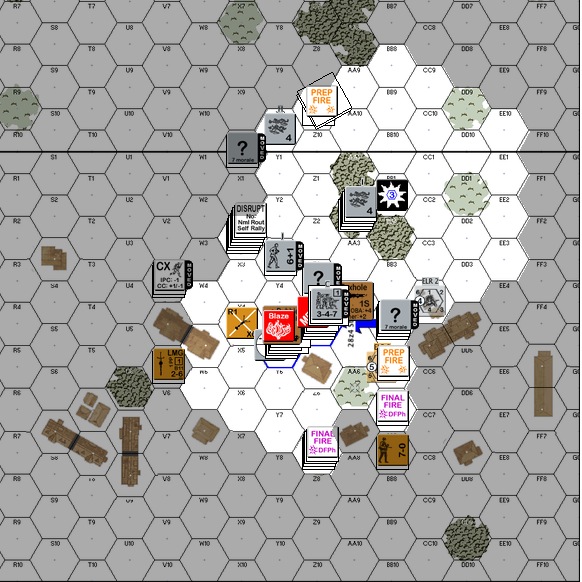
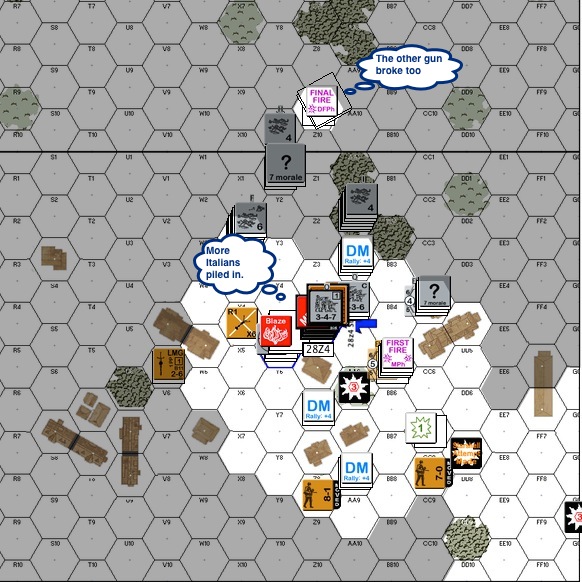
Italian Turn 4 After the Movement Phase : There were only 3 functional Russian squads left : 1 rifle squad and 2 SMG squads in the cellars.  The rifle squad spit out a fire lane with the Italian Breda M30 LMG, just to deter the Italians from rounding the building on the right.  As luck would have it, the Italian squad on the lower right in the dark would be hit and broken by Katya, who was obviously making it a late night tonight.

G38 - IT04 - After CC . Melee stays, Sniper hits 347 on right, 2IT in Y5-proc

Italian Turn 4 later in Close Combat : Two Italian squads made it into the left side of the cathedral.  There’s still a concealed SMG squad in the left cellar. Since the cellars were fortified, they would need to pin or to break the Russian SMG squads before they could go in for close combat!

G38 - RT04 - Sniper pins Melee continues not much-proc

Russian Turn 4 : The Italians continued to rally quite well, although they had some casualties from the cold (Extreme Winter E.3.742).  The Russians on the hand were still hanging on with a few squads.  To make matters worse, the German sniper showed up an pinned the fanatic Russian squad in the midst of their mêlée on the right.  Fortunately they survived and the fight continued, tying down that flank still for the Russians.

G38 - IT05 - Sniper broke fanatic hero died in CC 2 iT got into cellar pin 628 CC night closing in -proc

Italian Turn 5: Again, the Russians had no luck with star shells, and the Italians moved in.  The Italians managed to pin the Russian SMG squad in the cellar on the right and so two Italian squads advanced downstairs to say hello.  The mêlée on the far right was hit by German snipers again!  The Russian fanatic squad was broken and they were all killed when the hero found himself fighting the Russians alone.  The Russians outside were beginning to rally but listening to the sounds around them, SMG squad in the cellar on the left felt the darkness rolling rapidly in.

G38 - RT05 - Other gun broke 6+1 rallies Russians coming back more people in church-proc

Russian Turn 5 : The Italians got star shells in some choice positions!  Nonetheless the rallied Russian troops started to move back.  Fortunately, the other Italian gun broke as well, adding to the Russians’ fighting chance.

G38 - IT06 - Another Gun gone - Italians piled in-proc

Italian Turn 6 : GUSTS!!  The burning first floor of the cathedral collapsed!  Good thing it didn’t crash into the cellar.

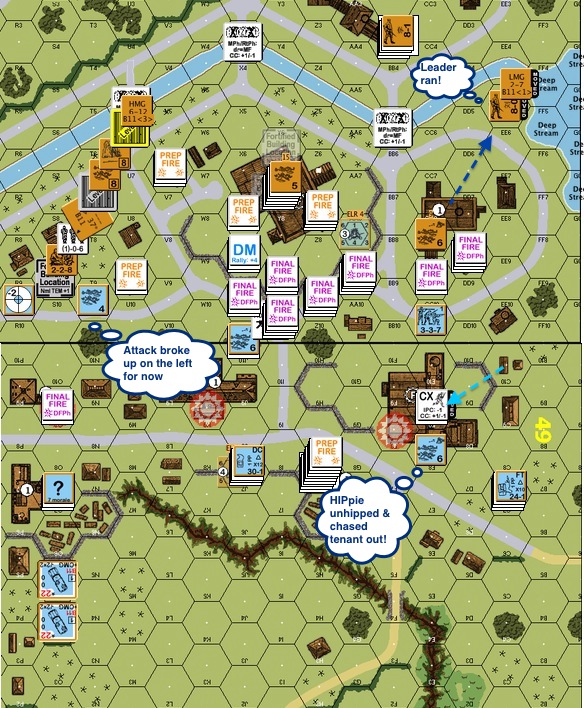
The Italians had to think defence now.  The Russians were getting back into the fight from the lower left of the map.  The Italians had to get into blocking positions while continuing to reinforce the mêlée.  The Russians couldn’t do much about stopping the Italians from reinforcing the cathedral.  You might also notice that the remaining Italian gun was operational now and again tried pounding the cellars.

G38 - RT06 - Russians rushed the building. Ldr OVR look for ambush-proc

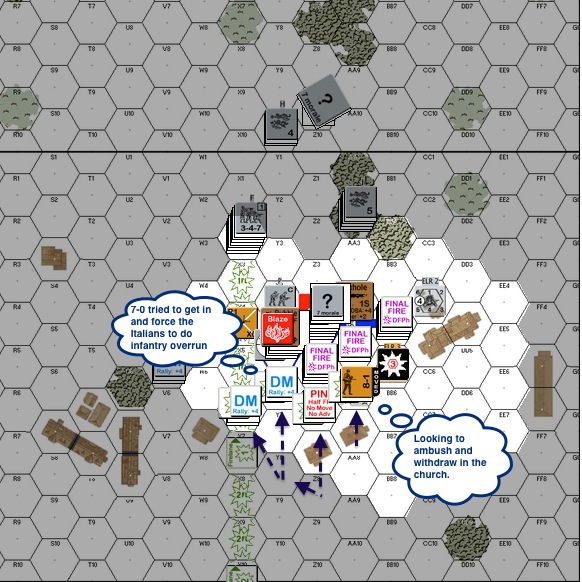
Russian Turn 6 : The Russians plodded towards the sounds of gunfire inside the cathedral.  First up was the 7-0 who looked to pop into the church hex on the left.  The choice for the Italians was either to spend firepower on him or to let him get into the ground floor and make the Italians do a +3 task check for “Infantry Overrides” in next turn to get in.  They shot him.  Next up is a Guards rifle squad that broke against the fire lane on the far left.

It looked even tougher on the right.

One squad got pinned and finally the last squad moved in with the 8-1.  Russians elites are stealthy and Italians are lax.  If the Russians could get an ambush they could infiltrate into the cathedral.  Unfortunately, it was the Russians who got ambushed, and the Italian squad withdrew into the cathedral.

At this moment, the cathedral cellar on the left was held by a good order Russian SMG squad and in the right, there was a mêlée raging on between a Russian squad and two Italian squads.  The Russian counterattack could only watch from outside the cathedral.

G38 - IT07 - Italians can't break guy in the cellar-proc

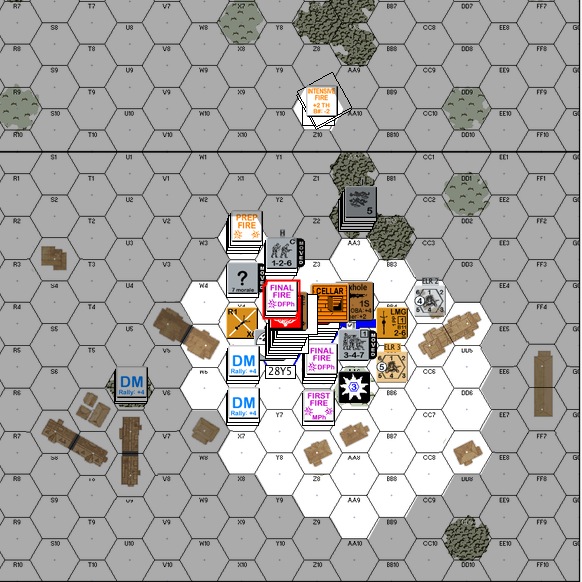
Italian Final Turn : It all went down to one question (read : dice roll) – whether the Italians could break or pin the Russian SMG squad holding out in the left cellar so that the Italians have a chance in close combat.

The Italians moved, trying to focus more fire power into the cellar during advancing fire.  The Russians outside managed to pin one of the 3 squads that got into the cathedral, directly above the stubborn Russian SMG squad.  The Italians mustered up a firepower of 6, so that was a FP6+4 shot.

The Italians rolled an 11.

The Russians won.

DB081 Lack of Discernment AAR – Defending!

DB081 - Start-proc

Here’s the AAR of when I played this scenario as the attacker against Carl Nogueira.

Now that I got a chance to see how the grownups do it, Carl gave me a chance to put my learning to the test.  He let me play this again, with me defending as the Red Chinese this time.

The above is my attempt to draw a pentagram with imaginary fire lanes when setting up the defence.  Carl put his defence all upfront.  I am not so confident.  Just so everyone knows, this scenario has a variable ending depending on when the GMT can capture enough multi-hex buildings to get the points required by the end of Turn 4 to 7 while  suffering no more than 24 CVPs.  The multi-hex buildings on the south of the canal are worth 1 point each, the ones to the north are worth 2.  The two bigger buildings on the south I labelled “Factory” are worth 2.  The first target for the GMT is to get 8 points by the end of Turn 4.  However if the Reds reinforcements come in south of the canal, that requirement for the GMT falls to 7.

Carl put his defence up front.  I wasn’t so confident.  I thought the weight will come from the right and that the GMTs would be crossing the canal up the top right corner to grab at the 2 point buildings.  I couldn’t give up the use of the single hex multi storied building on the left, that was where I placed my HMG, a quick fire 37* gun and ground level fortifications.  I put another fortification in the middle of the factory where my commissar sat.  I got another fortification hex behind him as “the Alamo”.

He would expect the Red Chinese “death star” on the left so I didn’t bother HIPing it.  I did however HIP’d two half squads on the right to help with the defence.  The MMG and the 70* gun were across the canal to the North.  In a way the longer the big gun laid unfound, the better it is.

Notice Carl got a nasty death star : 2 MMGS + HMG + 9-2 on level 1 of a building.

Okay, talk is cheap, let’s see how all these work out.

DB081 - T1 RC 02 Deathstar duel-proc

Red Chinese Turn 1 : The GMT pushed very aggressively into and in some case past the first line of buildings.  The Reds death star exchanged shots with the powerful GMT one and didn’t fare too well.  The GMT staged for the attack on the (middle) factory.   Yes, the Reds “sulked” and skulked as well into the factory and later advanced back out.

DB081 - T2 GMT02 CC'd-proc

GMT Turn 2 : GMT attacked across the street!  They quickly found the 37* gun on the fortified ground floor in the building to the left.  The broken attacker was taken prisoner and was ushered into the building quickly.  The Reds position in the factory and in the building to the right looked shaky.  Broken Reds quickly piled up.  There were two close combats.  The 2 GMT squads to the left was ambushed by the Reds and were both KIA’d.  The GMT squad to the right fared better, it killed the Reds squad and flanked the building.

DB081 - T2 RC01 UnHIP right Leader ran Deathstar dead-proc

Red Chinese Turn 2 : The GMT had pretty much captured the building on the right.  The Reds leader decided to make a run for it with the LMG and head for the canal!  A HIPpie on the right popped out and headed for the factory on the right, going after the broken GMT squad and absolutely intend to be a nuisance.  The factory being 2 points, Carl had to comeback and root the little Reds squad out.

I hope to survive past Turn 4 and receive the GMTs across the canal.

DB081 - T2 RC02 New Prisoner-proc

Red Chinese Turn 2 (contd) : The Reds took another GMT squad prisoner and dragged them into the (middle) factory.  The broken Reds squad ran after their leader to the right.  The GMT now had 5 points against the required 8 needed to win the game in Turn 4.

DB081 - T3 GMT01 Left DD rush Encircled FT blew out RightTop squad ran-proc

GMT Turn 3 : The GMT went back into the factory to the right to reclaim it.  A GMT Dare Death squad led the charge to the left!  May be the GMT was looking to cut off the middle factory from the left as well.

DB081 - T3 GMT02 DD snakeeyes CVP19 GMT7 need factory-procGMT Turn 3 (contd) : Prospects for the Reds weren’t looking up.  Their “death star” on the left was slowly getting cut off and surrounded.  The GMTs were all lined up outside the middle factory.  The canal was ready for a cross over.  The GMT got squads lined up against the left in case the Reds send reinforcements in from south of the canal.

DB081 - T3 RC01 CC Ambush CVP24 then CVP 26 Bldg 7 Req -1-proc

Reds Turn 3 : Turn 4 was coming up and doing the usual was not going to help me survive.  I need some GMT CVPs fast.  The GMT armoured trucks hadn’t been moving from the bottom left at all.  Trap or not, I had to go for it.  Each armoured truck gives me 5 CVPs.  The one with the armoured leader gives me another 3 CVPs for a total of 8.

So the Reds moved in concealed.  One of the Reds squad survived Defensive Fire from the GMT death star (broke one of the guns as well), passed the PAATC check, placed its demolition charge properly and ..

Blew up one of the armoured trucks with no survivors.

Too bad the armour leader was in the other truck!  Another Reds squad moved in, ambushed and killed a GMT squad in close combat.

All these gave the Reds 22 CVPs.  However, since the Reds had 2 GMT prisoners squads and prisoner CVP bonus counts at game end, the Reds stand to get 26 CVP if the game end right there.  (The GMT are only allowed 24 or less.)

This created a funny situation.  Since the Red Chinese reinforcement entered south of the canal, the GMT build points requirement in Turn 4 dropped from 8 to 7 which the GMT now had.  The GMT would need to rescue the prisoners before the end of Turn 4 to win the game.  Otherwise if the game “ends”, the Reds would realise 26 CVPs (+4 CVP bonus from the prisoners) instead of 22 and 2 CVPs more that what the GMT were allowed to lose.

DB081 - T4 GMT01 Sniper 9-2, CVP26 Bldg 7-proc

GMT Turn 4 : GMT squads started off a new turn prep firing away.  One of the shots invited a Reds hot sniper that hit the GMT death star.  A round of random selection nailed the GMT 9-2 leader in a stack of 4.

This gave the Reds the 3 CVPs need to reach the 25 CVPs to win the game (29 CVPs with the prisoners).  Great game! 


DB081 Lack of Discernment AAR – Attacking

This scenario took place on Dec 15th 1927, a full 12 years before World War Two.  It’s based on some of the earlier conflicts between the Red Chinese and the Nationalists (Guomintang, GMT or Kuomintang, KMT).  The conflict took place in Canton 廣東, not too far away from Hong Kong.  The Canton Red Chinese overestimated their strategic position, started a general uprising on Dec 12th and the Nationalist Chinese came for a brutal visit.

DB081 Starting position-proc

Carl Nogueira and I played this scenario twice.  I was the attacker – KMT Chinese and Carl the Red Chinese.  We then switched sides and played it again, you will read about the second one from a later AAR.

The victory conditions of this scenario is structured around the multi-hex buildings on the map.  The ones north of the canal are worth 2 points.  The ones south of the canal are worth 1 point except for the two building designated as factories.  The game ends on Turn 4 if the KMT Chinese get 8 points, Turn 5 for 9 points, Turn 6 for 10 points and Turn 7 for 12 points.  The KMT has to accomplish that while losing no more than 24 CVPs.

I planned to focus the main body of my troops to the right.  They are to capture the building on the right.  From there they can attack the factory immediately to the south of the canal, meeting up with a smaller force on the left flank.  Capturing the right building also allows for the possibility of forces wading across the canal for the higher value buildings on the north bank.  The small force on the far left is to protect the buildings from possible Red Chinese reinforcement  on Turn 3.  You see, the Red Chinese can choose to introduce their reinforcements from the north (top) side of the map, or the west (left) side of the map.   However if they come in from the south side of the canal, the VP requirements for the KMT drops by 1.

Anyway, that’s the plan .. until bullets start flying.

DB081 KMT1 DF-proc

KMT Turn 1 : The KMT rushed across the street.  A fearful death star appeared on the left flank in the single hex two storey building I never paid attention to before.  On the 2nd level, there was an MMG, a HMG and an 8-1.  On the ground level, there’s the 37mm gun sporting an ROF of 3.  These guys shot up a few of the squads on the left, rendered my HMG team useless for the duration of the scenario and made the rest of the folks very nervous.  The fortunate bit was that the elite Chinese squads were well placed to offer smoke grenades in support.

I was perhaps too careful with the armoured cars.  They are 5 CVPs and 7 CVPs (with a 9-1 armour leader) each, points that I hope won’t contribute to the Red Chinese 25 CVP goal.  Fearing a gun on the right side of the board, I planned to sneak around the side of the roadblock.  However when we ran into the death star, we froze.  In retrospect, the 37mm infantry gun has little more than 6% chance (HE only) of killing the KMT Type 22 armour truck (Chris Edwards’ Kill Calculator).  Granted, MGs can kill these vehicles but freezing in place is not the proper tactic either.

DB081 RC1 Sniper killed RC 8-0 GMT Ldr wound malf deathstar-proc

Red Chinese Turn 1 : Folks in the Red Chinese death star probably didn’t get their ancestors properly lined up.  First, a sniper killed the 8-1 .. and then both the MMG and the HMG malfunctioned on the same shot!  The concealed squads in the factory advanced out to the walls, which was brilliant.  I am not entirely sure why I never made use of the upper levels of the buildings I had to negate the walls.

DB081 KMT2 Sniper broke crew fire lanes-proc

KMT Chinese Turn 2 : KMT attacks!  The turn opened with squads advancing into the smoke that the élite squads laid down.  A 8-0 leader on the right went across the street and kicked the door in with the squad behind him ready to fire.  Other squads moved up and found the second gun at the rear of the building to the right of the map, as expected.  You can see the  laid and the Red Chinese squads putting down residual fire very efficiently.  The deathstar saw the HMG fixed but the sniper returned and broke the crew!

DB081 KMT2 End CVP 4-proc

End of KMT Chinese Turn 2 : This showed how ineffective the KMT attack was.  Losses was light fortunately, the Red Chinese accrued 4 CVP so far.

Red Chinese Turn 2 : On the right of the map, the KMT squads in front of their target building hope to  survived enemy fire and return a massive Defensive Fire back.  The KMT got a MMG team together with a 9-2 and kept the MGs in the death star suppressed. The KMT Chinese were getting ready to attack again.

DB081 KMT3 MPh-proc

KMT Chinese Turn 3 : KMT troops advanced forward on the right into the building.  LMG fire from across the canal came straight down the street.  On the left flank the KMT Chinese figured they should take advantage of the crippled death star and tried to rush the building, only to find the bottom floor fortified.  Worse – it’s fortified with a building full of self rallying crew!

DB081 KMT3 End-proc

End of KMT Chinese Turn 3 : We got into the building on the right. The rush on the left failed as the squad got shot up and bounced off the side of the fortified building.  The centre was pretty decimated.  The leaders were working hard to convince a few to get back into the fight.

DB081 RC3 End-proc

Red Chinese Turn 3 : The reinforcement came in from the north.  Things were not looking up for the KMT Chinese.   We only had a foothold on the right.  The troops on the left and in the middle were broken in huddled masses.  KMT didn’t seem to have enough people to make a third try.

DB081 KMT4 MPh All Shot up-proc

KMT Chinese Turn 4 : The KMT made an all out attack for the factory and the rightmost buildings.  Whilst they would get the right most building, the KMT Chinese got shot up everywhere else.

DB081 KMT4 End CVP18-proc

End of KMT Chinese Turn 4 : The KMT Chinese captured the gun on the right although they haven’t quite secured that building.  The force in the middle were almost entirely reduced into broken stacks.  Folks on the right who were there to guard against the Red Chinese reinforcement decided to move north to have a go at the death star.  I really like Carl’s demonstration of high level tactics.  Here we have a position where, if I attack, makes no contribution to the CVP.  However if I don’t, it will always interfere with my attack elsewhere.

DB081 RC4 End-proc

Red Chinese Turn 4 : The Red Chinese counter attacked!  Can you see the stack with the “DM” counter on top and a grey dotted line that extended to the left?  There’s an MMG in the stack and I should have laid a fire lane down that path to stop the Red Chinese from counter attacking.  However instead I was distracted by the first squad that rushed up.  Now I got 2 big stacks of broken troops threatened by marauding Red Chinese troops.  Since the Red Chinese already racked up 25 CVP, the scenario ended and Carl Nogueira won as the defender.

Notice the 2 fortified locations Carl revealed after the game.  He had the commissar situated in a fortified location in the middle of the factory.  He also had the other fortified hex immediately behind.  That last hex would be his “Alamo” before the Red Chinese bow out of the building.  Capturing a building like so was going to take a few turns more.

I would have the opportunity to improve my play by being the Red Chinese defenders against Carl’s KMT Chinese.

That will be in the next AAR!