FT111 Ghosts of the Danube After Action Report (AAR) Advanced Squad Leader scenario

Victory Conditions

In 1944, partisans discerned that a HQ unit of the Russian Liberation Army (defectors) were in Golubats, on the shore of the Danube.  Russian units were sent to kidnap them with partisan help under the cover of darkness.  The Russians win in 5.5 turns if they exit ≧ 2 EVP of the RLA HQ unit.  The setup of the RLA units were mostly predesignated.  The partisans setup HIP and there’s a Russian MGB that came to support the exfiltration to the south (left) of the map.  This is a Night scenario and there’s fog (+1 per hex) on the lower board.  

After Action Report

FT111 Ghosts of the Danube After Action Report (AAR) Advanced Squad Leader scenario

One quiet late October evening … 

FT111 Ghosts of the Danube After Action Report (AAR) Advanced Squad Leader scenario

Partisans appeared from out of the darkness and surrounded the HQ unit!  The folks desperately fired into the shadows but no one could be seen.  The HQ unit dug through their desk drawers but couldn’t find a single star shell.  The unit camped up the street didn’t hear anything either.  The Russians on the assault boat moved quickly through the fog and subdued the LMG team by the shore.  

FT111 Ghosts of the Danube After Action Report (AAR) Advanced Squad Leader scenario

Close Combat at the HQ was over quickly.  The HQ unit was bounded and dragged down the streets towards the river bank!  A broken RLA 6+1 seemed to be spared, but a Russian 6+1 watched from the shadows.  The RLA rescue team ran in via the top left of the map.  The retreating partisans ran into some HIP’d RLA units.  A few RLA units were therefore freed from ‘No Move’ counters.  Someone surely forgot to bring star shells along.  The LMG team on the other side of the river decided to move down and to the left.  The hope was that it would reach the river bank to lay down firelanes across the (4 hex) river exit (firelanes work better in fog).  

FT111 Ghosts of the Danube After Action Report (AAR) Advanced Squad Leader scenario

The rescue units made it to the edge of the open area on the left where the Russian kidnappers were likely to disembark.  All RLA units were now on the move and pushing to the left, blocked by the bodies of Russians in the open.  The Russian gunboat (green ‘cause the brown (VASL) VFS Motor Gun Boat is unusable) came in and shot up the LMG unit on the other river bank!  We laid out ‘WP’ overlays on the bottom half of the map as a reminder about the +1/hex fog.  The Night LV & the fog made shooting quite impractical.  But of course, once you are broken at Night, you might as well be dead (game-wise) ‘cause you probably won’t rally in time (and the Russians had higher firepower).  

FT111 Ghosts of the Danube After Action Report (AAR) Advanced Squad Leader scenario

The Russians were just body blocking venues of approach as the MGB chugged towards the shore.  The RLA rescuers on the left couldn’t get much effect with their firing.  They did however dispatched the pesky Russian 6+1.  The RLA units in the Woods on the right jumped into Close Combat in the hopes of clearing that side quickly (or even getting an ambush and therefore infiltration).  It was not to be.  Reduced that Russian squad as we might, Melee ensured and that approach was blocked.  The kidnapped units got dragged out to the shore.  

FT111 Ghosts of the Danube After Action Report (AAR) Advanced Squad Leader scenario

The RLA units tried to surge through the gaps!  The 447 on the far left made it through and approached the riverbank.  The Russian prisoners were dragged onboard the MGB.  One last chance to shoot that boat up?

FT111 Ghosts of the Danube After Action Report (AAR) Advanced Squad Leader scenario

Here we go.  The prisoner-ladened MGB moved into sight from behind the trees.  It was a +4 shot for the 447 through the fog but we couldn’t even kill our own people on board!  The HQ unit was taken into the darkness.

FT109 Hitler’s Lost Iron After Action Report (AAR) Advanced Squad Leader scenario

FT109 Hitler’s Lost Iron After Action Report (AAR) Advanced Squad Leader scenario

Victory Conditions

This is the first of a series of thrilling Motor Gun (Torpedo) Boat scenarios that are part of LFT St Nazaire, reflecting action around the world. The ocean’s at level 0, so a beached MGB, bristling with weapons, poses an exciting situation for garrison units with a taste for adventure. All houses are wooden and ground level only apart from the building at the top left that’s highlighted in orange. These MGBs have 14PP rubber rafts to ferry tourists to shore, but if MGBs are willing to risk going aground in the shallows, they can unload directly onshore.

This was Norway 1943, and the Norwegians were conducting a Commando Raid at Strød Island. As such, their 8 morale was fanatic on Ocean-Hinterland hexes. They win in 6.5 turns if they can successfully exit two DCs toting 338s via the space marked on the top of the map with the British roundels.  There’s a +1 LV and Moderate Mist to help those on the move.  

The Strød Island Garrison, who must have thought they pulled a nice assignment on the island in 1943, were 8 2nd-line half squads with 2 LMGs. Plus they had a pair of 105mm ART guns on the stone pier that the Norwegians already knew about!

After Action Report

FT109 Hitler's Lost Iron After Action Report (AAR) Advanced Squad Leader scenario

I pointed my 105mm guns each to a side.  The +1 LV hindrance and the Moderate Mist will at least a +2 to all shots.  However, if they hit, the Norwegians run the risk of drowning half their OB.  So I didn’t think they would come up the middle where the gun(s) need to make a +3 turn to shoot (a flat shot in reality since the boats were -3 targets).  My weak OB and the the MGB’s awesome firepower convinced most of the German Garrison to stay away from LOS to the waterline.   

Act of Valor movie

I had most of my garrison on the left of the map.  I figured the right of the map wasn’t as easy to get through, plus it was more of an Open Ground for commandos to cross from there to the exit space.  I had both of my LMGs and a 7-0 in the middle of the map as a backstop.  They had a stone wall that shield them from those MGBs but turned out the hindrances from Moderate Mist kept them well protected anyways.  

FT109 Hitler's Lost Iron After Action Report (AAR) Advanced Squad Leader scenario

As I suspected, the pair of MGB crashed into shore right away and offloaded their commandos!  My 105mm fired but missed (LOS blocked and Gun malf’d).  One of the MGBs went aground (loud expletives) with a Gun tagging on Acquisitions, a gunfight ensured.  We got a hit but couldn’t get an effect apart from claiming one HS.  Since the commandos went ashore, the Germans wasted no time running backwards from the shore.  

FT109 Hitler's Lost Iron After Action Report (AAR) Advanced Squad Leader scenario

Whilst the right 105mm and the stuck MGB traded shots, the left MGB went for the stone pier since the Germans couldn’t fix the right 105mm.  At 4 hexes, a torpedo splashed into the water and scored a direct hit on the pier!!  Both guns disappeared in a shower of rocks.  

FT109 Hitler's Lost Iron After Action Report (AAR) Advanced Squad Leader scenario

With half the MPh’s left, the Norwegian on the left made it to the top of the map.  The Germans fought to stay in front of them, with the LV & the Mist helping both sides.  One of the LMGs in the middle thought they would go to the big wooden building to help but quickly realised that the battle would move too fast for that.  One HS and three dummies on the right would keep the other half of the Norwegian OB delayed.  Meanwhile the two MGBs tried to find useful purchases.  The hindrances made it impractical to shoot at that distance.  They were there largely to strip German concealment.  

FT109 Hitler's Lost Iron After Action Report (AAR) Advanced Squad Leader scenario

The ‘VC’ stack on the left, with a leader and two DCs toting 338s, was almost at the end zone! The Germans made a dash for it too, with their LMG’s moving into place. The Norwegians on the right moved freely as well, since it was clear that most of the German garrison were on the left. We had to keep any DC toting 338’s at bay for two MPh!!

FT109 Hitler's Lost Iron After Action Report (AAR) Advanced Squad Leader scenario

The left VC stack was 2 hexes from the exit.  The German garrison crowded up that space.  However in the meantime, the right VC stack arrived at the scene.  

FT109 Hitler's Lost Iron After Action Report (AAR) Advanced Squad Leader scenario

There was a lot of movement and loud bangs, but when the action subsided, the Norwegians were still on board! An attempt on the left was thwarted for now, but the Norwegians were still in the thick of it! The right VC stack got closer to the exit, and things were really heating up! 

FT109 Hitler's Lost Iron After Action Report (AAR) Advanced Squad Leader scenario

The Germans made a valiant effort to stack up their two LMGs, but it was for nought. The Norwegians on the left were stopped, but they got the right VC stack off the board! What an incredible game!

Tenor

FT276 Genghis Khan Lives After Action Report (AAR) Advanced Squad Leader scenario

Victory Conditions


The year is 1921 and we have White Russians (Asian Cavalry Division, i.e. Mongolians) trying to stop a Chinese relief force. The White Russians win at the end of the turn if they control >= 25 level 3 hills and 25 >= buildings, provided the Chinese don’t get >= 30 CVP. The buildings on the bottom board count as 3 buildings. The Mongols set up on the top board. They can allocate troops to a flanking force entering from the left or right of the map. This flanking force roll to enter between turns 3 and 5 (7 turn scenario). The Chinese have an artillery screen with 2 MMGs & 2 70mm ARTs on the second board from the top and a garrison with one MMG & one 37mm ART on the third board from the top. A relief force with another 3 MMGs, a 37 & 2 75’s come up from the bottom board.

The Mongols have two officers who are Commissars, which I mistakenly assigned to the heavy weapons for staying power in an open terrain (more on this later). The following is how NOT to play cavalry. Or at least how NOT to play cavalry in this scenario.


After Action Report

FT276 Genghis Khan Lives After Action Report (AAR) Advanced Squad Leader scenario


FT276 Genghis Khan Lives After Action Report (AAR) Advanced Squad Leader scenario

I was very wary of the -2 for attacks and the double break for cavalry. Too cautious, in fact: I surrounded and killed the main Chinese outposts (mostly dummies), but I didn’t go nearly far enough. In reality, most Chinese weapons break on 11 and are prone to cowering. Also they were shooting from up high and couldn’t do Fire Lances.  What I should have done was to push as far down the board as possible and ignore the casualties. This is a big map and I would need a lot of time to take buildings, plus minimising my time out in the open would reduce the overall body count. The MMGs were split as overwatch for the left and right forces, led by 10-2 & 9-2, both Commissars. The left flank reached the first hilltop. The right flank also got to their hilltops and some of the cavalry went around the far right. The Chinese lost no time in firing all guns in contact and their relief force came up from the lower map without a care in the world as my troops hadn’t pushed down far enough.

One of my 37 malf’d on the first shot. To be honest, they were so ineffective that perhaps they should have moved in the wagons, they took all the time in the world to make it to the bottom hill on the second map from the top.

FT276 Genghis Khan Lives After Action Report (AAR) Advanced Squad Leader scenario

FT276 Genghis Khan Lives After Action Report (AAR) Advanced Squad Leader scenario


The Chinese relief force continued to saunter merrily from the bottom of the map. Our scattered movement was working in the sense that the Chinese guns were breaking and their conscripts were cowering, allowing other Mongolians to go deeper. Unfortunately, we decided to go on foot. I also learnt another problem with approaching with cavalry from all over the board, I left brokies all over and in the open. I had a hard time getting them to more central locations for the leaders to get to, and I was starting to miss the Commissars who stayed behind with the heavy weapons (I said HMGs in the picture, but they were MMGs). I started to dismantle the heavy weapons when I realised we wouldn’t all fit in the wagons. That cost us time.

The Chinese troops on the third board started to open up and fire. We needed more of them to do this so that the flanking force knew what was where.


FT276 Genghis Khan Lives After Action Report (AAR) Advanced Squad Leader scenario

The left flank is on the hill directly in front of the Chinese garrison. Unfortunately, despite having the better range, the Chinese had the better of the firefight, and the Mongols were hard to rally in the open. The MMG (not HMG) crew were shot up by a newly discovered GMT Deathstar as they tried to get closer. The remaining 37 made a slow journey down the board. The right flank approached the Chinese position, but they were too thin on the ground. Again, people refusing to rally in the open didn’t help. The Chinese relief force had NO problem getting to the Chinese garrison and getting ready. We should have gone around the back of the garrison at this point.

FT276 Genghis Khan Lives After Action Report (AAR) Advanced Squad Leader scenario


FT276 Genghis Khan Lives After Action Report (AAR) Advanced Squad Leader scenario


The Mongol flanking force was finally allowed in! They chose to come in from the left and opened with a pair of HS’s attacking one of the 70s. Both 70mm ended up firing, but one of the two marauding HS got into CC. By this time the front line guys were pretty well shot up and all over the map. One of the wagons carrying a 37 gun was shot down as it came up the hill in front of the Chinese garrison. The Chinese could afford to concentrate on the flank.


FT276 Genghis Khan Lives After Action Report (AAR) Advanced Squad Leader scenario

The rest of the flankers came in after both 70mm were tied down. I diverted one platoon towards the buildings (remember, these buildings give 3x rewards compared to buildings on other maps). The rest of the flankers went in with the Chinese. My Brokies didn’t rally, and when they did, they were too far away from the fighting. I had the left side of the bottom board pretty well taken care of, but I was too far behind in terms of hilltop/building captures. I conceded.


If I were to play this scenario again…

  • I would be bolder in taking casualtiesI would make more use of the range offered by the horses
  • I would do more HS cavalry chargesI would venture less into the hills unless necessary. Most would stay on the ground.
  • The guns would move from Turn 1.
  • The MMGs would move forward (down) sooner.
  • The Commissars would go with the attacking troops and do rallies.
  • The cavalry will scatter less on the approach and will scatter on the charge.

FT SmR6 Fox’s Fretful Night After Action Report (AAR) Advanced Squad Leader scenario

FT SmR6 Fox’s Fretful Night After Action Report (AAR) Advanced Squad Leader scenario

Victory Conditions

Eleven squads of North Koreans got 5 turns to clear 4.5 squads of Marines off 7 hill top hexes.  All Marines setup HIP’d and had Trip Flares and a 100+mm OBA with Variable Time (VT) Fuses.

After Action Report

FT SmR6 Fox's Fretful Night After Action Report (AAR) Advanced Squad Leader scenario

So the North Koreans had 5 turns to push the Marines off 2 hilltops. The Marines looked very understaffed at first glance but my opponent is never deterred by odds, big or small. I look at terrain differently at Night. Open Ground offers +1 LV straight up especially when most Marines should be on hilltops (equivalent to having Woods everywhere). Walking into Concealment Terrains required +1 MF though which made Open Ground more appealing. This was especially significant when you look at the hilltops. Getting onto a hilltop Brush costed 5 MFs, same of course for Woods. Five of the seven hilltop hexes were covered with Brush or Sparse Woods. So  getting into CC in most cases meant going in CX’d. While it’s harder to rally at Night, Marine squads self rally at 3 and get rid of their DM counter at 8.

Running around in the open when a Star Shell was overhead means certain death against Marine firepower. The threat of Proximity Fuses in the Marine OB is a big cause for concern. We needed to fish out the radio guy as quickly as we can.

We approached the left hilltop from both sides. The way we setup, it would be tough for Korean leaders to get to everyone, but we only have 5 MPh’s to get things done. Not many Americans popped out of HIP but we broke the Marine MMG team early on.. We surrounded the left hilltop but we were too relaxed about the broken MMG team wandering about. No Hipped unit popped up the top though.

We approached the left hilltop from the bottom with the other half of the force coming in from the right. Marine firepower broke up our initial entry but the sunken road offered the Commissar a safe space to talk sense into the chaps.

Two turns down. Marines were not going to show themselves unless we get even more aggressive.

FT SmR6 Fox's Fretful Night After Action Report (AAR) Advanced Squad Leader scenario

We ran NK squad up the hilltops to see if there’s anyone there.

NK piled into the left hilltop CX’d and commenced Close Combat!! We kicked off some wires for trip flares but nothing flared up. We had the left hilltop almost cleared apart from a fireteam taking us into Melee. 

The bad news was that we allowed the broken MMG team to self rally and join the right hilltop defence! The good news was the Marine radio malfunctioned and was inadvertently pushed off the Steep Hills without a shot! The Koreans kept close with the Marines but their concealment were getting rapidly stripped by the insane firepower.

FT SmR6 Fox's Fretful Night After Action Report (AAR) Advanced Squad Leader scenario

The Koreans reinforced the Melee on the left hilltop but that fight continued. Well placed Marine star shells prevented us from getting too feisty in the open when the Marines had -1 leaders in choice places.

The right hilltop unfortunately saw the Americans got their act together and blew some of our troops away now that most of the sticks and branches we held up for concealment were decimated.

FT SmR6 Fox's Fretful Night After Action Report (AAR) Advanced Squad Leader scenario

The left hilltop finally got that Melee over with. The star shell situation convinced the North Koreans to stick with their Concealments as they pushed to the right. It was a mistake as I have only 1 MPh left.

Over on the right, the shot up Koreans were rallied by their fearless Commissar to have one last go. We finally had a DC bearing squad in position to launch a DC hero but the union cited personal safety concerns (the boys sat back down for more tea and cake). The Marines consolidated into solid chunks. We got a Melee going anyway which kept some of them from shooting.

FT SmR6 Fox's Fretful Night After Action Report (AAR) Advanced Squad Leader scenario

Bob came back from his bio-break and the chaps quickly volunteered him to be the next DC hero. Someone suggested the moniker ‘The Flash’ but they decided that might not be entirely auspicious. So Bob went off screaming, the Marines opened up and Bob was practically doing the Matrix bullet time all the way up the hill!  He was about to dive into the Marine foxholes when he tripped on an empty coke can, smacked his head against a rock and died. Bob did cause enough distraction for the rest of the band to move up to CC position though! Some of the Koreans got close enough on the left side of the hilltop as well when CC time comes around. 

We couldn’t clear ALL the HDPs at the end though. Plus you know what? It wouldn’t have mattered. A HIP’d fireteam popped up from a hex the left NK team never checked and reoccupied the left hilltop.

`Ah well.

FT SmR5 Fox on the Hill After Action Report (AAR) Advanced Squad Leader scenario

FT SmR5 Fox on the Hill After Action Report (AAR) Advanced Squad Leader scenario

Victory Conditions

The Marines had 5.5 turns to attack up a couple of hills and capture 5 out of 7 “HDP” (Hilltop Defensive Perimeters) hexes.  The KPA wins immediately if they could amass 13 CVPs or more.  

After Action Report

FT SmR5 Fox on the Hill After Action Report (AAR) Advanced Squad Leader scenario

It’s US Turn 2, after the Rout Phase.  The Marines plodded through some rice paddies and reached the hills.  The NK wasn’t shy about shooting at anyone who looked a bit too comfortable.  The Marine overwatch however, shot and broke the NK MMG team.  Thus taken out the most powerful gun in the NK arsenal.  I actually expected the right portion of the HDP to be more vulnerable.  Turns out it’s not the case.  I had a unit on the bottom left desperately trying to dig a hole, just so the reinforcing Marines would have a tougher time flanking the left hill.  

FT SmR5 Fox on the Hill After Action Report (AAR) Advanced Squad Leader scenario

US Turn 3: some of the Marines got shot up on their initial approaches to both portions of the HDP.  The broken NK MMG team (leader & squad) failed to rally on time and so the forward elements came back and tried to pick up the MMG.  At around that time, we managed to get a proper foxhole on the left.  Marines crowded the middle of the field, so my guards on the right flank came into reinforce the right hilltop.  The North Koreans had to constantly make the correct choice between shooting or staying concealed for protection against Advanced Fire.

FT SmR5 Fox on the Hill After Action Report (AAR) Advanced Squad Leader scenario

US Turn 4: my left hilltop got swamped by Marines!  Everyone’s pretty much broken in the area with no aspect of rallying.  The right hilltop was holding on, tried to keep the Marines off the backside even but the Marine 8-1 firebase is steadily taking its toll.  Could we take a hex back?

FT SmR5 Fox on the Hill After Action Report (AAR) Advanced Squad Leader scenario

NK Turn 4: my left hilltop was completely swamped.  The Marines were now able to form a firebase against my right hilltop (that’s a trench I shouldn’t have put into hex BB27!).  The right hilltop could only try to keep concealment and keep the Marines guessing.  They had the advantage in that it would CX a Marine to CC three out of the four hexes on the right.  The Marines only needed two more!

FT SmR5 Fox on the Hill After Action Report (AAR) Advanced Squad Leader scenarioWhat could be broken were pretty much all broken.  The Marines would be able to advance up at least 2 hexes on the right HDP with no opposition in their last MPh.  The North Koreans were done.  

Thoughts

Most of the fights in LFT Fight for Seoul involves forces with very asymmetrical capabilities.  It’s an art that I have yet to even catch a glimpse of a steady toehold.  As the North Koreans, how do I find the balance between hiding from the insane Marine firepower but yet take steady attrition of his smaller manpower?  How do I take advantage of my ownership of the terrain but yet not get into standup firefights?  Close combat seems to be the natural answer but how do you get close enough to execute?

The elusiveness of these questions is perhaps the key element that brings me back to the game time and time again.  

FT SmR4 Passage of Lines After Action Report (AAR) Advanced Squad Leader scenario

FT SmR4 Passage of Lines After Action Report (AAR) Advanced Squad Leader scenario

Victory Conditions

The Marines started dispersed across the rice paddies and had to take at least 2 out of 3 HDP (“Hilltop Defensive Perimeters”) in 8.5 turns.  In retrospect I might have thought about HDP’s wrongly.  You don’t have to take all the HDP hexes to control a HDP.  You only have to take most of a HDP’s hexes to take the whole thing down.  

The Marines had a 81mm mortar and 2 HMGs (6-12) with a 9-2 posted on the hill on the top, giving 2 flat shots in most cases to the Korean positions.  They also had a 60mm OBA which would be useful later in the game.  The North Koreans had 2x82mm mortars, a 45L gun and a 76L gun.  They also had 2 HMGs, 1 MMG and 6 LMGs covering their digs.  The North Koreans win when they take 13 CVPs on KMC personnel or 40 CVP on UN personnel.  

After Action Report (AAR)

There was a group of South Korea Marines (1st Battalion, 1st Regiment) retreating at the start of the turn.  The Marines were all deployed into fireteams and started moving towards the North Koreans. The going was brutal.  Four fire teams and an 8-1 bought the farm early on.  I should have the South Koreans withdraw slower and put their firepower in use a bit more.  As it went, the North Koreans didn’t bother with the KMC at all.   

FT SmR4 Passage of Lines After Action Report (AAR) Advanced Squad Leader scenario

The North Koreans malfunctioned both of their 82 mm mortars!  The Marines kept their heads down and tried to move as quickly as possible through the rice paddies.  Regrettably, they drew a red chit on their first call to Artillery, and then they broke their radio!  Our 1-time OBA hit the 2nd HDF from the left but failed to do much.  

FT SmR4 Passage of Lines After Action Report (AAR) Advanced Squad Leader scenario

During US Turn 3, the Marines on the right were almost at the village.  You could almost hear a collective sigh of relief.  That was of course, if you could ignore the bloody curling scream from one of the fireteam that went berserk!  Folks on the left were in the open and running into 2 murderous HMGs.  Good thing both guns were down and one of the 82mm mortars went dead.  Not getting much cover from the HMGs, the fireteams spread out further to not be in the same CAs.  Anyone carrying an MMG was hit particularly hard.  Fireteams from both flanks were doing massive “amoeba” style Advance Fire groups as they move closer.  The big old US mortar on the hill first went out of WP and then out of action.  

FT SmR4 Passage of Lines After Action Report (AAR) Advanced Squad Leader scenario

US Turn 4 saw the pair of Pershings on.  There being 5 antitank mine factors, the Pershings decided to go down the same path.  The railroad takes 2 MP out of every hex, so the road got the vote.  Marines in the village were bringing their firepower to bear.  The Koreans tried to move forward to interdict them.  Some of the Korean units were moving right, so we hoped we could get the tank machine guns in place to hinder the use of that road.  The Marines on the left continued to get decimated in both our turn and the opponents.  The good news was that they were in fireteams, but the bad news was that they were getting taken out at an alarming speed.  

But hey, the 60mm OBA was back in play. 

FT SmR4 Passage of Lines After Action Report (AAR) Advanced Squad Leader scenario

The 60mm OBA failed to suppress 1 of the 2 HMGs in US Turn 5.  Fireteams on the left desperately tried to move to the houses on the far left corner, from which it might turn the Korean flank.  One of the Pershings malfunctioned its gun on the first shot and was now trying to move as close as it dared to so as the other Pershing could get a better shot.  The Marines on the right decided that it’s better to hit the HDP on the far right and shifted their people over.  The Koreans moved back up their hills.  The Korean mortar came to life and laid a smoke round on the path in front of the right most HDP to cover their retreat.  

FT SmR4 Passage of Lines After Action Report (AAR) Advanced Squad Leader scenario

When we reached North Korean Turn 7, one of the Pershings is already gone because of a broken main gun.  The remaining one popped off round after round and yet failed to make it’s 90L presence felt!  It did, however, cut off the 2 HDPs on the right from the left.  The 60mm OBA managed to bring down WP which helped a lot.  The wind picked up and made things even better!  The survivors on the left finally managed to get to the buildings on the far left and started to put up a more effective firefight.  At least now the Korean HMG fire was halved as one of them was blocked.  The Korean smoke round on the right that was now billowing down the road proved to be quite helpful.  Marines pushed towards the right most HDP, just in time to greet the Korean reinforcements.  

Two more US Movement phases to go.  We might well be out of time.

FT SmR4 Passage of Lines After Action Report (AAR) Advanced Squad Leader scenario

Last US turn!  The Koreans on the HDP on the left were broken but we didn’t have enough time to walk up.  The Koreans on the rightmost HDP were taking a beating but put up a “human wall” that’s going to take a couple more turns to kill.  The US conceded.  My opponent revealed all his mine placements in this last picture.  

FT SmR4 Passage of Lines After Action Report (AAR) Advanced Squad Leader scenario

The Marines needed more smoke rounds (than HE rounds) in order to be successful in this scenario.  I did the right thing by moving everyone in fireteams.  Some of the chaps on the right of course, recombined into squads when they reached the village.  I was hoping the Pershings with the malfunctioned gun could navigate through the road (trail break through the AT mines) and get on the hill where we would promptly turn left and get around the back between the 2 HDPs on the right.  That was not to be when the leading Pershing X’d out its repair.  My opponent is a very tough one but I feel I am finally getting a glimpse into the proper way to play the Marines in this LFT Fight for Seoul package (we already played through all the Fight for Seoul scenarios, and are now doing the Smith’s Ridge ones.) 

FT SmR1 Mired – Advanced Squad Leader AAR

FT SmR1 Mired – Advanced Squad Leader AAR

ASL Scenario Setup

The KPA (North Koreans) wins immediately by amassing more than 30 CVP (56% of KMC CVPs / 46CVP ground forces + 8 CVP air support).

The KPA can also win at game end if they can stop the Korean Marine Corps (South Koreans) from

  • Controlling 1 or more of 3 Hilltop Defensive Perimeters (“HDP”), which are the hilltop areas outlined in color. You should see 4 outlined hilltops on the map but the 2 on the left are considered the same area.
  • Exiting over 18 Exit VPs down the bottom edge. The KMC carries 46 CVPs, which means we need to kill, break or delay 28 CVPs or 61% of the KMC OB.
  • Inflict over 30 CVP on the KPA. The KPA has 44 CVP, so 32% has to survive.

The KPA has more long-range weapons than the KMC. They have a small window (probably 3 turns) to inflict as much casualties as possible on the KMC from the start to when the KMC Air Support / OBA comes into play and when the infantry finally comes into range. The KMC has an OBA with an Offboard Observer (auto Radio Contact) at Level 5 and 4 planes with rockets, bombs & 12FP MGs for 4 turns out of 8.5. Any sort of KPA movement won’t be possible for half of the game. We expect to have to fight in place. All Fortifications would be on HDPs.

Given these factors, the KPA’s best bet seemed to be to amass all the range weapons onto the HDP Fortifications. Their goal would be to deplete the KMC numbers as quickly as possible before US Airpower and SW malfunctions wipe out their toys. They would also need to keep the KMC outside of 5 hexes for as long as possible by keeping them off Open Ground (and in Rice Paddies) where they would always be mindful of the Infiltration (HIP’d) units.

If the KMC gets to a position where it can exit 18 VPs down the bottom edge, chances are it will have captured at least one of the HDPs.

They can either hold till Game End or push ahead and exit VPs. Either way, they might continue to lose CVPs (especially if the KPA OBA remains operational). There might be KPA counterattacks, although the KMC will be in Fortifications this time. All considerations seem to point towards a HDP focused setup that puts all the KPA firepower upfront and in Fortifications since it won’t be a fighting withdrawal.

Advanced Squad Leader AAR

FT SmR1 Mired After Action Report (AAR) Advanced Squad Leader scenario

So the KPA put all the range weapons up on HDPs. The easiest HDP to take is the second (2 hex one) from the left. It has the best covered approach, and I didn’t cover that as well as I should. Our Infiltration teams were HIP’d very close to our positions. Given the lack of manpower, to use them as speed bumps would be a waste. At least this way, the KMC would look for HIP units around the rice paddies longer. Most of our Boresights were not on the elevated road/ rail, as we did not expect the KMC to use them. Our Observer was the leader from the Infiltration units so he’s HIP’d on the leftmost HDP with limited LOS to the village and to the “easy” HDP. We put our 45LL ROF 3 Gun on the right flank behind the Sparse Woods, expecting serious Pointblank shots. Unfortunately, I misunderstood Sparse Woods and thought I had LOS to the Open Ground beyond where I put its BS (illusions of ITT CH abound). That was not to be. An Infiltrating unit with an LMG held our left flank.

The KMC moved forward in a mass of HSs, putting most of its weight on the covered approach on my right. I immediately saw the errors in my ways, but there’s no second chance in ASL. Our range weapons started shooting almost immediately. It’s now or our peace would forever be held upon us.

FT SmR1 Mired After Action Report (AAR) Advanced Squad Leader scenario

Turn 3 and “The Death Rattlers” were in the air. Two of them immediately took out our HMG. We were resisting the KMC HSs on the left and in the center. The KMC on the right was unfortunately streaming into the village, mindful only of our HIP units and our pair of mutually supporting but retreating Dummies. Our Observer called in a Harassing Fire mission on the village, which was akin to telling my opponent that there were no HIP units in the area. Our OBA was the 70mm variety, so it’s just 2+2 on the Thatched Roof Wood Buildings.  It made the KMC go around though, the dice gods were not to be tempted.

FT SmR1 Mired After Action Report (AAR) Advanced Squad Leader scenario

The Death Rattlers were on us both in their Prep Fire and in our Movement/ Defensive Final Phase.  Our 9-1 who had a memorable time with the HMG died of lead poisoning from a sniper. The valiant fighters on the middle two hilltops were all broken or dead. An Infiltrator at the second from the left hilltop sprang up and offered some point blank shots after the Dummy units moved (and faded away). The KMC OBA was finishing what the Corsairs started there. Our unfailing Harassing Fire missions protected our (now almost deserted) second from the right HDP. A pair of KMC HS came around from the back, unfortunately. The rightmost HDP tried to keep the wolves off them as much as they could from across the road. Our AT sprung into action, but we weren’t the best against the KMC at close quarters. The lights got dimmer.

FT SmR1 Mired After Action Report (AAR) Advanced Squad Leader scenario

KMC Turn 6 and two of The Death Rattlers had one more attack (the Strafing was worse than the Bombing / Rockets). The hilltops on the flanks were barely holding. We even had a couple of rallies for the last hurrah. The Observer, who boasted that his momma gave him no Red chits, finally lost contact with the battery. The KMC was kicking down the two hilltops in the middle.

FT SmR1 Mired After Action Report (AAR) Advanced Squad Leader scenario

The KMC broke through to our two hilltops in the middle. They broke most of our chaps at this stage and we simply didn’t have the strength to put together a counterattack to take a HDP back. The KPA conceded and the door to Seoul got kicked in at a cost of 18 KMC CVP.

PS If you are playing this as well, note that Foxholes (of which we had 6) actually offer a -1 Rallying Bonus when on HDP’s (Sm2.4). Something we missed.

FT S4 Dilemma at Ma Po Boulevard – Advanced Squad Leader AAR

FT S4 Dilemma at Ma Po Boulevard – Advanced Squad Leader AAR

Scenario Background

It’s September 26 1950, Captain Stanford’s Marine’s fought to clear Ma Po Boulevard.  Upon meeting a North Korean roadblock at a junction, he had to decide on whether to run straight up and clear the way to Deoksu Palace or to take the right fork and clear that road instead.  

“M26 number B32 in action on a street in Seoul.” Mike’s Research

Victory Conditions & Tactical Considerations

We have three North Korean (Fanatic) Roadblocks in 3 specified locations.  The main one is located at the fork of the road, where a 45LL AT Gun gets matched up with 2 medium machine guns and a Pillbox with an ultra wide CA.  The North Korean player gets a choice between a second 45LL AT Gun or a 76L ART.  There are 15 NK squad equivalents of various descriptions, managed by 2 commissars and 2 other leaders.  They have an ATR, 6 Minefield factors and 2 Fortified Locations.  

Against this the Marines have a forward team of 3 squad equivalents (one being an Assault Engineer with a Smoke Factor of 5).  This is followed by 10+ squads, a M26A1 Pershing, a M4A3 Tank Dozer and a POA-CWS-H5 Flamethrower tank that I was last playing with in Okinawa scenarios!

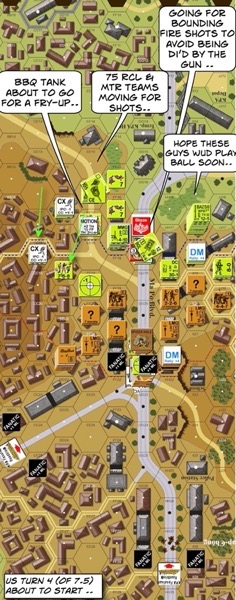
The Americans have 7.5 turns to take one Roadblock and exit 12 VP (4 squads) or take two Roadblocks and exit 9 VP (3 squads) or take three Roadblocks.  The North Koreans can stop the game when they kill or immobilise two out of three AFVs.  To do that, the NKs have the aforementioned guns, as well as an ATR and 6 Suicide Heros (read: THH) that can setup HIP somewhere or bust out of a squad when the mood strikes.  The confining terrain in this scenario definitely doesn’t make it tank country. The NK’s can also stop an USMC victory by taking out 19 CVP, which in this case is 6 squads + 1 fire team.  

Having said all that, the BBQ tank doesn’t have to stop moving.  The tankdozer has a blade that adds a +2 on a Hull Hit.  The Pershing is impervious to most shots on the battlefield but can still be DI’d.  

Advanced Squad Leader AAR

FT S4 Dilemma at Ma Po Boulevard After Action Report (AAR) Advanced Squad Leader scenarioFrom the left of the map, F Company immediately started to setup their MMG and got their fire teams to probe NK concealments.  The E Company came up from behind and a bit more than half went for the right of the map.  The AFVs rolled down the road but the higher level Burning Wreck that’s there on setup made it a little hazardous to roll up in front of a ROF3 AT gun.  Plus it’s impossible to be on the boulevard without being in DI’able range.  I thought the right of the map would be a more straightforward travel but it’s confining nature made it easier for the NK defenders and didn’t facilitate armour support.  By Turn 4 it’s evident that the NK’s were very effective there.  A large number of broken fireteams routed towards the rear.  The BBQ tank and the tank dozer lend their support on the left and found they could safely sneak shots into the boulevard.  The left side met some initial set backs but were able make better progress.  The AFV’s were making Bounding Fire shots where possible but they couldn’t bring it up close in most cases because of the chance of meeting Suicide Heros in Street Fighting.  The strategy was to try to flank the NK’s down both sides while putting AFV fire to defenders down along the boulevard.
Continue reading

FT S3 Last Stand on An-San – Advanced Squad Leader AAR

FT S3 Last Stand on An-San – Advanced Squad Leader AAR

Scenario Background

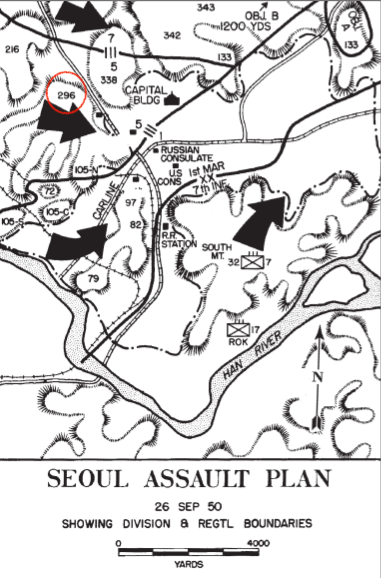
This is 26 September 1950.  Lt Col. Taplett’s (gent in the pic below) 3rd Battalion, 5th Marines fought southeastwards down the slopes of An-San/ Hill 296 towards the city (see the red circle on the map below, credit “Battle of the Barricades” by Col Alexander).  The North Korean 78th Independent Infantry Regiment and the 25th Infantry lead by Colonel Pak Han Lin put up a stout defence.

Battle of the Barricades Colonel Joseph H Alexander

Victory Conditions & Tactical Considerations

The KPA (North Koreans) started on Level 3 or above.  The Marines entered from the left of the map at or above Level 2.  In about 6 turns, the Marines should fight their way to Level 1, the KPA should fight to stay on Level 3 or above.  The KPA started with 2×447, 4×426 (conscripts), an LMG and a 8+1 Commissar.  The KPA counterattack force, comprising of 2.5×458, 2×527, 2×447, 3xLMG and 2 leaders enter from the right side of the map on Turn 3.  The Marines started strong with 4×768 3×248, 2xMMG, 1xBaz and 2 leaders.  They had a reserve platoon coming from the left on Level 5 on Turn 3 as well.  All units counted “Exit Point” style (“Good Order”) toward the Victory Condition, prisoners excluded. USMC wins on ties.

So the KPA had 31 VP vs USMC 22 VP in their OB’s.  The USMC would need to reduce the KPA force.  Soon it would mean tough decisions between putting your squads on your level to score vs going to your opponent’s level to prevent them from scoring.  The KPA had the last turn so we would have a chance to “Advance” back on Level 3.

Advanced Squad Leader AAR

BoF2 Polish Requiem After Action Report (AAR) Advanced Squad Leader scenario

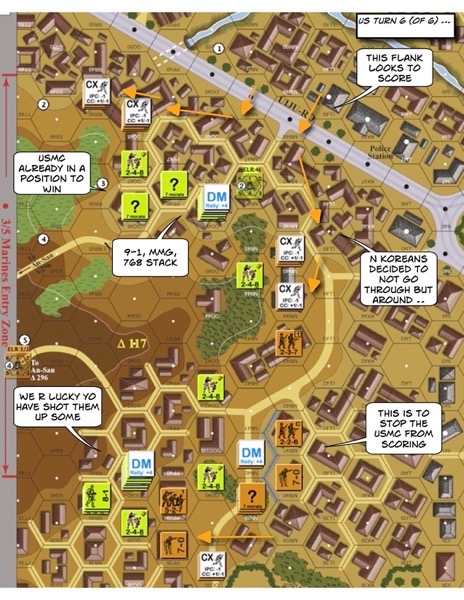
The KPA was weak.  They were also forced to spread out in their setup.  The USMC could go anywhere and shoot anything.  The KPA had their Concealments easily blown, broke up by Assault Fire and Captured in CC.  Very quickly they pushed the KPA off Level 3 and took more than a few prisoners.  The area on the bottom of the map offered more cover for the counterattack, so naturally the USMC focused their forces there.

BoF2 Polish Requiem After Action Report (AAR) Advanced Squad Leader scenario

The original KPA defenders were no longer coherent as a force.  The way to Level 1 was wide open for the USMC on the top and the KPA  had only scattered remnants on the bottom.  However, the Marines weren’t on Level 1 on the bottom of the map yet.  I decided to send the stronger of my Turn 3 reinforcements to the top of the map and the weaker (and more short ranged) to the bottom of the map, just to keep the Marines off Level 1.  The boulevard’s gotta be where the Marines would make their stand with an additional -1, so we needed to cross before the Marines assemble in place.  So hopped along the river edge we did, to a point by the boulevard where there were orchard cover.  The KPA forces at the bottom of the map arrived in time to catch the defenders sent reeling by the USMC.  That (bottom, vertical) road’s where we would make our stand.

BoF2 Polish Requiem After Action Report (AAR) Advanced Squad Leader scenario

At the top of the map, we made it across the boulevard okay when the lone American squad cowered.  We decided to split into two groups and go around the USMC forces, to places where we could Advance up to Level 3.  We simply couldn’t do close range firefights with the Marines on Level 1.  The USMC would have to decide whether they would get off Level 1 where they needed to be to score in order to fight us.  At the bottom of the map we got in a few lucky shots that set some Marines back.  That probably got them more worried about the KPA making a rush for Level 3 rather than them trying to make Level 1.  Nonetheless, we would keep the line at the street.

BoF2 Polish Requiem After Action Report (AAR) Advanced Squad Leader scenario

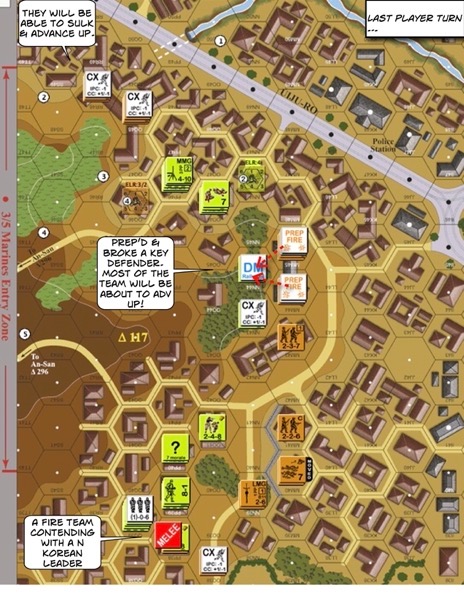
At the top of the map, the USMC decided to keep their forces and hence their gains on Level 1.  No one’s coming after our eventual Advance onto Level 3.  We made a critical PREP at the middle of the map and broke one of the defending Fire Teams in the Woods.  That would allow at least 2 of our MMC’s to Advance up.  At the bottom of the map, our line of KPA conscripts held and so my opponent conceded.

How’s this scenario interesting?

This scenario represents an interesting problem for both sides and it really highlights the terrain in Seoul.  This is a multi-level fight amongst the Dense Urban Terrain.  If a unit’s CX’d, it won’t Advance up a level, so you have to time it right.  A KPA conscript unit has especially limited mobility in this terrain and you don’t want to be CX’d when you are Lax as a conscript (+2 Ambush).  I think USMC Fire Teams would be very useful here.  Fire Teams could block more venues up the hill and it’s not easy to break Morale 8 units in +2 TEM.  Plus each Squad, when broken into Fire Teams is worth 3 VP when it’s worth only 2 VP as a unit.  If every USMC squad’s deployed, the USMC OB is worth 28 VP (vs 22 VP undeployed) against the KPA’s 31.  Both players have to find the balance between pushing through and scoring points versus fighting the opponent on a different level to stop him from scoring.  While the KPA player has to fight uphill, there are more of them that can swamp up to Level 3.  This is a tight little puzzle of a scenario!

(Credits: Wikipedia)

Trailer: LFT The Fight for Seoul