ITR15 Tractor Factory 137 After Action Report (AAR) Advanced Squad Leader scenario
Victory Conditions
It was March 1943 and the SS Panzergrenadiers looked to take 4 factories in 7 MPh’s from the Soviets in Kharkov. The Soviets had 20 squads & 4 leaders (1 commissar) with 4 AFVs and 3 Guns. Kindling was NA and the EC’s Wet. Factory had Roofs and the Russians had 3 Fortified Locations, plus MOL Capability. The SS had 22 squads (3 of them 838 AE) with 5 leaders (1 10-2), 3 PzIIIL, 1 StuG and 2 Tigers.
After Action Report

As the SS, we didn’t have much time, so we needed to hit all 4 factories concurrently. At the advice of my opponent, I divided my troops to teams of 20FP firebase plus deployable 548s assault units, with 1 team of DC & FT guys and the 838 AE’s dispersed as the ‘smokers’. The AFVs were to provide Smoke (didn’t get much), to provide street cover, to neutralise Soviet AFVs, to push to the back row and to finally help breach buildings (Fortifications). The 2 Factories on the left would be hit head on. The 2 Factories on the right would be hit head on AND flanked in case we couldn’t push through the front one quickly.

On the right, we pushed across the first street quickly, with the enemy on the flank collapsing. The Russians had an ATR in the Factory that threatened DI shots. The Russians did MOL attacks whenever they could in a bit to start fires. My Tiger with the 9-1 armor leader pushed down the middle a little slowly. The opposing T-34 got a chance to get in motion. The resistance in the middle was tougher as well for the infantry. The Russians had their MGs and their best leaders lined up there, with another T-34 behind a wall. We edged our Flamethrower team closer to it. On the left, there were a few Russians on the 1/F designed to mess with my routing (and to waste my time). Whilst the folks on the left pushed into the street, it’s not without difficulty ‘cause the two blocks on the left were mutually supportive. My other Tiger slid to the left, the T-34 tried but couldn’t get away. The one big thing we got going for the SS was their remarkable rallying ability, which was often a 6 while DM’d but in a building, before leadership’s applied. Our ‘recon by walking around’ found the Russian 76* (not 76L in the following diagram) on the left flank.

That T-34 in the middle that went into motion did a master move: it went to the right and threatened a PzIIIL! We were relieved when it burned on a lucky CH. The STuG decided to move over and offer it support nonetheless. AFVs should never fight alone. A wandering 548 ‘found’ their 45L that decided it was a worthwhile target. Our mighty 10-2 led 20FP stack, bolstered by a Hero (20-3!!) moved into a target factory. The stack moved right in front of a ROF3 45L Gun but it was a risk it had to take. In the middle the FT folks got shot up and dropped their toys on the street. The other 76* popped smoke which makes the 2 ‘stacked’ factories on the right harder to take but it did cover us from their MG death stars as well. The T-34 on the left got chased off (helped by a Smoke round from their 76*) but our AFVs focused on helping our troops cross the street. We got to the smoking 76*. Still, there seemed to be too many Russians anywhere!

The Russians never stopped trying for MOLs. Thanks to the Wet EC, buildings didn’t all brew up in flames! The nightmare scenario happened: our 20-3 Jedi stack broke under attack from the 45L. The Russians closed in from all directions and a T-34 crashed into the building behind it. Our 2 AFVs couldn’t kill the offending T-34. Our teams on the right looked tattered. The news stunned all the SS troops on the board. The troops in the middle looked to cross the street intact when T-70 whizzed by on their left. It stopped behind a PzIIIL but forgot to Bounding Fire. The targeted PzIIIL spun around.

Our Jedi stack routed up to the Roof but it’s already dead. The flankers took the opportunity to run down the right. Unfortunately the Gun on the STuG malfunctioned while trying to shoot the moving (zigzagging?) T-34. The Tiger in the middle decided to push up behind the T-34 (and over the dropped FT) and German troops went into CC with the same T-34. Our folks in the middle crossed the street! Our PzIIIL burned the T-70 on the left. Our guys were done with that factory (yes, there’s a Fanatic 838 AE) and was ready to move out (it was Blazing up too). The Tiger went after the T-34.

The STuG fixed its gun in the nick of time and shot the T-34, which tried to move around it through a building. The flankers on the right gathered to hit the ‘back’ factory building when the STuG then went straight to the back row and started taking shots from their remaining 76* Gun. The Tiger in the middle started putting rounds into the ‘front’ factory and found a Fortified location. A PzIIIL went to back it up while an 8-0 dived under it to retrieve the dropped FT. The teams in the middle was making progress and the teams on the left was moving to the left flank to help them out. The Tiger shot the T-34 and the AFVs moved to the back row on the left as well.

The Russians were consolidating and getting concealed were possible. The fact was, I couldn’t stop that nonsense until I break into the Factories! The STuG’s dueling with the 76* Gun while the Tiger’s sending shots to it from the other side. Shooting wasn’t going to get rid of the Russians. We gotta breach.

We didn’t forget about the front Factory on the right. A PzIIIL moved over, popped Smoke to help people cross the street. We tried getting into the back Factory but troops broke under the insane firepower from the 8-1 stack. The Tiger in the middle kept shooting at the 76* Gun and would later CH that hex (bye bye Gun). Other AFVs moved to the back to prevent concealments. All the Russans on the left were now squeezed into a Factory by two teams of SS.
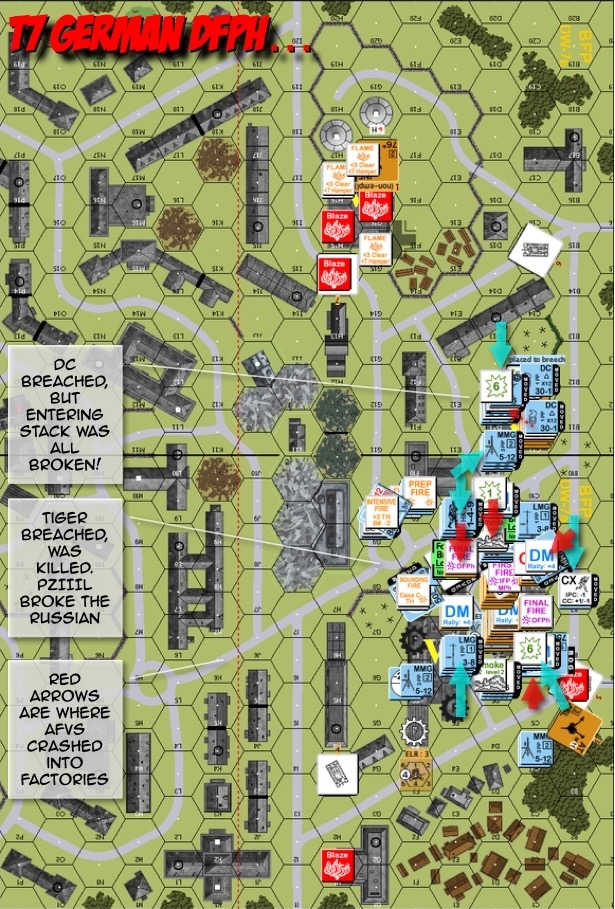
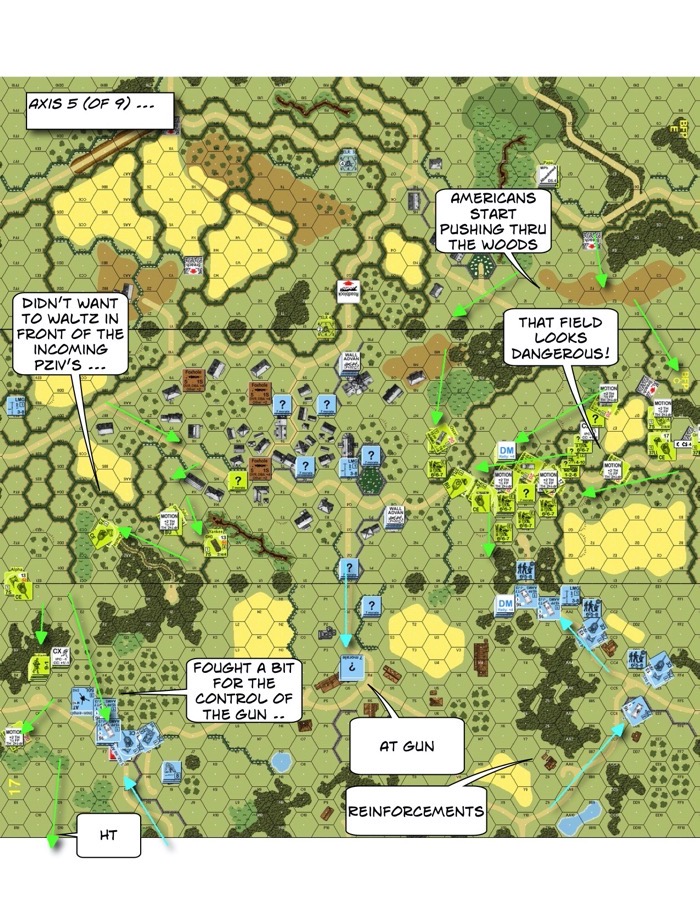
AFV’s crashed into Factories from all directions (red arrows)! A Tiger was killed and 2 PzIIIL were immobilised, but we should have done this earlier. We took Factory number 2 (the ‘front’ Factory). We breached the Fortified location on the left but the Defensive Fire broke all of the assaulters at the breach. That location would potentially cost us the game.

And it did. Assault Fire from the unbroken SS stack in the left Factory failed to break the Russians in the Fortified location. There’s no way we could take all 4 factories. The SS lost.
 The Russians have 8 Movement Phases. They will have to do 5 hexes per phase for 4 phases to put them in the vicinity of the 2 hex Wooden building on the left half of Board 17. That leaves them 4 turns to fight. The KV-2, on the hand, is a real monster. It is big enough to give a -2 to any TH for size. It spots an armor factor of 8 all around, 11 if you hit that turret from the front. Its 152mm gun dishes 30 IFT / TK21 (AP9 & no IF). On the otherhand, it can only turn it’s turret by paying NT penalties (we played it wrong: we played it as if it’s an NT), goes 9 MP per turn and that’s only if you pass the Mechanical Reliability DR. The PzIVD offers fantastic mobility [amended, see footnote 1]. It packs a good set of MGs (totalling 8 IFT) but it’s 75* (short barrel) with a TK of only 10 (AP7). It’s hard to kill a KV-2 with anything less than a swarm but all you need is to kill one and scatter (the remaining Russian tank will have to kill all the PzIVDs to win via that route). The Germans can also immobilise one first (net +3 and a hull hit), hopefully in some awkward position/location. Their smoke dischargers (s9) can help the German reinforcements cross all that open ground from the top to the middle of the map!


 Both sides had a chance to attack and to defend. There’s a lot of force allocation decisions to be made especially for the Russian player. The Germans couldn’t afford to be distracted by buildings on the fringes, they had to make it to the village on time in order to disrupt the Russian attack. The KV-2’s were a real challenge. Nothing short of a nice “dance of death” would do (with the survivors running off to the far corners of the map). Then if that’s the case, they wouldn’t be helping their reinforcements cross that vast Open Ground on the top half of the map. Typical of the best scenarios, there are a good number of what-if’s and tradeoffs to be made. I thought I was on track for an easy win but my opponent obviously proved me wrong.
 The Germans need to get at at least 12VP at Game End to win. VPs are earned by occupying buildings on the right half of the map. Each VP corresponds to the # of ground hex locations a building occupies, the exception being the long wooden rowhouse which is only 3VP and not 5. This being early in the morning, there’s a +1LV for the entire game. The bocages are Light Bocages, meaning they are half height obstacles, don’t throw a blind hex behind and are not as onerous to cross. A particular evil element to note are the few Up-Slope hexes in the German setup area that allows them to look beyond the Light Bocages.


 BoF2 A Polish Requiem has long been a classic. It’s a whirling dervish of a battle!! Polish AFVs were slow but those 37* kills on a 7, pretty respectable considering most German AF’s 1. The German forces might seem overwhelming but these guys were tied to a timetable. If the player on the Polish side keeps his PMC (read: Personal Morale Check) he might win this scenario yet. The German AFVs might X themselves out or folks might get delayed just enough. Had the Polish MMG at the end zone not X’d out it would have been harder for the Germans. Scoring 37 (Poles) vs 27 on ROAR, I recommend this scenario unreservedly.


