A55 The Cat Has Jumped – AAR on Seaborne Assault!!

This scenario reflects the seaborne assault by the IJA on a relatively lightly held beach in the Philippines. The landing took place on Dec 22 1941, shortly after the attack on Pearl Harbour. Conditions were not ideal on this beach – the wind’s heavy and so’s the surf. The Japanese launched their attack on these “shohatsu’s” (or “LCs” for landing crafts) which were really big steel boats.

Shohatsu

As such, neither the crew nor the passengers get to button up.  They were therefore subjected to a +2 CE DRM (Crew Exposed DR modifier) at all times.  The Filipino defenders had problems of their own as well : they were using MGs that were stored since the 1920’s.  The defenders’ machine guns were therefore a lot less reliable than usual (X11 instead of B12).

The IJA wins immediately if they manage to exit 25 or more VPs (“victory points”) off the right edge of the map and/or gain that number in CVPs (“casualty victory points).  The entire IJA force had 22 squads, 3 crews and 5 leaders – a total of 58 VPs which meant they needed to exit half.  The entire Philippines force was 29 CVPs should the IJA decides to focus on CVPs instead.

A55 Start-proc

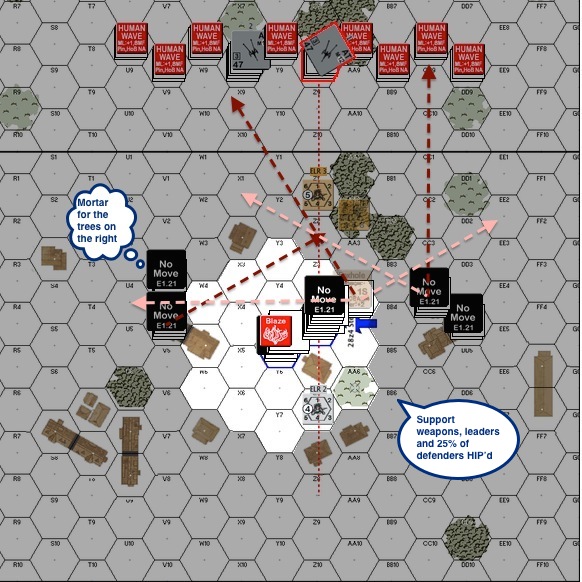
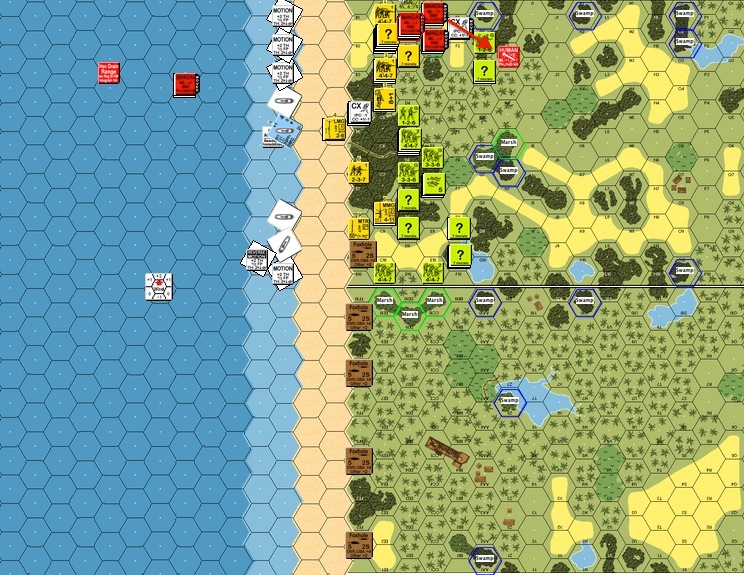
IJA Turn 1 : This was a humid day at a peaceful beach.  I could almost see people frolicking in the shallow waters (almost).

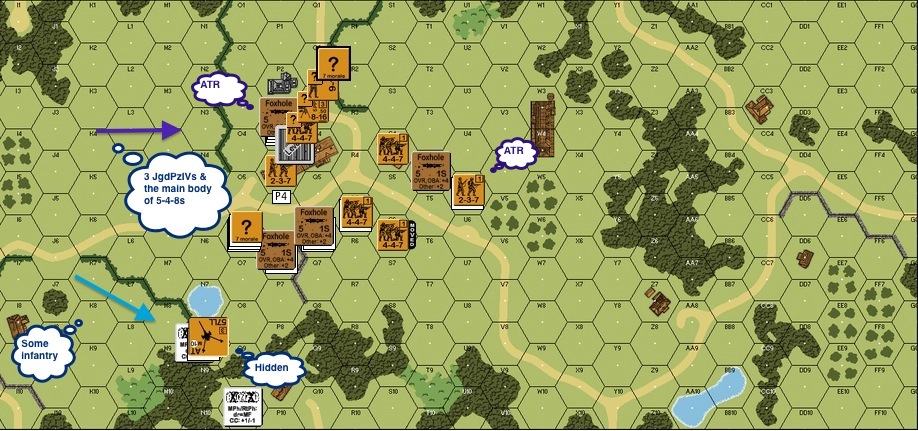
The terrain on the top of the map was very restrictive, especially compared to the bottom of the map.  It would be difficult for the IJA to exit the map via there.  The terrain was more ideal on the bottom half of the map.  The orchards provided a degree of hindrance whilst requiring only 1 MF per hex to move through.  Defence looks pretty sparse on the bottom of the map and I suspect that’s because the Filipinos stationed their 4 squad equivalents there.  The way this was setup, the bottom of the map looked too inviting for me.  I therefore aim the IJA landing forces towards the top part of the map.  My opponent had gracefully given me the balance, so there were 2 MMGs and 1 HMG instead of 3 MMGs and 1 HMG, but those MGs still encouraged me to head for the jungle. Jungles are ideal banzai terrain after all.

A55 PT2 Prep - Lose both MMGs-proc

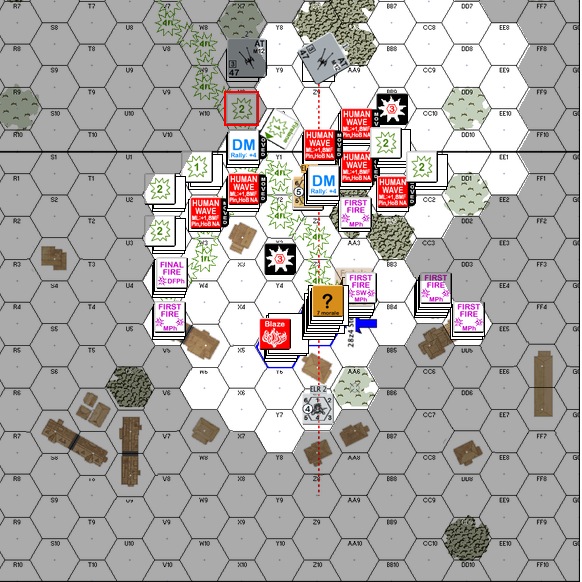
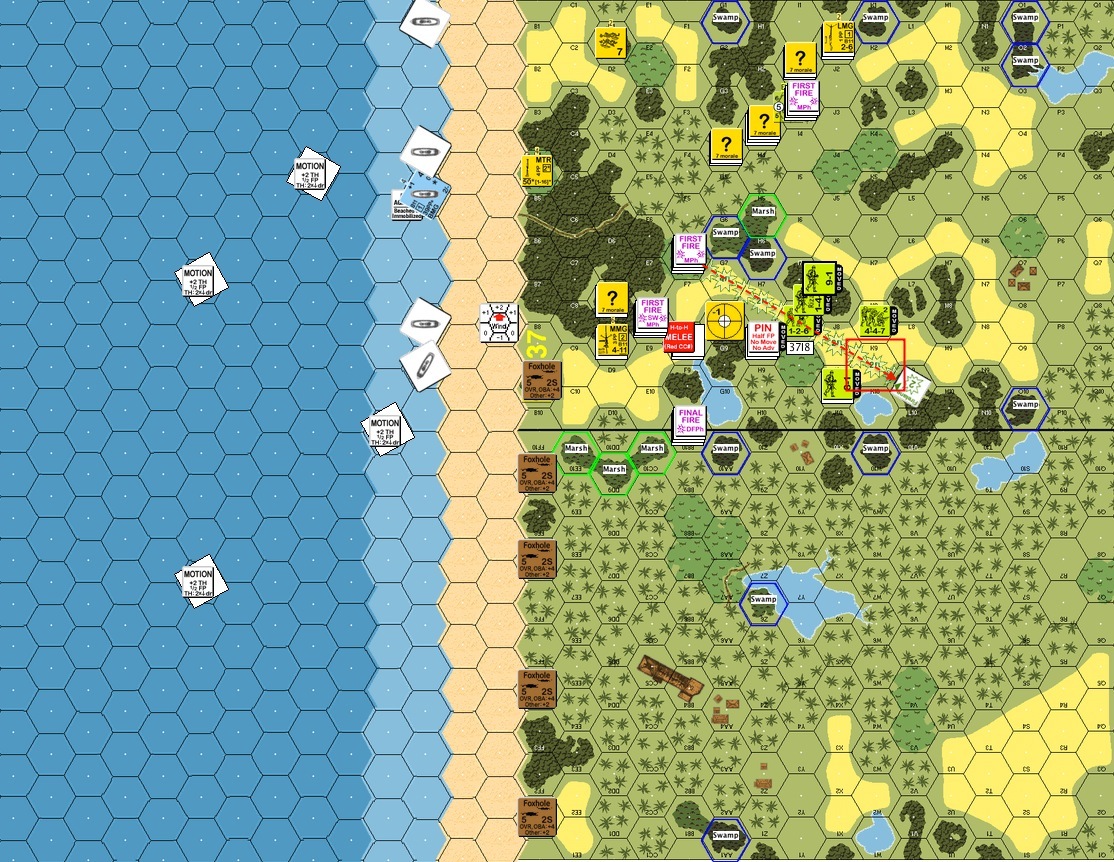
Philippines Turn 2 : The 9 IJA boats were still coming in okay.  None of the boats were lost in the heavy surf yet.  The Filipinos started shooting at the incoming LCs.  Stunning the LC crew would cause the boats to flounder and throw the IJA off their landing schedule.  Unfortunately both MMG clogged up and random selection designated both for the junk heap (and there was much cursing).

A55 JT3 MPh - Broached No Survivors-proc

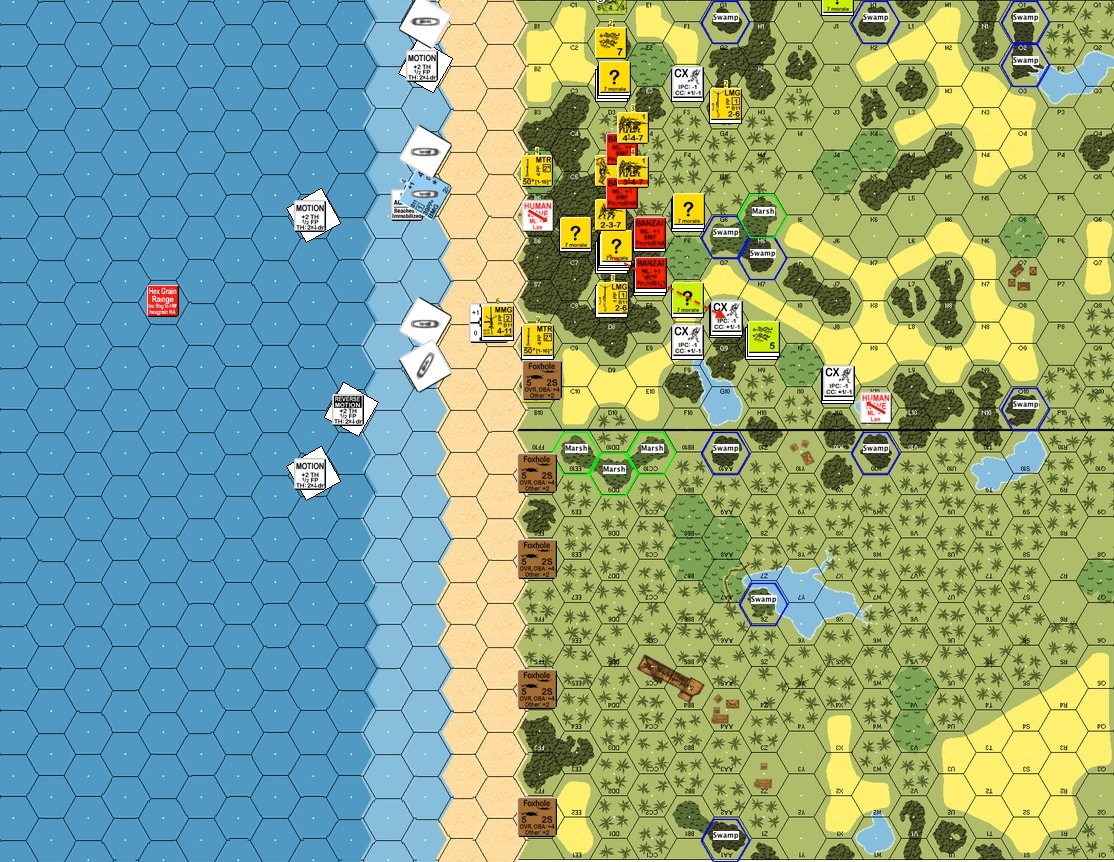
IJA Turn 3 : It was difficult to beach the LCs properly in the heavy surf.  One LC was swamped and ran aground.  One LC’s crew struggled hard with the waves and wasn’t able to do much.  One LC broached against the swells and was destroyed, no survivors.  One LC got shot up bad and was floundering in the shadow seas.  The 5 that beached okay, started to unload its passengers.  Infantry on the beach are fanatic.  However, if they fail morale checks they casualty reduce.

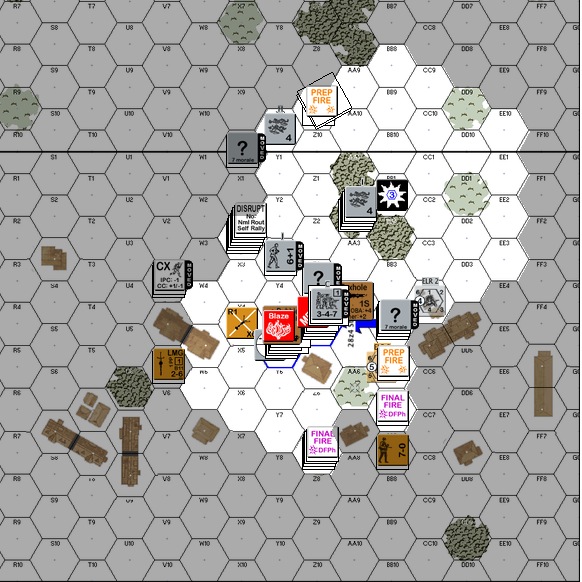
The 5 LCs that beached, started to unload.  However being a first time seaborne assaulter I was concerned about pushing entire stacks out on the beach risking -2 shots on everyone.  So I decided to offload the heavy weapons first, those chaps would need to assemble their toys on the beach away.  This decision would cost the IJA a few more platoons as more LCs got broached in the heavy surf.

I asked my mentor Witchbottles about it afterwards, and he said to get off the boat absolutely as fast as we can!

A55 PT4 End - P moving into blocking positions-proc

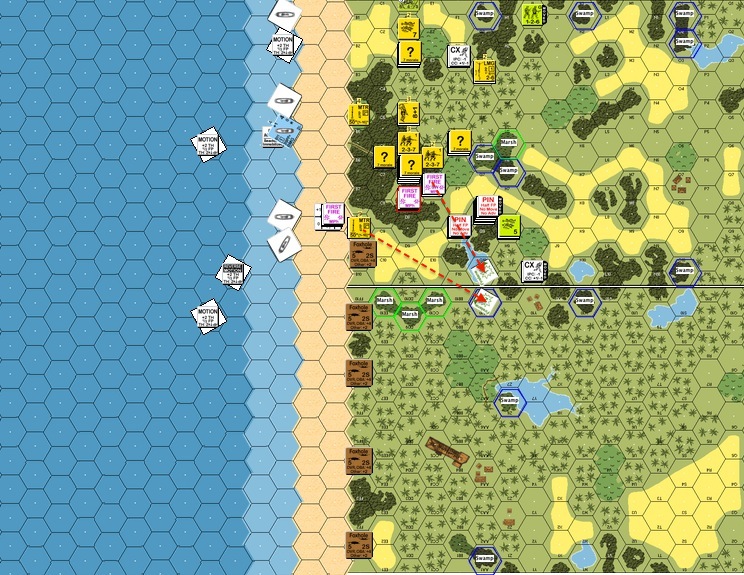
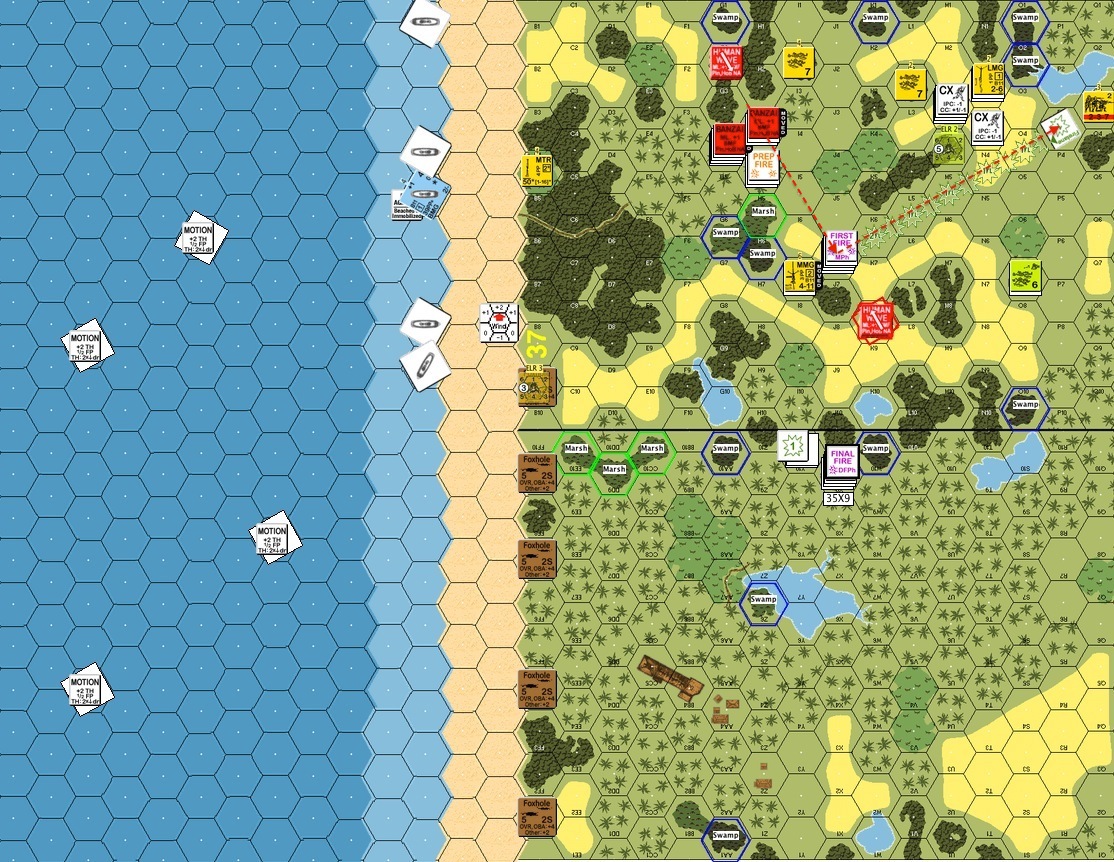
Philippines Turn 4 : The IJA got inland on the left flank.  It’s great news apart from the fact that they could get boxed in with a few Filipino squads against the board edge especially with this terrain.  The remaining  Filipino MG, the heavy machine gun expired as well.  The defenders were caught with a beach full of fanatic IJAs and no high rate of fire weapon to do anything about it.  However, they had moved inland methodically to key locations.  The IJA got a bad feeling about what was to come as they couldn’t stop the Filipinos from slipping away.

A55 JT5 Another boat broached 11 squads 10-2 10-1 9-0-proc

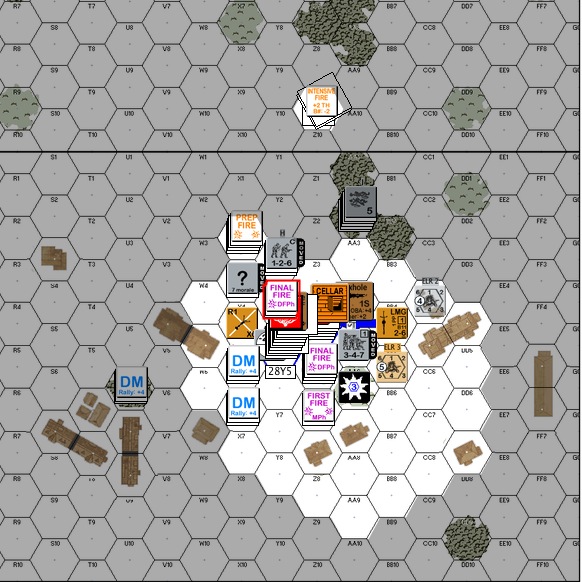
IJA Turn 5 : The IJA got another LCs broached!!  The IJA had lost a total of 11 squads and the best 3 of the 5 leaders.  Considering that the IJA started with 22 squads 5 leaders ad 3 crews, that was almost half of the force!

A55 JT6 Banzai 02-proc

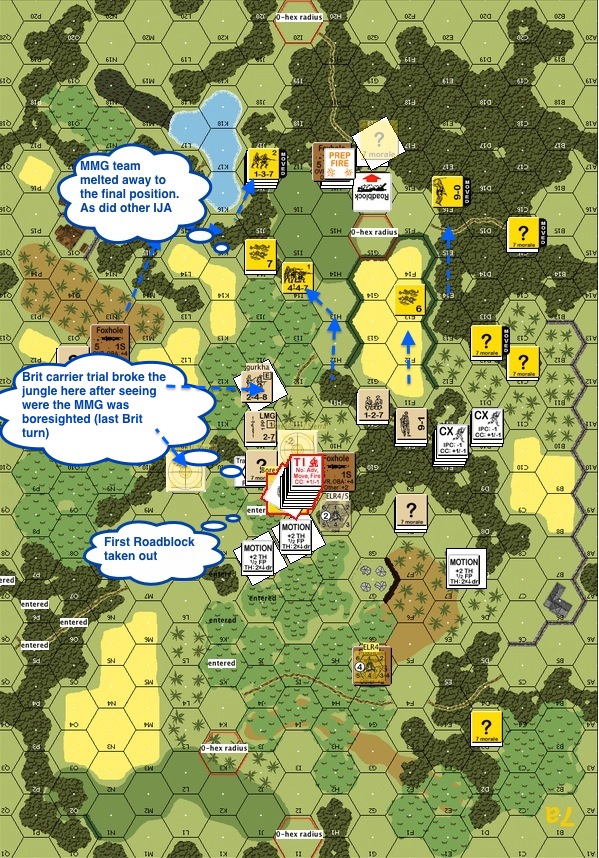
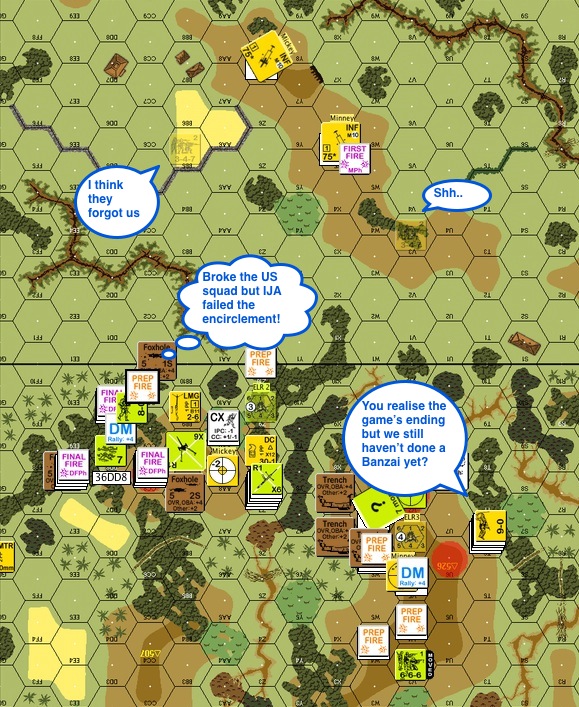
IJA Turn 6 : This is Turn 6 and the IJA just got off the beach.  Witchbottles’ advice to always read the scenario victory conditions at the start of every turn definitely helped here.  The IJAs couldn’t move fast enough to get 25 VPs off the board, especially not with the Filipinos shooting at their backs.  The IJAs decided to change tack and to round them up in the jungle instead.

BAAAAANNNZZZAAAAAAAAIIIIIIIIIIIII!!!!!!!!

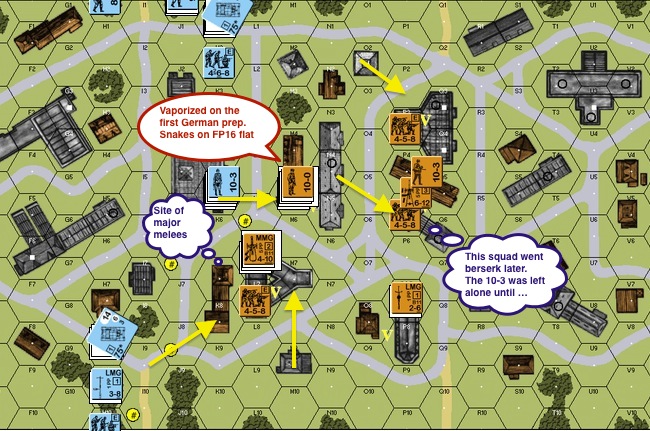
This was the second banzai attack of the game.  The first one was almost exploratory.  The aim ws to catch and kill the blocking force in front.

A55 JT6 Banzai 03-proc

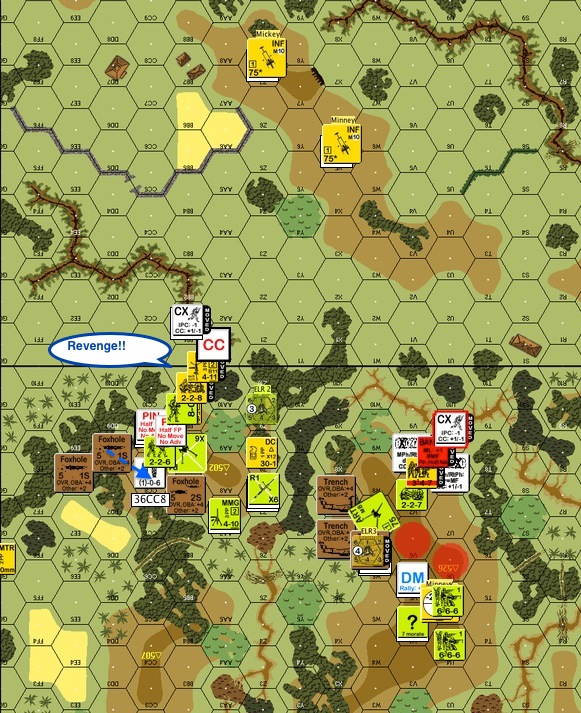
IJA Turn 6 (contd.) : This is the third banzai to catch the bulk of the Filipinos in the woods.  The jungle was just perfect banzai country!

A55 JT6 End CVP16 IJA 13 sqs 4 ldrs-proc

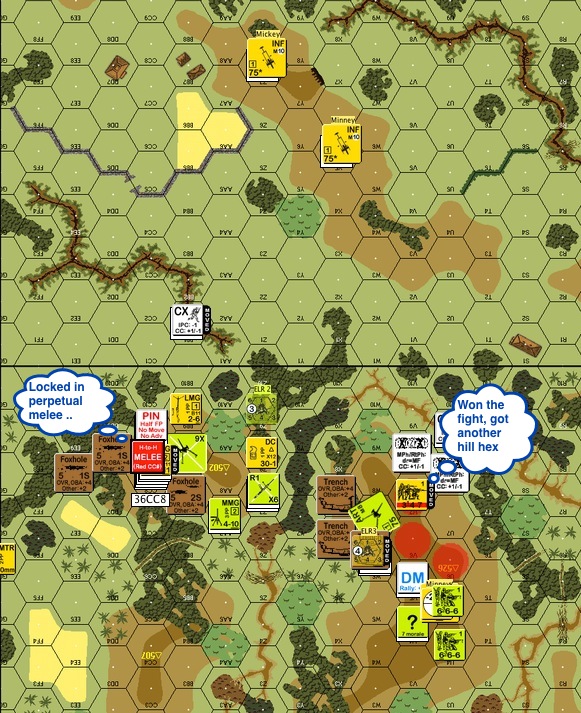
IJA Turn 6 : This was the aftermath of Turn 6.  The IJA lost a total of 13 squads and 4 leaders but have scored 16 CVPs in total.  They needed 9 more to win the game.  The Filipinos were wiped off the top of the map.  However, there were still enough Filipino troops retreating into blocking positions.

A55 PT6 Using FLs to stop the P from retreating-proc

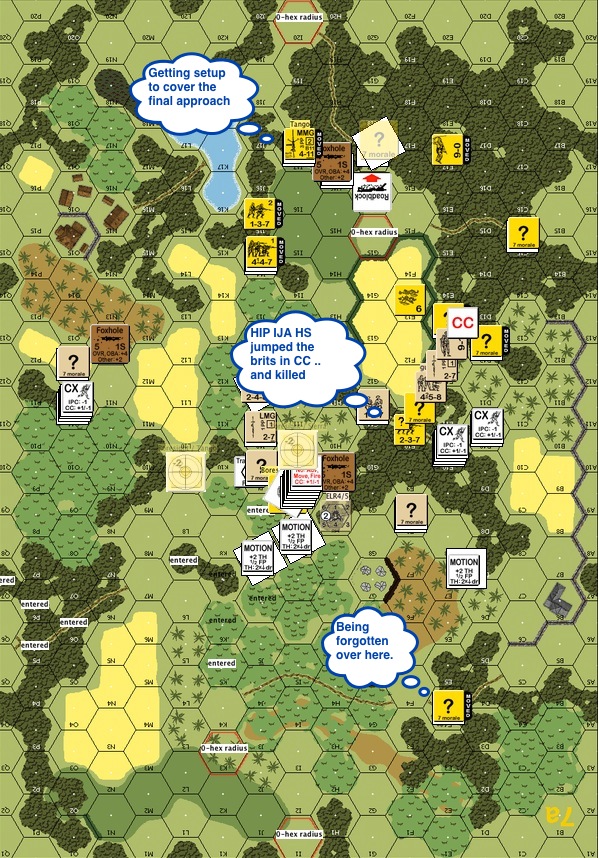
Philippines Turn 6 : The IJAs used fire lanes to delay the Filipino retreat.  Meanwhile, the left flank looked to be clear all the way to the goal line!

A55 JT7  Banzai 04 IJA 13 Ldr 4 CVP 18-proc

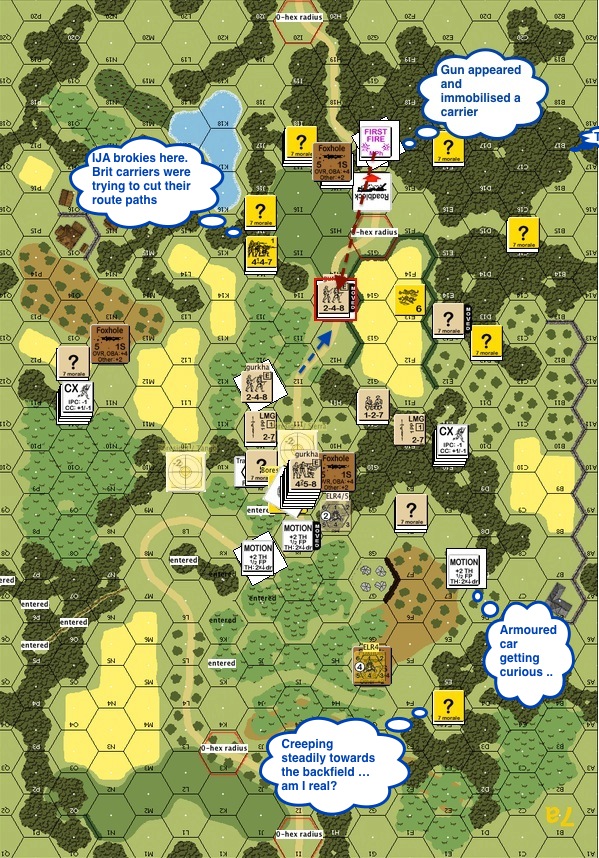
IJA Turn 7 : The IJA sprung their 4th banzai.  It was a big decision considering they had only 1 leader (8+1) left.  However the way he was positioned he definitely didn’t need to get too intimately involved.  You can see by the red arrow, how the IJA looked to catch the rest of the defenders.  The IJA now had 18 CVPs.

A55 PT7 Firelane Hero-proc

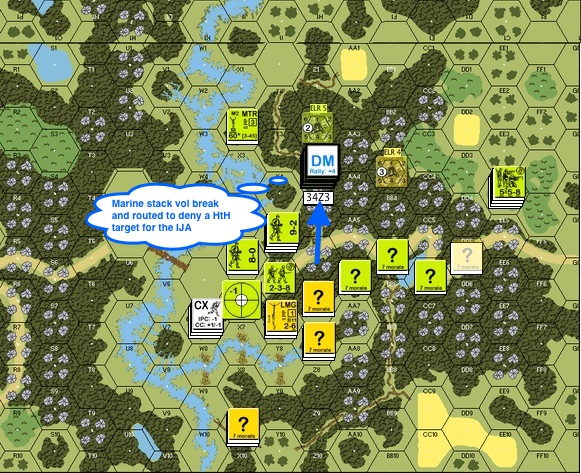
Philippines Turn 7 : The Filipinos got themselves a hero!  The hero, when coupled with the remaining 8-1 produced a fairly respectable stack with a HS and an IJA LMG.  Either way, the IJA moved into positions where they could lay down fire lanes to delay the Filipino retreat.  My opponent had already seen the bottleneck on the top right of the map where there was a lake.  To get to the board edge, the IJAs on the left flank had to run through the one hex that was 4 hexes from the top and 2 hexes from the right.

A55 JT9  Banzai 05 Need 5 more CVPs stop FL-proc

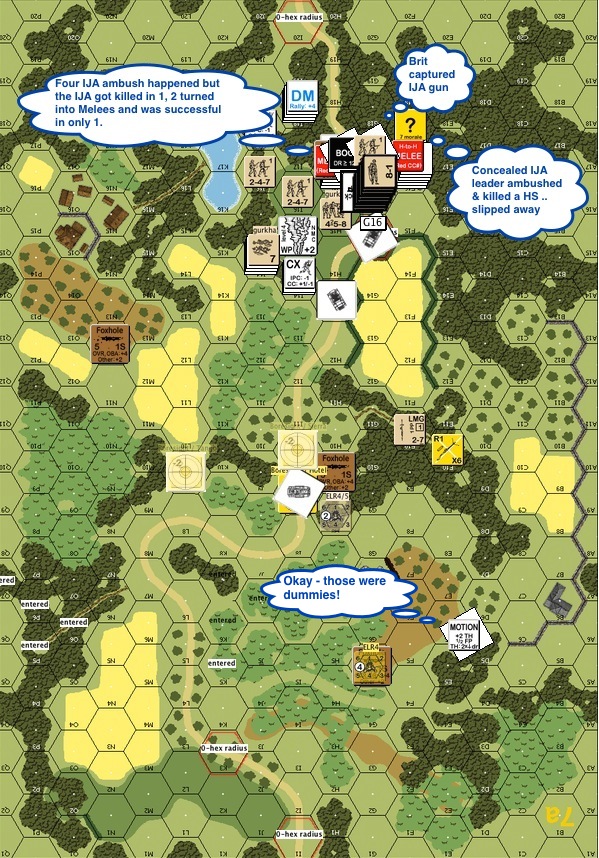
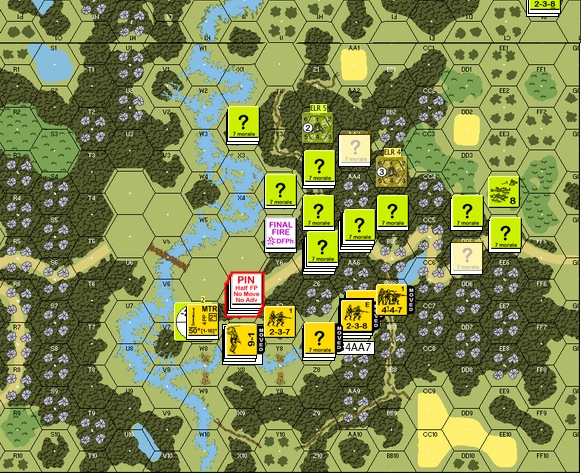
IJA Turn 9 : The Filipino leader / hero / HS / LMG stack got into a position to lay a fire lane down on the IJA exit.  The first fire striped the lead IJA squad.  The IJA had about 7 VPs worth of squads who could exit off in this very turn and we needed only 5. We had to get rid of that fire lane and one good way was to force the enemy squad into Final Protective Fire.  The Filipino leader-hero stack’s collective hearts must had skipped a beat when they looked away from their gleefully laid fire lane and saw the bunch of IJAs looking menacingly at them from their left.

Uh oh.

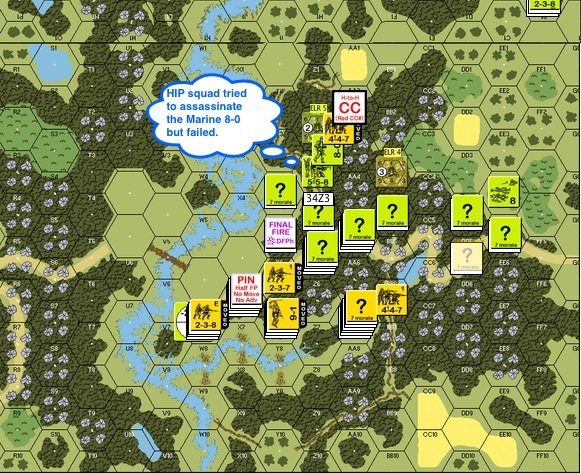
The fifth banzai attack had no problems crashing through the open  and into the fire lane stack.  There was nothing the Filipinos could do.   The fire lane stopped after a quick struggle and the 7 VPs worth of IJA squads exited at their leisure.

A55 JT9 Ends-proc

IJA Turn 9 : This was the end of the game as the IJA killed and exited more than 25 VPs.

As my opponent warned me, seaborne assaults are not for the faint of heart.  The attackers should expect to lose more than half the force to the elements and to casualty reduction until his troops hit the hinterland.  For the IJAs, only 4 LCs managed to head back to the ships.  4 others were wrecked and 1 went aground.  Half the force was dead at turn 6, mostly to broaching LCs.

I got to remember to get EVERYONE off the LCs immediately next time.


Gin Drinkers’ Revenge 2014 – Hong Kong Advanced Squad Leader Tournament

Gin Drinkers Revenge 2014Saturday, Sept 20 2014.  I found the corner table just like George Bates did when he was the tourney director for the Malaya Madness tourney in Singapore and I set my bag down.  The Hong Kong Society of Wargamers has 2 rooms booked at the KITEC (Kowloon International Trade & Exhibition Center) regularly for their meetings.  Today, however is unlike any other day.

Today is the day for the Gin Drinkers’ Revenge 2014.

Twelve arrived.  We had them divide up into three categories :

  • Former HK ASL Tourney winners
  • 5 years experience and above
  • Newbies

We had 8 hours, 2 rounds, single elimination, 4 hours per game.  We wasted no time in deciding on scenarios and bidding for sides.

Round 1 : J59 Friday The 13th

Aris Avi

My first round was played against Aris Avi from Greece.  He lived in Hong Kong for a little while and will be going back to Greece shortly after the tournament.  He said however, that whilst he used to play Squad Leader, he’s more into miniatures back home.

I was hoping for J12 Jungle Fighters as some folks here are less versed with (or are even adverse to) PTO.  We decided on J59 Friday the 13th instead.  I have never played this but Aris said since he played the defenders last time, he would like to be the attackers.

Friday 13 01

If you would ignore the blue arrows for a moment, this was my defensive setup.  The Germans had 3 JgdPzIVs that came in with 10 5-4-8 paras and 3 leaders from the left.  The objective was for the Germans to capture all buildings around where you see the Russians concentrated.  The Germans had 6 turns.  I had my antitank gun (57LL with ROF3) pointed at where it could most likely take a side shot on the Jagdpanzers.

Aris opened up with an armour assault on the top part of the board.  He had a small contingent heading towards where my AT gun was emplaced together with some wire.  My AT gun fired during the Defensive Final phase, got a hit even though I lost ROF.  YES!   I will take one out of three.  Side shot, TK looked great, I rolled.

BOXCARS – BOOOOOIINNKKKKKKKKKKK!!!

The round glanced off the Jagdpanzer closest to me and then of course the entire German force was then aware of our gun’s presence.  Too late now, the paras closest to the AT Gun started to move towards it.  On the top side of the board the Germans started getting shot up by the Russian HMG on the first level of the big house.  The Russian HMG team held out moderately well and when it broke the half squad on the ground level advanced up to help, except that it couldn’t find the HMG of course (“What do you mean you can’t find the gun??  We left it standing by the WINDOW!!!”)

The Germans para were unable to reach the hedge.  At one point most of them even low crawled back to the tree line.  On Turn 3 or 4 two Jagdpanzers decided to jump the hedge.  Believe it or not, I planned for it.  That’s why I had a squad in a fox hole with an ATR looking for an underbelly shot when Jagdpanzers jump the hedge.  However as the Jagdpanzer rolled over, I forgot.  The first Jagdpanzer overran the foxhole.  The good news was that Jagdpanzers with FP1 bow machine guns don’t offer much fireworks.  The better news was the squad survived and killed the tank hunter in close combat.  At this point, I started to move my Russian infantry up for a counter attack.

Gin Drinkers Revenge 2014

I was in a bit of danger on my left flank (bottom) though as the Germans killed the gun crew.  One German squad was however caught in the wire and my opponent wasn’t sure whether my other wire was some where in the woods as well.  The Germans stopped coming through the Russian left flank.  Katya (the Russian sniper) once again came by and broke the remaining German squad for me.

The second JagdPanzer that jumped the hedge stopped with its gun pointed at the HMG farmhouse.  I got it caught between two ATR squads as shown and blew it away from behind as my opponent was perhaps too focused on taking out the big farmhouse to let the German paras in.  There were no survivors.

My opponent conceded.

Round 2 : T4 Shklov’s Labors Lost

My next opponent was Ted Kwong.  Ted said he bought his Advanced Squad Leader modules a long time ago.  It’s only recently that he started learning the system.  He told me how terrific a teacher Erwin Lau is.  Erwin is a local grognard who plays a variety of games and has been winning (multiple?) championships in past Advanced Squad Leader tournaments held by the Hong Kong Society of Wargamers.  As a testament to how much Erwin has done in pushing ASL locally, Ted is the third person who told me recently as to how immensely patient Erwin is as a teacher.

Ted Kwong Christopher Chu (1)

Here you can see Ted Kwong on the left after rolling a pair of snake eyes on his opponent in ASL126 Commando Schenke.

We decided on T4 Shklov’s Labors Lost (Ted didn’t want to do PTO, so no AP84 Double Trouble).  I would be the attacking Germans.  JR Tracy told he they used to call this scenario “Gandalf vs the Balrog” because each side gets a 10-3.

Shklov's Labors Lost-proc copy

This was the setup from memory.  I got the Germans who had 9 4-6-8s with a star-studded leadership team : 10-3, 9-2, 8-1 with 2 armor leaders 9-1, 8-1.  There were also 2 STuGIIIB to help them with taking 5 designated Russian buildings in 6 turns.  The Russians had 7 and a half 4-5-8s led by a 10-0 and a 10-3.

The placement of the Russian 10-0 made me wonder if they had their MMG up front.  The HMG was probably with the 10-3.

Ted just won his last game against Christopher Chu and he was in a pretty good mood.  We shook hands and the game got underway.

Shklov's Labors Lost-proc copy 2
First matter of the day : the Germans prep’d their deathstar – FP16 flat versus the commissar stack.

Snake eyes.

We opened the game with a 2KIA!  Great omen I’d say, I gripped a little tighter my pair of lucky dice that saw me through Malaya Madness as well.  The commissar stack vaporised before the commissar had a chance to rub his eyes.  The STuGs led the way with armoured assault, chucking smoke out of their smoke dischargers at key points down the left and the right.  The Germans had no intention of doing frontal attacks.  The Germans entered the commissar building from the Russian right flank and went slightly behind the first building on the Russian left flank.  The STuG from the Russian right came across, discharged smoke immediately before reaching the MMG building and did a bypass freeze on the MMG hex (froze the ground level only).  The Germans then piled in through the front and from the side under the cover of a timely smoke grenade.

Shklov's Labors Lost-proc copy 3

The German deathstar later moved into commissar building and joined the 9-2 and his team.  At around Turn 3 the Russian 10-3 was pinned and the Russian HMG squad went berserk!!  They dropped the HMG, ran into the street and the berserkers were UNSTOPPABLE.  All the heavy German firepower had assembled in the commissar building at that point but apart from bring critically reduced, the Russian berserkers made its way across.   It was only when the deathstar final fired at it from an adjacent hex.

The Germans then looked up and met the eyes of the lonely Russian 10-3.  The Russian quickly grabbed the HMG, admirable but futile.  The STuG rode by and put down smoke from its dischargers.  The Germans 9-2 led 2 squads across the street into the Russian 10-3 hex.  The STuGIIIB continued its way and got behind the VC buildings.  Four buildings down and I would take the Russian HMG as well after we shoot the 10-3.

Ted gracefully conceded.

Aftermath


20140922_54b305d9a0cd84ec01284qW9l8oE0wLa-1

So here we go.  We have a front runner from each of the 3 groups :

  • Tourney winners – Erwin Lau
  • 5 years Experience and above – Anthony Leung
  • Newbies – Jackson Kwan

There will be games arranged at a later date to determine the final rankings amongst these three, subject to Hong Kong Society of Wargamers’ scheduled events and venue availability.

Watch the video!!

http://www.youtube.com/watch?v=RnqXRFauZFA

IMG_8125IMG_8126


G38 Castello Fatato – Extreme Winter at Night

G38 - Starting-proc

It was December 20 1942.  The Italian Bersaglieri Regiment approached the Russian town of Meshkov in their retreat.  The Russians got there ahead of them and used its “fairy tale castle” ie. catello fatato cathedral as a strongpoint.  It was dark, it was extremely cold and yet the cathedral was illuminated by a portion of the building that was on fire.

The scenario opened with 20 squads of Italians doing a human wav across the snow towards 2 squads of Russian SMG units plus 6 rifle squads of the Russian 1st Guards Army.  The above is my defensive layout and where my machine guns were positioned.  Typically in a night scenario, support weapons and leaders are HIP’d (“hidden initial placement”) as are 25% of the defenders.  The Italians win when they control the cathedral (the hex with the “Blaze” counter and the hex to the upper right of it. )

G38 - IT01 - Defensive FF Fire Lanes-proc

Italian Turn 1 After the Movement Phase : The NVR (“Night Vision Range”) was 5, so the screaming Italians were spotted.  The Russians tried to break as many Italian squads as they could.  Italian squads have a moral level of 7 and a broken side morale of 6.  At night, units don’t get to remove their “DM” status until they roll less than its current printed morale.  Running with 4 leaders (2 of them 6+1), these Italian should be very hard to rally once they break.  Turns out it was the Russians who couldn’t rally for most of the game.  The Italian 6+1’s were rather successful in convincing their troops to get back into the fight.

G38 - RT01 - After AF - Sniper, Gun hits Church .. choice between hitting and skulking sniper knocks off 8-1-proc

Russian Turn 1 After Advance Fire Phase : The Russian should perhaps have skulked at least part of their forces but I was determined to break a few more Italian squads.  The Italians fired their Austrian made Cannone da 47/32 (ROF3), broke a squad on the ground level of the church and the heavy machine gun (“HMG”) team in the trench next to it.  The HMG was later lost to the Italians and never served under Russian use again.

Katya, our Russian sniper did miracles though!  She identified an 8-1 leader from a stack of brokies and put a hole through his head.  He was the highest ranking leader the Italians had and the only one with a negative modifier!

G38 - IT03 - End - It got in, melee, tieup, one gun down-procItalian Turn 3 : The Russian couldn’t find any star shells!!  Since illuminated units cannot see into the darkness outside the zone of illumination, it was safe for the Italians to move around the rim of blaze illumination and sneak an Italian squad into the cathedral.  The Italians had also jumped both of my flanks and tied them down in mêlée.  Given the huge disparity inmanpower, the Russians should have done a fighting retreat and leverage on their advantage in troop quality.  Once the Italians closed, the difference in morale level was gone and they could keep reinforcing any mêlée.

Case in point : the Russian’s right flank got a little agitated and turned fanatic along with the production of a hero (I promptly named him after my esteemed opponent .. heh heh), the Italians jumped on them immediately in the Close Combat phase, nullifying their qualities.

G38 - RT03 - End - 8-1 dead sniper wnd 7-0 cellar 628 cc kill IT-proc

Russian Turn 3 Close Combat Phase : There wasn’t a lot to do in this Russian turn.  The fellas steadfastly refused to be rallied.  Since one of the Italian guns malfunctioned and the Russian SMG squads hid in fortified cellars, there wasn’t much damage.  One of those Russian SMG squad decided to come out of hiding however, advanced up to see if it can ambush the Italian squad up top.  It didn’t, but it took out the Italian squad anyway in close combat.  In face of all the firepower and the important job it had to do, advancing up was a risk.  However the act might burn more time from the Italians.

The sparky Katya (sniper) continued to work hard, she found a 7-0 in another big stack of brokies and wounded him.  The Italians had 2 healthy 6+1’s left.  Both of the Russian flanks continued to be tied down in mêlée.

G38 - IT04 - After MPh-proc

Italian Turn 4 After the Movement Phase : There were only 3 functional Russian squads left : 1 rifle squad and 2 SMG squads in the cellars.  The rifle squad spit out a fire lane with the Italian Breda M30 LMG, just to deter the Italians from rounding the building on the right.  As luck would have it, the Italian squad on the lower right in the dark would be hit and broken by Katya, who was obviously making it a late night tonight.

G38 - IT04 - After CC . Melee stays, Sniper hits 347 on right, 2IT in Y5-proc

Italian Turn 4 later in Close Combat : Two Italian squads made it into the left side of the cathedral.  There’s still a concealed SMG squad in the left cellar. Since the cellars were fortified, they would need to pin or to break the Russian SMG squads before they could go in for close combat!

G38 - RT04 - Sniper pins Melee continues not much-proc

Russian Turn 4 : The Italians continued to rally quite well, although they had some casualties from the cold (Extreme Winter E.3.742).  The Russians on the hand were still hanging on with a few squads.  To make matters worse, the German sniper showed up an pinned the fanatic Russian squad in the midst of their mêlée on the right.  Fortunately they survived and the fight continued, tying down that flank still for the Russians.

G38 - IT05 - Sniper broke fanatic hero died in CC 2 iT got into cellar pin 628 CC night closing in -proc

Italian Turn 5: Again, the Russians had no luck with star shells, and the Italians moved in.  The Italians managed to pin the Russian SMG squad in the cellar on the right and so two Italian squads advanced downstairs to say hello.  The mêlée on the far right was hit by German snipers again!  The Russian fanatic squad was broken and they were all killed when the hero found himself fighting the Russians alone.  The Russians outside were beginning to rally but listening to the sounds around them, SMG squad in the cellar on the left felt the darkness rolling rapidly in.

G38 - RT05 - Other gun broke 6+1 rallies Russians coming back more people in church-proc

Russian Turn 5 : The Italians got star shells in some choice positions!  Nonetheless the rallied Russian troops started to move back.  Fortunately, the other Italian gun broke as well, adding to the Russians’ fighting chance.

G38 - IT06 - Another Gun gone - Italians piled in-proc

Italian Turn 6 : GUSTS!!  The burning first floor of the cathedral collapsed!  Good thing it didn’t crash into the cellar.

The Italians had to think defence now.  The Russians were getting back into the fight from the lower left of the map.  The Italians had to get into blocking positions while continuing to reinforce the mêlée.  The Russians couldn’t do much about stopping the Italians from reinforcing the cathedral.  You might also notice that the remaining Italian gun was operational now and again tried pounding the cellars.

G38 - RT06 - Russians rushed the building. Ldr OVR look for ambush-proc

Russian Turn 6 : The Russians plodded towards the sounds of gunfire inside the cathedral.  First up was the 7-0 who looked to pop into the church hex on the left.  The choice for the Italians was either to spend firepower on him or to let him get into the ground floor and make the Italians do a +3 task check for “Infantry Overrides” in next turn to get in.  They shot him.  Next up is a Guards rifle squad that broke against the fire lane on the far left.

It looked even tougher on the right.

One squad got pinned and finally the last squad moved in with the 8-1.  Russians elites are stealthy and Italians are lax.  If the Russians could get an ambush they could infiltrate into the cathedral.  Unfortunately, it was the Russians who got ambushed, and the Italian squad withdrew into the cathedral.

At this moment, the cathedral cellar on the left was held by a good order Russian SMG squad and in the right, there was a mêlée raging on between a Russian squad and two Italian squads.  The Russian counterattack could only watch from outside the cathedral.

G38 - IT07 - Italians can't break guy in the cellar-proc

Italian Final Turn : It all went down to one question (read : dice roll) – whether the Italians could break or pin the Russian SMG squad holding out in the left cellar so that the Italians have a chance in close combat.

The Italians moved, trying to focus more fire power into the cellar during advancing fire.  The Russians outside managed to pin one of the 3 squads that got into the cathedral, directly above the stubborn Russian SMG squad.  The Italians mustered up a firepower of 6, so that was a FP6+4 shot.

The Italians rolled an 11.

The Russians won.

DB081 Lack of Discernment AAR – Defending!

DB081 - Start-proc

Here’s the AAR of when I played this scenario as the attacker against Carl Nogueira.

Now that I got a chance to see how the grownups do it, Carl gave me a chance to put my learning to the test.  He let me play this again, with me defending as the Red Chinese this time.

The above is my attempt to draw a pentagram with imaginary fire lanes when setting up the defence.  Carl put his defence all upfront.  I am not so confident.  Just so everyone knows, this scenario has a variable ending depending on when the GMT can capture enough multi-hex buildings to get the points required by the end of Turn 4 to 7 while  suffering no more than 24 CVPs.  The multi-hex buildings on the south of the canal are worth 1 point each, the ones to the north are worth 2.  The two bigger buildings on the south I labelled “Factory” are worth 2.  The first target for the GMT is to get 8 points by the end of Turn 4.  However if the Reds reinforcements come in south of the canal, that requirement for the GMT falls to 7.

Carl put his defence up front.  I wasn’t so confident.  I thought the weight will come from the right and that the GMTs would be crossing the canal up the top right corner to grab at the 2 point buildings.  I couldn’t give up the use of the single hex multi storied building on the left, that was where I placed my HMG, a quick fire 37* gun and ground level fortifications.  I put another fortification in the middle of the factory where my commissar sat.  I got another fortification hex behind him as “the Alamo”.

He would expect the Red Chinese “death star” on the left so I didn’t bother HIPing it.  I did however HIP’d two half squads on the right to help with the defence.  The MMG and the 70* gun were across the canal to the North.  In a way the longer the big gun laid unfound, the better it is.

Notice Carl got a nasty death star : 2 MMGS + HMG + 9-2 on level 1 of a building.

Okay, talk is cheap, let’s see how all these work out.

DB081 - T1 RC 02 Deathstar duel-proc

Red Chinese Turn 1 : The GMT pushed very aggressively into and in some case past the first line of buildings.  The Reds death star exchanged shots with the powerful GMT one and didn’t fare too well.  The GMT staged for the attack on the (middle) factory.   Yes, the Reds “sulked” and skulked as well into the factory and later advanced back out.

DB081 - T2 GMT02 CC'd-proc

GMT Turn 2 : GMT attacked across the street!  They quickly found the 37* gun on the fortified ground floor in the building to the left.  The broken attacker was taken prisoner and was ushered into the building quickly.  The Reds position in the factory and in the building to the right looked shaky.  Broken Reds quickly piled up.  There were two close combats.  The 2 GMT squads to the left was ambushed by the Reds and were both KIA’d.  The GMT squad to the right fared better, it killed the Reds squad and flanked the building.

DB081 - T2 RC01 UnHIP right Leader ran Deathstar dead-proc

Red Chinese Turn 2 : The GMT had pretty much captured the building on the right.  The Reds leader decided to make a run for it with the LMG and head for the canal!  A HIPpie on the right popped out and headed for the factory on the right, going after the broken GMT squad and absolutely intend to be a nuisance.  The factory being 2 points, Carl had to comeback and root the little Reds squad out.

I hope to survive past Turn 4 and receive the GMTs across the canal.

DB081 - T2 RC02 New Prisoner-proc

Red Chinese Turn 2 (contd) : The Reds took another GMT squad prisoner and dragged them into the (middle) factory.  The broken Reds squad ran after their leader to the right.  The GMT now had 5 points against the required 8 needed to win the game in Turn 4.

DB081 - T3 GMT01 Left DD rush Encircled FT blew out RightTop squad ran-proc

GMT Turn 3 : The GMT went back into the factory to the right to reclaim it.  A GMT Dare Death squad led the charge to the left!  May be the GMT was looking to cut off the middle factory from the left as well.

DB081 - T3 GMT02 DD snakeeyes CVP19 GMT7 need factory-procGMT Turn 3 (contd) : Prospects for the Reds weren’t looking up.  Their “death star” on the left was slowly getting cut off and surrounded.  The GMTs were all lined up outside the middle factory.  The canal was ready for a cross over.  The GMT got squads lined up against the left in case the Reds send reinforcements in from south of the canal.

DB081 - T3 RC01 CC Ambush CVP24 then CVP 26 Bldg 7 Req -1-proc

Reds Turn 3 : Turn 4 was coming up and doing the usual was not going to help me survive.  I need some GMT CVPs fast.  The GMT armoured trucks hadn’t been moving from the bottom left at all.  Trap or not, I had to go for it.  Each armoured truck gives me 5 CVPs.  The one with the armoured leader gives me another 3 CVPs for a total of 8.

So the Reds moved in concealed.  One of the Reds squad survived Defensive Fire from the GMT death star (broke one of the guns as well), passed the PAATC check, placed its demolition charge properly and ..

Blew up one of the armoured trucks with no survivors.

Too bad the armour leader was in the other truck!  Another Reds squad moved in, ambushed and killed a GMT squad in close combat.

All these gave the Reds 22 CVPs.  However, since the Reds had 2 GMT prisoners squads and prisoner CVP bonus counts at game end, the Reds stand to get 26 CVP if the game end right there.  (The GMT are only allowed 24 or less.)

This created a funny situation.  Since the Red Chinese reinforcement entered south of the canal, the GMT build points requirement in Turn 4 dropped from 8 to 7 which the GMT now had.  The GMT would need to rescue the prisoners before the end of Turn 4 to win the game.  Otherwise if the game “ends”, the Reds would realise 26 CVPs (+4 CVP bonus from the prisoners) instead of 22 and 2 CVPs more that what the GMT were allowed to lose.

DB081 - T4 GMT01 Sniper 9-2, CVP26 Bldg 7-proc

GMT Turn 4 : GMT squads started off a new turn prep firing away.  One of the shots invited a Reds hot sniper that hit the GMT death star.  A round of random selection nailed the GMT 9-2 leader in a stack of 4.

This gave the Reds the 3 CVPs need to reach the 25 CVPs to win the game (29 CVPs with the prisoners).  Great game! 


DB081 Lack of Discernment AAR – Attacking

This scenario took place on Dec 15th 1927, a full 12 years before World War Two.  It’s based on some of the earlier conflicts between the Red Chinese and the Nationalists (Guomintang, GMT or Kuomintang, KMT).  The conflict took place in Canton 廣東, not too far away from Hong Kong.  The Canton Red Chinese overestimated their strategic position, started a general uprising on Dec 12th and the Nationalist Chinese came for a brutal visit.

DB081 Starting position-proc

Carl Nogueira and I played this scenario twice.  I was the attacker – KMT Chinese and Carl the Red Chinese.  We then switched sides and played it again, you will read about the second one from a later AAR.

The victory conditions of this scenario is structured around the multi-hex buildings on the map.  The ones north of the canal are worth 2 points.  The ones south of the canal are worth 1 point except for the two building designated as factories.  The game ends on Turn 4 if the KMT Chinese get 8 points, Turn 5 for 9 points, Turn 6 for 10 points and Turn 7 for 12 points.  The KMT has to accomplish that while losing no more than 24 CVPs.

I planned to focus the main body of my troops to the right.  They are to capture the building on the right.  From there they can attack the factory immediately to the south of the canal, meeting up with a smaller force on the left flank.  Capturing the right building also allows for the possibility of forces wading across the canal for the higher value buildings on the north bank.  The small force on the far left is to protect the buildings from possible Red Chinese reinforcement  on Turn 3.  You see, the Red Chinese can choose to introduce their reinforcements from the north (top) side of the map, or the west (left) side of the map.   However if they come in from the south side of the canal, the VP requirements for the KMT drops by 1.

Anyway, that’s the plan .. until bullets start flying.

DB081 KMT1 DF-proc

KMT Turn 1 : The KMT rushed across the street.  A fearful death star appeared on the left flank in the single hex two storey building I never paid attention to before.  On the 2nd level, there was an MMG, a HMG and an 8-1.  On the ground level, there’s the 37mm gun sporting an ROF of 3.  These guys shot up a few of the squads on the left, rendered my HMG team useless for the duration of the scenario and made the rest of the folks very nervous.  The fortunate bit was that the elite Chinese squads were well placed to offer smoke grenades in support.

I was perhaps too careful with the armoured cars.  They are 5 CVPs and 7 CVPs (with a 9-1 armour leader) each, points that I hope won’t contribute to the Red Chinese 25 CVP goal.  Fearing a gun on the right side of the board, I planned to sneak around the side of the roadblock.  However when we ran into the death star, we froze.  In retrospect, the 37mm infantry gun has little more than 6% chance (HE only) of killing the KMT Type 22 armour truck (Chris Edwards’ Kill Calculator).  Granted, MGs can kill these vehicles but freezing in place is not the proper tactic either.

DB081 RC1 Sniper killed RC 8-0 GMT Ldr wound malf deathstar-proc

Red Chinese Turn 1 : Folks in the Red Chinese death star probably didn’t get their ancestors properly lined up.  First, a sniper killed the 8-1 .. and then both the MMG and the HMG malfunctioned on the same shot!  The concealed squads in the factory advanced out to the walls, which was brilliant.  I am not entirely sure why I never made use of the upper levels of the buildings I had to negate the walls.

DB081 KMT2 Sniper broke crew fire lanes-proc

KMT Chinese Turn 2 : KMT attacks!  The turn opened with squads advancing into the smoke that the élite squads laid down.  A 8-0 leader on the right went across the street and kicked the door in with the squad behind him ready to fire.  Other squads moved up and found the second gun at the rear of the building to the right of the map, as expected.  You can see the  laid and the Red Chinese squads putting down residual fire very efficiently.  The deathstar saw the HMG fixed but the sniper returned and broke the crew!

DB081 KMT2 End CVP 4-proc

End of KMT Chinese Turn 2 : This showed how ineffective the KMT attack was.  Losses was light fortunately, the Red Chinese accrued 4 CVP so far.

Red Chinese Turn 2 : On the right of the map, the KMT squads in front of their target building hope to  survived enemy fire and return a massive Defensive Fire back.  The KMT got a MMG team together with a 9-2 and kept the MGs in the death star suppressed. The KMT Chinese were getting ready to attack again.

DB081 KMT3 MPh-proc

KMT Chinese Turn 3 : KMT troops advanced forward on the right into the building.  LMG fire from across the canal came straight down the street.  On the left flank the KMT Chinese figured they should take advantage of the crippled death star and tried to rush the building, only to find the bottom floor fortified.  Worse – it’s fortified with a building full of self rallying crew!

DB081 KMT3 End-proc

End of KMT Chinese Turn 3 : We got into the building on the right. The rush on the left failed as the squad got shot up and bounced off the side of the fortified building.  The centre was pretty decimated.  The leaders were working hard to convince a few to get back into the fight.

DB081 RC3 End-proc

Red Chinese Turn 3 : The reinforcement came in from the north.  Things were not looking up for the KMT Chinese.   We only had a foothold on the right.  The troops on the left and in the middle were broken in huddled masses.  KMT didn’t seem to have enough people to make a third try.

DB081 KMT4 MPh All Shot up-proc

KMT Chinese Turn 4 : The KMT made an all out attack for the factory and the rightmost buildings.  Whilst they would get the right most building, the KMT Chinese got shot up everywhere else.

DB081 KMT4 End CVP18-proc

End of KMT Chinese Turn 4 : The KMT Chinese captured the gun on the right although they haven’t quite secured that building.  The force in the middle were almost entirely reduced into broken stacks.  Folks on the right who were there to guard against the Red Chinese reinforcement decided to move north to have a go at the death star.  I really like Carl’s demonstration of high level tactics.  Here we have a position where, if I attack, makes no contribution to the CVP.  However if I don’t, it will always interfere with my attack elsewhere.

DB081 RC4 End-proc

Red Chinese Turn 4 : The Red Chinese counter attacked!  Can you see the stack with the “DM” counter on top and a grey dotted line that extended to the left?  There’s an MMG in the stack and I should have laid a fire lane down that path to stop the Red Chinese from counter attacking.  However instead I was distracted by the first squad that rushed up.  Now I got 2 big stacks of broken troops threatened by marauding Red Chinese troops.  Since the Red Chinese already racked up 25 CVP, the scenario ended and Carl Nogueira won as the defender.

Notice the 2 fortified locations Carl revealed after the game.  He had the commissar situated in a fortified location in the middle of the factory.  He also had the other fortified hex immediately behind.  That last hex would be his “Alamo” before the Red Chinese bow out of the building.  Capturing a building like so was going to take a few turns more.

I would have the opportunity to improve my play by being the Red Chinese defenders against Carl’s KMT Chinese.

That will be in the next AAR!


Roger B. MacGowan & Wargames

906629_828688150475781_3266142249287560170_o

Growing up with Avalon Hill wargames, I have long noticed the same signature on the boxes of some of the most loved wargames : The Russian Campaign, The Longest Day, Squad Leader, Advanced Squad Leader ..etc.

That signature belongs to a prolific designer and game publisher, Roger B MacGowan.

Please see his design gallery.
Please see the list of his art designs.

AP90 Smashing The Hook (an AP9 “To The Bridge!” scenario)

I was chatting online about Gary Fortenberry’s new Advanced Squad Leader Action Pack “ASL Action Pack 9: To The Bridge!” when Sam Tyson offered to play.  The next thing I knew, I was experiencing a truly action packed scenario, well designed and well “interpreted” by Sam. This was February 1942 in Burma.  Patrols from the King’s Own Yorkshire Light Infantry discovered IJA roadblocks around Danyingon.  So elements from the King’s Own Yorkshire Light Infantry and the 1/7th Gurkha Rifles set out to evict the IJA from the area.

There were 2 roadblocks in predestinated positions on the map.  The British goes from the bottom of the map to the top.  They get an instant win when they clear both roadblocks or if there are no good order IJA troops around either roadblock after five and a half turns.  The British got a mix of armoured cars and (scary) Gurkha ladened carriers.  The IJA got to hide (always good) plus a Mountain Gun. 001 AP90 BT1 Start-proc

British Turn 1 : You can see where the IJA gun was hidden and where it was bore-sighted.  There was an MMG on the hill to the top left bore-sighted to a path through the jungle.  There was an IJA half squad hidden in the brush hoping that the British would pass him by and another IJA half squad near the first roadblock in the middle of the map.  There’s a scenario special rule that requires all hidden IJA to reveal themselves via Banzai attacks in Turn 4.  I figured that might be where the British would be by then.  The British were very aggressive in their first move given the short time frame.  My foxhole on the hill on the bottom of the map was immediately overran.  Nothing but a human speed bump!  The carrier hooked around the foxhole and made sure there was no escape for the IJA half squad therein. 003 AP90 BT2 AFPh Start-proc

British Turn 2 : The British methodically beat down the brush and found our first hidden IJA half squad.  A British armoured car headed straight for the defending IJA at the roadblock.  IJA’s LMG scored a hit and a lucky kill.  The IJA started backing off. 004 AP90 BT2 RtPh Vol Break-proc

British Turn 2 Rout Phase : The IJA started melting away before the British could engage them in close combat.  The IJA looked to delay and to collapse into the last roadblock gradually.  They formed a line right before the tree line where the hidden IJA half squad was. 005 AP90 JT3 DFPh Cleared Roadblock-proc

IJA Turn 3 : The end of the turn saw the IJA melting away again, collapsing towards the last roadblock.  Before the MMG team on the hill on the middle of the map did, they vaporized a British half squad coming down the jungle path.  The Brits then decided to use a carrier to create a trail break in the jungle nearby.

006 AP90 JT3 CCPh Jumped the Brits-proc IJA Turn 3 : The IJA MMG team from the middle of the map repositioned to around the last roadblock, MG trained onto the road.  A big stack of British troops successfully removed the first road block.  A British 9-1 and a Gurkha squad walked into the hidden IJA half squad in the last turn.  The half squad should have popped up in the earlier British Turn when this happened.  Hand to hand fighting nonetheless ensured immediately and they were all killed. 007 AP90 BT4 Gun appears carrier immo-proc

British Turn 4 : The Brits were out to chase down the routing IJA squads.  The first carrier sped down the road and the IJA gun roared from behind the second roadblock.  The carrier was hit and immobilized.  Meanwhile the hidden stack on the bottom of the map tried to get the British armoured car’s attention by slowly creeping towards the British backfield. 008 AP90 BT4 MG hit but bounced Int Gun kill carrier-proc

British Turn 4 still : The action heated up as the second carrier comes running down the path.  The MMG managed to score a hit but the bullets bounced off.  This carrier managed to hook around and cut off the IJA brokies’ rout path.  The third carrier went straight for the roadblock!  The gun crew intensive fired  and killed that one too.  The rest of the British troops moved in quickly.  This was Turn 4, the British had 2 more Movement Phases to go.

009 AP90 JT4 WP and formed a line-proc IJA  Turn 4 : The IJA mortar crew laid a white phosphorous (WP) round on the carrier but the Gurkhas were too tough for it.  The WP round did allow the IJA troops to slip by and escaped back to around the second roadblock.  The IJA gun killed the immobilised carrier, taking more of an interest in its Gurkha crew.   However, I should have left the gun pointing towards the right for the next British round. The British were consistently great at cutting rout paths and taking prisoners.  The IJA realised they need to stop the British from getting behind them if they were to survive – hence the line. 010 AP90 BT5 IJA Vol Break-proc

British Turn 5 : While their comrades held the line, the IJA on the left melted away so they could counter attack against the British troops at the roadblock.  The armoured car on the bottom of the map finally verified that we had a moving stack of dummies.  It was a miracle that the IJA kept this armoured car out of the battle for so long! 011 AP90 BT5 CC 2 Melees Big stack on Roadblock-proc

British Turn 5 still : The British were unlucky in that all four close combats started with IJA ambushes.  However the IJAs were killed around the gun and 2 of the fights resulted in melees.  Only on the right did we see a solitary but concealed leader slaughtered a British half squad and slipped deeper into the jungle. 012 AP90 JT5 Counter Attack!!-proc

IJA Turn 5 : The routed IJA again rallied and attacked towards the roadblock.  The British were assembling around the roadblock at this stage.  If they manage to clear the roadblock, they get an instant win but if not, they would need to makes sure there were no good order IJA troops around the area marked with a big red hexagon. 013 AP90 JT5 -9 Roadblock Clear mod-proc IJA Turn 5 – Game End : The close combat phase was a good one for the IJA, they reclaimed two of the hexes around the last road block.  However, the British were able clear the roadblock by rolling less than 10.  (You need to roll 2 or less on a pair of dice, but the Brits had enough people to get a -7 modifier.)

Mr. Sam Tyson won!!

FE27 The Bravest Thing I Ever Saw

This scenario from Fanatic Enterprises describes a situation in Bataan in January 6 1942.  The Americans fought a delaying action that saw the gunners from both sides exchange shells for shells.  Carl Nogueira played the defending American and I the attacking IJA in this after action report (AAR).  We actually exchanged sides and played this twice, with me getting my teeth kicked in both times.  This is already the less ugly version, rated PG-13.

The side that gained the most Victory Points (VP) wins.  You can gain Casualty Victory Points normally and you gain 1 VP for controlling each Level 2 hill hexes on your opponent’s side.  The Americans set up on the bottom of the map and the IJA on the top.  We get 5 and a half turns.

01 FE27 JT2 02 CC Kill-proc

IJA Turn 2 : You can see where the IJA guns were.  Line of sight (LOS) to the American hill tops were limited due to jungle terrain.  You can also see two hidden 2nd liners to slow down any sort of American counterattack.  The big stack in the middle of the top map were two IJA medium machine gun (MMGs), but their leader, a 9-1 who’s also the best leader in the IJA order of battle (OB) was killed by a sniper early in the game.  You can see the 3 lines of IJA advance on the American side.  The left most IJA rush would have been the most threatening but I failed to capitalise on the situation properly before they got wiped out.  The middle advance would be stuck for a while and in retrospect I should have strike out through the swamp towards the right to put the squeeze on the Americans on the hill on the right of the American positions.  On the right, the IJA caught and took an American 8-0 and a squad together with it in a flurry of hand-to-hand action.  At this point I expected the American guns to be towards the bottom of the map.

02 FE27 AT3 01 Start-proc

American Turn 3 : The IJA found the first American gun on the left by walking straight into it.  There was nothing left of the squad.  The attack on the left was also wiped out and the Americans started moving towards the right.  The attack in the middle was floundering as well.  The IJA on the right kept pushing towards the bottom of the map, fully expecting to find the second American gun there.

03 FE27 AT4 01 Start-proc

American Turn 4 : The American gun on the left malfunctioned!  The IJA forced their way through the bamboo to kill the gun crew before they had a chance to fix the infernal contraption.  You can see a blotch of red on the hilltop to the right where once again, the IJA found the other American gun the wrong way.  You can also see the pair of IJA MMGs moving in during the last turn as it didn’t look like the Americans were going to make a push to the north.

04 FE27 JT5 02 CC IJA dead US CR-proc

IJA Turn 5 : The IJA troops surrounded an American 8-0 and a 2nd liner in a 3 point stance.  The IJA were of course, feeling very pleased with themselves.  There was an IJA demolition charge laying on the ground in the middle.  That was the aftermath of an IJA half squad’s attempt to blow up the American MMG stack.  On the right, the IJA made another attempt up the hill and caught more Americans in close combat.  Unfortunately this IJA half squad could only take half of the American squad with it.  On the bottom right of the map you can see the Americans on a reverse slope defence configuration, looking to get the first shot in if any IJA pop over the crest line.  The probing stack of IJA troops however decided to move back up to their leader for a last push as time was running out.

05 FE27 AT5 01 Ring of Fire-proc

American Turn 5 : The “ring of fire” on the left broke the American squad but they failed to encircle the Americans properly.  Apparently you need to fire at the target sequentially for encirclement to happen (A7.7, note to self).

06 FE27 AT5 02 Ops-proc

American Turn 5 (still) : On the left, the broken American squad surrendered and the IJA picked the weakest (a 1-2-7) amongst the trio to be the guard.  That was the last mistake they would ever make.  The American 8-0 promptly jumped on the otherwise occupied IJA half squad in close combat …

07 FE27 AT5 02 Counter Capture-proc

American Turn 5 (aftermath) : The American 8-0 singlehandedly killed the IJA guards, rescued his men and found enough weapons to rearm half of his squad.  (Note to self : encircle properly & be mindful about who’s to play guards).

08 FE27 JT6 02 Banzai DC Hero-proc

Final IJA Turn : The IJA decided that they wouldn’t go down without a proper Banzai charge.  Therefore they targeted the gun crew who ventured out to retake a hill hex.  Just to be professional about it, they even short-strawed a poor chap to be a DC hero as well!  He was well perforated, his DC satchel went flying but he drew enough fire from his “friends” for them to jump on the American gun crew.

09 FE27 JT6 03 Wounded Leader-proc

Final IJA Turn (still) : An IJA leader in the middle rushed in and tried to grab the DC pack.  He got shot and was wounded as he picked it up and he never managed to place it.

10 FE27 JT6 04 CC again-proc

Final IJA Turn (almost done) : An MMG crew from the original “Ring of Fire” caught up with the American leader and squad on the left, knives drawn …

11 FE27 JT6 05 End-proc

Final : The banzai’ing IJA came victoriously out of the close combat on the right.  The folks on the left however would be locked in perpetual mêlée.  You would know I lost the game a long time ago if you can see the huge stack of IJA casualties.  Carl was nice enough to play this through to the bitter end!!

Lessons learned:

  • When playing against the Americans, the IJA needs to make good use of the Advance Phase.  Try to move into American Line Of Sight only in the Advance Phase, and if you can stay concealed, even better.  This way the IJA don’t have to take high American firepower with “First Fire Movement in Open Ground” (FFMO) and “First Fire Non Assault Move” (FFNAM) modifiers.  If the Americans fire in the following Prep Fire, they don’t get to move away and the IJA will have a chance to fire against their low morale (US Marines excepted).
  • Don’t give prisoners to someone who might not fare well in (close) combat.
  • Encirclement : remember to fire on the target sequentially.
  • Use 7 as a gauge, if you can get a result on a 7, it’s a good choice.  Alternatively, try to move in routes that stack so much DRMs on your opponent’s shot that he/she can’t get results on a 7.
  • Don’t spread your forces too thin.  There should be reserves behind an attack to exploit results.

Other thoughts?

A44 Blocking Action at Lipki AAR

I love PTO.  However, jungles do not present decent tank country.  Too much time spent in the PTO as a newbie can result in lopsided development that is short on armoured fighting vehicle (AFV) experience.

This scenario took place near Borisov (Russia), mid-1941 – the opening stages of Barbarossa.  Elements of the 1st Moscow Motor Rifle Division was sent to block the spearhead that was Guderian’s 18th Panzer Divison.

001 Turn 2 German Rally-proc

North is on the right of the map.  The Germans deployed on the top map (west) and the Russians came in from the bottom (east).  The Russians win when they exit more than 15 victory points (VPs) off the top edge of the map between the road on the top middle to the road on the top right. The other way to win was to kill enough Germans.  The KV2 was worth 7 VPs, the T-34 was also worth 7 points and each squad was worth 2 points.  As you already know, the Russians had a KV2,  a T34 M40 and a couple of BT7s.  The Germans had a couple of PzIIIGs, a halftrack sporting a 37mm gun with a high rate of fire (I forgot about the ATR that it also carried) and a couple of halftracks with the usual machine guns.  They were backed by a 28mm antitank gun and further reinforced by a pair of PzIVEs in Turn 4.

The above was the German Turn 2.  You can see the two Panzers on the left lying in wait and hoping to get a first shot at the Russians.  The antitank gun was towed to a clump of woods near the exit for a last-ditch defence.  The half track with the 37mm gun was on the right and they could hear the speedy BT7s and a convoy of trucks rumbling towards them.

002 Turn 3 Russian Move HT37L blew up BT-7 rof-proc


This was the Russian Turn 3.  The T34 came up the left and the PzIIIG fired, looking to scoot behind the woods quickly afterwards.

I rolled a 1,1 .. and  a 1.  Critical Hit!!

The T34 exploded into a burning wreck, and the German tankers sat stunned as bits of Russian tank rained down.  On the right, the 37mm gun pumped shot after shot into one of the BT7 and killed it.

001 Turn 3 German Idiot Move ATR-proc

This was the German Turn 3.  I am very inexperienced in tank warfare so you won’t see an end to idiotic moves in the near term.  This was one of them. I backed a PzIIIG up over the bridge on the left in the hope of being able to get away faster when the Russian tanks appear.  Not only did I presented my rear facing to the Russians, I forgot to button up.  The tank was immediately stunned by infantry fire and then killed by a Russian antitank rifle (ATR).  Things worked out better on the right as my 37mm gun shocked the other BT7.

005 Turn 4 German DPh Capers abound-proc

This was the German Turn 4.  To the left you can see another one of my moments.  The Germans were hoping to crash a halftrack through the woods on the left, get back on the road and circle around the back of the Russian trucks on the right.  However, they realised that trail breaking took a little time and by the time the half track emerged from the woods, it was looking down the barrel of a KV2!  So instead of breaking to the right of the map, they sped towards the left to escape.  The KV2 fired but the halftrack speed and its size saved it.  The surviving BT7 recovered from its shock and killed the gun-toting halftrack.  Unfortunately the reinforcing PzIVEs arrived and got it bracketed from two directions.

008 Turn 5 Russian DFPh Truck immo-proc

This was Russian turn 5.  Our escaping halftrack on the left had a Russian ATR squad on its tail.  The KV2 on the other hand laughed and used the trail-break created by the charitable halftrack to get to the “inside line” of the Germans.  The BT7 blew out its gun in a shootout with the PzIVe on its left (which also malf’d its gun) and was killed by the PzIVe on its right.  The right PzIVe proceeded to shoot up the Russian trucks one by one.

009 Turn 5 German MPh Berserk Charge Killed by Sniper-proc

During German turn 5, one of the German half squad had a berserk moment.  They got tired of the shooting and concluded that the proper thing to do was to charge the Russian medium machine gun.  So off they went.  They ran through Defensive First Fire, then Subsequent First Fire … jumping into the MMG nest, they survived Final Protective Fire!!  “.. and THIS is how it’s done!!” they yelled.  Meanwhile, Katya, the peasant girl sniper rolled her eyes, spat and muttered “Men” before shooting up the marauding German half squad and ended the lunacy.

011 Turn 6 Russian DF KV2 moved up German shot up trucks-proc

This was Russian Turn 6.  During the last German turn, the only Panzer with a functioning gun sped into its final position while its colleague proceeded to kill all the Russian trucks with its MGs on the right of the map.  However,  the KV2 killed the halftrack that tried to escape from in front of the wooden house.  The escaping halftrack to the left survived another shot from the Russian ATR and ran.  The KV2 crew watch incredulously as the crazy halftrack ran across its covered arc.  Then it realised that KV2 can’t intensive fire.  The halftrack disappeared behind some woods.  In this turn, the KV2 followed.  I can only imagine the commotion on the halftrack as the KV2 reappeared on its “rear view mirrors”.

012 Turn 7 Russian AFPh KV2 Malf-proc

This was Russian Turn 7.  The mighty KV2 lumbered towards the goal line.  The PzIVE and the antitank gun bounced shot after shot off its front armour.  The KV2 went to a “fork” position, threatening the German truck with its rear MGs while shooting back at the antitank gun with high explosives from its terrifying “bunker busting” 152mm gun.   The antitank gun crew worked as fast as they could, dreading the massive fireball that the next moment must bring.

Then for a moment, there was silence – the 152mm gun malfunctioned.

HS8 Bailey’s Demise AAR – fighting the Marines in the jungle

JT1a-proc

Learning jungle terrain in ASL153 Totsugeki is one thing.  Learning about Marine Raiders in the dense jungles of Guadalcanal is another matter entirely.

This is HS8 Bailey’s Demise, from MMP’s Operational Watchtower Historical Study.  The date is September 26 1943.  This scenario as with the whole History Study, is centered around Guadalcanal.  The river depicted on the map represents the Matanikau river.  The Marine Raiders were looking to cross the river to the west bank to complete an encirclement.  Unbeknownst to the Marines, the IJA had crossed the river and was on the east bank when the engagement occurred.

The Marine Raiders came in from the top left into a wholly hidden (HIP) deployment of IJA troops.  The Marine Raiders, like the IJA 1st-liners, were also stealthy.   They were to cross at least 6 CVP (3 squads or other combinations) to the west bank of the river in 7.5 turns.

All interior jungle hexes are dense jungle.  All jungle hexes next to non jungle hexes are light jungles.  The difference being while light jungle are similar to woods, dense jungle has a terrain effect modifier (TEM) of 2, does not permit fire groups and allows a stacking limit of only two.  This map’s marked with “crags” (4 point stone formations) merely to remind ourselves that the marked hexes were dense jungles.

The map above was my IJA setup, units unhidden for your perusal.  The mortar team down on the bottom left was largely ineffectual against American counter-battery fire.  I should have spread them out.

AT2b-proc


This was the Marine Turn 2.  The Marine made contact with the defenders and withstood IJA fire rather well.  Taking the risk to move in stacks (given the +2 cover of the dense jungle) their Advance Fire was devastating round after round for the IJA.  The IJA looked to block the Marines as much as possible, rout back (squads breaking “automatically” into half squads in the process) when in doubt and take advantage of their leader’s “Commissar-like” ability to rally them without (DM) penalty.

As I expected, the Marines avoided the bamboo patches on the right and came in from the top down.

Please keep in mind that IJA counters in faded yellow were hidden units that the Marine player couldn’t see.

JT2b - After MPh-proc

This is the IJA Turn 2.  Some of the frontline IJA routed back.  The IJA mortar team on the left was completely shot up.

AT3c After MPh-proc

American Turn 3.  The rallied IJA put up a fight in face of the advancing Raiders.

JT3c After MPh-proc

IJA Turn 3.  The IJA rallied and reconstructed a respectable line of defence.  In retrospect this approach didn’t work well.  The IJA, even concealed, could hardly withstand the withering Marine gunfire.  Perhaps a better strategy is to pair up the half squads.  One half squad would go aggressive, knocking off US concealment counters and drawing fire.  The other concealed half squad will close and either hope for an ambush in close combat.

JT3c HIP CC-proc

Talking about close combat, the Marines with their overwhelming firepower are deadly in normal CC (plus the IJA has no favorable modifiers).  Here you have a HIP squad that sprung out in the hopes of assassinating the Marine 8-0, they were promptly killed in CC.

I should have avoided normal CC with Marines to start with.  Hand to Hand (HtH) combat, when done with sufficiently lopsided odds (IJA half squad vs one or two Marines squads) offer a good trade for the IJA since the results of most are mutual annihilation!  Other than that, I should have ran!

AT4a Ambush by IJA-proc

Marine Turn 4 : here you can see how the Marines were already crowding the last passage way towards the river.  A Raider squad jumped a concealed IJA half squad and was ambushed and killed.  That was unfortunately the only time when close combat went happily for the IJA in this game!

JT4b Am Vol Rout-proc

IJA Turn 4 : The situation doesn’t look good for the IJA but they were still fighting hard.  Here you can see a Marine stack breaking voluntarily and routing away from possible IJA close combat.  Here’s a thought : had I not used the hidden IJA units in close combat, they could have sprung up now and kill the whole stack!

AT5a MG-proc

Marine Turn 5: the Marines started to cross the river!!  A repositioned IJA machine gun put the west end of the bridge squarely in its sights but it couldn’t stop the flow.

JT6a End-proc

IJA Turn 6: This was how it ended for the IJA, decimated and encircled.

The next time I play as the IJA against Marines, I will try :

  • Using my HIP units largely for cutting rout paths.
  • Pair up units (half squads), keep one concealed and use one for knocking off enemy concealment, with the hope of trading half squads for bigger stacks of Marines in hand-to-hand combat.
  • Rush IJA squads through openings created by successful hand-to-hand combat and go for encirclement
  • I thought of stacking IJA units to give them heavier fire power since I can’t create fire groups in dense jungles but I think that will just create bigger targets for blistering Marine firepower.
  • While retreating and blocking as the IJA might be a good idea at times, I should keep at least a 1 hex distance from the Marines.  That way the Marines would need to use advancing fire against my concealed units.
  • What happened to Banzai charges?

What’s your experience with fighting cardboard Marines in the jungles?  What are your thoughts?