A: Guards Counterattack After Action Report (AAR) Advanced Squad Leader scenario

Victory Conditions

We all know this one.  I want to do an AAR on it because this is the first time I played this scenario since my Squad Leader days.  The Russians win if they get 2 more buildings than they lose of their own initially-held stone buildings and/or have a 3:1 unbroken squad equivalent, in 5 turns.  If you find yourself yelling at your screen here, note that I played an early stage player.  

After Action Report

A: Guards Counterattack After Action Report (AAR) Advanced Squad Leader scenario

For those who are familiar with this scenario, you know most of the setup is ‘predesignated’.  Where possible, I readied myself for those terrorising Russian Human Waves, especially from the mass of 628’s on the left.  

A: Guards Counterattack After Action Report (AAR) Advanced Squad Leader scenario

The Russians decided to neutralise some of the German firepower first with their 18FP per hex firegroup(s) on the left.  A couple of the German units in building F5 broke, leaving parts of it unsecured.  In the middle our 9-2 LMG DeathStar (I7) managed to break the MMG crew!  The action on the right was also intense, with firefights erupting across the streets. There’s a Commissar lurking in the back of the building there. I realized I had a problem—I couldn’t see the back of that building!

A: Guards Counterattack After Action Report (AAR) Advanced Squad Leader scenario

Seeing that the MMG team is down, the Germans in K5 dashed across the street and made it into building J5!  (See top right)  With the LMGs in building K5 (center) no longer watching the street on the left, the 37th Guards seized the opportunity!  The 10-2 struck a heroic pose and nonchalantly waved the mass of 638’s forward in a human wave!  Casualties were considerable, with a couple of KIA’s.  Meanwhile, a lone squad scrambled towards the rightmost buildings (bottom right), trying to get some visibility at the back of building N4 where the Commissar rallied broken units.

A: Guards Counterattack After Action Report (AAR) Advanced Squad Leader scenario

The defenders of building F5 died heroically along with their 9-1.  Hopefully they took a chunk of the Guards with them!  The 8-1 moved his HMG team from the bottom right to the bottom left, anticipating the next Human Wave on building I7 (where the 9-2 and dual LMGs were stationed).  The LMG in building K5 got ready as well.  Unfortunately the Commissar & the 308th Rifles in N4 (right) also looked a little too eager.  Hmm… 

A: Guards Counterattack After Action Report (AAR) Advanced Squad Leader scenario

This next Human Wave struck from the right!  The Commissar led the 308th Rifles into building K5 (center)!!  The fire from building L6 up the street to hex L1 was awesome but one of the Russian units got into building K5 all the same.  The Guards on the left headed towards the 9-2 and the dual LMGs in I7 as well as the left side of building K5!  Casualties were high but this might just get the Russians two more buildings than what the Germans got.  

A: Guards Counterattack After Action Report (AAR) Advanced Squad Leader scenario

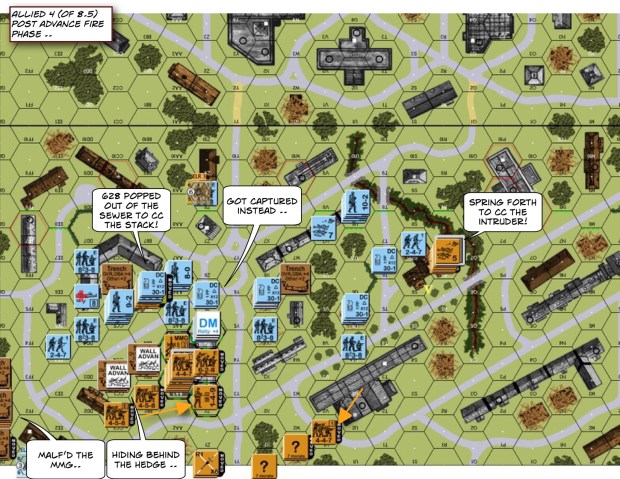
When the dust cleared the Russians captured two more buildings than they initially held vs one for the Germans (hence one more).  The Germans counterattacked by dashing the unit from the Russian MMG (building J2) into H2, then advanced to G3 to take the building.  The Germans also moved into building N4 (right) but the Russian brokies were right at the stairwell and could rout upstairs.  Instead of fighting it out in the recently ‘human-waved’ building K5, a HS went to capture M2 from the Russians instead.  

ITR15 Tractor Factory 137 After Action Report (AAR) Advanced Squad Leader scenario

ITR15 Tractor Factory 137 After Action Report (AAR) Advanced Squad Leader scenario

Victory Conditions

It was March 1943 and the SS Panzergrenadiers looked to take 4 factories in 7 MPh’s from the Soviets in Kharkov.  The Soviets had 20 squads & 4 leaders (1 commissar) with 4 AFVs and 3 Guns.  Kindling was NA and the EC’s Wet.  Factory had Roofs and the Russians had 3 Fortified Locations, plus MOL Capability.  The SS had 22 squads (3 of them 838 AE) with 5 leaders (1 10-2), 3 PzIIIL, 1 StuG and 2 Tigers.

After Action Report

ITR15 Tractor Factory 137 After Action Report (AAR) Advanced Squad Leader scenario

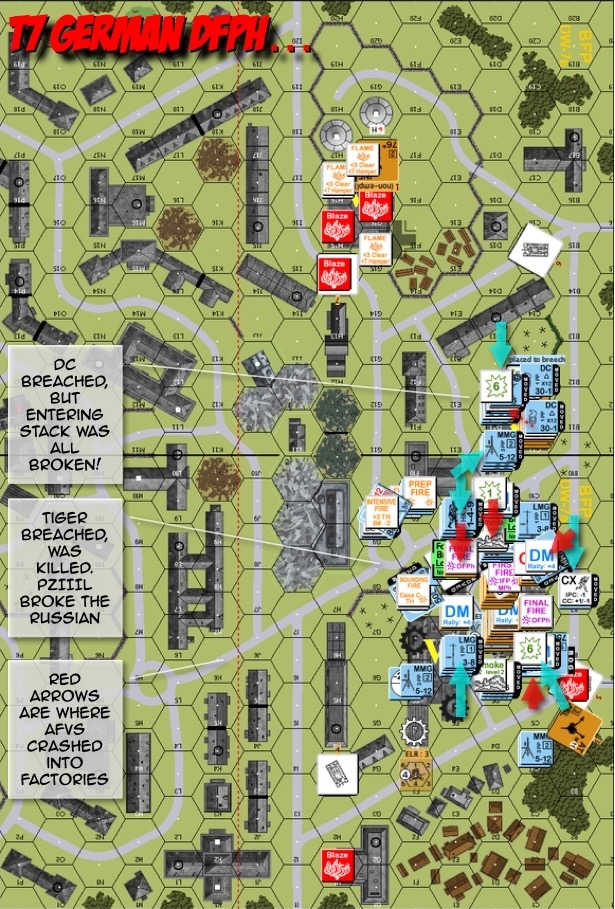
As the SS, we didn’t have much time, so we needed to hit all 4 factories concurrently.  At the advice of my opponent, I divided my troops to teams of 20FP firebase plus deployable 548s assault units, with 1 team of DC & FT guys and the 838 AE’s dispersed as the ‘smokers’.  The AFVs were to provide Smoke (didn’t get much), to provide street cover, to neutralise Soviet AFVs, to push to the back row and to finally help breach buildings (Fortifications).  The 2 Factories on the left would be hit head on.  The 2 Factories on the right would be hit head on AND flanked in case we couldn’t push through the front one quickly.

ITR15 Tractor Factory 137 After Action Report (AAR) Advanced Squad Leader scenario

On the right, we pushed across the first street quickly, with the enemy on the flank collapsing.  The Russians had an ATR in the Factory that threatened DI shots.  The Russians did MOL attacks whenever they could in a bit to start fires.  My Tiger with the 9-1 armor leader pushed down the middle a little slowly.  The opposing T-34 got a chance to get in motion.  The resistance in the middle was tougher as well for the infantry.  The Russians had their MGs and their best leaders lined up there, with another T-34 behind a wall.  We edged our Flamethrower team closer to it.  On the left, there were a few Russians on the 1/F designed to mess with my routing (and to waste my time).  Whilst the folks on the left pushed into the street, it’s not without difficulty ‘cause the two blocks on the left were mutually supportive.  My other Tiger slid to the left, the T-34 tried but couldn’t get away.  The one big thing we got going for the SS was their remarkable rallying ability, which was often a 6 while DM’d but in a building, before leadership’s applied.  Our ‘recon by walking around’ found the Russian 76* (not 76L in the following diagram) on the left flank.

ITR15 Tractor Factory 137 After Action Report (AAR) Advanced Squad Leader scenario

That T-34 in the middle that went into motion did a master move: it went to the right and threatened a PzIIIL!  We were relieved when it burned on a lucky CH.  The STuG decided to move over and offer it support nonetheless.  AFVs should never fight alone.  A wandering 548 ‘found’ their 45L that decided it was a worthwhile target.  Our mighty 10-2 led 20FP stack, bolstered by a Hero (20-3!!) moved into a target factory.  The stack moved right in front of a ROF3 45L Gun but it was a risk it had to take.  In the middle the FT folks got shot up and dropped their toys on the street.  The other 76* popped smoke which makes the 2 ‘stacked’ factories on the right harder to take but it did cover us from their MG death stars as well.  The T-34 on the left got chased off (helped by a Smoke round from their 76*) but our AFVs focused on helping our troops cross the street.  We got to the smoking 76*.  Still, there seemed to be too many Russians anywhere!

ITR15 Tractor Factory 137 After Action Report (AAR) Advanced Squad Leader scenario

The Russians never stopped trying for MOLs.  Thanks to the Wet EC, buildings didn’t all brew up in flames!  The nightmare scenario happened: our 20-3 Jedi stack broke under attack from the 45L. The Russians closed in from all directions and a T-34 crashed into the building behind it.  Our 2 AFVs couldn’t kill the offending T-34.  Our teams on the right looked tattered.  The news stunned all the SS troops on the board.   The troops in the middle looked to cross the street intact when T-70 whizzed by on their left.  It stopped behind a PzIIIL but forgot to Bounding Fire.  The targeted PzIIIL spun around.

ITR15 Tractor Factory 137 After Action Report (AAR) Advanced Squad Leader scenario

Our Jedi stack routed up to the Roof but it’s already dead.  The flankers took the opportunity to run down the right.  Unfortunately the Gun on the STuG malfunctioned while trying to shoot the moving (zigzagging?) T-34.  The Tiger in the middle decided to push up behind the T-34 (and over the dropped FT) and German troops went into CC with the same T-34.  Our folks in the middle crossed the street!  Our PzIIIL burned the T-70 on the left.  Our guys were done with that factory (yes, there’s a Fanatic 838 AE) and was ready to move out (it was Blazing up too).  The Tiger went after the T-34.

ITR15 Tractor Factory 137 After Action Report (AAR) Advanced Squad Leader scenario

The STuG fixed its gun in the nick of time and shot the T-34, which tried to move around it through a building.  The flankers on the right gathered to hit the ‘back’ factory building when the STuG then went straight to the back row and started taking shots from their remaining 76* Gun.  The Tiger in the middle started putting rounds into the ‘front’ factory and found a Fortified location.  A PzIIIL went to back it up while an 8-0 dived under it to retrieve the dropped FT.  The teams in the middle was making progress and the teams on the left was moving to the left flank to help them out.  The Tiger shot the T-34 and the AFVs moved to the back row on the left as well.

ITR15 Tractor Factory 137 After Action Report (AAR) Advanced Squad Leader scenario

The Russians were consolidating and getting concealed were possible.  The fact was, I couldn’t stop that nonsense until I break into the Factories!  The STuG’s dueling with the 76* Gun while the Tiger’s sending shots to it from the other side.  Shooting wasn’t going to get rid of the Russians.  We gotta breach.

ITR15 Tractor Factory 137 After Action Report (AAR) Advanced Squad Leader scenario

We didn’t forget about the front Factory on the right.  A PzIIIL moved over, popped Smoke to help people cross the street.  We tried getting into the back Factory but troops broke under the insane firepower from the 8-1 stack.  The Tiger in the middle kept shooting at the 76* Gun and would later CH that hex (bye bye Gun).  Other AFVs moved to the back to prevent concealments.  All the Russans on the left were now squeezed into a Factory by two teams of SS.

ITR15 Tractor Factory 137 After Action Report (AAR) Advanced Squad Leader scenario

AFV’s crashed into Factories from all directions (red arrows)!  A Tiger was killed and 2 PzIIIL were immobilised, but we should have done this earlier.  We took Factory number 2 (the ‘front’ Factory).  We breached the Fortified location on the left but the Defensive Fire broke all of the assaulters at the breach.  That location would potentially cost us the game.

ITR15 Tractor Factory 137 After Action Report (AAR) Advanced Squad Leader scenario

And it did.  Assault Fire from the unbroken SS stack in the left Factory failed to break the Russians in the Fortified location.  There’s no way we could take all 4 factories.  The SS lost.

ITR13 To the Last Bullet After Action Report (AAR) Advanced Squad Leader scenario

ITR13 To the Last Bullet After Action Report (AAR) Advanced Squad Leader scenario

Victory Conditions

This is the summer of 1942 and the Germans are on the march! They’re looking to clear the NKVD headquarters at Rostov.  They’ll win in 8 turns, if they control both buildings K8 and L12.  You can see the two buildings marked with big yellow ‘V’s on the map.

The Russians have eleven 8 morale squads, mostly 628’s, so they’re ready for the fight! These are supported by a 10-0 commissar and a 9-1 plus an 8-0. They come with four Fortified Locations, twenty Mine Factors, an ATR, a MMG and a Flamethrower. The Germans have sixteen squads, four of them 548 with 3 smoke. They have 5 leaders with a total of -4 modifiers amongst them, four MMGs and 4 tanks. I knew these buildings would take forever to clear, but I was excited to see how quickly my squads could work together to overcome the challenge.

After Action Report

ITR15 TO the Last Bullet After Action Report (AAR) Advanced Squad Leader scenario

The Germans were situated directly across the street. We spotted a rout trap protecting the top (west) building and so we decided to focus our forces on the bottom (east) building. We wanted to get behind these two buildings as well because if the Russians get to rotate concealed units out, we would never win this battle. For the time being, we would ignore but isolate the three Russian stacks in that building on the top of the Russian deployment. We had four MMGs distributed between the 9-1 and the 9-2 stacks as deathstars to support the assault troops moving across the street. The 548’s would provide smoke (& close up assault fire) and the 467’s would deploy where possible. We would have to note the hexes the Russians step into if we want to avoid the mines. They would undoubtedly withdraw into the top victory building (west), so we’ll have to be quick!

ITR15 TO the Last Bullet After Action Report (AAR) Advanced Squad Leader scenario

In a stunning turn of events, the Russian flank guard melted away in an unexpected blaze of glory (a break and then Fate). The Deathstars tried to stop the Russians from moving up to the middle and the top building. We were moving troops to the left (south) side of the buildings, and it was going great! The four tanks arrived on the scene, ready to provide smoke and armour cover to those crossing the streets. We made it through the first of the Russian fortified positions! There were three more to go!

ITR15 TO the Last Bullet After Action Report (AAR) Advanced Squad Leader scenario

The Russian 10-0 commissar kept putting brokies back in circulation, which was a great move! We had to move the AFVs to put a stop to the unacceptable situation. One of the AFVs moved too close and got destroyed (fine, I wasn’t paying attention), though it became a nice crossing point. The Germans blew through the second Fortified location, yeah! The deathstars started moving to support the attack on the top (west) building, although I have to admit, I wasn’t covering them from Russian sniper well.  At this point in the game, both the Russian ATR and the flamethrower malfunctioned, which was a real shame.

ITR15 TO the Last Bullet After Action Report (AAR) Advanced Squad Leader scenario

We had no choice but to stack ourselves up to the often 12+3 or more firepower from Russian 628’s.  We had to keep up the pressure!!  The 9-2 broke trying to organise his men at the new deathstar position.  An 8-1 dived through his own lines and tried to deliver a DC to the Russians, he got killed for his efforts.  I had to move a wounded 7-0 to that center building to keep the attack going.  There’s a Russian 9-1 nursing a broken MMG on the corner of the last VC building.  We had to move the AFVs in to mess with that rout as well.  

ITR15 TO the Last Bullet After Action Report (AAR) Advanced Squad Leader scenario

We got the Russian hemmed into a corner of the top VC building! The two Russian leaders are in the hex with the last Fortified Location, and they’ve got all the brokies! The tank I dispatched to keep the brokies away from the Russian 9-1 was killed by a LMG from the 8-0 stack we tried to isolate in the building at the top of the Russian layout. But that just made the rest of us more determined to get the job done! In a bold move, they then tried to dash across the street to join the fight! Unfortunately, they got pinned in the street, and I sent a tank through and overran the stack! My 9-2 was shot by the Russian sniper, but that allowed his machinegunners run across the street to help! It was after the German AFPh that the Russians finally gave in in disgust.

I think the one thing this scenario taught me is to target one bit of the puzzle at a time and focus all your firepower, assault troops and AFVs on it.  It’s basic tactics but it’s one that I failed to get my head around in execution till now!  On the otherhand, this seems to be a scenario that’s tilted to the German side.  Perhaps those of you who played this will share your thoughts?

BoF4 About His Shadowy Sides – Advanced Squad Leader AAR

BoF4 About His Shadowy Sides – Advanced Squad Leader AAR

Scenario Background

The date was 24 June 1941, the place was the west of Dubysa (a stream), Lithuania.  Russian units debuted their new KV-2 the day before and shocked the Germans.  Another attack hit Panzer-Abteilung 65 by surprise and neighbouring units were called in to prevent a penetration.

Victory Conditions & Tactical Considerations

The Russians win at game end by controlling 9 or more building hexes and/or by eliminating 3 or more AFVs than the Germans eliminated.  The first part of the Victory Conditions means I have to take 9 building hexes and hold them til game end.  The second part means if I lose 1 KV-2, I have to kill all the German AFVs.  The Russian forces enter from the right on Turn 1. The Germans have some units onboard but they have 8 squads with 2 minus 1 leaders entering from the top on Turn 2, 4 PzIVDs on Turn 3 from the left.  There are 13 building hexes below the water bodies on Board 17 (lower board).  These I would have to take and hold against the German counter attack.

KV-2The Russians have 8 Movement Phases.  They will have to do 5 hexes per phase for 4 phases to put them in the vicinity of the 2 hex Wooden building on the left half of Board 17.  That leaves them 4 turns to fight.  The KV-2, on the hand, is a real monster.  It is big enough to give a -2 to any TH for size.  It spots an armor factor of 8 all around, 11 if you hit that turret from the front.  Its 152mm gun dishes 30 IFT / TK21 (AP9 & no IF).  On the otherhand, it can only turn it’s turret by paying NT penalties (we played it wrong: we played it as if it’s an NT), goes 9 MP per turn and that’s only if you pass the Mechanical Reliability DR.  The PzIVD offers fantastic mobility [amended, see footnote 1].  It packs a good set of MGs (totalling 8 IFT) but it’s 75* (short barrel) with a TK of only 10 (AP7).  It’s hard to kill a KV-2 with anything less than a swarm but all you need is to kill one and scatter (the remaining Russian tank will have to kill all the PzIVDs to win via that route).  The Germans can also immobilise one first (net +3 and a hull hit), hopefully in some awkward position/location.  Their smoke dischargers (s9) can help the German reinforcements cross all that open ground from the top to the middle of the map!

My KV-2’s have to cover each other’s blind spots, It’s best to stick to congested areas where it’s harder for the nimble PzIVD to get around.  We also need to keep them away from Deliberate Immobilisation shots.  I am tempted to have them keep the PzIVDs from helping the German reinforcements but that will open them up to being swamped and killed.  I decided to have them operate strictly in the village (bottom map, ie Board 17).

Advanced Squad Leader AAR

BoF4 About His Shadowy Sides After Action Report (AAR) Advanced Squad Leader scenario

I had about 4 turns to get in position, so all Russian units rushed in from the right.  We got lucky when we knocked out the Level 1 MMG perched up on that two hex Wooden building in the middle of board #17.  Up in the woods in the middle of the map, we situated our range weapons – our MMG and our MTR.  Their job was to stop/ delay the German reinforcements.  A couple of other squads were there to pick up the 2 buildings nearby.  The KV-2’s quickly reached the stone wall from which we wanted to fight from (good defence against Deliberate Immobilisation).

BoF4 About His Shadowy Sides After Action Report (AAR) Advanced Squad Leader scenario

The Russians made great progress by the start of Turn 5.  We were closing in on the 2 hex wooden building on the left of Board 17.  We picked up 7 building hexes at this stage.  However the team on our Northern flank’s getting crushed by the 3 PzIVD’s (CH’s in Advancing Fire helped) and the German regulars.  They were cowering in a big broken heap near the pond.  We moved the KV-2 up to the left to help our flank out and to keep the German tanks away from our last building objective.  A 152mm HE shot sent some of the Germans flying back for a bit but that won’t last.  We need to get (and hold) 9 buildings before the German reinforcements come through to the village (Board 17)!

BoF4 About His Shadowy Sides After Action Report (AAR) Advanced Squad Leader scenario

The Germans got through!  Worse, they came in from behind us with 2 PzIVDs and recaptured one of the buildings.  Our northern flank recovered somewhat but so did the Germans in that 9-1 stack.  We could see them getting ready for another go.  Our KV-2’s decided to relocate but one of them promptly broke down!  Fortunately the crew decided to stayed with the biggest chunk of metal on the field.  The other KV-2 had no choice but to break formation and go right up to the stone wall in full view of the pair of PzIVD’s (right of map).  That would give them something to think about.  Both the main assaulting team and the flank protection team were told that no help was coming.  Our captured buildings were defended by Disrupted units but that would have to do!

BoF4 About His Shadowy Sides After Action Report (AAR) Advanced Squad Leader scenario

The 9-1 Germans indeed had another go at the second building in the Woods (middle of the map).  Most broke through the Russian fire but one unit survive to recapture another of our buildings!  The Russians were now down to 8.  The PzIVD on the left tried its luck but was the first to brew up by the immobilised KV-2.  Both PzIVDs on the right tried motion & smoke but had no luck with the dice.  One of them did fled but the one remaining was hit and burned as well!  If the Russian hit another PzIVD we might win the game.  The German infantry was coming in from the rear and I couldn’t spare any of the men to keep them away!

BoF4 About His Shadowy Sides After Action Report (AAR) Advanced Squad Leader scenario

To my surprise the “escaped” PzIVD didn’t go far.  It kept after the Russian flank.  The KV-2 decided to hop the stone wall and go after it.  To be honest, I was wary of having this last KV-2 immobilise as well but the VC was on the line!  Meanwhile the main assault team made for the “Alamo” on the bottom map.  We had 3 squads against 1 German squad and a wounded 10-2 (how hard can that be?).  Well, it was hard.  The Germans broke 2/3 of the assaulting teams.  The good news was that the guys on the North flank crawled back up, encircled and recaptured one of the buildings!  We got 9 and would had to keep it that way for the remaining turn.

BoF4 About His Shadowy Sides After Action Report (AAR) Advanced Squad Leader scenario

I expected a mad dash from the Germans (from the left) for some of the center buildings.  I had a squad of conscript and a rear facing MG in the KV-2 to counter that.  That didn’t materialise.  One of the PzIVD came around the left and took a shot at my immobilised KV-2.  We both forgot that the KV-2 turret could in fact turn, albeit with a NT penalty.  The Northern flank held onto their recaptured building (we got 9), even though the 7-0 who had the MMG to himself jammed it in a live demonstration of what not to do with a Maxim!  The PzIVD on the left gunned its engines in a bid to pull off another escape but was hit and killed.  The Germans conceded.
BoF4 About His Shadowy Sides After Action Report (AAR) Advanced Squad Leader scenario

How’s this scenario interesting?

KV-2Both sides had a chance to attack and to defend.  There’s a lot of force allocation decisions to be made especially for the Russian player.  The Germans couldn’t afford to be distracted by buildings on the fringes, they had to make it to the village on time in order to disrupt the Russian attack.  The KV-2’s were a real challenge.  Nothing short of a nice “dance of death” would do (with the survivors running off to the far corners of the map).  Then if that’s the case, they wouldn’t be helping their reinforcements cross that vast Open Ground on the top half of the map.  Typical of the best scenarios, there are a good number of what-if’s and tradeoffs to be made.  I thought I was on track for an easy win but my opponent obviously proved me wrong.

[Footnote 1] I previously said the PzIVD is a “small” target.  It’s not.  Thanks to Michael Rodgers for pointing it out.  You can read Michael’s blog on https://lowammo.ca/

FrF5 The Valley of Death After Action Report (AAR) Advanced Squad Leader scenario

FrF5 The Valley of Death After Action Report (AAR) Advanced Squad Leader scenario 

Scenario Background

The Soviets launched Little Saturn on Dec 16 1942, looked to destroy the Italian 8th Army and to cut off relieving forces to Stalingrad.  This scenario set in the Arbuzovka valley on December 23 1942 depicts Axis efforts to break out of the encirclement.  The Germans and the Italians did break the encirclement historically.  With 10,000 Axis dead, 5,000 wounded/ frostbitten and 10,000-15,000 taken prisoners, Italian soldiers called it the “Valley of Death”.  


Victory Conditions and Tactical Considerations

Elements of the Italian Blackshirt Brigade, Pasubio Division set up on the south (left of map) with 16 squads, 3 leaders, 1 HMG 1 MMG and 3 LMG plus 2 (little) mortars.  They were supported by 2 StuGIIIG’s.  The Axis suffered Ammunition Shortage but that didn’t factor much into our game.  The Russian 35th Guards Rifle Division set up to the north (right of map) with 5 458’s 3 447, 2 leaders, 1 LMG 1 mortar and 2 ATRs.  I took the balance in this game and so 3 527, a leader, a radio (70mm OBA) and a T-34 M41 showed up on Turn 2.  Both sides were to setup on non Hill hexes, so we both had to slog it up the Hills against Ground Snow.  

The Italians had 5.5 turns to get more unbroken (didn’t have to be in good order – could be in Melee/Berserk) non-crew infantry CVP north (right) of map than the Russians, provided that the Russians hadn’t destroy both StuGs.  I marked the “victory” line beyond which the Italians had to move on the first AAR map below with a blue dotted line.

The Italians outnumber us 2:1, plus they had more long range toys and 2 StuGs.  Our Russians had better quality troops but that’s a lot of map to cover, good thing the Hills were quite barren.  The Russians would have to rely on their higher morale of their infantry and the higher mobility of their T34 m41.  That T34 wouldn’t win any long range shootouts against StuGs.  We would try to fend off an amoeba attack and to not get caught in Close Combat.  


After Action Report

The StuG’s split off and went to both hills, threatening a pincer action, supported by a platoon each.  The platoon to the east (bottom) was of particular interest since it carried an HMG & an MMG.  I really couldn’t split off my troops since they were thin as it was.  I diverted 2 squads, a leader and an ATR to the west (top) and my T-34 to the left (bottom).  The rest of the Russians on the valley floor dutifully withdrew as their flanks were threatened.  Heck, the Italians on the hills were already shooting at my skulking Russians!  My T-34 got a lucky shot at the “heavy weapons” team.  Italians aren’t easy to rally.  I expect that to put them out of action for a little while.  (The blue dotted line is the goal line.)

Advanced Squad Leader scenario FrF5 The Valley of Death After Action Report (AAR)

I parked my T-34 on the highest point, went Hull Down and congratulated myself for how smart I was.  That didn’t last because a StuG went into a position to engage from the west Hills (top) while another StuG went to my left.  My TH was 6 (+1 BU +1 small) to the west Hill StuG but his TH was 8 coming back, and my HD wasn’t going to hold because of the StuG to my left.  Urgh!  I always thought “lone tanks die” and I was on track to prove this out again with my T34.  Hopefully the Russian squads rushing up the east Hill would save those treads! 

Good thing an ATR shot broke the platoon on the west Hill (perhaps we could meet the StuG alone then) and the heavy weapons guys on the east Hill went for R&R.  The Russians in the valley were slowing the Italians down some but they were moving forward still.  Our first Spotting Round went wildly off which didn’t help things.  I needed a nice Harassing Fire to shut that party down.  

Advanced Squad Leader scenario FrF5 The Valley of Death After Action Report (AAR)

The ATR team on the west (top) Hill went straight for the StuG, if it wanted to deal with us it would have to change VCA.  An ATR hit would immo on a 5, and if they pass their PAATC, immo the STuG on a 7!  But all that talk didn’t distract the west Hill StuG from our T-34.  

It’s time.  I knew my T34 couldn’t fire while being CE but we threw open the hatch and tried for a vehicular smoke grenade anyway.  Nada.  Well, there goes nothing.  We gunned the engines and sure enough the first shot whizzed by!  We pushed forward off the hill and the StuG intensive fired!  The shot came real close but that missed as well.  We couldn’t believe it!  Everyone in the tank screamed “GO GO GO GO!!”.  We thought about rounding to the back of the east (bottom) Hill StuG, DM’ing the Italian heavy weapons team and going HD behind the stone wall.  Unfortunately we wouldn’t get a first shot off anyway being CE and that StuG would have a chance to spin around and we would need a 5 to kill (they needed a 6 and they had a spare AFV).  We decided to make for the area behind Italian lines.  If the StuGs wanted to come for us they would have to go the “wrong” direction and abandon their infantry.  We stayed in motion behind some buildings, hidden from the west Hill StuG.  

Well, our ATR shot went wide, even when our guys were practically bracing the ATR against the side of the StuG!  “We can still go in and kill the thing!” someone yelled.  The 7-0 thought about it for a second and remembered how his momma always told him to not be a hero.  

Next turn came around and as you expect, the StuG started up. POW!!  The ATR team fired again and watched the round arc’d gracefully off to the distance.  The StuG overran the Russian team.  They survived somehow and rolled around for their CC Reaction Fire.  This one’s tough ‘cause the StuG’s moving but they managed to immo the StuG with its gun pointing in a not so useful direction.  

The radio guy got Harassing Fire down properly in the valley as well, catching the Italians in the open.  The Italians conceded.  

Advanced Squad Leader scenario FrF5 The Valley of Death After Action Report (AAR)

How’s this Scenario Interesting?

Classic quality versus quantity?  The pair of StuG’s could be tough to deal with.  I thought I’d just run that T34 around (and not stopping) and lean on my superior mobility, cut rout paths and stuff.  I wouldn’t win shooting matches with either of them.  Putting Italians on the hills made it challenging for the Russians as they didn’t have the bodies to spare.  StuGs were there to lay smoke I think, without which the Italians couldn’t move safely. The Italians also shouldn’t mass up because of the OBA and so spreading them out might well be the way to go.  Some Italians might break but the Russians couldn’t shoot them all.   The StuG should do what assault guns were meant to do: shoot smoke rounds from the back and keep the T34 from getting cute.  They shoot way better at a distance anyway.  I took the balance because it’s largely an Italian win on ROAR but I can see how tough it was for my opponent.  

References

Advanced Squad Leader scenario FrF3 The Swedish Voluntary Corps After Action Report (AAR)

Advanced Squad Leader scenario FrF3 The Swedish Voluntary Corps After Action Report (AAR)

Scenario Background

It’s March 2 1940, Märkäjärvi, Finland.  Russians discovered a Swedish base camp and decided to move in to shut them down.  It’s minus 47C (-52.6F)!!

Victory Conditions & Tactical Challenges

The situation’s not pretty from the start, the Swede OB was cool but not Finnish-self-rallying cool.  The Russians came in two directions with 24 (6 on ski’s) squads and 2 leaders.  The Swedes had 9 squads and 3 leaders and all of them on ski’s.  Extreme Winter, Winter Camoflage and Deep Snow’s in effect (did I mention it’s cold?).  The Russians have to force all Good Order Swedes out of a 7 hex magic circle drawn in the Woods within 5.5 turns.  

After Action Report

Advanced Squad Leader scenario FrF3 The Swedish Voluntary Corps (AAR)

By Turn 2, the Swedes were already suffering heavy losses (KIA’d a 8-0 too) plus morale’s breaking all over, level 8 or not.  They had the same range as the Russians, which didn’t allow them to take good advantage of the Open Ground that he Russians had to cross.  Russians were taking on an orderly pattern of moving and doing big firegroups.  What we were most wary of were Human Waves that would propel the Russian quickly over that Open Ground (snow).  We tried to keep LMG’s in firelane positions and put Half Squads out to catch Human Wav’ing Russians forward.  However at the rate at which we took casualties, I would be amazed if we could hang on (as the Swedes) to the magic circle for 5.5 turns!  

IMG 4277

Somehow we kept the Russian hordes in the open for a little while longer.  We were still careful about  keeping HS’s between our main forces and the Russians to fend off potential Human Waves but none materialised.  Timing is everything, if we duck into the Woods too early it would give the Russians free passage across the snow.  

IMG 4301

We fought hard to not let the Russians flank us.  Unfortunately two berserkers popped up and punched holes in our lines.  At the end of the turn we would see one melee and most Swedes melting into the Woods.  We ran out of Open Ground already!  Okay, 2 more Russian moves to go.  

Advanced Squad Leader scenario FrF3 The Swedish Voluntary Corps After Action Report (AAR)

We deployed to cover more ground and some of our troops rallied.  In our last MPh, a HS drew fire by placing a Demo Charge on a 2 x 447 stack.  It got shot to bits, a Hero ran in, picked up the DC and tried to place it again, he too got blown away by Subsequent Fire, The good news was that the Residual wasn’t placed in our “escape” hex.  A leader picked up the DC, backed up through the escape rout and casually chucked it at the 2 x 447 in Advance Fire Phase.  That package of love didn’t do anything to anyone.  Well, we did try!  On the otherhand a Hero on the right sneaked up to a Russian brokie.  He ambushed the brokie, killed it and positioned himself to interdict the incoming Russian MMG team.  The rest of the Swedes formed up into a hedgehog inside the magic circle.  The Russians conceded.  

How is this Scenario Interesting?

This is classic quantity vs quality.  I count myself lucky to not have seen a Russian Human Wave over the snow.  That would have likely given the Russians a lot more time to work the Swedes over in the Woods.  I mean, these guys had more squads than I had bullets!  Close Combat in the Woods with 9 squads vs 24 is not a welcomed prospect either.  As I mentioned earlier, timing is everything with this scenario.  The Swedes had to hold their ground until towards the end even though Russian firegroups (and Berserkers) were breaking the Swedish lines all over.  Then again, the ROAR records on this scenario is 11:4 in favor of the Swedes, perhaps I am being a bit of a drama queen here.  

Advanced Squad Leader War Stories

Advanced Squad Leader War Stories

We were chatting with Witchbottles on ASL Discord today and he brought up a few outstanding war stories.  

Story#1: Overrunning with a Mk VIB

MkvibPziiid

I overran with a Mk VI B tank on a Crew Exposed Pz III crew that missed their initial shot, missed their ROF (rate of fire) shot and broke his MA on an Intensive Fire shot as the Mk VI B rolled over a wall and onto the road to OVR the exposed crew, then out the back. Stunned them too!!!

Story #2: A Tank Busting Buda

PzivhRubvrL70RuDC

My best was in a game of FB14 At the Narrow Passage, when a Buda Volunteer Regiment 7-0 with a DC waltzed out into the street behind a stopped Mk IV, it turned its VCA and fired MGs, NMC, 2.3 DR , pass, it fired its MA, Hit, 1 MC, 2,2 DR, Pass, fired its IF MA, hits, NMC, 2,1, DR, pass, then Mr Buda placed the DC on the tank, and placement DR in the AFPh was optimal and WHOOM!! on a 1,2 DR, up goes said Panzer in flames, while Mr Buda advanced back into the building and said nonchalantly…. ” THAT, gentlemen, is how you blow up a tank….”

Story #3: Stalin’s Nephew

StgiiigRuL81HeroicRu527SRu527SGeL92GeMMGGe467S

The other good one was in a Festung Budapest CG III. A Russian 8-0 took a 24 flat shot from a concealed FT, rolled 1,1 DR and battle hardened into a 8-1. He then advanced into CC in the next turn with a BU StuG. Threw a 1,1 DR and bye bye StuG. A HMG took a shot at him in his next turn, he turned Heroic on another 1.1 DR from a 2MC.

Later on as the Hungarian defenses were falling, Stalin’s nephew led a pair of 5-2-7s in as an assault team on the last 9-2 led MG nest…..

What are some of your war stories?  Let us hear them in the Comments!

Advanced Squad Leader scenario 3 The Czerniakow Bridgehead (AAR)

It’s September 22nd 1944, Warsaw.  The 1st Polish Army, fighting under Russian command and the Polish Home Army (the famous “Kampinos Battle Group“) defended the Czerniakow Bridgehead withdrawal against Kaminiski’s White Russians, fighting under German colors across the Vistula.

The “Germans” need to take more CVPs than the “Russians” and have enough on Board 8 to exert 20 unmodified FP at the end of 10 turns.

Thoughts

  • This is a good German management team, 7 leaders totaling -5 Leader mods.
  • The Poles have numerical superiority : 27 squads vs German’s 15 (balanced off by half the team having bad ELR). We have a force that will happily swap bodies in CC.
  • The 1st Polish Army need to recover quickly post “bombardment” and re-situate to interdict where the Germans decide to cross in force.
  • The Poles don’t have the firepower to engage the Germans inside buildings and have to seek shooting opportunities in Open Ground.

ASL AAR After Action Report

The Poles had been able to delay the Germans at the crossing enough to for the Kampinos battlegroup to resituate.  Once the Germans bring their machine guns into the buildings acrossing the river it will be much tougher for the Poles with their lower firepower and shorter range.  I would have to figure out how to take maximum advantage of our stealthiness, MOLs and sewer movement (ie, fight up close).

Advanced Squad Leader scenario 3 The Czerniakow Bridgehead

The Germans made an approach to the bridge on the left as well.  As a result I need to retain forces to the left of the board.  I have a squad, an LMG plus a -1 leader HIP’d at the G/F of the building where you see Defensive Fire going to the DM’d German stack (red dotted line).  Unfortunately they will never get to leash hell on the bulk of the German forces since we decided to end the game here.

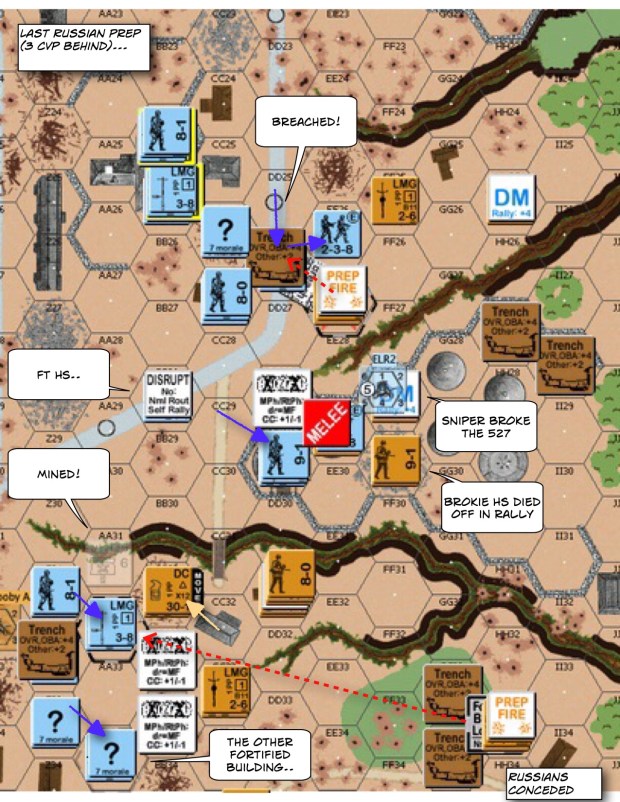
4 The Commissar’s House

November 9 1942, Germans at the Barricady noticed a nice red house.   They pulled up some fresh pioneers and told them to go mess with it.

What follows is one of most beautifully crafted, and an oft played ASL scenario (150:147 G:R).

(Typo Russian Turn 3)

img_3900

DB133 A Deadly Landscape

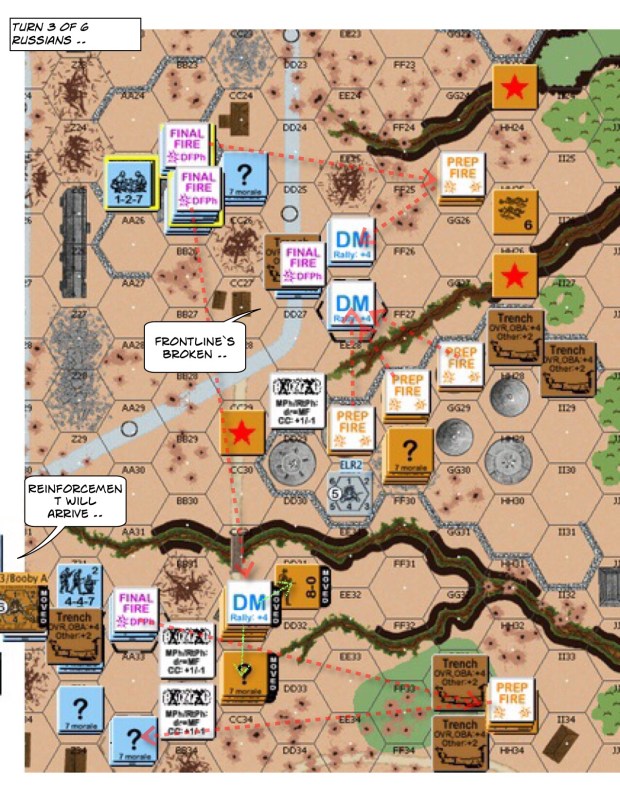
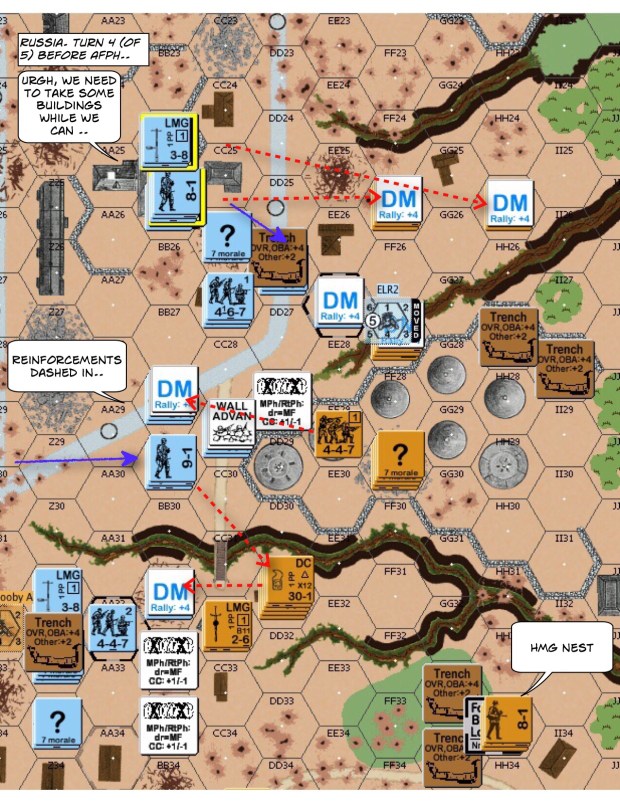
This scenario is played on part of the Red Barricades map.  SAN starts at 4 for the Germans and 5 for the Russians and increases to 5 & 7 respectively on Turn 2 and 6 & 8 on Turn 4.  The Russians are given the chance to open the attack but German reinforcements will come in on Turn 3 (of 5).

They largely compete for the buildings, trenches, rubble, bridge & storage .. but every sniper kill counts as well.

img_3146