J116 Brigade Hill AAR, a PTO classic!


J116 - Setup-proc
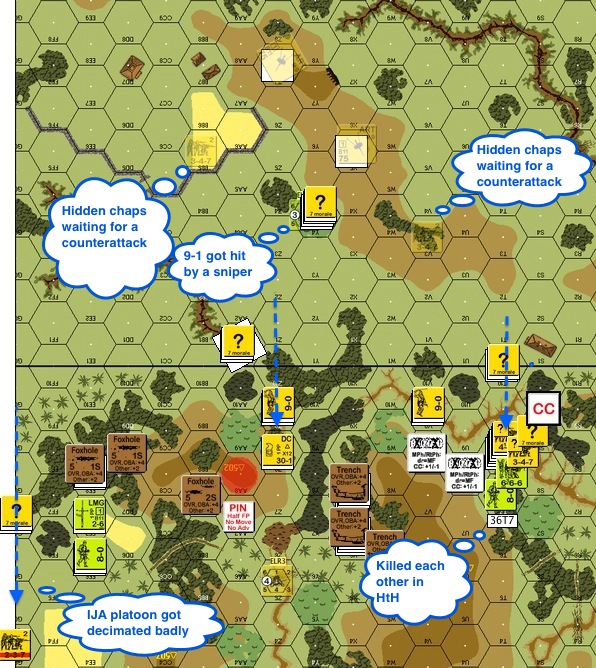
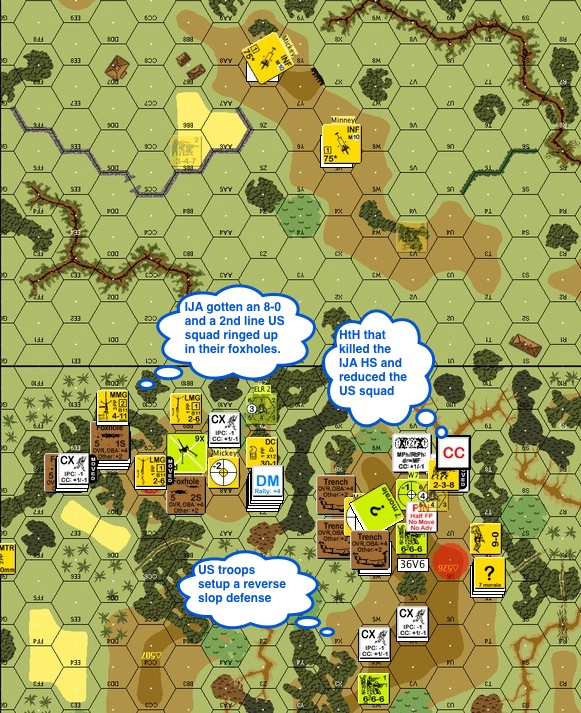
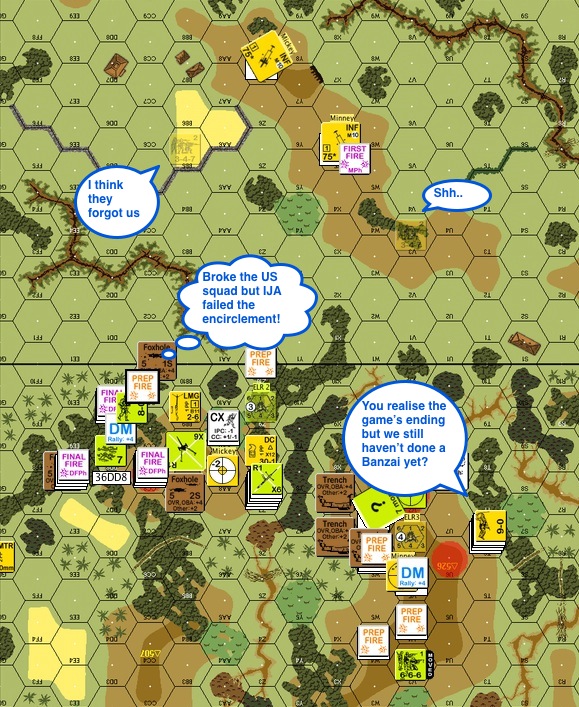
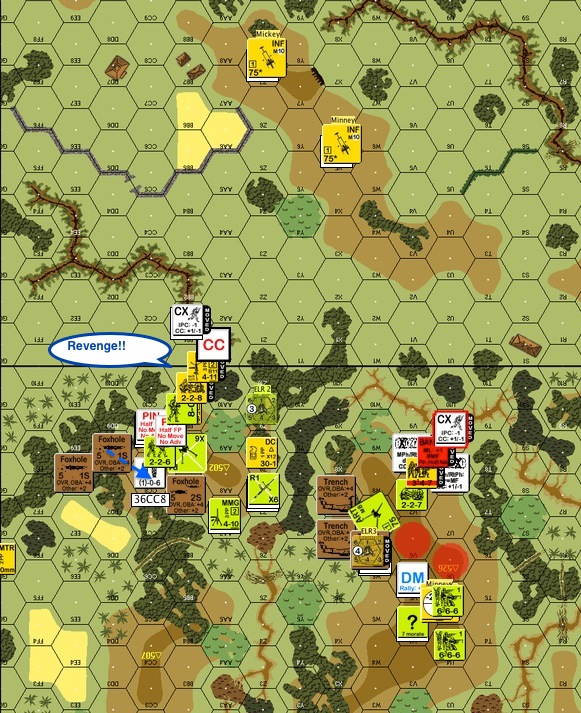
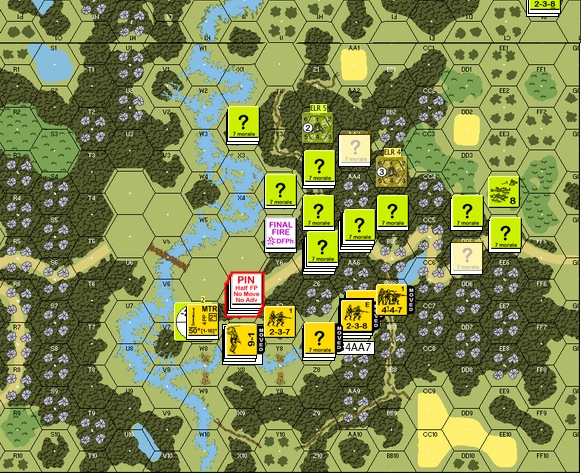
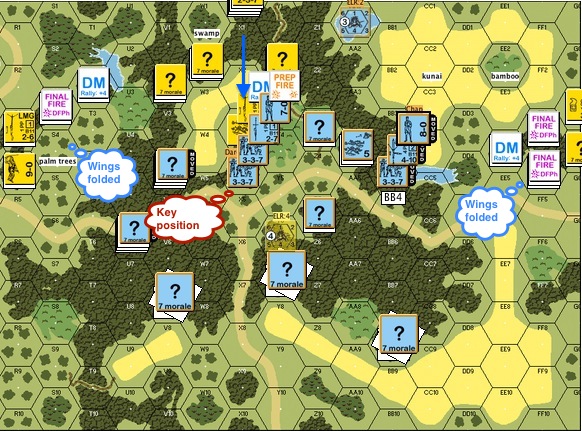
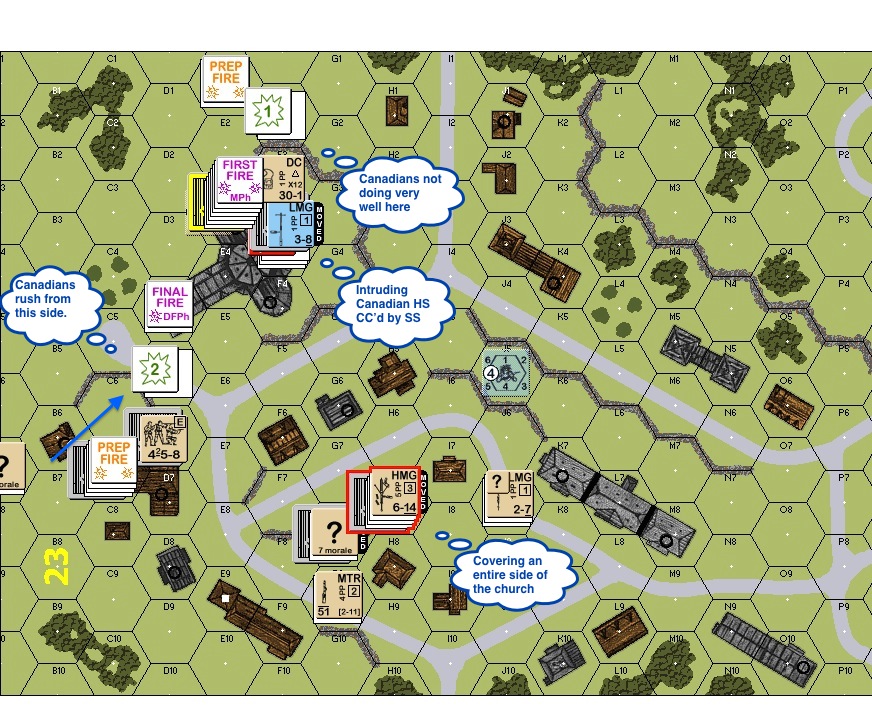
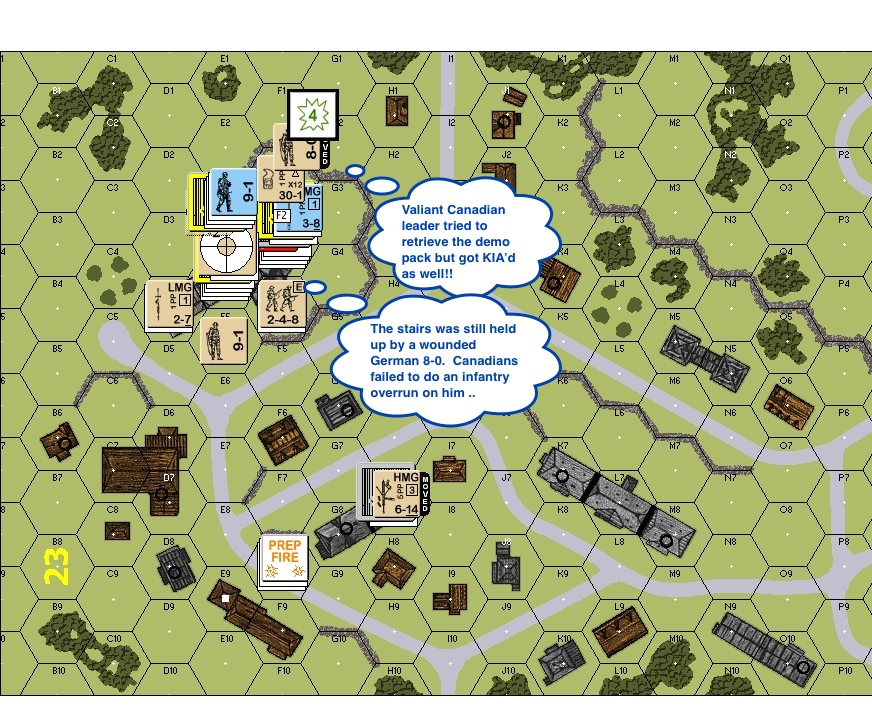
This is a game that I setup earlier in the year when I found that J116 Brigade Hill was going to be one of the scenarios in the Malaya Madness tourney.  Erwin & I managed to do a few turns before the Malaya Madness and sure enough, Brigade Hill was my last game at the tourney.

The Battle for Brigade Hill was part of a campaign where the IJA pushed the Australians along the Kokoda trail towards Port Moresby, Papua New Guinea, during the Second World War.  The IJA setup a blocking force between the Australian brigade headquarters and its forward battalions.  The cutoff Australians were therefore asked to reestablish contact with their headquarters.

I played the IJA and my buddy Erwin from Belgium, the Australians.  The Australians had to take 3 or more of the hill tops marked with “V”s.  The fourth “V” that you can’t see from the map above was under the foxhole on the top right.  This setup is taken from Chris Doary (of BattleSchool).  The Australians came in from the right.  The big hill was tough to defend apart from a reverse slope setup.  In this instance the big hill was left bare and covered by 2 medium machine guns from the hill on the top left and a mortar from the bottom left.  This channelled the Australians through the jungles on both sides of the big hill, ideal IJA country.  I put a HIP (“hidden initial placement”) in the second most likely frequented clump of jungle on the big hill.

J116 - T2 IJA - End Vol Breaks-proc

End of IJA Turn 2 : The Australians advanced carefully to their first VC position and probed the right IJA flank.  The mortar from the top right hill opened fire but it broke on the first shot.  The IJA chucked it down the hill in frustration.  The IJA on the right flank voluntarily broke and melted away into the jungle, looking to use the gully as the second line.

J116 - T3 IJA - Blocking on right Shoot Brits off Hill top Reinforcement entered 02-proc

End of IJA Turn 3: Guns and mortar from both of the small hills start shooting Australians off the big hill-top.  Reinforcements from both combatants entered.  The IJA chose to enter in the “back field” to help defence on the left flank and to tie some Australian units down.  The units on the right flank got into a blocking position and would gain concealment before the turn was over.

J116 - T4 IJA - ? 237 ambush 458 squad-proc

End of IJA Turn 4: The IJAs got aggressive on the right flank.  An IJA half squad was sent to unconceal an Australian squad.  It was killed in the process but the Australian squad was ambushed and killed in the subsequent close combat when a concealed IJA half squad moved in.  The IJA was pressured on the left flank however, the forward units pulled back and the reinforcement group pushed forth to the Australian hilltop.

J116 - T5 Bri - Mortars fight Leader wounded berserk-proc

Australian Turn 5: The opposing mortars continued to duke it out, the IJA finally caught a lucky shot that wounded its leader and made a half squad go berserk!

J116 - T5 Bri - HIP-proc

Australian Turn 5 (still): The IJA revealed a previously HIP’d unit in hex W7 when an Australian squad left its 9-2 leader behind.  We didn’t do this correctly though as the HIP’d unit should have appeared concealed.  Either way as such, the adjacent Australian squad piled in (which I was happy about) but they managed to roll an ambush against the IJA (which I was less delighted about).  The Australians decided to take their leader and withdrew.

J116 - T5 IJA after MPh-proc

IJA Turn 5: The last Australian turn put the IJA left flank under pressure.  The IJA reinforcement group decided to shift back to threaten the Australian rear.  The previously HIP’d IJA squad continued to pursuit the escaped Australian 9-1 (and the 458).  See that stack I noted as “Dummies” in the foxhole?  That hill would have been Australian quickly had Erwin know this.  The IJA stepped up their counterattack on their right flank.  The IJA broke the other Australian squad on the lower left of the map and the berserker piled in!

J116 - T5 IJA CC Entire Stack killed-proc

IJA Turn 5 (still): An  IJA HS jumped back into the 9-1 & 458 stack and managed to annihilate everyone in the hex.  The brokie routed away from the berserker on the bottom left at the moment, for a little while longer.

J116 - T6 Bri Mortar + Snakeeyes killed 8-1 breaks squad .. both MMGs broke-proc

IJA Turn 6: The hill on the bottom left was threatened by a slow-moving concealed Australian stack up the middle.  The wounded 8-0 in the lonely foxhole decided to grab the mortar himself and took a shot at the approaching Australians.  A snake eyes shot along with fire from the previously HIP’d IJA squad on the big hill broke the Australian squad and killed a leader.  This squad would then be eliminated for failure to rout.  Our death star on the top left tried to hold off the hoards and broke BOTH MMGs together!  Baadddd timing …

J116 - T6 IJA CCPh -proc
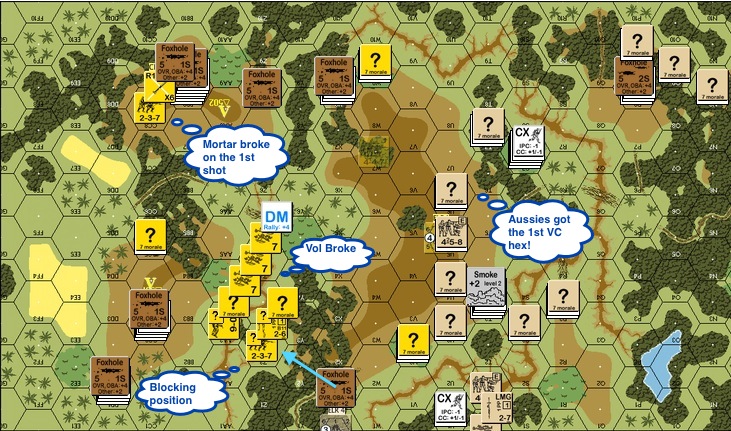
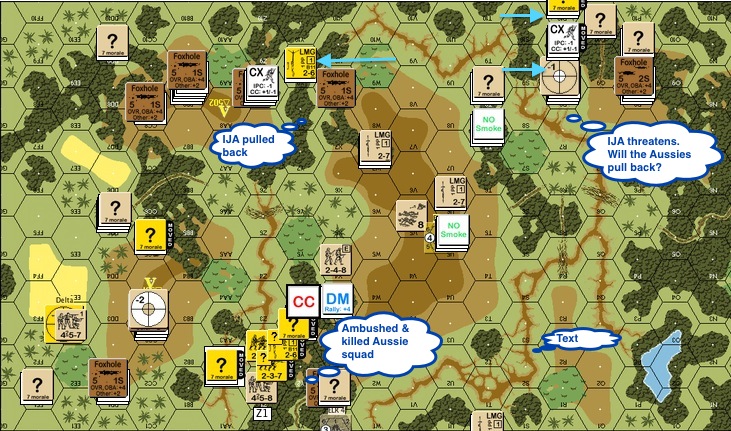
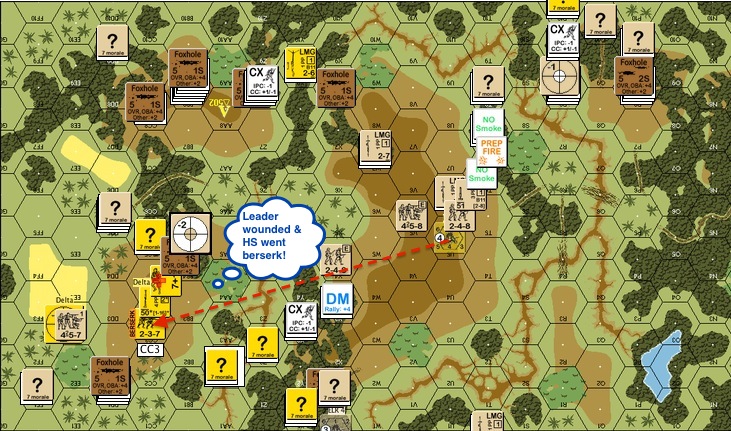
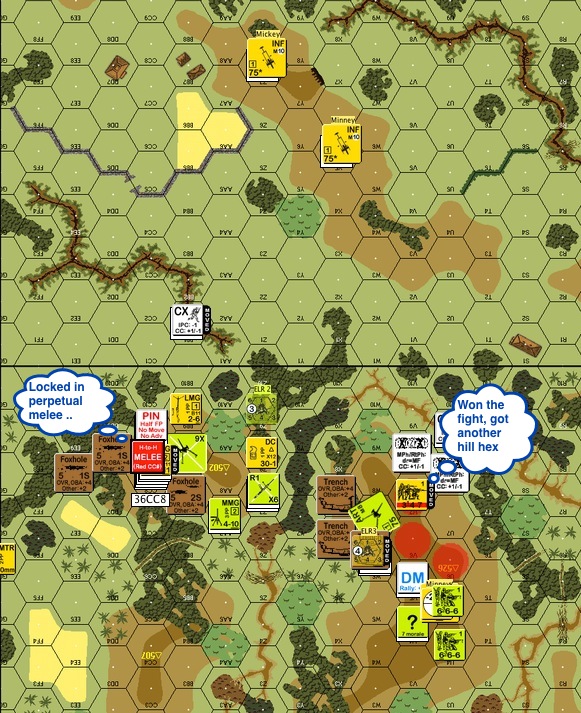
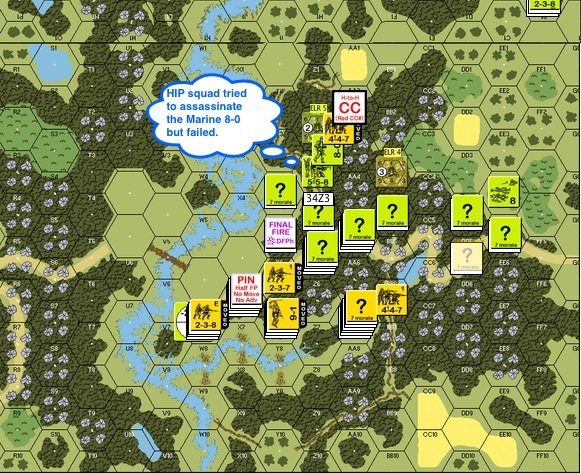
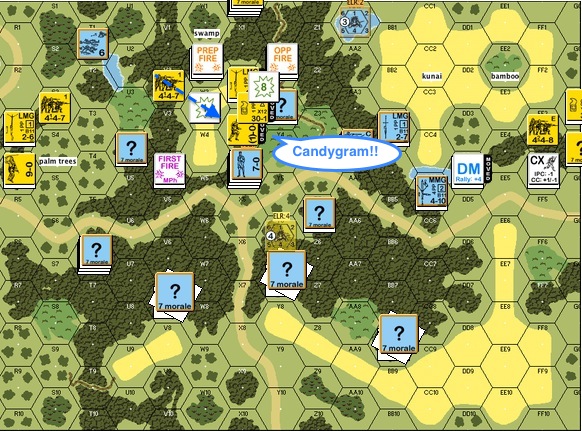
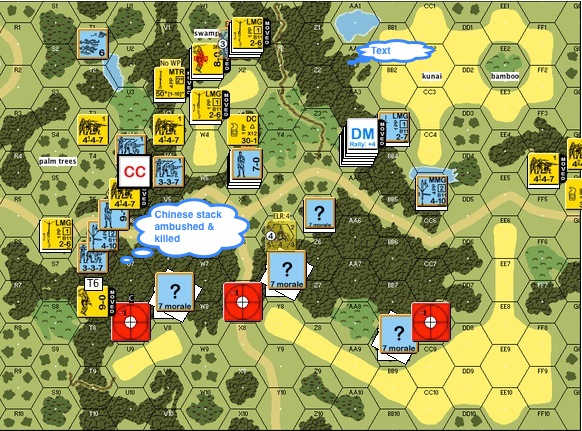
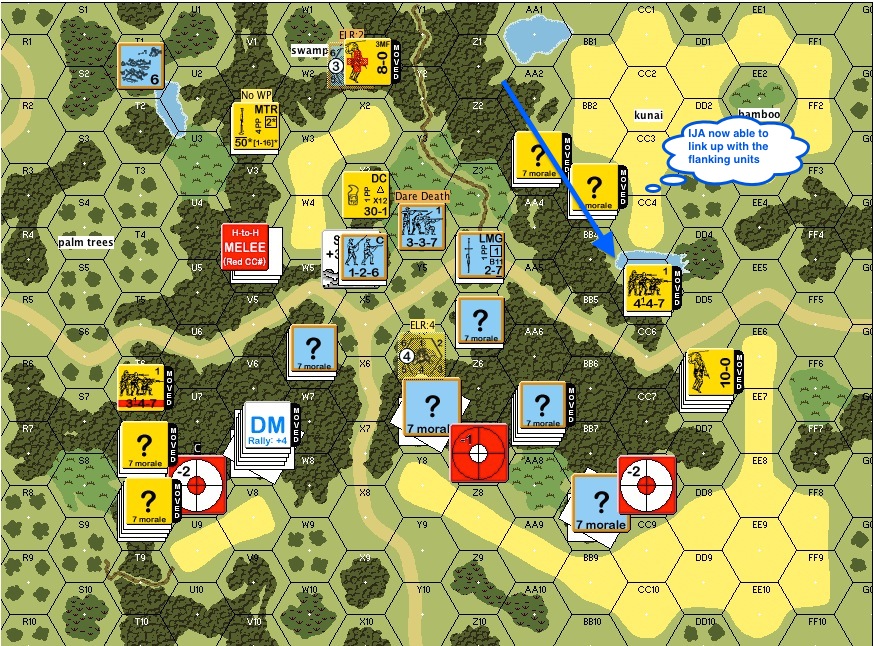
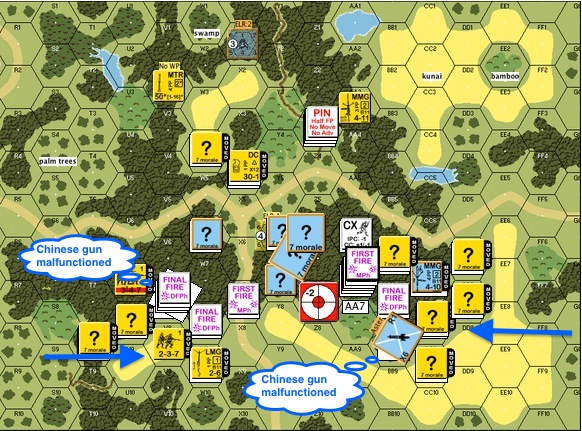
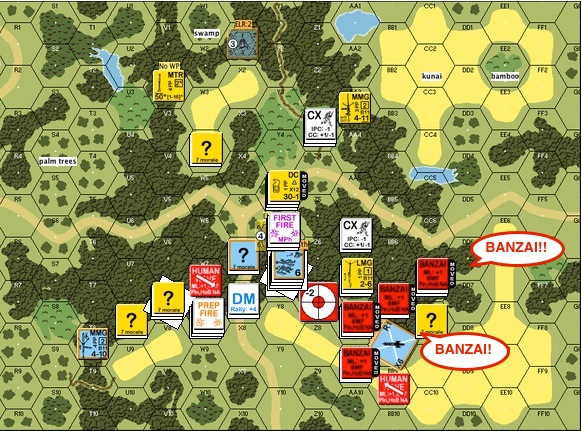
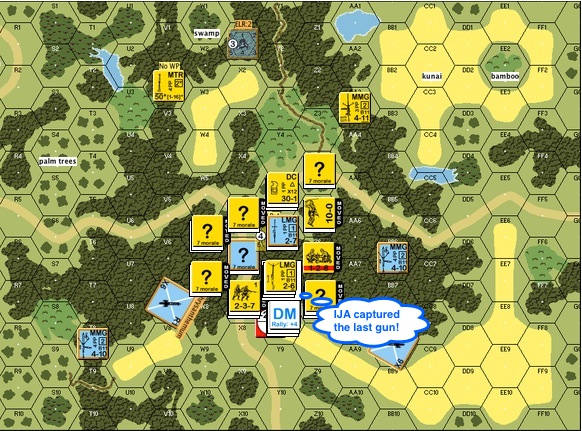
IJA Turn 6 (still): This was the last IJA turn before the final Australian onslaught.  The IJA made an unsuccessful effort to take the Australian fox hole on the top right.  The IJA berserker chased down and killed an Australian brokie on the far left.  A concealed IJA squad, determined to clear the field, advanced onto and killed a half squad in the middle right.  The MMG crews and some half squads stacked up on the top left hill.  Since IJA crew stripes instead of breaks, one round of gun fire would not be able to push them out of the hex.  If the Australian half squad moved up the hill and engaged the stack in close combat, the Australians wouldn’t be able to own the top left VP hex without another squad stepping in.  The IJA right flank resumed its blocking position.

J116 - T7 Bri End CC-proc

Australian Turn 7: On the top left of the map, the Australian half squad refused to be broken by IJA gun fire. It advanced up and engaged the IJA stack in close combat.  Since Hand to Hand combat is not an option for the Australians, the likely outcome here was that the units would be locked in a perpetual mêlée.

We rolled.  The Australians failed the “To Kill” number by 1!

The IJA got a Critical Reduction result, thereby killing the Australian half squad.

The IJAs won.

Other AARs:


FE27 The Bravest Thing I Ever Saw

This scenario from Fanatic Enterprises describes a situation in Bataan in January 6 1942.  The Americans fought a delaying action that saw the gunners from both sides exchange shells for shells.  Carl Nogueira played the defending American and I the attacking IJA in this after action report (AAR).  We actually exchanged sides and played this twice, with me getting my teeth kicked in both times.  This is already the less ugly version, rated PG-13.

The side that gained the most Victory Points (VP) wins.  You can gain Casualty Victory Points normally and you gain 1 VP for controlling each Level 2 hill hexes on your opponent’s side.  The Americans set up on the bottom of the map and the IJA on the top.  We get 5 and a half turns.

01 FE27 JT2 02 CC Kill-proc

IJA Turn 2 : You can see where the IJA guns were.  Line of sight (LOS) to the American hill tops were limited due to jungle terrain.  You can also see two hidden 2nd liners to slow down any sort of American counterattack.  The big stack in the middle of the top map were two IJA medium machine gun (MMGs), but their leader, a 9-1 who’s also the best leader in the IJA order of battle (OB) was killed by a sniper early in the game.  You can see the 3 lines of IJA advance on the American side.  The left most IJA rush would have been the most threatening but I failed to capitalise on the situation properly before they got wiped out.  The middle advance would be stuck for a while and in retrospect I should have strike out through the swamp towards the right to put the squeeze on the Americans on the hill on the right of the American positions.  On the right, the IJA caught and took an American 8-0 and a squad together with it in a flurry of hand-to-hand action.  At this point I expected the American guns to be towards the bottom of the map.

02 FE27 AT3 01 Start-proc

American Turn 3 : The IJA found the first American gun on the left by walking straight into it.  There was nothing left of the squad.  The attack on the left was also wiped out and the Americans started moving towards the right.  The attack in the middle was floundering as well.  The IJA on the right kept pushing towards the bottom of the map, fully expecting to find the second American gun there.

03 FE27 AT4 01 Start-proc

American Turn 4 : The American gun on the left malfunctioned!  The IJA forced their way through the bamboo to kill the gun crew before they had a chance to fix the infernal contraption.  You can see a blotch of red on the hilltop to the right where once again, the IJA found the other American gun the wrong way.  You can also see the pair of IJA MMGs moving in during the last turn as it didn’t look like the Americans were going to make a push to the north.

04 FE27 JT5 02 CC IJA dead US CR-proc

IJA Turn 5 : The IJA troops surrounded an American 8-0 and a 2nd liner in a 3 point stance.  The IJA were of course, feeling very pleased with themselves.  There was an IJA demolition charge laying on the ground in the middle.  That was the aftermath of an IJA half squad’s attempt to blow up the American MMG stack.  On the right, the IJA made another attempt up the hill and caught more Americans in close combat.  Unfortunately this IJA half squad could only take half of the American squad with it.  On the bottom right of the map you can see the Americans on a reverse slope defence configuration, looking to get the first shot in if any IJA pop over the crest line.  The probing stack of IJA troops however decided to move back up to their leader for a last push as time was running out.

05 FE27 AT5 01 Ring of Fire-proc

American Turn 5 : The “ring of fire” on the left broke the American squad but they failed to encircle the Americans properly.  Apparently you need to fire at the target sequentially for encirclement to happen (A7.7, note to self).

06 FE27 AT5 02 Ops-proc

American Turn 5 (still) : On the left, the broken American squad surrendered and the IJA picked the weakest (a 1-2-7) amongst the trio to be the guard.  That was the last mistake they would ever make.  The American 8-0 promptly jumped on the otherwise occupied IJA half squad in close combat …

07 FE27 AT5 02 Counter Capture-proc

American Turn 5 (aftermath) : The American 8-0 singlehandedly killed the IJA guards, rescued his men and found enough weapons to rearm half of his squad.  (Note to self : encircle properly & be mindful about who’s to play guards).

08 FE27 JT6 02 Banzai DC Hero-proc

Final IJA Turn : The IJA decided that they wouldn’t go down without a proper Banzai charge.  Therefore they targeted the gun crew who ventured out to retake a hill hex.  Just to be professional about it, they even short-strawed a poor chap to be a DC hero as well!  He was well perforated, his DC satchel went flying but he drew enough fire from his “friends” for them to jump on the American gun crew.

09 FE27 JT6 03 Wounded Leader-proc

Final IJA Turn (still) : An IJA leader in the middle rushed in and tried to grab the DC pack.  He got shot and was wounded as he picked it up and he never managed to place it.

10 FE27 JT6 04 CC again-proc

Final IJA Turn (almost done) : An MMG crew from the original “Ring of Fire” caught up with the American leader and squad on the left, knives drawn …

11 FE27 JT6 05 End-proc

Final : The banzai’ing IJA came victoriously out of the close combat on the right.  The folks on the left however would be locked in perpetual mêlée.  You would know I lost the game a long time ago if you can see the huge stack of IJA casualties.  Carl was nice enough to play this through to the bitter end!!

Lessons learned:

  • When playing against the Americans, the IJA needs to make good use of the Advance Phase.  Try to move into American Line Of Sight only in the Advance Phase, and if you can stay concealed, even better.  This way the IJA don’t have to take high American firepower with “First Fire Movement in Open Ground” (FFMO) and “First Fire Non Assault Move” (FFNAM) modifiers.  If the Americans fire in the following Prep Fire, they don’t get to move away and the IJA will have a chance to fire against their low morale (US Marines excepted).
  • Don’t give prisoners to someone who might not fare well in (close) combat.
  • Encirclement : remember to fire on the target sequentially.
  • Use 7 as a gauge, if you can get a result on a 7, it’s a good choice.  Alternatively, try to move in routes that stack so much DRMs on your opponent’s shot that he/she can’t get results on a 7.
  • Don’t spread your forces too thin.  There should be reserves behind an attack to exploit results.

Other thoughts?

A44 Blocking Action at Lipki AAR

I love PTO.  However, jungles do not present decent tank country.  Too much time spent in the PTO as a newbie can result in lopsided development that is short on armoured fighting vehicle (AFV) experience.

This scenario took place near Borisov (Russia), mid-1941 – the opening stages of Barbarossa.  Elements of the 1st Moscow Motor Rifle Division was sent to block the spearhead that was Guderian’s 18th Panzer Divison.

001 Turn 2 German Rally-proc

North is on the right of the map.  The Germans deployed on the top map (west) and the Russians came in from the bottom (east).  The Russians win when they exit more than 15 victory points (VPs) off the top edge of the map between the road on the top middle to the road on the top right. The other way to win was to kill enough Germans.  The KV2 was worth 7 VPs, the T-34 was also worth 7 points and each squad was worth 2 points.  As you already know, the Russians had a KV2,  a T34 M40 and a couple of BT7s.  The Germans had a couple of PzIIIGs, a halftrack sporting a 37mm gun with a high rate of fire (I forgot about the ATR that it also carried) and a couple of halftracks with the usual machine guns.  They were backed by a 28mm antitank gun and further reinforced by a pair of PzIVEs in Turn 4.

The above was the German Turn 2.  You can see the two Panzers on the left lying in wait and hoping to get a first shot at the Russians.  The antitank gun was towed to a clump of woods near the exit for a last-ditch defence.  The half track with the 37mm gun was on the right and they could hear the speedy BT7s and a convoy of trucks rumbling towards them.

002 Turn 3 Russian Move HT37L blew up BT-7 rof-proc


This was the Russian Turn 3.  The T34 came up the left and the PzIIIG fired, looking to scoot behind the woods quickly afterwards.

I rolled a 1,1 .. and  a 1.  Critical Hit!!

The T34 exploded into a burning wreck, and the German tankers sat stunned as bits of Russian tank rained down.  On the right, the 37mm gun pumped shot after shot into one of the BT7 and killed it.

001 Turn 3 German Idiot Move ATR-proc

This was the German Turn 3.  I am very inexperienced in tank warfare so you won’t see an end to idiotic moves in the near term.  This was one of them. I backed a PzIIIG up over the bridge on the left in the hope of being able to get away faster when the Russian tanks appear.  Not only did I presented my rear facing to the Russians, I forgot to button up.  The tank was immediately stunned by infantry fire and then killed by a Russian antitank rifle (ATR).  Things worked out better on the right as my 37mm gun shocked the other BT7.

005 Turn 4 German DPh Capers abound-proc

This was the German Turn 4.  To the left you can see another one of my moments.  The Germans were hoping to crash a halftrack through the woods on the left, get back on the road and circle around the back of the Russian trucks on the right.  However, they realised that trail breaking took a little time and by the time the half track emerged from the woods, it was looking down the barrel of a KV2!  So instead of breaking to the right of the map, they sped towards the left to escape.  The KV2 fired but the halftrack speed and its size saved it.  The surviving BT7 recovered from its shock and killed the gun-toting halftrack.  Unfortunately the reinforcing PzIVEs arrived and got it bracketed from two directions.

008 Turn 5 Russian DFPh Truck immo-proc

This was Russian turn 5.  Our escaping halftrack on the left had a Russian ATR squad on its tail.  The KV2 on the other hand laughed and used the trail-break created by the charitable halftrack to get to the “inside line” of the Germans.  The BT7 blew out its gun in a shootout with the PzIVe on its left (which also malf’d its gun) and was killed by the PzIVe on its right.  The right PzIVe proceeded to shoot up the Russian trucks one by one.

009 Turn 5 German MPh Berserk Charge Killed by Sniper-proc

During German turn 5, one of the German half squad had a berserk moment.  They got tired of the shooting and concluded that the proper thing to do was to charge the Russian medium machine gun.  So off they went.  They ran through Defensive First Fire, then Subsequent First Fire … jumping into the MMG nest, they survived Final Protective Fire!!  “.. and THIS is how it’s done!!” they yelled.  Meanwhile, Katya, the peasant girl sniper rolled her eyes, spat and muttered “Men” before shooting up the marauding German half squad and ended the lunacy.

011 Turn 6 Russian DF KV2 moved up German shot up trucks-proc

This was Russian Turn 6.  During the last German turn, the only Panzer with a functioning gun sped into its final position while its colleague proceeded to kill all the Russian trucks with its MGs on the right of the map.  However,  the KV2 killed the halftrack that tried to escape from in front of the wooden house.  The escaping halftrack to the left survived another shot from the Russian ATR and ran.  The KV2 crew watch incredulously as the crazy halftrack ran across its covered arc.  Then it realised that KV2 can’t intensive fire.  The halftrack disappeared behind some woods.  In this turn, the KV2 followed.  I can only imagine the commotion on the halftrack as the KV2 reappeared on its “rear view mirrors”.

012 Turn 7 Russian AFPh KV2 Malf-proc

This was Russian Turn 7.  The mighty KV2 lumbered towards the goal line.  The PzIVE and the antitank gun bounced shot after shot off its front armour.  The KV2 went to a “fork” position, threatening the German truck with its rear MGs while shooting back at the antitank gun with high explosives from its terrifying “bunker busting” 152mm gun.   The antitank gun crew worked as fast as they could, dreading the massive fireball that the next moment must bring.

Then for a moment, there was silence – the 152mm gun malfunctioned.

HS8 Bailey’s Demise AAR – fighting the Marines in the jungle

JT1a-proc

Learning jungle terrain in ASL153 Totsugeki is one thing.  Learning about Marine Raiders in the dense jungles of Guadalcanal is another matter entirely.

This is HS8 Bailey’s Demise, from MMP’s Operational Watchtower Historical Study.  The date is September 26 1943.  This scenario as with the whole History Study, is centered around Guadalcanal.  The river depicted on the map represents the Matanikau river.  The Marine Raiders were looking to cross the river to the west bank to complete an encirclement.  Unbeknownst to the Marines, the IJA had crossed the river and was on the east bank when the engagement occurred.

The Marine Raiders came in from the top left into a wholly hidden (HIP) deployment of IJA troops.  The Marine Raiders, like the IJA 1st-liners, were also stealthy.   They were to cross at least 6 CVP (3 squads or other combinations) to the west bank of the river in 7.5 turns.

All interior jungle hexes are dense jungle.  All jungle hexes next to non jungle hexes are light jungles.  The difference being while light jungle are similar to woods, dense jungle has a terrain effect modifier (TEM) of 2, does not permit fire groups and allows a stacking limit of only two.  This map’s marked with “crags” (4 point stone formations) merely to remind ourselves that the marked hexes were dense jungles.

The map above was my IJA setup, units unhidden for your perusal.  The mortar team down on the bottom left was largely ineffectual against American counter-battery fire.  I should have spread them out.

AT2b-proc


This was the Marine Turn 2.  The Marine made contact with the defenders and withstood IJA fire rather well.  Taking the risk to move in stacks (given the +2 cover of the dense jungle) their Advance Fire was devastating round after round for the IJA.  The IJA looked to block the Marines as much as possible, rout back (squads breaking “automatically” into half squads in the process) when in doubt and take advantage of their leader’s “Commissar-like” ability to rally them without (DM) penalty.

As I expected, the Marines avoided the bamboo patches on the right and came in from the top down.

Please keep in mind that IJA counters in faded yellow were hidden units that the Marine player couldn’t see.

JT2b - After MPh-proc

This is the IJA Turn 2.  Some of the frontline IJA routed back.  The IJA mortar team on the left was completely shot up.

AT3c After MPh-proc

American Turn 3.  The rallied IJA put up a fight in face of the advancing Raiders.

JT3c After MPh-proc

IJA Turn 3.  The IJA rallied and reconstructed a respectable line of defence.  In retrospect this approach didn’t work well.  The IJA, even concealed, could hardly withstand the withering Marine gunfire.  Perhaps a better strategy is to pair up the half squads.  One half squad would go aggressive, knocking off US concealment counters and drawing fire.  The other concealed half squad will close and either hope for an ambush in close combat.

JT3c HIP CC-proc

Talking about close combat, the Marines with their overwhelming firepower are deadly in normal CC (plus the IJA has no favorable modifiers).  Here you have a HIP squad that sprung out in the hopes of assassinating the Marine 8-0, they were promptly killed in CC.

I should have avoided normal CC with Marines to start with.  Hand to Hand (HtH) combat, when done with sufficiently lopsided odds (IJA half squad vs one or two Marines squads) offer a good trade for the IJA since the results of most are mutual annihilation!  Other than that, I should have ran!

AT4a Ambush by IJA-proc

Marine Turn 4 : here you can see how the Marines were already crowding the last passage way towards the river.  A Raider squad jumped a concealed IJA half squad and was ambushed and killed.  That was unfortunately the only time when close combat went happily for the IJA in this game!

JT4b Am Vol Rout-proc

IJA Turn 4 : The situation doesn’t look good for the IJA but they were still fighting hard.  Here you can see a Marine stack breaking voluntarily and routing away from possible IJA close combat.  Here’s a thought : had I not used the hidden IJA units in close combat, they could have sprung up now and kill the whole stack!

AT5a MG-proc

Marine Turn 5: the Marines started to cross the river!!  A repositioned IJA machine gun put the west end of the bridge squarely in its sights but it couldn’t stop the flow.

JT6a End-proc

IJA Turn 6: This was how it ended for the IJA, decimated and encircled.

The next time I play as the IJA against Marines, I will try :

  • Using my HIP units largely for cutting rout paths.
  • Pair up units (half squads), keep one concealed and use one for knocking off enemy concealment, with the hope of trading half squads for bigger stacks of Marines in hand-to-hand combat.
  • Rush IJA squads through openings created by successful hand-to-hand combat and go for encirclement
  • I thought of stacking IJA units to give them heavier fire power since I can’t create fire groups in dense jungles but I think that will just create bigger targets for blistering Marine firepower.
  • While retreating and blocking as the IJA might be a good idea at times, I should keep at least a 1 hex distance from the Marines.  That way the Marines would need to use advancing fire against my concealed units.
  • What happened to Banzai charges?

What’s your experience with fighting cardboard Marines in the jungles?  What are your thoughts?


My First Foray into PTO terrain : ASL153 Totsugeki! AAR

I played ASL153 Totsugeki! a while ago with Brian Y.  I played a few PTO (Pacific Theatre of Operations) scenarios before but this is my first foray into full-blown jungle terrain.

The usual Chinese vs Japanese (IJA) or Canadian vs Japanese scenarios occurred in China or Hong Kong, both of which are not in PTO terrain.  ASL153 Totsugeki! however, took place in northern Burma.  “Totsugeki” is Japanese for “Charge”.  Chinese gunners, working with the Americans, were cut off in the jungle with fields of fire still uncleared.  The IJA 55th Regiment pushed in and everyone in the 6th Field Artillery Battery found themselves fighting for their lives.


A60-JT1a-proc

IJA pushed in from the top of the map.  There are three Chinese guns in specified hexes.  The Victory Conditions for the IJA is to eliminate or to capture all three Chinese guns and to occupy their hexes with good order crew/half squads/squads (“MMC” in ASL parlance) in 6.5 turns.  The Chinese has 14 first liners vs the IJA’s 11 but they were understandably shaky (ELR 2).

This is Japanese turn 1.  The IJA wasted no time in rushing both flanks.  They showed that the IJA squad will almost always get to where it wants to go.  The jungle hindrance of course helped a great deal.

A60-CT1 AFPh-proc

End of Chinese Turn 1 : you can see the IJA was successful in turning both flanks.  The Chinese 2 squads stack with the leader posed an issue though since it occupied a key position in the center of the map.   Approaching IJA units invariably got shot up.

A60-JT2 MPh CANDYGRAM!-proc

Japanese Turn 2: The IJA decide to get the party going with a DC Hero (“CANDYGRAM!!!”, a phrase favoured by one of my ASL mentors, Witchbottles).  Unfortunately the Chinese weren’t ready to go wild yet and promptly shot the messenger.

A60-JT2 CC Ambush Kill-proc

Japanese Turn 2 still : IJA forces slid down the left flanks, ambushed and killed the Chinese medium machine gun (MMG) team.  This flank looked shaky but the Chinese held firm in the middle.  That double squad Chinese stack in the middle were still chuckling over their DC hero kill.

A60-JT3 Banzai-proc


Japanese Turn 3 : The IJA was getting frustrated about not being to make much inroads in the centre and on the right flanks.  On top of it, trotting through the jungle was a very slow going affair.  So they decided to do a banzai attack!


A60-JT3 End-proc

This is my first banzai attack in jungle terrain and I started to appreciate how well banzai attacks go together with jungles.  It is got to be terrifying to have IJA troopers crashing out of the trees and falling into the ranks with bayonets and swords waving!  This charge allowed the IJA forces in the centre to link up with the right flank.

A60-JT5 End DFPh - both Chinese guns malf-proc

Japanese Turn 5 : The IJA spent turn 4 bringing the troops together for the final assault on the guns.  The IJA mass assault moved through the jungle.  The two guns on the flanks fired pointblank at the incoming IJA and they both malfunctioned!

A60-JT6 MPh Banzai Charge-proc

Japanese Turn 6: The IJA came into contact with the Chinese troops around the gun and one last banzai ensured!

A60-JT6 AFPh .. DC Hero shot-proc

Sensing that the game was almost over, a DC hero decided to gave it another go.  He too was shot before he could deliver the payload.  On the other hand the last banzai piled a few IJAs into the last gun hex.

A60-JT6 End-proc

The IJA captured the last Chinese gun and surrounded the defenders.

Totsugeki is a great introduction for me to the PTO terrain.  Going toward I’d very much like to explore the best ways for DC Heros  to play together with Banzai’ers.

I’d also like to commend Brian Y as a terrific ASL player.  Thanks for a great game Brian!

Please see also my friend Joss Attridge’s experience with Totsugeki : “Totsugeki (ASL 153)”

Banzai


“Advanced Squad Leader is the Greatest Wargame Ever Published”

JT3a-proc

Ladies & Gentlemen, the following is Mr. Eoin Corrigan’s “Majestic”, the best essay to date on the beauty of Advanced Squad Leader, published with his permission.  

Let’s begin with a provocative statement: Advanced Squad Leader is the greatest wargame ever published.

Obviously, I’m unashamedly partisan. My purpose in writing this review is to persuade you that the preceding statement is true.

I’m sure you know a little about ASL but just in case you haven’t here are the basics. Following the success of its predecessor system, Squad Leader, Avalon Hill published ASL in 1985. The game is best understood as a modular system. At its core are the rules, the famous three ring binder of several hundred pages. Beyond Valor is the first of the modules and provides the German and Soviet orders of battle, the necessary information counters, 20 odd scenarios and the map boards on which its scenarios are played. A series of further modules provide the counters, rules and map boards necessary to play a scenario based on almost any tactical engagement which occurred during WWII.

ASL as a play experience is usually based around a scenario, almost always a one page document which describes the victory conditions, the general environmental conditions, the map boards depicting the terrain and the infantry units, vehicles and guns which will be used in that scenario. In all but a few cases, scenarios are based on an actual historical engagement, although often the representation is somewhat stylised; this is a game, after all, not historical research. Both players set up their forces and begin play, which generally proceeds on an IGO, UGO turn basis, which is familiar to most wargamers and indeed most gamers of any hue. The core of the game is an elegant set of mechanics which are far less complex than the game’s reputation suggests.

Those are the basics. If I may, I think it may be worthwhile at this point to address some of the obvious objections to my opening statement.

Yes, ASL is expensive. So are most things in life worth having. You can’t take it with you, so why not spend your money on things which will improve your life? Like ASL, for instance.

Yes, it can be difficult to source out of print modules. For those of us who have begun playing ASL during the last 10 years this has been a fact of life. However, out of print components of the system are reprinted and, in the interim, it’s possible to source second-hand copies or to simply play the many, many thousands of scenarios which are playable right now with in print material. You don’t need to own the entire system to play. Take the long view.

Yes, we’re still waiting for the Finnish module. It’s coming!

Yes, learning to play competently can be a challenge. So what? Step up. Learning to play ASL well is the wargaming equivalent of the marathon. ASL is obviously not a svelte Euro; the system provides more text describing Belgian armoured vehicles than the entire rules set of some other tactical wargames. That’s a feature, not a flaw. Besides which, no pain, no gain, my friends. And if you’re having trouble with the rules you can avail of a lot of help along the way.

Yes, ASL is chrome rich. But this chrome is usually associated with a dilemma or two, with a set of potential benefits and risks which amplify a play experience which is already decision-rich.

While we’re here, let’s put another criticism to bed. ASL is not a simulation of a WWII company level commander’s lot (nor, for that matter, is any other multiplayer tactical wargame played for fun). The ‘failed-simulation critique’ is often levelled at ASL and is based on a misunderstanding, wilful or otherwise, of what a simulation is. In ASL, each player has:

– Perfect knowledge of the OOB of both sides.
– Almost perfect knowledge of the opponent’s forces.
– Real time perfect knowledge of the quality, status and location of friendly forces.
– Perfect knowledge of the terrain.
– An abundance of control. Players decide the exact movement of individual men and small units. Players decide on the engagement priorities of each and every weapon system and infantry unit.
– Absolute victory conditions. Force preservation is, more often than not, irrelevant. In a standard scenario, casualty rates will be extremely high, as one or both sides fight to utter destruction.

A simulation of a WWII company commander’s perspective would be a very different creature. A host of information and control constraints would be required which would compromise the fun aspect. An umpire would also be required. If you’re looking for a two player simulation look elsewhere and bear in mind that you’ll probably have to look far beyond Boardgamegeek.

ASL is a game and it has limitations. Don’t mistake detail for simulation. Winning a couple of scenarios will not qualify you to lead men into high intensity combat. Recruiting officers from your nation’s military will not be handing you a commission after your first tournament win.

Now that we’ve dispatched the simulation red herring, some words on ASL’s purpose. The game’s intellectual origins lie in Squad Leader, its fêted predecessor, which had two primary conceptual platforms:

– Post WWII studies performed by the US Army which indicated that the performance of a given tactical unit under fire is highly dependent on the actions of a few individuals. These individuals are not necessarily the NCOs and junior officers, although they are often found in those ranks. These are the individuals who demonstrate initiative, bravery and leadership, the men who turn and win battles.
– The observation that an assault is generally preceded by a bombardment. ASL inherits its turn structure from Squad Leader, in which the preparatory fire phase, which represents fire to reduce and suppress the enemy, precedes movement.

These are the core elements of ASL’s intellectual inheritance. ASL is a refined, more coherent and fuller expression than Squad Leader. ASL’s grand success lies in the fact that its design ambition was to go much, much further than any predecessor had dared. The goal of ASL’s designers was to produce a system which could represent or portray any tactical engagement which occurred during WWII. ASL is designed to comprehend the whole land war at the tactical level; every theatre, every front, every major weapon system, every belligerent, every season, every weather condition, every tactical situation.

ASL has delivered on this design goal. In so doing it has provided us with some superb vistas:

– Vicious clashes of Nationalist Chinese and Imperial Japanese Army infantry and armour in 1937.
– The frustration of German anti-tank gunners facing France’s Char B1bis outside the village of Stonne in the summer of 1940.
– Dutch colonial troops outclassed by the offensive flexibility of the Japanese army amid their assault on the East Indies in 1941.
– Partisan ambushes against rear echelon Axis troops in Croatia.
– Budapest under siege in the winter of 1944. The gradual degradation of the defending Hungarian, Wehrmacht and SS troops as ammunition, fuel and food supplies dwindle.
– Anxious advances by US infantry through the ruins of Aachen, fearful of the inevitable ambush.
– Imperial Japanese troops defending tiny atolls against the awesome firepower of a late war American amphibious assault.

ASL has taken many of us to these places; the game sketches such diverse actions very well. And in so doing, the game can provide some insights into why the war was fought in certain ways, and why certain armies tended to prevail in certain circumstances.

In many respects ASL represents continuity in wargame design. Modular map-boards with hexagonal grids and combat result tables were long established features of wargames in 1985. ASL innovated elsewhere, along two principal avenues. As described, it sought to be all-encompassing. This goal was, and remains, a hugely innovative objective which no other tactical game of World War II has come close to realising, or even attempting. The second path of innovation is gameplay related. The structure of each player turn is relatively simple: rally, conduct preparatory fire, move, defensive fire, advancing fire, rout, advance and close combat, a sequence largely inherited from Squad Leader. ASL’s great leap forward is in the mechanics of defensive fire occurring during the movement phase, a time when moving units are particularly vulnerable. In short, a defending unit may interrupt movement and fire on a moving attacker; however the defending unit may usually fire again at the same moving unit or other moving units subject to certain limitations. A consequence of the defensive fire mechanics is that each player’s movement phase fully involves both players in a sub-game, with a quasi-psychological component, of movement and defensive fire. It’s a vastly engaging element of the game during which both players are totally involved. Rapid decision making based on sound judgement and an understanding of attacking and defensive priorities is required. As the phase progresses, the complex interplay of risk and benefit shifts, requiring fresh mental calculations. Perhaps more than any other aspect of the game, this is where games are won and lost, the part of the game which distinguishes poor players from good players.

Player decisions and agency aren’t the be all and end all, however. Playing the game can be a frantic, chaotic experience. Friction on the battlefield is well represented in ASL. The sniper mechanism is a roving element designed to both provide random loss of cohesion and also to check the good fortune of the side which is benefitting from the better die rolls. In most scenarios, a high frequency of low dice rolls by a player has a greater chance of activating the enemy sniper who may wound or kill leaders and heroes, pin or break squads and even cause tanks and other AFVs to depart the battlefield due to the loss of exposed crew. This is another example of a typical dilemma served up by ASL’s mechanics. Does a player expose his AFV crews to avoid poor vision related fire penalties, or are they exposed to enemy fire? It’s your choice. The rolling of double-6 boxcars can also have disastrous consequences as weapons systems fail, vehicles fail to start or units take unexpected casualties. However, the friction depicted shouldn’t give the impression that the game is a free for all dice-fest, devoid of skill. Good players mitigate risk and ride Fortuna’s wave. ASL tournaments are dominated by a small cohort of elite players; these are the players who consistently make the best decisions.

The game has what may seem to be a schizophrenic relationship with history. In some respects it seeks to be faithful, in others ASL departs from history. My argument is that ASL consistently and sensibly privileges player latitude and agency over the imposition of historical constraints.

For instance, engagements in ASL tend to emphasise unit destruction and manoeuvre, and are therefore probably quite unrepresentative of many WWII assaults, particularly in the late war European theatre on the Western Front. The role of supporting artillery is present but downgraded and the role of manoeuvre units is correspondingly elevated. Company and battalion level indirect and direct fire support is often absent; for instance, by the end of the war German infantry companies were each allocated three 81mm mortar tubes. These weapons are rarely represented in ASL.

The nature of engagements is different to that often depicted in the historical record. In very few ASL scenarios does a defending unit take 10-15% casualties and then elect to undertake an orderly withdrawal as generally tended to occur in real life; in most cases units fight to their utter destruction. Similarly, attacks are often high intensity and very direct. Formal reconnaissance is largely irrelevant or is outside the scope of the typical scenario; if it does occur in the course of a scenario it’s usually achieved by aggressive manoeuvre or reconnaissance-by-fire, as opposed to a cautious advance by specialist regimental or divisional reconnaissance assets. If WWII had actually been fought this way it would have ended a lot sooner.

ASL does not enforce doctrinal imperatives. For instance, ASL allows, and even encourages in some circumstances, a panzer grenadier commander to use his halftracks with reckless aggression, to levels which would likely have resulted in a court martial. Specialist units, such as AFV crews which have abandoned hors de combat vehicles, are not safely ushered to the rear but are usually thrown into engagements for which they had little training. There are different schools of thought; some players generally try to avoid ahistorical practices and especially the (mis)use of transport assets. I generally don’t like to play against opponents who accompany their attack with a host of empty trucks seeking cheap overrun targets. Other players have no problem at all with such practices. Fortunately, it’s easy to find players who share one’s preferences.

In other ways ASL displays faith with the historical record, although again I stress that it does so with gameplay in mind.
Nationality distinctions are an important feature of the game. Different nationalities have differing squad types. Nationalities are further distinguished by Heat of Battle modifiers; an elite German squad is far more likely to produce a hero or become fanatic than a conscript Romanian squad. Certain nationalities also have special rules. Pre-October 1942 Soviet units may be accompanied by political commissars. Certain Chinese infantry units have close combat bonuses and may voluntarily go berserk. Most Commonwealth squad types have steady nerves and therefore do not cower, which has important implications for defensive fire. The ASL designer notes freely admit that the nationality distinctions are based on stereotypes. I think it’s fair to say that they are also inaccurate, in several respects. For instance, the treatment of elite Italian units, such as the famed Alpini or Folgore, surely does a disservice to those high quality formations with proud combat records. However, with minimal rules overhead, belligerents are well differentiated and the points of differentiation tend to produce interesting narratives. Most ASL players have a story about how a Soviet conscript squad has won them a scenario with an unlikely act of derring-do.

The Japanese in ASL deserve special mention. At first glance, their squads and half-squads seem unremarkable. However, some ingenious mechanisms specific to Japanese units lend them a very special flavour. Japanese infantry tend not to break; instead they step reduce. Their leaders never break. Japanese can launch a special form of human wave attack, the famed banzai charge which, when used well, can win a scenario outright. The Japanese are depicted as close combat experts with a great skill for camouflage and concealment. Japanese units are also skilled in the use of set demolition charges and may produce tank hunter heroes; in modern parlance, IEDs and suicide bombers. All in all, these qualities provide scenarios featuring the Japanese with a unique set of characteristics which are highly entertaining to play with or against. Happily, the Pacific Theatre expansion for ASL, Rising Sun, will soon be back in print and will give a new generation of ASL players an opportunity to experience the many delights of the Pacific War, as rendered by ASL.

A further element of nationality distinction and historical accuracy is the attention paid to capturing the effect of each combatant’s mix of support weapons and ordnance. The designers of ASL were clearly fascinated by the gadgetry of warfare. In general, support weapons are assigned to squads and half squads and are individually depicted with their own counters. Most common are the three classes of machine gun; light, medium and heavy, the distinctions usually based on ammunition and tripod availability. Each belligerent’s machine guns have bespoke counters; a German medium machine gun is far superior to its Soviet counterpart. The famed Japanese knee mortar is depicted and is a highly effective tool. The Soviet anti-tank-rifle has a greater likelihood of penetrating armoured vehicles than similar British or French weapons due to its larger calibre. A seductive array of company level support weapons are available: flamethrowers and demolition charges for the assault engineers; low calibre mortars and direct fire guns for company level fire support; bazookas, piats and panzerschrecks for anti-armour teams. Certain weapons are abstracted, such as panzerfausts, molotov cocktails and anti-tank magnetic mines; the subsystems governing use of these abstracted weapons provide fog of war and some delicious moments of uncertainty at the cost of a little additional rules complexity.

A mechanic associated with certain shaped charge weapons which I particularly relish is the backblast rule. A player may opt to absorb the dangerous backblast effect of firing a bazooka or similar weapon from a building or rubble, but with the benefit of a much greater chance of hitting the enemy target. For me, this is a superb example of an interesting gameplay decision made possible by ASL’s attention to detail. The average player turn in an ASL game is punctuated by such dilemmas. The chrome pays off.

While ASL’s nationality distinctions and gadgetry fixation reveal some of the systems predilections, the vehicle and terrain rules reveal the evident fascination the designers have with the battlefields and AFVs of WWII.

ASL’s depiction of the geographical environment is exceptional. Chapter B of the rules address terrain. Again, the hallmark is the comprehensive approach. It’s no great insight to observe that geographic conditions have a pronounced impact on tactical considerations. The suburbs of Arnhem and the high mountains of the Caucasus are very different places. An ASL scenario set in Normandy’s bocage, Stalingrad’s factories or the Libyan coastal road will have the terrain to match. Olive groves, graveyards, swamps, wooden huts, cactus hedges etc. etc. are depicted in over 60 official geomorphic map boards. You can even send your brave boys into the sewers, hoping to emerge from a basement and achieve a close quarter ambush. The historical modules provide maps based on actual terrain, often sourced from photographs taken during aerial reconnaissance sorties. The rules differentiate terrain types in a manner which is usually simple and concise, although some of the Pacific-specific terrain types, such as caves and paddy fields, are overly complex. Deformation of the physical environment is not uncommon; shell-holes can be created, grain fields set alight, buildings may collapse due to large calibre high explosive hits. Achieving a hit on an enemy machine gun position which not only eliminates the crew and weapon, but which collapses an entire upper storey and sets a building ablaze is the kind of drama which ASL excels at delivering. And such changes can often have a huge impact on the tactical situation. The smoke produced by a burning copse can shield an assault. The collapse of a steeple can deny a perfect observation post for an artillery observer. Stuff like this doesn’t happen in other games.

ASL’s treatment of the urban environment is particularly notable. Sewers, cellars, roofs, burnt-out buildings, huge factories and terraced houses are all addressed. Much of Chapter E concerns weather effects. Dry conditions result in increased chance of fires breaking out. Icy conditions freeze streams and jam weapons. Gusting winds cause fires to spread and play havoc with landing gliders. Mist and rain result in vision based modifiers to fire attacks. Mud impedes off road movement.

As comprehensive as ASL’s terrain and weather rules are, its treatment of the vehicles of war is outstanding. Turning its back entirely on the simple approach to armoured combat taken by Squad Leader, which is simply an adjunct to infantry combat, ASL fixates on the technical details. Every major vehicle of every combatant is depicted, from the legacy WWI tanks fielded by many nations at the beginning of the war to the late war behemoths which fought on the Eastern Front in 1944 and ‘45. Extensive vehicle notes supplement the information found on counters and provide for bespoke rules specific to vehicles which have unusual capabilities or limitations. Reading the vehicle notes is an enjoyable and educational experience, in and of itself, and the detail provided offers its own narrative of the evolution of the war. See, for instance, the ad hoc development of tank destroyers by the Wehrmacht in late 1941, as it responded to encounters with the T-34 and KV series tanks fielded by the Soviets. Consider the very different design philosophies of the various combatants and how they evolved over time.

Squad Leader’s initial scenarios are set in Stalingrad. As a consequence, Stalingrad is a spiritual homeland for ASL players, the place where it all began. Stalingrad 1942 is the subject of the first historical module, Red Barricades. One of ASL’s unique aspects has been the production of historical modules based on specific actions. They come with a map based on the actual battlefield and a set of scenarios describing elements of the battle. They also include campaign games which are a set of linked scenarios in which force preservation becomes an important factor. Thus far, a wide variety of official historical modules have been produced and each has been based on extensive research by the designers. Besides Red Barricades, others are set in the Ardennes, Normandy, Tarawa, Guadalcanal, the Rhineland and Arnhem. Most recently, Festung Budapest describes the late-1944 siege of Budapest. The historical module campaign games are perhaps the point at which ASL most closely resembles a simulation of sorts: the maps are faithful renditions of the actual terrain and the players are required to deal with some real life constraints, such as the need to limit losses and to trade space for time. Each historical module is an opportunity to experiment. Festung Budapest is particularly innovative as it models the impact of a protracted siege on the Hungarian and German garrison; the impacts of ammunition, fuel and food shortages are captured. The map is fantastic, a beautiful treatment of an urban battlefield completely unlike any other ASL map. Playing a module like Festung Budapest gives one a very strong sense of some of the tactical dynamics of an actual battle and the impact of the actual geography; as a player one develops a very real understanding of the savagery of a late war, urban winter siege.

Another unique aspect is that ASL can boast a literature of sorts. A lot of words have been written about ASL during its three decades of existence. The official magazines, the ASL Annual and ASL Journal, have been in semi-regular production. In recent years the ASL Journal has been published on a yearly basis. Third party magazines and rules guides have also been published, some of which are of extremely high quality, such as those produced by Bounding Fire Productions or Le Franc Tireur. As such, there’s an extant bank of articles on specific areas of the rules, beginner’s tips, scenario guides, play analysis, designer notes etc. This knowledge is extremely useful to players new to the community; a great way to learn the subtleties of play is to read articles on specific matters written by distinguished ASL players. A very wide range of excellent articles are available, many of which are hosted online and are free of charge. Many of the older Annuals and Journals are out of print, but are available on ebay etc., although sometimes the prices can be very high.

ASL’s detail and rules provides some insights into the war and how it was fought. The manner in which the game depicts WWII combat can be illustrative. The game’s rules provide an answer to questions such as ‘How did the Wehrmacht’s Panzer IIIs and IVs overcome the Soviet KVs and T-34s during Operation Barbarossa?’ A player of ASL will be familiar with many of the simple tenets of modern warfare. An early learning outcome for all beginners is the dangers of stacking. Fire attacks usually apply to all units in a location, so the greater the degree to which you stack, the more efficient your opponent’s attacks. The game provides other lessons, such as:

– The positioning of important weapons systems.
– The importance of camouflage.
– Combined arms, particularly the benefit of infantry and armour working well together.
– The frailty of unsupported armour in urban settings.
– The bankruptcy of the cavalry charge yet the continued usefulness of horse borne dismounted troops operating a lá dragoons, particularly against partisan formations.
– The advantage of high ground; as an ASL player part of the skill set you will develop is the analysis of terrain depicted on the boards, identifying vantage points, lines of sight and dead ground.
– The peril defenders face when surrounded and when avenues of retreat are cut off.
– For the attacker, the importance of outflanking and achieving envelopment. The destruction of opposing infantry is often most efficiently achieved by breaking key units, penetrating the defensive line and rendering the entire position untenable, as opposed to destroying enemy units using direct fire attacks or closing to close combat and exposing your forces to the risks of close combat.

Much of ASL’s detail is intended to cause players to incorporate actual tactical considerations into their play. Players are often incentivised by the rules to deploy their troops and weapon systems in ways which mirror historical practice. Infantry will disperse in attack and in defence. Once in contact with the enemy, your troops will assault in short dashes under cover. Tank platoons will manoeuvre together, each responsible for different sectors. Defending machine gun teams will be placed in prime vantage points, covering open ground, junctions and interdicting movement along streets. Overwatching firegroups will attempt to suppress enemy defences with weight of fire. AFVs will deploy behind walls or hull down on hillsides. In scenarios set later in the war, hidden tank-hunter infantry teams armed with shaped charge weapons will lie in wait by crossroads and bridges, hoping to ambush enemy armour. Antiaircraft halftracks will accompany your armoured columns hoping to discourage or impede enemy air support. ASL’s rules, more often than not, encourage behaviour which maps well to how we know the armies fought.

ASL’s unique advantage over every other wargame is the scale and degree of connection among the playing community. Estimates of the playing population vary, however I’ve read that there’s a core of 5,000 active players and I have no reason to dispute this. These 5,000 are largely dispersed across North America, Europe and Australia / NZ in numbers sufficient to support vibrant local clubs in many of the larger cities. There are also regular weekend tournaments which occur all over the world. Even if you lack local opposition and cannot travel to play, there’s a very lively and supportive online community. There are at least two ongoing international PBEM tournaments and a less formal ASL Ladder. Finding an opponent is very easy. There are a number of forums where one can ask for a PBEM or live VASL game and I can guarantee that in 99% of cases opponents are found within 24-48 hours. And it really is a community, members of which are happy to teach newcomers and often to share or sell-at-cost material which is difficult to find or out of print.

I think it’s important to dwell on the community point. Wargames are designed to be played. To an unhappy degree, wargaming has taken a backseat to the hobby of collecting wargames. The wargames industry, such as it is, annually produces a quantum of games which quite obviously dwarfs the capacity of the wargaming population to play those games to any meaningful extent. As a consequence, it’s all too common for a wargamer to own shelves of unplayed wargames. Possessions take precedence over experiences. ASL is in counterpoint to this general state of affairs. First and foremost, ASL is played. There may be many ASL collectors or those who have abandoned ASL for greener pastures, but there can be no doubt that ASL as a play phenomenon dwarfs all but a handful of other wargames. ASL provides a venue in which those who may be tired of buying unplayed game after unplayed game can, if they wish, halt and commit to play, as opposed to staying on the merry-go-round of new game after new game, or worse still, collecting purely for collecting’s sake.

Quite aside from strength of community, ASL is also flourishing in another sense. Multiman Publishing, the official publisher, regularly produces new product and reprints of out of print modules. A stable of well-regarded third party publishers, such as Bounding Fire Productions, Le Franc Tireur and Friendly Fire, produce complementary material, usually scenario packs and campaign games, some of which are highly innovative. That’s a remarkable testament to the strength of the fan base and the dedication of the publishers; after almost 30 years fresh, quality material is still coming.

ASL is an intense and immensely engaging game experience – decision point after decision point, dilemma after dilemma. The design’s devotion to capturing detail is outstanding. The game system can describe almost any tactical engagement which occurred during the war. ASL boasts a large and growing literature. The system is still growing; a healthy stream of scenario packs, magazines and modules are produced every year. The community is large, friendly and supportive of new players.

For all of these reasons, ASL is the greatest wargame. Hence the remarkable longevity of ASL and its vibrant playing community.

If you haven’t played ASL before, I hope I’ve convinced you to consider joining us. Buy a starter kit. Give it a go. Come join us! Come play!

Eoin Corrigan’s “Majestic”, originally published on BoardGameGeek, July 10 2013.  

ASL 105 Going to Church AAR

French Canadians from Les Fusiliers Mount-Royal met up with German SS troopers at St. Martin-de-Fontenay on August 1 1944.  The Canadians were to clear the SS from a church in the area.  I played the Canadians and Robert Zinselmeyer, the SS .   This was a 6 turn scenario and the Canadians win immediately when there were no unbroken SS in the church.

ASL105-CT1b-proc

This was the Canadian Turn 1 : the Canadian death star contained a heavy machine gun (“HMG”) that went on a long rate tear, obliterating the east side of the church  A team of Canadians rushed forward from the northeast.  Another team moved around to the south-west of the church to catch Germans routing to that side.

ASL105-GT2a-proc

This was the German Turn 2 : the Canadian death star continued to work on the east of the church.  Canadians move closer from the northeast and the southwest.

ASL105-GT3a-proc

This is the German Turn 3: a half squad attempted to approach the church with a demo pack earlier but was routed.  This was the first attempt to retrieve it.  The half squad (“HS”) was then KIA’d, as were a number of other Canadian units afterwards.  The Canadians never got this demo pack back.  The Canadian death star decided to relocate for lack of targets.

ASL105-CT4a-proc

This was the Canadian Turn 4 : The Canadians didn’t do very well on the east side.  The lone intruding HS crashed into the church but was immediately met with the SS in close combat!

ASL105-GT5a-proc

German Turn 5 : Even though the odds of that mêlée was turning because of reinforcing Canadians from all sides.  The Germans were still blocking one of the staircases while the rest raced upstairs.

ASL105-CT6a1 - KIA Demo-proc

Canadian Turn 6 : A valiant Canadian 8-0 made a desperate try for the dropped demo pack and was killed as well.  The mêlée hadn’t ended.  Scores of Canadians were held up by a wounded German 8-0 at one of the staircases!  Someone suggested an infantry overrun on the wounded German but the Canadians failed to act.  It was just too crowded and they were afraid that they might shoot their own.  The Canadians rushed up the other staircase in frustration.

ASL105-End-proc

Last German Turn : the Canadians were able to dispatch the wounded German 8-0 at the end of the previous turn.  All German upstairs were then immediately encircled!!  The Canadian laid heavy firepower on the Germans inside the church.  The HMG went on a rate tear as well!  However when the smoke settled, one German HS remained.

The Canadians ran out of time.

Journey to a Tourney, Part 3 : The Aftermath

M36 JacksonI never expected this, but there IS an “aftermath” to having done a tourney for the first time :

  • Having prepared for all 25 tourney scenarios, I read a lot more of the rulebook and the scope of scenarios I can play expanded.
  • I met some great folks around the region as well.  I have a few more regular “Live” games now on VASL apart from my usual stable of PBeM (“Play By eMail”).
  • I play a little faster.
  • I play differently too, having seen different styles of play.  For example :
    • I know I should be more aggressive with my movements.  Moving and encircling is way more effective (and time efficient “turn wise”) than sitting and shooting.
    • I know what establishing a tempo as an attacker feels like.
    • I don’t care about the die rolls anymore.  “Reversion to Mean” dictates that it will all even out at the end.  Good decisions win the game not die rolls.
    • I overheard Ian Percy and George Bates said (and this is far from an exact quote) : “it’s not so much about what you do, it’s more about presenting your opponent with a serious of tough decisions and one way or the other, he’s going to mess a few up.  Make him do all the work.”
    • It’s important to plan out where you should be on the map and also when you should be where on the map especially as the attacker so you don’t run out of time.
    • There was an earlier poll on GameSquad asking whether folks are more comfortable attacking or defending in a scenario.  I can’t find it now but someone said “Is there a defence?”.  This thought rang in my head during my last round as the IJA (Imperial Japanese Army) defender in J116 Brigade Hill.  The IJA were infiltrating and cutting the attacker’s rout paths.  My understanding of Book VI (“Defence”) in Clausewitz’s “On War” echoes the thought : defence is just a different form of offensive action – counterattack!
  • Now I am getting ready to support the Hong Kong Society of WargamersAdvanced Squad Leader Tournament this year!!

Lastly I want to share something from the tourney with everyone.  John Charles Knowles, who’s teaching me jungle warfare through Operation Watchtower at the moment, wrote a cheat sheet for the PTO for our benefit.  Here we are :

Malaya Madness Chapter G Cheat Sheet

Cpl Kwan 7-0

A33 Tettau’s Attack AAR

http://www.defendingarnhem.com/commanders.htm

Lt General Hans von Tettau

A33 Tettau’s Attack puts us right back into Arnhem, 18 September 1944.  The Red Devils had landed and various German units were on the counter attack.  Lt General Hans von Tettau and his hastily gathered battle group was tasked with attacking the British drop zones.

The Germans got a mix of conscripts, a big lot of second line squads, a first line squad and 3 leaders.  They were SS but was in reality a group of camp guards and depot troops(ELR:2).  The Scots got only 4 elite squads, 3 leaders, a medium machine gun (“MMG”) and some LMGs.

The Germans win by exiting 3 victory points worth of units to the right of the map in 11 turns.  A squad is 2 points, a half squad 1, a leader 1 and each leadership modifier exited is 1 (hence a 9-1 leader is 2 points).

BT1a-proc

I played the Germans against a gentlemen who’s recently coming back to Advanced Squad Leader (“ASL”).  The superior troops and machines of the Scots were deadly over that much open ground.  I split the Germans into two.  The regulars were to make their way across the grain field to the left where the woods offer cover down most of the map.  The MMG went into the wooden building to suppress the Scot MMG and to hinder the Scots from shifting their troops to the left.  The conscripts were on the right and their goal was to draw fire as I was not optimistic about them moving down the right in time with their movement rate of 3.

GT1a-proc

This was the German Turn 1.  The regulars dashed over to the far left of the field (top of the map).  The Scot MMG went on a horrifying rate tear.  The Germans kept their heads down and ran.  When it’s all over, the Germans KIA’d 2 squads with another squad broken.

GT2a-proc

German Turn 2 : The survivors on the left flank (top of the map) pushed into the Scot LMG team.  One German half squad got too close and was vaporised.  The conscripts on the right (bottom) got a lucky break when the Scot 9-2 with the MMG team broke.

BT3a-proc

British Turn 3 : More lucky breaks for the Germans!!  The fire group formed by the surviving Germans broke the Scot LMG team on the left!  The conscripts rabble on the right made very little progress through grain field.  However they served their purpose by drawing the Scot’s attention.

GT3a-proc

German Turn 3: The Germans were not going to let the Scots on rally on the left flank.  They shot and they ran after the routing Scots on the left flank.  The Scot 9-2 (MMG team) rallied and the grain field on the right was covered with German conscripts too scared to run.  However, the Scots started to realise something was not quite right.

GT4a-proc

German Turn 4: the Germans on the left flank caught up with the routing Scots and killed them.  A German 8-0 with a LMG decide to stay back, scrambled into the wooden house and lay fire lanes to hinder the pursuing Scots.   The rest of the Scots started running back and the German on the right flank tried to slow them down with long-range shots.  Meanwhile a pair German leaders on the right broke off and started running toward the right of the map for a few more Victory Points.

BT5a-proc

British Turn 5 : the German 8-0 with LMG was a rather effective rearguard.  The running Germans focused on putting walls and hedges behind them as the Scots couldn’t see over unless they came right up against these structures.

GT5a-proc

German Turn 5 : the Germans need to get at least a squad and a half over the wall before the Scots recover.  The German leaders on the right flank were also scrambling for the exit just to make sure.

The closest Scot units were broken up against the wall.  All hopes were lost for the Scots as another two German units jumped over the wall after their friends.

Or was it?

BT6a - shot back snakes-proc

British Turn 6: A Scot 9-1 leader rallied!  He dusted himself off and clambered over the hedge after the Germans.  His sights were on the LMG the German left behind.  Yes, that German 8-0 with the LMG just made it over the far wall.  May be he won’t turn around …

But he did.  The German 8-0 turned around and slammed the LMG on the wall he just jumped over.  He took a shot through the orchard hex which hindered his sight.  He had to make this shot because otherwise the Scot leader would dive into the woods behind the building with the LMG.

He rolled snake eyes ..

And the valiant Scot leader failed his morale check and hit the dirt.

The Germans ran off.

Cpl Kwan 7-0

Journey to a Tourney, Part 1: Decisions

I did it.

I registered for my first Advanced Squad Leader tournament, the Malaya Madness (Feb 21 to 23 2014) in Singapore. I bought my plane ticket. I booked my hotel.

Two months ago I never would have even thought about it. (Flying to Singapore for a weekend to do what?!!) A year and a half ago, Advanced Squad Leader (“ASL”) wasn’t even a blip on my radar.

Before I go on, I want to make one thing crystal clear:

  1. If you are a relatively new player,
  2. If you are a “dormant” ASL player who’s quietly learning and playing ASL by yourself,

I am writing to you.

I know there are a lot of you out there and I care to guess that doing ASL by yourself is not the easiest hobby to do. I am writing to you. I would like to share my rationale for some of the decisions I made along the way.

I hope this helps you with your choices.

So there I was, working through the Infantry rules in my room, flipping through the massive 2nd edition Advanced Squad Leader Rulebook. I was highlighting important texts and I was noting important ideas in the margin. I was studying hard. When I got tired, I played a few rounds of ASL solo, planning to play through each scenario in turn.

Even playing was slow going, I found myself re-reading the rulebook more than I was playing.

Question 1: Do I keep on studying the rulebook or do I dive straight into a game?

I looked for live games. I found the folks at the Hong Kong Society of Wargamers who have face-to-face (“FtF”) games very weekend. Getting experienced players to take you through ASL games shows you the rules in action. It gives you context. The rulebook becomes much easier to read.

Oh yes , in case no one told you :

  1. Don’t wait to read and study the rulebook and “be ready” before you play your first game. Just go look for live games and attend. I have never met an ASL’r who’s not willing to teach.
  2. No, you don’t have the read the whole rulebook. You can start playing infantry only scenarios after Chapter A.

Question 2: Do I keep on dabbling solo or do I get on a regular play schedule?

I attended live games with the Hong Kong ASL’rs, but I couldn’t have joined them every weekend. ASL was still a solo affair for me. Had it continued in this fashion ASL might have become another of my passing fancies.

It never did.

Out of the blue Don Lazov wrote and asked me if I want to learn ASL from him. I was going to keep my “ASL hobby” on a personal level. but here I was, there’s an experienced player offering to teach. Do I keep it a private & low pressure affair or do I get serious about this?

Anything worth doing is worth doing seriously.

I stopped thinking and said “yes”. That decision changed my ASL life. ASL went from a private study to a social affair. Playing intelligent and thoughtful human beings makes ASL come alive from that moment on. ASL becomes the complex and rich experience that it’s designed to be.  Having a regular play schedule helps me internalize the rules.

Question 3: Do I stick with PBeM or do I play live?

I play ASL via PBeM using VASL. What I mean is that I play ASL via exchanging logs generated from Rodney Kinney’s “Virtual ASL” platform. I was up to 9 concurrent games at one stage. PBeM saves me from having to be at appointed places at appointed times. With my work travel schedule that was simply beyond the realm of possibilities. I step through my opponent’s moves from the logs they send me.  I interject my responses and I send my logs back.

What I lost was the social interaction. What I have was perhaps too much time to consider and to reconsider my moves. PBeM games allow for methodical and well thought out games, perhaps too well thought out.

So I started having more live VASL games where I see my opponent’s moves real time and we interact via Skype. Often times another friend(s) drop by and it becomes a virtual club night! I still travel as much but I keep a regular live VASL schedule now.

My other mentor, Witchbottles, a man who’s a lot busier than I am said it’s a matter of time management.

I am learning to play faster. I also learn to give up the notion of playing a “perfect game”. I am learning to square up a situation, structure a solution on the fly and execute!

Play, laugh and have a great time.

Question 4: Do I stay “in the shadows” or do I go signed up for a tournament?

I heard there will be an ASL tournament in Singapore for a little while before it was announced. I have to admit I didn’t give it any thought. The idea of paying for flight and hotel to Singapore by myself just to play boardgames was crazy. I didn’t even join the one in Hong Kong last year (I haven’t turn Fanatic then)!

Both of my mentors said I MUST go. One of them had even said in the past that he doesn’t go to tourneys anymore. He said I should go and decide for myself.

I gingerly broached the topic with my family. I have to admit, it feels like telling them that I am joining a motorcycle gang. My beautiful family was incredulous at first but quickly came around and gave me the support I need.

I signed up for my first ASL tournament.

Do I have a chance in hell of winning anything? No, but that’s not the point, although they do have a prize for the one who lose the most games.

To me the points are :

  • This is my gesture to myself that I want to do ASL well. Anything that’s worth doing is worth doing well. I might not become a world class player but I want to be wicked good and a lot of fun to play.
  • This is me reaching out and be part of the Asia Pacific ASL community. These are the core group of guys I’ll be playing countless hours of ASL with for years to come.
  • This is me supporting efforts to foster and to grow the Asia Pacific ASL community. Today I already count among my regular opponents, a player from Singapore and a player from Japan. I look forward to a lot more!
“Journey to a Tourney” is a multipart series that details my personal journey to what’s hopefully the first in a long line of regular ASL Tournaments in Asia Pac. I hope this will encourage any new or experienced players to come join us as well!

References :