G15 Bone of Contention – Partisans vs Retreating German SS

On 31 August 1944, the SS-Panzer Abteilung 102, Waffen SS’s heavy tank division retreated towards Germany after a 20 day stand at Hill 112 near Caen (see Operation Jupiter).  In the map above the left most marker is Utah, second one from the left is Omaha, Hill 112 is the 2nd from the left and Rouen is the one to the left.

The division was almost destroyed by the heavy fighting and had to abandon their tanks at Rouen by the shore of the Seine.  On the night of August 31, a team of soldiers, mechanics and tankers crossed back to the western shore of the Seine to destroy the abandoned tanks.  Amongst the wrecks they found two abandon Panthers sitting immobile, with  local partisans trying to figure out the mechanical beasts.

The German’s mission was to destroy the two Panther’s and the partisans, the BCRA Maquis de Rouen, were to protect their prizes at all costs.

Witchbottles played the Germans and I the partisans.  We got German conscripts and self rallying crew pitted against partisans who couldn’t form fire groups, has low ammo and tend to break toys easily.

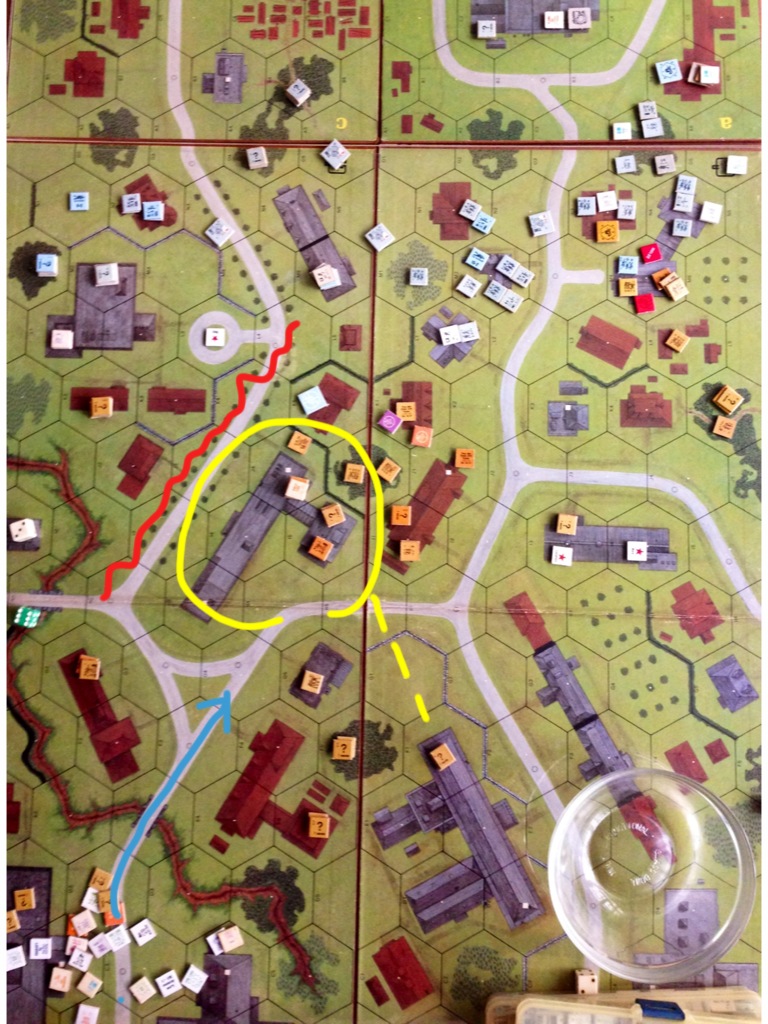
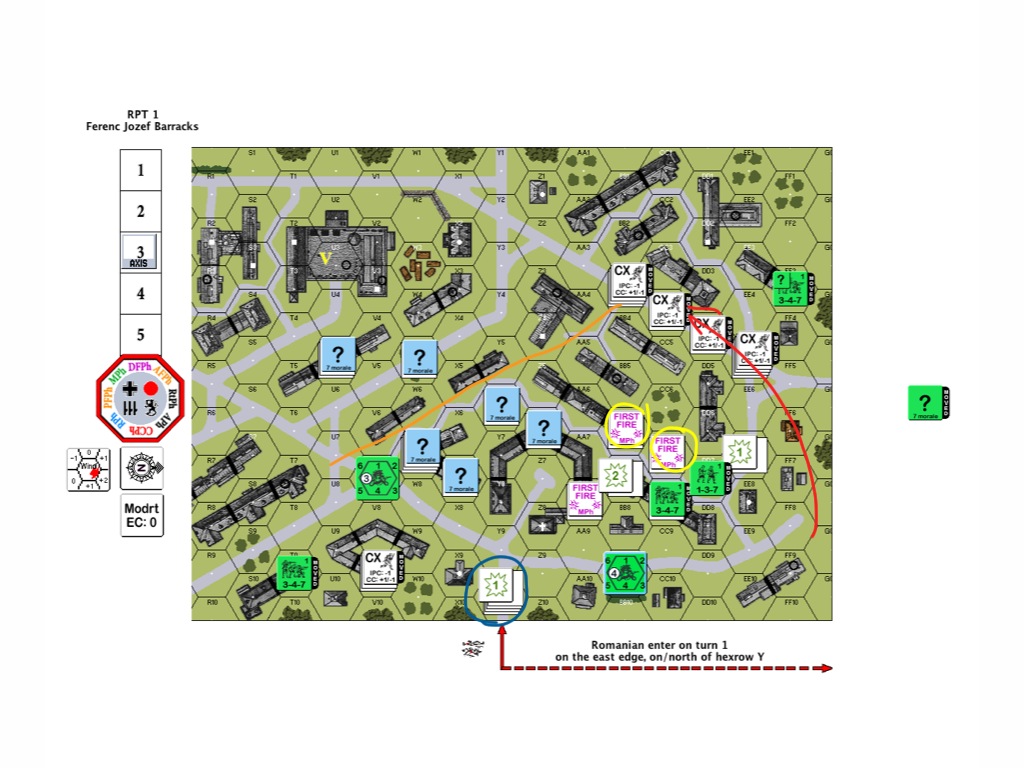
This is the initial setup, and the north is on the right.  The partisans couldn’t stack and couldn’t be more than four hexes away from a specified hex.  I looked to use the gully as a protected passage between the forces to the east (bottom of the map) and their comrades on the south side (left of the map).  The Germans enter from the left and the bottom of our screen.  As it turns out, the Germans from the left took the direct route but the Germans from the bottom took a long detour around the partisans to the north.

As the turns progress, this flanking move would take the northern defenders off their prepared positions.

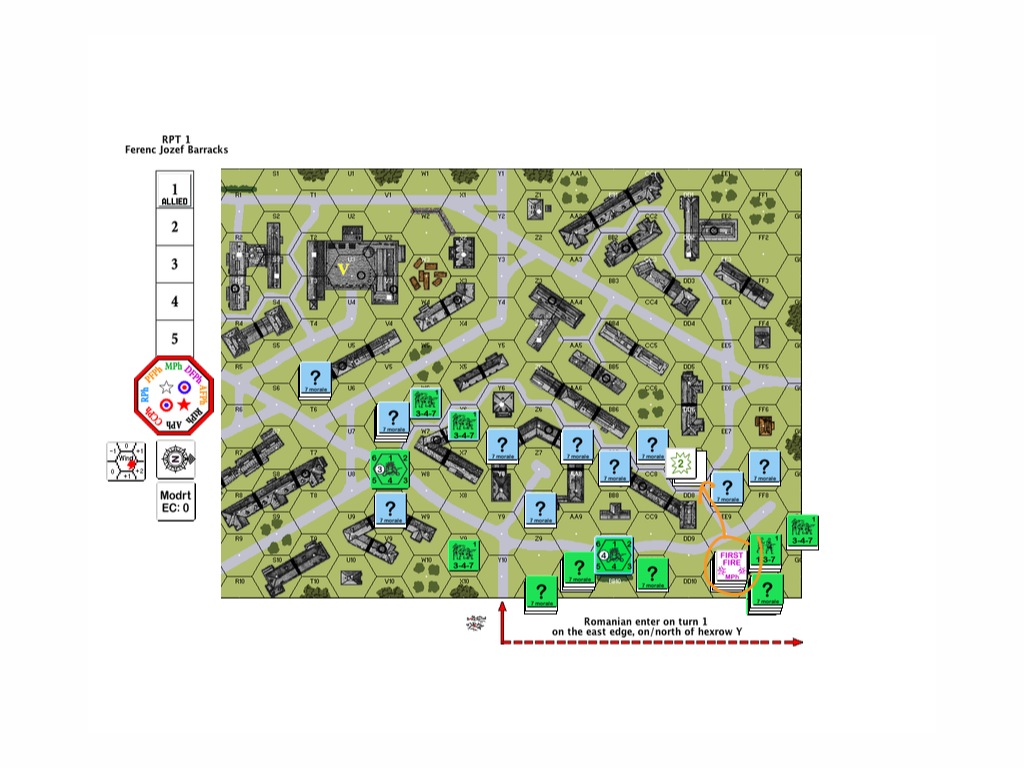
Over to the south (left), an all out street fight ensured.  The partisans tried to stay concealed for protection but took every opportunity to snapshot the Germans between the one hex buildings.

photo 2-2

To the north (right) the Germans outflanked the partisans and started to make their way to the Panthers, darting between the tombstones.

After the game, Witchbottles observed that he would have rushed forward to occupy the large stone structure to the upper right of the northern partisan forces, to the right of the graveyard (dark green).  That would have secured the partisan’s northern flank, no doubts.

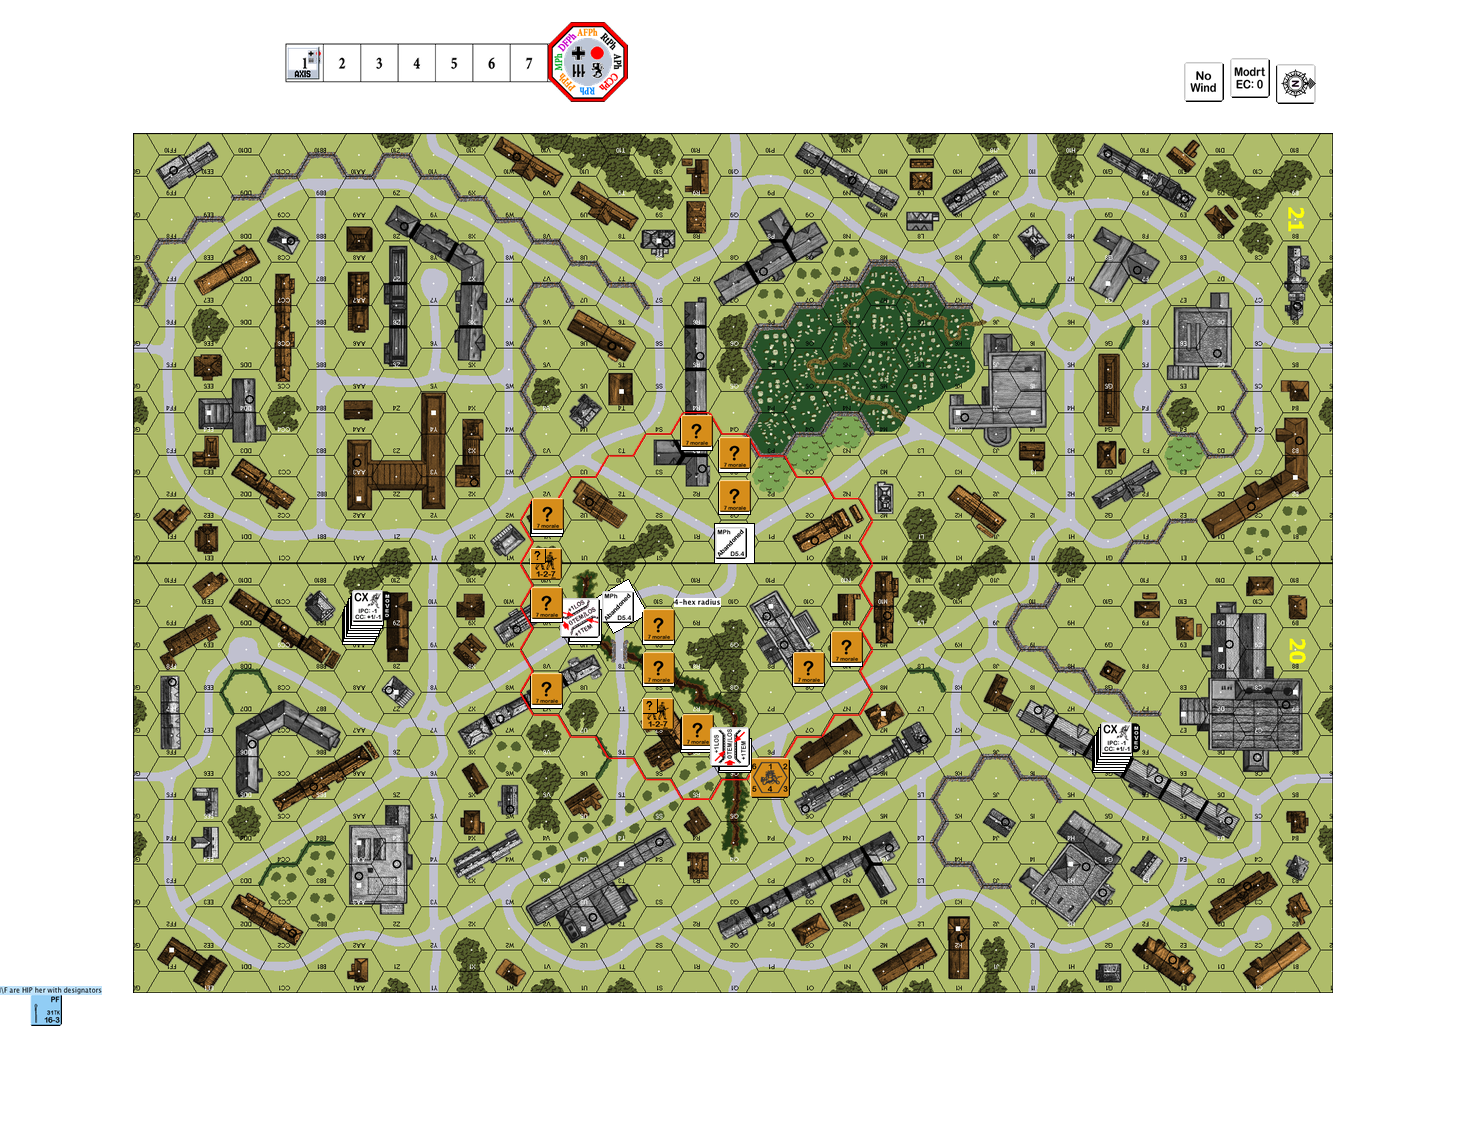
The German unit I marked off with a yellow circle and an arrow was the unit who managed to put a panzerfaust into the side of the Panther.  The partisans I marked off with rough dotted lines in the middle was the partisan squad that killed a German half squad with gunfire but attracted a sniper shot to the Panther on the top right (to the lower left of the dark green graveyard).  The shot that killed the partisan commander stunned the crew and they promptly abandoned their big toy.  One Panther burning, one Panther abandoned.

Turn 6 Axis AFPh - Killed Panther

A partisan squad managed to run to the graveyard walls and took a couple of shots at the approaching tank crew and promptly ran out of ammo.  The mechanics and crew realized they couldn’t get a good shot at the Panther from the graveyard and so they came over the walls.  In the German Turn 6 the game ended at the Advanced Fire Phase when the Germans nailed the second Panther.

In retrospect aside from moving to occupy the big stone building to the north and thus securing my northern flanks like Witchbottles advised, I should make better use of fire lanes and residual fire.  Next time!  You live and learn.

A big THANKYOU to Witchbottles for a very interesting game!

RPT1 (Finale) Ferenc Jozef Barracks – A View of Advanced Squad Leader Scenarios

Painting depicting Greek soldiers on bayonet c...

Painting depicting Greek soldiers on bayonet charge. (Photo credit: Wikipedia)

We picked the game back up at the start of the Hungarian Turn 3.  For those readers who just picked this up: the Hungarians are the ones with the pretty blue rim and the Romanians are the ones without.  The Hungarians were doing a fighting retreat from the bottom right of the map to the upper left.  The Romanians were hot in pursuit, racing the Hungarians through the city blocks and tried to stop them from ever reaching the barracks.

Two of the pursuing Romanian squads were ambushed by the retreating Hungarians.  Luckily the Hungarians weren’t looking for a fight but took the chance to slip away instead.  One of the escaping Hungarian squad even ran through a semicircle of gunfire to pull off their Houdini like escape!

Towards the end of the Romanian Turn 4, the Romanians caught up with a few Hungarian squads again but the preference was to position themselves to cut off the Hungarians from crossing the street back into the barracks.  Two of the Romanian half squads managed to slip through the Hungarians and took up a position on the side of street.  The other Romanian squad locked a Hungarian squad in melee, stopping them from running back in time.

T5 Romanian RPh - Start of the last turn

This is the start of the last Romanian turn, the last chance for the Romanians to get into, to clear and to hold onto the barracks.  Some of the Hungarian troops were held back, but some managed to cross back into the barracks in spite of Romanian gunfire in the open streets.  There was some pretty vicious hand to hand combat going on towards the top right of the map (“Melee”), strangers joint by an encounter by Chance and locked in perpetuity by Fate.

Sketch 2013-07-01 11_24_12

The Romanian 9th Cavalry poured into the streets amidst a wave of bloodcurdling screams.   The heavy machine gun (under the “9-1” leader counter) was a primary concern.   Some men ran to draw fire, others raced towards the barracks from all sides.  A Romanian 9-2 leader and a pair of half squads managed to run six hexes through the open streets and gun fire, jumped into the barracks and killed the defenders!!

T5 Romanian - CC end moment when Romanians has possession

Unfortunately their sacrifices were for nought as too many of their brothers had fallen.  The Hungarians folded back into the barracks in the last turn and negated the Romanian victory conditions of having to clear the structure of good order Hungarian troops.  Below is the Hungarian endgame.

T5 Hungarian End Game

A couple of thoughts for the Romanian player:

  • Your FP (of 3) is useless in cities. If you don’t have support weapons (most of mine malfunctioned), engage the Hungarians in CC.
  • Manage your schedule, if you can’t hold the Hungarians before the barracks you need to run up there quick and have at least 2 turns to battle through the barracks. Take a count of the hexes and you will realize the Romanians truly does not have time.
  • I suppose there are two approaches to this –
    • Move fast and try to make the retreating Hungarian units run through streets of fire
    • Go full contact and engage the Hungarians before they can break off towards the barracks.

If you happen to play this scenario as well, I’d appreciate it if you drop me a note to let me know how it went for you, especially if you played Romanian and you won!!

hu347Sax347S

S1 (Part 1) Retaking Vierville

On June 7 1944, one day after the Normandy landings. the 101st Airborne (“Screaming Eagles”) was sorting themselves out from all over the Cotentin Peninsula and was tasked with securing the eastern approach to the American landing at Utah beach. Vierville-sur-Mer was a major traffic thoroughfare. Although the Americans secured it earlier they had to moved westwards towards the German strongpoint of St. Come du Mont (see Mission Albany).

There are three groups of symbols in this map of Normandy.  The one on the top left is Utah Beach, the one on the bottom left is St. Come du Mont which was a German stronghold.  The group to the right is Omaha beach and a bit inland from Omaha Beach is Vierville-Sur-Mer.

An assortment of German units took the opportunity to deliver a counterattack and among them, the elite 6th Fallschirmjäger Regiment. This day would see an all out brawl at Vierville-sur-Mer, paratroopers to paratroopers.

Erwin plays the Germans and I the Americans. We decided to play this Advanced Squad Leader Starter Kit Scenario with full Advanced Squad Leader rules. The Americans win if there are no “good order” German units in the four buildings marked with “V”s on the map. By the same token, the Germans need to keep a “good order” unit in at least one of the four buildings at game end (notice the Americans have the last move).

Turn 1 German - MPh

Turn 1 German Movement Phase

Some elements of the 1st Battalion, 506th Regiment of the Screaming Eagles were making their way through the center of town when German units (1058th & 919th Grenadier Regiments) appeared from different directions.   (Right edge of the map is North.)

The Americans went straight to work.  Two full squads and the  8-1 leader went to the key buildings in the southwest, the other elements went to the northeast to meet up immediately with the 1058th Grenadiers.  The southwest element could potentially be isolated and might find itself fighting a much tougher battle until  reinforcements arrive.  Their mission was to play for time.  The northeast element was to clear the way for the reinforcements and were free to play to their strength in the attack.

Turn 1 American - Close Combat Phase

Turn 1 American Close Combat Phase

Other American elements started to arrive.  They used the grain field (which is in season) to make it across the open ground, using a building for cover.  A potential danger was that new German elements might appear behind them and cut them off from their rout paths.  So one squad stayed behind in the woods as the rear guard (circled in orange on the map above).

Sketch 2013-06-22 18_27_32

Turn 2 American Movement Phase

A broken American squad on the south west decided to step it up, rallied and went fanatic (battle hardened, marked by the asterick). In their desperation, a hero arose in their midst!  The reinforcing Screaming Eagles lost no time in closing with the 1058th Grenadiers on the northeast.  Hellbent on blasting their way through, they also drew fire away from their brothers who followed.  The German paratroopers arrived from the south east as well.  They carefully made their way through the woods towards the sounds of battle.  (Right edge of the map is North.)

Sketch 2013-06-22 18_40_09

Turn 3 German Advance Fire Phase

The 919th Grenadiers crossed the street in the south-west and pressured the squads on that corner of the intersection.  At the same time the 6th Fallshirmjäger moved to slice the battlefield in half, isolating the 8-1 and his little group.  To the north (right edge of the map), the Screaming Eagles couldn’t break through the 1058th Grenadiers.  They needed to clear a way to town fast ‘cause the key buildings are falling to the Fallshirmjäger soon, which also means they and their arriving brothers would all be standing outside the grain field with no protection if they couldn’t get into town.

Sketch 2013-06-22 18_45_21-1

Turn 4 German Rally Phase

The Screaming Eagles managed to get into close combat in the north.  A half squad was killed when they went in for hand to hand with a German squad and their 8-1 leader.  On the other side of the block an American half squad ambushed their German counterpart when they broke into their building.  The Americans slipped through to the other side and met up with the American paratroopers that were holding the Fallshirmjägers at bay.  However the American’s hold on the key junction was strained as they endured volleys after volleys of German fire.

So here we are at the start of Turn 4 in a 5 turn scenario.  Will the Germans succeed in capture at least one of the buildings at the intersection and hold off American attacks?

am747Sge548S

How about coming home everyday to 30 mins of PBeM game over VASL?

Whether you are a fellow newbie who would like to learn together or an experienced ASLer who don’t mind helping me up the curve. I play to enjoy and to learn. Please message me at jackson-dot-kwan-at-gmail-dot-com!!

Google

DASL1 The Schoolhouse – Team Play

Photo taken early game

Last Sunday I spent the afternoon playing DASL1 The Schoolhouse.  I was thankfully partnered up with an experienced ASL’r, Simon, as the Russians.

This engagement took place on July 9 1943 at a Russian village at the Kursk salient called Ponyri.  The scenario card described this as “the most intense street fighting since Stalingrad“.  This engagement also saw the huge Ferdinand tank destroyer (aka “Elefant “or “Porsche Tiger”) in action.

I got to say : this is a VERY interesting scenario. The Germans (Lawrence, Erwin & Wah) had limited time before a whole new Russian army piled in. On one hand they needed to be aggressive as they were under time pressure, although they couldn’t be too aggressive as they had to be able to fall back to proper defensive positions when the Russian counterattack arrived.

My partner Simon did a terrific job defending the stone building (marked in yellow) to the immediate north of the intersection on board d. His use of  tunnels (one of them marked with yellow dotted line) to the two buildings behind (forfeited fortified buildings) as rout paths and to gain concealment was a beautiful thing to see. Too bad the Germans lost their flamethrower early in the game!!

The Russian defence involved the use of set demolition charges as well. The Russians fell back when necessary but did everything to delay the Germans until the counterattack arrived. One of the Elephants was torched with Molotov Cocktails when it tried to rush a killer stack. Two of the remaining three Elephants were immobilized but were in great positions. It didn’t look easy for the counterattacking Russian tanks if they want to hit back through the narrow streets.

The Germans tried rushing the street (marked with the wavy red line) in front of the stone building but was wiped out by spraying fire.  At one point the Germans got that stone building encircled, rush the ground floor and was in the process of destroying one end of the tunnels.

That was precisely when the counterattack showed on Turn 7 (marked with the blue arrow).

The lead tanks and the elite troopers of the 1st Battalion 1032nd Rifles helped defend the tunnels together with the 307th Rifles coming back through. I had to run at that point but my friends told me there was a human wave on the German’s left flank and Germans conceded on Turn 8.

How about coming home everyday to 30 mins of PBeM game over VASL?

Whether you are a fellow newbie who would like to learn together or an experienced ASLer who don’t mind helping me up the curve. I play to enjoy and to learn. Please message me at jackson-dot-kwan-at-gmail-dot-com!!

Google

RPT1 (Part 3) Ferenc Jozef Barracks – A View of Advanced Squad Leader Scenarios

Turn 2 Hungarian - PFPh

Turn 2 Hungarian – PFPh

We are back on RPT1 Ferenc Jozef Barracks.  Just so everyone remembers, the Romanian 9th Cavalry were the attackers and the Hungarian 1st Tank Division were the defenders.  This engagement was part of the horrendous 100 day siege of Budapest.  The Hungarians were fighting along Nazi Germany and the Romanians were Russian allies.  The goal of the scenario is for the Romanians to capture the barracks (marked with a yellow “V” by Don) seen on the top left of the map within a 5 turn (10 mins in real world) time frame .

Turn 2 Hungarian

The above was what it looked like at the start of the Hungarian Turn 2.  The Hungarians started moving back towards the barracks while keeping their guns pointed to areas where their Romanians pursuers would need to cross.

Turn 2 Hungarian DFPh

Turn 2 Hungarian DFPh

The Romanian 9-2 squad leader hiding all along together with a squad and a shiny new medium machine gun (in the middle on the bottom, circled in orange) decided it was the best time to come out of concealment and open fire at the Hungarians who came into sight.  Unfortunately the MMG went the way of the flamethrower and clonked out on the first volley!  Apart from making a mental note to launch a complaint against the armoury after the engagement there wasn’t a lot he could do.  The other chaps in the building to the bottom right heard the ruckus and joined in as well but they then realised they no longer had line of sight.

The Hungarian defenders did a beautiful job slipping away towards the barracks whilst staying in concealment.  (Note to self : watch & learn)

Turn 3 Romanian

Turn 3 Romanians DFPh

Turn 3 Romanians DFPh

The Romanians orchestrated a series of moves in the hopes of stopping the bulk of the Hungarians from reaching the barracks.  On the righthand side of the map, the Romanians successfully kept the 2 Hungarian squads (circled in yellow) distracted while they double-timed a number of squads up the boulevards to the west.  They also intended to engage and even kill a few of the Hungarian squads by hand to hand combat where they could.

On the bottom of the map, the fuming 9-2 squad leader and his squad (circled in blue) who were dragging their broken MMG across the street (Note to self: use “Dash” next time) got pinned under heavy fire.  So there they were, hugging the ground and cursing up a storm in the middle of the street.

The orange line through the street on top was where the Romanians planned to shoot at the Hungarians who would need to cross over to the next building on their way to the barracks.

Turn 3 Hungarian RPh

Turn 3 Hungarian RPh

The Romanians (circled in red) tried to grab a couple of the escaping Hungarians, but in both instances they were ambushed instead!  The Hungarians decided to withdraw and slipped away while the Romanian attackers were still hugging their guns in fright.

So here we are at the start of the Hungarian Turn 3.  The Romanians have only 2 turns left and the Hungarians has done an elegant job in slipping away intact as a force while mostly staying under concealment.

Will the Romanians catch up to the Hungarian masters of defence?  Keep an eye out for Part 4 of RPT Ferenc Jozef Barracks!

hu347Sax347S


How about coming home everyday to 30 mins of PBeM game over VASL?

Whether you are a fellow newbie who would like to learn together or an experienced ASLer who don’t mind helping me up the curve. I play to enjoy and to learn. Please message me at jackson-dot-kwan-at-gmail-dot-com!!

Google

“The Best Advice Garnered From Many An ASL’r Much Better Than I”

Iwo Jima

Jon H, aka “witchbottles”, the editor for the top notched Advanced Squad Leader newsletter “Point Blank!” gave me the following advice when I first join the GameSquad forums.

It’s only after a month later when I realize the true value of his words.  I went back to him and he gratefully gave me the permission to repost what he told me for the benefit of all.

So here we go …

The Best advice garnered from many an ASL’r much better than I:

  • Read the rules, pick one chapter every month and read front to back, including footnotes.  (Credited to Carl Noguiera)
  • Follow the time-honored “programmed instruction” (“Eight steps to ASL – A programmed instruction approach”, The General, v30n1) Basic infantry; MGs and SW; terrain variations; guns and mortars; Vehicles and AFVs; Climate changes; Air support; then paras and gliders; night ; then PTO; finally DTO . The system was designed by Jim Stahler, and it works!  (Jim Stahler – remember that German 9-2 counter?)
  • Read EVERYTHING you can get your hands on about ASL:
  • Use ROAR to understand play balance; use the ASL Scenario Archive advanced search routines to find scenarios to fall into the above mentioned order of learning.
  • It will go quick if you used to play Squad Leader. Big changes are in the vehicles, Guns, and defensive fire and support weapon mechanics. Walking in with Squad Leader – GI Anvil of Victory you have about 10% learned. ( the rest will be no longer used).
  • Play, play, and oh yeah …. PLAY. the more the merrier, and the most diff opponents you can find!  (Credited to Gary “Fort” Fortenberry and many, many others!)

KRL, Jon H

Kwan01

How about coming home everyday to 30 mins of PBeM game over VASL?

Whether you are a fellow newbie who would like to learn together or an experienced ASL’r who don’t mind helping me up the curve – please message me at jackson-dot-kwan-at-gmail-dot-com.  I play to enjoy and to learn!!

Baptism of Fire – Introduction to Tank Play via S21 Clash at Borisovka

German Tiger I of the 501st heavy tank battali...

German Tiger I of the 501st heavy tank battalion in Tunisia. (Photo credit: Wikipedia)

I am in trouble!

I just found myself regular face-to-face (“FtF”) games with the good people of the Hong Kong Society of Wargamers who, when they are not playing miniatures, meet regularly to play Advanced Squad Leader games.

I thought I would just drop by, watch and learn how ASL rules come alive in FtF play.  It’s my first meeting with these folks (names withheld since I didn’t ask for their permission) and I was determined not to be too much of a disruption.  I mean these are very experienced players who carry all the ASL tables in their heads, surely they don’t have time for newbies …

They would have none of that.

Before I knew it I was taking part in a scenario “S21 Clash at Borisovka“.  This scenario depicts a situation on March 14 1945, in Borisovka, where the German Grossdeutschland Division had penetrated deep into Russian lines and elements of the 3rd Guard Tanks Corps was sent to stop them.  It’s a tank on tank scenario where the Russians has 10 T-34s and the Germans has 4 Mark IVs and 2 Tigers.  I haven’t yet read Chapter D but soon after they took the time to explain gameplay to me, I was running a T-34 from behind the woods, speeding through open ground and ramming up against the side of a row of Mark IVs on our flanks and took two of them out!

The Tigers were much harder to deal with.  We were trying to run T-34s around them and even got some rammed up their sides but to no avail.  We though things were going downhill for the Russians when one of the Tiger’s gun malfunctioned!

You should have heard the screams!

At the end the Russians won, befitting the engagement’s historical ending.  If you saw the level of engagement (Advanced Squad Leader is a VERY interactive game), it’s not hard to understand how some folks devote a lifetime to playing it.

To my fellow newbies : It’s true – the best way to learn Advanced Squad Leader is to have seriously experienced players to play with you.  You’ll be amazed how quickly everything fall into place!

(If the above sounds fantastic, you should know that I was learning more than playing .. a couple of grognards did all the moves!!)

Kwan01

How about coming home everyday to 30 mins of PBeM game over VASL?

Whether you are a fellow newbie who would like to learn together or an experienced ASLer who don’t mind helping me up the curve. I play to enjoy and to learn. Please message me at jackson-dot-kwan-at-gmail-dot-com!!

RPT1 (Part 2) Ferenc Jozef Barracks – A View of Advanced Squad Leader Scenarios

Don and I waded a little into scenario RPT1 Ferenc Josef Barracks this week. The Romanians got on the board intact. Most of them manage to keep their concealment. I will need to rely on the buildings for cover going forward because I simply don’t have the time to retain concealment / to assault move. The only squad with smoke grenades is the one 4-4-7 holding the flamethrower and that’s only with a die roll of 1 (17% chance). As an attacker with a short schedule, I have to balance the urge to rip up the streets against taking stupid risks and losing the bulk the Romanian force before getting to the barracks. From the way Don was setup, the Hungarians are looking to do a fighting withdrawal back to the barracks. It’s therefore going to be a running street battle all the way back.

Guys with low firepower like the 3-4-7s are simply ineffective against defenders concealed in stone buildings. For my shooting to be effective, I need die rolls so low that will trigger the snipers in most cases. I only have 2 leaders in the pack so I need to avoid low probability shots.

Turn 1 Romanian

Turn 1 Romanian, end of MPh

What you are looking at here (blue marking) is two of the Hungarian squads who came out of concealment and took a shot at the Romanian 3-4-7 assaulting up into the road hex in Y10. I expected a good number of Hungarians to be staring at that road hex all day. They would open up and the residual fire would rip up anyone else coming after, pretty nasty on an open road hex! This Romanian squad got lucky though and no one else was going to come through.

On the other hand  the elite Romanian 4-4-7 squad in building F9 (orange marking – underneath the 1-3-7) was eager to unleash their flamethrower on the concealed Hungarians in DD8 they caught a glimpse of when they ran up. Unfortunately flamethrower FP is halved at 2 hexes and halved again versus concealed targets. FP 6 flat is still a good shot  though considering the alternative but the Hungarians escaped a fiery fate for now.

Turn 1 Hungarian

Turn 1 Hungarian MPh

Don executed the time-honored strategy of skulking. He assault-moved all of his squads from concealment territory to concealment territory and in most cases out of my line of sight.  (Note: this denied me the opportunity to fire at them in the Defensive Fire Phase and they would advance back into their original position at the end of this turn, ready to stop my next advance!)

The Romanians in EE10 decided to come out of concealment and took a FP4 +3 shot at the folks skulking off at DD7 (orange marking). The Romanians needed a die roll of 4 or below (17% chance) to have any effect but that was the one chance where they could disrupt the Hungarians in preparation for the coming Romanian Turn 2. Again, the Hungarians were well concealed and the stones protected them well – no effect.

Turn 2 Romanians

Turn 2 Romanians end of Defensive Fire Phase

It was time.

The Romanian management said it was time to go out there and do some business. The elite 4-4-7 squad decided to give their toy another try. They looked to roast the Hungarian squad that spotted them on the open ground coming over. Another FP6 flat shot across the street – and the big toy broke with a “clunk”. They carried their flamethrower all the way over and it spluttered on the second shot!

Anyway, it was time to reach out and touch someone. The Romanian squads and half squads assaulted out into the street, trying to spread out as much as they could. This is a picture of the Romanians in the street and getting fired on. The gods are with them as only 2 of the squads/half-squads were pinned and the rest were unscathed.

You can see also where the Romanians pushed two squads into GG7 and GG8 (orange markings on the right), running over open ground and risking -2 shots. They saw their compatriots before them being relatively unharmed and hence they took the chance to flank the Hungarians.

The Romanians piled into the concealed Hungarian positions in the buildings across the street (DD8, EE8, FF7) and on the left of the map, into V9 – the one concealed position that was blocking the way.

Turn 1 Romanian Close Combat Phase

SURPRISE!!!  All positions except DD8 (marked “CC”) came up empty. The good news was that the Romanians uncovered all the fake Hungarian positions. The bad news was that they failed to catch the bulk of the Hungarian forces.

The same Hungarian squad that survived two roasting attempts decided to hold their ground and fight. The Romanians weren’t going to let them get away this time either and so they went for a bloody hand to hand combat. It was over quickly with the Romanians taking some losses and the stubborn Hungarian squad finally eliminated.

Turn 2 opens for the Hungarians. Will they be able to retreat safely? Will they be able to delay the Romanian hordes?

hu347Sax347S

How about coming home everyday to 30 mins of PBeM game over VASL?

Whether you are a fellow newbie who would like to learn together or an experienced ASLer who don’t mind helping me up the curve. I play to enjoy and to learn. Please message me at jackson-dot-kwan-at-gmail-dot-com!!

Google

RPT1 (Part 1) Ferenc Jozef Barracks – A View of Advanced Squad Leader Scenarios

Siege of Budapest

Historical Background

This battle is part of what’s considered one of the bloodiest city fight ever – the 102 day siege of Budapest between December 1944 to February 1945. Soviet & Romanian troops laid seige to Budapest in their drive towards Berlin. Hitler declared the city “Festung Budapest” (“Fortress Budapest”) and so it was to be defended to the last man by German and Hungarian troops. This battle was particularly vicious in that its inhabitants were never evacuated and their suffering continued long after the city’s surrender on February 13 1945.

Scenario “RPT1 Ferenc Jozef Barracks” took place on Jan 12 1945 at the Ferenc József Barracks which is located between Kerepesi Road, Hungária Boulevard and Pongrác Road. I tried to locate the area on Google Map. To those of you who are more adept in the subject: I’ll be very appreciative if you will correct me on the matter.

Initial Setup

Initial Setup

The Setup

Romanian 9th Cavalry enter the board from the north-eastern side (botton right) of the map. Their goal is to clear the barracks (marked with a “V”) on the south-western side (upper left) of the map of any good order Hungarian units within five turns. Considering the 2 mins turns in Advanced Squad Leader, this exchange allows the Romanians 10 mins to meet their objectives. Each hex in Advanced Squad Leader represents about 40 meters. The Romanians need to go about 10 hexes (400 meters) straight up the street from middle of the map up towards the left just to get into a position where the they can attack the barracks. That’s 2 turns of out of 5. Considering the first turn is for entry and for trying not to get killed over open ground (off-board is open ground), the Romanians has only two turns left for fighting. This will have to be a maneuver war.

The Hungarian 1st Tanks Division start the scenario concealed in concrete buildings. Somewhere among the open windows there is a heavy machine gun pointing at the open ground below.

In real life the battle was so savage that all the officers and the NCOs of the attacking Romanian companies were killed but they did capture the barracks.

I hope I can do the same.

This is my first ASL game with an opponent (“PBeM” – Play by Email).  I am really appreciative of the tutorage of my good friend Don “Zovs” Lazov. Zovs’s a terrific teacher who’s  bringing the ASL rules to life for me. As you can see, he opts for a forward defense. This allows him to take out some of the Romanians right at the start.  As I am on a tight schedule, Zovs doesn’t have to kill me, he only need to delay my advance while he backs off into the barracks itself.

How do I beat this defense and clear the barracks in 5 turns?

How do I even engage the Hungarians without getting mauled over the open ground?

More on this later.

ax347Shu347S

How about coming home everyday to 30 mins of PBeM game over VASL?

Whether you are a fellow newbie who would like to learn together or an experienced ASLer who don’t mind helping me up the curve. I play to enjoy and to learn. Please message me at jackson-dot-kwan-at-gmail-dot-com!!

Source used 

See also

Google

How To Play Advanced Squad Leader With Anyone Anytime Anywhere

Young Tibetan Buddhist monks smiling and happy...

Young Tibetan Buddhist monks smiling and happy, double dorje room, Sakya Lamdre, Tharlam Monastery, Boudha, Kathmandu, Nepal (Photo credit: Wonderlane)

Unless you already know someone who plays Advanced Squad Leader and assuming that I perked your interest so far, one question must have crossed your mind or have even smothered that fledgling spark of interest already:

Who am I going to play with?

The good thing about Advanced Squad Leader is that the user base is very strong. It’s a niche market but the user base is enthusiastic, sociable and thanks to the Internet, connected. The Hong Kong Society of Wargamers for example, meets and plays regularly.

This might be where you realize that your issue is not one of people, but of time. We got careers. We got families. We got obligations. It’s not easy to get together regularly for games. For me who’s a novice (read: n00b) at Advance Squad Leader, I need LOTS of play time if I am ever going to be any good.

VASL is a platform developed by Rodney Kinney that provides virtual map boards, counters and mean of communication so that two players anywhere in the world can play each other in real-time or NOT in real-time.

Playing VASL “live” via VASL servers allows two players to be location independent. VASL by email allows two players to be TIME independent.

Using VASL to play ASL by email is known as “PBeM” or really “ASL PBeM”.  Let me explain.  An Advanced Squad Leader turn is broken down by phases, some phases are interactive, others are not.

  • Rally Phase (Non interactive)
  • Prep Fire Phase (Non interactive)
  • Movement Phase (Interactive)
  • Defensive Fire Phase (Non Interactive)
  • Advance Fire Phase (Non Interactive)
  • Rout phase (Non Interactive)
  • Advance Phase (Non Interactive)
  • Close Combat Phase (Interactive)

The interactive phases like the Movement Phase and the Close Combat Phase are phases where control needs to be passed back and forth a couple of times between the two players (and these are best parts of the game). This is where the game takes time. However, the non interactive phases can be sequential – one player can complete what he/she needs to do before passing “control” off to the other player – which makes these other phases quicker in execution.

As you move your counters around the VASL map, VASL records all your moves in detail to a log file. At appropriate points in a turn, you stop your actions and send that log file to your opponent. Your opponent opens your log file on his/her VASL program and playback YOUR MOVES step by step and he/she can stop the playback at any point to interject his/her actions when needed.  Your opponent will have his/her actions recorded on another log file and will send it back to you and you will then playback his/her moves.  The interactivity of the game is essentially time-shifted, along with any commentary (and taunts) that each player elect to insert between his/her actions.

So here we go : the question “Who am I going to play with?” should no longer stop you from diving into the Advanced Squad Leader world.  

You can:

  • Bribe your friends to play with you.
  • Join the good people at The Hong Kong Society of Wargamers who runs ASL games and tournaments regularly
  • Play anyone in the world “live” via VASL (and the VASL server)
  • Play anyone in the world at anytime via VASL PBeM

Questions?  Please let me know!

How about coming home everyday to 30 mins of PBeM game over VASL?

Whether you are a fellow newbie who would like to learn together or an experienced ASLer who don’t mind helping me up the curve. I play to enjoy and to learn. Please message me at hongkongwargamer-at-disroot-dot-org!!

Resources:

Google