Tag Archives: board wargames
Gin Drinkers’ Revenge 2014 – Hong Kong Advanced Squad Leader Tournament
 Saturday, Sept 20 2014. I found the corner table just like George Bates did when he was the tourney director for the Malaya Madness tourney in Singapore and I set my bag down. The Hong Kong Society of Wargamers has 2 rooms booked at the KITEC (Kowloon International Trade & Exhibition Center) regularly for their meetings. Today, however is unlike any other day.
Today is the day for the Gin Drinkers’ Revenge 2014.
Twelve arrived. We had them divide up into three categories :
- Former HK ASL Tourney winners
- 5 years experience and above
- Newbies
We had 8 hours, 2 rounds, single elimination, 4 hours per game. We wasted no time in deciding on scenarios and bidding for sides.
Round 1 : J59 Friday The 13th

My first round was played against Aris Avi from Greece. He lived in Hong Kong for a little while and will be going back to Greece shortly after the tournament. He said however, that whilst he used to play Squad Leader, he’s more into miniatures back home.
I was hoping for J12 Jungle Fighters as some folks here are less versed with (or are even adverse to) PTO. We decided on J59 Friday the 13th instead. I have never played this but Aris said since he played the defenders last time, he would like to be the attackers.
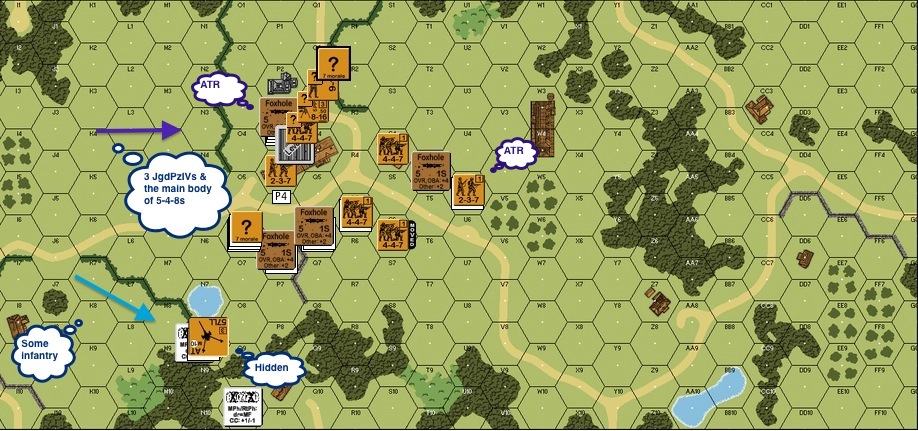
If you would ignore the blue arrows for a moment, this was my defensive setup. The Germans had 3 JgdPzIVs that came in with 10 5-4-8 paras and 3 leaders from the left. The objective was for the Germans to capture all buildings around where you see the Russians concentrated. The Germans had 6 turns. I had my antitank gun (57LL with ROF3) pointed at where it could most likely take a side shot on the Jagdpanzers.
Aris opened up with an armour assault on the top part of the board. He had a small contingent heading towards where my AT gun was emplaced together with some wire. My AT gun fired during the Defensive Final phase, got a hit even though I lost ROF. YES! I will take one out of three. Side shot, TK looked great, I rolled.
BOXCARS – BOOOOOIINNKKKKKKKKKKK!!!
The round glanced off the Jagdpanzer closest to me and then of course the entire German force was then aware of our gun’s presence. Too late now, the paras closest to the AT Gun started to move towards it. On the top side of the board the Germans started getting shot up by the Russian HMG on the first level of the big house. The Russian HMG team held out moderately well and when it broke the half squad on the ground level advanced up to help, except that it couldn’t find the HMG of course (“What do you mean you can’t find the gun?? We left it standing by the WINDOW!!!”)
The Germans para were unable to reach the hedge. At one point most of them even low crawled back to the tree line. On Turn 3 or 4 two Jagdpanzers decided to jump the hedge. Believe it or not, I planned for it. That’s why I had a squad in a fox hole with an ATR looking for an underbelly shot when Jagdpanzers jump the hedge. However as the Jagdpanzer rolled over, I forgot. The first Jagdpanzer overran the foxhole. The good news was that Jagdpanzers with FP1 bow machine guns don’t offer much fireworks. The better news was the squad survived and killed the tank hunter in close combat. At this point, I started to move my Russian infantry up for a counter attack.

I was in a bit of danger on my left flank (bottom) though as the Germans killed the gun crew. One German squad was however caught in the wire and my opponent wasn’t sure whether my other wire was some where in the woods as well. The Germans stopped coming through the Russian left flank. Katya (the Russian sniper) once again came by and broke the remaining German squad for me.
The second JagdPanzer that jumped the hedge stopped with its gun pointed at the HMG farmhouse. I got it caught between two ATR squads as shown and blew it away from behind as my opponent was perhaps too focused on taking out the big farmhouse to let the German paras in. There were no survivors.
My opponent conceded.
Round 2 : T4 Shklov’s Labors Lost
My next opponent was Ted Kwong. Ted said he bought his Advanced Squad Leader modules a long time ago. It’s only recently that he started learning the system. He told me how terrific a teacher Erwin Lau is. Erwin is a local grognard who plays a variety of games and has been winning (multiple?) championships in past Advanced Squad Leader tournaments held by the Hong Kong Society of Wargamers. As a testament to how much Erwin has done in pushing ASL locally, Ted is the third person who told me recently as to how immensely patient Erwin is as a teacher.

Here you can see Ted Kwong on the left after rolling a pair of snake eyes on his opponent in ASL126 Commando Schenke.
We decided on T4 Shklov’s Labors Lost (Ted didn’t want to do PTO, so no AP84 Double Trouble). I would be the attacking Germans. JR Tracy told he they used to call this scenario “Gandalf vs the Balrog” because each side gets a 10-3.

This was the setup from memory. I got the Germans who had 9 4-6-8s with a star-studded leadership team : 10-3, 9-2, 8-1 with 2 armor leaders 9-1, 8-1. There were also 2 STuGIIIB to help them with taking 5 designated Russian buildings in 6 turns. The Russians had 7 and a half 4-5-8s led by a 10-0 and a 10-3.
The placement of the Russian 10-0 made me wonder if they had their MMG up front. The HMG was probably with the 10-3.
Ted just won his last game against Christopher Chu and he was in a pretty good mood. We shook hands and the game got underway.

First matter of the day : the Germans prep’d their deathstar – FP16 flat versus the commissar stack.
Snake eyes.
We opened the game with a 2KIA! Great omen I’d say, I gripped a little tighter my pair of lucky dice that saw me through Malaya Madness as well. The commissar stack vaporised before the commissar had a chance to rub his eyes. The STuGs led the way with armoured assault, chucking smoke out of their smoke dischargers at key points down the left and the right. The Germans had no intention of doing frontal attacks. The Germans entered the commissar building from the Russian right flank and went slightly behind the first building on the Russian left flank. The STuG from the Russian right came across, discharged smoke immediately before reaching the MMG building and did a bypass freeze on the MMG hex (froze the ground level only). The Germans then piled in through the front and from the side under the cover of a timely smoke grenade.
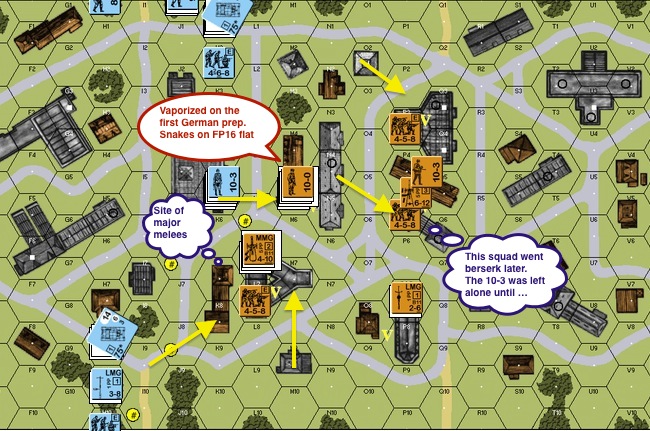
The German deathstar later moved into commissar building and joined the 9-2 and his team. At around Turn 3 the Russian 10-3 was pinned and the Russian HMG squad went berserk!! They dropped the HMG, ran into the street and the berserkers were UNSTOPPABLE. All the heavy German firepower had assembled in the commissar building at that point but apart from bring critically reduced, the Russian berserkers made its way across. It was only when the deathstar final fired at it from an adjacent hex.
The Germans then looked up and met the eyes of the lonely Russian 10-3. The Russian quickly grabbed the HMG, admirable but futile. The STuG rode by and put down smoke from its dischargers. The Germans 9-2 led 2 squads across the street into the Russian 10-3 hex. The STuGIIIB continued its way and got behind the VC buildings. Four buildings down and I would take the Russian HMG as well after we shoot the 10-3.
Ted gracefully conceded.
Aftermath
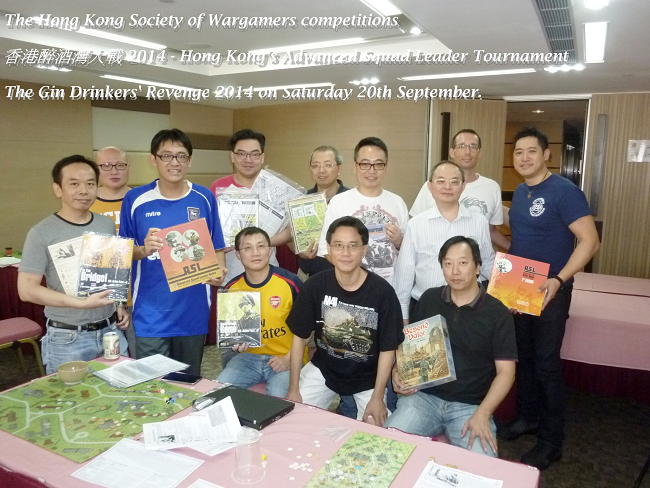
So here we go. We have a front runner from each of the 3 groups :
- Tourney winners – Erwin Lau
- 5 years Experience and above – Anthony Leung
- Newbies – Jackson Kwan
There will be games arranged at a later date to determine the final rankings amongst these three, subject to Hong Kong Society of Wargamers’ scheduled events and venue availability.
Watch the video!!
http://www.youtube.com/watch?v=RnqXRFauZFA

FE27 The Bravest Thing I Ever Saw
This scenario from Fanatic Enterprises describes a situation in Bataan in January 6 1942. The Americans fought a delaying action that saw the gunners from both sides exchange shells for shells. Carl Nogueira played the defending American and I the attacking IJA in this after action report (AAR). We actually exchanged sides and played this twice, with me getting my teeth kicked in both times. This is already the less ugly version, rated PG-13.
The side that gained the most Victory Points (VP) wins. You can gain Casualty Victory Points normally and you gain 1 VP for controlling each Level 2 hill hexes on your opponent’s side. The Americans set up on the bottom of the map and the IJA on the top. We get 5 and a half turns.
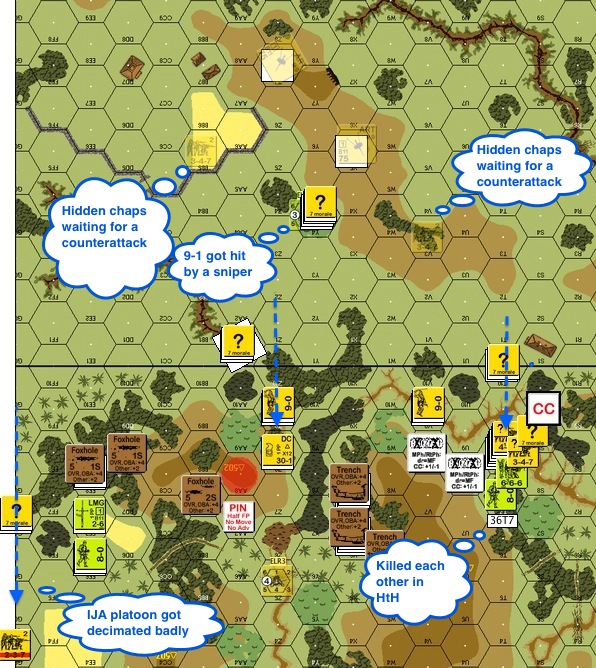
IJA Turn 2 : You can see where the IJA guns were. Line of sight (LOS) to the American hill tops were limited due to jungle terrain. You can also see two hidden 2nd liners to slow down any sort of American counterattack. The big stack in the middle of the top map were two IJA medium machine gun (MMGs), but their leader, a 9-1 who’s also the best leader in the IJA order of battle (OB) was killed by a sniper early in the game. You can see the 3 lines of IJA advance on the American side. The left most IJA rush would have been the most threatening but I failed to capitalise on the situation properly before they got wiped out. The middle advance would be stuck for a while and in retrospect I should have strike out through the swamp towards the right to put the squeeze on the Americans on the hill on the right of the American positions. On the right, the IJA caught and took an American 8-0 and a squad together with it in a flurry of hand-to-hand action. At this point I expected the American guns to be towards the bottom of the map.

American Turn 3 : The IJA found the first American gun on the left by walking straight into it. There was nothing left of the squad. The attack on the left was also wiped out and the Americans started moving towards the right. The attack in the middle was floundering as well. The IJA on the right kept pushing towards the bottom of the map, fully expecting to find the second American gun there.

American Turn 4 : The American gun on the left malfunctioned! The IJA forced their way through the bamboo to kill the gun crew before they had a chance to fix the infernal contraption. You can see a blotch of red on the hilltop to the right where once again, the IJA found the other American gun the wrong way. You can also see the pair of IJA MMGs moving in during the last turn as it didn’t look like the Americans were going to make a push to the north.
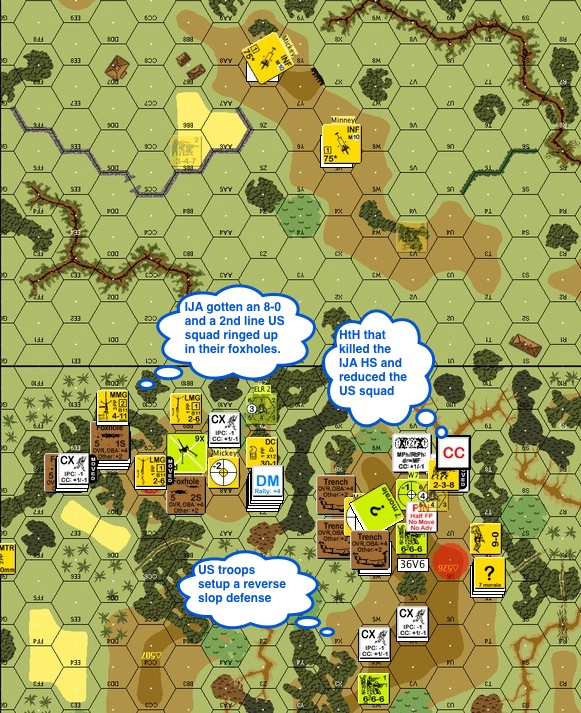
IJA Turn 5 : The IJA troops surrounded an American 8-0 and a 2nd liner in a 3 point stance. The IJA were of course, feeling very pleased with themselves. There was an IJA demolition charge laying on the ground in the middle. That was the aftermath of an IJA half squad’s attempt to blow up the American MMG stack. On the right, the IJA made another attempt up the hill and caught more Americans in close combat. Unfortunately this IJA half squad could only take half of the American squad with it. On the bottom right of the map you can see the Americans on a reverse slope defence configuration, looking to get the first shot in if any IJA pop over the crest line. The probing stack of IJA troops however decided to move back up to their leader for a last push as time was running out.
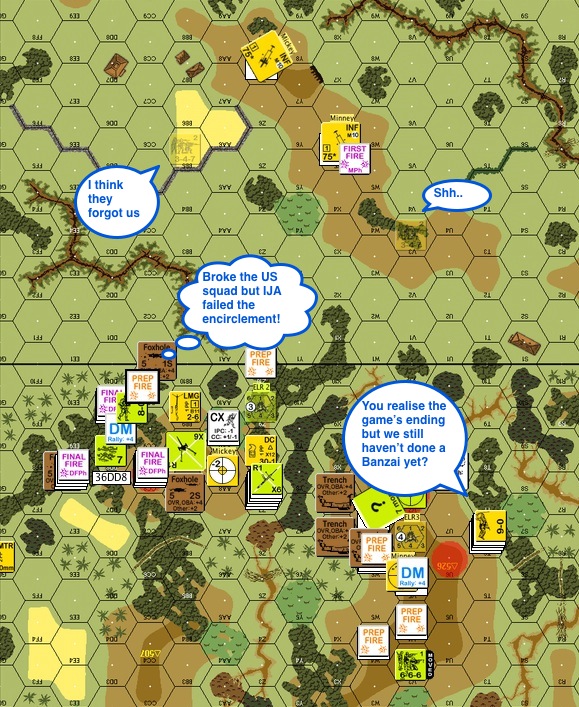
American Turn 5 : The “ring of fire” on the left broke the American squad but they failed to encircle the Americans properly. Apparently you need to fire at the target sequentially for encirclement to happen (A7.7, note to self).

American Turn 5 (still) : On the left, the broken American squad surrendered and the IJA picked the weakest (a 1-2-7) amongst the trio to be the guard. That was the last mistake they would ever make. The American 8-0 promptly jumped on the otherwise occupied IJA half squad in close combat …

American Turn 5 (aftermath) : The American 8-0 singlehandedly killed the IJA guards, rescued his men and found enough weapons to rearm half of his squad. (Note to self : encircle properly & be mindful about who’s to play guards).

Final IJA Turn : The IJA decided that they wouldn’t go down without a proper Banzai charge. Therefore they targeted the gun crew who ventured out to retake a hill hex. Just to be professional about it, they even short-strawed a poor chap to be a DC hero as well! He was well perforated, his DC satchel went flying but he drew enough fire from his “friends” for them to jump on the American gun crew.

Final IJA Turn (still) : An IJA leader in the middle rushed in and tried to grab the DC pack. He got shot and was wounded as he picked it up and he never managed to place it.
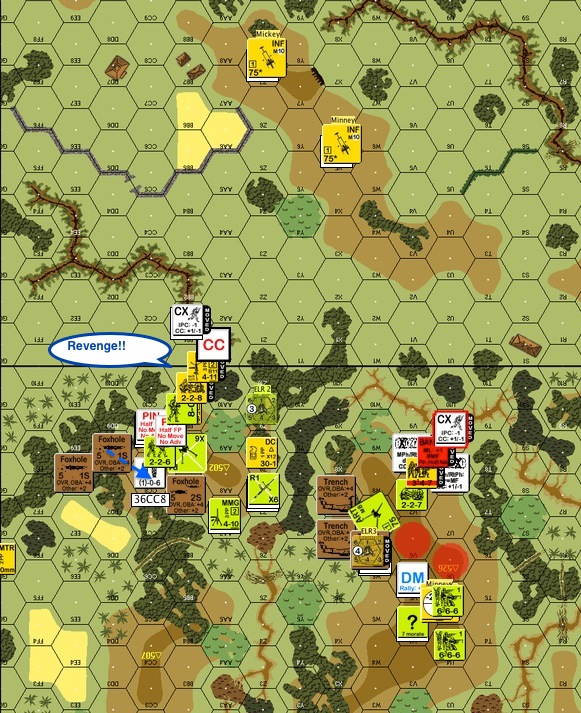
Final IJA Turn (almost done) : An MMG crew from the original “Ring of Fire” caught up with the American leader and squad on the left, knives drawn …
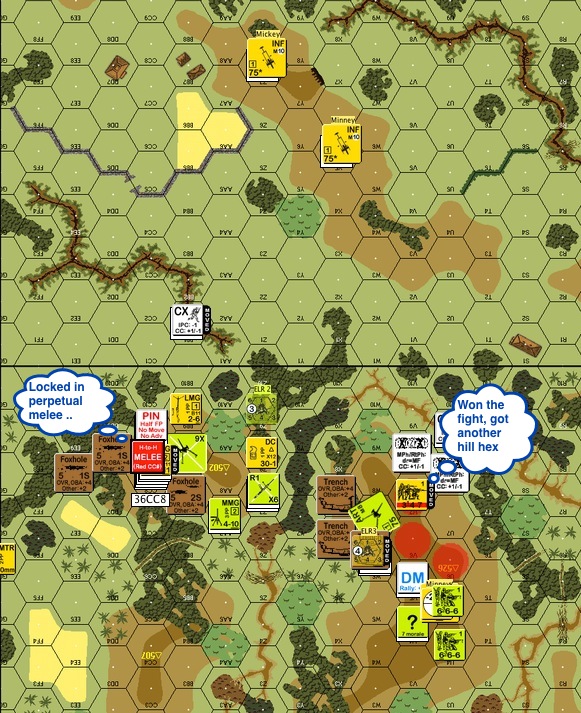
Final : The banzai’ing IJA came victoriously out of the close combat on the right. The folks on the left however would be locked in perpetual mêlée. You would know I lost the game a long time ago if you can see the huge stack of IJA casualties. Carl was nice enough to play this through to the bitter end!!
Lessons learned:
- When playing against the Americans, the IJA needs to make good use of the Advance Phase. Try to move into American Line Of Sight only in the Advance Phase, and if you can stay concealed, even better. This way the IJA don’t have to take high American firepower with “First Fire Movement in Open Ground” (FFMO) and “First Fire Non Assault Move” (FFNAM) modifiers. If the Americans fire in the following Prep Fire, they don’t get to move away and the IJA will have a chance to fire against their low morale (US Marines excepted).
- Don’t give prisoners to someone who might not fare well in (close) combat.
- Encirclement : remember to fire on the target sequentially.
- Use 7 as a gauge, if you can get a result on a 7, it’s a good choice. Alternatively, try to move in routes that stack so much DRMs on your opponent’s shot that he/she can’t get results on a 7.
- Don’t spread your forces too thin. There should be reserves behind an attack to exploit results.
Other thoughts?
DB099 The Gin Drinker’s Line AAR
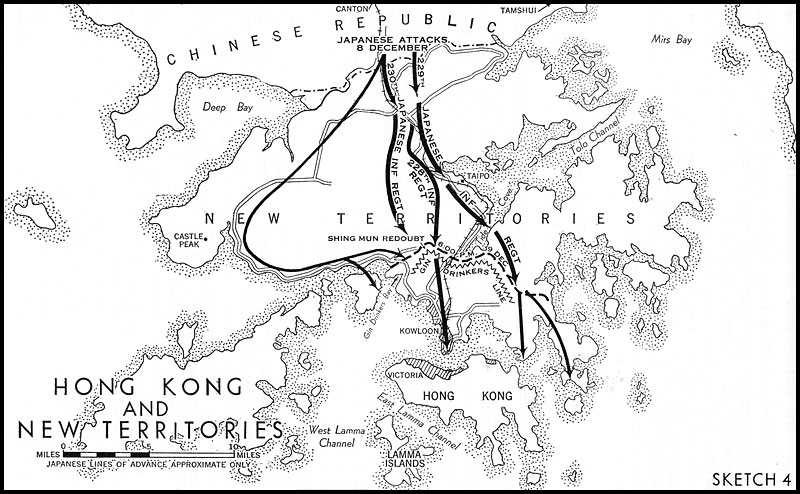
During the night of 9 Dec, Japanese troops mounted a massed attack on the western portion of the defensive line, and the Gin Drinkers’ Line collapsed by 10 Dec. On 11 Dec, as Japanese troops advanced southward along the Kowloon Peninsula, Maltby ordered the evacuation of all troops to Hong Kong Island.
– C. Peter Chan, Battle of Hong Kong, World War II Database
The Gin Drinker’s Line
This latest scenario is from Dispatches from the Bunker, dated Dec 10 1941 and centered around the breakthrough of the western part of the “Gin Drinker’s Line” which led to the siege of Hong Kong island. (Hong Kong surrendered on Christmas Day, 1941.)

Erwin played the Imperial Japanese Army (IJA) and I the Rajputs of the British Indian Army. The above illustration is the British Turn 1. The IJA had already initiated their advance from the west. The IJA’s winning condition was to amass more “victory points” (ie kill more) than the British and to occupy 5 or more huts (“the village”) on the top right of the map. The two “TI” units you see are a mortar unit and a medium machine gun (‘MMG’) unit trying to dig foxholes in a grain field, looking to dominate the depression and to slow the IJA advance to the huts. You can see also where the mortar bore-sighted (the semi-transparent marker on the top left) and where the MMG bore-sighted (bottom right). The IJA could choose to have reinforcements coming in from the top left of the map in Turn 2 or from the bottom right of the map in Turn 3. In retrospect I should have weighted my defence more toward the top of the map where the approach to the huts was shorter.

This is IJA Turn 2. The IJA was already rushing the Rajput trenches. There was a Banzai attack on the top left of the map where 2 IJA squads and a leader ran through all defensive fire and into a trench with a solitary Rajput squad. These Rajputs fought valiantly and with their last gasp took ALL the offending IJAs with them in brutal hand to hand combat. (Note to self: never put too many squads into a HtH, kill odds for BOTH sides are good.)

The British Turn 2. The IJA had already crumbled the top side of the Rajput trench defence but now it was clear that the IJA reinforcements would not be coming from the top left but from the bottom right on Turn 3. The Rajput mortar squad fired off a smoke round to block the IJA mortar crew and the MMG crew on the opposite side of the depression. The Rajputs from the trench line were in full retreat, desperately running across the depression. The orchards in the depression provided a fair bit of cover. The MMG squad was still trying to dig their fox holes amidst all the action upfront. You should also see a British squad pinned on the bottom left before it could get into the depression. These guys won’t survive the engagement.

IJA Turn 3 : The IJA was going for blood! The IJA reinforcements appeared on the bottom right of the map. The orchards provided good hindrance for them. In the meantime, the mortar and the MMG squads were busy firing away, as did the retreating squads in the depression. The IJA arrived at the edge of the depression. They were also on the verge of overrunning the routing Rajputs in the woods on the top of the map.

IJA Turn 4 : the Rajput mortars took out an IJA 9-1 leader and a crew in the preceding British turn from across the depression with an airburst and so the IJA decided that it was time to lay a smoke round on them. The MMG squad finally got their foxholes in the preceding turn. You can see the IJA reinforcements coming to the woods line immediately south of the village (on the right of the map) where the IJA sniper broke the LMG crew in the hut on the south-eastern tip.
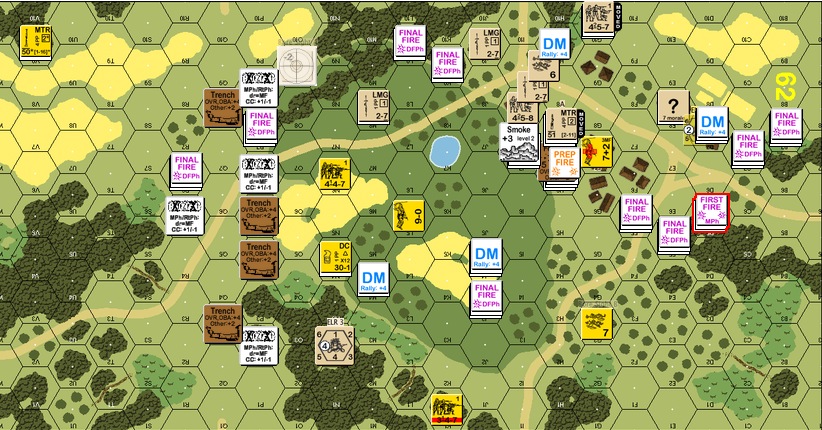
British Turn 4 : this was the last chance for the Rajputs to prepare for the inevitable IJA onslaught. The game teetered on a balance at this point. In the middle of the village, the IJA smoke round actually protected the Rajput mortar as it relocated to prepare for a last turn IJA rush. The MMG in the foxhole kept the 3-hut cluster relatively clean (it would kill the injured IJA leader). You can also see the IJA already moved into the Rajput LMG position on the south end of the village.

Final IJA Turn : The good news from the last British turn was that the IJA fired at the broken stack in the hut on the north-west tip of the village and granted the Rajputs a battle hardened élite squad! In this last IJA turn you can see all the residual fire on that corner of the village, evidence of the élite Rajputs (and the mortar squad) fighting hard. The IJA broke into the south side of the village unfortunately. Even though the Rajputs routed some broken squads forward in the last turn as speed bumps, they weren’t much good in the IJA Advance Phase (having routed off already). The IJA won this scenario when the dust settled with a 1 point lead in VP and five huts secured.
To be honest, I didn’t read and understand the Victory Conditions properly. I thought the IJA had to get more than 5 huts so I biased my defence towards the northwest of the village. I was going to let the IJA have five huts but deny him the rest. I succeed at that but unfortunately all they needed was 5.
If I play this scenario again, I will bias my trench line defence to the top of the map. It’s also important that the trench line Rajputs retreat as fast possible to help with the village defence.
This was a tight scenario all the way to the end. The action was brutal, the fight was desperate and the body count high. For those who wants to experience PTO without the PTO terrain, this is a top notched scenario.
By 13 December, the 5/7 Rajputs of the British Indian Army commanded by Lieutenant Colonel R. Cadogan-Rawlinson, the last Commonwealth troops on the mainland, had retreated to Hong Kong Island.
– “Battle of Hong Kong“, Wikipedia


English: Entry of the galleries from Shing Mun Redoubt, part of the Gin Drinkers Line in Hong Kong Français : Entrée de l’une des galeries souterraines de la Shing Mun Redoubt qui faisait partie de la ligne fortifiée Gin Drinkers de Hong Kong (Photo credit: Wikipedia)

Rajput Regiment (Photo credit: Wikipedia)
Related articles
- A Moment in ASL: Imperial Japanese Army in Hand-to-Hand Combat (hongkongwargamer.com)
A Moment in ASL: Imperial Japanese Army in Hand-to-Hand Combat

Dead Japanese personnel lie where they fell on Attu Island after a final “banzai” charge against American forces on May 29, 1943 during the Battle of Attu. (Photo credit: Wikipedia)
So here we were, right at the opening of DB99 The Gin Drinker’s Line. Indian troops were sitting in trenches on a windy mountain pass, staring down advancing IJA troops bent on breaking through the last defence line between them and the capture of the entire Kowloon peninsula (Hong Kong).
At a particular trench, defensive fire broke and routed two Indian squads from the trenches. A squad nearby advanced into the trench hex. IJA troops kept moving in and it was too late to get into the trench. One IJA squad broke through the grain fields straight up front, our squad pinned it down with First Fire. Good. Another IJA half squad raced by to the right and Subsequent First Fire failed to bring them down. The Indian squad was now out of guns and wishing for the enemy Movement Phase to end.
From the swirling mist to the left, an IJA 8-0 leader at the tree line thrust his sword into the air and screamed : BAAAANNNNZZZZZZZAAAAAAAAAIIII!!!
Two IJA squads pour out of the forest with the 8-0, running straight for our Indian squad. Staring Death in the eye, the Indians invoked Final Protective Fire, survived the Morale Check but failed to knock back the IJA horde.
The Indians were locked in Close Combat with two IJA squads and a 8-0. With 2-1 Hand-to-Hand odds and the IJA -1 DRM, a DR of 10 would wipe the Indians out (92% probability). Sure enough, IJA rolled a 7.
With death being a certainty, the Indians decided to take on all comers. Hand-to-Hand combat at 1-2 odds calls for a dice roll of 6. Since they were fighting the IJA, they needed a 5.
Our squad rolled 1 & 3. They took the 2 IJA squads and the 8-0 leader down with them.
Brian Youse pointed out the dangers of Hand-to-Hand (HtH) combat in his article “The Case for Infiltration” (ASL Journal 3).
It is not a good idea to commit too many IJA troops to a HtH combat because of the high chance of mutual destruction. In our case H-t-H allowed the “dying” Indian squad to take out 1 IJA squad with a die roll of 6 (42% probability) vs 4 in normal close combat (17%), or 2 IJA squads with a die roll of 5 (28%) vs 3 in normal close combat (8%).
This is an important note to self.
Related articles
- A Moment in ASL: LMG vs Tankette (hongkongwargamer.com)
A Moment in ASL: LMG vs Tankette

Type 94 TK tankette captured at Battle of Okinawa (Photo credit: Wikipedia)
So I perched on the side of a skating rink today, returning a PBeM log on BoF01 The Marco Polo Bridge Incident.
Two IJA (Imperial Japanese Army) tin cans drove down the bridge on Turn 3 to stop the Chinese from threatening their rear. As the lead tin cans drove around the woods, a Chinese squad unconcealed and started up with their light machine gun (LMG).
The range was 6 hexes. I needed to roll a 10 to hit. Moving target and the brief appearance added 4 to the dice roll (Case J), the size of the tiny Type 94 tank added 2 (Case P) .. I needed a 4 and I rolled 2,2! PPOONGGGGGGGGG!!!
So I got a hull side hit where the armour’s zero. I needed another 4 or less to kill it (2 rolls of 4 or less is a 2.9% probability).
It was a 1,2 – BOOM! The Chinese LMG took out a Japanese tankette!!
JUST HOW COOL IS TTTHATTTT?
“The Best Advice Garnered From Many An ASL’r Much Better Than I”

Jon H, aka “witchbottles”, the editor for the top notched Advanced Squad Leader newsletter “Point Blank!” gave me the following advice when I first join the GameSquad forums.
It’s only after a month later when I realize the true value of his words. I went back to him and he gratefully gave me the permission to repost what he told me for the benefit of all.
So here we go …
The Best advice garnered from many an ASL’r much better than I:
- Read the rules, pick one chapter every month and read front to back, including footnotes. (Credited to Carl Noguiera)
- Follow the time-honored “programmed instruction” (“Eight steps to ASL – A programmed instruction approach”, The General, v30n1) Basic infantry; MGs and SW; terrain variations; guns and mortars; Vehicles and AFVs; Climate changes; Air support; then paras and gliders; night ; then PTO; finally DTO . The system was designed by Jim Stahler, and it works! (Jim Stahler – remember that German 9-2 counter?)
- Read EVERYTHING you can get your hands on about ASL:
- all the play aids at Desperation Morale;
- all the View from the Trenches issues, ( they are free);
- all the old The General articles ( likewise, same place);
- the old At the Point ASL rag ( at the same place).
- Get Banzai ( free from the Texas ASL club); then use the Texas ASL club,
- Wall Advantage at blogspot;
- the SoCal ASL club websites to look at AARs on any scenarios you are planning to play for the first time.
- Use ROAR to understand play balance; use the ASL Scenario Archive advanced search routines to find scenarios to fall into the above mentioned order of learning.
- It will go quick if you used to play Squad Leader. Big changes are in the vehicles, Guns, and defensive fire and support weapon mechanics. Walking in with Squad Leader – GI Anvil of Victory you have about 10% learned. ( the rest will be no longer used).
- Play, play, and oh yeah …. PLAY. the more the merrier, and the most diff opponents you can find! (Credited to Gary “Fort” Fortenberry and many, many others!)
KRL, Jon H

How about coming home everyday to 30 mins of PBeM game over VASL?
Whether you are a fellow newbie who would like to learn together or an experienced ASL’r who don’t mind helping me up the curve – please message me at jackson-dot-kwan-at-gmail-dot-com. I play to enjoy and to learn!!
Baptism of Fire – Introduction to Tank Play via S21 Clash at Borisovka

German Tiger I of the 501st heavy tank battalion in Tunisia. (Photo credit: Wikipedia)
I am in trouble!
I just found myself regular face-to-face (“FtF”) games with the good people of the Hong Kong Society of Wargamers who, when they are not playing miniatures, meet regularly to play Advanced Squad Leader games.
I thought I would just drop by, watch and learn how ASL rules come alive in FtF play. It’s my first meeting with these folks (names withheld since I didn’t ask for their permission) and I was determined not to be too much of a disruption. I mean these are very experienced players who carry all the ASL tables in their heads, surely they don’t have time for newbies …
They would have none of that.
Before I knew it I was taking part in a scenario “S21 Clash at Borisovka“. This scenario depicts a situation on March 14 1945, in Borisovka, where the German Grossdeutschland Division had penetrated deep into Russian lines and elements of the 3rd Guard Tanks Corps was sent to stop them. It’s a tank on tank scenario where the Russians has 10 T-34s and the Germans has 4 Mark IVs and 2 Tigers. I haven’t yet read Chapter D but soon after they took the time to explain gameplay to me, I was running a T-34 from behind the woods, speeding through open ground and ramming up against the side of a row of Mark IVs on our flanks and took two of them out!
The Tigers were much harder to deal with. We were trying to run T-34s around them and even got some rammed up their sides but to no avail. We though things were going downhill for the Russians when one of the Tiger’s gun malfunctioned!
You should have heard the screams!
At the end the Russians won, befitting the engagement’s historical ending. If you saw the level of engagement (Advanced Squad Leader is a VERY interactive game), it’s not hard to understand how some folks devote a lifetime to playing it.
To my fellow newbies : It’s true – the best way to learn Advanced Squad Leader is to have seriously experienced players to play with you. You’ll be amazed how quickly everything fall into place!
(If the above sounds fantastic, you should know that I was learning more than playing .. a couple of grognards did all the moves!!)
How about coming home everyday to 30 mins of PBeM game over VASL?
Whether you are a fellow newbie who would like to learn together or an experienced ASLer who don’t mind helping me up the curve. I play to enjoy and to learn. Please message me at jackson-dot-kwan-at-gmail-dot-com!!
RPT1 (Part 2) Ferenc Jozef Barracks – A View of Advanced Squad Leader Scenarios
Don and I waded a little into scenario RPT1 Ferenc Josef Barracks this week. The Romanians got on the board intact. Most of them manage to keep their concealment. I will need to rely on the buildings for cover going forward because I simply don’t have the time to retain concealment / to assault move. The only squad with smoke grenades is the one 4-4-7 holding the flamethrower and that’s only with a die roll of 1 (17% chance). As an attacker with a short schedule, I have to balance the urge to rip up the streets against taking stupid risks and losing the bulk the Romanian force before getting to the barracks. From the way Don was setup, the Hungarians are looking to do a fighting withdrawal back to the barracks. It’s therefore going to be a running street battle all the way back.
Guys with low firepower like the 3-4-7s are simply ineffective against defenders concealed in stone buildings. For my shooting to be effective, I need die rolls so low that will trigger the snipers in most cases. I only have 2 leaders in the pack so I need to avoid low probability shots.
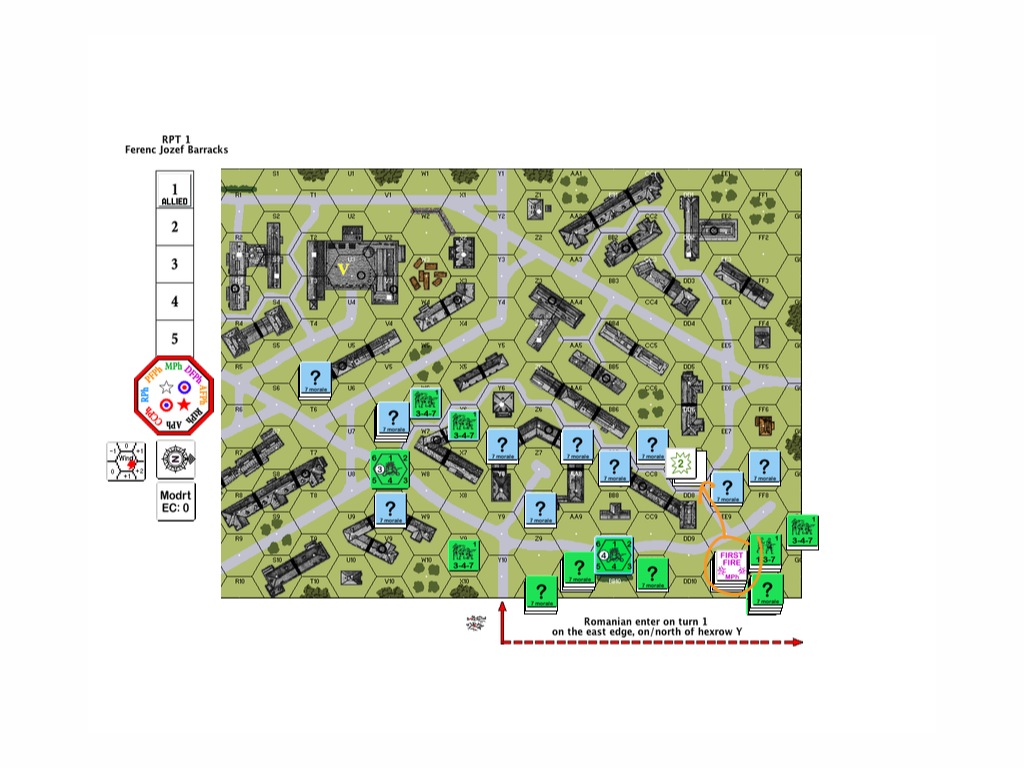
Turn 1 Romanian

What you are looking at here (blue marking) is two of the Hungarian squads who came out of concealment and took a shot at the Romanian 3-4-7 assaulting up into the road hex in Y10. I expected a good number of Hungarians to be staring at that road hex all day. They would open up and the residual fire would rip up anyone else coming after, pretty nasty on an open road hex! This Romanian squad got lucky though and no one else was going to come through.
On the other hand the elite Romanian 4-4-7 squad in building F9 (orange marking – underneath the 1-3-7) was eager to unleash their flamethrower on the concealed Hungarians in DD8 they caught a glimpse of when they ran up. Unfortunately flamethrower FP is halved at 2 hexes and halved again versus concealed targets. FP 6 flat is still a good shot though considering the alternative but the Hungarians escaped a fiery fate for now.
Turn 1 Hungarian
Don executed the time-honored strategy of skulking. He assault-moved all of his squads from concealment territory to concealment territory and in most cases out of my line of sight. (Note: this denied me the opportunity to fire at them in the Defensive Fire Phase and they would advance back into their original position at the end of this turn, ready to stop my next advance!)
The Romanians in EE10 decided to come out of concealment and took a FP4 +3 shot at the folks skulking off at DD7 (orange marking). The Romanians needed a die roll of 4 or below (17% chance) to have any effect but that was the one chance where they could disrupt the Hungarians in preparation for the coming Romanian Turn 2. Again, the Hungarians were well concealed and the stones protected them well – no effect.
Turn 2 Romanians

It was time.
The Romanian management said it was time to go out there and do some business. The elite 4-4-7 squad decided to give their toy another try. They looked to roast the Hungarian squad that spotted them on the open ground coming over. Another FP6 flat shot across the street – and the big toy broke with a “clunk”. They carried their flamethrower all the way over and it spluttered on the second shot!
Anyway, it was time to reach out and touch someone. The Romanian squads and half squads assaulted out into the street, trying to spread out as much as they could. This is a picture of the Romanians in the street and getting fired on. The gods are with them as only 2 of the squads/half-squads were pinned and the rest were unscathed.
You can see also where the Romanians pushed two squads into GG7 and GG8 (orange markings on the right), running over open ground and risking -2 shots. They saw their compatriots before them being relatively unharmed and hence they took the chance to flank the Hungarians.
The Romanians piled into the concealed Hungarian positions in the buildings across the street (DD8, EE8, FF7) and on the left of the map, into V9 – the one concealed position that was blocking the way.

SURPRISE!!! All positions except DD8 (marked “CC”) came up empty. The good news was that the Romanians uncovered all the fake Hungarian positions. The bad news was that they failed to catch the bulk of the Hungarian forces.
The same Hungarian squad that survived two roasting attempts decided to hold their ground and fight. The Romanians weren’t going to let them get away this time either and so they went for a bloody hand to hand combat. It was over quickly with the Romanians taking some losses and the stubborn Hungarian squad finally eliminated.
Turn 2 opens for the Hungarians. Will they be able to retreat safely? Will they be able to delay the Romanian hordes?


How about coming home everyday to 30 mins of PBeM game over VASL?
Whether you are a fellow newbie who would like to learn together or an experienced ASLer who don’t mind helping me up the curve. I play to enjoy and to learn. Please message me at jackson-dot-kwan-at-gmail-dot-com!!
Related articles
- RPT1 Ferenc Jozef Barracks – A View of Advanced Squad Leader Scenarios (Part 1) (hongkongwargamer.com)
How To Play Advanced Squad Leader With Anyone Anytime Anywhere

Young Tibetan Buddhist monks smiling and happy, double dorje room, Sakya Lamdre, Tharlam Monastery, Boudha, Kathmandu, Nepal (Photo credit: Wonderlane)
Unless you already know someone who plays Advanced Squad Leader and assuming that I perked your interest so far, one question must have crossed your mind or have even smothered that fledgling spark of interest already:
Who am I going to play with?
The good thing about Advanced Squad Leader is that the user base is very strong. It’s a niche market but the user base is enthusiastic, sociable and thanks to the Internet, connected. The Hong Kong Society of Wargamers for example, meets and plays regularly.
This might be where you realize that your issue is not one of people, but of time. We got careers. We got families. We got obligations. It’s not easy to get together regularly for games. For me who’s a novice (read: n00b) at Advance Squad Leader, I need LOTS of play time if I am ever going to be any good.
VASL is a platform developed by Rodney Kinney that provides virtual map boards, counters and mean of communication so that two players anywhere in the world can play each other in real-time or NOT in real-time.
Playing VASL “live” via VASL servers allows two players to be location independent. VASL by email allows two players to be TIME independent.
Using VASL to play ASL by email is known as “PBeM” or really “ASL PBeM”. Let me explain. An Advanced Squad Leader turn is broken down by phases, some phases are interactive, others are not.
- Rally Phase (Non interactive)
- Prep Fire Phase (Non interactive)
- Movement Phase (Interactive)
- Defensive Fire Phase (Non Interactive)
- Advance Fire Phase (Non Interactive)
- Rout phase (Non Interactive)
- Advance Phase (Non Interactive)
- Close Combat Phase (Interactive)
The interactive phases like the Movement Phase and the Close Combat Phase are phases where control needs to be passed back and forth a couple of times between the two players (and these are best parts of the game). This is where the game takes time. However, the non interactive phases can be sequential – one player can complete what he/she needs to do before passing “control” off to the other player – which makes these other phases quicker in execution.
As you move your counters around the VASL map, VASL records all your moves in detail to a log file. At appropriate points in a turn, you stop your actions and send that log file to your opponent. Your opponent opens your log file on his/her VASL program and playback YOUR MOVES step by step and he/she can stop the playback at any point to interject his/her actions when needed. Your opponent will have his/her actions recorded on another log file and will send it back to you and you will then playback his/her moves. The interactivity of the game is essentially time-shifted, along with any commentary (and taunts) that each player elect to insert between his/her actions.
So here we go : the question “Who am I going to play with?” should no longer stop you from diving into the Advanced Squad Leader world.
You can:
- Bribe your friends to play with you.
- Join the good people at The Hong Kong Society of Wargamers who runs ASL games and tournaments regularly
- Play anyone in the world “live” via VASL (and the VASL server)
- Play anyone in the world at anytime via VASL PBeM
Questions? Please let me know!
How about coming home everyday to 30 mins of PBeM game over VASL?
Whether you are a fellow newbie who would like to learn together or an experienced ASLer who don’t mind helping me up the curve. I play to enjoy and to learn. Please message me at hongkongwargamer-at-disroot-dot-org!!
Resources:
- Playing ASL with VASL by Homefront Wargame Center
- The Joys of VASL PBeM
- VASL module, boards, overlays, extensions & setups
