Tag Archives: wargame
How to Watch Live ASL Games on VASL & the Code of Conduct
 I watch live ASL games on VASL like people watch TV. There’s almost always something going on and it’s a good way for new folks to get some context for understanding the ASL Rulebook or simply to see how they can expand their opponent horizon from local to global.
“Von Marwitz” on GameSquad recent wrote a great “Step by Step” to do just that. So the following is posted with his permission.
#1. Don’t be afraid to try. Only the question that is not asked is dumb.
#2. To find an opponent, you can post in the “Opponents Wanted” section of this forum:
http://forums.gamesquad.com/forumdisplay.php?42-ASL-Opponents-Wanted
Describe your situation and chances are that you will find someone to play with in short order. (Hong KongWargamer : plus the ASL Groups on VASL – https://www.facebook.com/groups/advancedsquadleader/, https://www.facebook.com/groups/vaslmeetup/, https://www.facebook.com/groups/27083456599
#3. If you log on to the VASL server, you will find yourself in the “Main Room”. The actual playing goes on in the other rooms, often titled by the name or ID of the scenario. You can join a room by syncronizing with one of the players in it. Personally, I send a short Personal Message to ask if it is ok to sync before I do so. Usually I get a “Yes, sure.” in short order. Once synced, you will see the playing area, the log and counters moving about. Common etiquette is not to move their counters (you can do a mouse-over to expand stacks depending on your settings which they will not see on their screen). You do not hit any dice-roll buttons etc. Normally, you would not type anything into their log unless you previously by Private Message inquired if it is ok to do so. This is the basic etiquette.
Most VASL-players use a combination of VASL and Skype because communication is quicker. As an observer, this makes it a bit more difficult to follow the game, especially as a newbie, because you might not be able to glean what the reason for some dice rolls in the log were. If players don’t use skype, they will (necessarily) type that into the log. Sometimes, people are willing to add observers to their Skype call so that you can listen in (which you could find out by inquiring via private message). If they do, usually you would listen and not take part in the conversation. This might be different if you have become familiar with the players.
While being an observer, regardless whether via log or Skype, you do not give tactical tips to the players in an ongoing game. Usually, I would not point out rules mistakes to the players either unless I know they do not mind. And even then I would point out an illegal move via PM only to the player that just got a rule wrong.
In case you do not “see” the maps, then you might not have them in your “boards” folder and need to download them first (and resync). Same is true for overlays. Then there are some “extensions”, that might expand VASL with some extra counters or gadgets. Most of this stuff can be found in the downloads section of the vasl.info website.
ITR5 Fire Teams AAR

“Catalina Kid,” a M4 medium tank of Company C, 745th Tank Battalion, drives through the entrance of the Aachen-Rothe Erde railroad station during the fighting around the city viaduct on Oct. 20, 1944. Courtesy of First Division Museum
It’s Oct 1944. The Americans were about to engage the Germans in what was to be their largest urban fight in the Second World War. Aachen was also to be the first German city captured by the Allies.
In this “BFP Into the Rubble” scenario, 10 elite & 12 US 1st line squads teamed up with 3 Shermans and 2 tank destroyers faced off against a mix of 18 German squads with mostly 2nd liners, a pair of AA guns and 2 Hetzers. The Germans also had 21 concealment counters, 8 Fortified locations and sewer movement capabilities.
There was a lot of rubble.
The Americans were to capture 7 buildings in 8 turns.

American Turn 2 about to start : The German Fortress troops had a surprise for me. They stacked a few Fortified counters on each other and brought the 37L AA gun onto the 2nd level! This flak gun didn’t have the 2cm FlaKvierling’s “20” firepower but it did have Stielgranate 41 ammo which offered TK# 26 within 11 hexes. The high rate of fire from both AA guns were particularly disconcerting if only for Deliberate Immobilizations. I am quite the novice with AFVs. I decided to keep my tanks together in mutually supporting roles. My AFVs would stick with the infantry (panzerfausts abound) and we would use MGs (and not tanks) against ordnance.
There were a couple more tactical things I wanted to do / get into the habit of doing:
- Place a squad on high ground. If nothing else to make it harder for my opponent to gain concealment. Squads in high places could interdict as well.
- Get to the center building (where the malfunctioned Flak gun was). My opponent observed that the center building was the ideal jump off point to the latter portion of the American attack.
- The German SAN was 5 and I got open top tank destroyers. I got to make sure we got dedicated sniper shielding for our key units!
 Credit : Photo Gallery of World War 2
I was on a tight schedule here as the Americans. I pushed on, using smoke whenever possible, dummies or not. One of the first things we found was of course the Flak tower my opponent constructed on my right flank (top of the map). My AFVs then slid towards the middle of the map.
 End of German Turn 2 : The Americans managed to push to the middle of the board. The AA Gun commanding the middle of the street immobilized one of the Shermans. The American 10-2 (aka Jedi) Deathstar got taken out as well. However while the other AFVs spun towards the middle of the board to avoid the Steilgranate wielding Flak tower, a lone Sherman remained to provide smoke cover for the infantry (Errata : The 37L AA gun’s actually on the 2nd level, not the 3rd).
The Americans deployed 4 half squads towards the back to screen off the German sniper, and they took a few hits. Unfortunately the German sniper killed 2 out of 7 American leaders, something the Americans could ill afford with their lower morale. The American sniper relocated to the vicinity Before the game is up, the Germans would see their SAN reduced from 5 to nothing by Sniper-on-Sniper action!

In the midst of American Turn 4 : The Americans pushed forward and captured the lone AA gun in the middle of the board. American leaders continue to be shot by the German sniper. The latest victim was the radio guy who was in the midst of relocating this radio. The Jedi Master and his HMG team took the chance to rush past the sniper. Towards the sound of gunfire!
The Americans took the center building, we just needed to remember to get guys upstairs. Towards the bottom of the map, the infantry continue to lead the way with AFVs coming in as support.

End of American Turn 6 : Two more turns to go and the Americans still got 2 or 3 buildings to take. We were definitely running tight on time.
From the right flank (top of map), the American OBA put the Flak tower’s stairwell on fire! The gun crew was therefore encircled. The German brokies were blocking the approach from the American forces though.
On the left, a Sherman got blown up by a German squad who found a panzerfaust. An American flamethrower squad hopped by and broke the half squad involved. That gave the other American AFVs time to push the wreck out of the way and to get into position for an assault on the final VP building on the left flank (bottom of map).
The German Hetzers were about to enter from the left of the board.

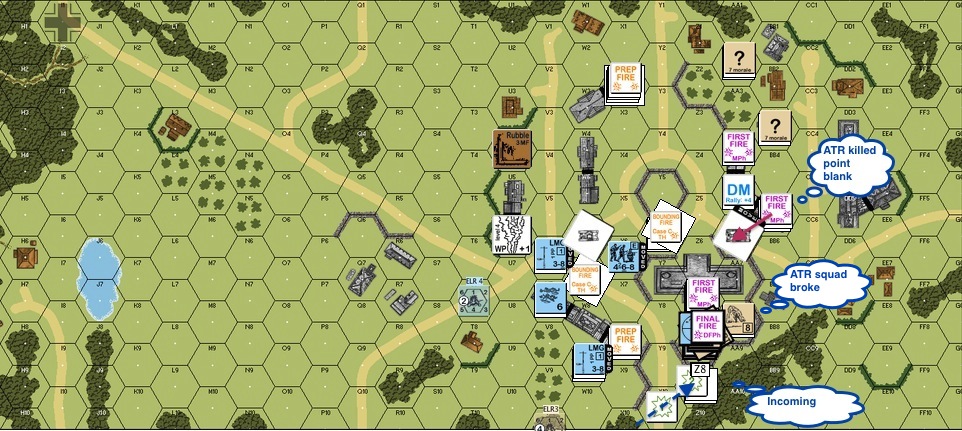
After American Turn 7 : Encircled as it might be, the German Flak tower was still in the fight. It blew up the TD that rushed over to help! Nearby MGs were engaging it, as was the captured AA gun from the middle of the board. We got a little thin on our right but the lay of the rubble made it hard for us to rebalance.
The wounded artillery observer brought fire down on the left flank target building to good effect. The Americans on the left flank got ready to hit the building in the last turn.

End Game : The OBA on the left flank (bottom of map) broke some German units and even killed a Hetzer as it tried to move towards the Americans.
On the American right (top of map), the US forces had nothing but open ground to traverse unfortunately. We tried to shift as much forces as possible to the right but having to get around the German brokies proved to be fatal!! The Americans therefore lost this scenario by one VC building!
Thoughts? What would you have done better? What do you think of the tactical choices? Would you try this scenario Please comment!
DB104 The Police Station – AAR – Canadian Valor in Hong Kong!!
 Winnipeg Grenadiers in Camp Shamshuipo HK Credits : http://stpaulslestweforget.wikispaces.com/
The IJA landed on Hong Kong island near North Point / Aldrich Bay on Dec 18 1941 and proceeded to move inland through the middle of the hilly island. The Winnipeg Grenadiers made a particularly heroic stand at the Wong Nai Chung Gap Police Station.
This is a rather interesting scenario in which part of the Canadian and part of the IJA forces started using simultaneous and hidden placement in an area in front of the Police Station. The scenario began with a round of Close Combat between forces that started in the same location, two of which the IJA could designate “hand to hand”. The IJA’s goal was to take the Police Station and to make sure that there were less than one squad equivalent of “good order” Canadians within a 4 hex area around the station, all within 5.5 turns.
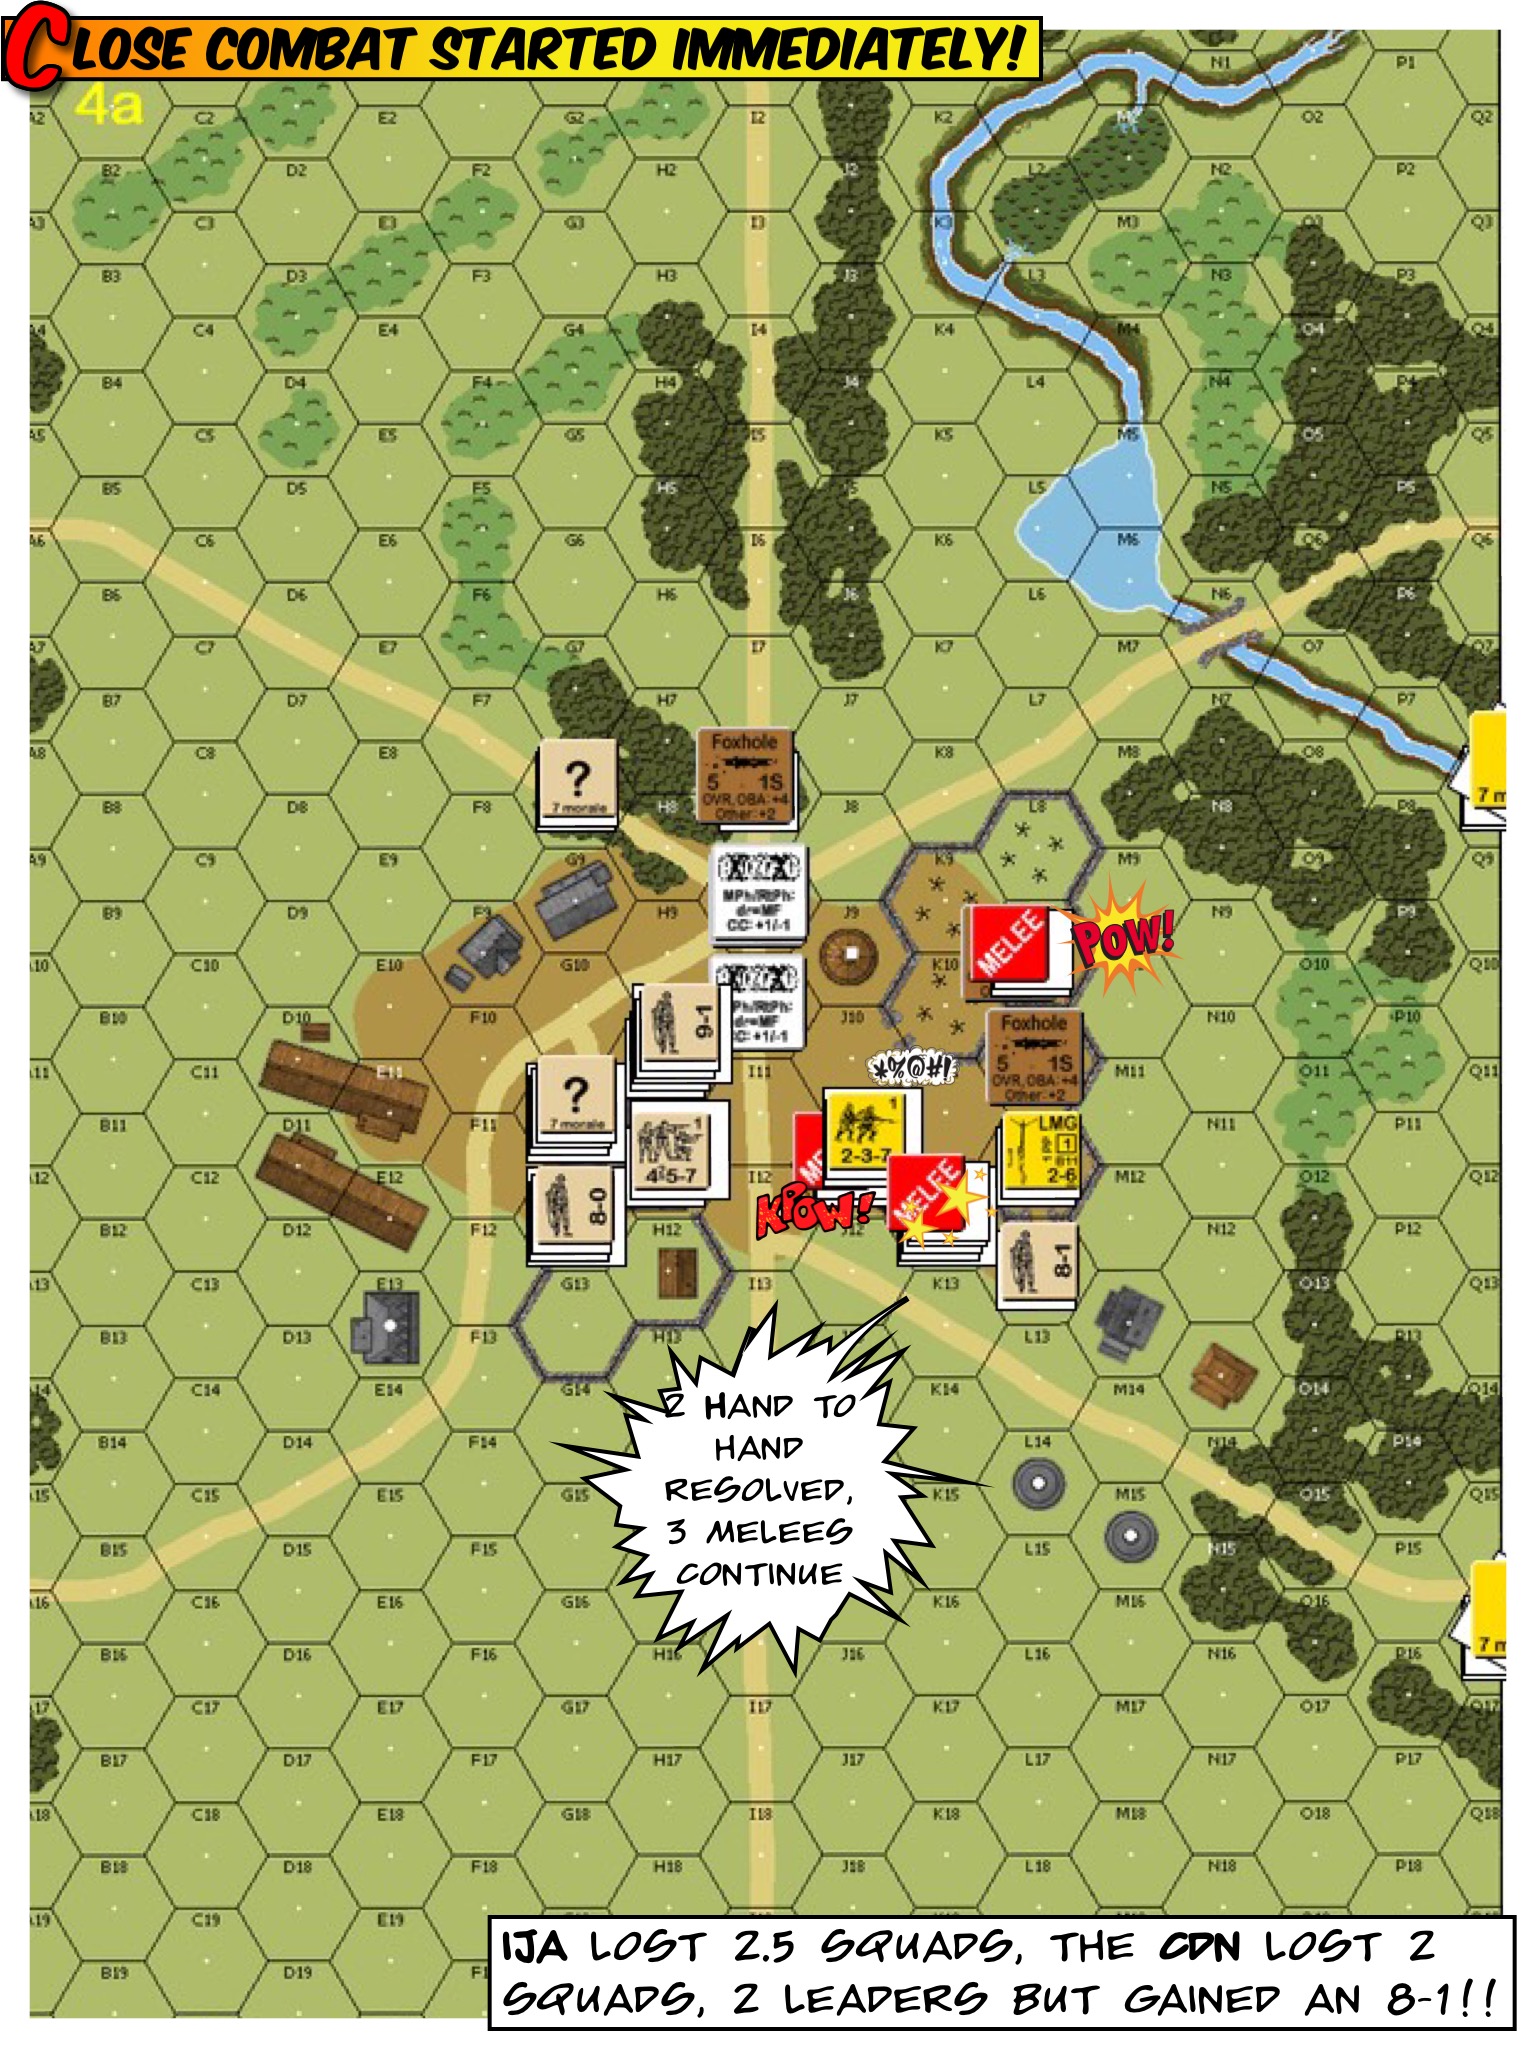
The game started off quite intriguingly as Carl Nogueira and I discovered where each other’s hidden forces were, where they “co-existed” and what the Close Combat odds were. I designated two of the melees as “hand to hand” and off we went. As expected, “HtH” battles both pretty much resulted in mutual annihilation. The Canadians lost 2 leaders in addition but an 8-1 rise to the fore in the heat of battle!
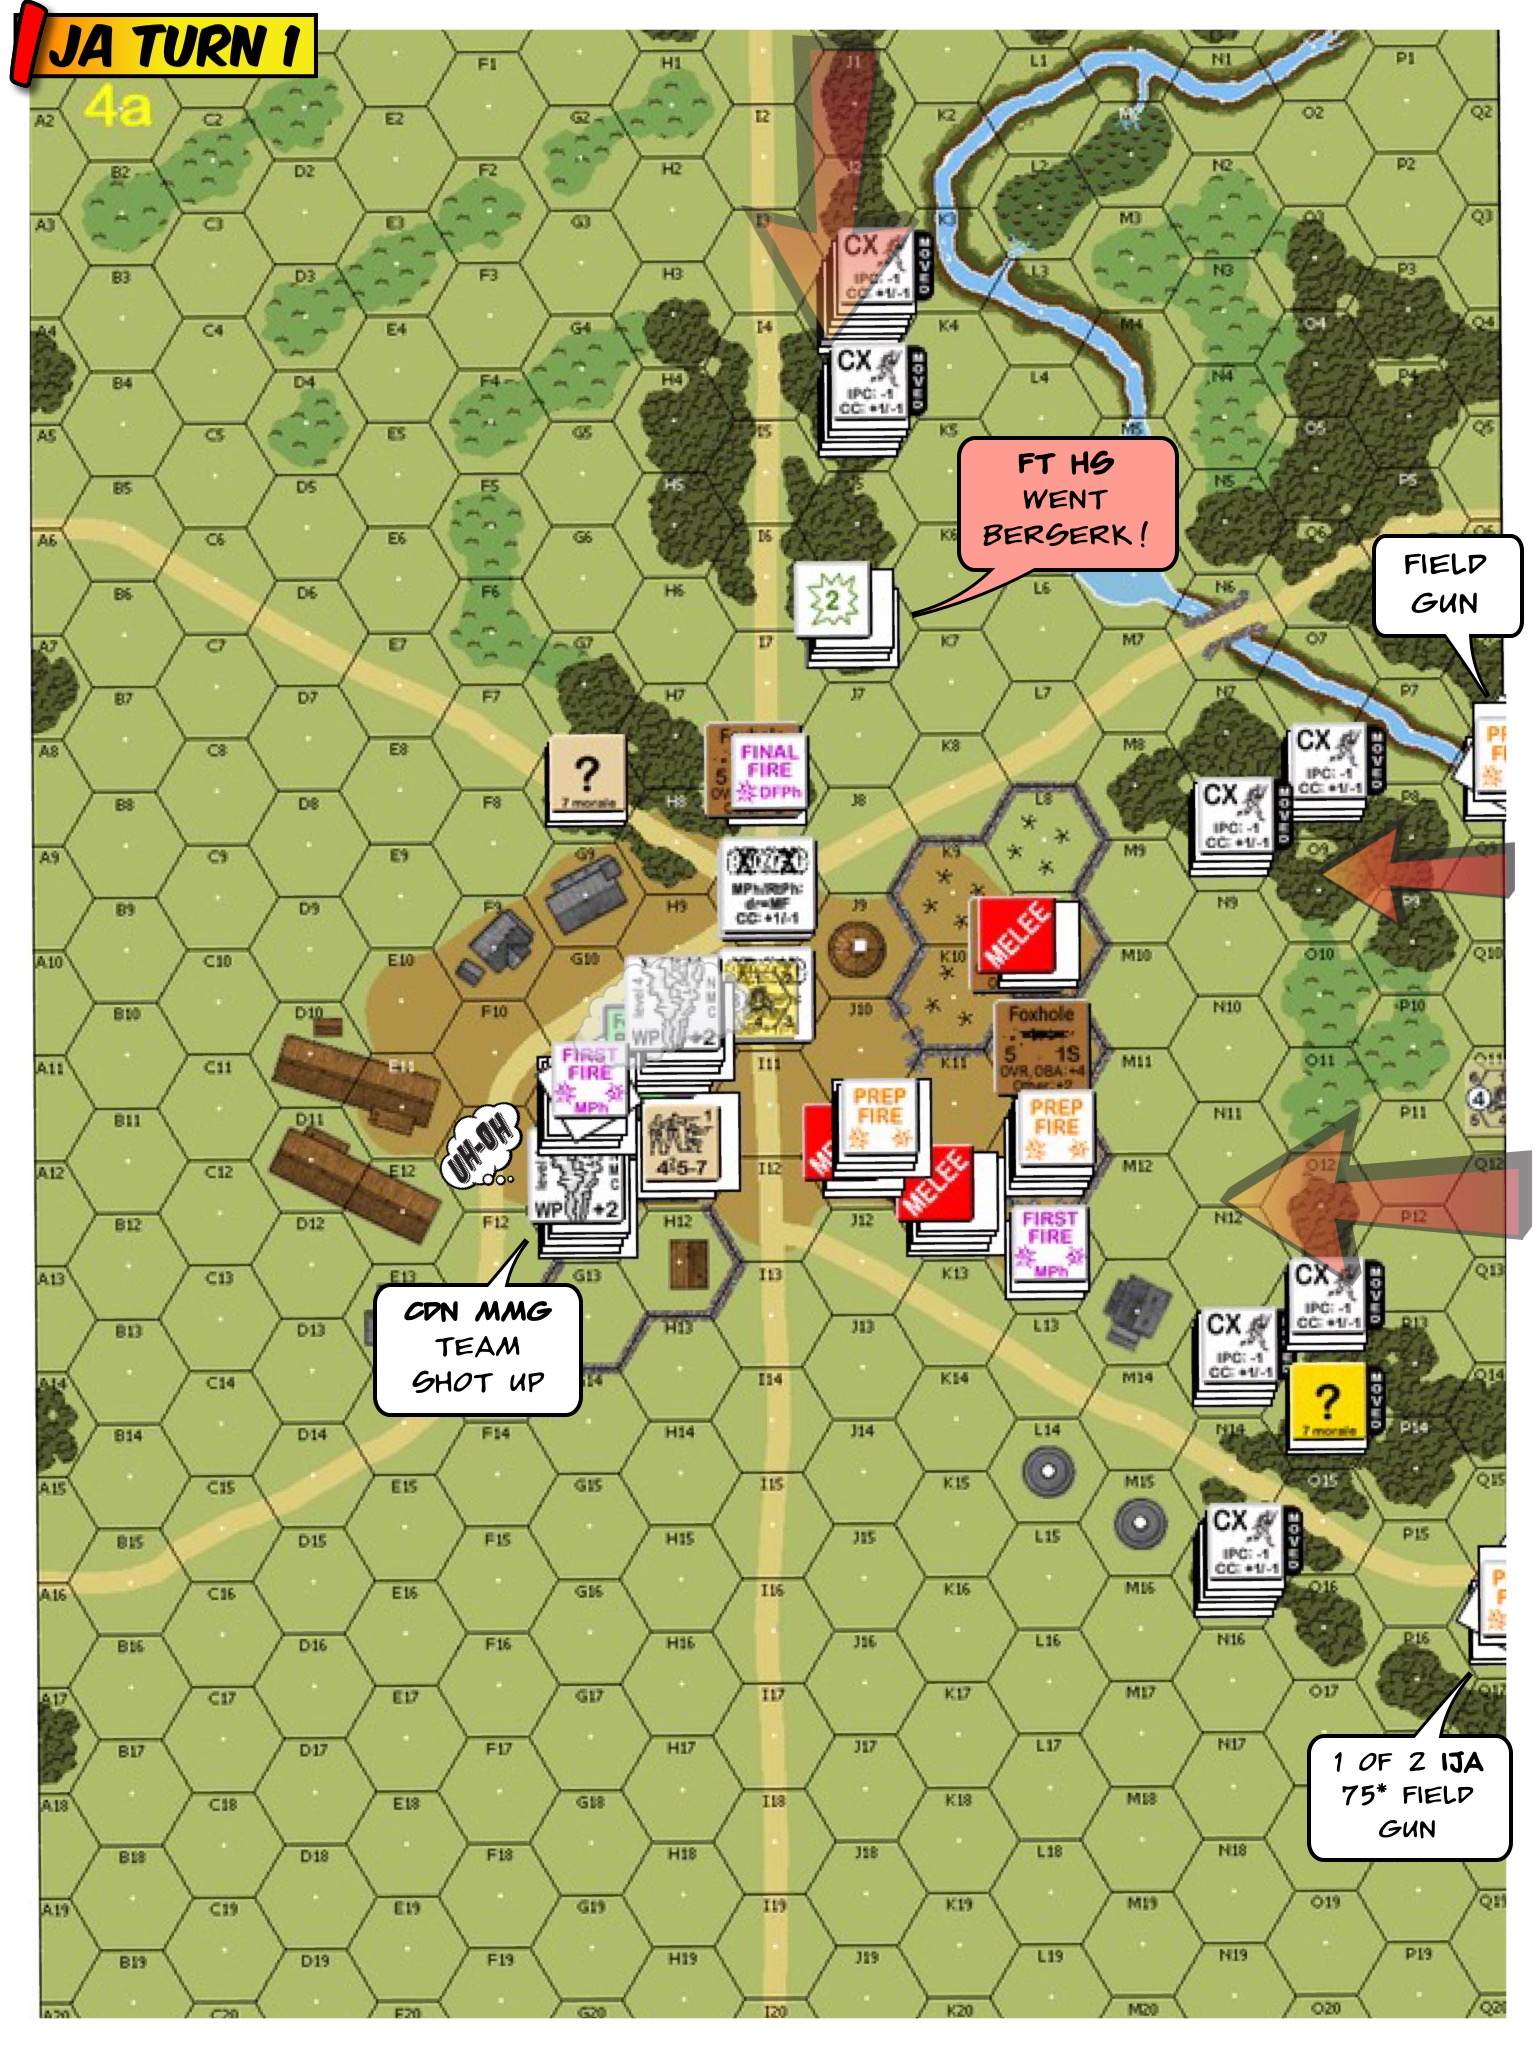
IJA Turn 1 : The IJA led off with their two offboard field guns putting Willie Pete on two corners of the rather well MG-equipped station. Unfortunately the flamethrower team got ID’d early and was shot at. Anxious that they’d never get to use their toy, they promptly went berserk.

IJA Turn 2 : The berserk FT team rigged up their toy and in their blind fury, must had bent a trigger or something. Flamethrower died without a shot. The IJAs discovered the Canadian pillbox cross the front of the Police Station. Fighting outside took quite a toll on both sides. The IJA hoped to hook around the back (left) of the police station as “Failure to Rout” seems to be the only way to clear the station of Canadians.

IJA Turn 3 : The IJA malf’d one of their two offboard guns and therefore proceeded to setup their mortars so as to provide smoke cover. To the top of the map, the IJA piled on top of the pillbox while trying to hook around the left. To the right, the IJA continued to navigate through the open field and hoped to advance though the pillbox laid fire lane.

IJA Turn 4 : The berserk HS charged across the street and into the station!! The maniacs survived fire that left 12 and 8 residuals, only to die later in Close Combat. Their buddies took advantage to the situation and walked around the left. The IJA on the right continued to hit the station in front. The newly established deathstar had a malf’d HMG, true to IJA weaponry of the period.

IJA Turn 5 : So the Berserker couldn’t stay in the station. The IJA opened with a DC HS that got shot out of existence when they advanced to the MG nest. On the other side of the station, poor Toshi was volunteered to be the “DC Hero of the Day”. They sent him to the front door, patted him on the back and stuffed a DC into his arms.
They couldn’t get the berserker either, they said.
Toshi popped out to the middle of the street and was promptly vaporised along with his DC.
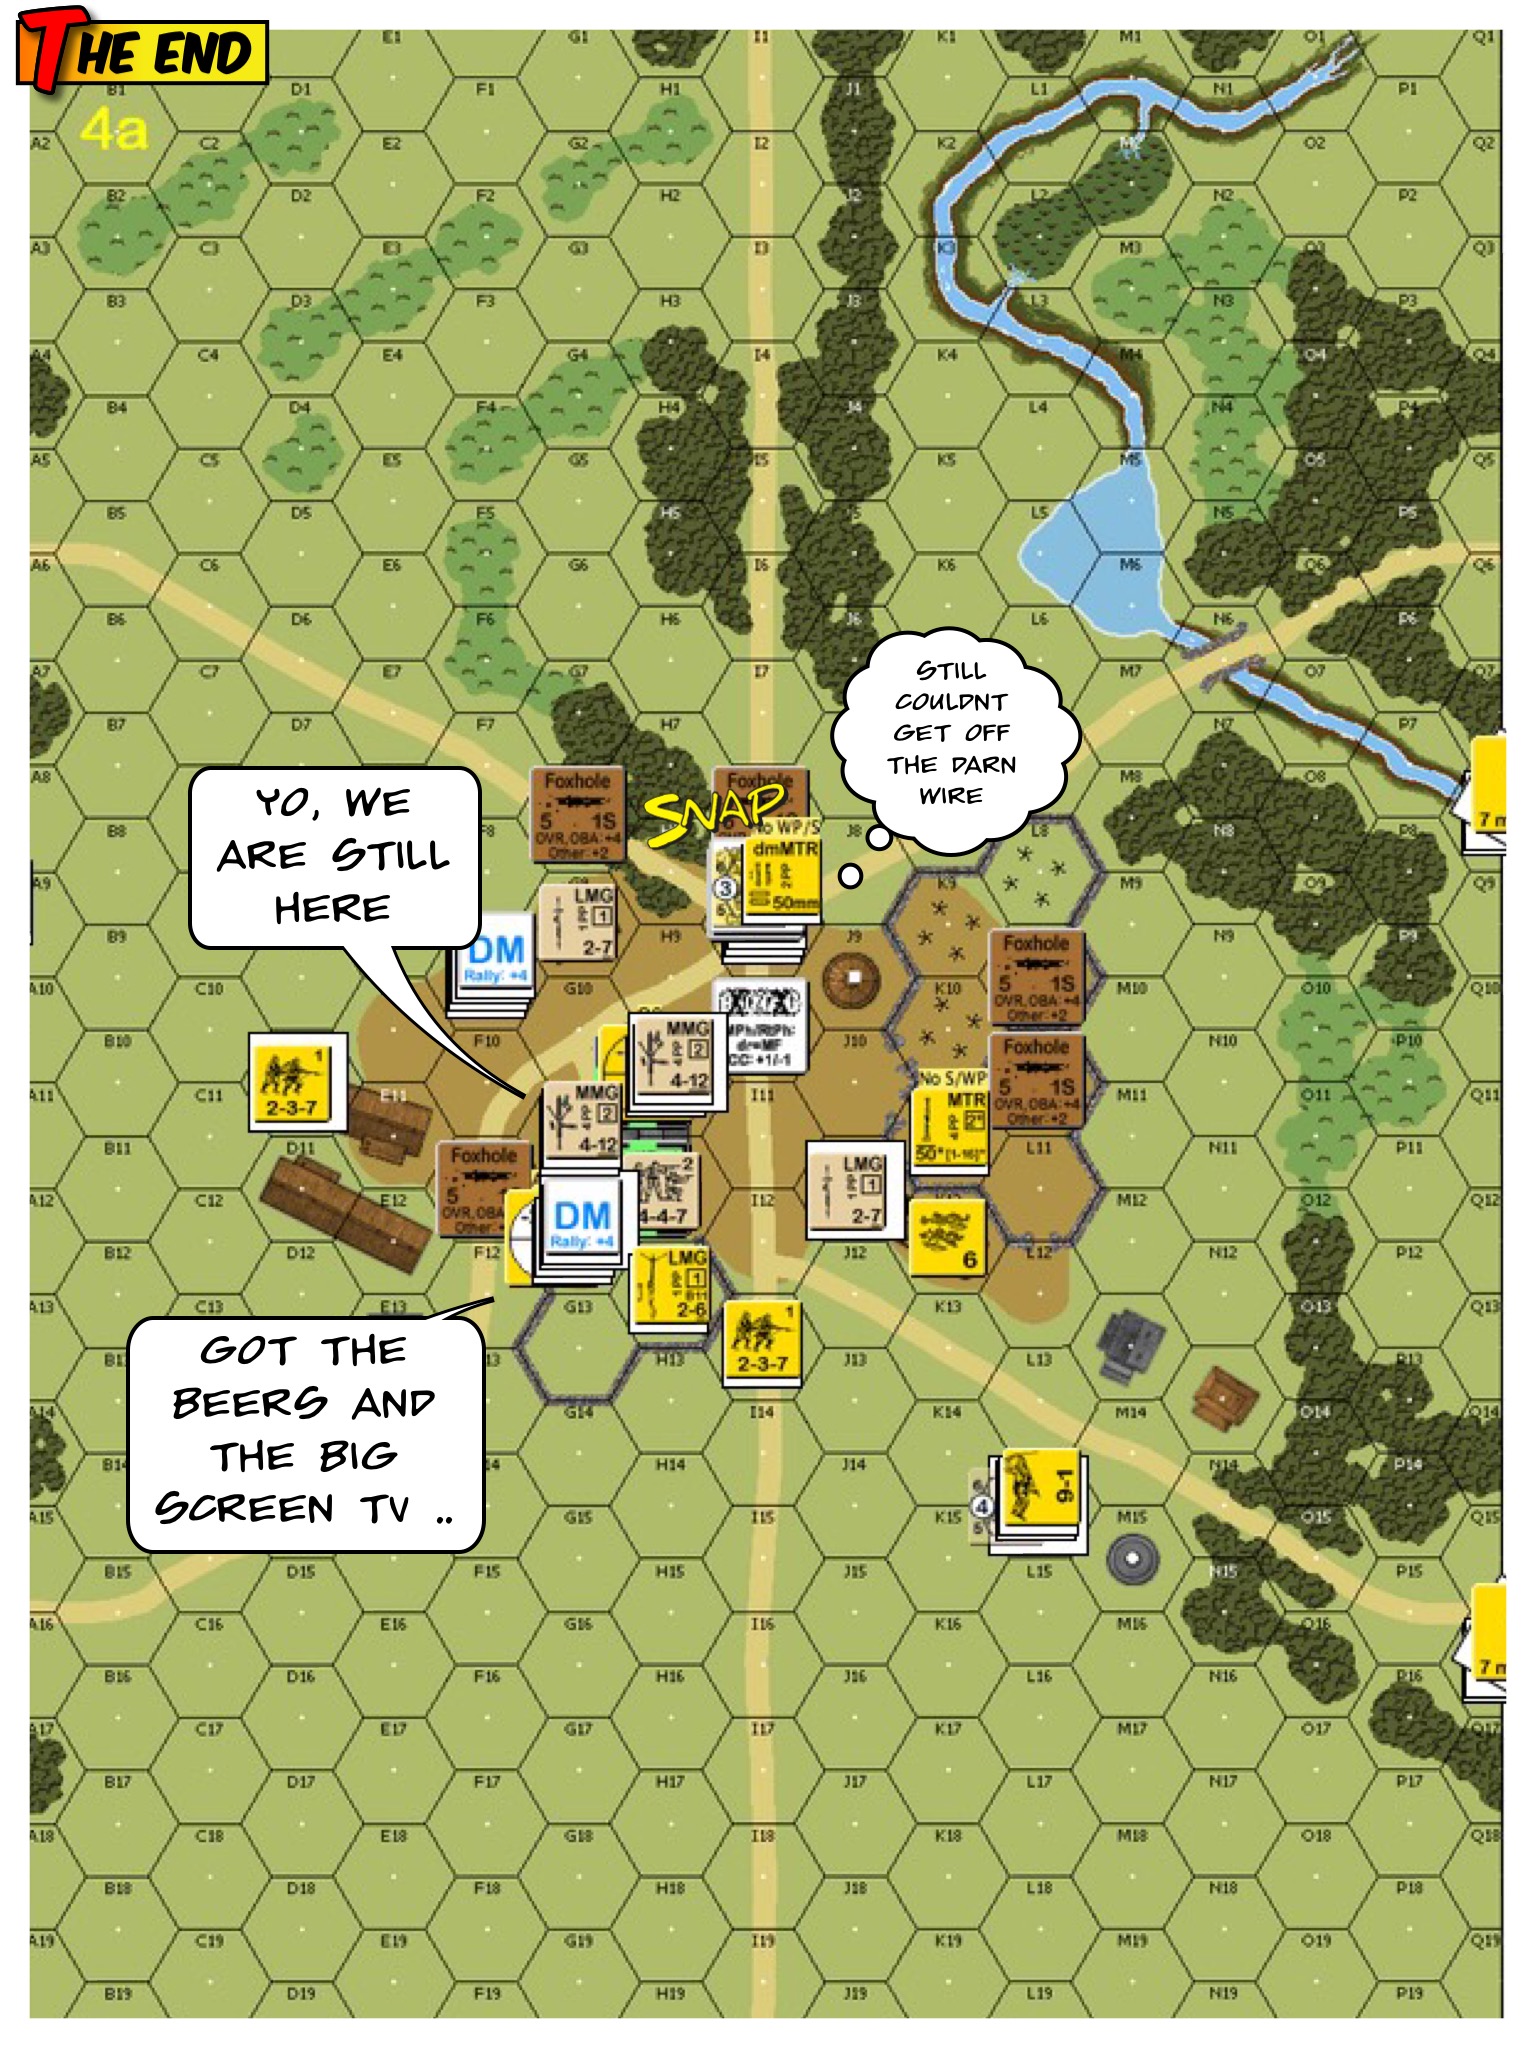
Canadian Turn 5 : With 1 Movement Phase left, there was not enough time for the IJA to clear the building (nor the 4 hex radius around it). The IJA conceded.
Thoughts :
- Forget about walking around the station. Turn 2 is probably when I should just walk STRAIGHT UP to the station and get part of the gang into the house.
- I used WP and smoke from the offboard guns. I should probably have used my knee more for additional cover.
- I should have protected my Flamethrower a lot better.
What else would you have done? Please comment.
Advanced Squad Leader Player Creed by Dan Dolan

Game Designer Carl Nogueira was asked “What do you like about ASL?”
 Likes, damn near all of it, but I’ll try to focus:
The way in which the game is layered: The rules are complex, master that, the tactics are complex, master that, the psychology of the game can be challenging too. Even then, there is no one way to win at this game. I know many top players with very different styles, who all have had enjoyed a good deal of success with the game. There are many ways to skin a cat. Everyone can succeed by refining their own approach to the game.
Obviously, because it is fun: If it wasn’t for this, there isn’t a thing I could list that would make it worthwhile. Of course what is fun for one person may not be for others, but there is room for many at the table. I am a competitive cuss, so I love the challenge of competing against my fellow gamers. Others approach it from a beer and pretzels perspective, but everyone who comes to embrace the hobby, ends up having fun with it.
The people: The camaraderie in ASL is unparalleled in wargaming. It is a niche hobby within a niche hobby and you can strike up a conversation with any player from here to Hong Kong, and immediately be speaking the same language. Because the bond between players forms quickly, many of my closest friends over the years are fellow gamers. I do not hesitate if I can extend a helping hand and have not encountered many who won’t the other way around either. There really is a bond. Certainly not on a level of military compatriots or police officers or others who have dangerous occupations, but certainly more than most with merely a common interest linking them. Such has been my experience.
The game itself is varied and handles moving from theatre to theatre VERY well: If you play many operational games, the difference between playing in the desert or the hills of Italy is pretty superficial. Here, moving from the Winter War, to the desert to the jungle to the steppes is absolutely worlds apart and FEELS like it is worlds apart. Put simply, ASL is the ultimate triumph of design for effect and there are literally thousands of scenarios and well north of one hundred CG’s. If you can’t find something to play, then you would quite rightly be likened to a little kid sitting in his room surrounded by toys screaming “I’m Bored!!!”
Finally, to succeed at this game you have to be very detail oriented and know how to plan on the fly when the best laid plans go up in smoke. Very challenging indeed!
The accessibility of the hobby in terms of helping new guys: With everything from questions, advice on everything from purchases to game tactics.
What I don’t like:
Some of the rules can be gamey, but then, it IS a game. Also, there is always the magic of the SSR to fix that which truly galls you.
– Carl Nogueira, May 6 2015
Dinant : Chasseurs on the Meuse AAR

Notre Dame de Dinant & the Citadel. Source : Wikipedia
Calm down, you didn’t miss it. Dinant is not out yet.
Dinant is a project in development. Dan Dolan’s the designer, Nadir Elfarra did the map and Carl Nogueira, the campaign game. Stanley Neo and I have been playtesting the Dinant scenarios, so this perhaps one of the rare times when you see an AAR on a product not released.
This scenario, “Chasseurs on the Meuse”, depicts an action that took place on May 13 1940. The Belgian 8th Chasseurs de Ardennais, fighting a series of delaying actions, was chased all the way up to the edge of the Meuse by Rommel’s Ghost Divison (7th Panzer). The French arrived at the west shore and did their best to help out. The Germans are to seize the victory locations marked on the top of this map within 7 turns. The German Recon company can choose to come in from the marked locations on the right side of the map. Their HQ and Armoured Car platoons can come in from the south (bottom of the map) as well.

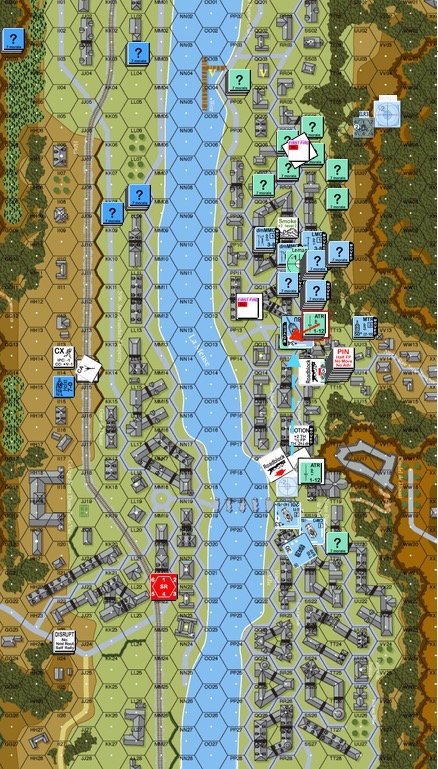
This was my Belgian/French setup. The three VC locations were on the top part of the map. One of the VC hexes was under the stack of Belgians to the right of the VC stone building. The Germans start with 13 elite squads, 5 leaders, 4 armoured cars and a host of motorcycles. . The Belgians fields 9 first liners and the French, 3 first liners immediately and 3 on Turn 3. The Allies have 6 leaders, 2 self propelled guns and a module of OBA with scarce ammunition.
The Belgians had 2 HS HIP’d with ATRs around Rue Saint Jacques (the road through the valley from the right) and one on the first level of Notre Dame de Dinant. The big set of concealment counters in front of the roadblock at Place Reine Astrid (in front of Notre Dame de Dinant and the Citadel was a decoy to turn enemy AFVs that way.

Place Reine de Astrid. http://www.citadellededinant.be

Citadel de Dinant. http://www.citadellededinant.be
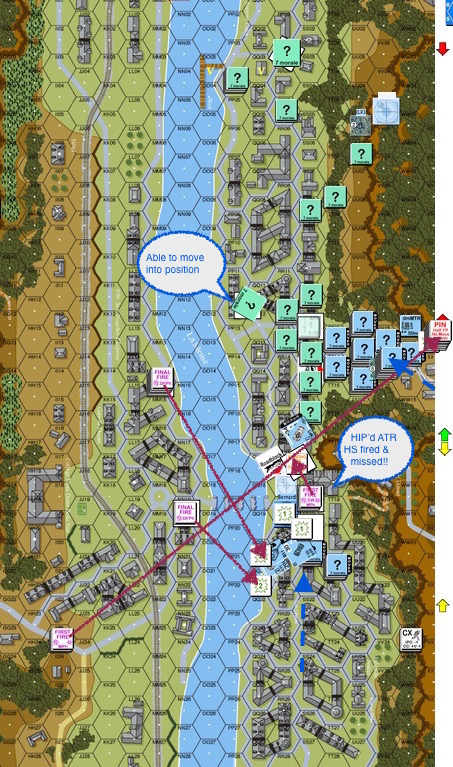
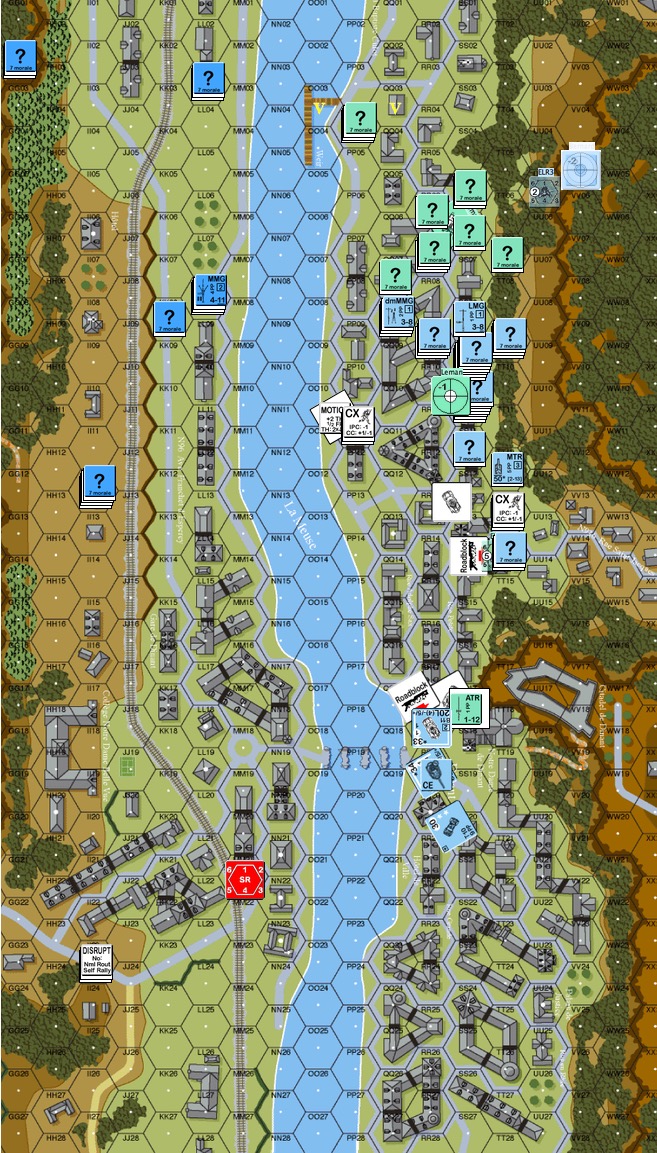
Turn 2 Germans : The German infantry decided to heap through the Rue Saint Jacques en masse. The French mortar managed however, to catch their counterparts from across the Meuse. The armoured cars got a bit of harassing fire from the French across the river.
Hearing the Germans in the Plaza outside, the Belgian HS in the Notre Dame threw off their cover and went to the windows with their ATR. One entrance to the narrow streets was blocked but the other one needed to be sealed as well, best with a wreck. The first armored car passed by and was about to turn into the narrow streets to the north.
Boom!! The anti tank grenade missed,
The targeted AC continued to speed away and the second followed suit. The other ACs started firing into the church and the German infantry got the headsup about Notre Dame.
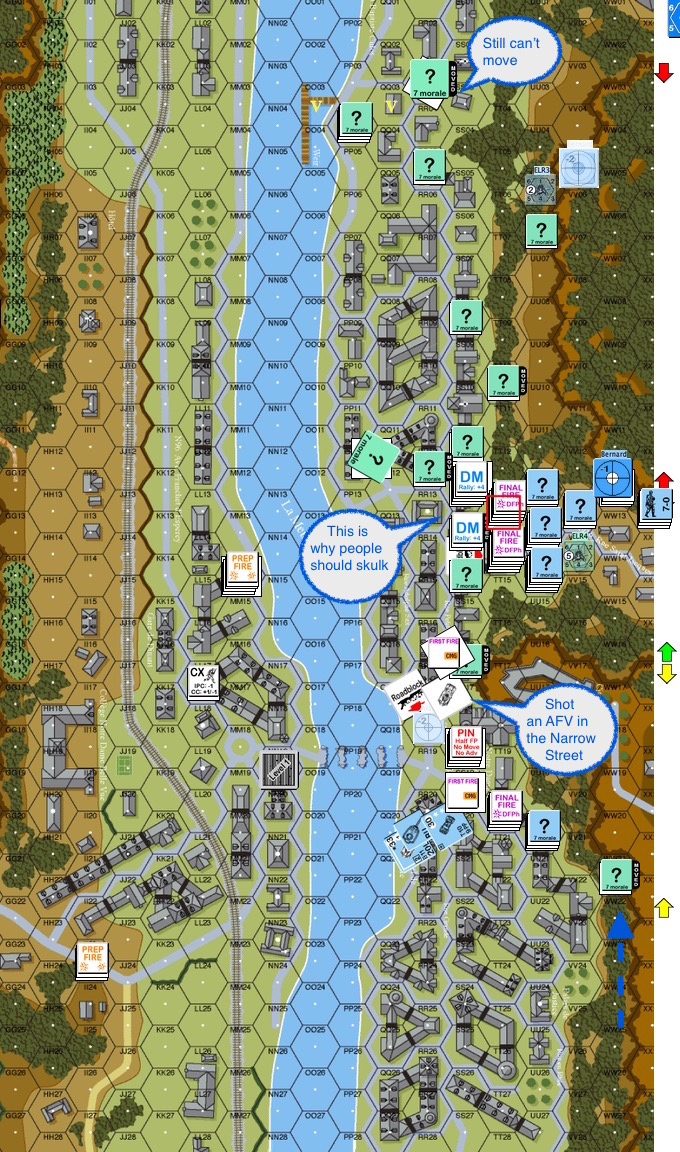
Turn 2 Belgians : The intrepid ATR team survived the initial German fire. It now sounded like half the German army was running for the church. The Belgians went to the windows again and fired. This time wrecking the 2nd armored car and therefore successfully blocked the armoured car platoon from the action to the north!
In the north, the Belgians were nervous about all the Germans coming down the valley but they felt a little too smug about lying concealed in stone buildings. They decided not to skulk.
Big mistake. The Belgians in the first 2 building hexes got blown away by the massed German firepower.
While one of the Belgian self propelled guns moved into place. The one to the north refused to budge without their partner and a radio to contact them with.
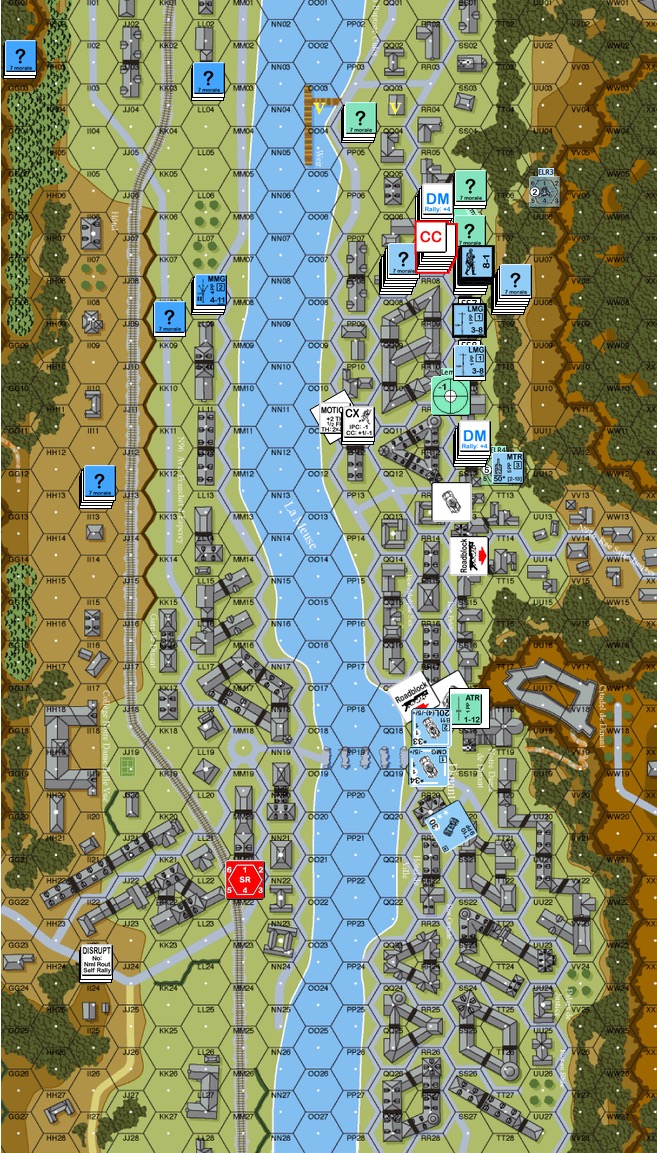
Turn 3 Germans : The Belgians to the north were simply not retreating fast enough. The Germans caught them in 3 locations where Close Combat killed 2 Belgian squads.
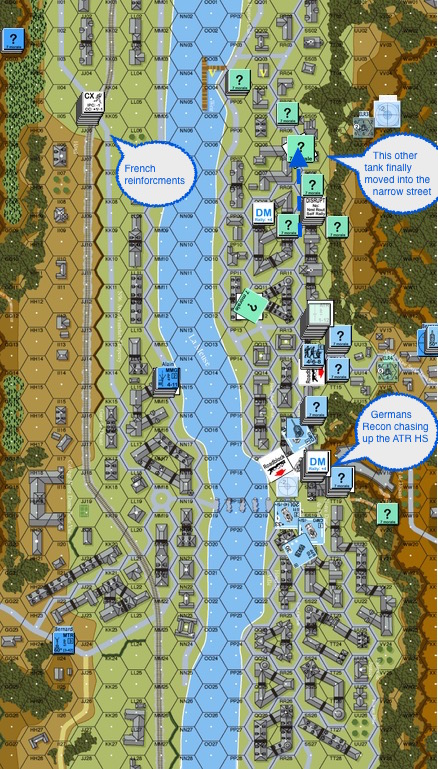
Turn 3 Belgians : Hey! The French reinforcement arrived, together with a radio to call down the artillery. Yes, ammunition was scare but it’s something. Given the rowhouse configuration, the French could only look for line of sights through the gaps they could find.
The other Belgian self propelled gun was touched by the change in sentiment and moved into one of the narrow streets to cover the German advance.
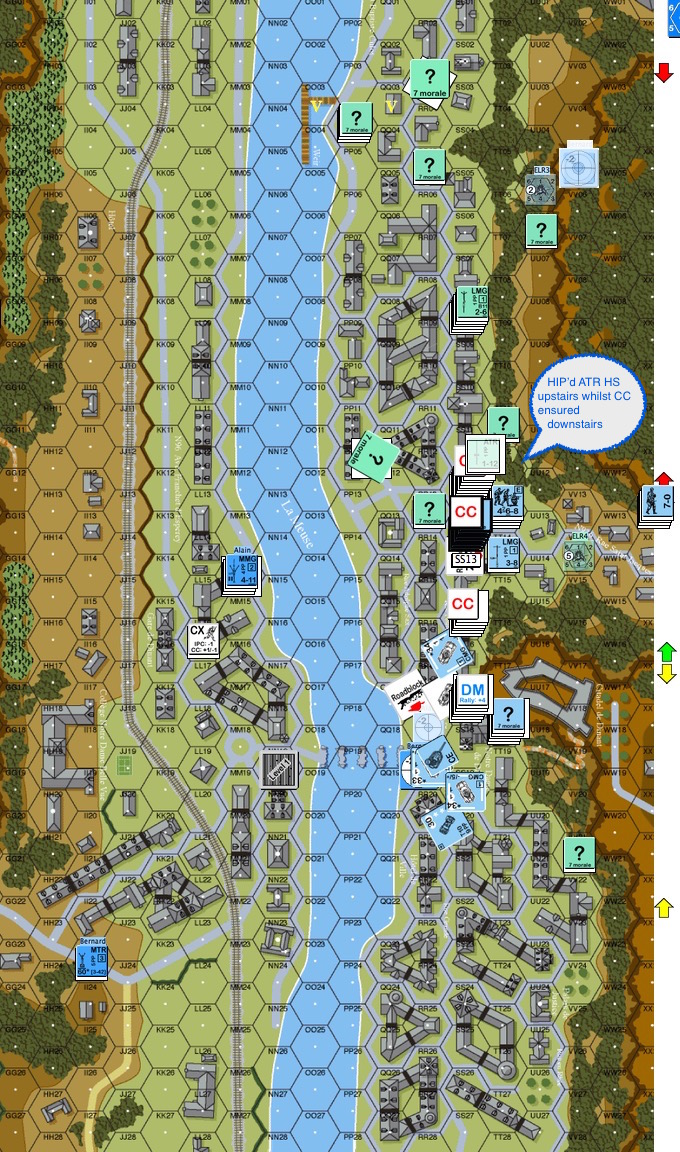
Turn 5 Germans : The Belgians finally got the hang of just how far to move back and how to shoot the Germans in bypass.
The Belgian SPG closer to the river was shooting at the Germans moving through the little plaza. When it Firist Fired, the lead German AC moved forward, turned and faced it.
The other HIP’d HS ATR team who sat through the Close Combat downstairs sprung out of hiding.
They shot and killed the lead AC!
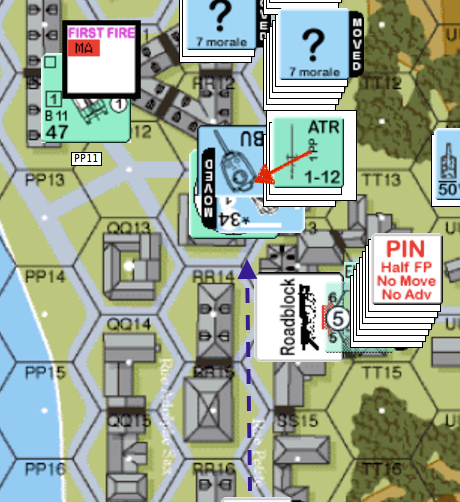
A Close Up shot of how the lead German AC was killed by a HIP’ed Belgian ATS HS.
Turn 6 Germans : The Belgians continued to back off just enough to shoot at the Germans in bypass. The French OBA was of no help whatsoever. By the time they got a response from obliging French gunners their radio went dead.
Our second Belgian ATR HS managed to run away though!
The Germans, running out of the time, got even more aggressive and jumped onto a concealed Belgian stack. The Belgians chose NOT to unconceal and NOT to fight. To the German’s disappointment, Belgians survived the German attack and retained the option of moving away in the next Belgian turn, blocking the Germans for another round.
Seeing the distance between themselves and the VC building, the Germans decided that they won’t be able to make it to the VC objectives in time.
Overall : I think the long lines of rowhouses presented an interesting problem. The Belgians had to be far enough to not invite close combat given the German superiority in numbers and to not be shot in their retreat. However they needed to be close enough to in turn shoot the Germans in bypass. This is especially important when they do not have enough firepower to take the Germans inside the stone buildings.
The mass of Germans was unnerving but had some of the Germans came in further to the north and down the cliffs, they would have been a handful.
Trying to get the French to help from across the Meuse is a problem as well. Finding gaps between buildings though you can shoot was tough. The OBA was practically useless in my game.
Thoughts from Stanley Neo : I packed the Germans’ entries via the XX13-XX16 while 3 choices were given. After some thoughts, I should have spread the force into two groups, one taking the top XX03-XX13 and the other remaining in XX13-XX16 to put more pressure on the Allies that is on the same side. At least some Germans would then be able to attempt to climb down and do a flank from the North.
Germans on the East were stuck around the entry zone for too long and should have pushed more aggressively. LoS study of the terrain may eliminate issues of troops getting pinned or broken by Mortar fire from the West.
The roadblocks were wisely placed at a chockpoint around QQ17/RR17 with ATR. This effectively blocked out the rest of the German’s AFV support making it harder for the Germans coming from the East to push.
Overall the scenario is relatively great to play. Would be interesting to replay the scenario with the afterthoughts built into the attack plan.
What are your thoughts with regards to this module? Are you looking forward to it?
Trailer : Albany
PBP02 The RHA at Bay AAR – a fighting withdrawal!!
 This was the setup. The German wins if both British guns were eliminated and more than 10 CVPs of Good Order Germans exit off the east edge (right edge of the map). It’s a draw if both guns were eliminated without the requisite exits. There were two nice locations to where the guns could be emplaced : both were orchards with stone walls. I had the two ATRs positioned to not take immediate fire but to be where they would cause the most delay. Their threat was more powerful than their actual effectiveness against German tanks. So here we are: eight British second liners (they were search light operators) and two guns against ten German élite and first liners plus five tanks.
  German Turn 2: The British reserves moved up to front line positions after seeing how the Germans commit. The British right flank got shot up pretty bad. All that was holding that side up was a British second liner. The Germans used smoke and cover well but a squad got tired of the searchlight operators shooting back and promptly went berserk.
  German Turn 3: The berserkers charged! You can see how they made their way straight into the first stone building only to be cut down when they got to the house. The single British second liner continued to hold up the right flank while their compatriots were busy rallying. The first German tank rounded the corner on the British left flank and the ATR team got to work, only to bounce a round off the tank. German tanker: “That wasn’t even scary.”
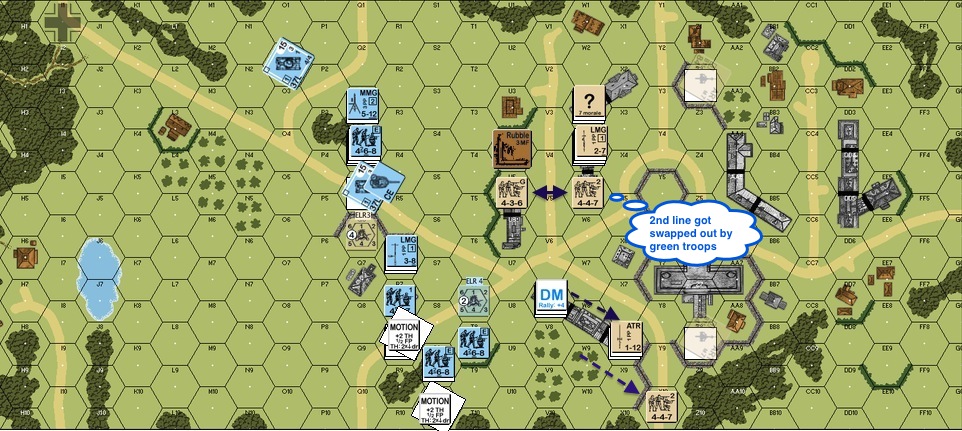
British Turn 3: The British were in general retreat .. erm .. retrograde. The idea here was to stay ahead of the Germans and get to the next building before the Germans get their guns on and to keep the inside lines open. On the right, a rallied British green squad switched a second liner out as the rear guard. These guys would see a few medals before the day is over.
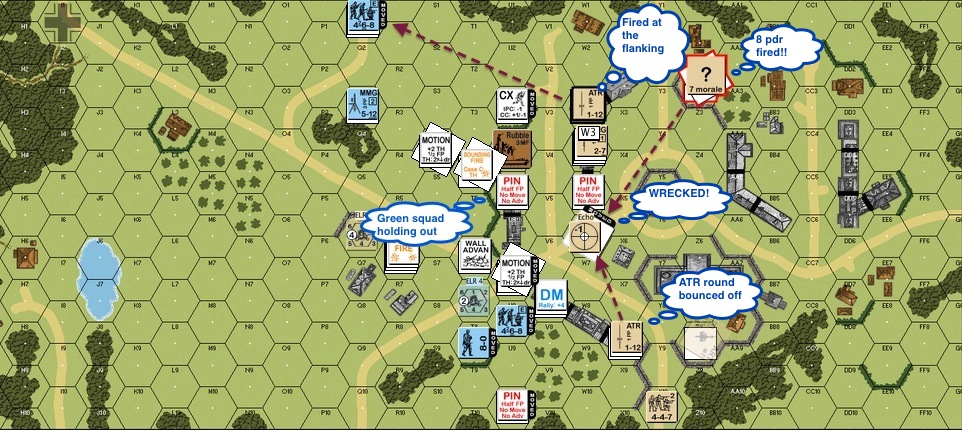
German Turn 4: The action heated up on German Turn 4. On the British left, a German tank tried to get to the back field. The British ATR team held their shot until the tank went to the other side of the building. However they bounced a second round off the German tanks even when they had a side shot. The 18 pounder (typo in the picture) on the British right “appeared” and wrecked the German tank in the Defensive Fire Phase.
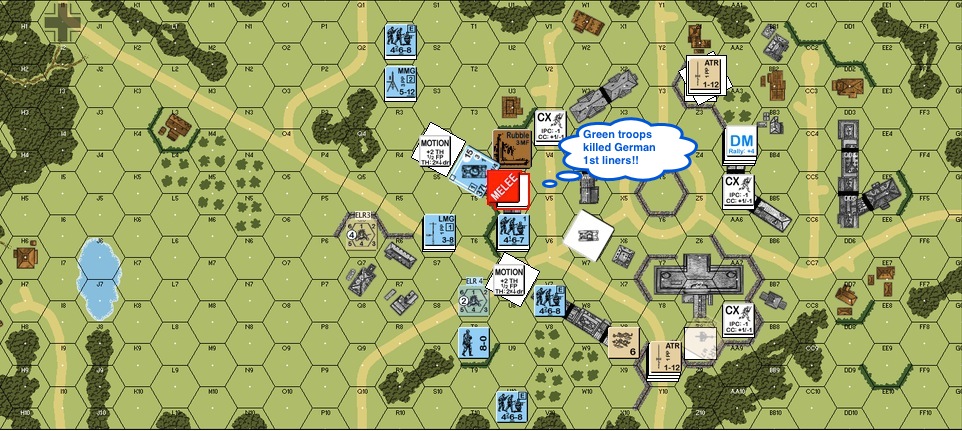
British Turn 4: The British green squad on the right dispatched the German first liners who held them in melee!! The rest of the British squads got to the last line of buildings. They cut it quite close, as the Germans shot some of them between the gaps. The British continued to get to positions that were a little out-of-the-way but cover grounds the Germans would move into.
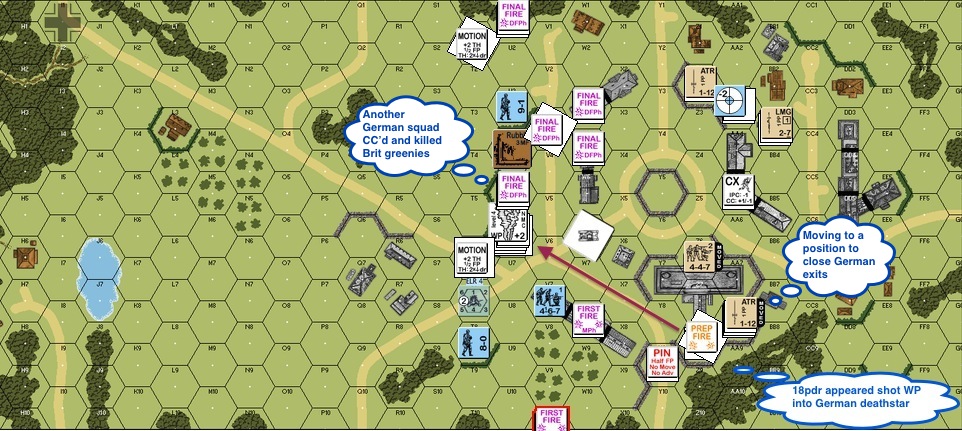
British Turn 5: The Germans started building a death star on the British left and the left British gun appeared!! It promptly put a round of white phosphorous into the building. The British ATR teams repositioned towards buildings where they could prevent the German tanks from exiting. On the right, the malfunctioned British gun couldn’t be fixed and was eliminated from the game. The Germans sent another squad in on the right flank and killed the pesky British green squad that was holding up traffic but these heroes had already saved their brothers.

German Turn 6: The Germans were almost of top of the British now. A German tank got inside the British lines but one ATR team was broken and the other one couldn’t get close enough. Good thing the white phosphorous forced the German death star to move.

German Turn 7: The Germans got up to the right ATR team and was wrecked at pointblank range! The Germans rushed up on the British left as well. They advanced up and captured the gun hex in the CC phase!!

British Turn 7: The British couldn’t let the Germans have a fire phase to spike the left gun. The British squad fired pointblank and KIA’d the squad! This led to an interesting revelation after a few rounds of discussions on the forums. There’s no way to kill the gun by small arms fire without a crew / possessing infantry (A9.74) present! So the only chance of the Germans getting a tie is to kill it with the tank ordnance.
We never got to that so here we go. It’s a three hex range with an infantry target. The base TH is 8. The gun was emplaced, so there’s a +2 DRM.

SNAKES!! The Modified TH# is 8 .. rolled a 2+2 which is not less than half but it’s an original 1,1 nonetheless.. so we need a subsequent roll ..  That’s equal to half the Modified TH# of 8!! CRITICAL HIT!!!
As AZslim pointed out to me on GameSquad, guns (and crew) are automatically destroyed on Critlcal Hits. So both British guns were gone. This game went all the way to the last roll – and it’s a DRAW!!
Gotta admit, this is some finish!! Witness the narrative power of an ASL game – and that’s why we love it.
A55 The Cat Has Jumped – AAR on Seaborne Assault!!
This scenario reflects the seaborne assault by the IJA on a relatively lightly held beach in the Philippines. The landing took place on Dec 22 1941, shortly after the attack on Pearl Harbour. Conditions were not ideal on this beach – the wind’s heavy and so’s the surf. The Japanese launched their attack on these “shohatsu’s” (or “LCs” for landing crafts) which were really big steel boats.

Shohatsu
As such, neither the crew nor the passengers get to button up. They were therefore subjected to a +2 CE DRM (Crew Exposed DR modifier) at all times. The Filipino defenders had problems of their own as well : they were using MGs that were stored since the 1920’s. The defenders’ machine guns were therefore a lot less reliable than usual (X11 instead of B12).
The IJA wins immediately if they manage to exit 25 or more VPs (“victory points”) off the right edge of the map and/or gain that number in CVPs (“casualty victory points). The entire IJA force had 22 squads, 3 crews and 5 leaders – a total of 58 VPs which meant they needed to exit half. The entire Philippines force was 29 CVPs should the IJA decides to focus on CVPs instead.

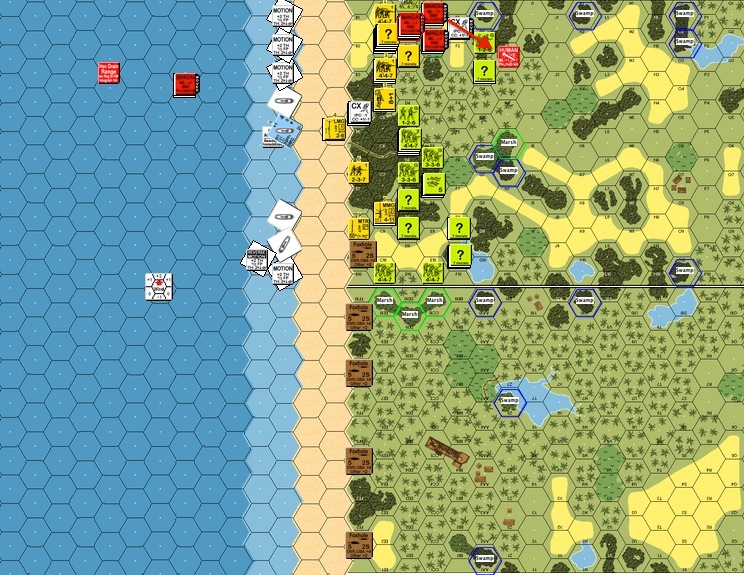
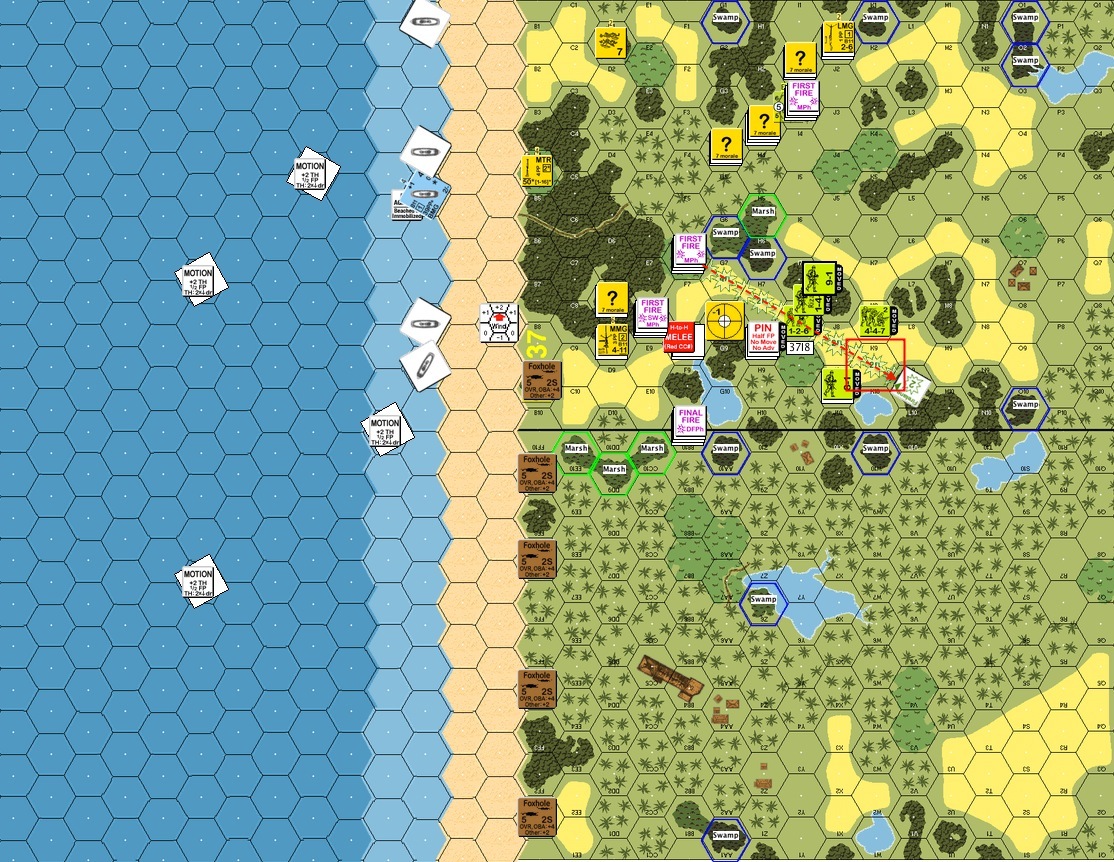
IJA Turn 1 : This was a humid day at a peaceful beach. I could almost see people frolicking in the shallow waters (almost).
The terrain on the top of the map was very restrictive, especially compared to the bottom of the map. It would be difficult for the IJA to exit the map via there. The terrain was more ideal on the bottom half of the map. The orchards provided a degree of hindrance whilst requiring only 1 MF per hex to move through. Defence looks pretty sparse on the bottom of the map and I suspect that’s because the Filipinos stationed their 4 squad equivalents there. The way this was setup, the bottom of the map looked too inviting for me. I therefore aim the IJA landing forces towards the top part of the map. My opponent had gracefully given me the balance, so there were 2 MMGs and 1 HMG instead of 3 MMGs and 1 HMG, but those MGs still encouraged me to head for the jungle. Jungles are ideal banzai terrain after all.

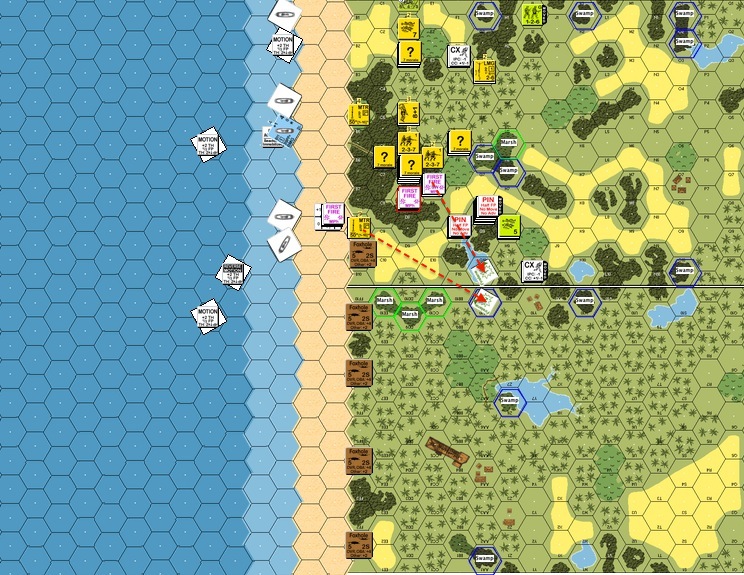
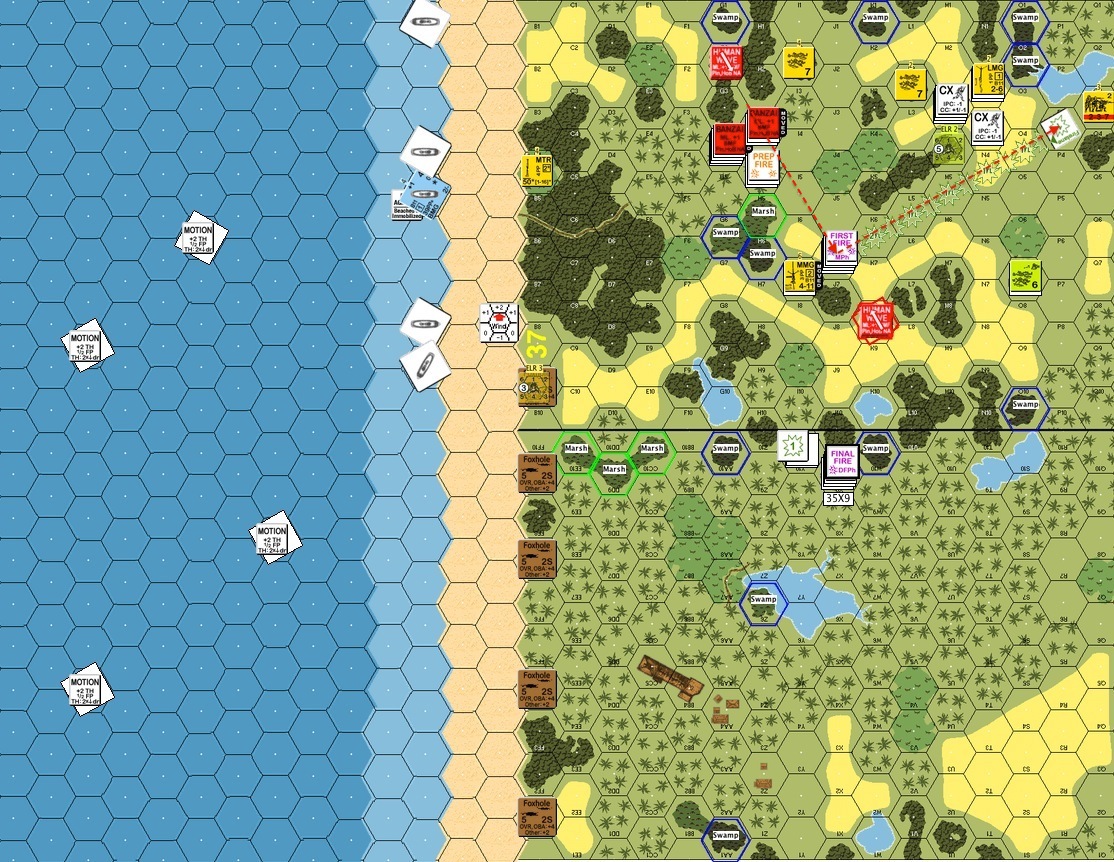
Philippines Turn 2 : The 9 IJA boats were still coming in okay. None of the boats were lost in the heavy surf yet. The Filipinos started shooting at the incoming LCs. Stunning the LC crew would cause the boats to flounder and throw the IJA off their landing schedule. Unfortunately both MMG clogged up and random selection designated both for the junk heap (and there was much cursing).

IJA Turn 3 : It was difficult to beach the LCs properly in the heavy surf. One LC was swamped and ran aground. One LC’s crew struggled hard with the waves and wasn’t able to do much. One LC broached against the swells and was destroyed, no survivors. One LC got shot up bad and was floundering in the shadow seas. The 5 that beached okay, started to unload its passengers. Infantry on the beach are fanatic. However, if they fail morale checks they casualty reduce.
The 5 LCs that beached, started to unload. However being a first time seaborne assaulter I was concerned about pushing entire stacks out on the beach risking -2 shots on everyone. So I decided to offload the heavy weapons first, those chaps would need to assemble their toys on the beach away. This decision would cost the IJA a few more platoons as more LCs got broached in the heavy surf.
I asked my mentor Witchbottles about it afterwards, and he said to get off the boat absolutely as fast as we can!

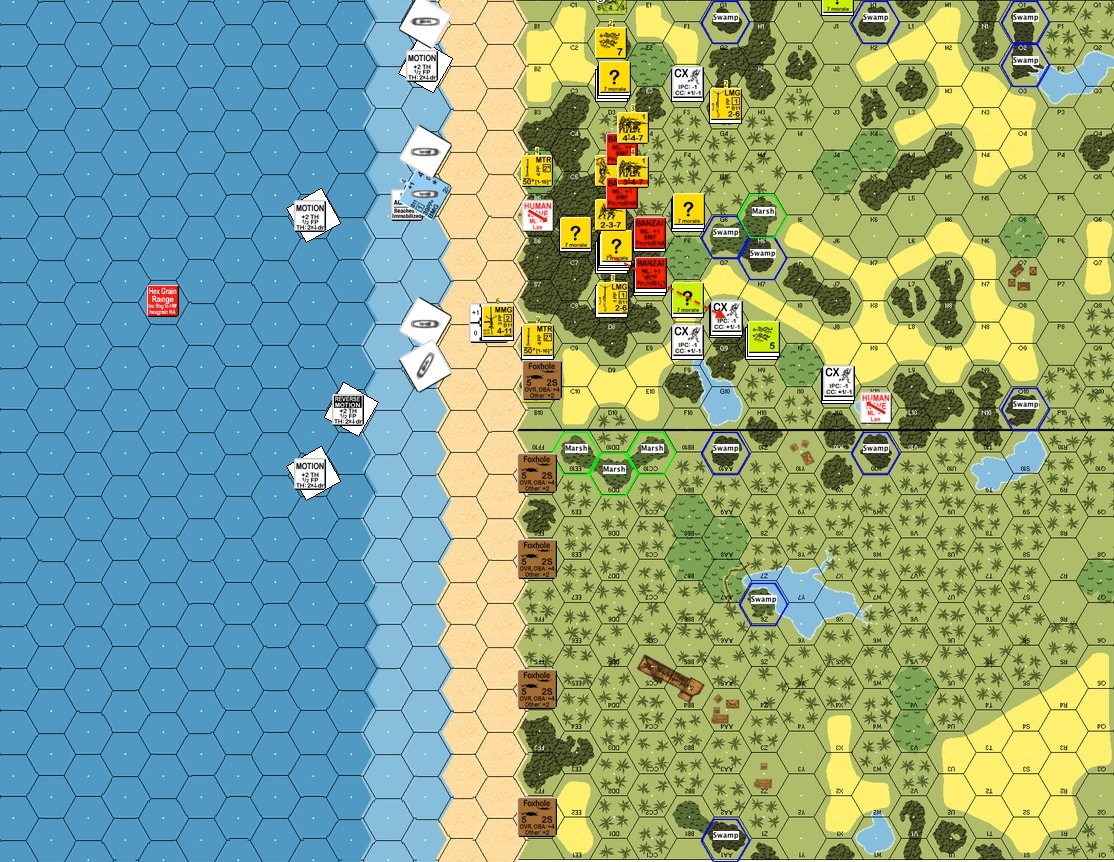
Philippines Turn 4 : The IJA got inland on the left flank. It’s great news apart from the fact that they could get boxed in with a few Filipino squads against the board edge especially with this terrain. The remaining Filipino MG, the heavy machine gun expired as well. The defenders were caught with a beach full of fanatic IJAs and no high rate of fire weapon to do anything about it. However, they had moved inland methodically to key locations. The IJA got a bad feeling about what was to come as they couldn’t stop the Filipinos from slipping away.

IJA Turn 5 : The IJA got another LCs broached!! The IJA had lost a total of 11 squads and the best 3 of the 5 leaders. Considering that the IJA started with 22 squads 5 leaders ad 3 crews, that was almost half of the force!
IJA Turn 6 : This is Turn 6 and the IJA just got off the beach. Witchbottles’ advice to always read the scenario victory conditions at the start of every turn definitely helped here. The IJAs couldn’t move fast enough to get 25 VPs off the board, especially not with the Filipinos shooting at their backs. The IJAs decided to change tack and to round them up in the jungle instead.
BAAAAANNNZZZAAAAAAAAIIIIIIIIIIIII!!!!!!!!
This was the second banzai attack of the game. The first one was almost exploratory. The aim ws to catch and kill the blocking force in front.

IJA Turn 6 (contd.) : This is the third banzai to catch the bulk of the Filipinos in the woods. The jungle was just perfect banzai country!

IJA Turn 6 : This was the aftermath of Turn 6. The IJA lost a total of 13 squads and 4 leaders but have scored 16 CVPs in total. They needed 9 more to win the game. The Filipinos were wiped off the top of the map. However, there were still enough Filipino troops retreating into blocking positions.
Philippines Turn 6 : The IJAs used fire lanes to delay the Filipino retreat. Meanwhile, the left flank looked to be clear all the way to the goal line!
IJA Turn 7 : The IJA sprung their 4th banzai. It was a big decision considering they had only 1 leader (8+1) left. However the way he was positioned he definitely didn’t need to get too intimately involved. You can see by the red arrow, how the IJA looked to catch the rest of the defenders. The IJA now had 18 CVPs.
Philippines Turn 7 : The Filipinos got themselves a hero! The hero, when coupled with the remaining 8-1 produced a fairly respectable stack with a HS and an IJA LMG. Either way, the IJA moved into positions where they could lay down fire lanes to delay the Filipino retreat. My opponent had already seen the bottleneck on the top right of the map where there was a lake. To get to the board edge, the IJAs on the left flank had to run through the one hex that was 4 hexes from the top and 2 hexes from the right.
IJA Turn 9 : The Filipino leader / hero / HS / LMG stack got into a position to lay a fire lane down on the IJA exit. The first fire striped the lead IJA squad. The IJA had about 7 VPs worth of squads who could exit off in this very turn and we needed only 5. We had to get rid of that fire lane and one good way was to force the enemy squad into Final Protective Fire. The Filipino leader-hero stack’s collective hearts must had skipped a beat when they looked away from their gleefully laid fire lane and saw the bunch of IJAs looking menacingly at them from their left.
Uh oh.
The fifth banzai attack had no problems crashing through the open and into the fire lane stack. There was nothing the Filipinos could do. The fire lane stopped after a quick struggle and the 7 VPs worth of IJA squads exited at their leisure.

IJA Turn 9 : This was the end of the game as the IJA killed and exited more than 25 VPs.
As my opponent warned me, seaborne assaults are not for the faint of heart. The attackers should expect to lose more than half the force to the elements and to casualty reduction until his troops hit the hinterland. For the IJAs, only 4 LCs managed to head back to the ships. 4 others were wrecked and 1 went aground. Half the force was dead at turn 6, mostly to broaching LCs.
I got to remember to get EVERYONE off the LCs immediately next time.
