I am not confronting any defenders directly but relentlessly seek to push deep and to constantly flank while the tanks followup to deliver the head on blow.
The Russians only have two turns left to crush everyone in the little yellow circle. My opponent think his defenders are falling apart but I think the reinforcing German conscripts will take a while to clear just by standing around.
I got up rather early on the last day and so I checked out, took my luggage to the venue and went down to McD for a nice breakfast. I met Benji there. Benji travelled in from nearby via Uber. He told me how he’s been playing Mark Humphries every Friday evening. As a matter of fact John Knowles told me about Benji earlier and said he’s one of those guys who’s been picking ASL up really quickly. Apparently this is his first tournament and he’s enjoying it. He knows there’s a learning curve to be surmounted and he is focusing on getting through the first 100 games. I, on the other hand, is on my 123rd game and I am no where close to NOT feeling like a beginner. I didn’t tell him that.
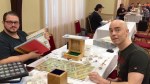
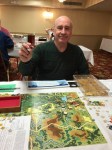
The China crew
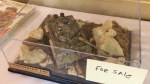
One of the Dare Death editors with his BattleDice
The China crew showed up with 5 players this year (6 including myself). They have already been playing in regional tournaments so they are no strangers to most in attendance. These guys definitely held their own : after all Kyle, Johnny & Xavier are experienced players. Xavier, aka the X teacher, holds monthly ASL classes in a Shanghai game store. However, since he was never before ranked internationally, he is awarded “The Outstanding Newbie” award. Kyle & Zhen “Richard” Wang, are the two chief editors of the Chinese ASL magazine “Dare Death”. We even came in personalised team t-shirts, designed by Xavier.
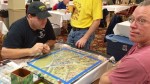
Jamie Westlake’s Four Dice
One thing a lot of us noticed was Westlake throwing 4 dice at a time. He came in second in the tourney and so whatever he’s doing must have worked. Either that or it’s his superhero t-shirts. We asked him to explain this “Four Dice System”:
“Hi guys…..Aussie convention…..red and white first. Blue and yellow second. If multiple morale checks, top unit red and white, next blue and yellow. Then roll again for third and fourth etc. exception: if you roll HOB, blue and white become HOB resolution. If leader creation, yellow is next. When first introduced to this twenty years ago I hated it. Now I love it…..on a to hit roll, red and white is the hit, blue and yellow the kill. Instant gratification….whack!”
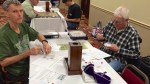
All the “other” folks I’d like to thank
Will Fleming
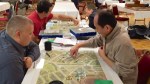
With so many players coming in from overseas and with a good number of new players, we knew there’s going to be an issue with maps and overlays. Will Fleming worked meticulously to put together good solid printouts of scenario maps on thick paper.
George Bates
George Bates couldn’t make the tournament because of real life issues. However, he’s instrumental to the success of Mayhem in Manila. He pushed through a lot of decisions and set the tone we want to bring forth in these tournaments. He was the one who went to Perry at Multi-Man Publishing and asked for sponsorship. That man showed me how it’s done.
Vlad See
Vlad See did the fantastic Mayhem t-shirts, amongst other things like driving players to airports. The graphics on the t-shirt is actually done by a professional design artist, not that it’s not noticeable.
The Sponsors
The sponsors! Oh my god, the sponsors!! They go such a very long way to make this a proper tournament. I can’t be more thankful of their support.
The Blog of Five Rounds
AP89 To the Pain, Bruce Probst
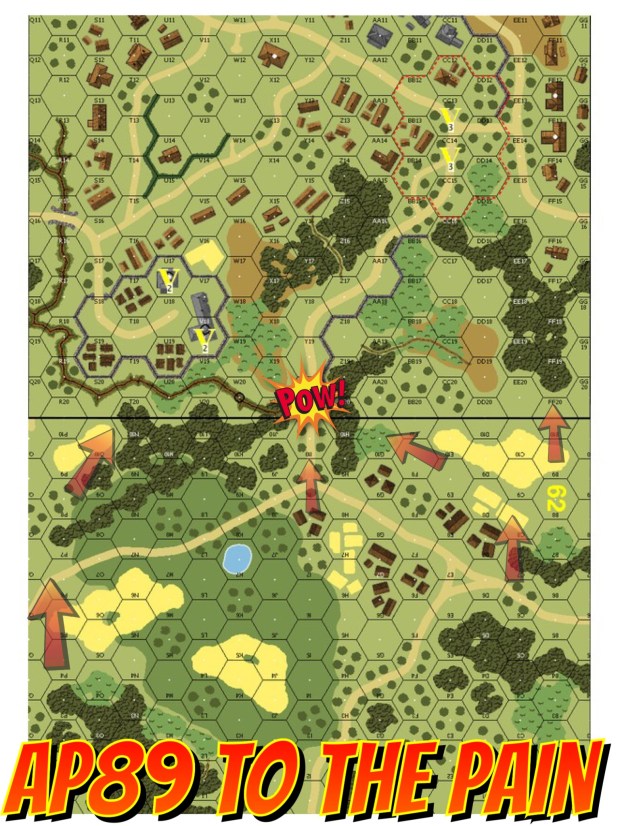
This is a Gary Fortenberry scenario from Action Pack 9 “To the Bridge”. The victory condition is a little out of the ordinary, there are multiple ways you can win. If you fulfil certain number of VC conditions at a certain point in time, the game ends. Otherwise it goes on to the next checkpoint until the 6.5 turn scenario is over.
Bruce Probst was my opponent on this first round. I played him in a Dare Death VASL tourney round before and he’s really one of the nicest chaps you can get matched up with.
If you look the picture above, the locations marked with a “V” are the places that allows the British to score. The arrows show where Probst’s Gurkha Rifles roamed. Probst was probing the left, centre as well as the right. My attention was draw more to the right because my asset allocation was more towards the middle. I don’t worry about the left as much since it’s a much harder terrain to traverse.
Probst took advantage of his mobility and shifted his weight from the left to the centre, where he started focusing on around Turn 3, our first “checkpoint” so to speak. I wasn’t setup very well and so I had no multi-man counters around the middle VC. However, I was confident that I could advance a MMG crew into the area and extend the game to the next checkpoint (from Turn 3 to Turn 5).
As luck would have it, the crew had to roll for an NMC on the Defensive Fire and produced boxcars. It’s easy for me to blame the dice for this but I shouldn’t be in this situation to start with. I should have focused much better on the Victory Conditions.
Focus on the VC!
J150 The Sangshak Redemption, John Knowles
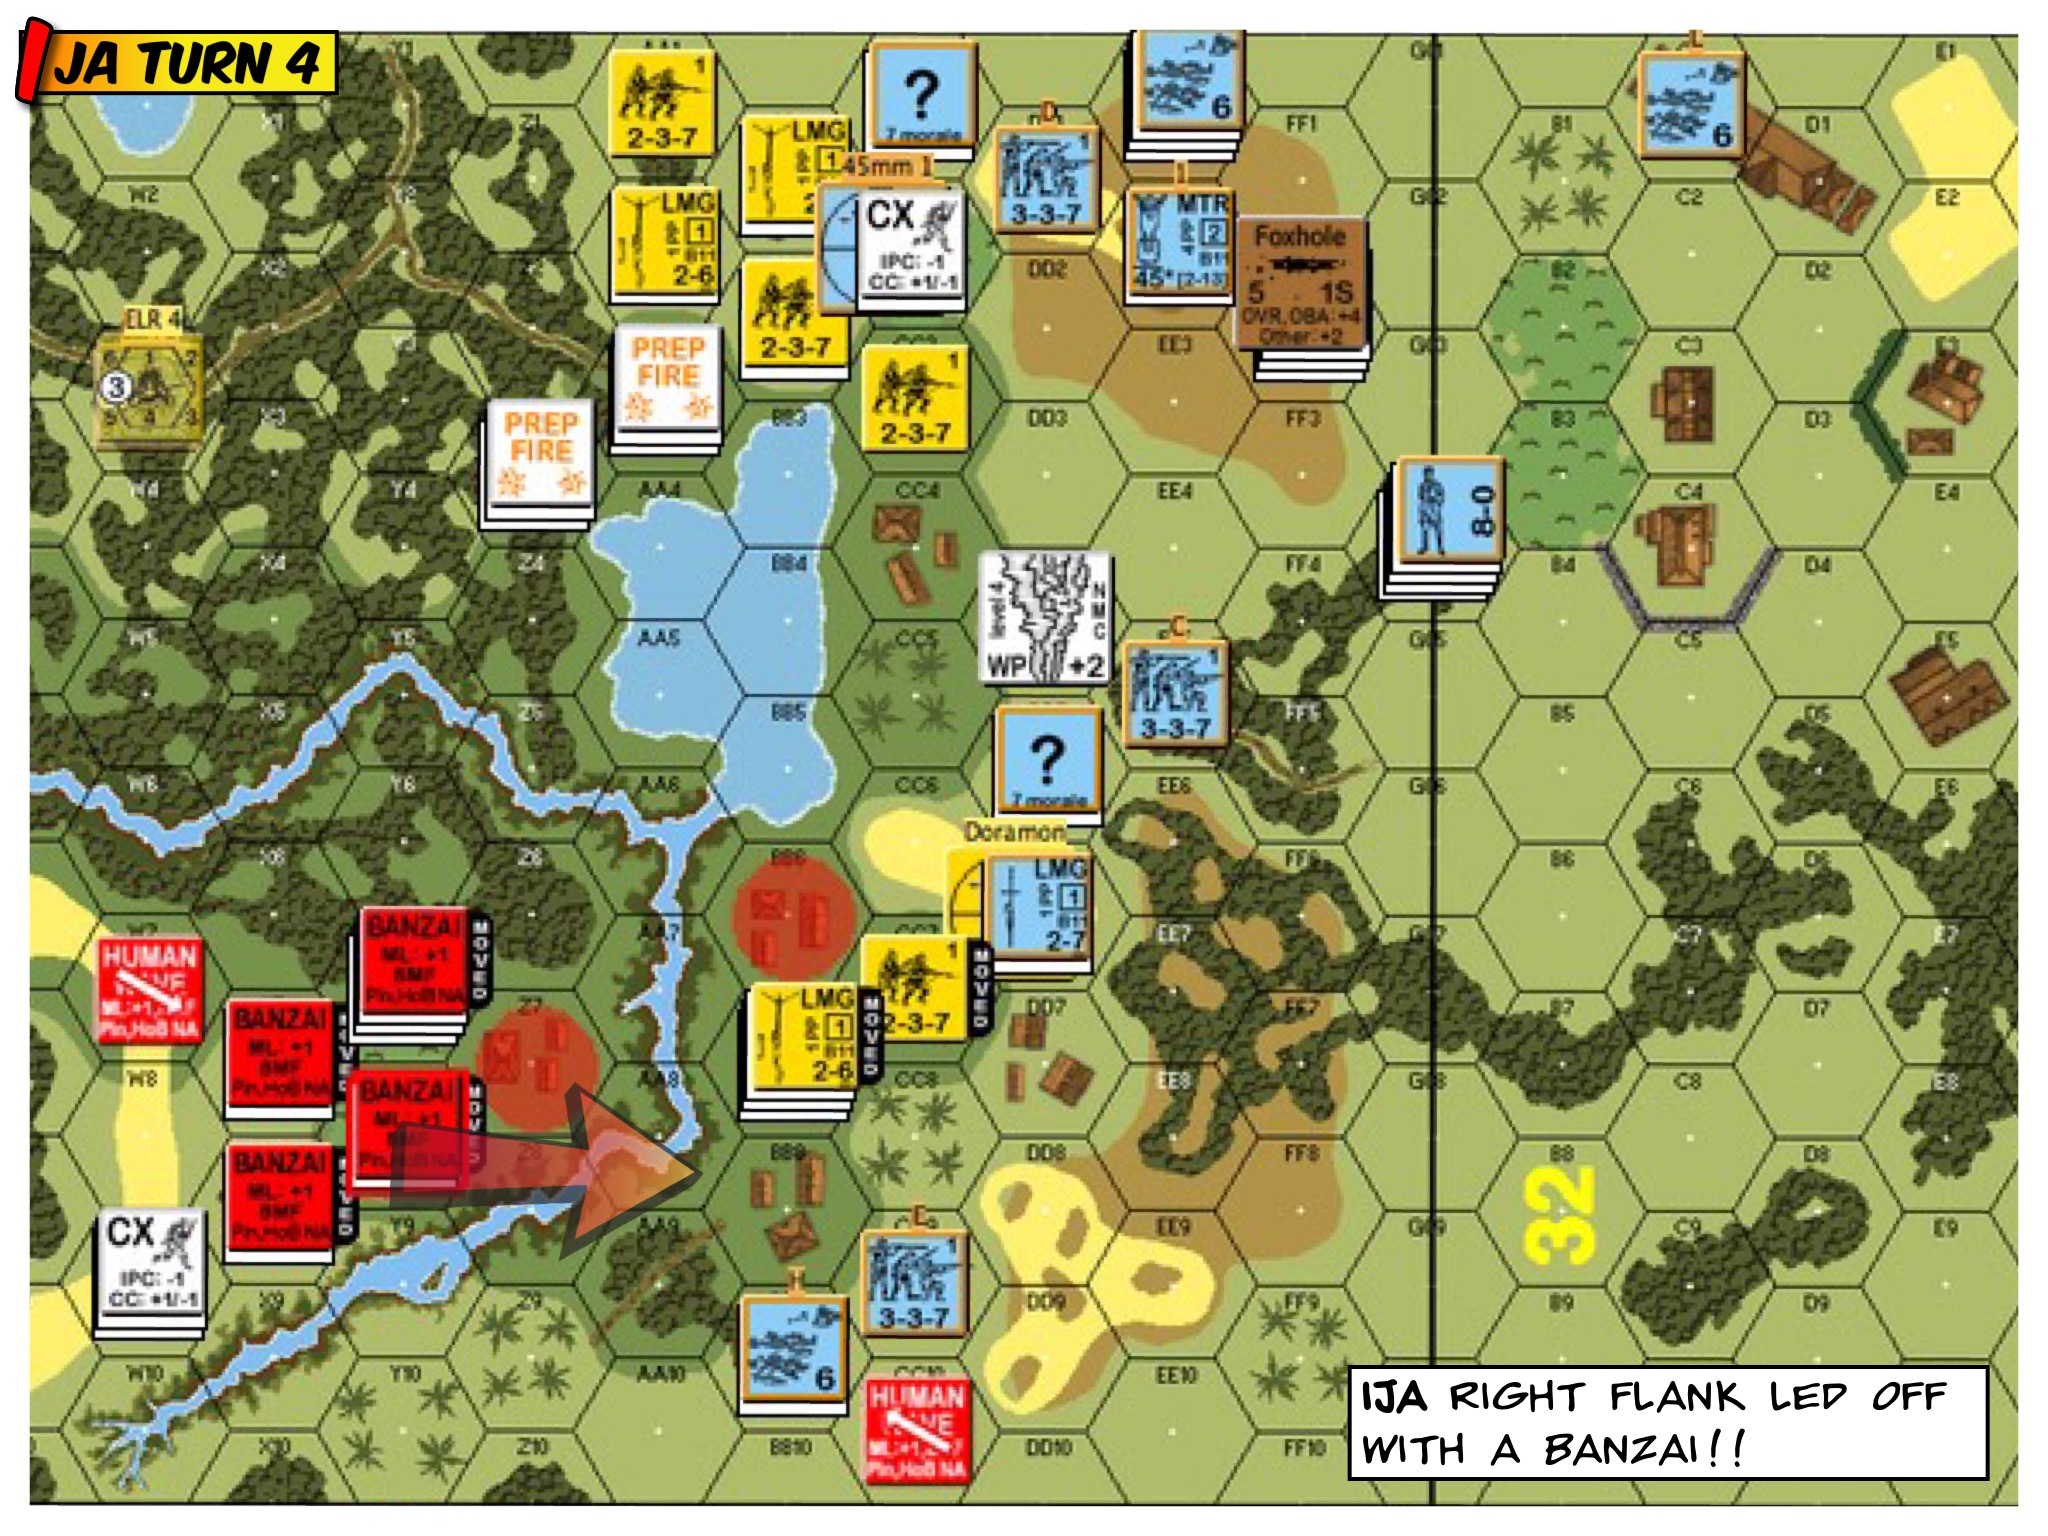
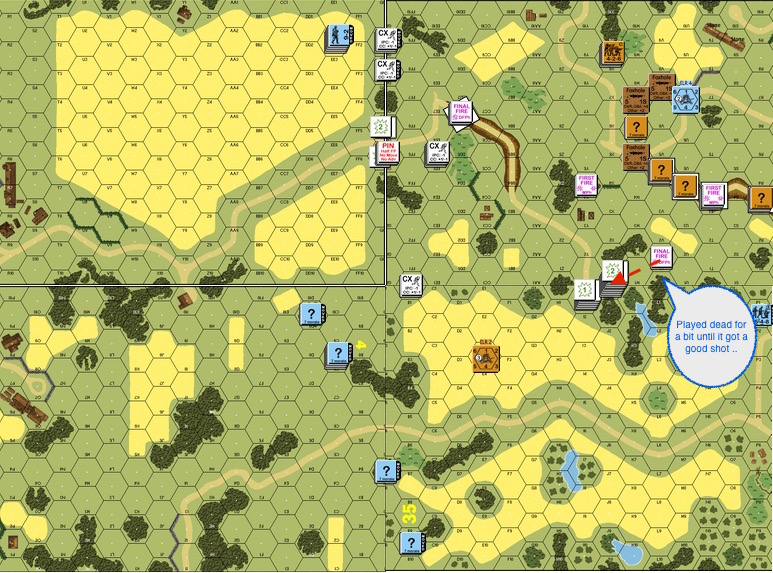
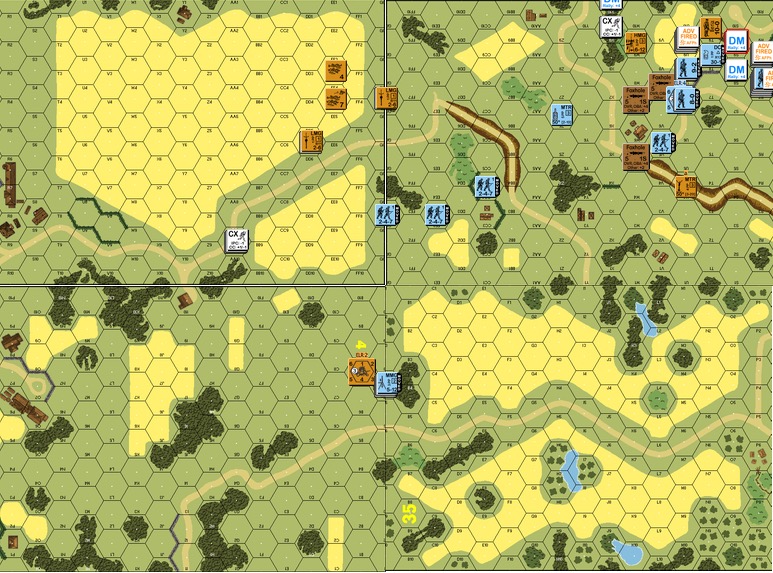
This 5 turn scenario is from ASL Journal 10. Both the Japan side and the Indian / Gurkha’s side get to attack as well as to defend. All the buildings are huts apart from the building in the middle of the VC circle which is a stone church. The IJA wins by winning ownership of the church (even just briefly) and keep two building within the VC circle at game’s end. My opponent was John Knowles, John and I play every Thursday evening, from “Into the Rubble” scenarios to Campaign Game playtests.
Initially, the IJA faced off a weak India setup. I needed to capture the church as soon as possible and to kill those 2 guns, to get into the right positions and to preserve my forces for the Gurkha onslaught. I didn’t move fast enough, I don’t think. I also saw an opportunity to banzai through cover and take out his ordnance. Those ordnance weren’t even pointed towards the banzai’er. Well, that didn’t turn out so well. I was able to pile into one of the Indian squads but neither of the guns.
My guys were off position and then John got a CH on the church from his 76mm mortar.
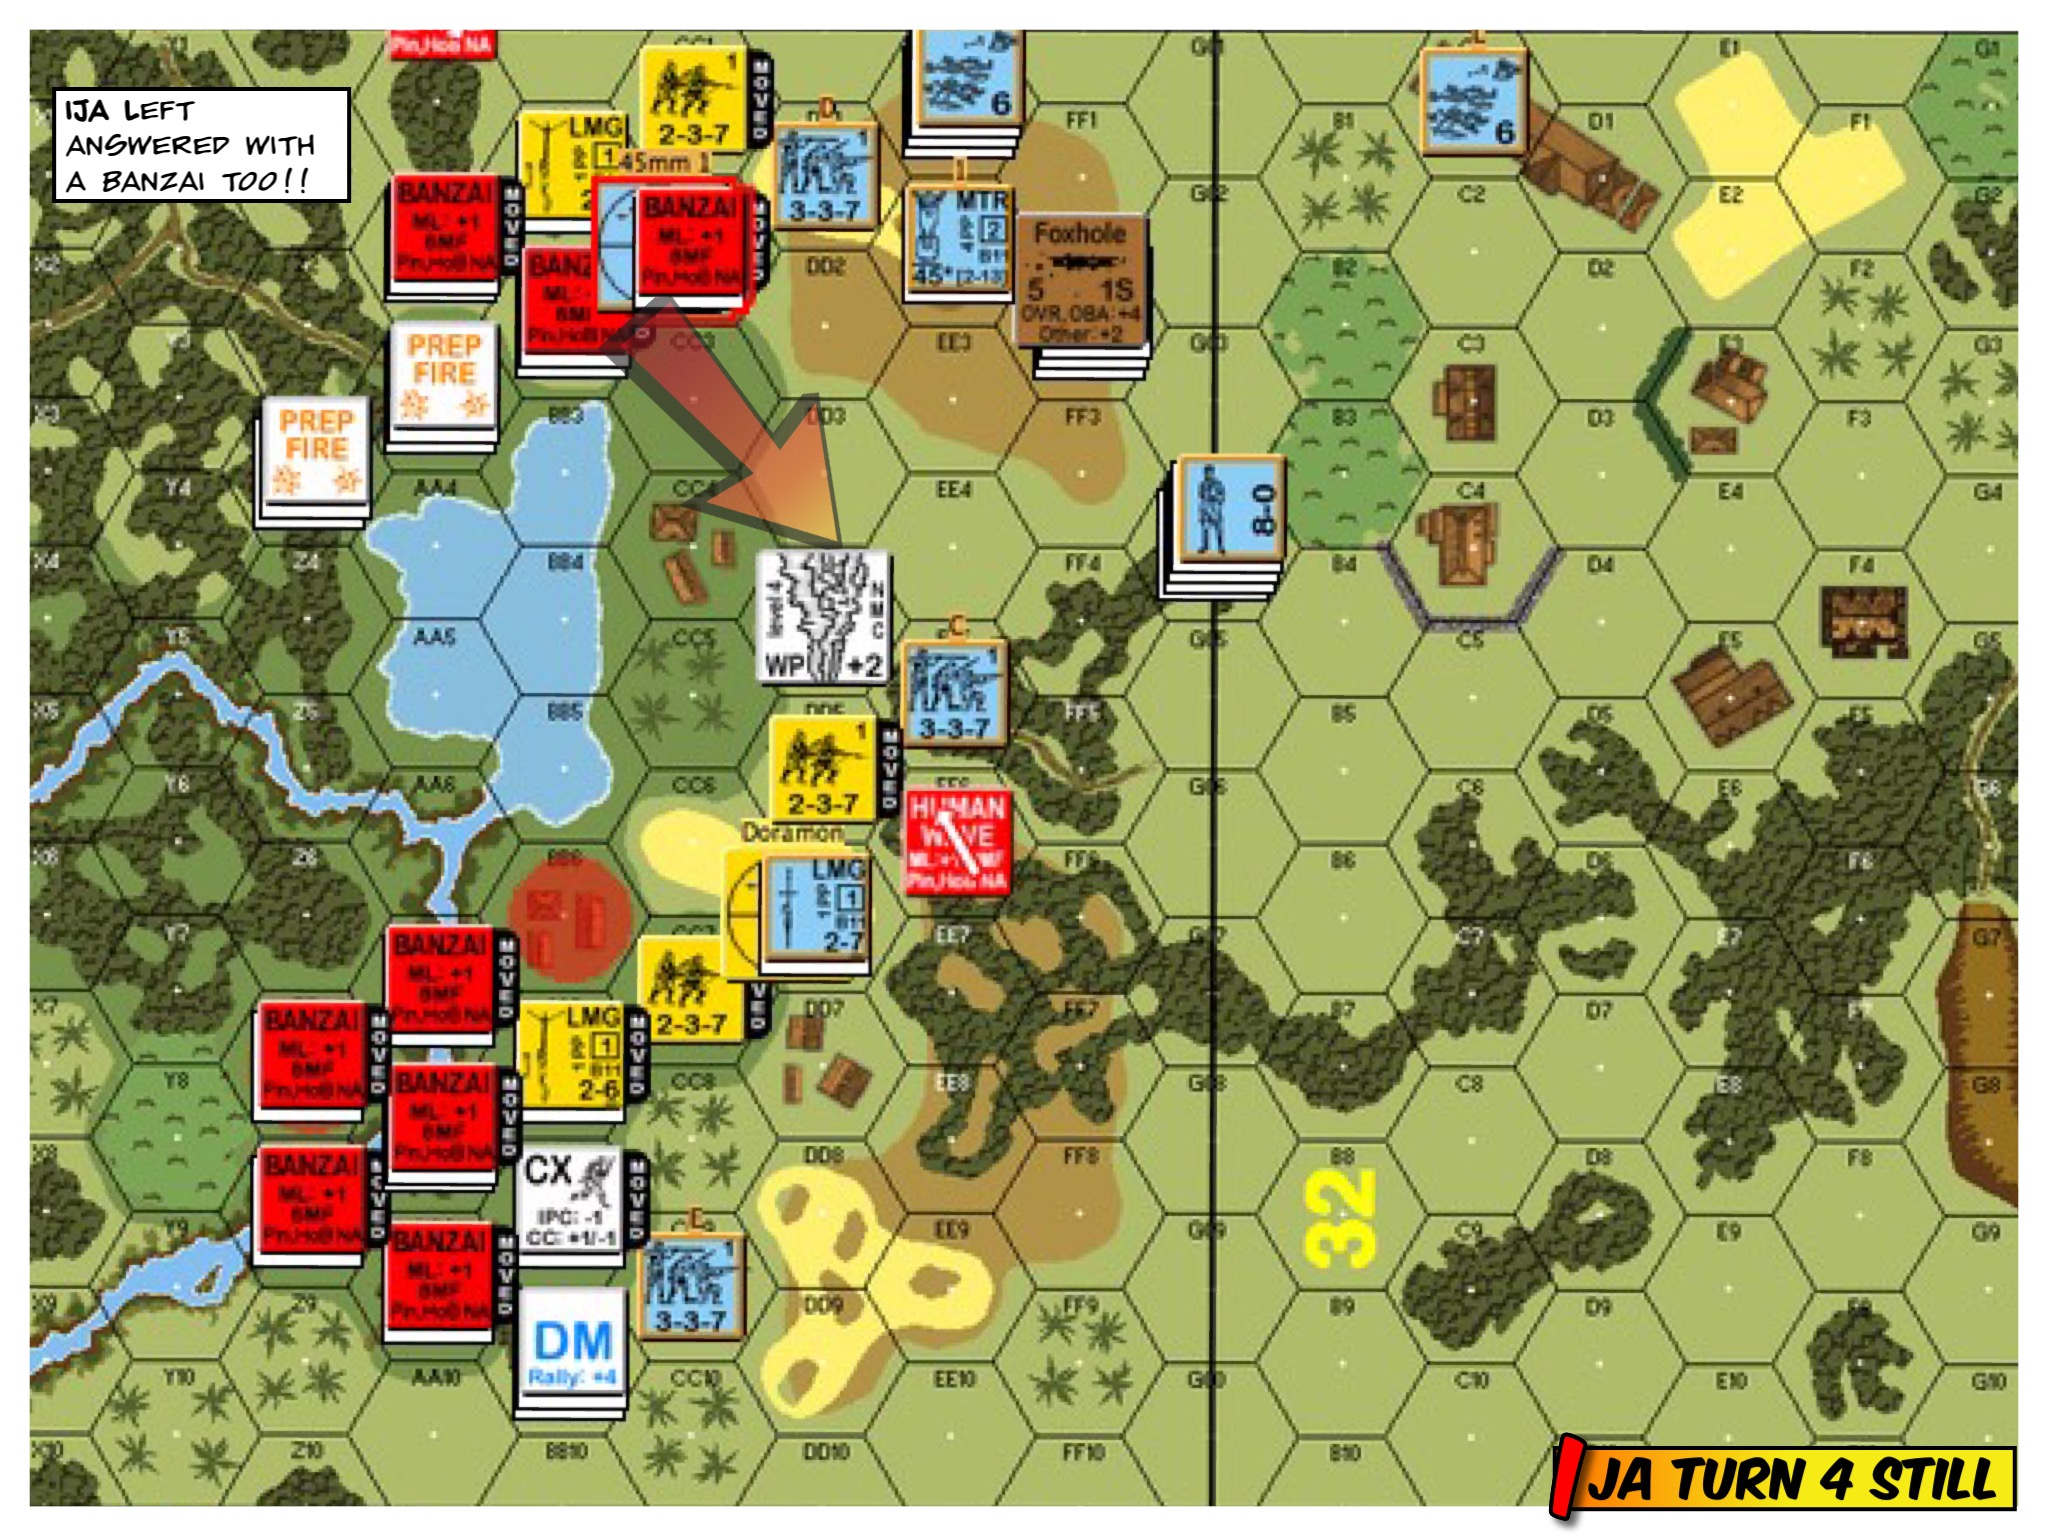
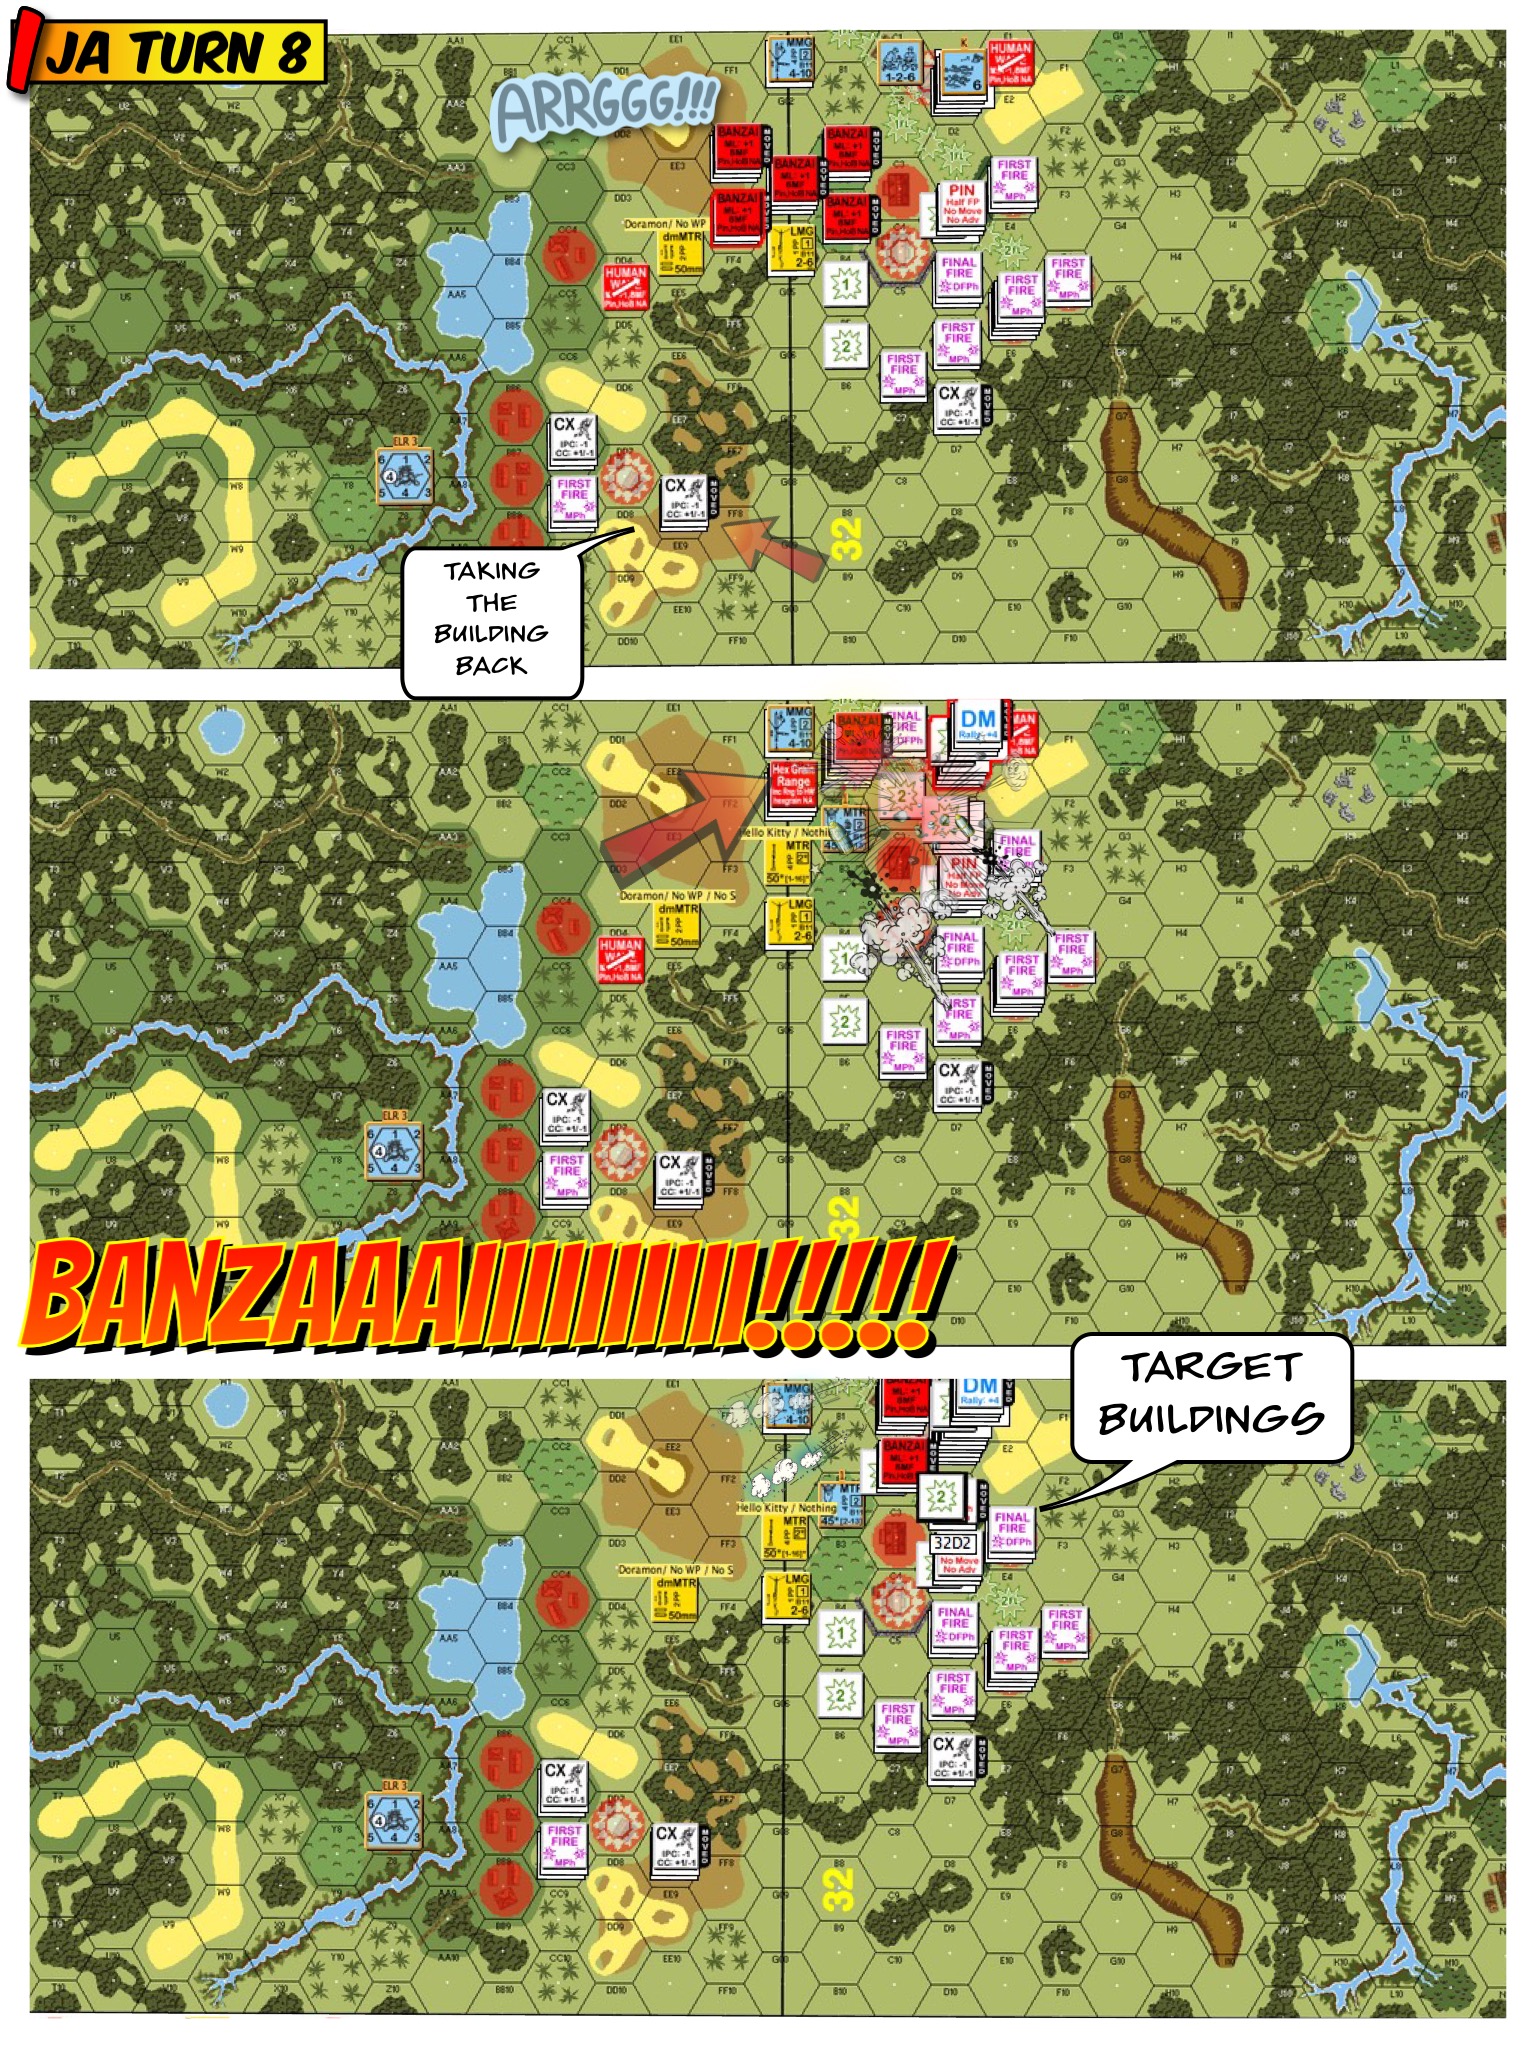
The expert that he is, he took maximum advantage of the opportunity to push into the church. My IJA couldn’t shoot at all that day, the Gurkhas were stacked and unloading barrages after barrages into the huts that the IJA were holding onto for dear life. In the diagram above, the bottom two arrows were how the IJA made their initial push. The arrows on the top and on the right were the Gurkha reinforcements.
I could have conceded after Turn 3, which was 2 Gurkha Movement Phases after his reinforcement arrived but I fought on. I surprised myself when the battle lasted through to Turn 5 until the necessary IJA forces were KIA’d off the map. To me this is a terrific reason as to why one should never concede. You never know how things will go.
Never concede!
AP59 Taking Heads, Zhen Wang
This is a 6.5 Turn scenario by another Fortenberry pack, Action Pack 6 A Decade of War. My opponent was Zhen Wang. Zhen’s one of the chief editors of Dare Death, the Chinese ASL magazine. The IJA attack down from the top of the map pushing against some ELR2 Philippines Army (“PA”) personnel. They could either win by exiting CVPs off the board, or by a combination of killing US units / capturing buildings (largely to the left of the “Fake HT”.
My issue started before the game even began and is perhaps the key weakness to date in my game. The “weak” Americans also get a 37LL AT Gun and two M3 GMC’s which are halftracks with 75mm guns. If you look at the diagram above, the 2 “bright” red dots are where they were located. The 37LL gun was at the back and never got used. They never really got into the right and is a big reason why I failed to get as many IJA kills as I should when they advance down over the top part of the map. To prevent CVP losses by losing those halftracks, I took them out of play myself. It absolutely obvious but it never hit me until now.
Zhen was able to demolish my PA troops piecemeal all the way back into the village buildings.
Put all your assets into the fight!
ITR1 Debacle at Sungkiang, Akira Lu
I was the defending Chinese in this 6.5 Turn Scott Holst scenario from “Into the Rubble”. My opponent was Akira Lu who is a relative newcomer into the hobby. He came to the tournament with nothing, not even Beyond Valor, but he left the tournament with Mark Humphries’ old Raaco boxes & bag set. I guess he’s finally convinced!
Alan Smee had a quick chat with me about what he saw in my play. He said I need to get as many assets as possible into the fight. I can even fall back into Fortifications but don’t put my assets out of play by putting them the backfields. He told me how he’d do a A103 Mayhem in Manila defence and that point came through loud and clear.
The red points on the map are where I placed my two 76mm artillery.
I put most of my assets forward and engaged the attackers for half the game around the top part of the map. The IJA had to capture 11 of those multihex buildings I won this one by adjudication as we ran out of time. My opponent is a newbie but I could feel the difference from my change in approach.
Push your assets forward, you can always back into fortified positions
AP90 Smashing the Hook, Benji Dayco
This is my other favourite scenario out of Action Pack 9 “To the Bridge”. This is a fast 5.5 turn scenario. The British needed to either destroy both roadblocks or clear IJA units from around the roadblock area.
My opponent was Benji Dayco whom I met that very morning at McD!
I figured we will fight this one in front. I put my 75mm infantry gun on the hill overlooking the first ridge. I had a MMG there in case the gun needed support. I also had HIP units on both sides of the road in front just in case some of these British breaks or if a leader wandered to the wrong place.
This worked out every well. The British seemed torn between running for the first roadblock or fighting it out. I won this one by concession as I had to make for the airport.
Lesson learned.
Defenders can still choose to fight the attackers in the ground of their choice.
Siem Reap, Cambodia?
We did a quick vote towards the end of Mayhem regarding the location of the next tournament. Siem Reap came out to be the winner and Raphael Ferry can’t be more enthusiastic in taking that on.
Siem Reap, home of Le Franc Tireur, does seem to be a top notched idea.
Snake eyes in the shadows of Ankor Wat.
I was chatting with Witchbottles the other day. Given all the issues and problems we have in life, whether personal or professional, to be able to see each other once a year means the both of you probably didn’t have too bad a year. It’s a blessing really.
“Catalina Kid,” a M4 medium tank of Company C, 745th Tank Battalion, drives through the entrance of the Aachen-Rothe Erde railroad station during the fighting around the city viaduct on Oct. 20, 1944. Courtesy of First Division Museum
It’s Oct 1944. The Americans were about to engage the Germans in what was to be their largest urban fight in the Second World War. Aachen was also to be the first German city captured by the Allies.
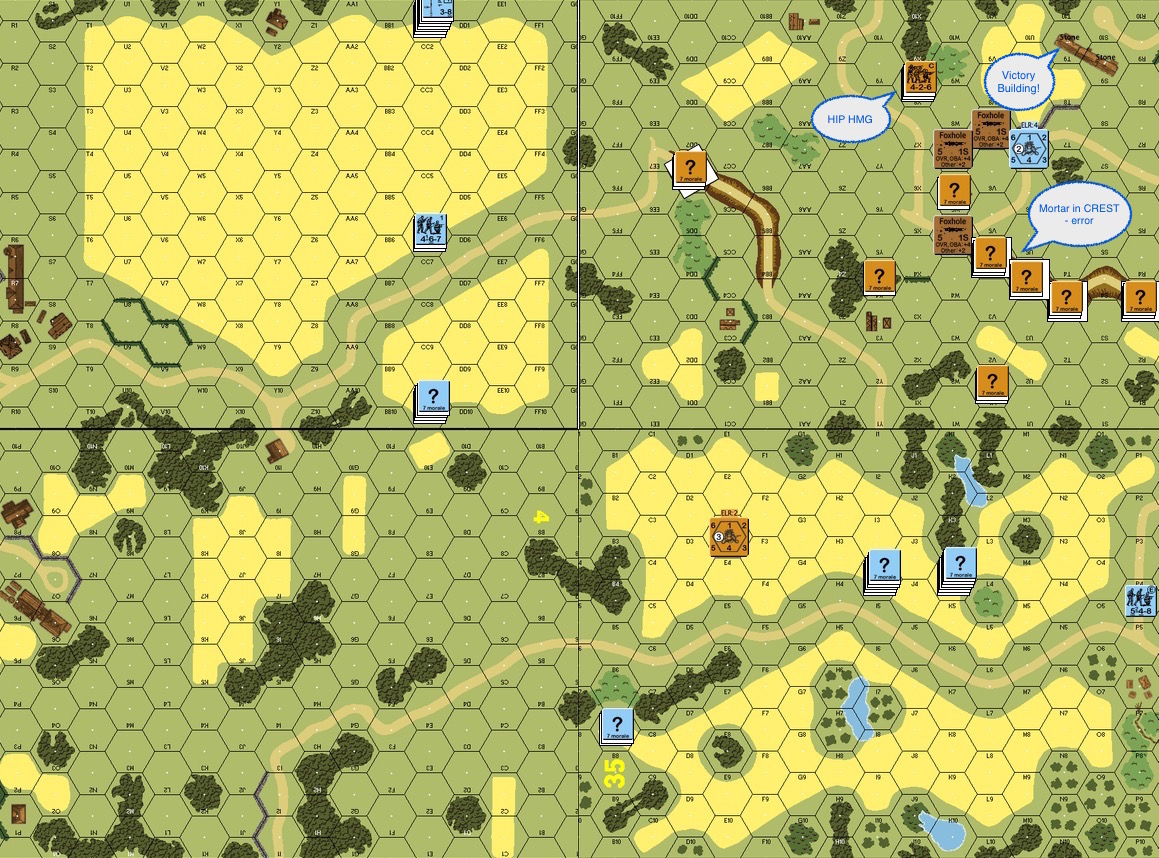
In this “BFP Into the Rubble” scenario, 10 elite & 12 US 1st line squads teamed up with 3 Shermans and 2 tank destroyers faced off against a mix of 18 German squads with mostly 2nd liners, a pair of AA guns and 2 Hetzers. The Germans also had 21 concealment counters, 8 Fortified locations and sewer movement capabilities.
There was a lot of rubble.
The Americans were to capture 7 buildings in 8 turns.
American Turn 2 about to start : The German Fortress troops had a surprise for me. They stacked a few Fortified counters on each other and brought the 37L AA gun onto the 2nd level! This flak gun didn’t have the 2cm FlaKvierling’s “20” firepower but it did have Stielgranate 41 ammo which offered TK# 26 within 11 hexes. The high rate of fire from both AA guns were particularly disconcerting if only for Deliberate Immobilizations. I am quite the novice with AFVs. I decided to keep my tanks together in mutually supporting roles. My AFVs would stick with the infantry (panzerfausts abound) and we would use MGs (and not tanks) against ordnance.
There were a couple more tactical things I wanted to do / get into the habit of doing:
Place a squad on high ground. If nothing else to make it harder for my opponent to gain concealment. Squads in high places could interdict as well.
Get to the center building (where the malfunctioned Flak gun was). My opponent observed that the center building was the ideal jump off point to the latter portion of the American attack.
The German SAN was 5 and I got open top tank destroyers. I got to make sure we got dedicated sniper shielding for our key units!
Credit : Photo Gallery of World War 2
I was on a tight schedule here as the Americans. I pushed on, using smoke whenever possible, dummies or not. One of the first things we found was of course the Flak tower my opponent constructed on my right flank (top of the map). My AFVs then slid towards the middle of the map.
End of German Turn 2 : The Americans managed to push to the middle of the board. The AA Gun commanding the middle of the street immobilized one of the Shermans. The American 10-2 (aka Jedi) Deathstar got taken out as well. However while the other AFVs spun towards the middle of the board to avoid the Steilgranate wielding Flak tower, a lone Sherman remained to provide smoke cover for the infantry (Errata : The 37L AA gun’s actually on the 2nd level, not the 3rd).
The Americans deployed 4 half squads towards the back to screen off the German sniper, and they took a few hits. Unfortunately the German sniper killed 2 out of 7 American leaders, something the Americans could ill afford with their lower morale. The American sniper relocated to the vicinity Before the game is up, the Germans would see their SAN reduced from 5 to nothing by Sniper-on-Sniper action!
In the midst of American Turn 4 : The Americans pushed forward and captured the lone AA gun in the middle of the board. American leaders continue to be shot by the German sniper. The latest victim was the radio guy who was in the midst of relocating this radio. The Jedi Master and his HMG team took the chance to rush past the sniper. Towards the sound of gunfire!
The Americans took the center building, we just needed to remember to get guys upstairs. Towards the bottom of the map, the infantry continue to lead the way with AFVs coming in as support.
End of American Turn 6 : Two more turns to go and the Americans still got 2 or 3 buildings to take. We were definitely running tight on time.
From the right flank (top of map), the American OBA put the Flak tower’s stairwell on fire! The gun crew was therefore encircled. The German brokies were blocking the approach from the American forces though.
On the left, a Sherman got blown up by a German squad who found a panzerfaust. An American flamethrower squad hopped by and broke the half squad involved. That gave the other American AFVs time to push the wreck out of the way and to get into position for an assault on the final VP building on the left flank (bottom of map).
The German Hetzers were about to enter from the left of the board.
After American Turn 7 : Encircled as it might be, the German Flak tower was still in the fight. It blew up the TD that rushed over to help! Nearby MGs were engaging it, as was the captured AA gun from the middle of the board. We got a little thin on our right but the lay of the rubble made it hard for us to rebalance.
The wounded artillery observer brought fire down on the left flank target building to good effect. The Americans on the left flank got ready to hit the building in the last turn.
End Game : The OBA on the left flank (bottom of map) broke some German units and even killed a Hetzer as it tried to move towards the Americans.
On the American right (top of map), the US forces had nothing but open ground to traverse unfortunately. We tried to shift as much forces as possible to the right but having to get around the German brokies proved to be fatal!! The Americans therefore lost this scenario by one VC building!
Thoughts? What would you have done better? What do you think of the tactical choices? Would you try this scenario Please comment!
The IJA landed on Hong Kong island near North Point / Aldrich Bay on Dec 18 1941 and proceeded to move inland through the middle of the hilly island. The Winnipeg Grenadiers made a particularly heroic stand at the Wong Nai Chung Gap Police Station.
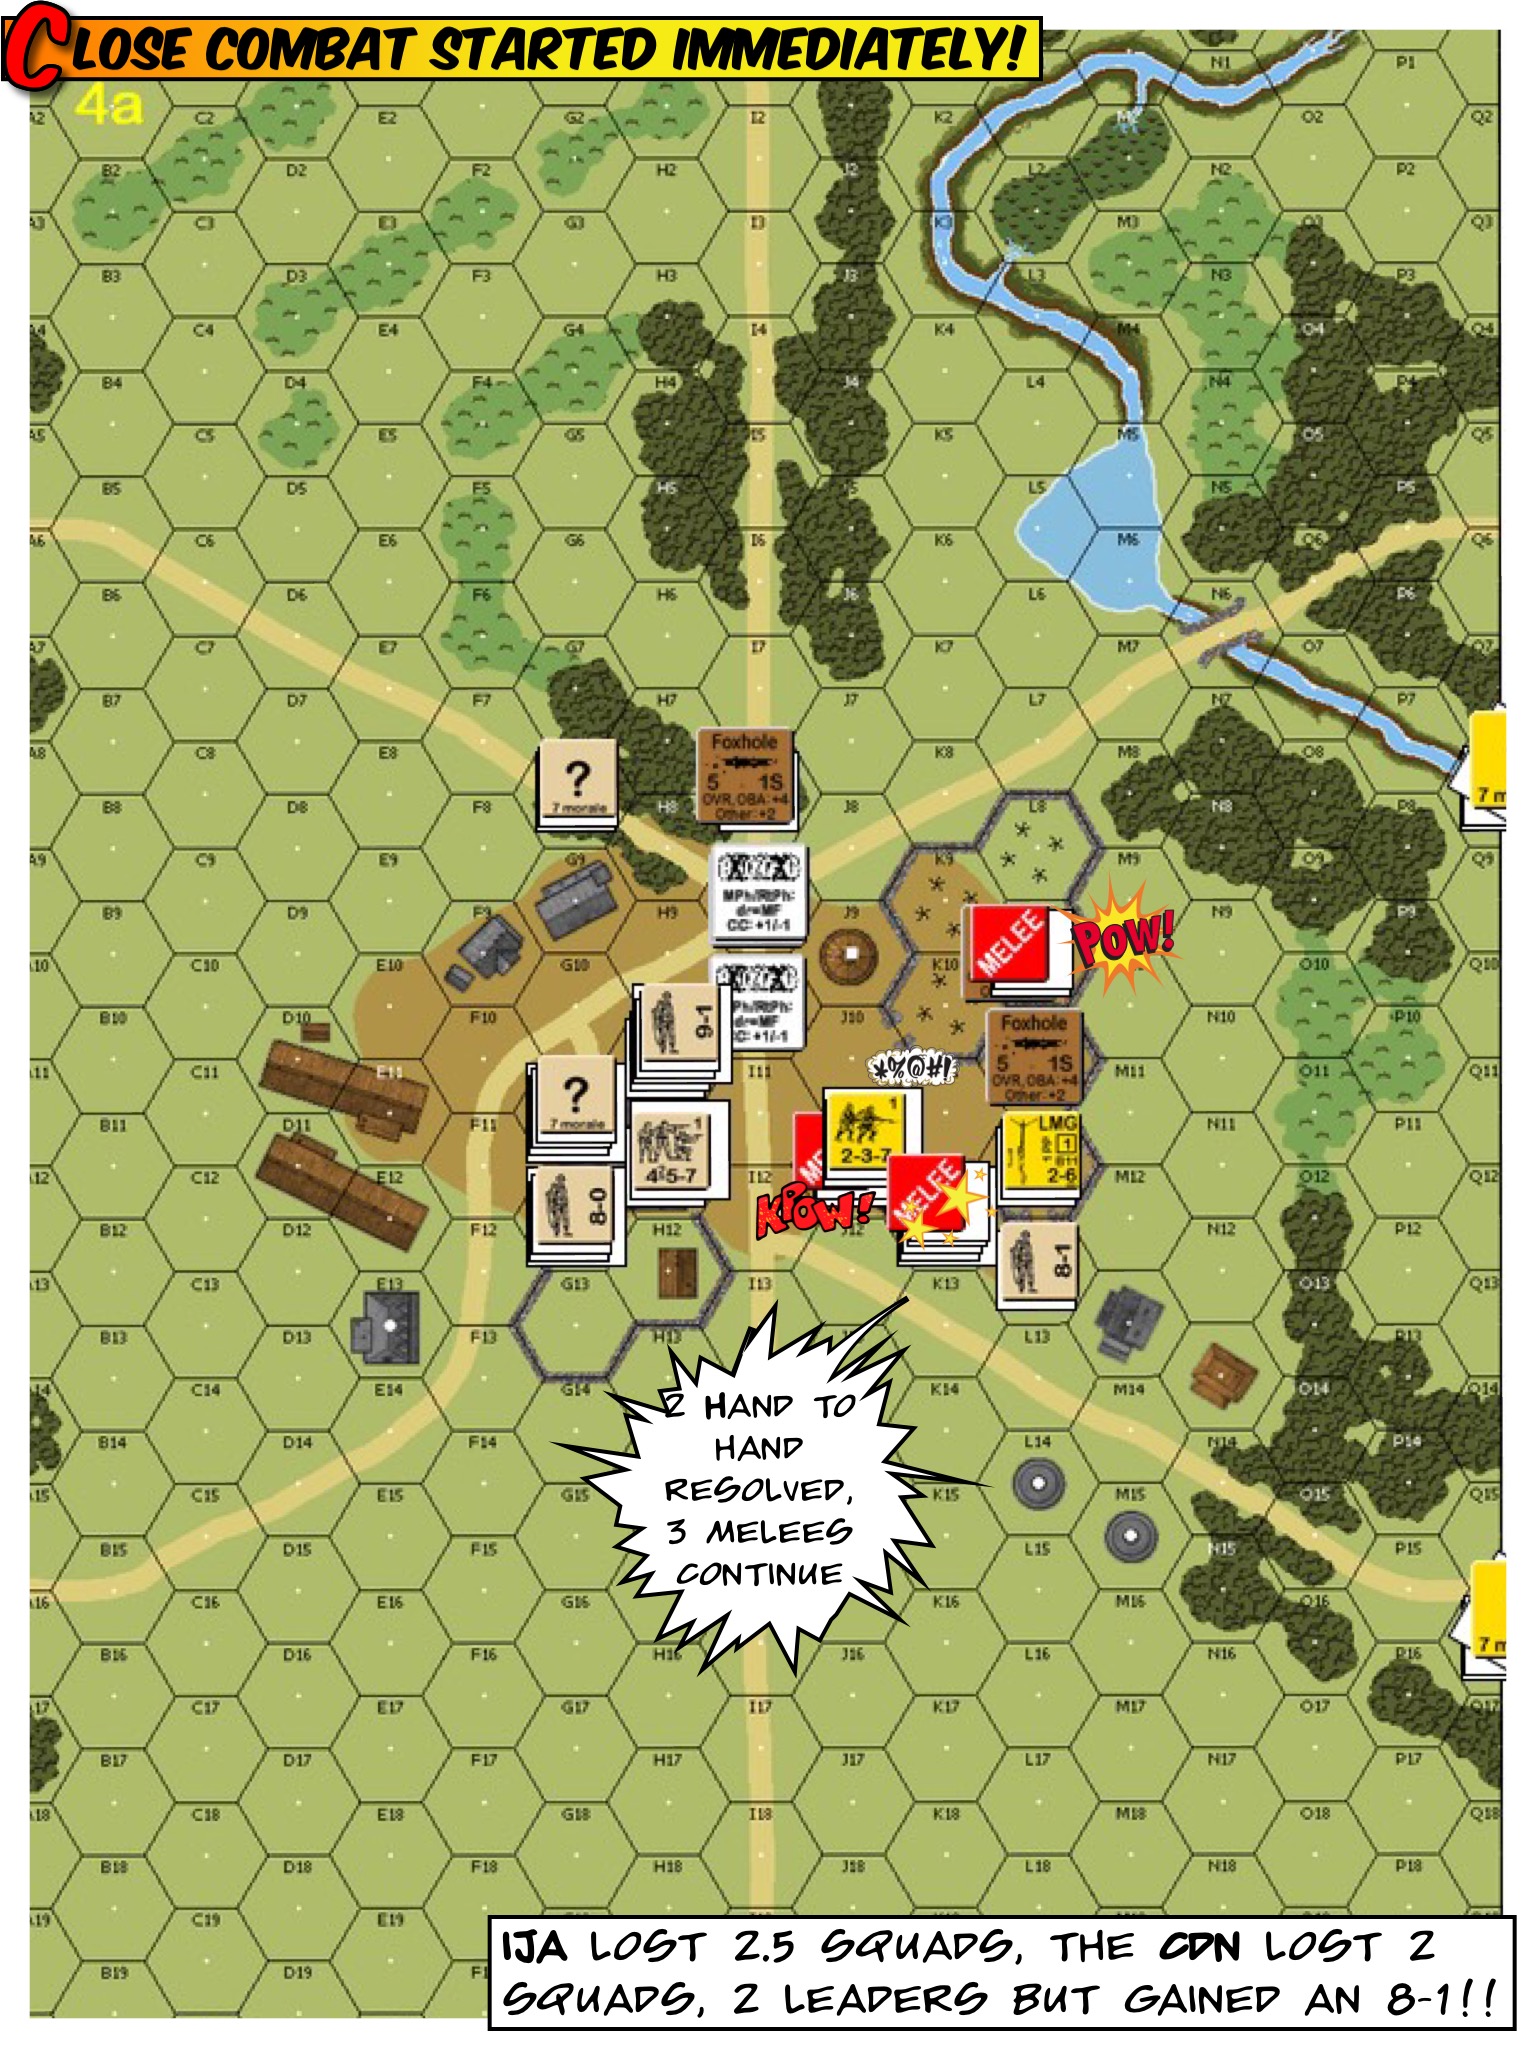
This is a rather interesting scenario in which part of the Canadian and part of the IJA forces started using simultaneous and hidden placement in an area in front of the Police Station. The scenario began with a round of Close Combat between forces that started in the same location, two of which the IJA could designate “hand to hand”. The IJA’s goal was to take the Police Station and to make sure that there were less than one squad equivalent of “good order” Canadians within a 4 hex area around the station, all within 5.5 turns.
The game started off quite intriguingly as Carl Nogueira and I discovered where each other’s hidden forces were, where they “co-existed” and what the Close Combat odds were. I designated two of the melees as “hand to hand” and off we went. As expected, “HtH” battles both pretty much resulted in mutual annihilation. The Canadians lost 2 leaders in addition but an 8-1 rise to the fore in the heat of battle!
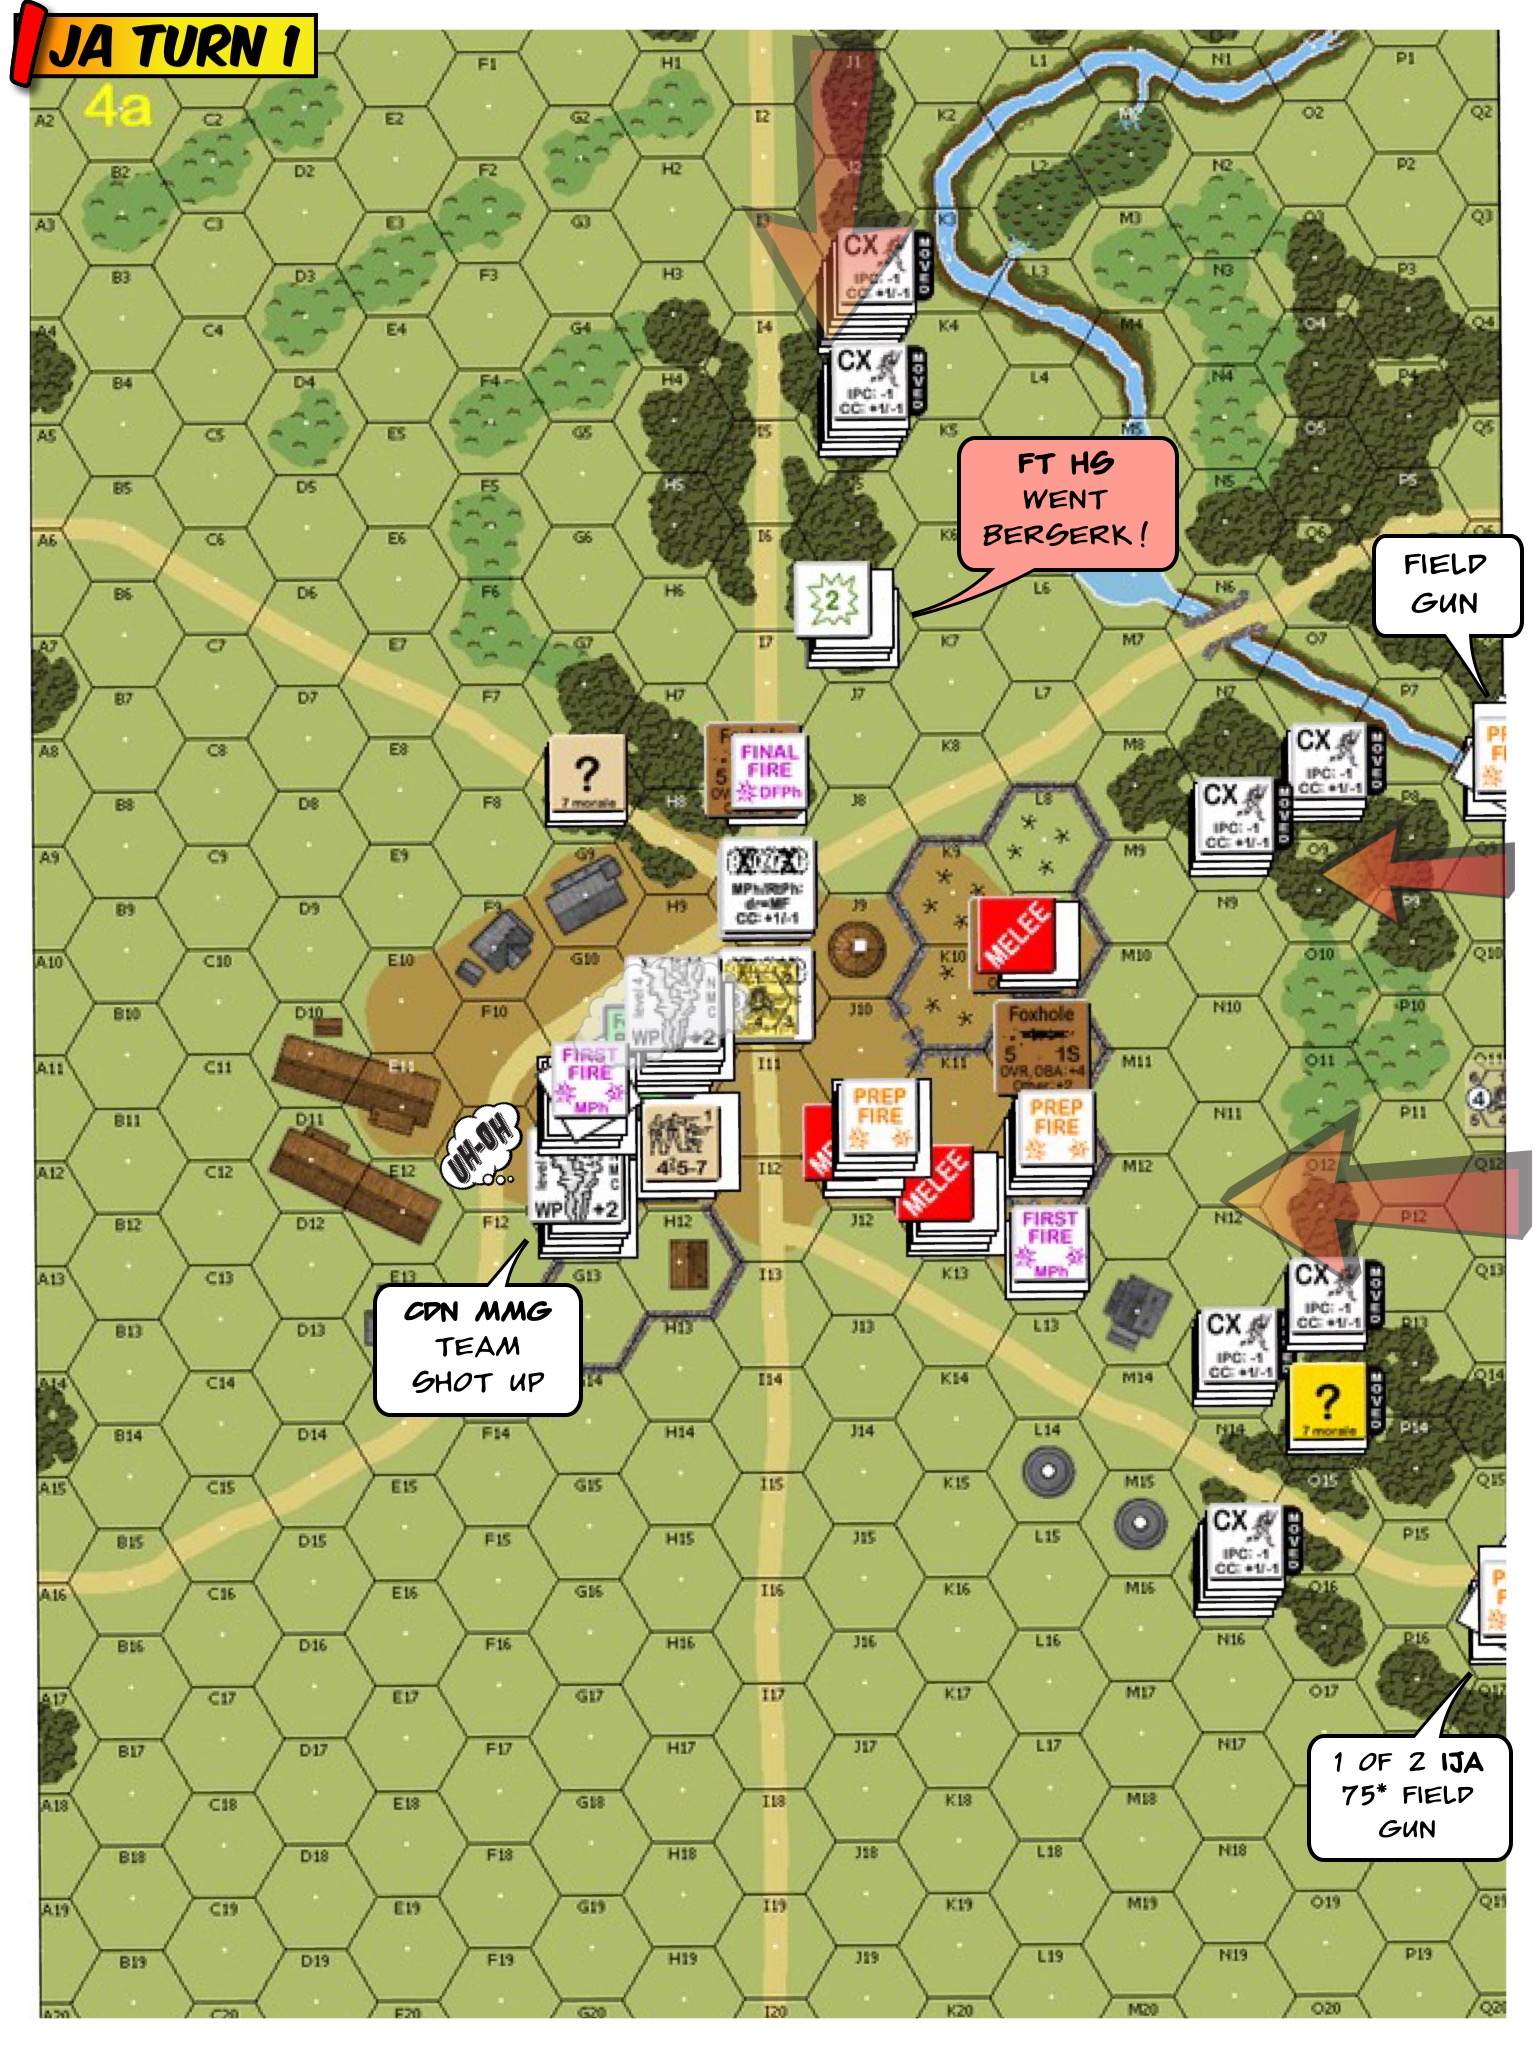
IJA Turn 1 : The IJA led off with their two offboard field guns putting Willie Pete on two corners of the rather well MG-equipped station. Unfortunately the flamethrower team got ID’d early and was shot at. Anxious that they’d never get to use their toy, they promptly went berserk.
IJA Turn 2 : The berserk FT team rigged up their toy and in their blind fury, must had bent a trigger or something. Flamethrower died without a shot. The IJAs discovered the Canadian pillbox cross the front of the Police Station. Fighting outside took quite a toll on both sides. The IJA hoped to hook around the back (left) of the police station as “Failure to Rout” seems to be the only way to clear the station of Canadians.
IJA Turn 3 : The IJA malf’d one of their two offboard guns and therefore proceeded to setup their mortars so as to provide smoke cover. To the top of the map, the IJA piled on top of the pillbox while trying to hook around the left. To the right, the IJA continued to navigate through the open field and hoped to advance though the pillbox laid fire lane.
IJA Turn 4 : The berserk HS charged across the street and into the station!! The maniacs survived fire that left 12 and 8 residuals, only to die later in Close Combat. Their buddies took advantage to the situation and walked around the left. The IJA on the right continued to hit the station in front. The newly established deathstar had a malf’d HMG, true to IJA weaponry of the period.
IJA Turn 5 : So the Berserker couldn’t stay in the station. The IJA opened with a DC HS that got shot out of existence when they advanced to the MG nest. On the other side of the station, poor Toshi was volunteered to be the “DC Hero of the Day”. They sent him to the front door, patted him on the back and stuffed a DC into his arms.
They couldn’t get the berserker either, they said.
Toshi popped out to the middle of the street and was promptly vaporised along with his DC.
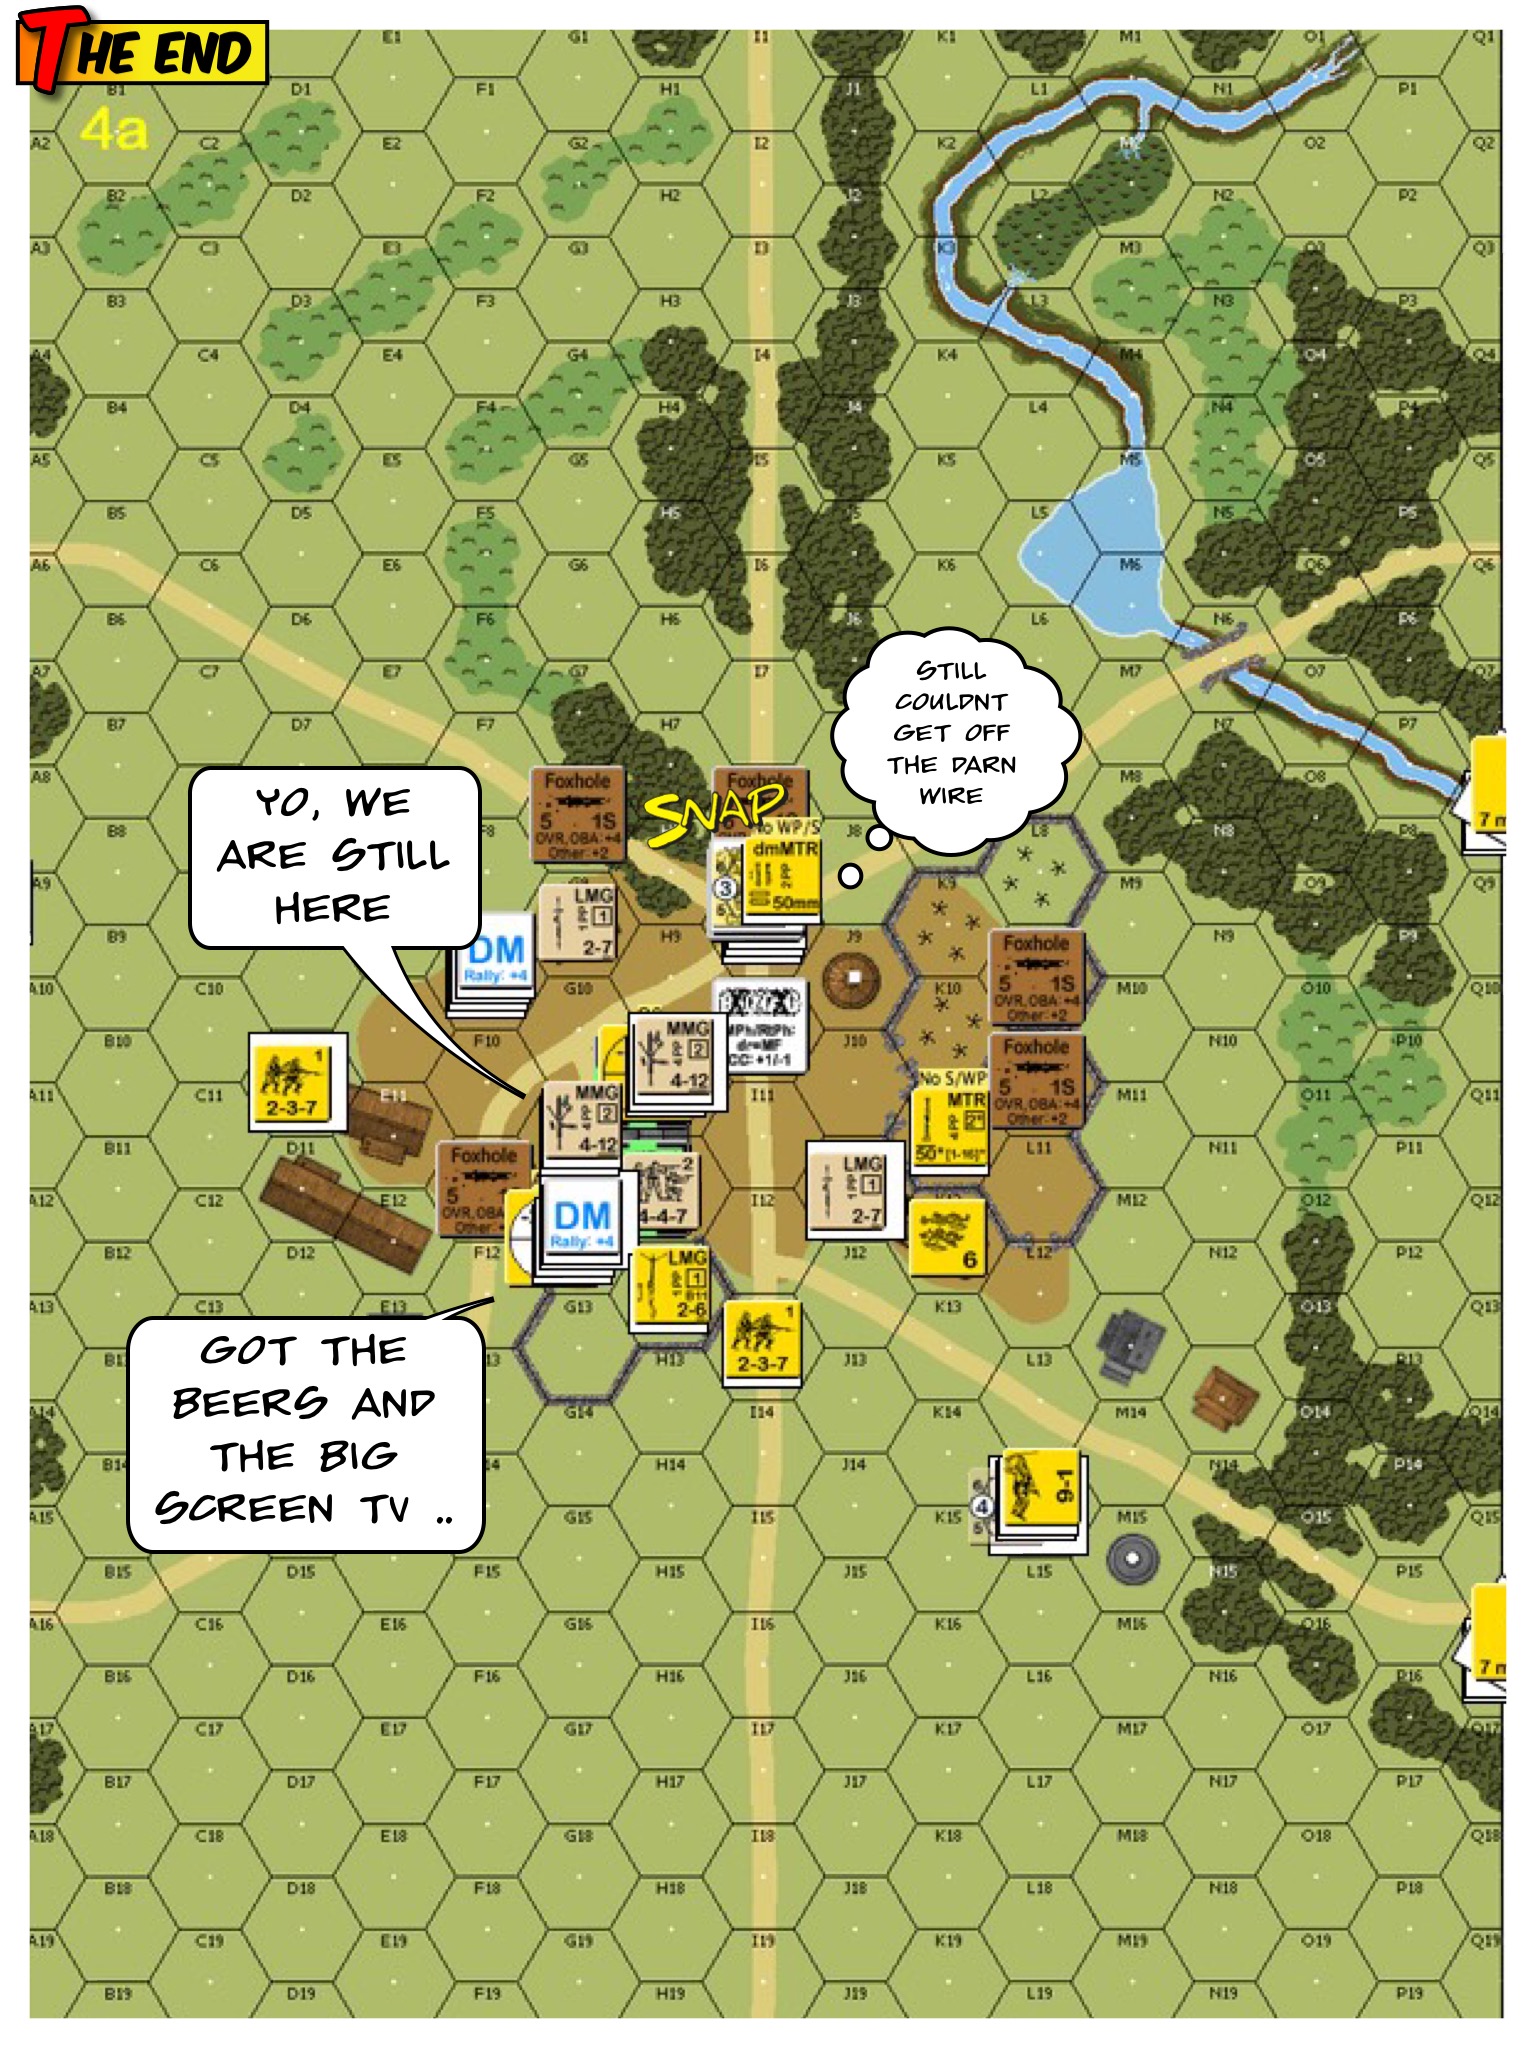
Canadian Turn 5 : With 1 Movement Phase left, there was not enough time for the IJA to clear the building (nor the 4 hex radius around it). The IJA conceded.
Thoughts :
Forget about walking around the station. Turn 2 is probably when I should just walk STRAIGHT UP to the station and get part of the gang into the house.
I used WP and smoke from the offboard guns. I should probably have used my knee more for additional cover.
I should have protected my Flamethrower a lot better.
The time was 25 August 1937. This was the second time the IJA attacked Shanghai. The IJA Shanghai Expeditionary Forced landed troops around Liuhe (浏河), Wusong (吳淞) and Chuanshakou (川沙口) as a diversionary to draw GMT troops away from Shanghai. This scenario depicts an engagement where the IJA troops pushed rapidly inland to encircle Shanghai.
This was a 7 turn scenario in which the IJA needed to control 10 or more buildings at the end. The GMT (Chinese) had 13 first liners, 1 MMG and 1 LMG led by an 8-1 and an 8-0. They were reinforced by 4 elite squads with 2 other leaders on Turn 4. The IJA started with 13 first liners led by 3 leaders. They were reinforced by a platoon of elite squads plus another leader on Turn 3.
There was an eastern approach for the IJA (top of the map). That approach led through jungles paths and onto a hill before a group of target buildings. There was also a western approach where the IJA had to navigate across a shallow stream and fight their way out of a depression. I guessed the eastern approach would be guarded heavier as the trek was slightly easier and targets richer.
I deployed with 60% of the IJA troops on the east side and 40% on the west with 2 squads HIP’d. Hopefully that would cause the GMT to lean a little towards the east.
Chinese Turn 1: Calamity hit the attackers almost immediately. An observant GMT sniper seek out the highest ranking (10-0) IJA officer amidst a concealed stack and put a round through his head.
Not that it bothered the troops too much, they stayed out of sight a little and continued moving on.
Chinese Turn 2: As the IJA approached the Chinese forces, an IJA HS was indignant that these brothers of the Greater Asia Co-prosperity Sphere shot at them. They went berserk but their target GMT squad routed away. A concealed GMT squad then moved in but failed to ambush the fuming mad IJA berserkers.
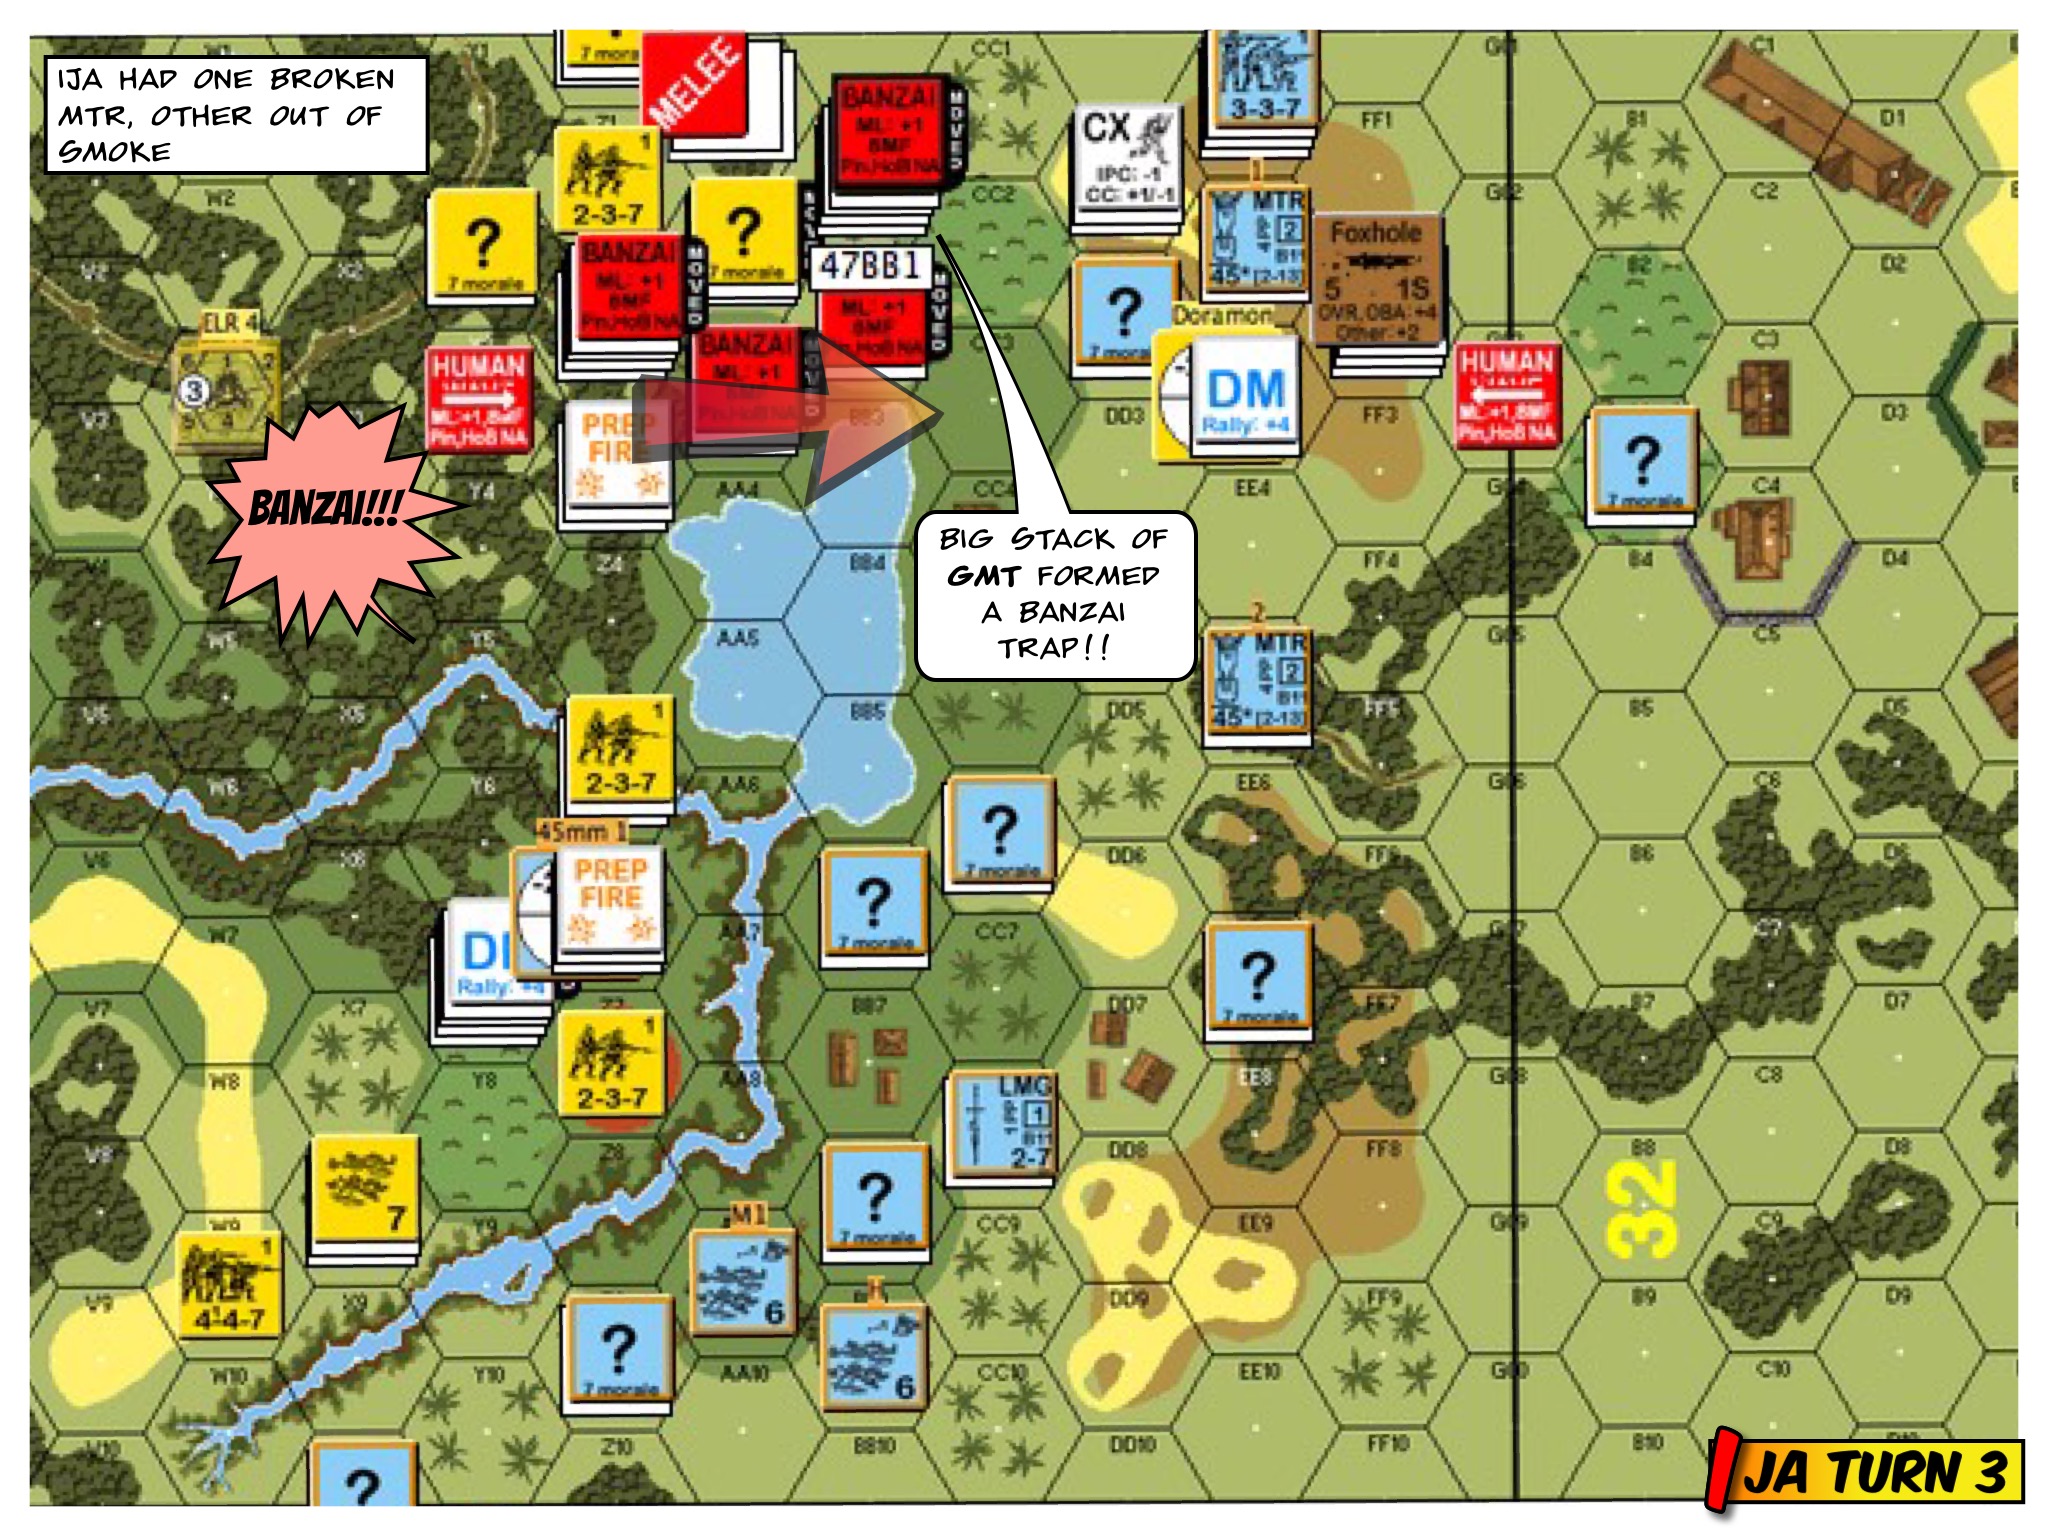
IJA Turn 3 : The IJA decided to Banzai through the bottleneck on the left flank around the lake. They almost immediately ran into a dangerous “Banzai” trap – a previously concealed stack of high fire power GMT that killed the led Banzai troops and threaten to suck in more. Good thing I was able to avoid having an IJA leader sucked into that hex.
IJA Turn 3 still : The IJA on the right flank begin the second Banzai to motor across the shallow stream!
IJA Turn 4 : The turn would see the right flank of the IJA banzai the rest of their troops over the shallow stream.
IJA Turn 4 still: The left flank answered with a Banzai to the center of the board and not directly up the hill itself. This was where I channelled my inner IJA and looked to infiltrate!
IJA Turn 5(errata – picture is wrong): The right flank banzai’d over the hill and looked to encircle the GMT defenders. Unfortunately it didn’t quite work out. Always an issue banzai’ing in the open.
On the otherhand, the left flank got up (and around) the hill and encircled the defenders there.
Chinese Turn 6 (errata -picture is wrong) : Quick as you might think the IJAs were, I began to run out of time. I shift the IJA troops from the right to the left in preparation for the final push.
But look – the GMT ran a couple of squads and a leader around the IJA right flank and threatened to reclaim the buildings again!
IJA Turn 7 (errata again!) : The IJA did a massive Banzai charge on the left flank into the cluster of target buildings behind the bamboo forest. GMT troops in the jungle to the west put up a ferocious volume of fire! The IJA couldn’t get into all of those buildings (missed 1, IJA pinned).
The End : At the close of IJA Turn 7 – the IJA got 9 buildings but stood to lose a few more in the counter attack – plus looked to lose 2 to 3 more to the GMT troops reclaiming buildings to the north (left of board).
It was a great game played with Peter-James Palmer in Australia.
Notre Dame de Dinant & the Citadel. Source : Wikipedia
Calm down, you didn’t miss it. Dinant is not out yet.
Dinant is a project in development. Dan Dolan’s the designer, Nadir Elfarra did the map and Carl Nogueira, the campaign game. Stanley Neo and I have been playtesting the Dinant scenarios, so this perhaps one of the rare times when you see an AAR on a product not released.
This scenario, “Chasseurs on the Meuse”, depicts an action that took place on May 13 1940. The Belgian 8th Chasseurs de Ardennais, fighting a series of delaying actions, was chased all the way up to the edge of the Meuse by Rommel’s Ghost Divison (7th Panzer). The French arrived at the west shore and did their best to help out. The Germans are to seize the victory locations marked on the top of this map within 7 turns. The German Recon company can choose to come in from the marked locations on the right side of the map. Their HQ and Armoured Car platoons can come in from the south (bottom of the map) as well.
This was my Belgian/French setup. The three VC locations were on the top part of the map. One of the VC hexes was under the stack of Belgians to the right of the VC stone building. The Germans start with 13 elite squads, 5 leaders, 4 armoured cars and a host of motorcycles. . The Belgians fields 9 first liners and the French, 3 first liners immediately and 3 on Turn 3. The Allies have 6 leaders, 2 self propelled guns and a module of OBA with scarce ammunition.
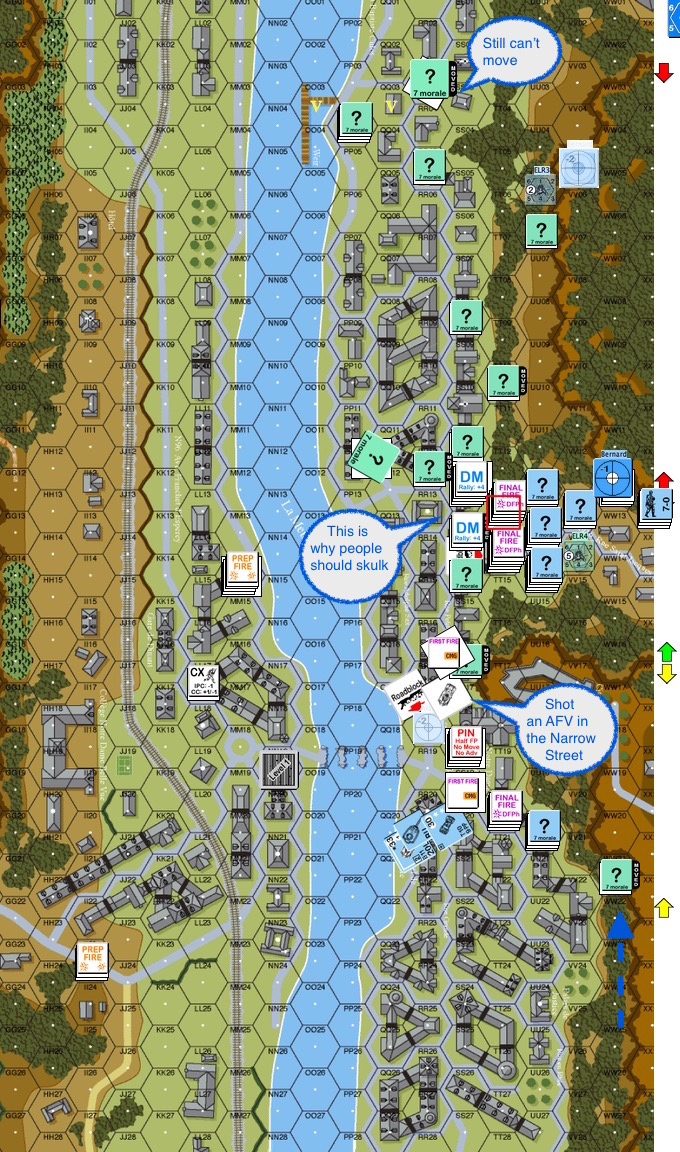
The Belgians had 2 HS HIP’d with ATRs around Rue Saint Jacques (the road through the valley from the right) and one on the first level of Notre Dame de Dinant. The big set of concealment counters in front of the roadblock at Place Reine Astrid (in front of Notre Dame de Dinant and the Citadel was a decoy to turn enemy AFVs that way.
Citadel de Dinant. http://www.citadellededinant.be
Turn 2 Germans : The German infantry decided to heap through the Rue Saint Jacques en masse. The French mortar managed however, to catch their counterparts from across the Meuse. The armoured cars got a bit of harassing fire from the French across the river.
Hearing the Germans in the Plaza outside, the Belgian HS in the Notre Dame threw off their cover and went to the windows with their ATR. One entrance to the narrow streets was blocked but the other one needed to be sealed as well, best with a wreck. The first armored car passed by and was about to turn into the narrow streets to the north.
Boom!! The anti tank grenade missed,
The targeted AC continued to speed away and the second followed suit. The other ACs started firing into the church and the German infantry got the headsup about Notre Dame.
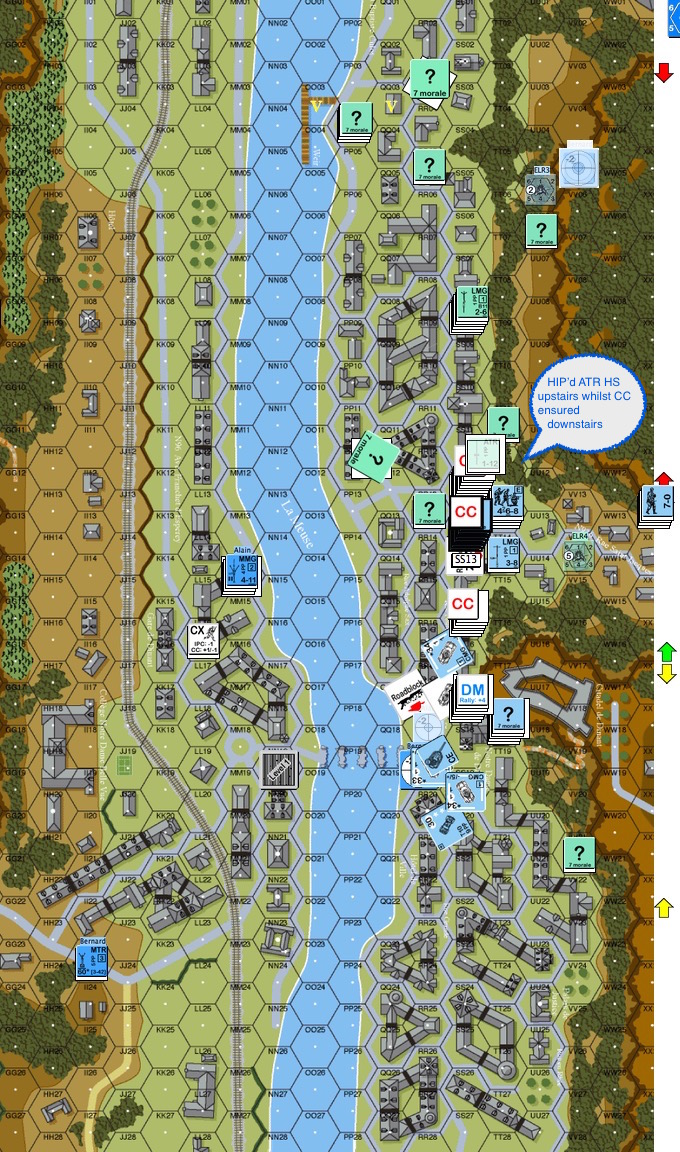
Turn 2 Belgians : The intrepid ATR team survived the initial German fire. It now sounded like half the German army was running for the church. The Belgians went to the windows again and fired. This time wrecking the 2nd armored car and therefore successfully blocked the armoured car platoon from the action to the north!
In the north, the Belgians were nervous about all the Germans coming down the valley but they felt a little too smug about lying concealed in stone buildings. They decided not to skulk.
Big mistake. The Belgians in the first 2 building hexes got blown away by the massed German firepower.
While one of the Belgian self propelled guns moved into place. The one to the north refused to budge without their partner and a radio to contact them with.
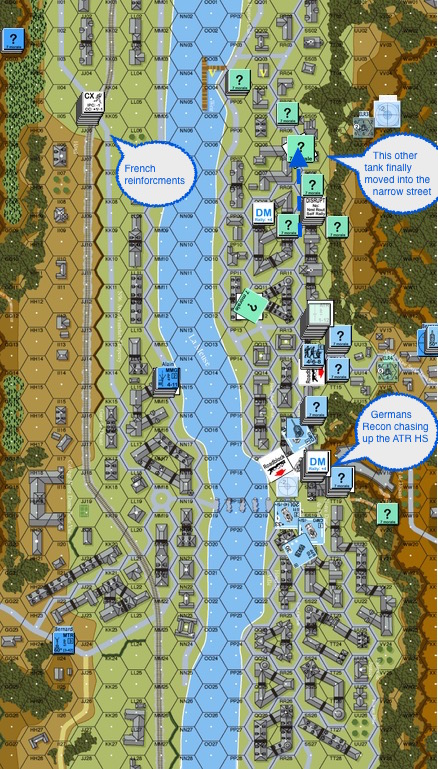
Turn 3 Germans : The Belgians to the north were simply not retreating fast enough. The Germans caught them in 3 locations where Close Combat killed 2 Belgian squads.
Turn 3 Belgians : Hey! The French reinforcement arrived, together with a radio to call down the artillery. Yes, ammunition was scare but it’s something. Given the rowhouse configuration, the French could only look for line of sights through the gaps they could find.
The other Belgian self propelled gun was touched by the change in sentiment and moved into one of the narrow streets to cover the German advance.
Turn 5 Germans : The Belgians finally got the hang of just how far to move back and how to shoot the Germans in bypass.
The Belgian SPG closer to the river was shooting at the Germans moving through the little plaza. When it Firist Fired, the lead German AC moved forward, turned and faced it.
The other HIP’d HS ATR team who sat through the Close Combat downstairs sprung out of hiding.
They shot and killed the lead AC!
A Close Up shot of how the lead German AC was killed by a HIP’ed Belgian ATS HS.
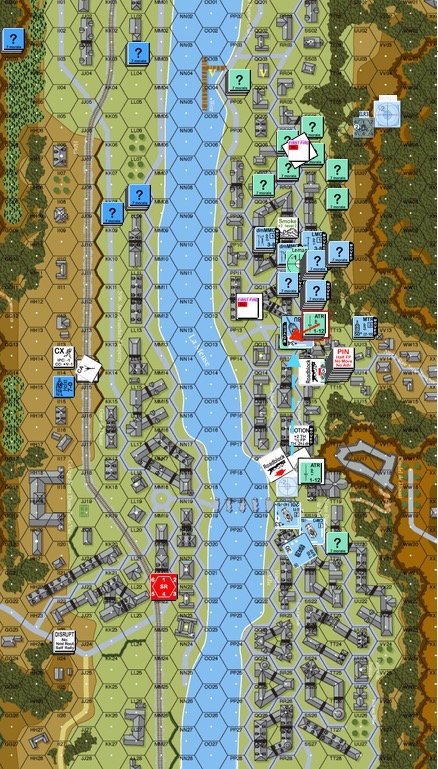
Turn 6 Germans : The Belgians continued to back off just enough to shoot at the Germans in bypass. The French OBA was of no help whatsoever. By the time they got a response from obliging French gunners their radio went dead.
Our second Belgian ATR HS managed to run away though!
The Germans, running out of the time, got even more aggressive and jumped onto a concealed Belgian stack. The Belgians chose NOT to unconceal and NOT to fight. To the German’s disappointment, Belgians survived the German attack and retained the option of moving away in the next Belgian turn, blocking the Germans for another round.
Seeing the distance between themselves and the VC building, the Germans decided that they won’t be able to make it to the VC objectives in time.
Overall : I think the long lines of rowhouses presented an interesting problem. The Belgians had to be far enough to not invite close combat given the German superiority in numbers and to not be shot in their retreat. However they needed to be close enough to in turn shoot the Germans in bypass. This is especially important when they do not have enough firepower to take the Germans inside the stone buildings.
The mass of Germans was unnerving but had some of the Germans came in further to the north and down the cliffs, they would have been a handful.
Trying to get the French to help from across the Meuse is a problem as well. Finding gaps between buildings though you can shoot was tough. The OBA was practically useless in my game.
Thoughts from Stanley Neo : I packed the Germans’ entries via the XX13-XX16 while 3 choices were given. After some thoughts, I should have spread the force into two groups, one taking the top XX03-XX13 and the other remaining in XX13-XX16 to put more pressure on the Allies that is on the same side. At least some Germans would then be able to attempt to climb down and do a flank from the North.
Germans on the East were stuck around the entry zone for too long and should have pushed more aggressively. LoS study of the terrain may eliminate issues of troops getting pinned or broken by Mortar fire from the West.
The roadblocks were wisely placed at a chockpoint around QQ17/RR17 with ATR. This effectively blocked out the rest of the German’s AFV support making it harder for the Germans coming from the East to push.
Overall the scenario is relatively great to play. Would be interesting to replay the scenario with the afterthoughts built into the attack plan.
What are your thoughts with regards to this module? Are you looking forward to it?
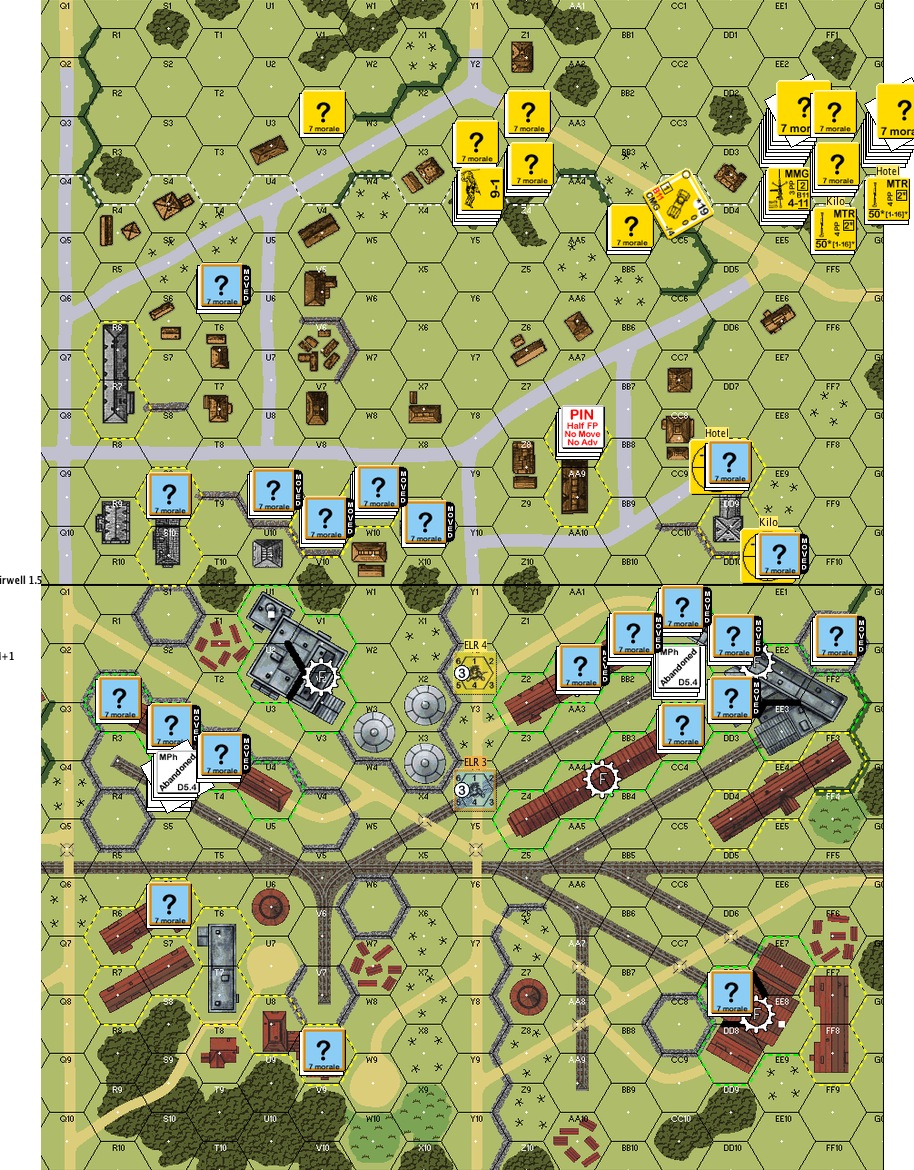
ESG6 Clean Up Crew is the first round scenario of the Asia Pacific VASL tourney, Deathwish 777. This is the first Eastside Gamers scenario I have ever played. This is also the first time I played Will Fleming.
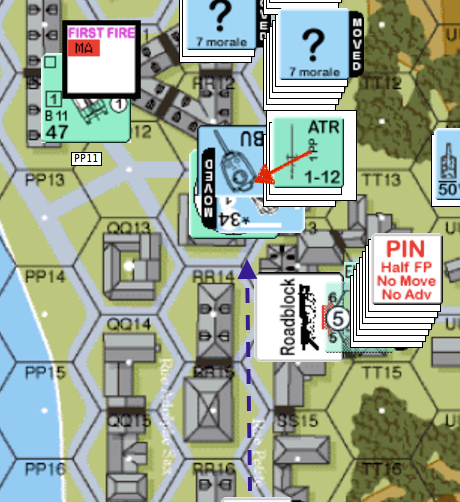
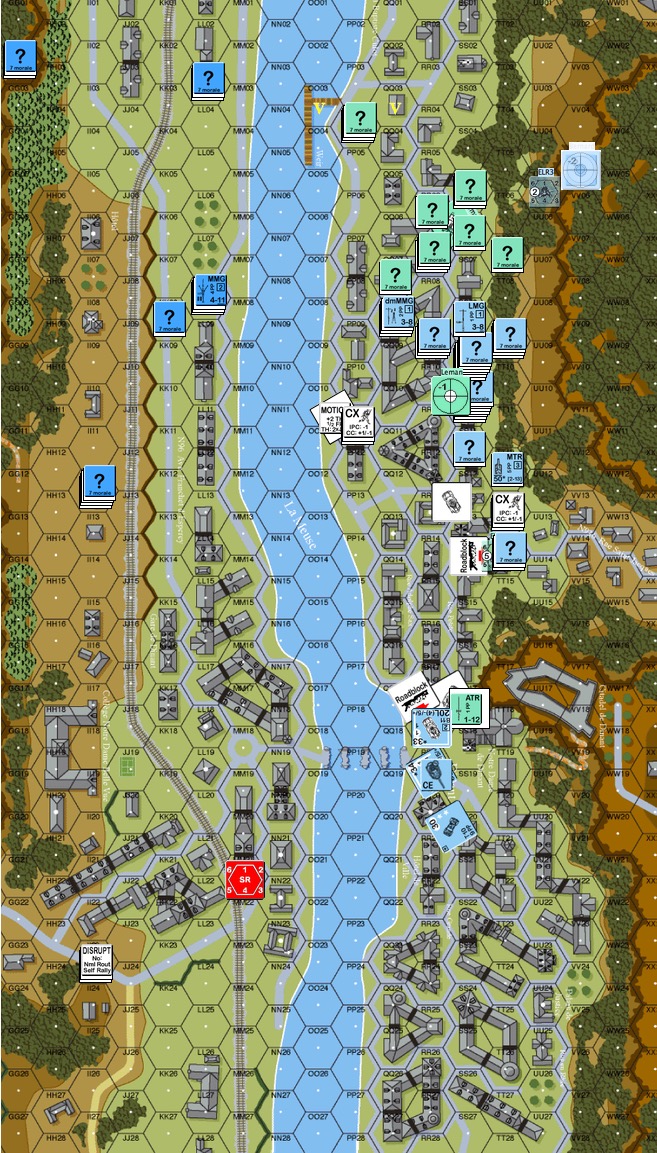
This is an interesting situation. The 2 hex building on the top right is considered ground level only stone while all other buildings are wooden. The German wins at Game End if they control this building. If you look at the map in quarters, Germans setup on the top left and bottom right. A Russian patrol comes in on Turn 1 from either the left edge or the bottom edge of the bottom left quadrant. Both sides get to attack and to defend, the 6 turn limit on this scenario promised rapid and violent action!
The Germans have a mix of elite and first liners. The Russians have a mix of first liners and conscripts (one elite squad too) but unfortunately an ELR of 2. They get 2 leaders on board, an 8-1 and a 7-0. A 9-1 comes in with the patrol later on from the lower left board. There was a bit of a debate as to whether to switch the 8-1 out for a 10-0 Commissar or not. Bruce Probst cautioned against the idea on GameSquad, stating that there really is no where for the Russians to properly rout to and that they should take the -1 Leadership from a fighting 8-1 instead. In hindsight, he’s right (no surprise). At the time, I swapped the 8-1 for a 10-0 in the hopes of cycling whimpering conscripts back into the fight again.
German Turn 1 : The Germans were on the move. The Russians looked to reveal as little information as possible until the Germans came within their (largely) 2 hex range, less when negative modifiers were in play. There wasn’t much action apart from the outer ring of “speed bump” conscripts. They didn’t expect to survive the slightest German fire and so their first shot needed to count.
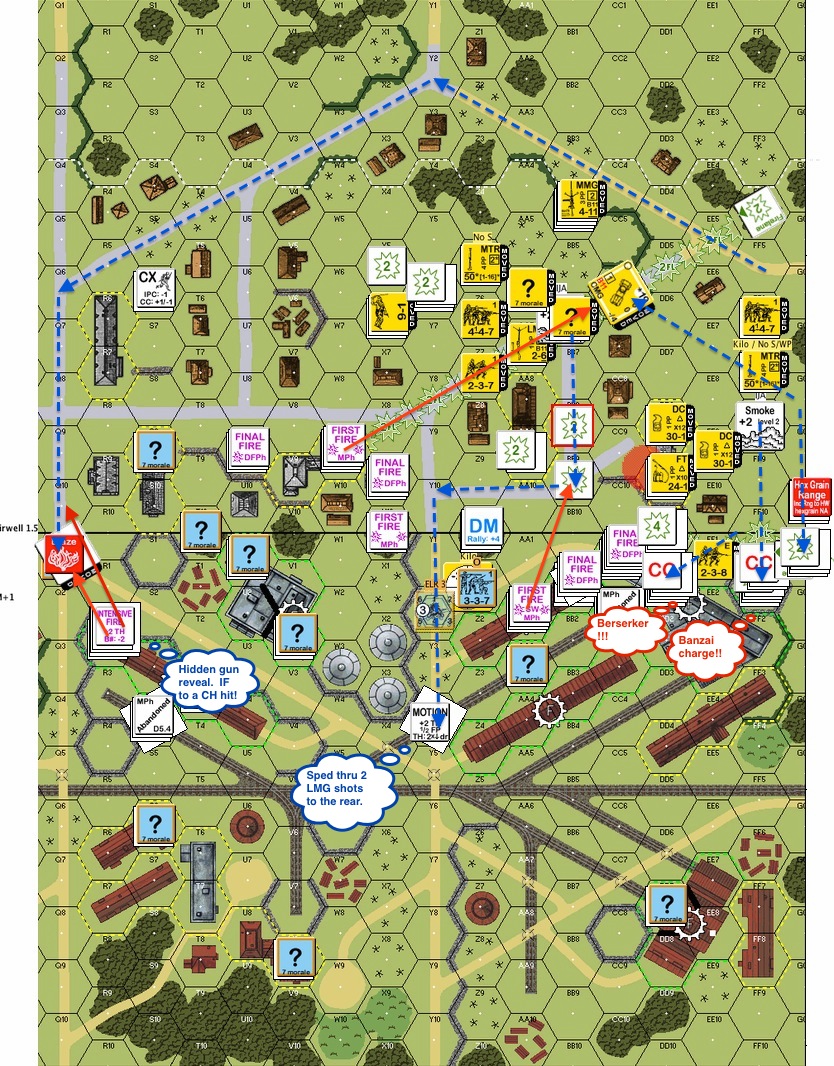
Russian Turn 2 : The Germans built a deathstar with a 9-2 in the left sunken road. Our HMG team had to relocate. Will Fleming also pointed out that mortars cannot fire from CREST positions so the mortar team had to figure out a plan B. One of the “speed bump” conscripts broke another German unit instead of running but got disrupted and was captured in the return fire. The rescuing Russian patrol had entered the map but not the fray at this point from the left edge.
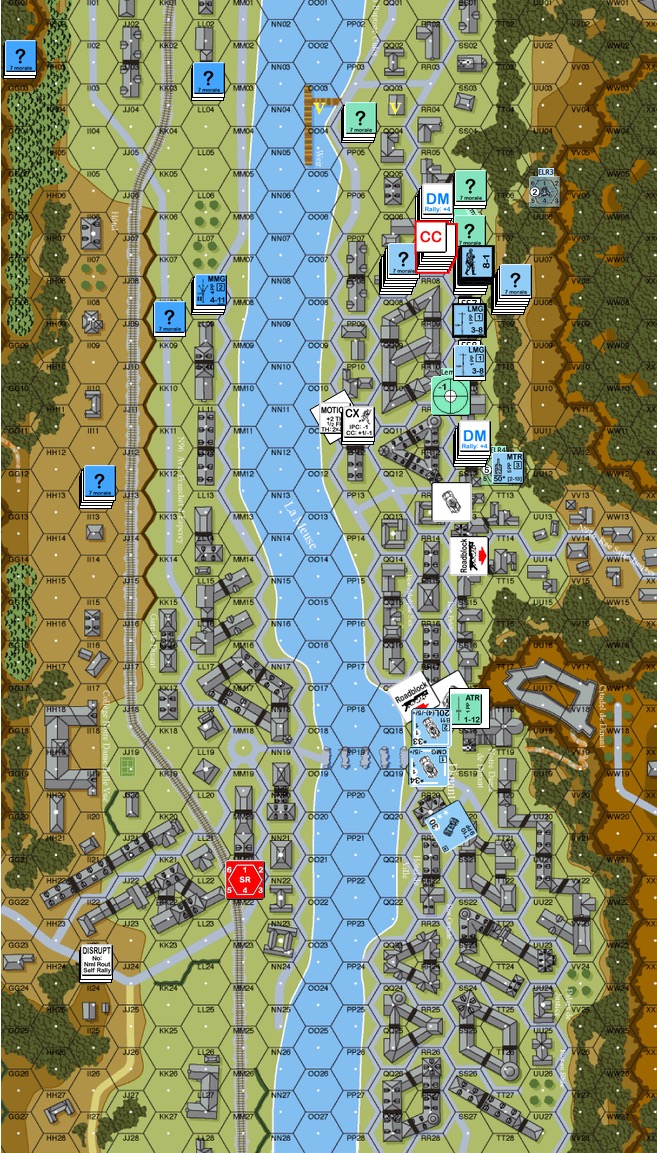
German Turn 3 : The Russian HMG went on a hellish rate tear in Defensive Fire, they KIA’d 2 German squads and broke the rest in the open!! The Russian prisoners found their guards killed and started eyeing the German DC laying in the grass…
Russian Turn 3 : The rearmed prisoners (Conscript HS) grabbed the German DC. There was a German DC HS on the left end of the sunken road to the right. A Russian squad assault moved away to draw fire in the safest way possible but was disrupted anyway. The rearmed Russian HS then rushed down the sunken road with their captured DC!! They survived the Final Fire from the “targeted” German DC HS, threw their DC and broke that HS. Unfortunately it was pinned itself and couldn’t advance to rout the broken Germans out of the foxhole. The Russian commissar decided to vol break and head towards THE house as Russian troops around him were either disrupted as conscripts or ELR’d into being conscripts.
German Turn 4 : The Germans moved towards the house and the Russians didn’t have too many live units left around the target building. A German MMC on the left put a fire lane down through the grain fields and made it tough for the rescuing patrol getting into the fight on time.
Then a horrible thing happened.
A German stack Adv Fired into the Russian HMG team through the brush – and rolled snakeeyes. The random selection that followed slated the full Russian squad for destruction, leaving a broken 7-0 with the gun. There was pretty much no one, save the routing commissar and a solitary conscript squad, in the target building.
German Turn 5 : The Commissar finally pulled himself together and joined the conscripts in the stone building. Between stacking up for better mutual support or spreading out to keep the Germans out of the building, they chose the former. The conscripts dutiful fired at the incoming Germans and did brilliantly well for the most part but things came apart at the end when the Germans rolled another snakeyes in the Adv Fire and broke the squad.
German Turn 5 (contd) : The commissar found himself the sole defender of the house when the German broke through the windows and doors. The ensuring close combat was 6-1. For a moment I had hope that the commissar would roll snakeeyes as well to kill off the entire German stack but it was not to be! The hardy commissar got wounded and finally succumbed to his wounds into the long quiet night.
A number of thoughts after the game :
Will Fleming is a terrific person to get to know and to play ASL with.
The 10-0 (if indeed a decision’s made to swap the 8-1 out) should be in the fight and helping to raise conscripts morale. The ELR of 2 had a material impact on this game.
Seeing that most of the Russians ELR’d and/or Disrupted – routing, rallying and fighting was not the right strategy. Taking a fighting 8-1, fighting and dying in place might be a better decision.
As a rout path, my foxholes were not properly lined up especially when there were Germans coming in from 2 angles.
Thoughts? Comments? Alternate strategies? Additional thoughts on 10-0 commissar vs 8-1?
John Knowles and I recently purchased the few “Into the Rubble” packs (Bounding Fire Productions) that Sam Tyson found laying around. So we decided to play the pack out one by one over the next year or however long it takes. The first one in the pack is Scott Holst’s “Debacle at Sung Kiang“. There are a few places called 松江, but since Scott mentioned “the city of Sung Kiang”, I take this as the area to the southwest of present day Shanghai. This scenario takes from a battle on November 8th 1937 when the Chinese GMT still had their German trained & equipped elite troops. As with all the scenarios in the “Into the Rubble” pack, it’s all about city fights. What I didn’t realise until the first Prep Fire was how unversed I am with city fights – I have definitely been running around jungles too long!
So here’s an account of my miserable loss (not an infrequent experience for me of course, but I don’t blog about my losses often enough) :
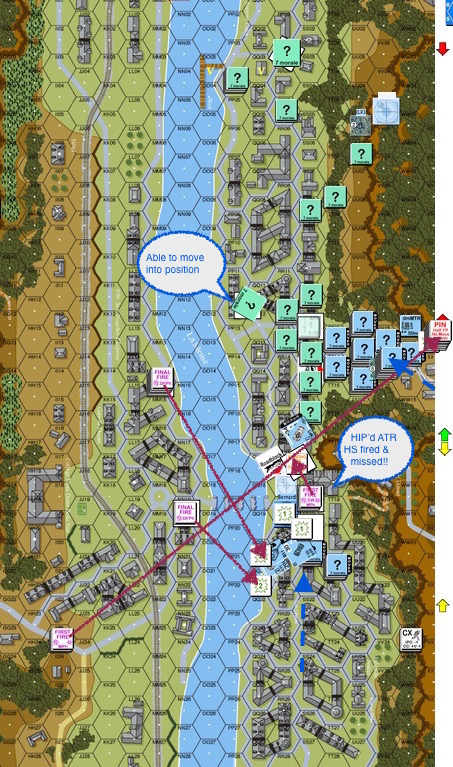
There are 16 multi hex buildings on the map. The IJA’s task is to capture 11 or more of them with 16 first liners, 2 elites, 4 leaders and 3 armoured cars in 6.5 turns. The Chinese fielded 9 elites, 7 first liners, 3 leaders, 2 76 guns and 2 of their funky Type 22 dual MG armoured trucks.
Chinese Turn 1 : This is what it looked like at the end of the first Chinese turn. The Chinese decided to use their “armoured” trucks a different way. Instead of running the trucks around with “0” armour, they decided to rip the 2 LMGs and the crews off them. That’s 4 new LMGs with 2 elite units that self rallies. The Chinese now have 8 LMGs, fantastic news to the IJA I am sure.
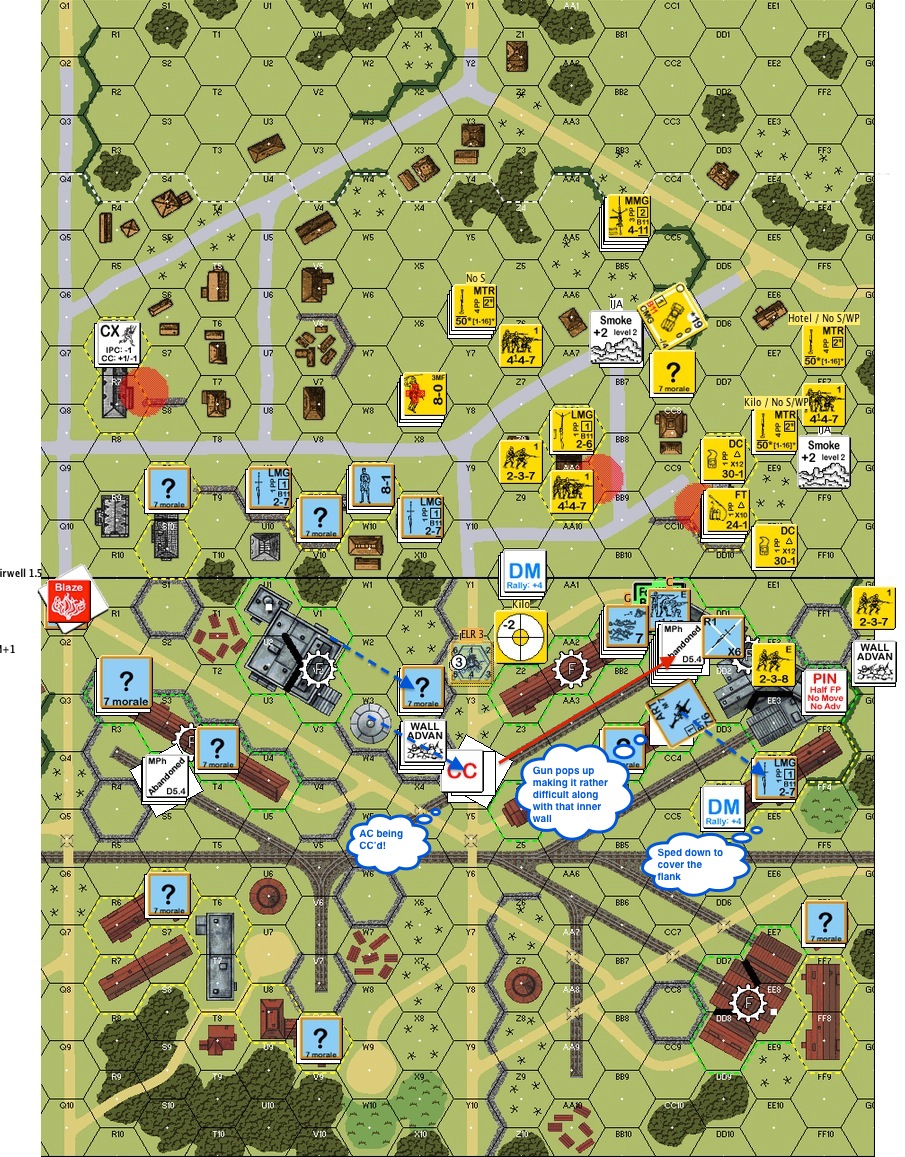
IJA Turn 3: The action exploded. First the IJA Banzai’d down the left edge of the board. Several fire lanes sprang up but the IJA made it across the open ground at acceptable losses. I then figured this was going to take too long : I should have an armoured car behind the Chinese lines to interdict routs and to limit Chinese movement. Therefore I ran an armoured car down the streets (just follow the blue dotted arrow that emanated from the concealed counter on the top left quadrant of the map). It survived one shot from the Chinese MMG that laid down a fire lane. Then the AC sped due south and made a right turn, surviving another LMG shot at close quarters. It then arrived at the center of the map. Another AC decided to do the same but via another route. This is the blue dotted arrow that encircled the top part of the map from right to left. Unfortunately it discovered one of the Chinese 75’s the wrong way. It was still hoping that its speed was going to save it. Boom – no hit, it laughed. The gun then went for Intensive Fire as the car came closer. Boom – Critical Hit!! The AC bursted into flames as car parts careened down the middle of the street!!
Chinese Turn 3: The Chinese moved folks over from the left, one of which CC’d my AC. The IJA uncovered a fortified position and strangely, a 75 gun popped up in the middle of the building complex on the right. That, together with the interior wall in the stone factory (see the hex side on the hex in “direction 2” of the gun) made it a little difficult to clear it out. The Chinese sped a unit to the far right to close the flanks.
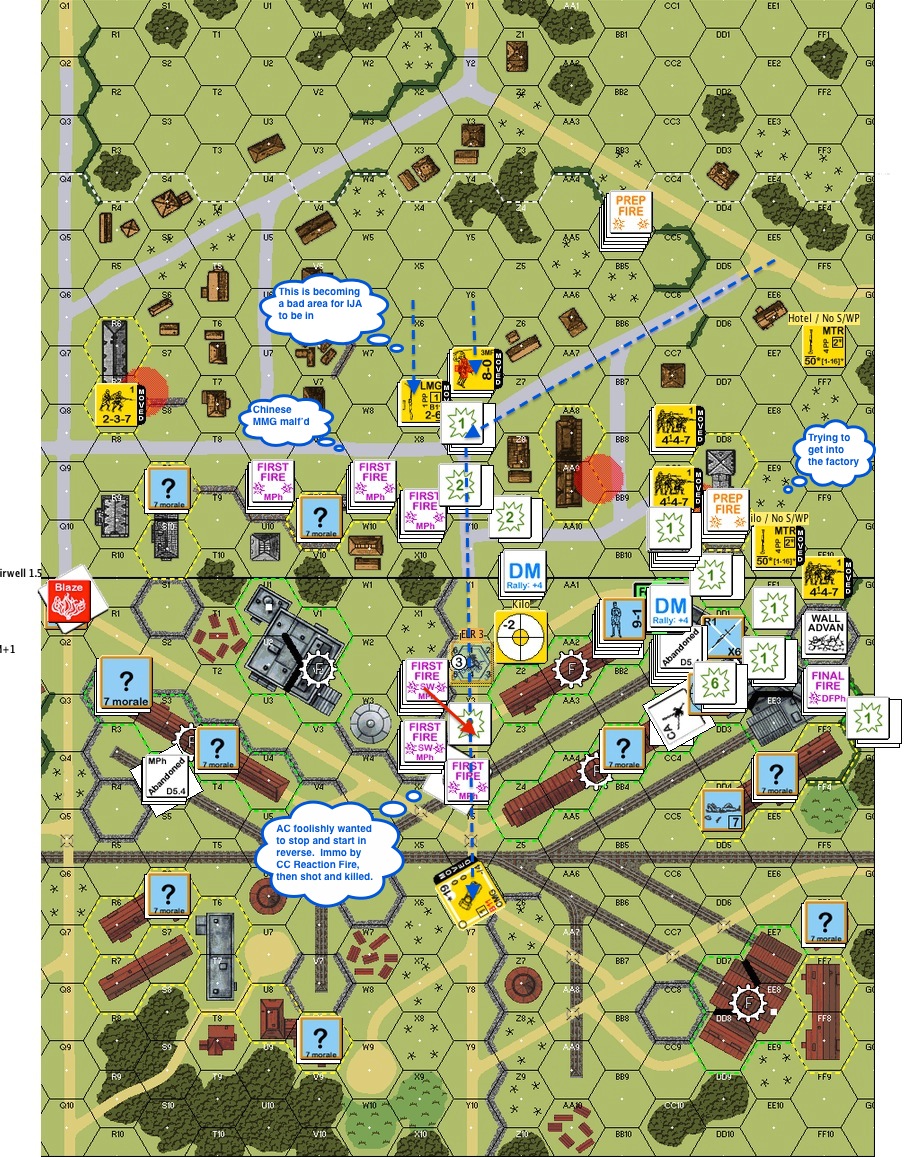
IJA Turn 4: Check out the middle of the board – here’s one of my extreme moments of stupidity: with a Chinese squad in the hex, I decided that it would be good idea to back the AC up to the Embankment Railroad. So I stopped the car meaning to go in reverse. The Chinese folks promptly declared CC Reaction Fire and disabled the car. A subsequent LMG shot killed it. *Brilliant*
All the action on the right were the IJA trying to pile more troops into the factory. The Chinese started shooting a lot better than they did a turn before unfortunately. The good bit was that the IJA finally broke the folks in the Fortified hex. The IJA folks in the top part of the map were starting to appreciate how exposed their positions were. Having said that, the Chinese MMG malfunctioned the turn before and so they were having a go at crossing the street.
The IJA then ran the last of their armoured cars down the middle of the street to help take the building complex on the right.
Meanwhile on the quiet left side, a couple of Chinese troopers pulled out a bag of marshmallow and strolled over to the bonfire ..
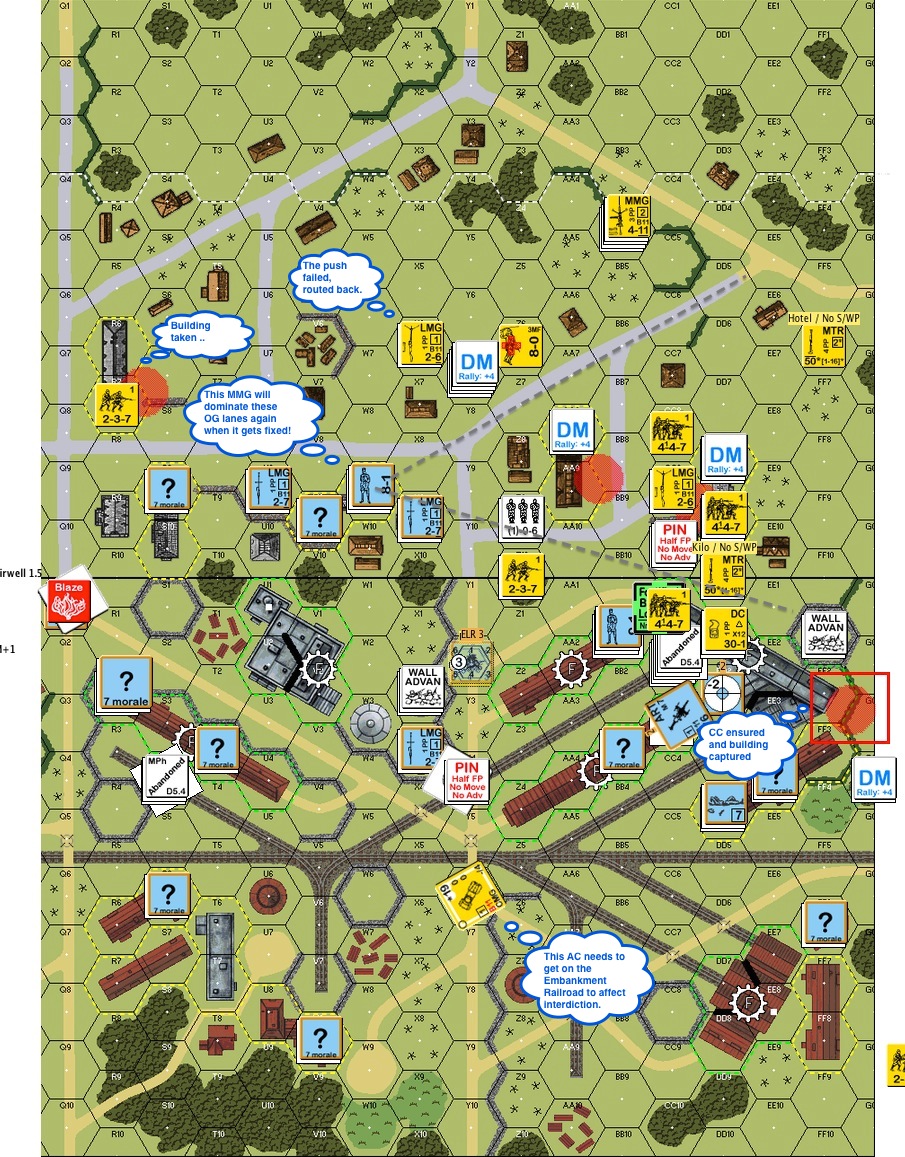
IJA Turn 4 : This is end of IJA Turn 4. IJA managed to capture the big factory on the right. In retrospect I should then have “spilled” more forces down the right edge to turn the Chinese flank. That would perhaps take me to the buildings to the lower half of the board. The folk in the center had to rout back. The MMG that malfunctioned was fixed prompted in the next Rally Phase. Meanwhile, the AC got into a threatening position but it had to get on an embankment to interdict any Chinese movements.
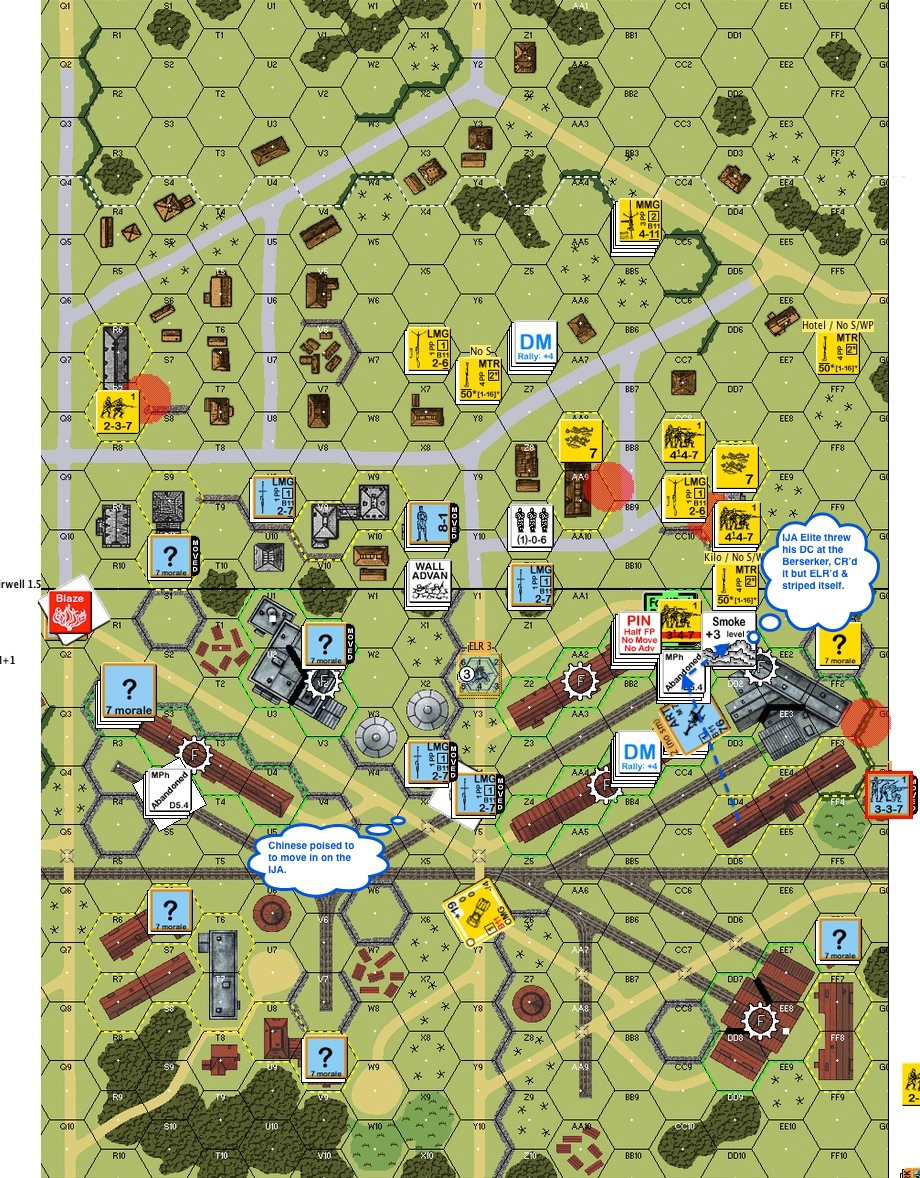
Chinese Turn 4 : Two Chinese squads went berserk and both targeted the striped IJA squad sitting in the Fortified hex on the right. One of the berserkers was underneath the Pinned squad next to the green Fortified hex so you can it imagine it doing the zombie dance against the wall. The other Chinese berserker rushed up (blue dotted arrow), spotted the IJA elite through the smoke to the right and switched directions. The IJA elite squad threw their DC at the crazies but only managed to CR the berserkers while ELR’ing itself to a first liner. The berserkers rushed in and got wasted by gunfire but it caused enough damage by taking the one squad the IJA had with a decent smoke component plus used up their DC!
The Chinese shifted their forces to the right as other sectors were not under threat (a street party was in progress around the bonfire by now). Notice also the 2 LMG squads closing in on the lone AC sitting in the middle of the board.
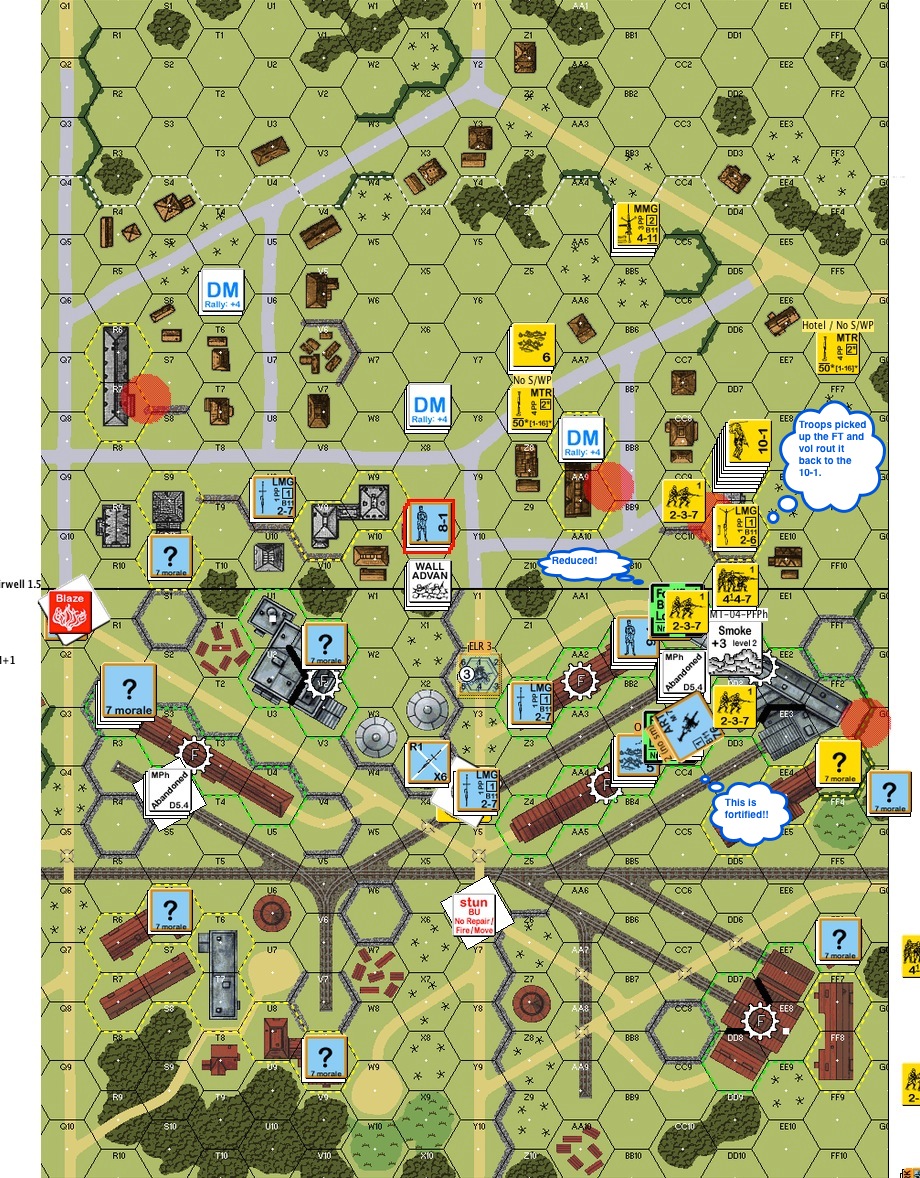
IJA Turn 5 : With all 3 mortars out of smoke and the one elite squad ELR’d to a first liner, the IJAs were not able to put more troops into the factory on the right as the Chinese had an MMG under an 8-1 in the middle of the map. Tried as they might, the IJA group in the middle couldn’t put much pressure on that MG, apart from discouraging it from putting up a fire lane. This is the end of IJA’s Turn 5. The troops inside the IJA’s hard won Fortified hex was steadily reduced. The fact that it should have advanced into the HMG squad (with the 9-1) long time ago to take them out by CC only occurred to me now. (Urgh..) Meanwhile, the 10-1 came forward to rally the troops. The 1st liners grabbed the flamethrower they recovered, vol broke and routed it back to the 10-1 in the hopes that the 10-1 would know how to use it.
I was definitely not at my best!
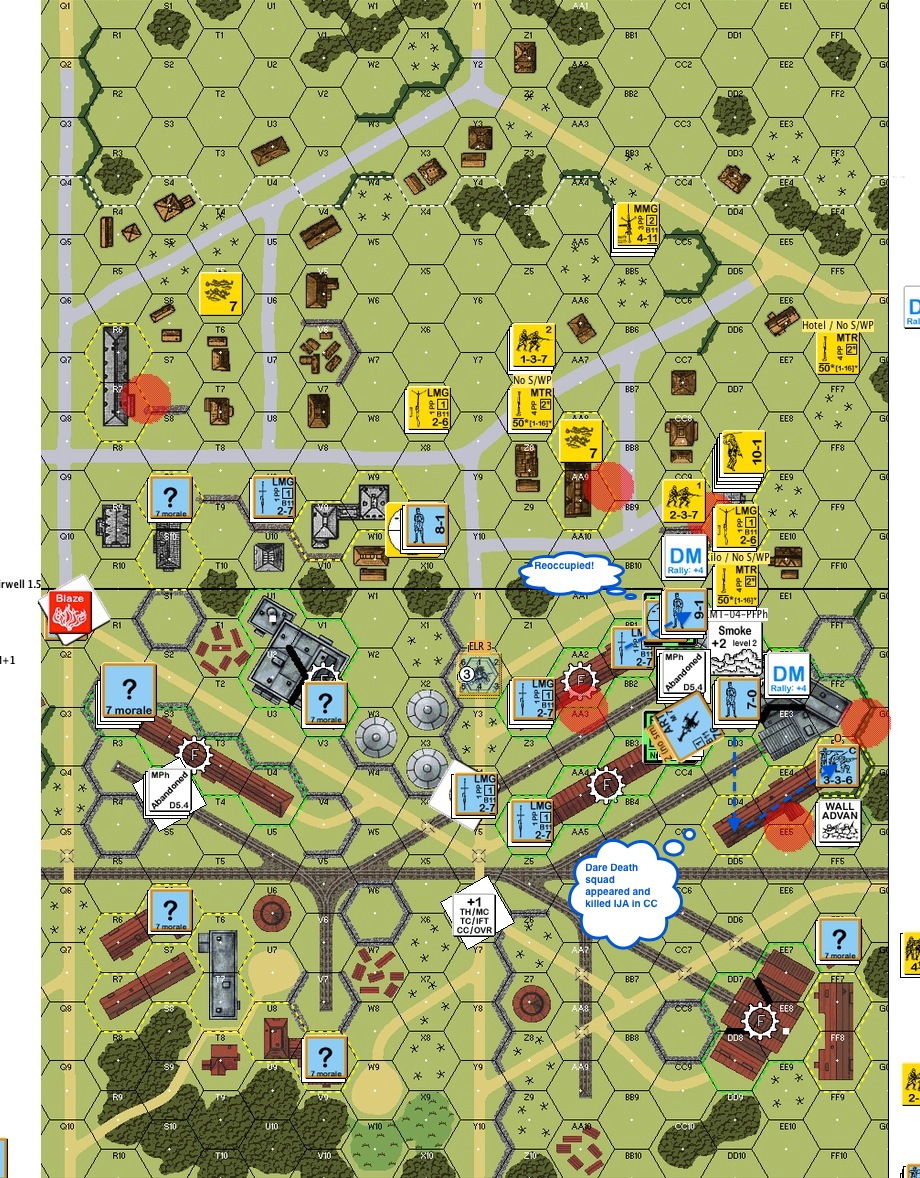
Chinese Turn 5 : It’s increasingly evident that the IJA were getting bogged down at the first factory. The Chinese reoccupied the Fortified hex and a Dare Death squad successful took back another building. While the retaking of the occupied hex didn’t mean immediate reversion of control, it did pretty much put the IJA at where they started with a lot less troops and only 2 Movement Phases to go.
This was where I conceded.
Review :
In retrospect I should probably have approached from the left side of the board where there were more cover. The center group should be anywhere BUT center in that wide open space.
I didn’t fully appreciate the threat that the MMG with the 8-1 poised on my operations either. We should have at least wrecked an AC in front of that building if nothing else.
Running the Armoured Cars around to the enemy’s back field was the right idea but they should not be left on their own for too long.
I should also have focused more efforts on sliding my troops down the right side to turn the Chinese flanks. Had I done that earlier, the dynamics would have been different. Instead, all the IJAs where bogged down in front of the big gun (of all places) and in the Fortified hex next to the highest ranking enemy officer and their HMG. The first thing IJA should have done was to advanced out of the Fortified hex and CC that HMG stack like there’s no tomorrow.
These are some of the major points I should have done better. In real life the IJA prevailed (and the ROAR was 15:11 Japanese:Chinese). As with real life, this is how much damage a bad leader (yours truly) can do!
What else could I have done better? What are your thoughts? Please comment.
"A15.1 The cauldron of battle, which destroyed so many units that failed the test of arms, could also forge better soldiers and/or acts of desperation borne of heroism or despair."


 This is a Gary Fortenberry scenario from Action Pack 9 “To the Bridge”. The victory condition is a little out of the ordinary, there are multiple ways you can win. If you fulfil certain number of VC conditions at a certain point in time, the game ends. Otherwise it goes on to the next checkpoint until the 6.5 turn scenario is over.
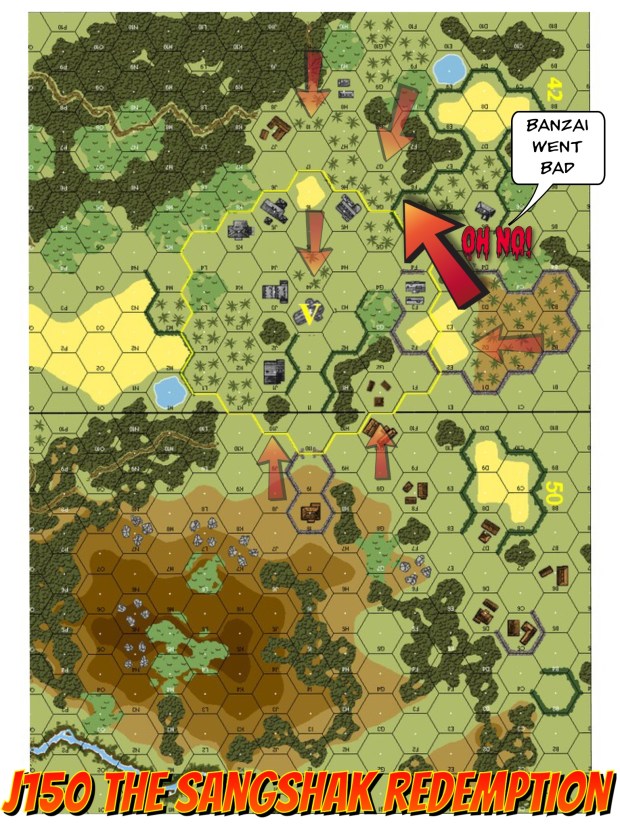 This 5 turn scenario is from ASL Journal 10. Both the Japan side and the Indian / Gurkha’s side get to attack as well as to defend. All the buildings are huts apart from the building in the middle of the VC circle which is a stone church. The IJA wins by winning ownership of the church (even just briefly) and keep two building within the VC circle at game’s end. My opponent was John Knowles, John and I play every Thursday evening, from “Into the Rubble” scenarios to Campaign Game playtests.
 This is a 6.5 Turn scenario by another Fortenberry pack, Action Pack 6 A Decade of War. My opponent was Zhen Wang. Zhen’s one of the chief editors of Dare Death, the Chinese ASL magazine. The IJA attack down from the top of the map pushing against some ELR2 Philippines Army (“PA”) personnel. They could either win by exiting CVPs off the board, or by a combination of killing US units / capturing buildings (largely to the left of the “Fake HT”.
 I was the defending Chinese in this 6.5 Turn Scott Holst scenario from “Into the Rubble”. My opponent was Akira Lu who is a relative newcomer into the hobby. He came to the tournament with nothing, not even Beyond Valor, but he left the tournament with Mark Humphries’ old Raaco boxes & bag set. I guess he’s finally convinced!
 This is my other favourite scenario out of Action Pack 9 “To the Bridge”. This is a fast 5.5 turn scenario. The British needed to either destroy both roadblocks or clear IJA units from around the roadblock area.