FT S9 Cowboys and Indians – Advanced Squad Leader AAR
Scenario Background

It was 26 Sep 1950. The Korean Marine Corps (South Koreans) were mopping up pockets of resistance at and around key thoroughfares. Chesty Puller thought they were best suited “to tell the cowboys from the Indians”. The North Korean occupation had not been well received by the city’s inhabitants. So the locals proved to be excellent sources of intelligence amidst neighbourhoods where North Koreans dressed up as civilians. (Crudely excerpted from the scenario card..)
(Photo Credit: Don O’Brien, View from atop the Hanto Hotel, Seoul Korea, Nov 1945)
Victory Conditions & Tactical Considerations
The North Koreans had 2 squads & 9 half squads of various quality plus 2 LMGs. They had self rallying ability as per SSR and no leaders were present. They were to setup, one squad or less per hex, HIP’d largely on the top half of the map pass the horizontal street and suffered Ammo Shortage (so Fire Lanes are out of the question). The Korean Marines (‘KMC’) win if they could amass more VPs than the North Koreans (‘KPA’). For both sides, VP = CVP + Exit VP, and the KPA gets 1 VP each for each Good Order concealed or HIP’d units that survives till game end. Plus the KPA starts with 3 VP. So unless it looked like a good kill, the KPA would stay put. A ‘mole hunt’ then you say? Yes – but this scenario is how a FUN mole hunt can be done. Now the KMC could enter on the left or the bottom of the map apart from setting up below the horizontal road. They started with 7 squads + 1 fire team and 3 leaders, 2 LMGs. Note that “Steep Hills” were in play, so those brown hexes were concealment terrain as well. All those Orchards were sparse, while they were concealment terrain, Partial Orchards were not.
My top priority was to prevent the KMC from cutting off my lines of retreat up through the top side of the map. Secondarily it’s to have a screen so civilian/ prisoner interrogation wouldn’t uncover important KPA ghettos. The KMC could enter from the left but while I didn’t want him sliding into the top behind us, I couldn’t see KMC’s entering onto the Citywide Boulevard (-1) hexes (‘CWB’) with no where to rout. I think the KMC expected the KPA to stay as far away as possible, which means the top right of the map was likely to be searched first. Places the KMC might overlook were rooftops and CWB hexes with Orchards, although my opponent is well known for being meticulous and detail oriented, I have never known him to miss things.
I put the 2 elite 248 HS’s over on the right. Their mission was to ‘confirm’ my opponent’s suspicions, to draw attention and to survive longer than most. I had a few units on the top left and at the Dense Urban Terrain (DUT) choke point on the top of the map. Note that DUT worked like Dense Jungle, stacking limit was two and you couldn’t firegroup with units in other DUT hexes. I had a HS on the first level of one of those stone rowhouses on the left (not that I really think my opponent would miss them) and another one slightly forward (down towards the horizontal road) to see if we could catch any impatient bypassing KMC units coming down the road.
(Photo credit: Time-Life, Street Fighting in Seoul by Hank Walker, 9 Sep 1950)
Advanced Squad Leader AAR
 Advanced Squad Leader scenario.jpg")
South Korean Turn 3: We had a rather big KMC force hitting the right of the map. The 2 248’s put out some shots on the road, one was demolished by Turn 3. The other had a choice of going up next to that massive 8-1 stack or down to the bottom side of the street to mess with the KMC further. If a unit could survive til the end of the game concealed or HIP’d, they score 1 VP for the team, so they would have to come after it. Unfortunately the remaining 248 didn’t last long after this but the duo did burn up some time. The SK rolled civilian interrogation though and a HIP unit on the 1st floor on the left got ratted out (and killed). So there goes my hope of the SK’s passing him by or it being able to ambush the Korean Marines somehow. We wondered if the SK’s on the left will wheel counter clockwise and sweep up to the top of the map! I also started to realize that having conscripts as screeners posed a liability. They could be easily captured and interrogated!
 Advanced Squad Leader scenario.jpg")
South Korean Turn 4. We had three Movement Phases left. The main body of Korean Marines on the left started to wander past our HIP’d crowd apart from one squad with an LMG. We took that shot at point blank with a HS (and a -1 CWB TEM) but bullets rolled off the Korea Marines. We decided to back off into the DUT and get reconcealed instead of pressing on, hoping that the SK squad would come in pursuit instead of walking into the other HIP’d units. Meanwhile on the right, the Korean Marines swept through the hexes in the area. That single hex two story house on the far right did look tempting but I didn’t want to be (immediately) encircled in it.
 Advanced Squad Leader scenario.jpg")
Using conscripts as screeners was indeed a liability. One of the captured HS gave into a copy of Doom Battalions v3 and ratted out another HIP’d unit! A HS and a 527 were surrounded. The 527 was encircled and CC’d but it look out the KMC 8-1. The other HS who got CC’d rolled infiltration and left off the map (I forgot whether it went with a new leader)! Over on the left, our sniper took out the guards earlier and a KPA HS was freed for a sweet moment!! It could try for the board edge but SK units would get to it first. It decided to go upstairs and it drew some units off the encircled lot.
 Advanced Squad Leader scenario.jpg")
Prisoners were recaptured and the scores were even going into the last (NK) player turn. The NK 527 had to die! The Korean Marines stood around and discussed it a bit and decided to ride on the higher Marine morale level and shoot into the Melee. All the fun triggered the NK sniper again who nailed another Marine unit but worse, the shooting laid an MC on the Melee stack. The NK 527 pinned but all the Korean Marines in the melee broke. The NK’s won, glory to the dice (the surviving but unconcealed NK 527 was not credited with VP’s but it’s incumbent on the SK to break the prevailing VP tie)!
(Photo credit: Time-Life, Street Fighting in Seoul, Hank Walker, 9 Sep 1950)
How’s this scenario interesting?
Normally you wouldn’t imagine bug hunt scenarios to be fun. However, this one’s small and quick enough to not be tedious for the South Koreans and to be nail-bitingly exciting at some points for the North Koreans. The North Korean player had to keep a pokerface while the Korean Marines swept through the streets. However it’s not a huge challenge while on VASL as long as you can keep your voice level. There are definitely multiple ways to play this. I wonder if any NK players decided to not play possum but actively looked to kill SK units? I wonder how that worked out. The use of interrogation kept life interesting and it reflected the historical situation quite well. The beauty of the Dense Urban Terrain (‘DUT’) rule came to the fore here. I wondered if more designers will do the same in the PTO with a mix of Dense & Light Jungle? This is an interesting scenario offering a good bit of fun in the evening, give it a try!
(Photo credit: Time-Life, Street Fighting in Seoul, Hank Walker, 9 Sep 1950)
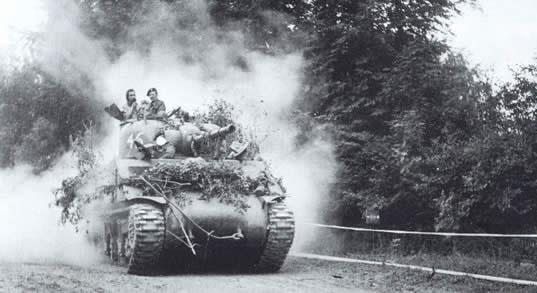 The top board has the second most restrictive terrain. The German convoy enters via a restrictive channel for a third of the board and the terrain opens up before leading into bocage country again for the last half of the board. The temptation is to start shooting at the Germans as they come out of the first third of the board but the openness will allow their guns to gang up against our tiny blocking force. I decided to duck further into the bocage with a HIP’d baz team, a Sherman and an MMG. Hopefully the choices for the Germans are either to come through to us one at a time down the channel or risk bogging and underbelly shots crossing the bocages to flank us. Forces were deployed along the road and a HIP’d baz team is on the bottom of the map since I suspected the Germans would be tempted to flank us along there.
 Advanced Squad Leader scenario.jpg")

 Advanced Squad Leader scenario.jpg")
.jpeg") On the top board, our Sherman backed off into the sunken road, escaping the 2 German AFV’s sitting behind the bocage. Unfortunately, they decided against coming over to chase after our lone Sherman! The sheer weight of the incoming halftracks/ armoured cars got our infantry on the hill to start thinking about heading back. They did have a few open top vehicles in the proximity so we tried to light up a few more.
On the top board, our Sherman backed off into the sunken road, escaping the 2 German AFV’s sitting behind the bocage. Unfortunately, they decided against coming over to chase after our lone Sherman! The sheer weight of the incoming halftracks/ armoured cars got our infantry on the hill to start thinking about heading back. They did have a few open top vehicles in the proximity so we tried to light up a few more. Advanced Squad Leader scenario.jpg")

 Advanced Squad Leader scenario.jpg")

 The Russians have 8 Movement Phases. They will have to do 5 hexes per phase for 4 phases to put them in the vicinity of the 2 hex Wooden building on the left half of Board 17. That leaves them 4 turns to fight. The KV-2, on the hand, is a real monster. It is big enough to give a -2 to any TH for size. It spots an armor factor of 8 all around, 11 if you hit that turret from the front. Its 152mm gun dishes 30 IFT / TK21 (AP9 & no IF). On the otherhand, it can only turn it’s turret by paying NT penalties (we played it wrong: we played it as if it’s an NT), goes 9 MP per turn and that’s only if you pass the Mechanical Reliability DR. The PzIVD offers fantastic mobility [amended, see footnote 1]. It packs a good set of MGs (totalling 8 IFT) but it’s 75* (short barrel) with a TK of only 10 (AP7). It’s hard to kill a KV-2 with anything less than a swarm but all you need is to kill one and scatter (the remaining Russian tank will have to kill all the PzIVDs to win via that route). The Germans can also immobilise one first (net +3 and a hull hit), hopefully in some awkward position/location. Their smoke dischargers (s9) can help the German reinforcements cross all that open ground from the top to the middle of the map!
 Advanced Squad Leader scenario.jpg")
 Advanced Squad Leader scenario.jpg")
 Advanced Squad Leader scenario.jpg")
 Advanced Squad Leader scenario.jpg")

 Advanced Squad Leader scenario.jpg")
 Advanced Squad Leader scenario.jpg")
 Advanced Squad Leader scenario.jpeg")
 Both sides had a chance to attack and to defend. There’s a lot of force allocation decisions to be made especially for the Russian player. The Germans couldn’t afford to be distracted by buildings on the fringes, they had to make it to the village on time in order to disrupt the Russian attack. The KV-2’s were a real challenge. Nothing short of a nice “dance of death” would do (with the survivors running off to the far corners of the map). Then if that’s the case, they wouldn’t be helping their reinforcements cross that vast Open Ground on the top half of the map. Typical of the best scenarios, there are a good number of what-if’s and tradeoffs to be made. I thought I was on track for an easy win but my opponent obviously proved me wrong.
 The Germans need to get at at least 12VP at Game End to win. VPs are earned by occupying buildings on the right half of the map. Each VP corresponds to the # of ground hex locations a building occupies, the exception being the long wooden rowhouse which is only 3VP and not 5. This being early in the morning, there’s a +1LV for the entire game. The bocages are Light Bocages, meaning they are half height obstacles, don’t throw a blind hex behind and are not as onerous to cross. A particular evil element to note are the few Up-Slope hexes in the German setup area that allows them to look beyond the Light Bocages.
 Advanced Squad Leader scenario.jpg")
 Advanced Squad Leader scenario.jpg")
 Advanced Squad Leader scenario.jpg")
 Advanced Squad Leader scenario.jpg")
 Advanced Squad Leader scenario.jpg")


 The IJA starts in two groups. The first group of 6 squads setup in the airfield (no Smoke in the rain) in the face of a 75* Artillery, a murderous Bofors AA (IFE 8 ROF 2) and a leader who can make it rain 70mm OBA. The second group of 9 squads setup on the east side (lower side on the map) of the hill. To counter that group, the King’s Own Royal Regiment and the King’s Own Scottish Rifles setup on the hill top. A group of Gurkhas setup within 3 hexes of the Flooded Pool.
 Advanced Squad Leader scenario.jpg")
 Advanced Squad Leader scenario.jpg")
 Advanced Squad Leader scenario.jpg")
 Advanced Squad Leader scenario.jpg")
 Advanced Squad Leader scenario.jpg")
 Advanced Squad Leader scenario .jpg")


.jpg")

.jpg")
.jpg")
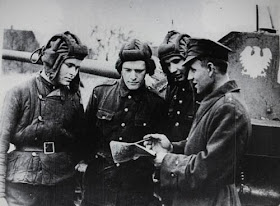 BoF2 A Polish Requiem has long been a classic. It’s a whirling dervish of a battle!! Polish AFVs were slow but those 37* kills on a 7, pretty respectable considering most German AF’s 1. The German forces might seem overwhelming but these guys were tied to a timetable. If the player on the Polish side keeps his PMC (read: Personal Morale Check) he might win this scenario yet. The German AFVs might X themselves out or folks might get delayed just enough. Had the Polish MMG at the end zone not X’d out it would have been harder for the Germans. Scoring 37 (Poles) vs 27 on ROAR, I recommend this scenario unreservedly.
 Advanced Squad Leader scenario.JPG") From the left of the map, F Company immediately started to setup their MMG and got their fire teams to probe NK concealments. The E Company came up from behind and a bit more than half went for the right of the map. The AFVs rolled down the road but the higher level Burning Wreck that’s there on setup made it a little hazardous to roll up in front of a ROF3 AT gun. Plus it’s impossible to be on the boulevard without being in DI’able range. I thought the right of the map would be a more straightforward travel but it’s confining nature made it easier for the NK defenders and didn’t facilitate armour support. By Turn 4 it’s evident that the NK’s were very effective there. A large number of broken fireteams routed towards the rear. The BBQ tank and the tank dozer lend their support on the left and found they could safely sneak shots into the boulevard. The left side met some initial set backs but were able make better progress. The AFV’s were making Bounding Fire shots where possible but they couldn’t bring it up close in most cases because of the chance of meeting Suicide Heros in Street Fighting. The strategy was to try to flank the NK’s down both sides while putting AFV fire to defenders down along the boulevard.
From the left of the map, F Company immediately started to setup their MMG and got their fire teams to probe NK concealments. The E Company came up from behind and a bit more than half went for the right of the map. The AFVs rolled down the road but the higher level Burning Wreck that’s there on setup made it a little hazardous to roll up in front of a ROF3 AT gun. Plus it’s impossible to be on the boulevard without being in DI’able range. I thought the right of the map would be a more straightforward travel but it’s confining nature made it easier for the NK defenders and didn’t facilitate armour support. By Turn 4 it’s evident that the NK’s were very effective there. A large number of broken fireteams routed towards the rear. The BBQ tank and the tank dozer lend their support on the left and found they could safely sneak shots into the boulevard. The left side met some initial set backs but were able make better progress. The AFV’s were making Bounding Fire shots where possible but they couldn’t bring it up close in most cases because of the chance of meeting Suicide Heros in Street Fighting. The strategy was to try to flank the NK’s down both sides while putting AFV fire to defenders down along the boulevard. 


 Advanced Squad Leader scenario .JPG")
 Advanced Squad Leader scenario .JPG")
 Advanced Squad Leader scenario .JPG")
 Advanced Squad Leader scenario .JPG")


 Advanced Squad Leader scenario.jpg")
 Advanced Squad Leader scenario.jpg")
 Advanced Squad Leader scenario.jpg")

 Advanced Squad Leader scenario.jpg")

