Advanced Squad Leader scenario FT225 Blue Hell at P.A. Abries (AAR)

The date is June 21 1940.  A unit of the Italian mountain infantry, the “Fenestrelle” battalion of the 3rd Alpini Regiment launched an attack on the French Chasseur Alpins (“Alpine Hunters”) at Abries.  The Chasseur Alpins are informally known as “Les diables bleus”or “The Blue Devils”.  This scenario’s designed by Mr Alexandre Rousse-Lacordaire “in memory of [his] great-grandfather Capitaine Télèphe Rousse-Lacordaire (111th BCA) KIA on August 27th 1914.”

This is an Advanced Squad Leader scenario from LFT14 Italians : FT225 Blue Hell at P.A. Abries.   The Italians are to score more CVPs than the French (and to grab 3 buildings/pillbox) in 7 turns.  The Italians have three attack groups that can setup from four different areas.  That makes for a rather large area that the French has to worry about.  Whichever side has higher CVPs win but the Italians can also gain CVPs by claiming buildings on the top left quadrant of the map (top half of the map and left of the white dotted line).

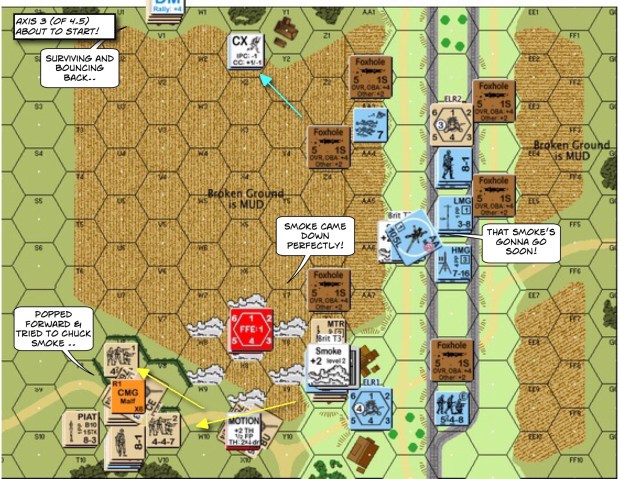
The Italians opened quite nicely from the valley.  I focused on shortening my lines and bringing the French forces together and traded space for time.  The issue is that I could have takened better advantage of the Italians having to cross open ground with 6 morale.  My OBA went silent quickly after a couple of Access.  The Italian artillery was still going strong on Turn 6, wrecking havoc all along the French retreat. The Italians avoided open ground and got stuck up the hills on the top right.  The French defenders on the top right were able to scramble back and really had to do so when the Italians started threatening the hills to their immediate right.  The Italians didn’t go for the bottom left either but went up via the middle where they get better cover (but slower progress).  So far we have been able to fall back just ahead of the Italians and avoided Close Combat.  Unfortunately we had to move out of the woods when the Italian artillery started coming in.

IMG 4166By Italian Turn 6, the French were behind by 4 points, but that’s not counting the buildings ceded and the buildings the Italians will move into in the remaining turn.  We failed to put ourselves in a position to surround and kill their brokies.  Hard to rally as the Italians might be, they do rally.  Their OBA continues to wreck havoc on our positions, aside from hindering our ability to relocated.  One more Italian red chit and it would be gone, but there’s no chance of that now.  A French counterattack in the cards (down in the middle of the board)?  

Advanced Squad Leader AAR FT225 Blue Hell at P.A. Abries

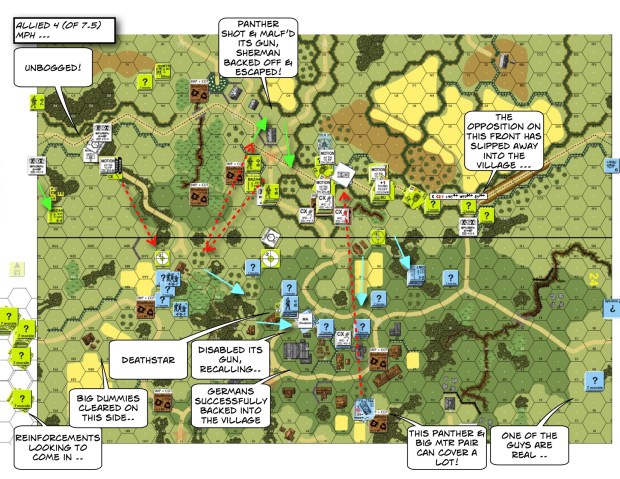
I should have read the Victory Conditions more carefully and shouldn’t have retreated out of the hill in the middle of the map.  Apart from killing more French than they lost, the Italians have to get at least 3 buildings from the top quartrant of the map.  Moving the defensive line to the north hold things together but left the Italians with 7 buildings.  That is of course not a huge issue if we had OBA, but we drew 2 “Reds” early in the game!

Holding the hill in the middle of the map longer will leave the defensive line on the top of the map and around the buildings near the church thinner.  A more spread out set of defenders will also make it harder to keep the Italians from winning in CVPs.  Ah well, perhaps that’s the way it would have to be!

Recently updated Advanced Squad Leader (ASL) AARs, July 23 2019

Ongoing

Started playing

  • 145 Shanghai in Flames
  • 3 Czerniakow Bridgehead

Currently setting up for

  • FT225 Blue Hell at P.A. Abries
  • 14 Silence that Gun
  • FrF3 The Swedish Voluntary Corps
Note : I keep about 10 to 12 scenarios & CGs running at the same time.  While I play 3 of them in weekly live VASL sessions, the rest of them are PBeM.  About half of my games are CGs (some playtest CGs) and the rest scenarios.  I update my AARs as the games roll along and so this is a notice to my readers of AAR updates and completions.

Recently updated Advanced Squad Leader AARs, June 4 2019

Ongoing

Note : I keep about 10 to 12 scenarios & CGs running at the same time.  While I play 4 of them in weekly live VASL sessions, the rest of them are PBeM.  About half of my games are CGs (some playtest CGs) and the rest scenarios.  I update my AARs as the games roll along and so this is a notice to my readers of AAR updates and completions.

Advanced Squad Leader scenario 42 Point of No Return (AAR)

One sunny day in Libya, Nov 1941, a victorious column of New Zealanders from the 25th Battalion got ambushed by a counterattack personally directed by Rommel!  One Valentine caught several rapid shots from their ROF3 guns but 2 managed to ran off!  The New Zealand infantry were caught in the open and were getting shot at, blasted and overranned.

This is an Advanced Squad Leader scenario: 42 Point of No Return.  Unfortunately for my cardboard Kiwis, this is my first real DTO ..

ASL AARASL AARASL AARASL AARASL AAR

DTO is definitely not as open as the mapboards might lead you to think.  There’s light Dust that affects every shot and there’s Vehicular Dust that every vehicle drags around.  There’s also a Mild Breeze in this scenario that creates Drifting Smoke (changed direction too!).  The southern group has kept the bulk of the Germans engaged for 6 turns now.  Unfortunately it’s not quite enough, the Kiwis probably need to tie them down for 8 out of 10 turns to get a victory.  The good news also, is that the reinforcements largely arrived intact from the north.

The small band of survivors in the south are trapped by the German onslaught.  The rest of the armor broke off to the left along the bottom of the map.  The carrier thought about picking up the 8-0, HS & the MMG.  Unfortunately that would burn off too many MPs.  The infantry stepped back and hope to recover the radio and the “double small” carrier sped off.  It was largely shielded by Smoke, Dust, Vehicular Dust and Wrecks.  The carrier headed straight for the German truck with the 50L 5cm PaK 38 onboard.  The two Valentines followed quickly in support ..

ASL AAR

We have 4 German Movement Phases to go.  I thought the Kiwi armor breakout will hold the bulk of the Germans down at the bottom of the map but doesn’t seem like it’s going to be the case.  The 2 Valentines and the carrier were all in CC at the end of the German turn.  One Valentine was NOT in motion and was caught with the German 10-3 “Darth Rommel”.  Darth Rommel alone adds 4 CCV to any squad and practically ripped the Val apart with his barehands!  All the southern Kiwi infantry are wiped out and the Germans start to converge on the final VC to the north.

Will the surviving carrier and the Valentine be able to hold off the Germans longer?

IMG_4176.JPG

Reality was that even though the hedgehog outpost held out til Turn 7, it wasn’t enough to keep the German off the main cluster of VC hexes.  Drifting Smoke and Vehicular Dust wrecked havoc here.  The 2 Valentines down at the Alamo couldn’t keep the German AFVs off the squads.  The Kiwi’s didn’t have anything about ground to keep the Germans from aggregating either.  When the Germans blew the Alamo apart, no one can reinforce the hex and hence we lost at the last turn!

I like this introduction to the DTO though.  The Desert is really not as “plain” as it looks.  Vehicular dust and (in this case) Drifting Smoke make the landscape as variable as Night.

OB9 First Crack at Hellzapoppin’ Ridge

Advanced Squad Leader scenario OB9 First Crack at Hellzapoppin’ Ridge

Bougainville!  The 3rd Marines need to control more Level 4 hexes than the Japanese and wrestle the 2 guns away.
img_3979

Recently updated Advanced Squad Leader AARs, Apr 17 2019

Ongoing

Note : I keep about 10 to 12 scenarios & CGs running at the same time.  While I play 4 of them in weekly live VASL sessions, the rest of them are PBeM.  About half of my games are CGs (some playtest CGs) and the rest scenarios.  I update my AARs as the games roll along and so this is a notice to my readers of AAR updates and completions.

TOT23 This Close to the Sharp End

Advanced Squad Leader scenario TOT23 This Close to the Sharp End

I finally get to play a scenario from the famous Time On Target 2: The Sharp End pack!

img_3992

Tanker Coins for Sale!

I got tired of having to look for the proper number on a d30 dice to track my MP usage everytime my opponent announces “I am shooting.”, only to have the d30 roll lazily away in the mist of the action.

So here we have the Tanker Coin, a much easier way to track MP usage:

Tanker Coins are selling for USD10+Postage, which I don’t imagine to be too much no matter where you are.

To buy one, send me an email at hongkongwargamer-at-speedpost-dot-net with your address & PayPal email and I will invoice you. It’s that simple!

Thanks

May 14 2019 Update : I expect to see the next batch of Tanker Coins mid June at the latest.  It will probably be the last batch I will sell at USD10 each.  There’s already an order list, please contact me if you want yours!

BFP18 Necklace of Pearls

Advanced Squad Leader scenario BFP18 Necklace of Pearls

Next one up in our Bocagefest (BFP Operation Cobra) is another one by George Kelln.  The Americans were still trying to breakout of the neverending Normandy bocages.  This time they need to clear a road from the north to the south in 7.5 turns.  The difference here from the last scenario is that there are now 3 Panthers and they are mobile (*shudder*).  Oh, there’s also this big 81mm ROF3 mortar that, my opponent gleefully reminded me, can be dismantled and loaded onto a Panther.  Sure enough, the mortar scored a critical hit firing through the trees at a Sherman moving behind a Bocage!

.. and the world went quiet for a moment as it rolled slowly to a stop.

img_3945IMG_3957

Gavutu-Tanambogo, Assault Period 4

This is it!!  The last of 4 Assault Periods in the “Sand & Blood” CG.  All Marines have landed.  The Americans win by controlling all land hexes on both islands (IJA has to surface to get land hexes) and not losing more CVPs than the IJA.

img_3942

So I (as the USMC) lost the equivalence of the entire IJA OB in CVPs.  That makes it impossible for me to fulfil the 2 fold Victory Conditions : to hold all land (aboveground) hexes and to not lose more CVPs than the IJA.

I believe landing the first wave on the south part of Gavutu (bottom island) behind the hill was a good decision.  Landing all the remaining groups in Assault Period 3 was a good decision as well because that effectively overwhelmed the defenders with targets.  I was lucky in that we took out the 2 x AA guns on Gaomi early.  That took out the guns from behind our backs as we attacked Tanambogo.

I would have used my fighter bombers more effectively though, to hit the island early as the landing crafts were approaching.  Sighting on units that broke from NOBA would have brought more devastation.  Oh, DCs are precious.  Sinking a few boatloads of DCs in the first Assault Periods resulted in a lot of Close Combats and manpower wasted to guard IJA exit point.

This is a great little CG.  I learned a ton about ASL seaborne assault.

Here’s the whole series:

(Sand & Blood CG is an Advanced Squad Leader campaign about Gavutu-Tanambogo that comes with MMP Rising Sun)