I got up rather early on the last day and so I checked out, took my luggage to the venue and went down to McD for a nice breakfast. I met Benji there. Benji travelled in from nearby via Uber. He told me how he’s been playing Mark Humphries every Friday evening. As a matter of fact John Knowles told me about Benji earlier and said he’s one of those guys who’s been picking ASL up really quickly. Apparently this is his first tournament and he’s enjoying it. He knows there’s a learning curve to be surmounted and he is focusing on getting through the first 100 games. I, on the other hand, is on my 123rd game and I am no where close to NOT feeling like a beginner. I didn’t tell him that.
The China crew
One of the Dare Death editors with his BattleDice
The China crew showed up with 5 players this year (6 including myself). They have already been playing in regional tournaments so they are no strangers to most in attendance. These guys definitely held their own : after all Kyle, Johnny & Xavier are experienced players. Xavier, aka the X teacher, holds monthly ASL classes in a Shanghai game store. However, since he was never before ranked internationally, he is awarded “The Outstanding Newbie” award. Kyle & Zhen “Richard” Wang, are the two chief editors of the Chinese ASL magazine “Dare Death”. We even came in personalised team t-shirts, designed by Xavier.
Jamie Westlake’s Four Dice
One thing a lot of us noticed was Westlake throwing 4 dice at a time. He came in second in the tourney and so whatever he’s doing must have worked. Either that or it’s his superhero t-shirts. We asked him to explain this “Four Dice System”:
“Hi guys…..Aussie convention…..red and white first. Blue and yellow second. If multiple morale checks, top unit red and white, next blue and yellow. Then roll again for third and fourth etc. exception: if you roll HOB, blue and white become HOB resolution. If leader creation, yellow is next. When first introduced to this twenty years ago I hated it. Now I love it…..on a to hit roll, red and white is the hit, blue and yellow the kill. Instant gratification….whack!”
All the “other” folks I’d like to thank
Will Fleming
With so many players coming in from overseas and with a good number of new players, we knew there’s going to be an issue with maps and overlays. Will Fleming worked meticulously to put together good solid printouts of scenario maps on thick paper.
George Bates
George Bates couldn’t make the tournament because of real life issues. However, he’s instrumental to the success of Mayhem in Manila. He pushed through a lot of decisions and set the tone we want to bring forth in these tournaments. He was the one who went to Perry at Multi-Man Publishing and asked for sponsorship. That man showed me how it’s done.
Vlad See
Vlad See did the fantastic Mayhem t-shirts, amongst other things like driving players to airports. The graphics on the t-shirt is actually done by a professional design artist, not that it’s not noticeable.
The Sponsors
The sponsors! Oh my god, the sponsors!! They go such a very long way to make this a proper tournament. I can’t be more thankful of their support.
The Blog of Five Rounds
AP89 To the Pain, Bruce Probst
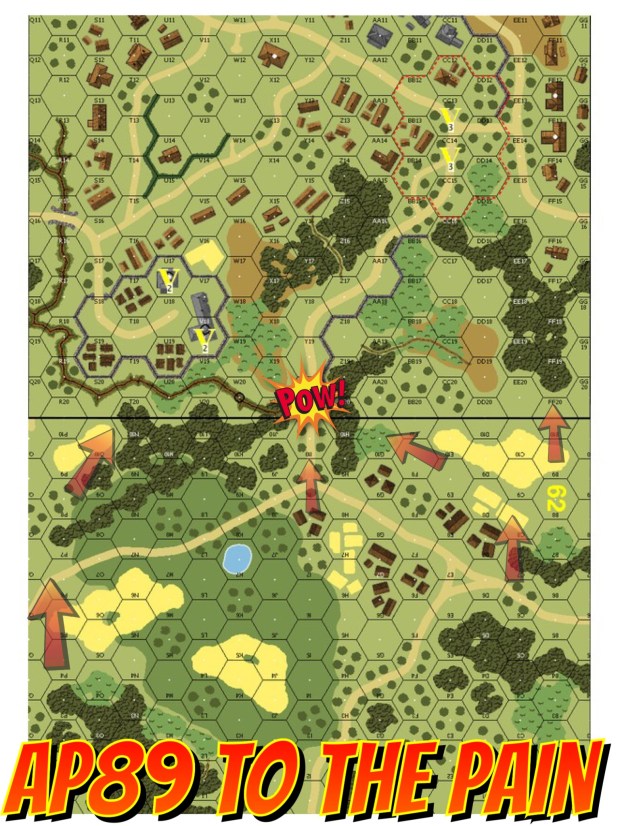
This is a Gary Fortenberry scenario from Action Pack 9 “To the Bridge”. The victory condition is a little out of the ordinary, there are multiple ways you can win. If you fulfil certain number of VC conditions at a certain point in time, the game ends. Otherwise it goes on to the next checkpoint until the 6.5 turn scenario is over.
Bruce Probst was my opponent on this first round. I played him in a Dare Death VASL tourney round before and he’s really one of the nicest chaps you can get matched up with.
If you look the picture above, the locations marked with a “V” are the places that allows the British to score. The arrows show where Probst’s Gurkha Rifles roamed. Probst was probing the left, centre as well as the right. My attention was draw more to the right because my asset allocation was more towards the middle. I don’t worry about the left as much since it’s a much harder terrain to traverse.
Probst took advantage of his mobility and shifted his weight from the left to the centre, where he started focusing on around Turn 3, our first “checkpoint” so to speak. I wasn’t setup very well and so I had no multi-man counters around the middle VC. However, I was confident that I could advance a MMG crew into the area and extend the game to the next checkpoint (from Turn 3 to Turn 5).
As luck would have it, the crew had to roll for an NMC on the Defensive Fire and produced boxcars. It’s easy for me to blame the dice for this but I shouldn’t be in this situation to start with. I should have focused much better on the Victory Conditions.
Focus on the VC!
J150 The Sangshak Redemption, John Knowles
This 5 turn scenario is from ASL Journal 10. Both the Japan side and the Indian / Gurkha’s side get to attack as well as to defend. All the buildings are huts apart from the building in the middle of the VC circle which is a stone church. The IJA wins by winning ownership of the church (even just briefly) and keep two building within the VC circle at game’s end. My opponent was John Knowles, John and I play every Thursday evening, from “Into the Rubble” scenarios to Campaign Game playtests.
Initially, the IJA faced off a weak India setup. I needed to capture the church as soon as possible and to kill those 2 guns, to get into the right positions and to preserve my forces for the Gurkha onslaught. I didn’t move fast enough, I don’t think. I also saw an opportunity to banzai through cover and take out his ordnance. Those ordnance weren’t even pointed towards the banzai’er. Well, that didn’t turn out so well. I was able to pile into one of the Indian squads but neither of the guns.
My guys were off position and then John got a CH on the church from his 76mm mortar.
The expert that he is, he took maximum advantage of the opportunity to push into the church. My IJA couldn’t shoot at all that day, the Gurkhas were stacked and unloading barrages after barrages into the huts that the IJA were holding onto for dear life. In the diagram above, the bottom two arrows were how the IJA made their initial push. The arrows on the top and on the right were the Gurkha reinforcements.
I could have conceded after Turn 3, which was 2 Gurkha Movement Phases after his reinforcement arrived but I fought on. I surprised myself when the battle lasted through to Turn 5 until the necessary IJA forces were KIA’d off the map. To me this is a terrific reason as to why one should never concede. You never know how things will go.
Never concede!
AP59 Taking Heads, Zhen Wang
This is a 6.5 Turn scenario by another Fortenberry pack, Action Pack 6 A Decade of War. My opponent was Zhen Wang. Zhen’s one of the chief editors of Dare Death, the Chinese ASL magazine. The IJA attack down from the top of the map pushing against some ELR2 Philippines Army (“PA”) personnel. They could either win by exiting CVPs off the board, or by a combination of killing US units / capturing buildings (largely to the left of the “Fake HT”.
My issue started before the game even began and is perhaps the key weakness to date in my game. The “weak” Americans also get a 37LL AT Gun and two M3 GMC’s which are halftracks with 75mm guns. If you look at the diagram above, the 2 “bright” red dots are where they were located. The 37LL gun was at the back and never got used. They never really got into the right and is a big reason why I failed to get as many IJA kills as I should when they advance down over the top part of the map. To prevent CVP losses by losing those halftracks, I took them out of play myself. It absolutely obvious but it never hit me until now.
Zhen was able to demolish my PA troops piecemeal all the way back into the village buildings.
Put all your assets into the fight!
ITR1 Debacle at Sungkiang, Akira Lu
I was the defending Chinese in this 6.5 Turn Scott Holst scenario from “Into the Rubble”. My opponent was Akira Lu who is a relative newcomer into the hobby. He came to the tournament with nothing, not even Beyond Valor, but he left the tournament with Mark Humphries’ old Raaco boxes & bag set. I guess he’s finally convinced!
Alan Smee had a quick chat with me about what he saw in my play. He said I need to get as many assets as possible into the fight. I can even fall back into Fortifications but don’t put my assets out of play by putting them the backfields. He told me how he’d do a A103 Mayhem in Manila defence and that point came through loud and clear.
The red points on the map are where I placed my two 76mm artillery.
I put most of my assets forward and engaged the attackers for half the game around the top part of the map. The IJA had to capture 11 of those multihex buildings I won this one by adjudication as we ran out of time. My opponent is a newbie but I could feel the difference from my change in approach.
Push your assets forward, you can always back into fortified positions
AP90 Smashing the Hook, Benji Dayco
This is my other favourite scenario out of Action Pack 9 “To the Bridge”. This is a fast 5.5 turn scenario. The British needed to either destroy both roadblocks or clear IJA units from around the roadblock area.
My opponent was Benji Dayco whom I met that very morning at McD!
I figured we will fight this one in front. I put my 75mm infantry gun on the hill overlooking the first ridge. I had a MMG there in case the gun needed support. I also had HIP units on both sides of the road in front just in case some of these British breaks or if a leader wandered to the wrong place.
This worked out every well. The British seemed torn between running for the first roadblock or fighting it out. I won this one by concession as I had to make for the airport.
Lesson learned.
Defenders can still choose to fight the attackers in the ground of their choice.
Siem Reap, Cambodia?
We did a quick vote towards the end of Mayhem regarding the location of the next tournament. Siem Reap came out to be the winner and Raphael Ferry can’t be more enthusiastic in taking that on.
Siem Reap, home of Le Franc Tireur, does seem to be a top notched idea.
Snake eyes in the shadows of Ankor Wat.
I was chatting with Witchbottles the other day. Given all the issues and problems we have in life, whether personal or professional, to be able to see each other once a year means the both of you probably didn’t have too bad a year. It’s a blessing really.
The ASL fanatics in New England got together two years ago and started building a scenario pack to commemorate 20 years of their involvement with ASL and more importantly, 20 years of their friendship via ASL.
This is truly a pack built by ASL fanatics, for fanatics. As such, standards are very high as these folks are well know players and scenario designers themselves.
One of the first ones that interests me is YASL#1 Full Immersion Baptism (Designer : Carl Nogueira). I was involved in its playtesting. This is the Spanish Civil War, replete with the Republican, the Nationalists, the Condor Legions and Moors with their ability to seek cover in the folds of the ground.
YASL#4 The Twin Pimples (Designer : Andy Howard), it’s British regulars and commandos pitted against Italians in the desert and at night. We are talking about 21 Italians & toys against 10 British squads and 9 commandos.
My first game out of this pack will most likely to be YASL#5 Patrols on the Trail to Hell (Designer Vic Provost) perhaps for no other reason than that I have been a huge fan of Vic Provost’s & the Bunker crew’s PTO design. This is a 5 turn USMC vs IJA jungle action that looks to be a good introduction for newer folks to the PTO terrain.
Oh hey, gritty Ground Snow at Dusk, ’44 Eastern front action in YASL#6 Hein Olshana (Designer : Robert “Kedge” Johnson). I know, you never get tired of ETO. StuGs (with no radios) vs SU76Ms!
YASL#8 Ass Backwards (Bob Tufano & Tom Morin) is the only other scenario in existence (according to ASL Scenario Archive) that features the British Archer. The Archer is a tank destroyer with a 76LL gun pointing BACKWARDS. This is a 6.5 turner that puts Panthers on the German side and plays on the Riley’s Road Map (from ASL Operation Veritable Historical Study).
Tanks ONLY action? You should take a look at YASL#9 Rack’em Up! (Designer : Ted Wilcox). This is German vs American (9 on 9), Jan 1945, Falling Snow and burnt out buildings (read : Open Ground). It’s a fast one with 4 turns. Paratroopers on the IJA? YASL#10 Dropping Topside (Designer : Michael J “Pooch” Puccio). Two German tank destroyers vs SIXTEEN T-34s? YASL#11 Ja, Bix (Designer : Brian “Dr Death” Sullivan). It’s a 5.5 turn where both parties can vary their OB.
YASL13 Die to the Last Man (Designer : Joe Gochinski) features the CG style OB purchases that I was hooked onto since St Louis’s China-Burma-India The Lost Theater pack. The IJA may run or they may fight. It’s up to the British to figure out.
Joe Gochinski is also the designer of one of my favorite scenarios – DB099 The Gin Drinkers’ Line, featuring Hong Kong.
By the way, when I call them fanatics, they are real fanatics. I don’t just mean they play like there’s no tomorrow. This pack features some of the best ASL scenario designers. Carl Nogueira is the designer for CH Dien Bien Phu and for the upcoming Dinant CG, Tom Morin is the designer for Valor of the Guards, Vic Provost (OB14 Pursuing Kobayashi), Stephen Johns, Ted Wilcox, Michael Puccio, Ralph McDonald and Joe Gochinski & the others have long lists of published scenarios inDispatches from the Bunker, the New England ASL newsletter.
Vic Provost – SSR: All Occupants of the Bunker Location are considered Fanatic [A10.8]
The Nor’easter ASL Tourney XX Anniversary Pack is truly a scenario pack designed by fanatics, for fanatics. It’s product that these group of friends can all be proud of. I am actually quite happy about the production (PDF) and the delivery (free & instantaneous). I know a good number of these folks personally, out of which Carl Nogueira spent the most time teaching me how to play properly. I just KNOW I am getting a top notched product. I also wish to show my support and therefore encourage more of these publishing efforts from other ASL groups around the world.
Who knows? We might even see a couple starting to come out of Asia!!
To get your own copy of Nor’easter ASL Tourney XX Anniversary Pack:
The cost of the Pack is $15.00. Please forward your payments to the PayPal account of Carl Nogueira if paying by PayPal or to: Carl Nogueira 7 Green Street New Bedford MA 02740 If paying by check/money order, please make payable to Carl H. Nogueira. If you have any questions regarding any aspect of the scenario pack, please contact Carl at chnogueira@aol.com, or here on facebook.
To get our own subscription to Dispatches from the Bunker:
This scenario took place on Dec 15th 1927, a full 12 years before World War Two. It’s based on some of the earlier conflicts between the Red Chinese and the Nationalists (Guomintang, GMT or Kuomintang, KMT). The conflict took place in Canton 廣東, not too far away from Hong Kong. The Canton Red Chinese overestimated their strategic position, started a general uprising on Dec 12th and the Nationalist Chinese came for a brutal visit.
Carl Nogueira and I played this scenario twice. I was the attacker – KMT Chinese and Carl the Red Chinese. We then switched sides and played it again, you will read about the second one from a later AAR.
The victory conditions of this scenario is structured around the multi-hex buildings on the map. The ones north of the canal are worth 2 points. The ones south of the canal are worth 1 point except for the two building designated as factories. The game ends on Turn 4 if the KMT Chinese get 8 points, Turn 5 for 9 points, Turn 6 for 10 points and Turn 7 for 12 points. The KMT has to accomplish that while losing no more than 24 CVPs.
I planned to focus the main body of my troops to the right. They are to capture the building on the right. From there they can attack the factory immediately to the south of the canal, meeting up with a smaller force on the left flank. Capturing the right building also allows for the possibility of forces wading across the canal for the higher value buildings on the north bank. The small force on the far left is to protect the buildings from possible Red Chinese reinforcement on Turn 3. You see, the Red Chinese can choose to introduce their reinforcements from the north (top) side of the map, or the west (left) side of the map. However if they come in from the south side of the canal, the VP requirements for the KMT drops by 1.
Anyway, that’s the plan .. until bullets start flying.
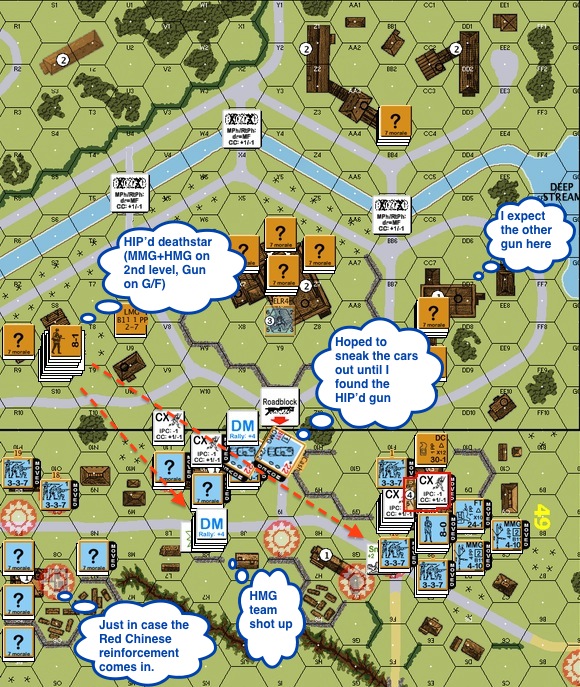
KMT Turn 1 : The KMT rushed across the street. A fearful death star appeared on the left flank in the single hex two storey building I never paid attention to before. On the 2nd level, there was an MMG, a HMG and an 8-1. On the ground level, there’s the 37mm gun sporting an ROF of 3. These guys shot up a few of the squads on the left, rendered my HMG team useless for the duration of the scenario and made the rest of the folks very nervous. The fortunate bit was that the elite Chinese squads were well placed to offer smoke grenades in support.
I was perhaps too careful with the armoured cars. They are 5 CVPs and 7 CVPs (with a 9-1 armour leader) each, points that I hope won’t contribute to the Red Chinese 25 CVP goal. Fearing a gun on the right side of the board, I planned to sneak around the side of the roadblock. However when we ran into the death star, we froze. In retrospect, the 37mm infantry gun has little more than 6% chance (HE only) of killing the KMT Type 22 armour truck (Chris Edwards’ Kill Calculator). Granted, MGs can kill these vehicles but freezing in place is not the proper tactic either.
Red Chinese Turn 1 : Folks in the Red Chinese death star probably didn’t get their ancestors properly lined up. First, a sniper killed the 8-1 .. and then both the MMG and the HMG malfunctioned on the same shot! The concealed squads in the factory advanced out to the walls, which was brilliant. I am not entirely sure why I never made use of the upper levels of the buildings I had to negate the walls.
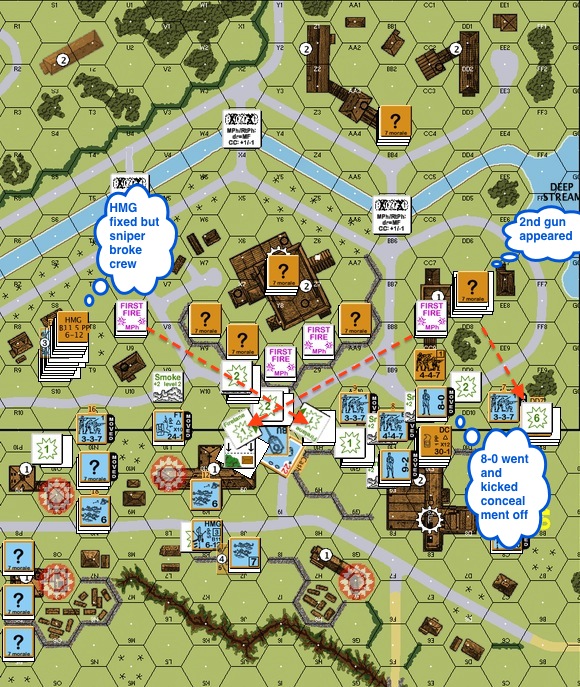
KMT Chinese Turn 2 : KMT attacks! The turn opened with squads advancing into the smoke that the élite squads laid down. A 8-0 leader on the right went across the street and kicked the door in with the squad behind him ready to fire. Other squads moved up and found the second gun at the rear of the building to the right of the map, as expected. You can see the laid and the Red Chinese squads putting down residual fire very efficiently. The deathstar saw the HMG fixed but the sniper returned and broke the crew!
End of KMT Chinese Turn 2 : This showed how ineffective the KMT attack was. Losses was light fortunately, the Red Chinese accrued 4 CVP so far.
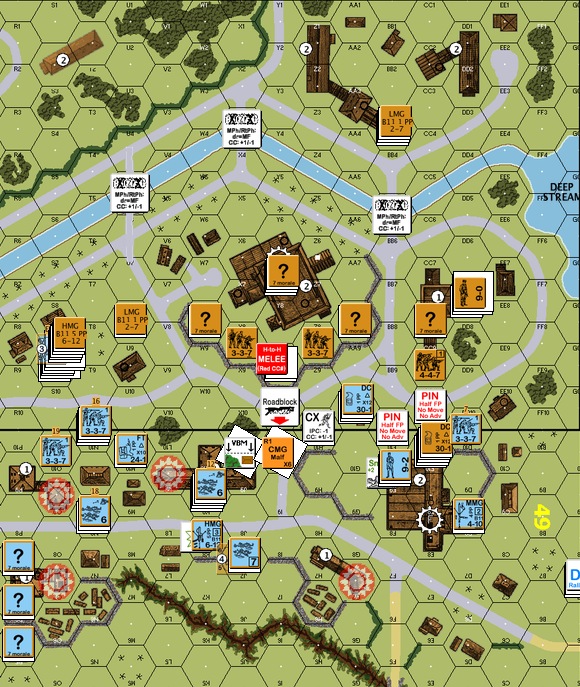
Red Chinese Turn 2 : On the right of the map, the KMT squads in front of their target building hope to survived enemy fire and return a massive Defensive Fire back. The KMT got a MMG team together with a 9-2 and kept the MGs in the death star suppressed. The KMT Chinese were getting ready to attack again.
KMT Chinese Turn 3 : KMT troops advanced forward on the right into the building. LMG fire from across the canal came straight down the street. On the left flank the KMT Chinese figured they should take advantage of the crippled death star and tried to rush the building, only to find the bottom floor fortified. Worse – it’s fortified with a building full of self rallying crew!
End of KMT Chinese Turn 3 : We got into the building on the right. The rush on the left failed as the squad got shot up and bounced off the side of the fortified building. The centre was pretty decimated. The leaders were working hard to convince a few to get back into the fight.
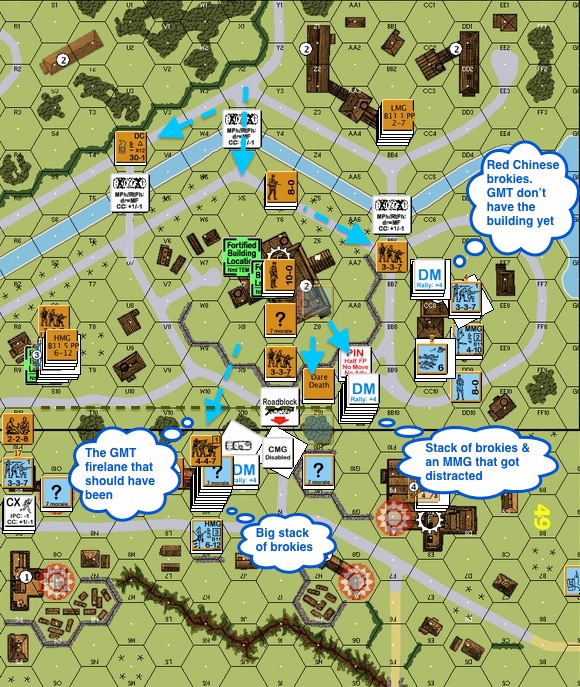
Red Chinese Turn 3 : The reinforcement came in from the north. Things were not looking up for the KMT Chinese. We only had a foothold on the right. The troops on the left and in the middle were broken in huddled masses. KMT didn’t seem to have enough people to make a third try.
KMT Chinese Turn 4 : The KMT made an all out attack for the factory and the rightmost buildings. Whilst they would get the right most building, the KMT Chinese got shot up everywhere else.
End of KMT ChineseTurn 4 : The KMT Chinese captured the gun on the right although they haven’t quite secured that building. The force in the middle were almost entirely reduced into broken stacks. Folks on the right who were there to guard against the Red Chinese reinforcement decided to move north to have a go at the death star. I really like Carl’s demonstration of high level tactics. Here we have a position where, if I attack, makes no contribution to the CVP. However if I don’t, it will always interfere with my attack elsewhere.
Red Chinese Turn 4 : The Red Chinese counter attacked! Can you see the stack with the “DM” counter on top and a grey dotted line that extended to the left? There’s an MMG in the stack and I should have laid a fire lane down that path to stop the Red Chinese from counter attacking. However instead I was distracted by the first squad that rushed up. Now I got 2 big stacks of broken troops threatened by marauding Red Chinese troops. Since the Red Chinese already racked up 25 CVP, the scenario ended and Carl Nogueira won as the defender.
Notice the 2 fortified locations Carl revealed after the game. He had the commissar situated in a fortified location in the middle of the factory. He also had the other fortified hex immediately behind. That last hex would be his “Alamo” before the Red Chinese bow out of the building. Capturing a building like so was going to take a few turns more.
I would have the opportunity to improve my play by being the Red Chinese defenders against Carl’s KMT Chinese.
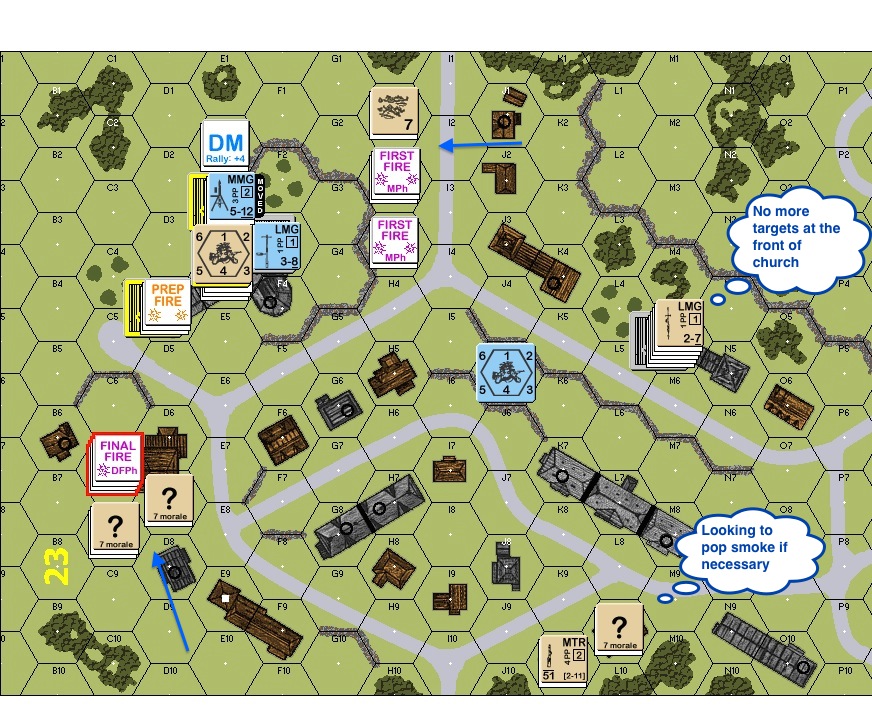
French Canadians from Les Fusiliers Mount-Royal met up with German SS troopers at St. Martin-de-Fontenay on August 1 1944. The Canadians were to clear the SS from a church in the area. I played the Canadians and Robert Zinselmeyer, the SS . This was a 6 turn scenario and the Canadians win immediately when there were no unbroken SS in the church.
This was the Canadian Turn 1 : the Canadian death star contained a heavy machine gun (“HMG”) that went on a long rate tear, obliterating the east side of the church A team of Canadians rushed forward from the northeast. Another team moved around to the south-west of the church to catch Germans routing to that side.
This was the German Turn 2 : the Canadian death star continued to work on the east of the church. Canadians move closer from the northeast and the southwest.
This is the German Turn 3: a half squad attempted to approach the church with a demo pack earlier but was routed. This was the first attempt to retrieve it. The half squad (“HS”) was then KIA’d, as were a number of other Canadian units afterwards. The Canadians never got this demo pack back. The Canadian death star decided to relocate for lack of targets.
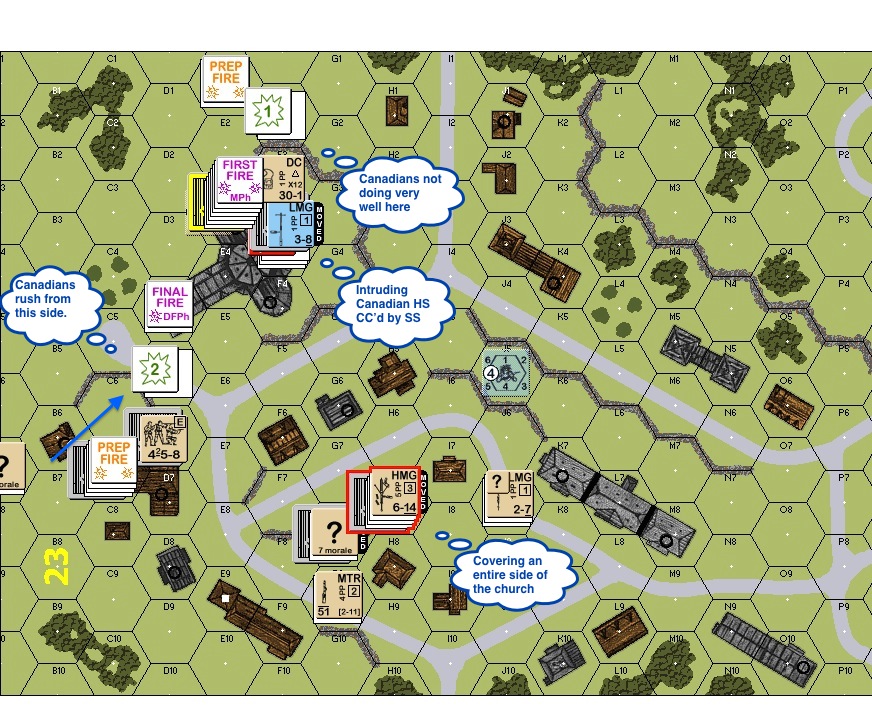
This was the Canadian Turn 4 : The Canadians didn’t do very well on the east side. The lone intruding HS crashed into the church but was immediately met with the SS in close combat!
German Turn 5 : Even though the odds of that mêlée was turning because of reinforcing Canadians from all sides. The Germans were still blocking one of the staircases while the rest raced upstairs.
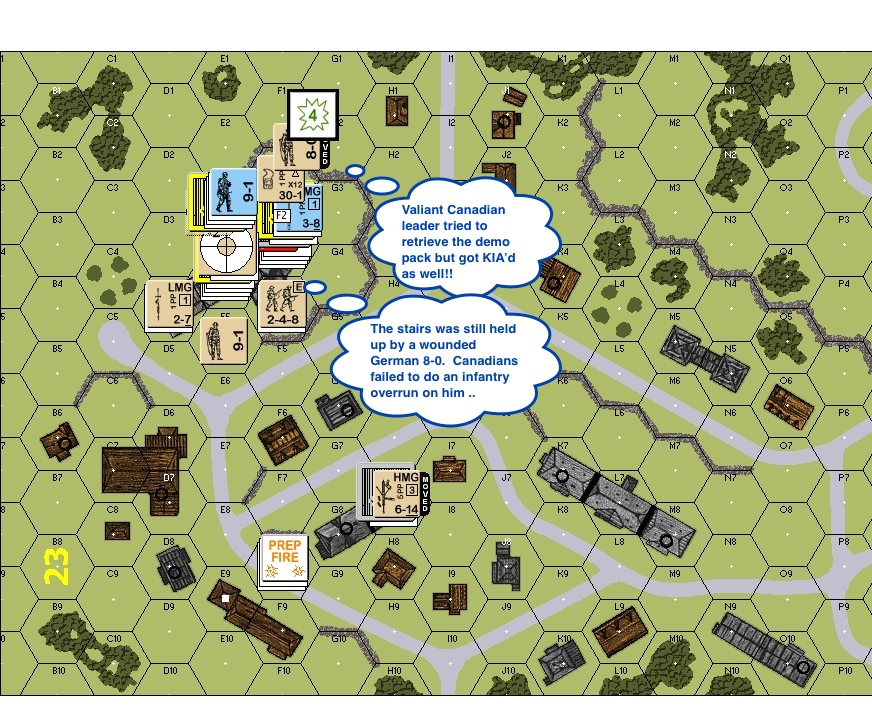
Canadian Turn 6 : A valiant Canadian 8-0 made a desperate try for the dropped demo pack and was killed as well. The mêlée hadn’t ended. Scores of Canadians were held up by a wounded German 8-0 at one of the staircases! Someone suggested an infantry overrun on the wounded German but the Canadians failed to act. It was just too crowded and they were afraid that they might shoot their own. The Canadians rushed up the other staircase in frustration.
Last German Turn : the Canadians were able to dispatch the wounded German 8-0 at the end of the previous turn. All German upstairs were then immediately encircled!! The Canadian laid heavy firepower on the Germans inside the church. The HMG went on a rate tear as well! However when the smoke settled, one German HS remained.
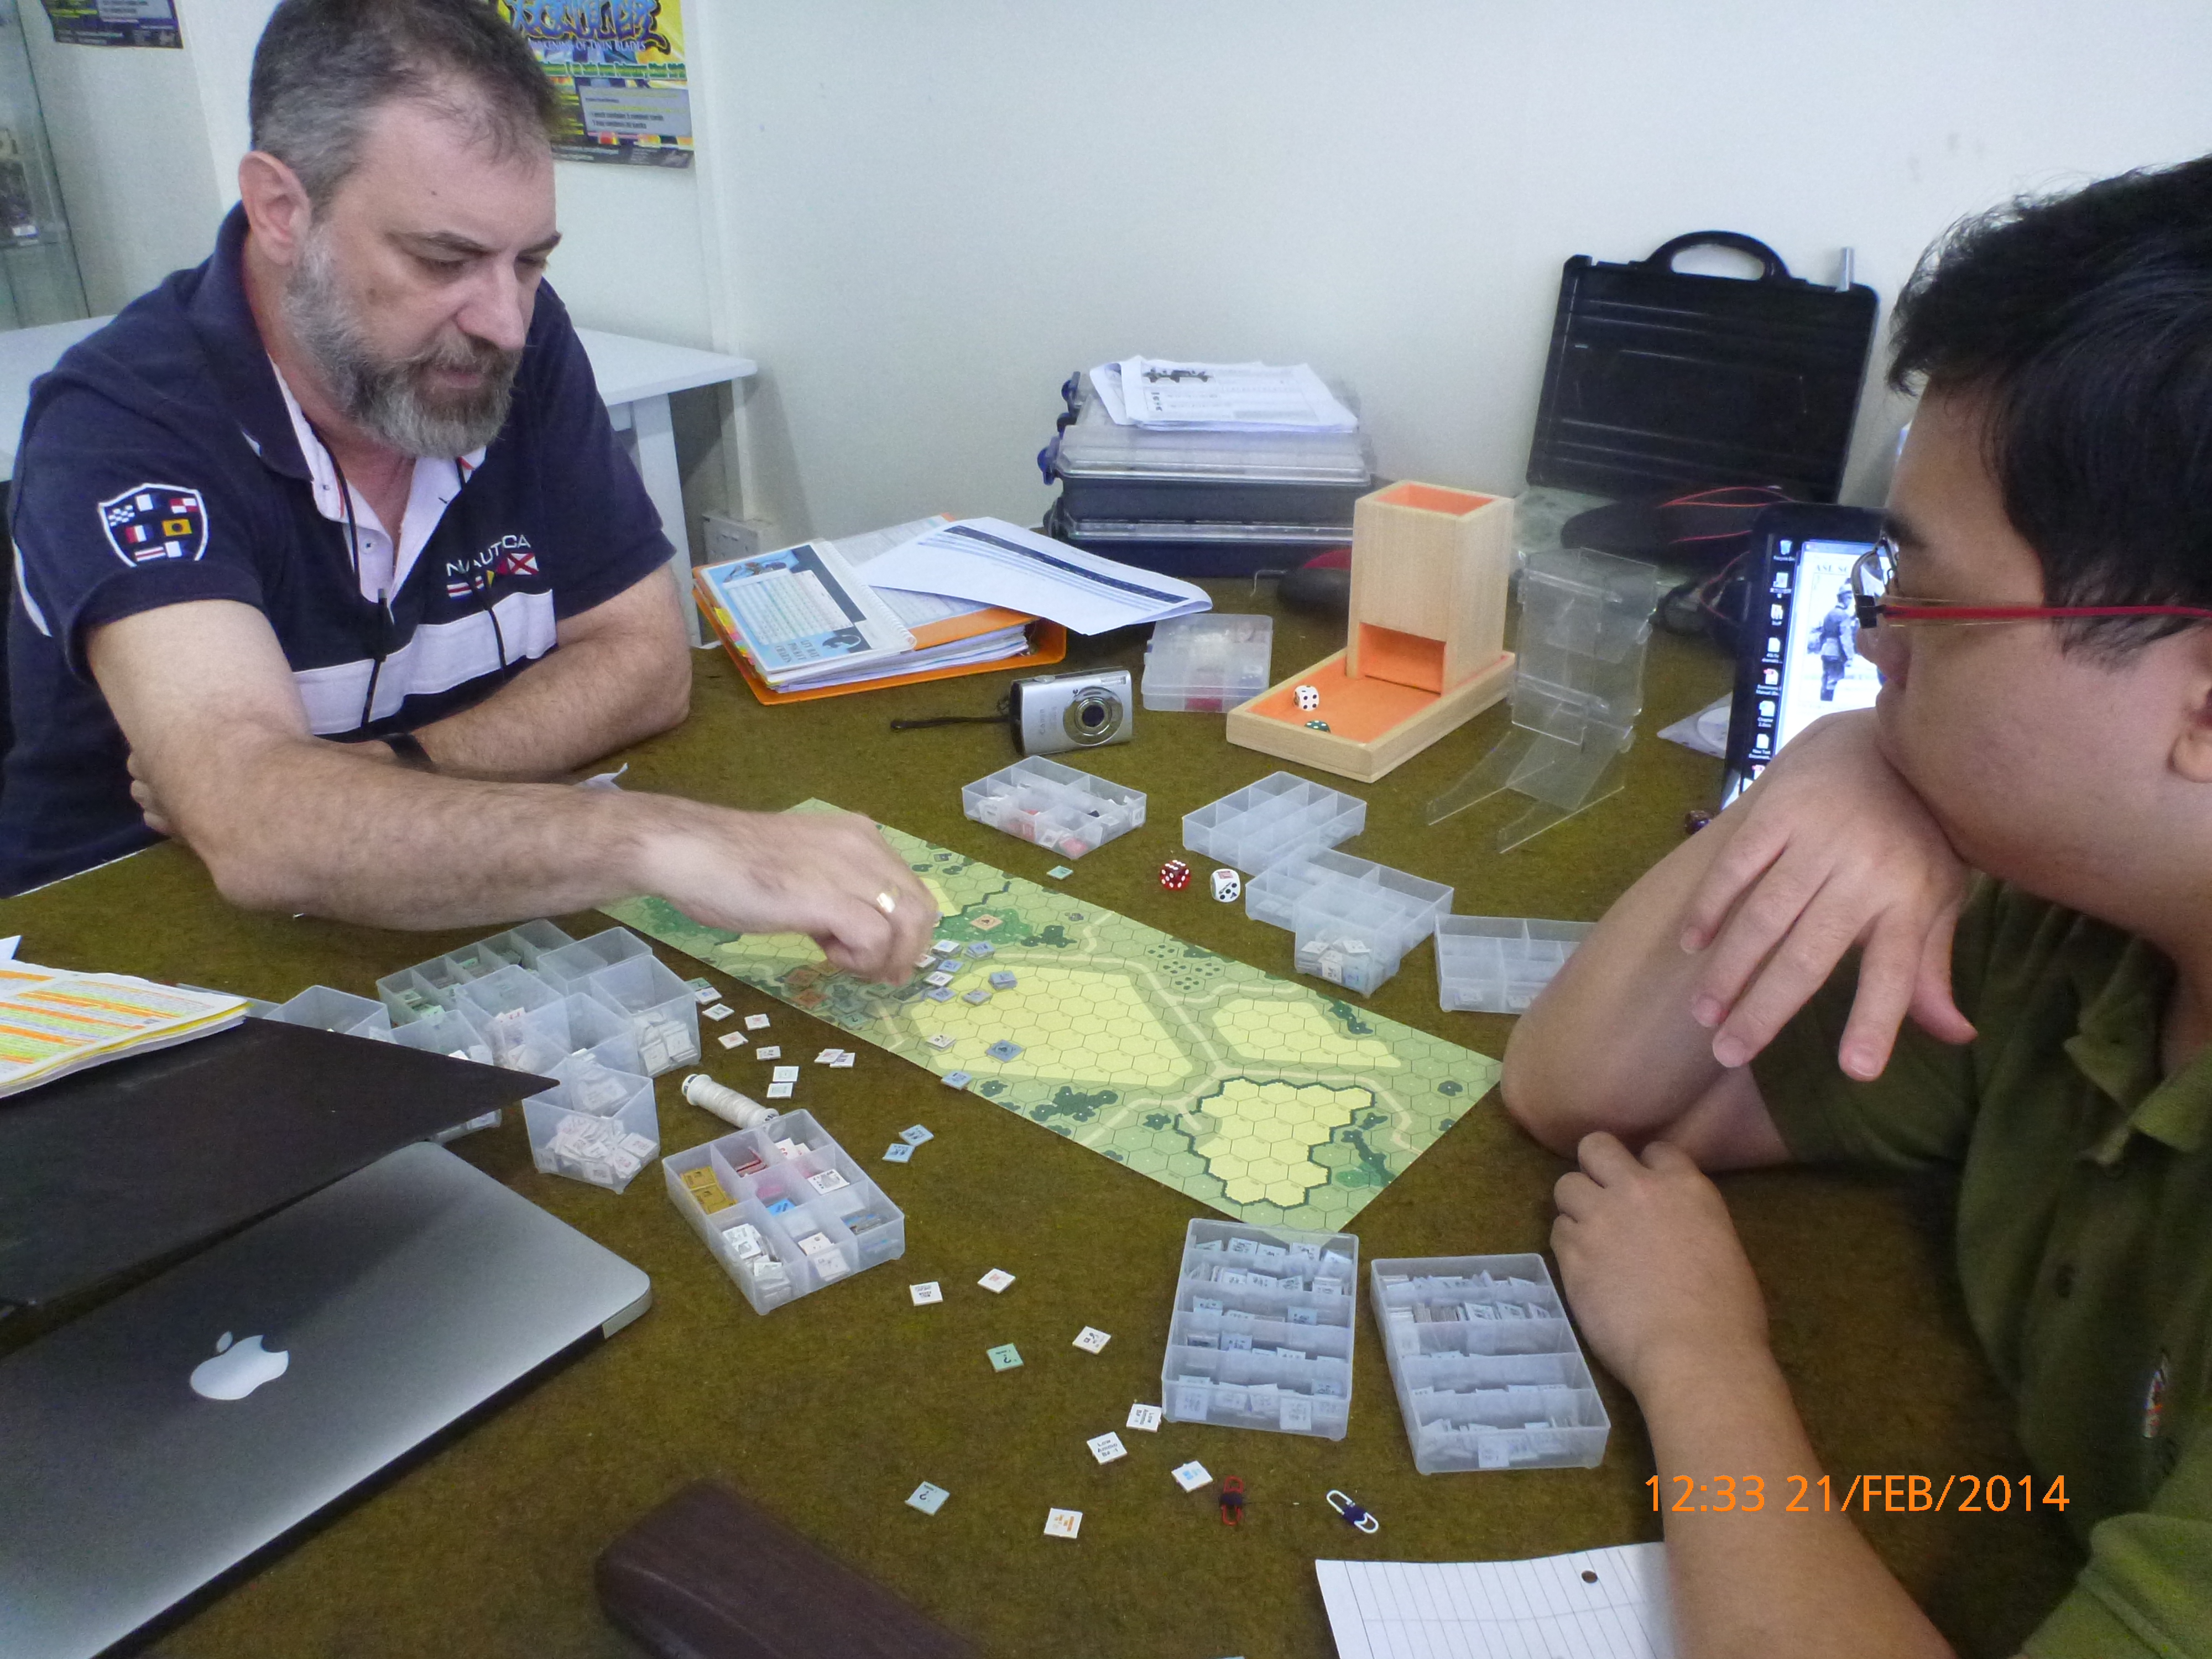
I am here!! I got into Singapore last night and found my way to a bunk that I rented at a “capsule hotel” called “The Pod”. It’s a little hotel where they have bunk beds in big comfortable rooms (with lockers), clean bathrooms and a nice common area. I met up with Peter Palmer late last night and went to the Malaya Madness venue early this morning.
By early I mean I got up at 0530 this morning and met Peter at 0615. We met up with George Bates at 0645 at the Bugis MRT (subway station). Apparently George got a cab lined up. That’s quite fortunate as both Peter and I got a big load of gear to haul over.
I am not going to write much more as I am pretty beat plus I would like to take a look at the scenarios for Round 3 and 4 tomorrow, but hey, pictures speak a thousand words (each) don’t they?
Having said all that : a huge thank you to Perry Cocke and Multi-Man Publishing for sponsoring the event!
This is the venue at 0730 in the morning. Most participants hasn’t arrived.
George starting up the event!
My first opponent Maik Brinkmann
George Bates and Vladimir See
Mark Humphries & David Leong
Ian Percy & Maik Brinkmann
Stanley Neo
Lunch, Singapore style : downstairs outside and spicy
General Eisenhower speaks with members of the 101st Airborne Division on the evening of 5 June 1944 (Photo credit: Wikipedia)
A lot of us has played this Advanced Squad Leader Starter Kit scenario a few times before. This infantry only scenario offers a purist’s exercise in fire and manoeuvre. It also offers both sides the opportunity to attack and to defend. It is my default warm up scenario with any new PBeM opponent, a chance for us to learn about each other before we embark on more complex scenarios.
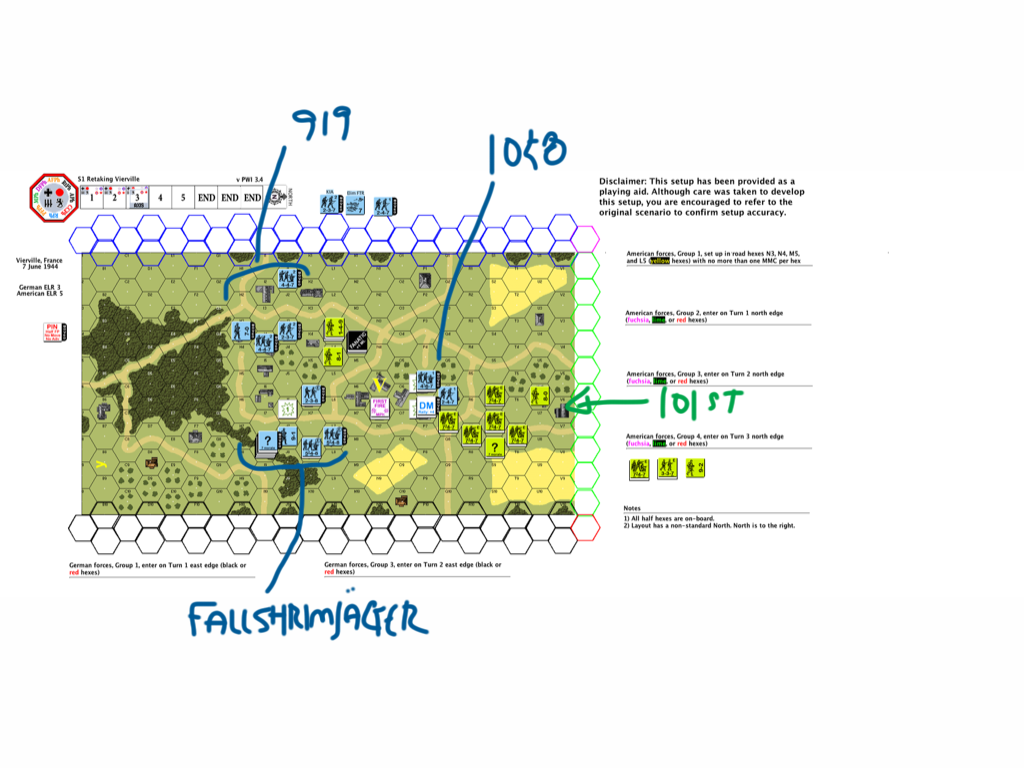
This time I play the Germans and we played with Advanced Squad Leader rules (not Starter Kit rules). In the picture above you see the Germans (blue counters) having returned to the village from the west (top) and the east (bottom). The American 101st Airborne (green counters) reacted by scattering to the buildings on both sides of the key interaction. Some of the American reinforcements had already appeared to the north (right).
As the Germans, the mission for the 1058th Grenadiers in the east (bottom) is to use the open ground to delay the American reinforcements as much as possible. The mission for the 919th Grenadiers is to do the same from the west (top). They were to buy enough time for the tough 6th Fallshirmjäger (paratroopers) Regiment to arrive from the east and take at least one of the four key buildings (circled in red) in the intersection to fulfil this scenario’s winning requirement.
Turn 3 German Movement Phase
Buildings P2 on the top (right) of the map and R7 on the bottom (right) of the map proved to be invaluable in delaying the Americans (both marked in yellow). At the same time the newly arrived 6th Fallschirmjägers planned to isolate the left side of the battlefield from buildings K6 & K8 (circled in red). Their compatriots made the first of three attempts to storm across the street into the key buildings to the right of the intersection. The Screaming Eagles‘ fearsome firepower would make that an exercise in futility. The other German paratrooper platoon sped up the woods on the left towards the top of the map.
Turn 4 German Movement Phase
Again the German paratroopers on the bottom of the map stormed across the street. The 1058th Grenadiers to the right of that building cluster provided diversion. They were still holding the American reinforcements at bay across the open fields though. The squads in building P1 (top) and R7 (bottom) held strong. A Fallschirmjäger platoon was making its way to the top of the map where the Americans in the two key buildings on the southwest (top) of the battlefield felt increasingly isolated.
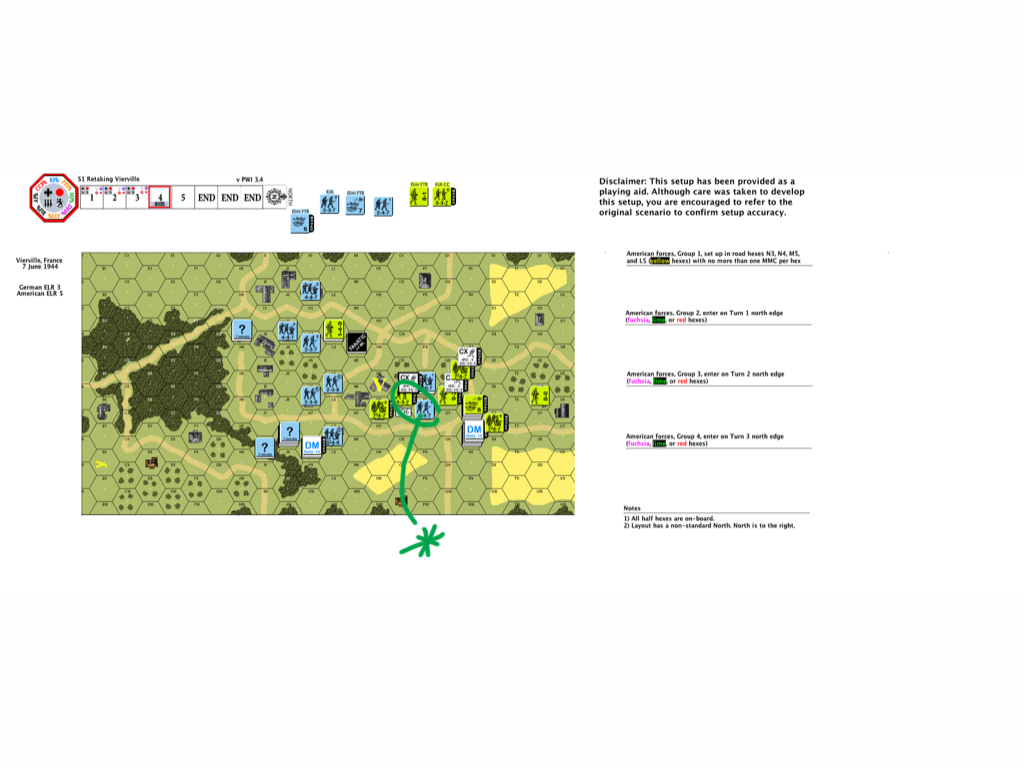
Turn 5 American Movement Phase
This is the last Movement Phase in the game. The Germans paratroopers succeeded in capturing one (red) of the four key buildings on the map in Turn 4, thus already fulfilling the victory conditions. The American reinforcements on the right went all out. The German squads in our top and bottom stone buildings fought a desperate fight but were very thankful of their training in the use of spraying fire.
They held on.
There’s a great deal of material on the internet around this scenario:
I am on more than a few PBeM scenarios at the moment. Some of which has to do with the PTO even, just in time for the release of Rising Sun. When they finish you’ll be the first to see the AARs.
On June 7 1944, one day after the Normandy landings. the 101st Airborne (“Screaming Eagles”) was sorting themselves out from all over the Cotentin Peninsula and was tasked with securing the eastern approach to the American landing at Utah beach. Vierville-sur-Mer was a major traffic thoroughfare. Although the Americans secured it earlier they had to moved westwards towards the German strongpoint of St. Come du Mont (see Mission Albany).
There are three groups of symbols in this map of Normandy. The one on the top left is Utah Beach, the one on the bottom left is St. Come du Mont which was a German stronghold. The group to the right is Omaha beach and a bit inland from Omaha Beach is Vierville-Sur-Mer.
An assortment of German units took the opportunity to deliver a counterattack and among them, the elite 6th Fallschirmjäger Regiment. This day would see an all out brawl at Vierville-sur-Mer, paratroopers to paratroopers.
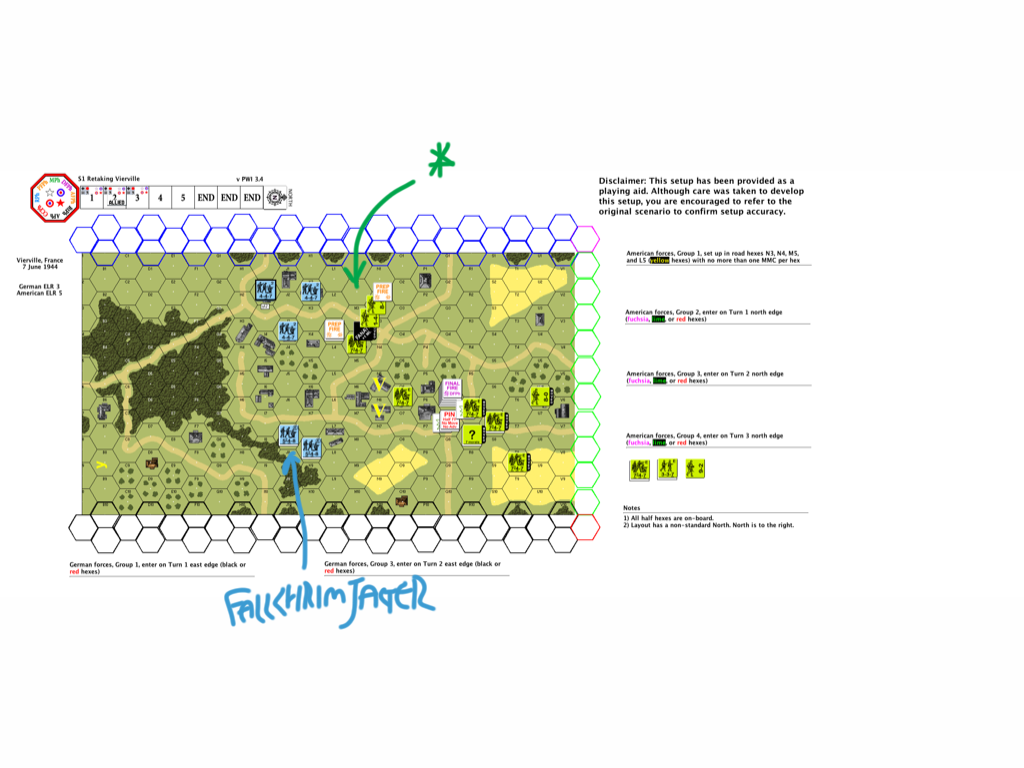
Erwin plays the Germans and I the Americans. We decided to play this Advanced Squad Leader Starter Kit Scenario with full Advanced Squad Leader rules. The Americans win if there are no “good order” German units in the four buildings marked with “V”s on the map. By the same token, the Germans need to keep a “good order” unit in at least one of the four buildings at game end (notice the Americans have the last move).
Turn 1 German Movement Phase
Some elements of the 1st Battalion, 506th Regiment of the Screaming Eagles were making their way through the center of town when German units (1058th & 919th Grenadier Regiments) appeared from different directions. (Right edge of the map is North.)
The Americans went straight to work. Two full squads and the 8-1 leader went to the key buildings in the southwest, the other elements went to the northeast to meet up immediately with the 1058th Grenadiers. The southwest element could potentially be isolated and might find itself fighting a much tougher battle until reinforcements arrive. Their mission was to play for time. The northeast element was to clear the way for the reinforcements and were free to play to their strength in the attack.
Turn 1 American Close Combat Phase
Other American elements started to arrive. They used the grain field (which is in season) to make it across the open ground, using a building for cover. A potential danger was that new German elements might appear behind them and cut them off from their rout paths. So one squad stayed behind in the woods as the rear guard (circled in orange on the map above).
Turn 2 American Movement Phase
A broken American squad on the south west decided to step it up, rallied and went fanatic (battle hardened, marked by the asterick). In their desperation, a hero arose in their midst! The reinforcing Screaming Eagles lost no time in closing with the 1058th Grenadiers on the northeast. Hellbent on blasting their way through, they also drew fire away from their brothers who followed. The German paratroopers arrived from the south east as well. They carefully made their way through the woods towards the sounds of battle. (Right edge of the map is North.)
Turn 3 German Advance Fire Phase
The 919th Grenadiers crossed the street in the south-west and pressured the squads on that corner of the intersection. At the same time the 6th Fallshirmjäger moved to slice the battlefield in half, isolating the 8-1 and his little group. To the north (right edge of the map), the Screaming Eagles couldn’t break through the 1058th Grenadiers. They needed to clear a way to town fast ‘cause the key buildings are falling to the Fallshirmjäger soon, which also means they and their arriving brothers would all be standing outside the grain field with no protection if they couldn’t get into town.
Turn 4 German Rally Phase
The Screaming Eagles managed to get into close combat in the north. A half squad was killed when they went in for hand to hand with a German squad and their 8-1 leader. On the other side of the block an American half squad ambushed their German counterpart when they broke into their building. The Americans slipped through to the other side and met up with the American paratroopers that were holding the Fallshirmjägers at bay. However the American’s hold on the key junction was strained as they endured volleys after volleys of German fire.
So here we are at the start of Turn 4 in a 5 turn scenario. Will the Germans succeed in capture at least one of the buildings at the intersection and hold off American attacks?
How about coming home everyday to 30 mins of PBeM game over VASL?
Whether you are a fellow newbie who would like to learn together or an experienced ASLer who don’t mind helping me up the curve. I play to enjoy and to learn. Please message me at jackson-dot-kwan-at-gmail-dot-com!!
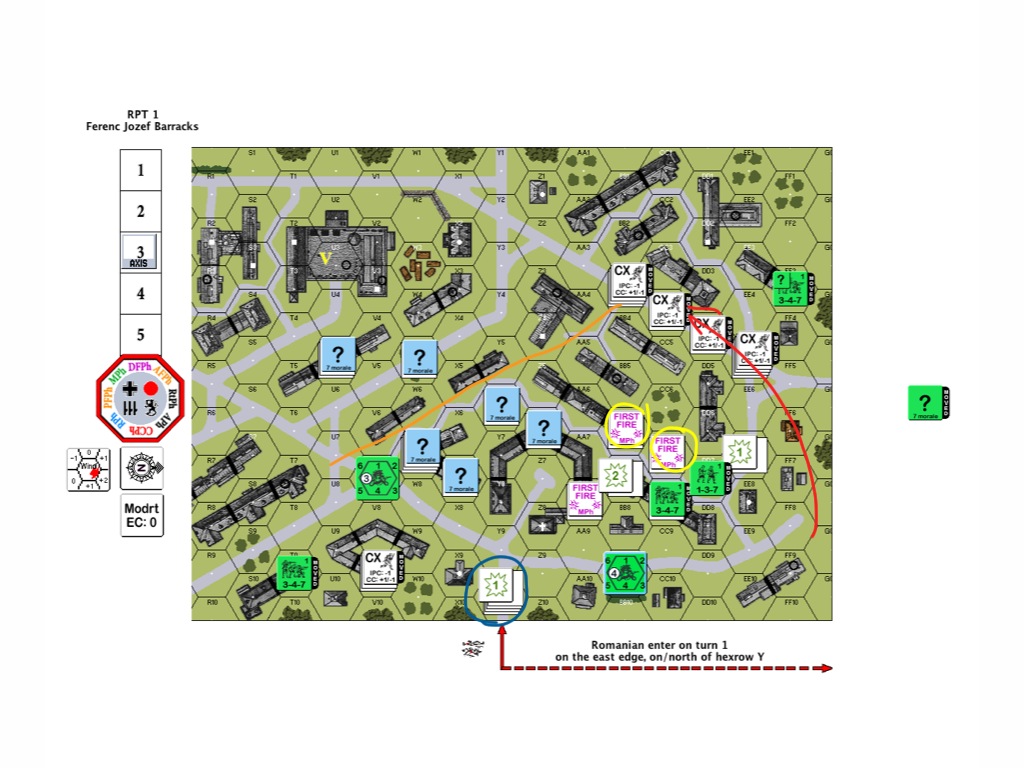
We are back on RPT1 Ferenc Jozef Barracks. Just so everyone remembers, the Romanian 9th Cavalry were the attackers and the Hungarian 1st Tank Division were the defenders. This engagement was part of the horrendous 100 day siege of Budapest. The Hungarians were fighting along Nazi Germany and the Romanians were Russian allies. The goal of the scenario is for the Romanians to capture the barracks (marked with a yellow “V” by Don) seen on the top left of the map within a 5 turn (10 mins in real world) time frame .
Turn 2 Hungarian
The above was what it looked like at the start of the Hungarian Turn 2. The Hungarians started moving back towards the barracks while keeping their guns pointed to areas where their Romanians pursuers would need to cross.
Turn 2 Hungarian DFPh
The Romanian 9-2 squad leader hiding all along together with a squad and a shiny new medium machine gun (in the middle on the bottom, circled in orange) decided it was the best time to come out of concealment and open fire at the Hungarians who came into sight. Unfortunately the MMG went the way of the flamethrower and clonked out on the first volley! Apart from making a mental note to launch a complaint against the armoury after the engagement there wasn’t a lot he could do. The other chaps in the building to the bottom right heard the ruckus and joined in as well but they then realised they no longer had line of sight.
The Hungarian defenders did a beautiful job slipping away towards the barracks whilst staying in concealment. (Note to self : watch & learn)
Turn 3 Romanian
Turn 3 Romanians DFPh
The Romanians orchestrated a series of moves in the hopes of stopping the bulk of the Hungarians from reaching the barracks. On the righthand side of the map, the Romanians successfully kept the 2 Hungarian squads (circled in yellow) distracted while they double-timed a number of squads up the boulevards to the west. They also intended to engage and even kill a few of the Hungarian squads by hand to hand combat where they could.
On the bottom of the map, the fuming 9-2 squad leader and his squad (circled in blue) who were dragging their broken MMG across the street (Note to self: use “Dash” next time) got pinned under heavy fire. So there they were, hugging the ground and cursing up a storm in the middle of the street.
The orange line through the street on top was where the Romanians planned to shoot at the Hungarians who would need to cross over to the next building on their way to the barracks.
Turn 3 Hungarian RPh
The Romanians (circled in red) tried to grab a couple of the escaping Hungarians, but in both instances they were ambushed instead! The Hungarians decided to withdraw and slipped away while the Romanian attackers were still hugging their guns in fright.
So here we are at the start of the Hungarian Turn 3. The Romanians have only 2 turns left and the Hungarians has done an elegant job in slipping away intact as a force while mostly staying under concealment.
Will the Romanians catch up to the Hungarian masters of defence? Keep an eye out for Part 4 of RPT Ferenc Jozef Barracks!
How about coming home everyday to 30 mins of PBeM game over VASL?
Whether you are a fellow newbie who would like to learn together or an experienced ASLer who don’t mind helping me up the curve. I play to enjoy and to learn. Please message me at jackson-dot-kwan-at-gmail-dot-com!!
It’s only after a month later when I realize the true value of his words. I went back to him and he gratefully gave me the permission to repost what he told me for the benefit of all.
So here we go …
The Best advice garnered from many an ASL’r much better than I:
Read the rules, pick one chapter every month and read front to back, including footnotes. (Credited to Carl Noguiera)
Follow the time-honored “programmed instruction” (“Eight steps to ASL – A programmed instruction approach”, The General, v30n1) Basic infantry; MGs and SW; terrain variations; guns and mortars; Vehicles and AFVs; Climate changes; Air support; then paras and gliders; night ; then PTO; finally DTO . The system was designed by Jim Stahler, and it works! (Jim Stahler – remember that German 9-2 counter?)
Read EVERYTHING you can get your hands on about ASL:
the SoCal ASL club websites to look at AARs on any scenarios you are planning to play for the first time.
Use ROAR to understand play balance; use the ASL Scenario Archive advanced search routines to find scenarios to fall into the above mentioned order of learning.
It will go quick if you used to play Squad Leader. Big changes are in the vehicles, Guns, and defensive fire and support weapon mechanics. Walking in with Squad Leader – GI Anvil of Victory you have about 10% learned. ( the rest will be no longer used).
Play, play, and oh yeah …. PLAY. the more the merrier, and the most diff opponents you can find! (Credited to Gary “Fort” Fortenberry and many, many others!)
KRL, Jon H
How about coming home everyday to 30 mins of PBeM game over VASL?
Whether you are a fellow newbie who would like to learn together or an experienced ASL’r who don’t mind helping me up the curve – please message me at jackson-dot-kwan-at-gmail-dot-com. I play to enjoy and to learn!!
"A15.1 The cauldron of battle, which destroyed so many units that failed the test of arms, could also forge better soldiers and/or acts of desperation borne of heroism or despair."


 This is a Gary Fortenberry scenario from Action Pack 9 “To the Bridge”. The victory condition is a little out of the ordinary, there are multiple ways you can win. If you fulfil certain number of VC conditions at a certain point in time, the game ends. Otherwise it goes on to the next checkpoint until the 6.5 turn scenario is over.
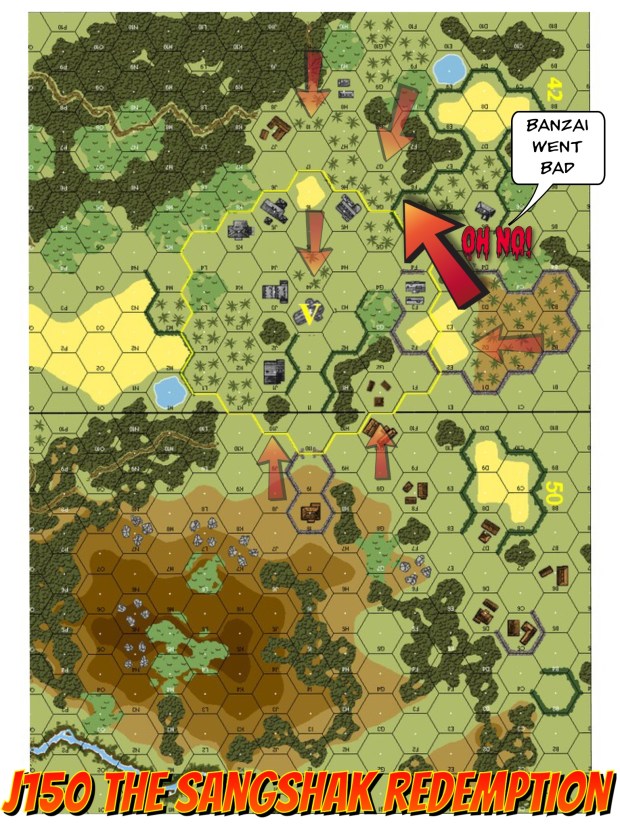 This 5 turn scenario is from ASL Journal 10. Both the Japan side and the Indian / Gurkha’s side get to attack as well as to defend. All the buildings are huts apart from the building in the middle of the VC circle which is a stone church. The IJA wins by winning ownership of the church (even just briefly) and keep two building within the VC circle at game’s end. My opponent was John Knowles, John and I play every Thursday evening, from “Into the Rubble” scenarios to Campaign Game playtests.
 This is a 6.5 Turn scenario by another Fortenberry pack, Action Pack 6 A Decade of War. My opponent was Zhen Wang. Zhen’s one of the chief editors of Dare Death, the Chinese ASL magazine. The IJA attack down from the top of the map pushing against some ELR2 Philippines Army (“PA”) personnel. They could either win by exiting CVPs off the board, or by a combination of killing US units / capturing buildings (largely to the left of the “Fake HT”.
 I was the defending Chinese in this 6.5 Turn Scott Holst scenario from “Into the Rubble”. My opponent was Akira Lu who is a relative newcomer into the hobby. He came to the tournament with nothing, not even Beyond Valor, but he left the tournament with Mark Humphries’ old Raaco boxes & bag set. I guess he’s finally convinced!
 This is my other favourite scenario out of Action Pack 9 “To the Bridge”. This is a fast 5.5 turn scenario. The British needed to either destroy both roadblocks or clear IJA units from around the roadblock area.

 YASL#8 Ass Backwards
 Who knows? We might even see a couple starting to come out of Asia!!