1 Fighting Withdrawal

I finally get to play one of the most oft played ASL classic, the first scenario in Beyond Valor: 1 Fighting Withdrawal.  I see almost 600 games reported on ROAR!

I got the Finns and my new-ish opponent got the Russians and the balance – ie the Russians do NOT suffer from ammo shortage.  The Finns need to exit more VPs than the Russians in 7 turns!

20190110 - bl lee - 1 fighting withdrawal - 015img_3851


FrF45 Totensonntag

This is one of the more popular Friendly Fire scenarios.  It’s Poland, September 1939 and the Poles launched an offensive against a German flank.  The Poles win if 6 or more German squads equivalents are eliminated or captured.  Each wooden building containing => 1 Polish squad equivalent equates to a German squad eliminated.

IMG_3651

40 Fort McGregor

I am finally doing DTO!!  Unfortunately for me, my first DTO scenario is also a Night scenario, something that I am not very well versed with.  Then again hey : I have a GREAT opponent, so the best time is definitely now.

This scenario is an ASL classic.  The Germans win by scoring 20 CVPs more than the Brits and by controlling the both Hillock summit.  There’s a bombardment before the German turn but it really didn’t do much!

NVR’s 3, the Germans crept in…

img_3149

My opponent conceded. Onto the next one!

DB133 A Deadly Landscape

This scenario is played on part of the Red Barricades map.  SAN starts at 4 for the Germans and 5 for the Russians and increases to 5 & 7 respectively on Turn 2 and 6 & 8 on Turn 4.  The Russians are given the chance to open the attack but German reinforcements will come in on Turn 3 (of 5).

They largely compete for the buildings, trenches, rubble, bridge & storage .. but every sniper kill counts as well.

img_3146

KGS10 Red Ruins Roulette

In this scenario, the Russians win if they control the GPU prison (see the cluster of German concealment counters around KK35) and/or Block 31 (marked on the Map) in 5 turns. Historically Block 31 was notorious for being sniper infested, so any Sniper that situates in Block 31 Pins on a dr of 2 AND 3.

T001 Gavin Take

In this scenario, the US Paras win if they exited 1 or more squad equivalent and more Leader out hex Q10, which is where the road exits in the middle of the map. Any German exits increase the exit requirements for the US.

BPF30 Melee Near The Coast AAR – the superior mobility of the IJA

The time was 25 August 1937.  This was the second time the IJA attacked Shanghai.  The IJA Shanghai Expeditionary Forced landed troops around Liuhe (浏河), Wusong (吳淞) and Chuanshakou (川沙口) as a diversionary to draw GMT troops away from Shanghai.  This scenario depicts an engagement where the IJA troops pushed rapidly inland to encircle Shanghai.

This was a 7 turn scenario in which the IJA needed to control 10 or more buildings at the end.  The GMT (Chinese) had 13 first liners, 1 MMG and 1 LMG led by an 8-1 and an 8-0.  They were reinforced by 4 elite squads with 2 other leaders on Turn 4.  The IJA started with 13 first liners led by 3 leaders.  They were reinforced by a platoon of elite squads plus another leader on Turn 3.

There was an eastern approach for the IJA (top of the map).  That approach led through jungles paths and onto a hill before a group of target buildings.  There was also a western approach where the IJA had to navigate across a shallow stream and fight their way out of a depression.  I guessed the eastern approach would be guarded heavier as the trek was slightly easier and targets richer.

I deployed with 60% of the IJA troops on the east side and 40% on the west with 2 squads HIP’d.  Hopefully that would cause the GMT to lean a little towards the east.

IMG_1089

Chinese Turn 1: Calamity hit the attackers almost immediately.  An observant GMT sniper seek out the highest ranking (10-0) IJA officer amidst a concealed stack and put a round through his head.

Not that it bothered the troops too much, they stayed out of sight a little and continued moving on.

IMG_1090

Chinese Turn 2: As the IJA approached the Chinese forces, an IJA HS was indignant that these brothers of the Greater Asia Co-prosperity Sphere shot at them.  They went berserk but their target GMT squad routed away.  A concealed GMT squad then moved in but failed to ambush the fuming mad IJA berserkers.

IMG_1091

IJA Turn 3 : The IJA decided to Banzai through the bottleneck on the left flank around the lake.  They almost immediately ran into a dangerous “Banzai” trap – a previously concealed stack of high fire power GMT that killed the led Banzai troops and threaten to suck in more.  Good thing I was able to avoid having an IJA leader sucked into that hex.

IMG_1092IJA Turn 3 still : The IJA on the right flank begin the second Banzai to motor across the shallow stream!

IMG_1093

IJA Turn 4 : The turn would see the right flank of the IJA banzai the rest of their troops over the shallow stream.

IMG_1094

IJA Turn 4 still: The left flank answered with a Banzai to the center of the board and not directly up the hill itself.  This was where I channelled my inner IJA and looked to infiltrate!

IMG_1095

IJA Turn 5 (errata – picture is wrong): The right flank banzai’d over the hill and looked to encircle the GMT defenders.  Unfortunately it didn’t quite work out.  Always an issue banzai’ing in the open.

On the otherhand, the left flank got up (and around) the hill and encircled the defenders there.

IMG_1096

Chinese Turn 6 (errata -picture is wrong) : Quick as you might think the IJAs were, I began to run out of time. I shift the IJA troops from the right to the left in preparation for the final push.

But look – the GMT ran a couple of squads and a leader around the IJA right flank and threatened to reclaim the buildings again!

IMG_1097

IJA Turn 7 (errata again!) : The IJA did a massive Banzai charge on the left flank into the cluster of target buildings behind the bamboo forest.  GMT troops in the jungle to the west put up a ferocious volume of fire! The IJA couldn’t get into all of those buildings (missed 1, IJA pinned).

IMG_1098

The End : At the close of IJA Turn 7 – the IJA got 9 buildings but stood to lose a few more in the counter attack – plus looked to lose 2 to 3 more to the GMT troops reclaiming buildings to the north (left of board).

It was a great game played with Peter-James Palmer in Australia.

PBP02 The RHA at Bay AAR – a fighting withdrawal!!

This was May 27 1940.  German mechanised units chased Allied forces through Belgium and northern France.  A detachment of the 5th Royal Horse Artillery found themselves to the immediate south of Dunkirk with 80 men from a searchlight unit and Germans units threatening to overrun. PBP02 is part of a scenario pack created by the Paddington Bear ASL Club in Australia.  I had a look through them, there are good number of PTO scenarios that never fails to draw my interest but overall the Paddington Bears often portray interesting tactical situations. PB2 Start-proc This was the setup. The German wins if both British guns were eliminated and more than 10 CVPs of Good Order Germans exit off the east edge (right edge of the map). It’s a draw if both guns were eliminated without the requisite exits. There were two nice locations to where the guns could be emplaced : both were orchards with stone walls. I had the two ATRs positioned to not take immediate fire but to be where they would cause the most delay. Their threat was more powerful than their actual effectiveness against German tanks. So here we are: eight British second liners (they were search light operators) and two guns against ten German élite and first liners plus five tanks. Turn 2 Ger 02 - EoT Berserk Germans Brit Right Wing collapse-proc German Turn 2: The British reserves moved up to front line positions after seeing how the Germans commit. The British right flank got shot up pretty bad. All that was holding that side up was a British second liner. The Germans used smoke and cover well but a squad got tired of the searchlight operators shooting back and promptly went berserk. Turn 3 Ger 01 - ATR Left bounced Berserker died Folks keeping huns at bay while comrades rally-proc German Turn 3: The berserkers charged! You can see how they made their way straight into the first stone building only to be cut down when they got to the house. The single British second liner continued to hold up the right flank while their compatriots were busy rallying. The first German tank rounded the corner on the British left flank and the ATR team got to work, only to bounce a round off the tank. German tanker: “That wasn’t even scary.” Turn 3 Brit 01 - Units fall back left Greenies in front.-proc

British Turn 3: The British were in general retreat .. erm .. retrograde.  The idea here was to stay ahead of the Germans and get to the next building before the Germans get their guns on and to keep the inside lines open.  On the right, a rallied British green squad switched a second liner out as the rear guard.  These guys would see a few medals before the day is over.  

Turn 4 Ger 01 - tank bounce off ATR shot but got nailed by gun-proc

German Turn 4: The action heated up on German Turn 4. On the British left, a German tank tried to get to the back field. The British ATR team held their shot until the tank went to the other side of the building. However they bounced a second round off the German tanks even when they had a side shot. The 18 pounder (typo in the picture) on the British right “appeared” and wrecked the German tank in the Defensive Fire Phase.

Turn 4 Bri 03 - G folks killed Ger 1st line-proc

British Turn 4: The British green squad on the right dispatched the German first liners who held them in melee!! The rest of the British squads got to the last line of buildings. They cut it quite close, as the Germans shot some of them between the gaps. The British continued to get to positions that were a little out-of-the-way but cover grounds the Germans would move into.

Turn 5 Bri 01 Gun appears WP ne.  fire & fun, concript died earlier-proc

British Turn 5: The Germans started building a death star on the British left and the left British gun appeared!!  It promptly put a round of white phosphorous into the building. The British ATR teams repositioned towards buildings where they could prevent the German tanks from exiting. On the right, the malfunctioned British gun couldn’t be fixed and was eliminated from the game. The Germans sent another squad in on the right flank and killed the pesky British green squad that was holding up traffic but these heroes had already saved their brothers.

Turn 6 Ger EoT-proc

German Turn 6: The Germans were almost of top of the British now. A German tank got inside the British lines but one ATR team was broken and the other one couldn’t get close enough.  Good thing the white phosphorous forced the German death star to move.

Turn 7 Ger MPh-proc

Turn 7 Ger CC Got the gun!!-proc

German Turn 7: The Germans got up to the right ATR team and was wrecked at pointblank range! The Germans rushed up on the British left as well. They advanced up and captured the gun hex in the CC phase!!

Turn 7 Brit End .. KIA'd-proc

British Turn 7: The British couldn’t let the Germans have a fire phase to spike the left gun.  The British squad fired pointblank and KIA’d the squad!  This led to an interesting revelation after a few rounds of discussions on the forums.  There’s no way to kill the gun by small arms fire without a crew / possessing infantry (A9.74) present!  So the only chance of the Germans getting a tie is to kill it with the tank ordnance. 

We never got to that so here we go.  It’s a three hex range with an infantry target.  The base TH is 8.  The gun was emplaced, so there’s a +2 DRM. 

snakes

SNAKES!!  The Modified TH# is 8 .. rolled a 2+2 which is not less than half but it’s an original 1,1 nonetheless.. so we need a subsequent roll ..   subsequent That’s equal to half the Modified TH# of 8!!  CRITICAL HIT!!!

As AZslim pointed out to me on GameSquad, guns (and crew) are automatically destroyed on Critlcal Hits.  So both British guns were gone.  This game went all the way to the last roll – and it’s a DRAW!!

Gotta admit, this is some finish!!  Witness the narrative power of an ASL game – and that’s why we love it.

J116 Brigade Hill AAR, a PTO classic!


J116 - Setup-proc
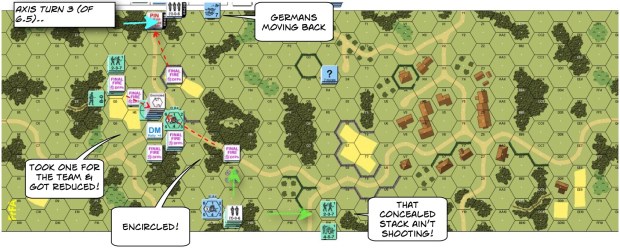
This is a game that I setup earlier in the year when I found that J116 Brigade Hill was going to be one of the scenarios in the Malaya Madness tourney.  Erwin & I managed to do a few turns before the Malaya Madness and sure enough, Brigade Hill was my last game at the tourney.

The Battle for Brigade Hill was part of a campaign where the IJA pushed the Australians along the Kokoda trail towards Port Moresby, Papua New Guinea, during the Second World War.  The IJA setup a blocking force between the Australian brigade headquarters and its forward battalions.  The cutoff Australians were therefore asked to reestablish contact with their headquarters.

I played the IJA and my buddy Erwin from Belgium, the Australians.  The Australians had to take 3 or more of the hill tops marked with “V”s.  The fourth “V” that you can’t see from the map above was under the foxhole on the top right.  This setup is taken from Chris Doary (of BattleSchool).  The Australians came in from the right.  The big hill was tough to defend apart from a reverse slope setup.  In this instance the big hill was left bare and covered by 2 medium machine guns from the hill on the top left and a mortar from the bottom left.  This channelled the Australians through the jungles on both sides of the big hill, ideal IJA country.  I put a HIP (“hidden initial placement”) in the second most likely frequented clump of jungle on the big hill.

J116 - T2 IJA - End Vol Breaks-proc

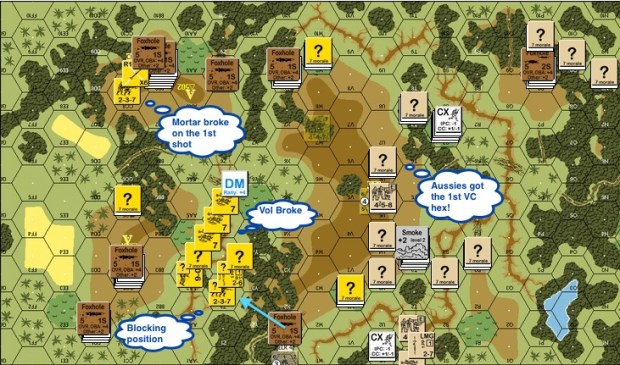
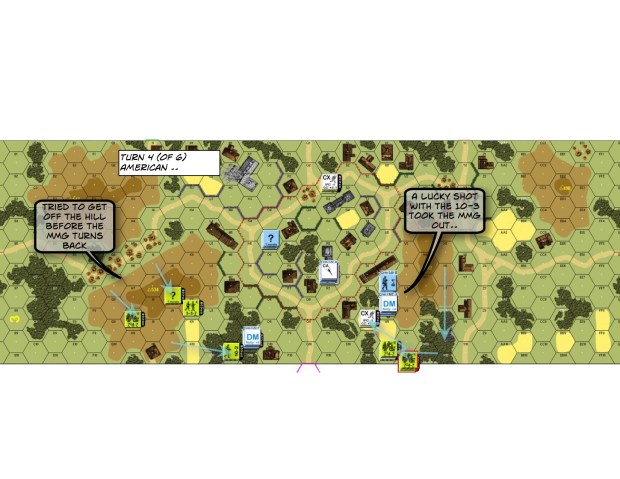
End of IJA Turn 2 : The Australians advanced carefully to their first VC position and probed the right IJA flank.  The mortar from the top right hill opened fire but it broke on the first shot.  The IJA chucked it down the hill in frustration.  The IJA on the right flank voluntarily broke and melted away into the jungle, looking to use the gully as the second line.

J116 - T3 IJA - Blocking on right Shoot Brits off Hill top Reinforcement entered 02-proc

End of IJA Turn 3: Guns and mortar from both of the small hills start shooting Australians off the big hill-top.  Reinforcements from both combatants entered.  The IJA chose to enter in the “back field” to help defence on the left flank and to tie some Australian units down.  The units on the right flank got into a blocking position and would gain concealment before the turn was over.

J116 - T4 IJA - ? 237 ambush 458 squad-proc

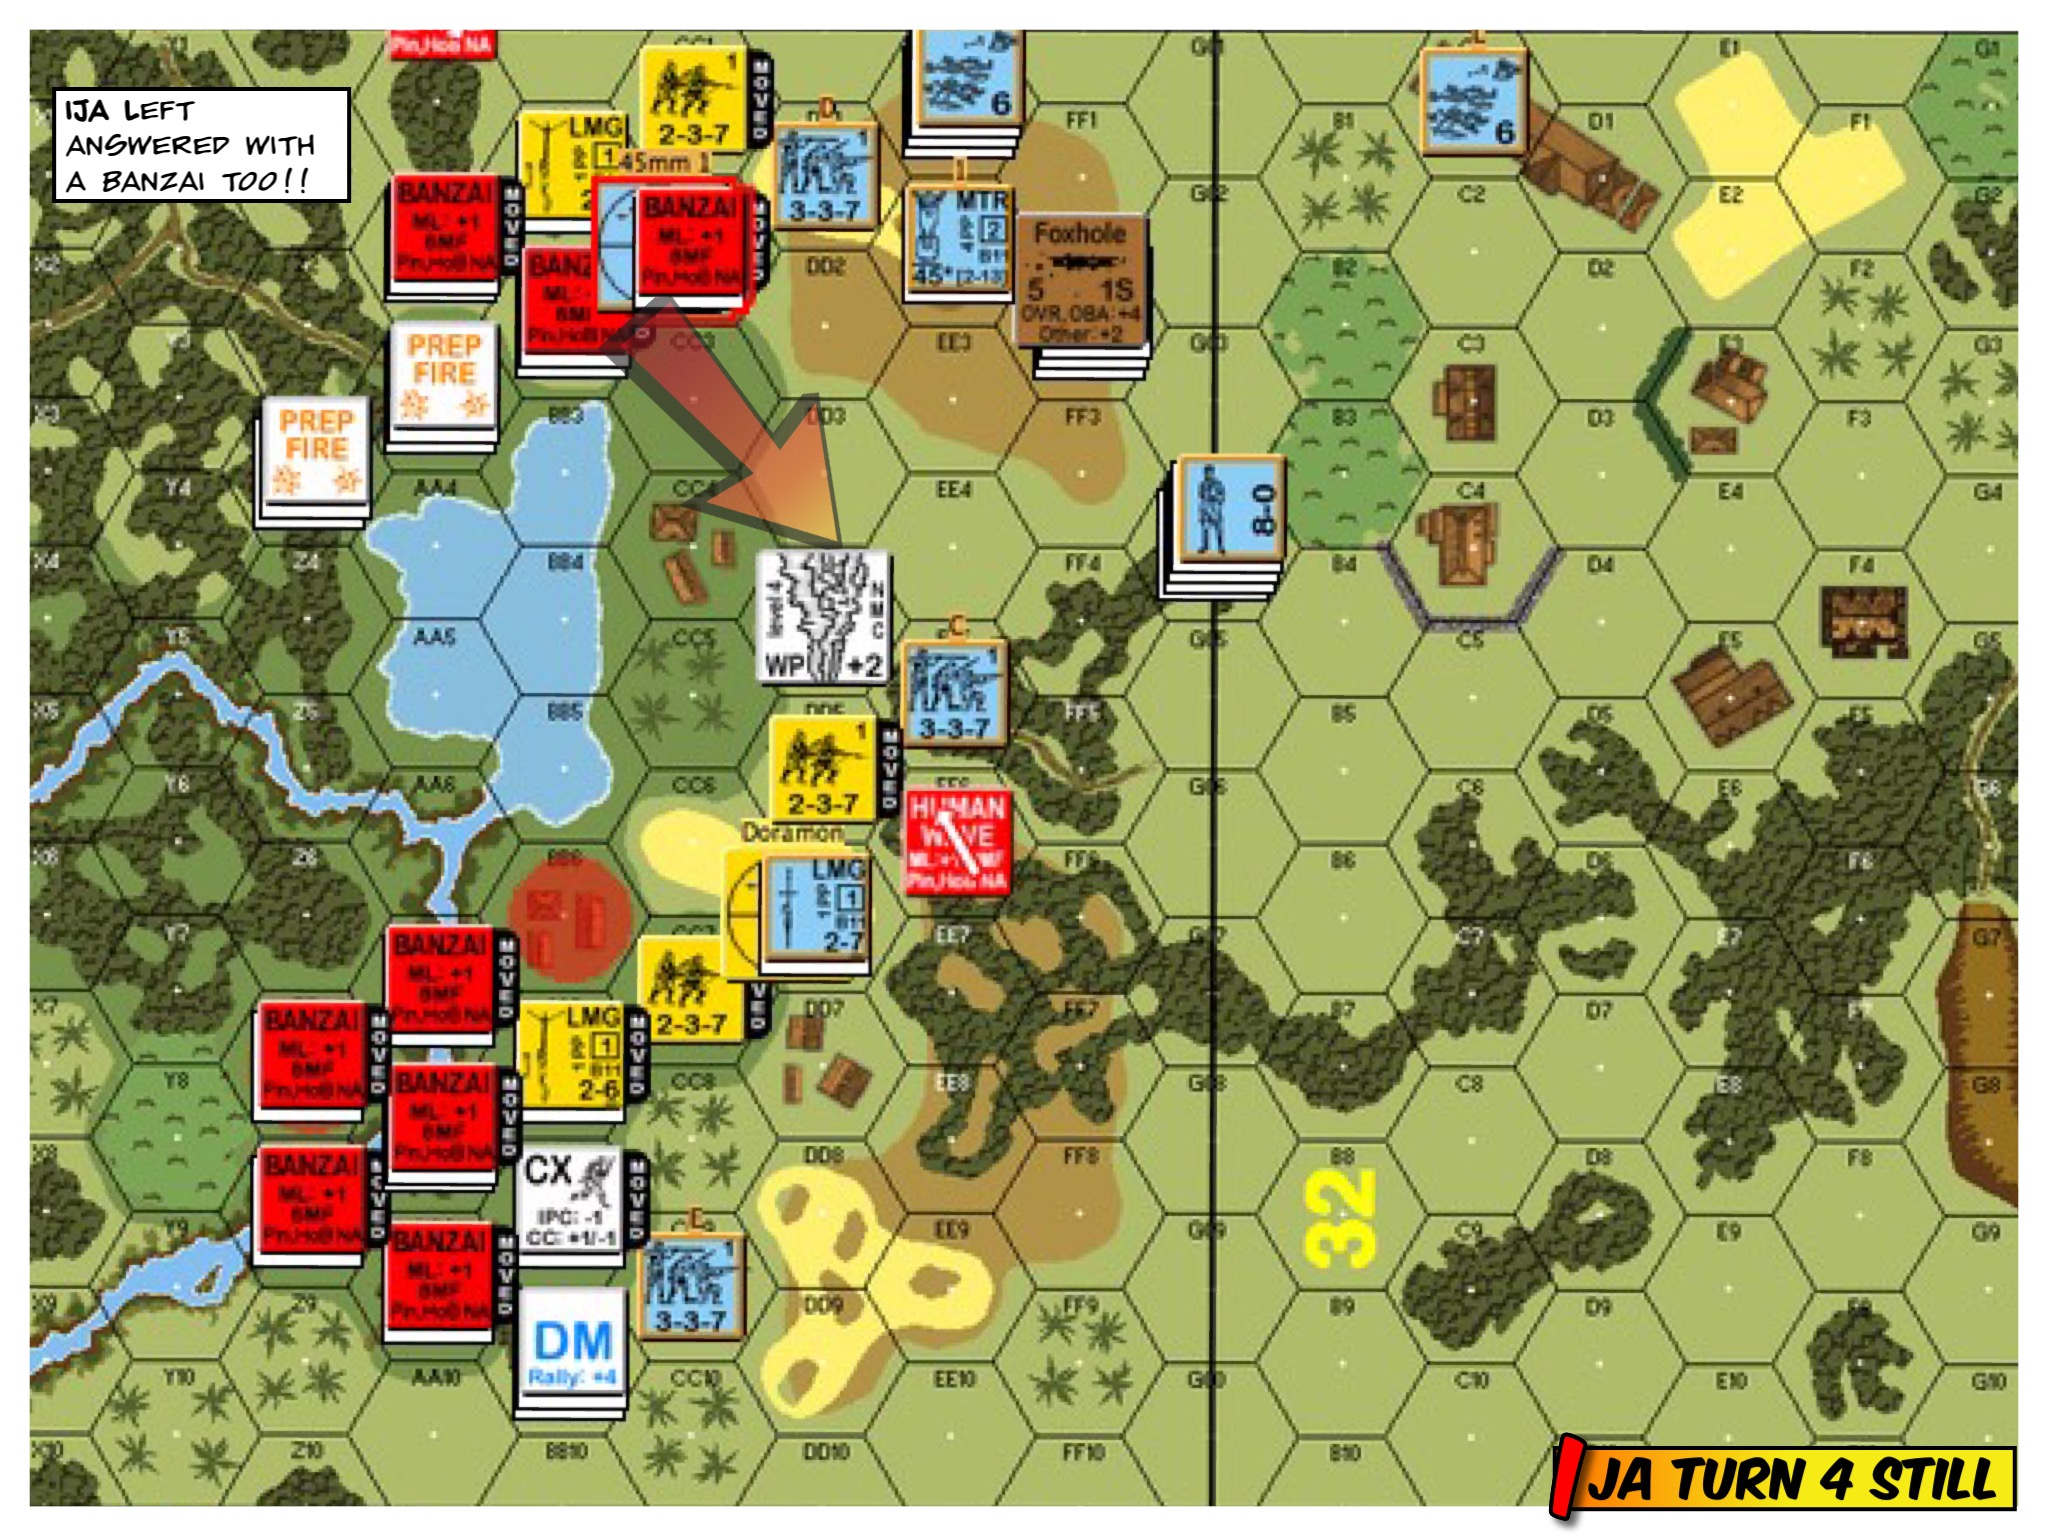
End of IJA Turn 4: The IJAs got aggressive on the right flank.  An IJA half squad was sent to unconceal an Australian squad.  It was killed in the process but the Australian squad was ambushed and killed in the subsequent close combat when a concealed IJA half squad moved in.  The IJA was pressured on the left flank however, the forward units pulled back and the reinforcement group pushed forth to the Australian hilltop.

J116 - T5 Bri - Mortars fight Leader wounded berserk-proc

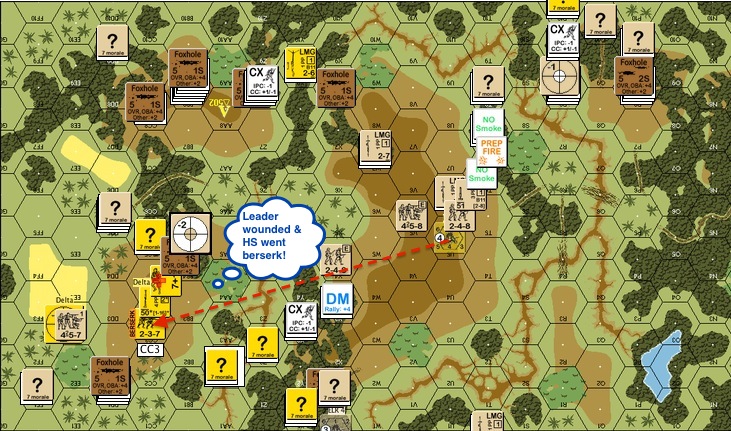
Australian Turn 5: The opposing mortars continued to duke it out, the IJA finally caught a lucky shot that wounded its leader and made a half squad go berserk!

J116 - T5 Bri - HIP-proc

Australian Turn 5 (still): The IJA revealed a previously HIP’d unit in hex W7 when an Australian squad left its 9-2 leader behind.  We didn’t do this correctly though as the HIP’d unit should have appeared concealed.  Either way as such, the adjacent Australian squad piled in (which I was happy about) but they managed to roll an ambush against the IJA (which I was less delighted about).  The Australians decided to take their leader and withdrew.

J116 - T5 IJA after MPh-proc

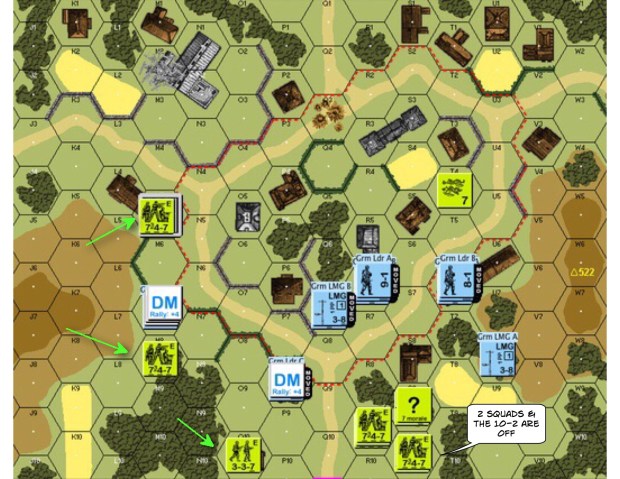
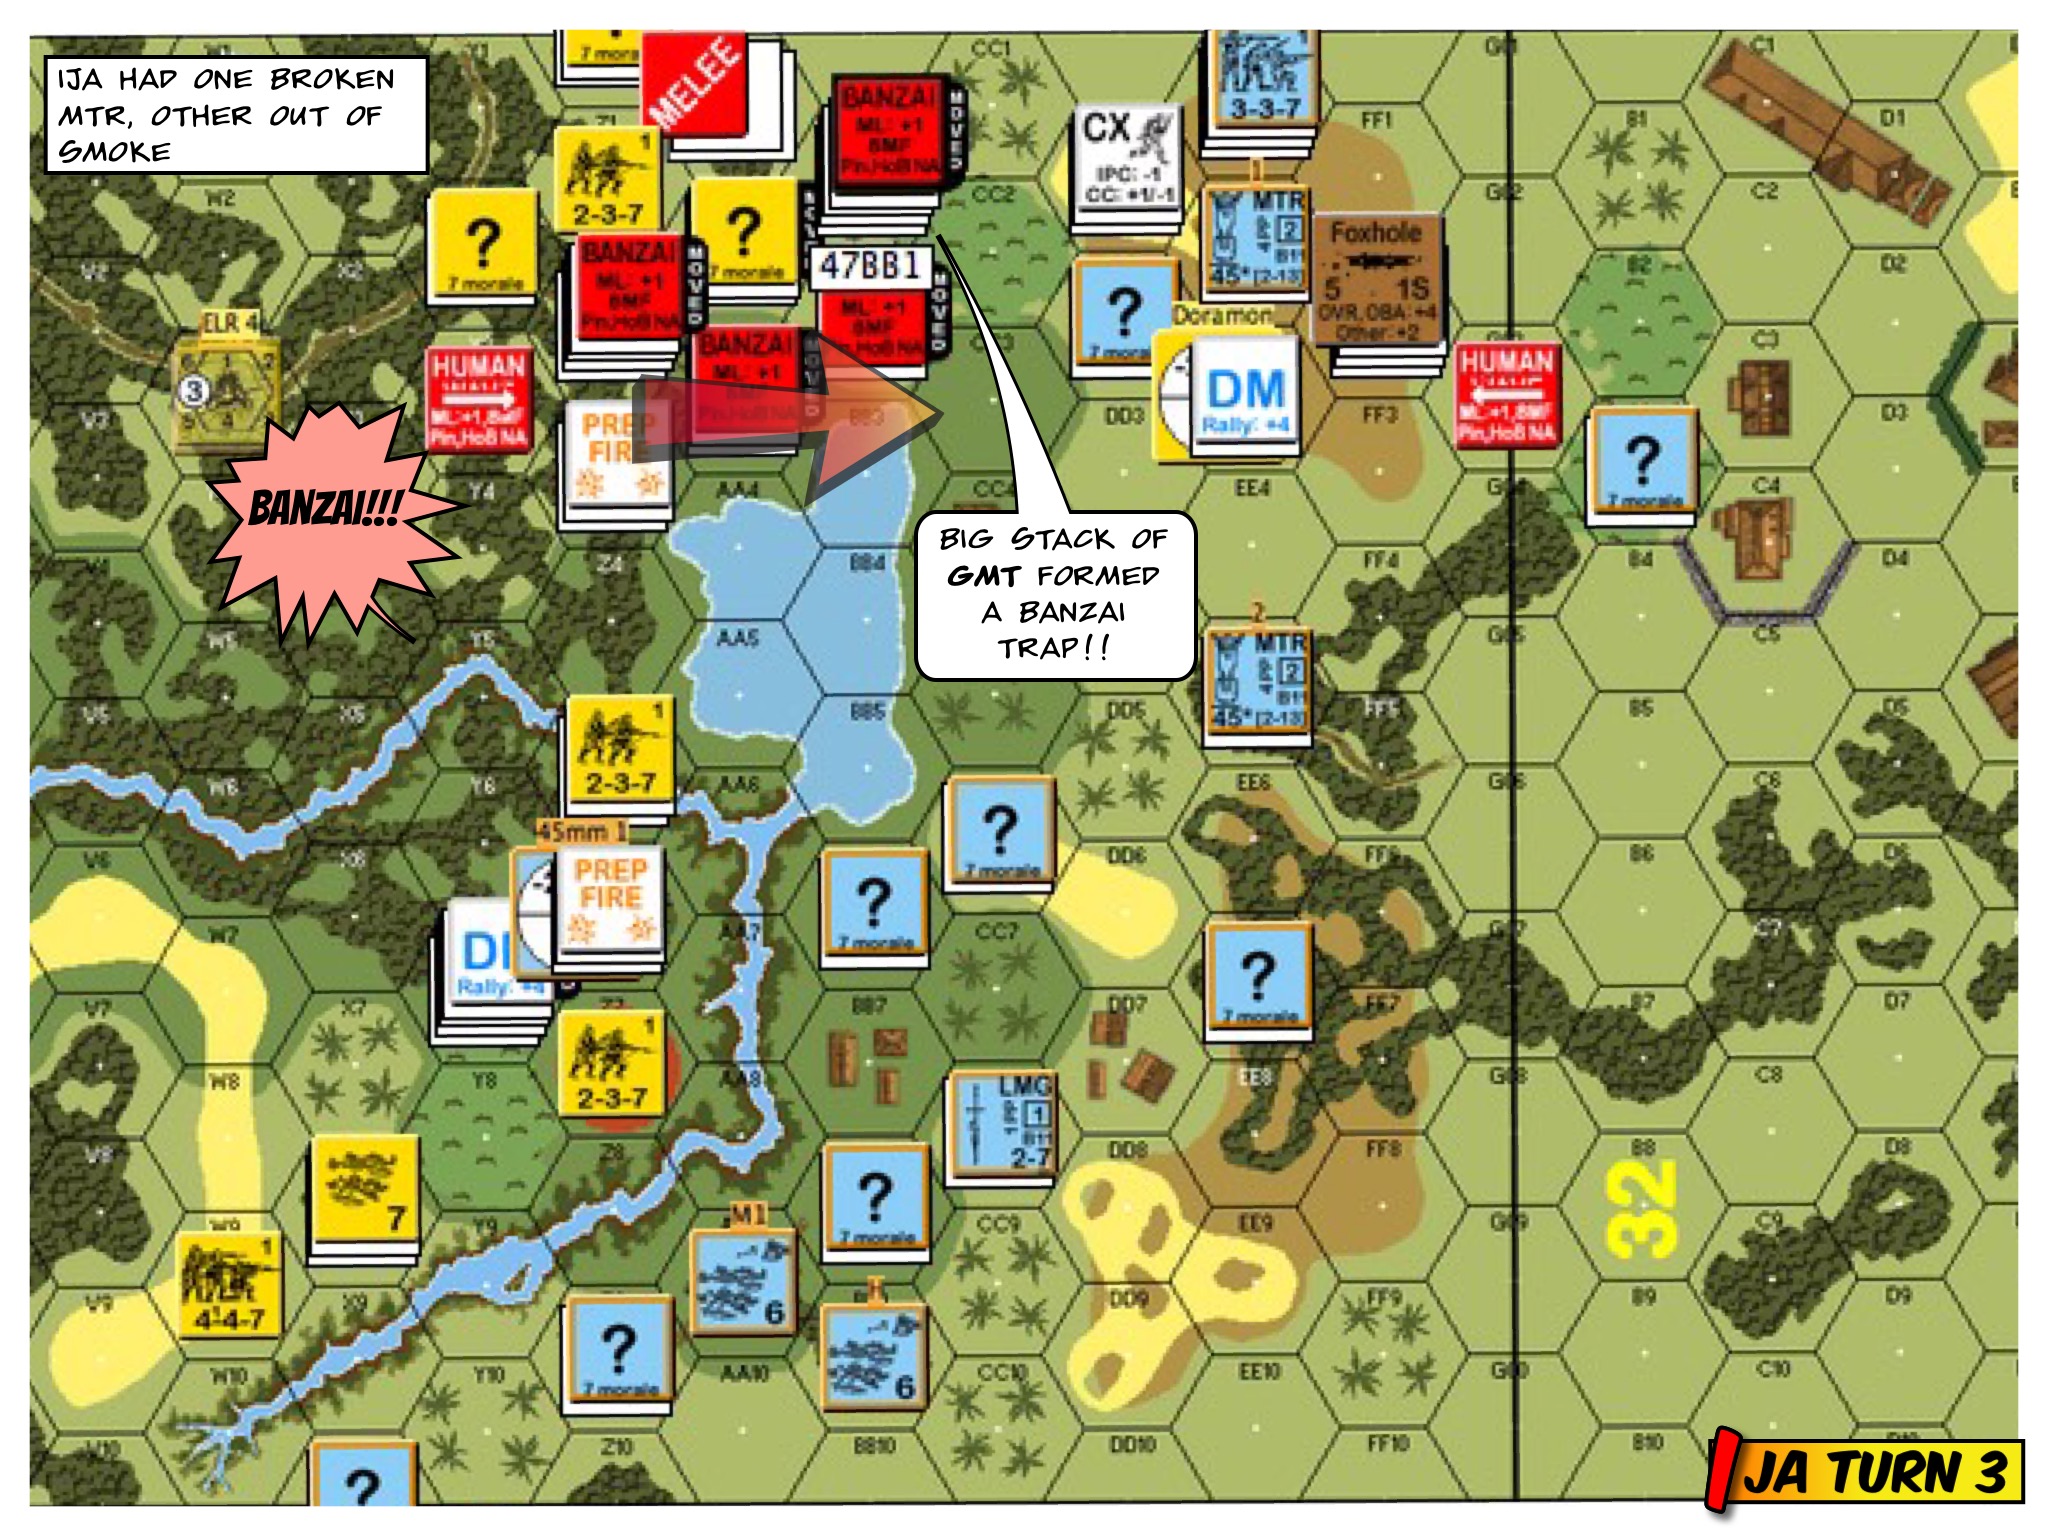
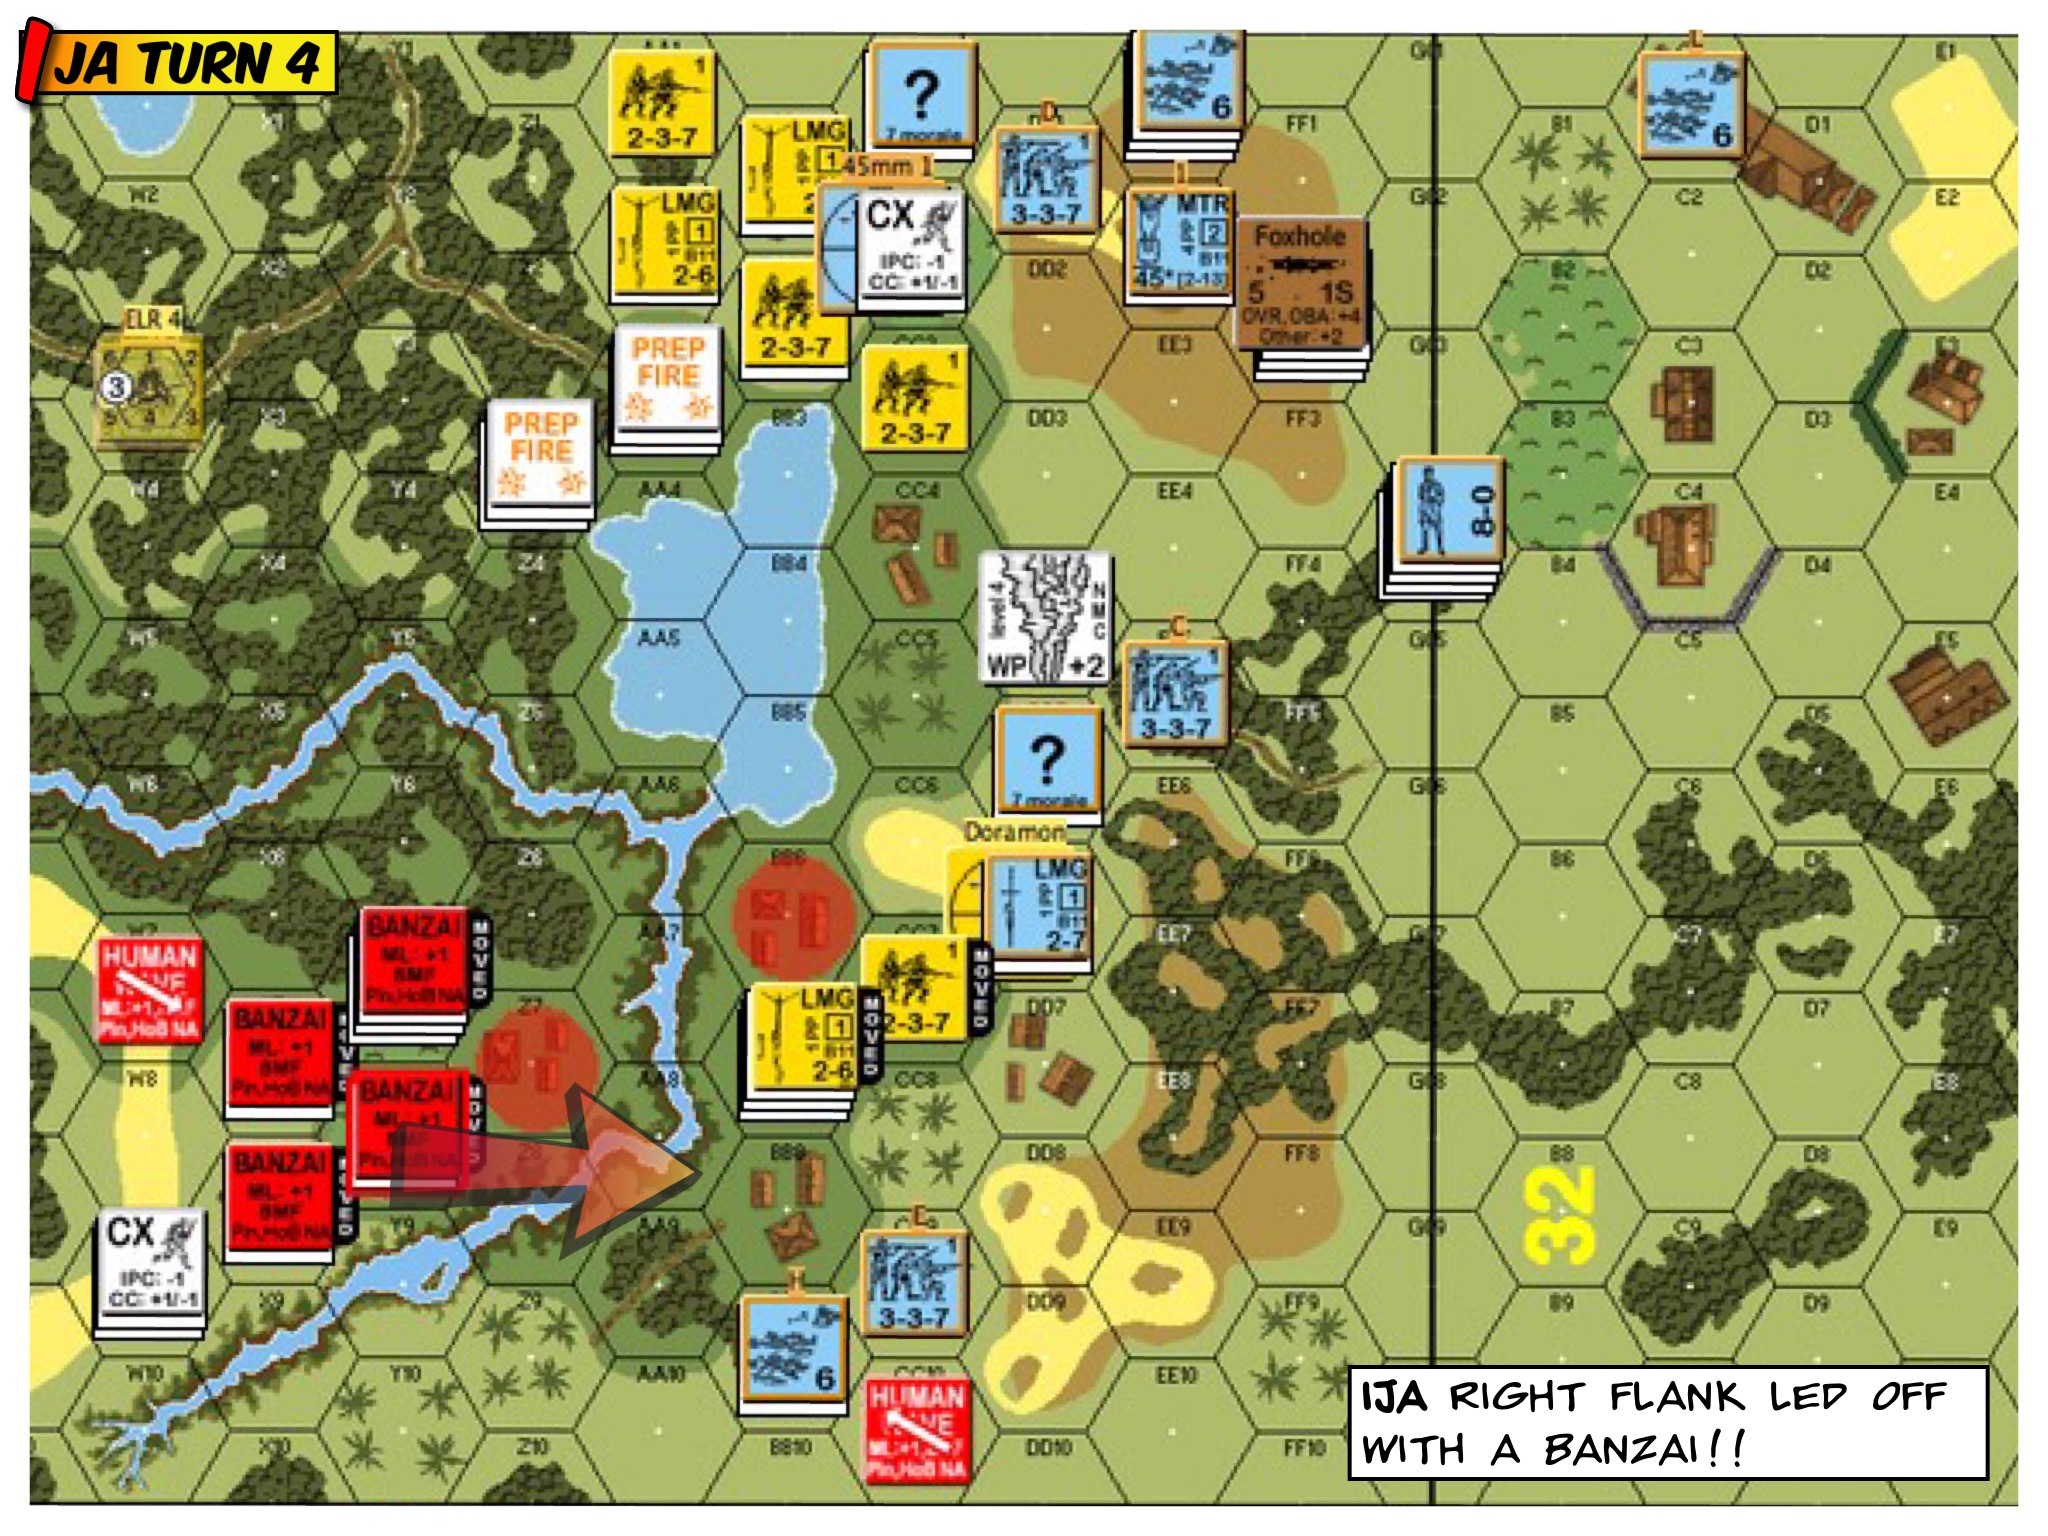
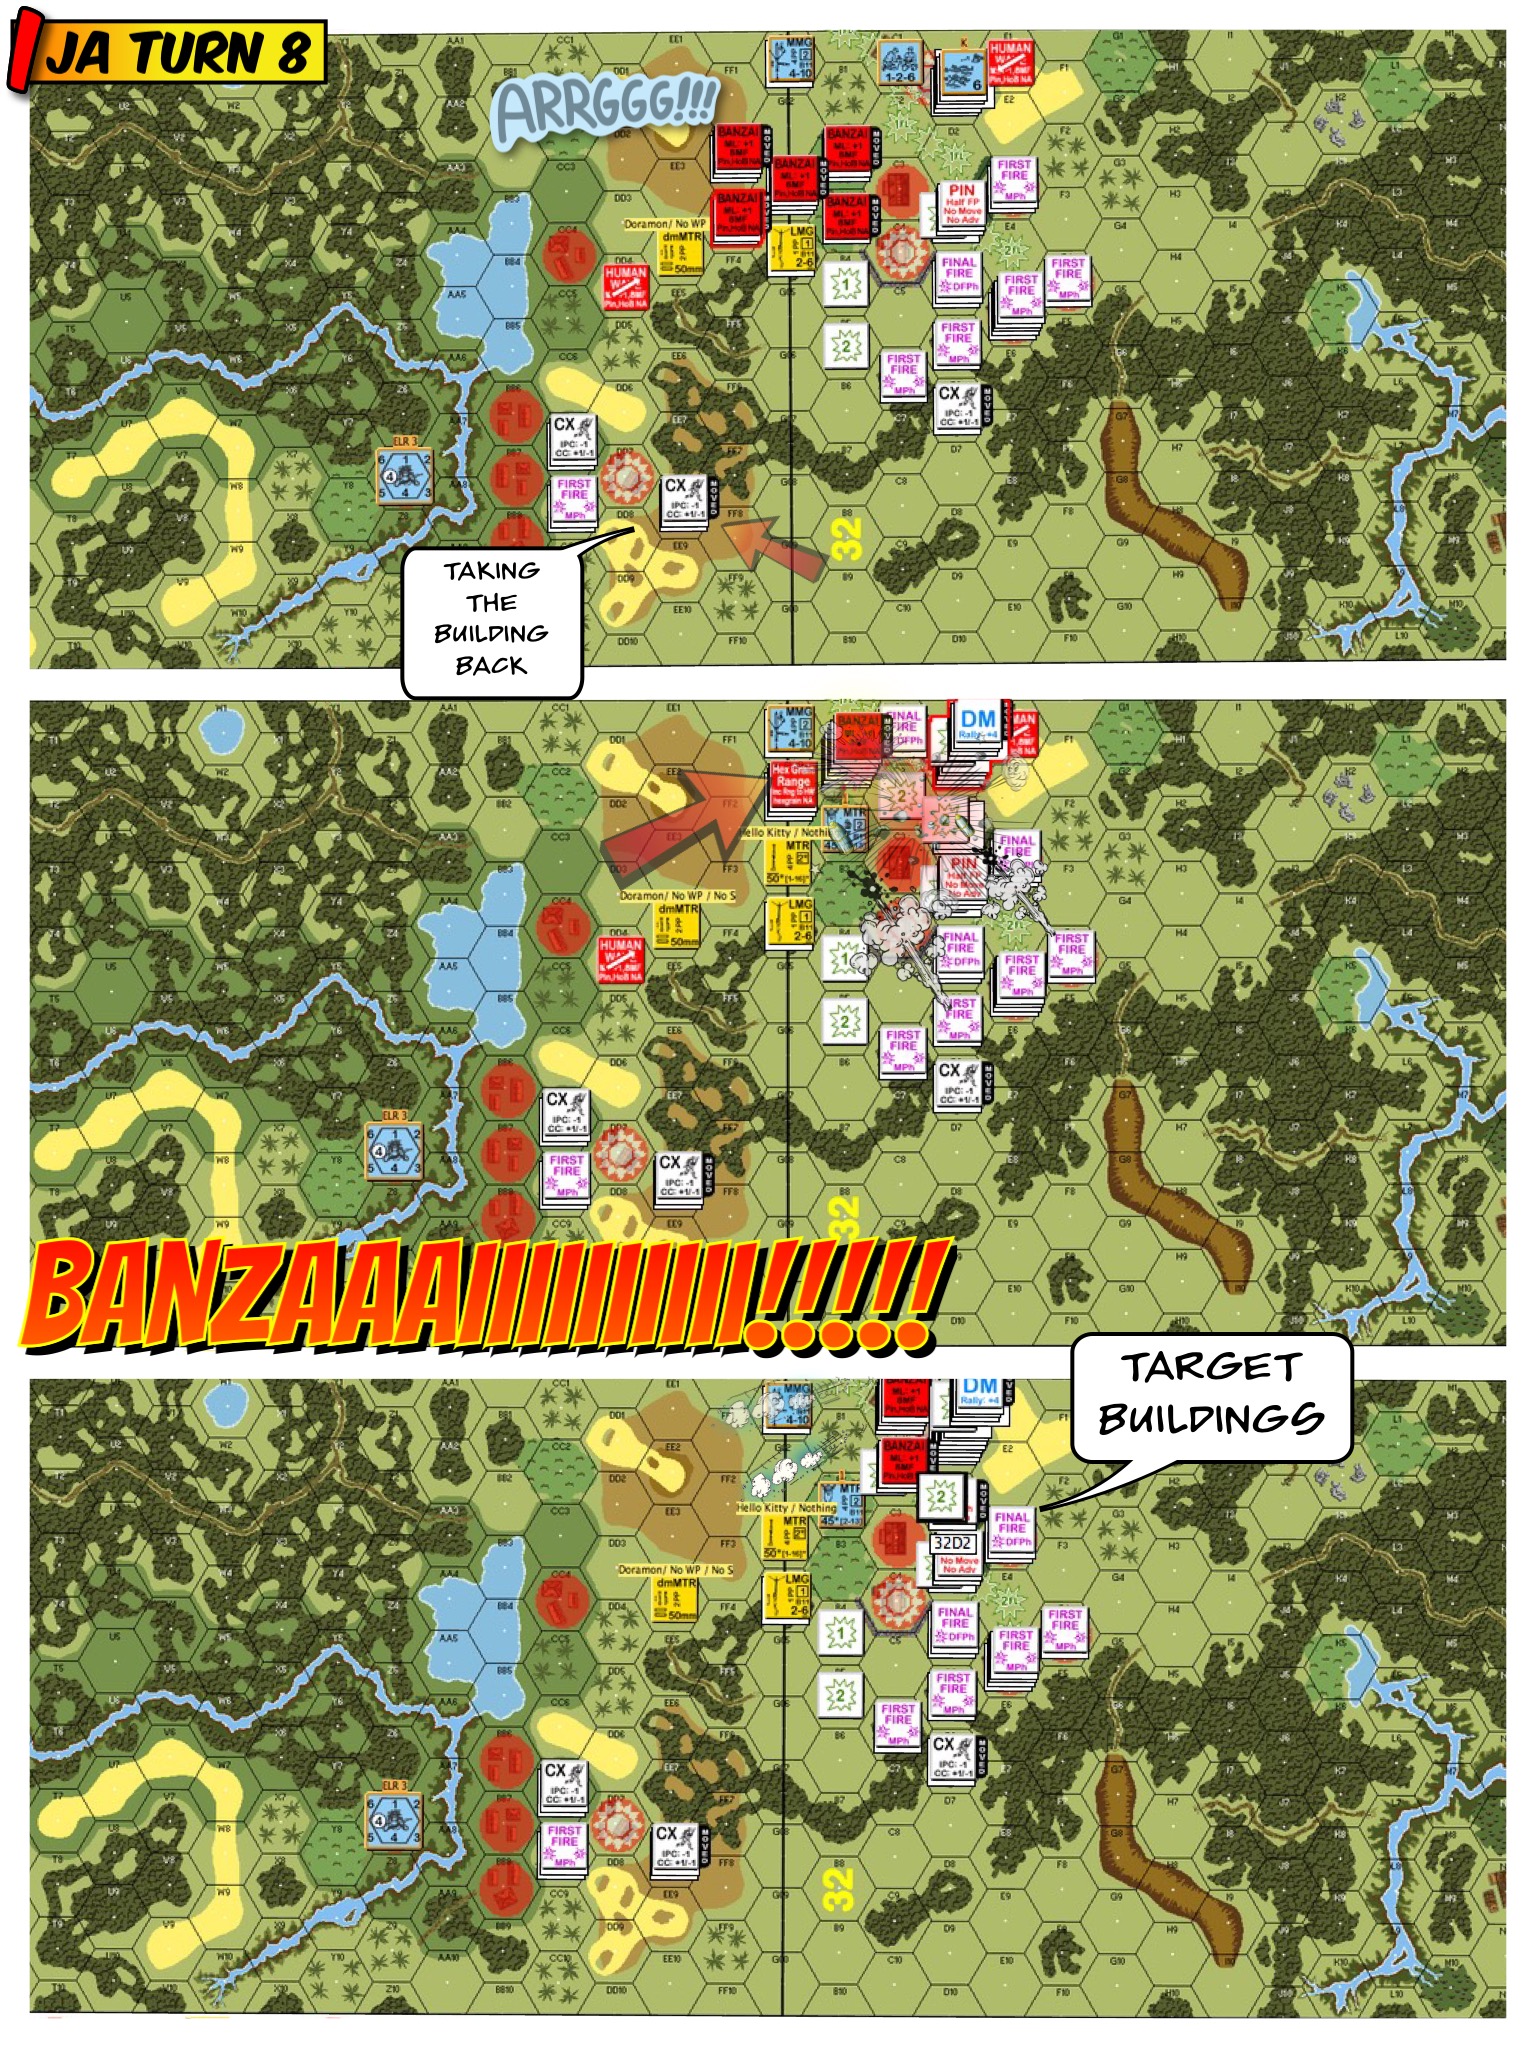
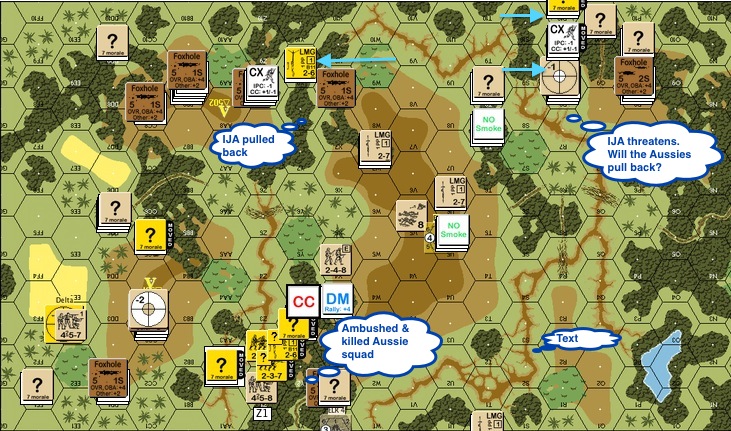
IJA Turn 5: The last Australian turn put the IJA left flank under pressure.  The IJA reinforcement group decided to shift back to threaten the Australian rear.  The previously HIP’d IJA squad continued to pursuit the escaped Australian 9-1 (and the 458).  See that stack I noted as “Dummies” in the foxhole?  That hill would have been Australian quickly had Erwin know this.  The IJA stepped up their counterattack on their right flank.  The IJA broke the other Australian squad on the lower left of the map and the berserker piled in!

J116 - T5 IJA CC Entire Stack killed-proc

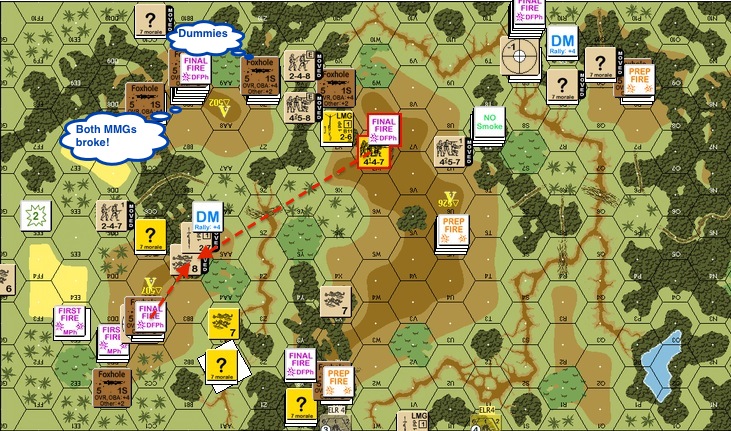
IJA Turn 5 (still): An  IJA HS jumped back into the 9-1 & 458 stack and managed to annihilate everyone in the hex.  The brokie routed away from the berserker on the bottom left at the moment, for a little while longer.

J116 - T6 Bri Mortar + Snakeeyes killed 8-1 breaks squad .. both MMGs broke-proc

IJA Turn 6: The hill on the bottom left was threatened by a slow-moving concealed Australian stack up the middle.  The wounded 8-0 in the lonely foxhole decided to grab the mortar himself and took a shot at the approaching Australians.  A snake eyes shot along with fire from the previously HIP’d IJA squad on the big hill broke the Australian squad and killed a leader.  This squad would then be eliminated for failure to rout.  Our death star on the top left tried to hold off the hoards and broke BOTH MMGs together!  Baadddd timing …

J116 - T6 IJA CCPh -proc
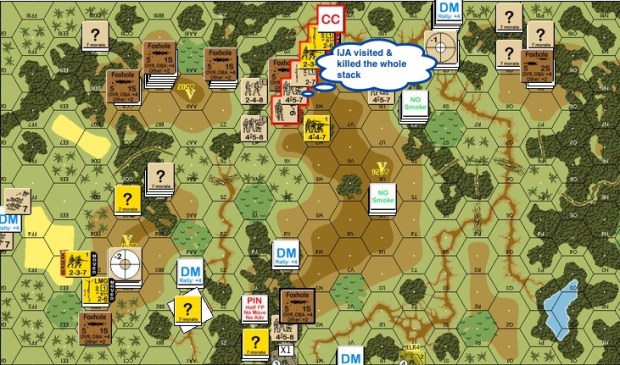
IJA Turn 6 (still): This was the last IJA turn before the final Australian onslaught.  The IJA made an unsuccessful effort to take the Australian fox hole on the top right.  The IJA berserker chased down and killed an Australian brokie on the far left.  A concealed IJA squad, determined to clear the field, advanced onto and killed a half squad in the middle right.  The MMG crews and some half squads stacked up on the top left hill.  Since IJA crew stripes instead of breaks, one round of gun fire would not be able to push them out of the hex.  If the Australian half squad moved up the hill and engaged the stack in close combat, the Australians wouldn’t be able to own the top left VP hex without another squad stepping in.  The IJA right flank resumed its blocking position.

J116 - T7 Bri End CC-proc

Australian Turn 7: On the top left of the map, the Australian half squad refused to be broken by IJA gun fire. It advanced up and engaged the IJA stack in close combat.  Since Hand to Hand combat is not an option for the Australians, the likely outcome here was that the units would be locked in a perpetual mêlée.

We rolled.  The Australians failed the “To Kill” number by 1!

The IJA got a Critical Reduction result, thereby killing the Australian half squad.

The IJAs won.

Other AARs: