Gin Drinkers’ Revenge 2014 – Hong Kong Advanced Squad Leader Tournament

Gin Drinkers Revenge 2014Saturday, Sept 20 2014.  I found the corner table just like George Bates did when he was the tourney director for the Malaya Madness tourney in Singapore and I set my bag down.  The Hong Kong Society of Wargamers has 2 rooms booked at the KITEC (Kowloon International Trade & Exhibition Center) regularly for their meetings.  Today, however is unlike any other day.

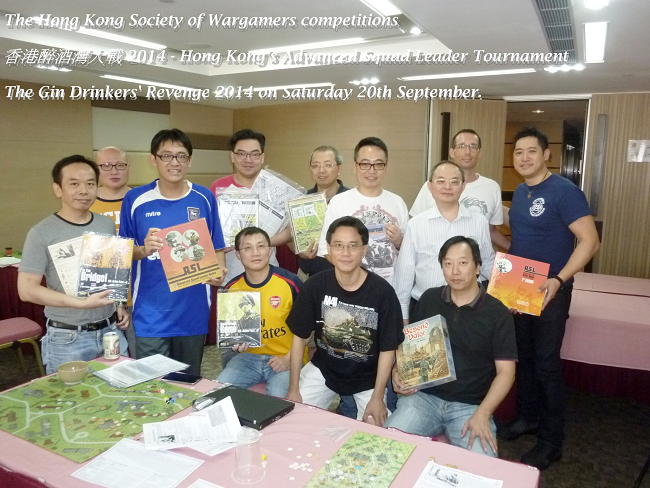
Today is the day for the Gin Drinkers’ Revenge 2014.

Twelve arrived.  We had them divide up into three categories :

  • Former HK ASL Tourney winners
  • 5 years experience and above
  • Newbies

We had 8 hours, 2 rounds, single elimination, 4 hours per game.  We wasted no time in deciding on scenarios and bidding for sides.

Round 1 : J59 Friday The 13th

Aris Avi

My first round was played against Aris Avi from Greece.  He lived in Hong Kong for a little while and will be going back to Greece shortly after the tournament.  He said however, that whilst he used to play Squad Leader, he’s more into miniatures back home.

I was hoping for J12 Jungle Fighters as some folks here are less versed with (or are even adverse to) PTO.  We decided on J59 Friday the 13th instead.  I have never played this but Aris said since he played the defenders last time, he would like to be the attackers.

Friday 13 01

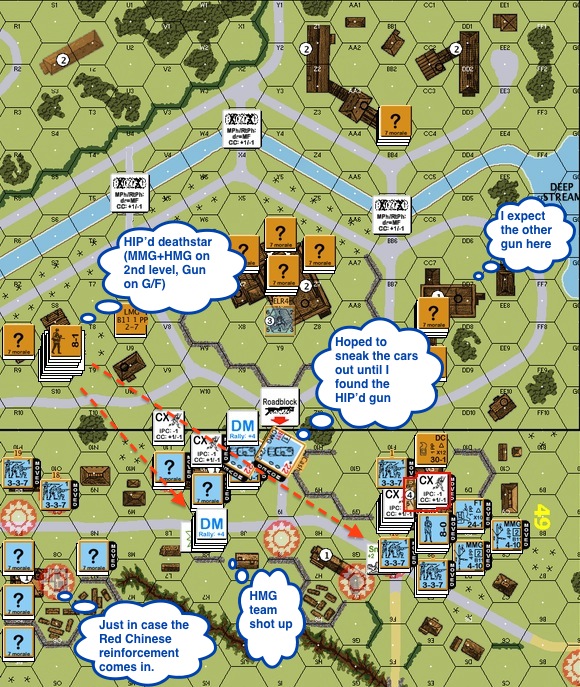
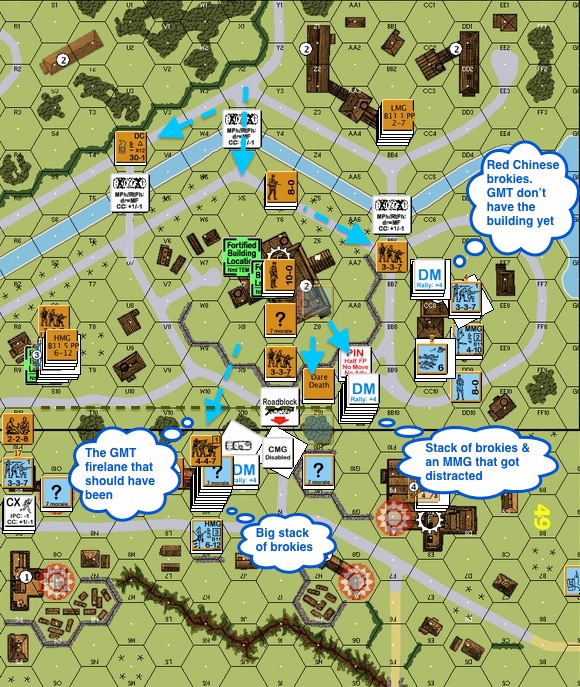
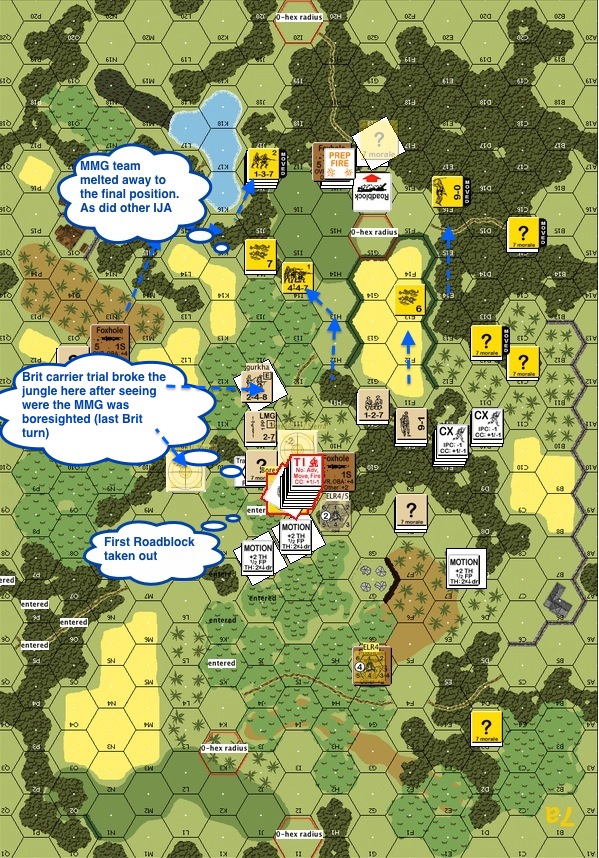
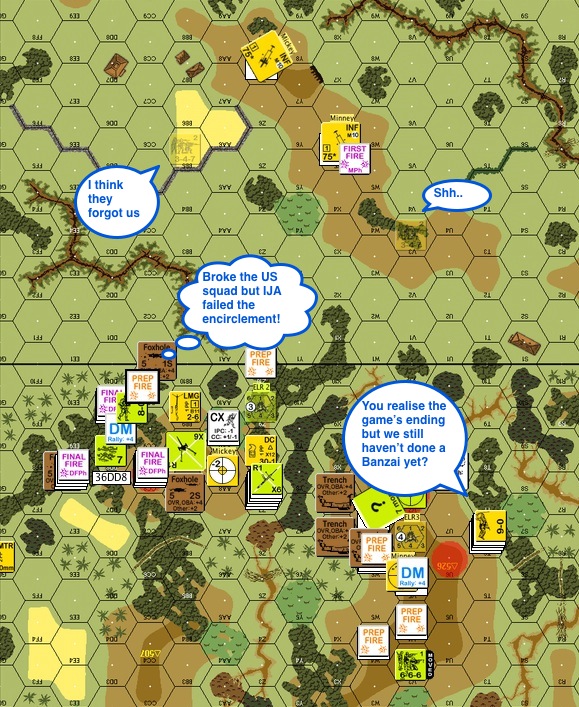
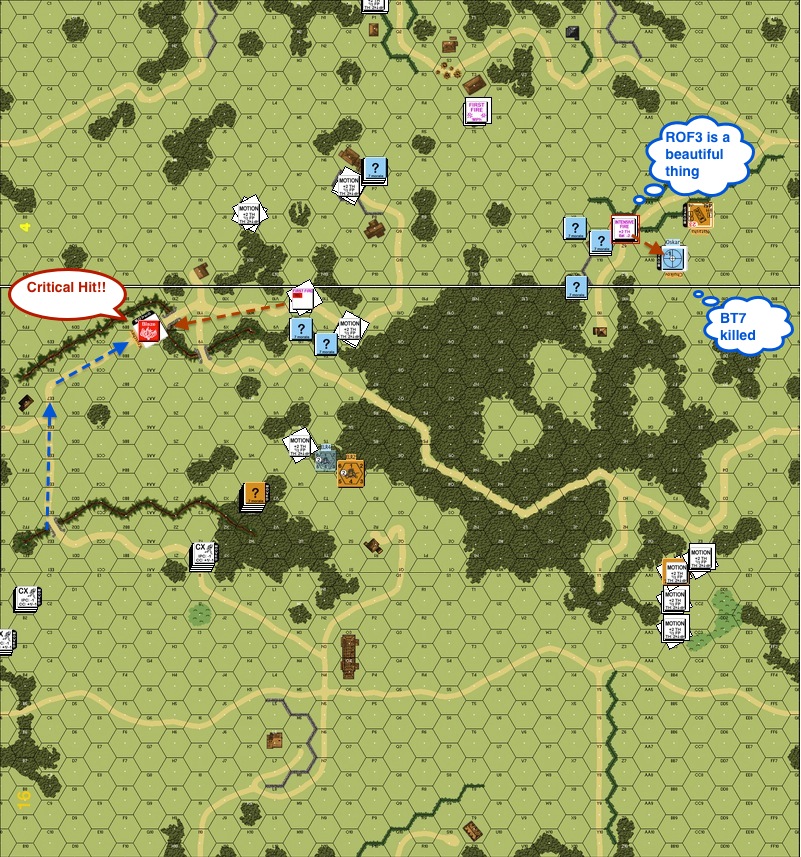
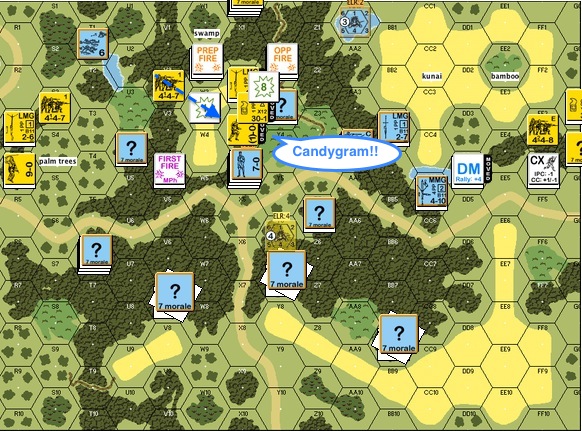
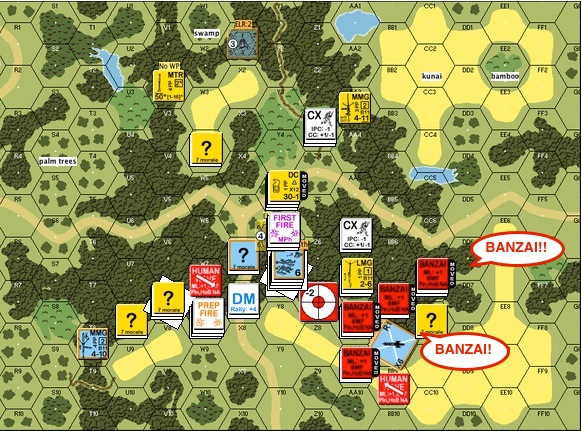
If you would ignore the blue arrows for a moment, this was my defensive setup.  The Germans had 3 JgdPzIVs that came in with 10 5-4-8 paras and 3 leaders from the left.  The objective was for the Germans to capture all buildings around where you see the Russians concentrated.  The Germans had 6 turns.  I had my antitank gun (57LL with ROF3) pointed at where it could most likely take a side shot on the Jagdpanzers.

Aris opened up with an armour assault on the top part of the board.  He had a small contingent heading towards where my AT gun was emplaced together with some wire.  My AT gun fired during the Defensive Final phase, got a hit even though I lost ROF.  YES!   I will take one out of three.  Side shot, TK looked great, I rolled.

BOXCARS – BOOOOOIINNKKKKKKKKKKK!!!

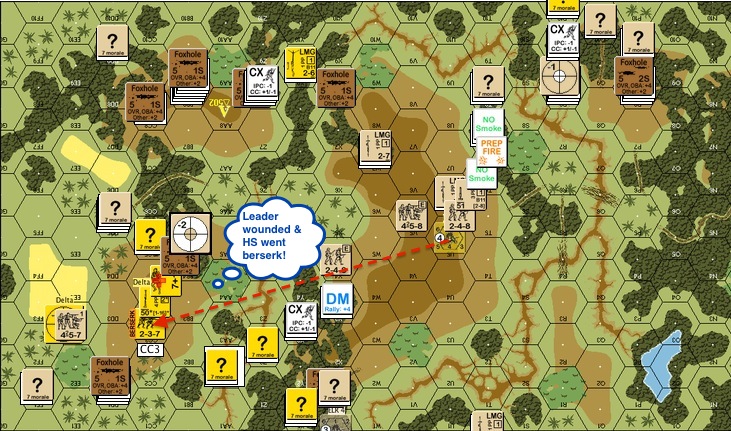
The round glanced off the Jagdpanzer closest to me and then of course the entire German force was then aware of our gun’s presence.  Too late now, the paras closest to the AT Gun started to move towards it.  On the top side of the board the Germans started getting shot up by the Russian HMG on the first level of the big house.  The Russian HMG team held out moderately well and when it broke the half squad on the ground level advanced up to help, except that it couldn’t find the HMG of course (“What do you mean you can’t find the gun??  We left it standing by the WINDOW!!!”)

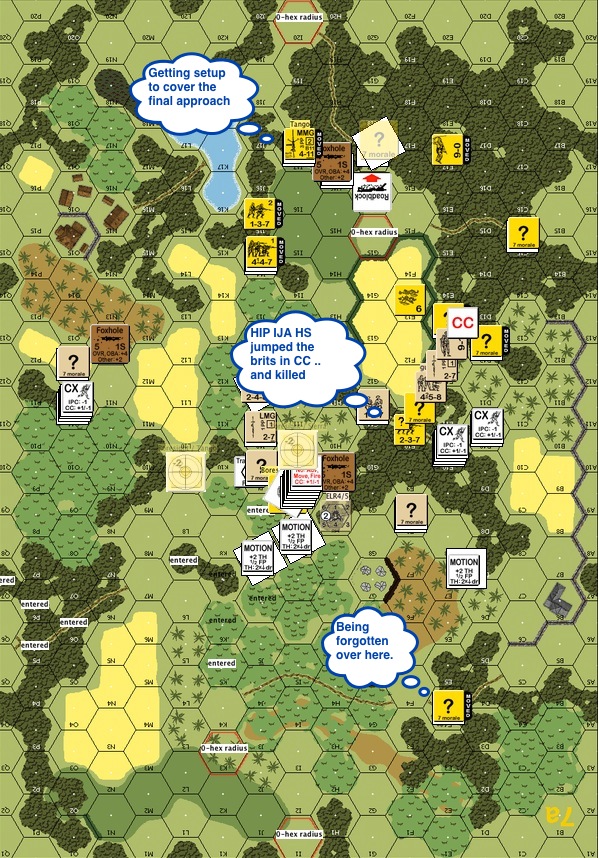
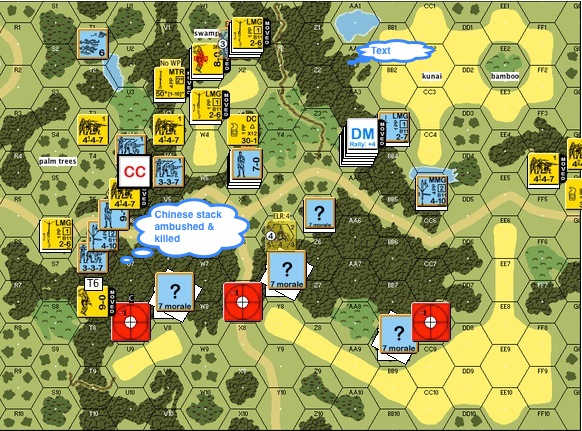
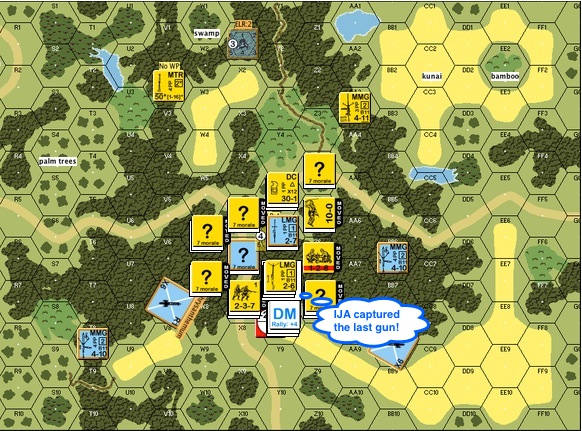
The Germans para were unable to reach the hedge.  At one point most of them even low crawled back to the tree line.  On Turn 3 or 4 two Jagdpanzers decided to jump the hedge.  Believe it or not, I planned for it.  That’s why I had a squad in a fox hole with an ATR looking for an underbelly shot when Jagdpanzers jump the hedge.  However as the Jagdpanzer rolled over, I forgot.  The first Jagdpanzer overran the foxhole.  The good news was that Jagdpanzers with FP1 bow machine guns don’t offer much fireworks.  The better news was the squad survived and killed the tank hunter in close combat.  At this point, I started to move my Russian infantry up for a counter attack.

Gin Drinkers Revenge 2014

I was in a bit of danger on my left flank (bottom) though as the Germans killed the gun crew.  One German squad was however caught in the wire and my opponent wasn’t sure whether my other wire was some where in the woods as well.  The Germans stopped coming through the Russian left flank.  Katya (the Russian sniper) once again came by and broke the remaining German squad for me.

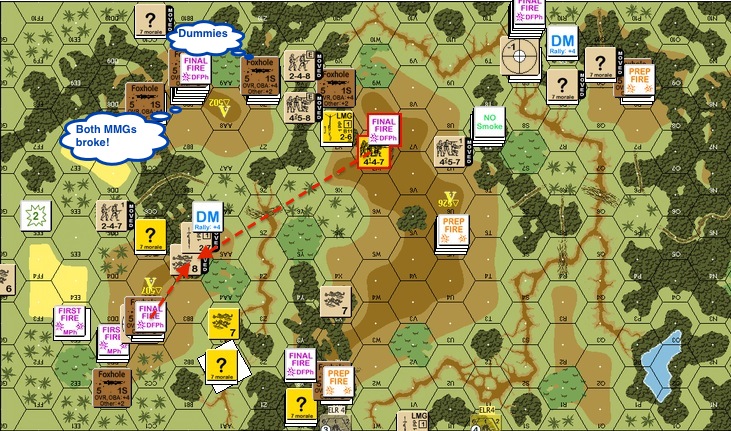
The second JagdPanzer that jumped the hedge stopped with its gun pointed at the HMG farmhouse.  I got it caught between two ATR squads as shown and blew it away from behind as my opponent was perhaps too focused on taking out the big farmhouse to let the German paras in.  There were no survivors.

My opponent conceded.

Round 2 : T4 Shklov’s Labors Lost

My next opponent was Ted Kwong.  Ted said he bought his Advanced Squad Leader modules a long time ago.  It’s only recently that he started learning the system.  He told me how terrific a teacher Erwin Lau is.  Erwin is a local grognard who plays a variety of games and has been winning (multiple?) championships in past Advanced Squad Leader tournaments held by the Hong Kong Society of Wargamers.  As a testament to how much Erwin has done in pushing ASL locally, Ted is the third person who told me recently as to how immensely patient Erwin is as a teacher.

Ted Kwong Christopher Chu (1)

Here you can see Ted Kwong on the left after rolling a pair of snake eyes on his opponent in ASL126 Commando Schenke.

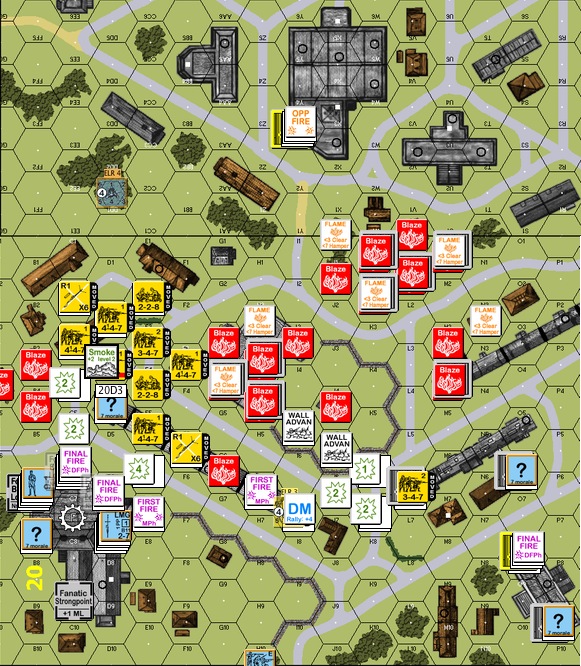
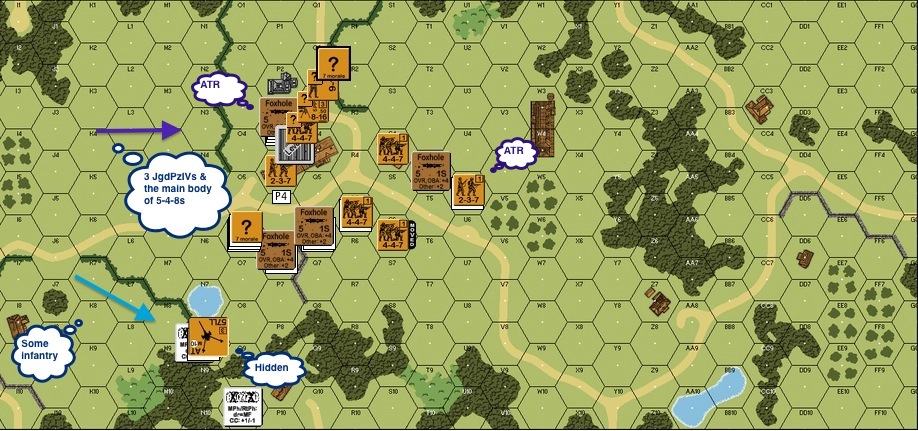
We decided on T4 Shklov’s Labors Lost (Ted didn’t want to do PTO, so no AP84 Double Trouble).  I would be the attacking Germans.  JR Tracy told he they used to call this scenario “Gandalf vs the Balrog” because each side gets a 10-3.

Shklov's Labors Lost-proc copy

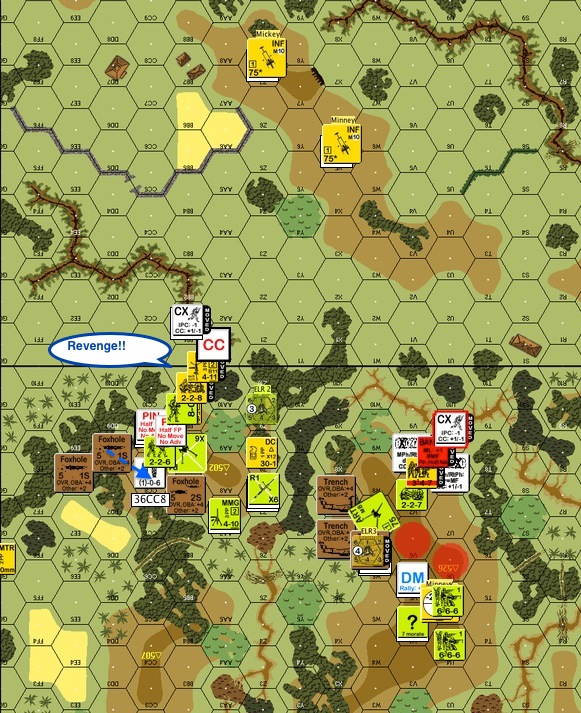
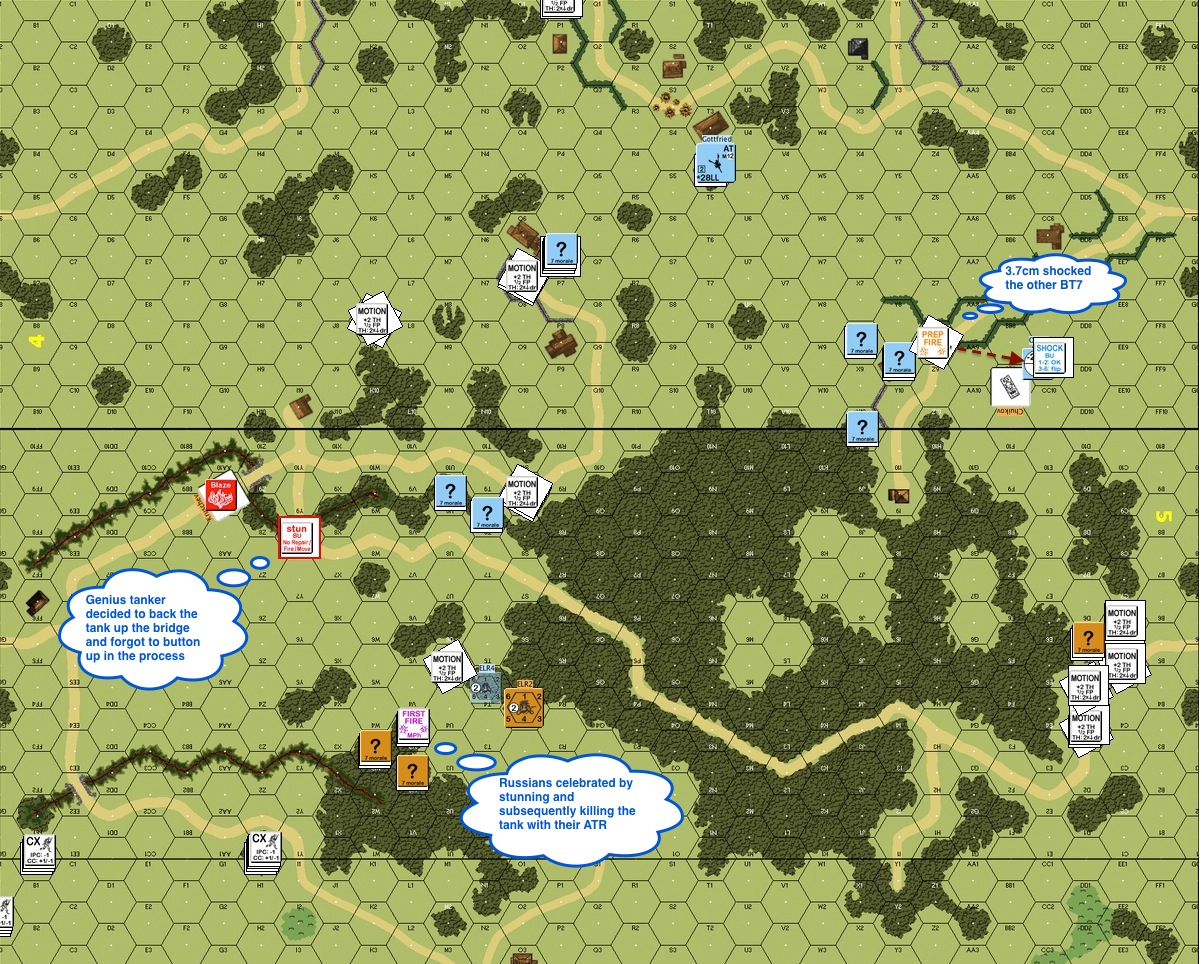
This was the setup from memory.  I got the Germans who had 9 4-6-8s with a star-studded leadership team : 10-3, 9-2, 8-1 with 2 armor leaders 9-1, 8-1.  There were also 2 STuGIIIB to help them with taking 5 designated Russian buildings in 6 turns.  The Russians had 7 and a half 4-5-8s led by a 10-0 and a 10-3.

The placement of the Russian 10-0 made me wonder if they had their MMG up front.  The HMG was probably with the 10-3.

Ted just won his last game against Christopher Chu and he was in a pretty good mood.  We shook hands and the game got underway.

Shklov's Labors Lost-proc copy 2
First matter of the day : the Germans prep’d their deathstar – FP16 flat versus the commissar stack.

Snake eyes.

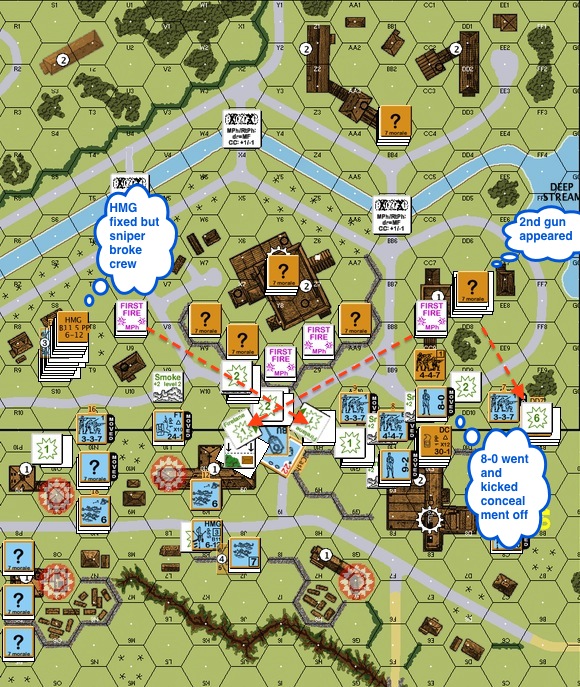
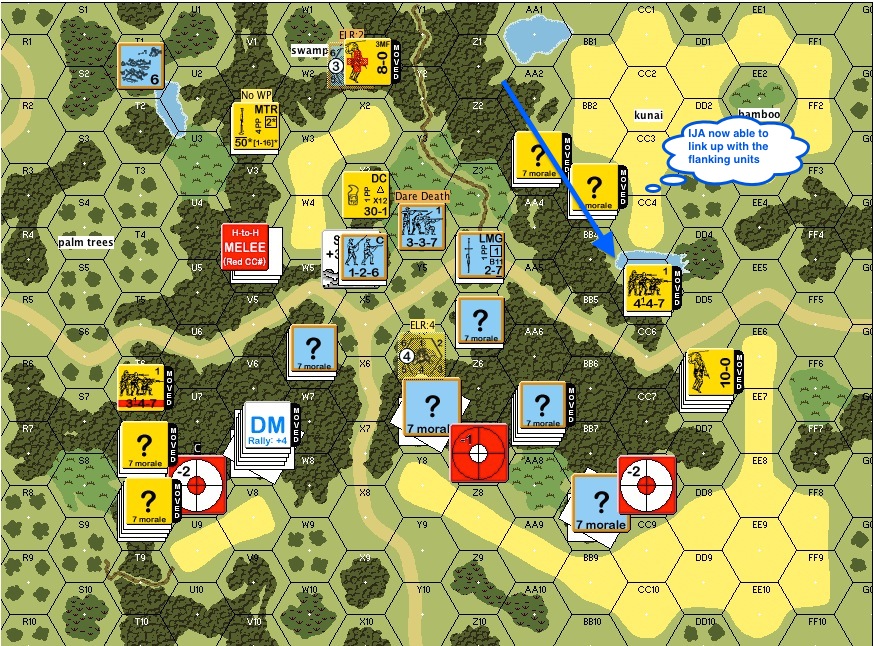
We opened the game with a 2KIA!  Great omen I’d say, I gripped a little tighter my pair of lucky dice that saw me through Malaya Madness as well.  The commissar stack vaporised before the commissar had a chance to rub his eyes.  The STuGs led the way with armoured assault, chucking smoke out of their smoke dischargers at key points down the left and the right.  The Germans had no intention of doing frontal attacks.  The Germans entered the commissar building from the Russian right flank and went slightly behind the first building on the Russian left flank.  The STuG from the Russian right came across, discharged smoke immediately before reaching the MMG building and did a bypass freeze on the MMG hex (froze the ground level only).  The Germans then piled in through the front and from the side under the cover of a timely smoke grenade.

Shklov's Labors Lost-proc copy 3

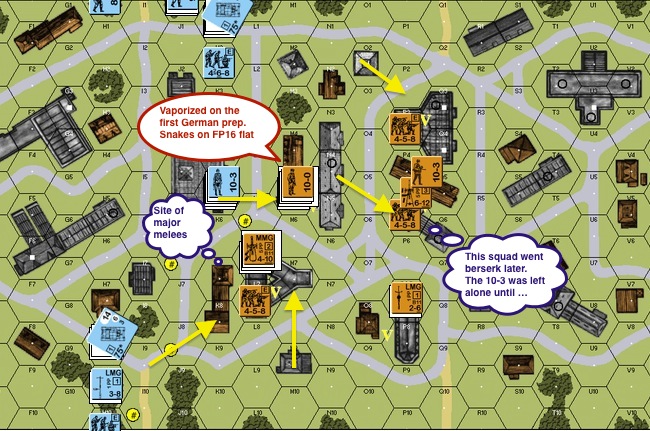
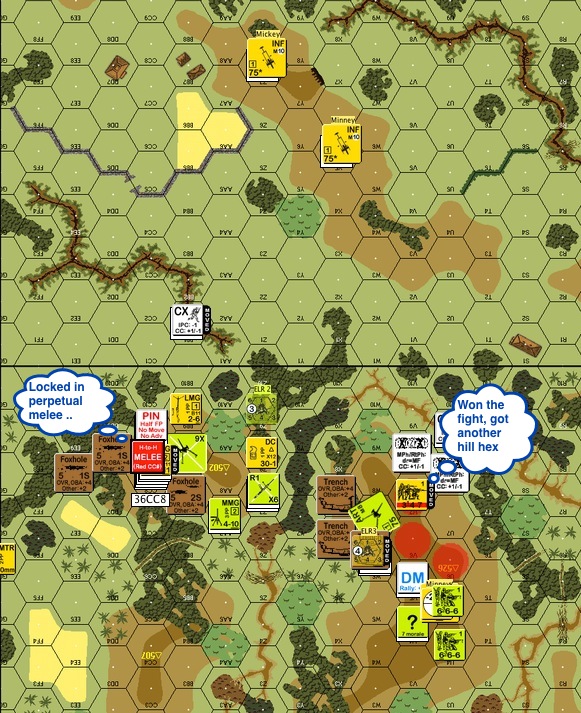
The German deathstar later moved into commissar building and joined the 9-2 and his team.  At around Turn 3 the Russian 10-3 was pinned and the Russian HMG squad went berserk!!  They dropped the HMG, ran into the street and the berserkers were UNSTOPPABLE.  All the heavy German firepower had assembled in the commissar building at that point but apart from bring critically reduced, the Russian berserkers made its way across.   It was only when the deathstar final fired at it from an adjacent hex.

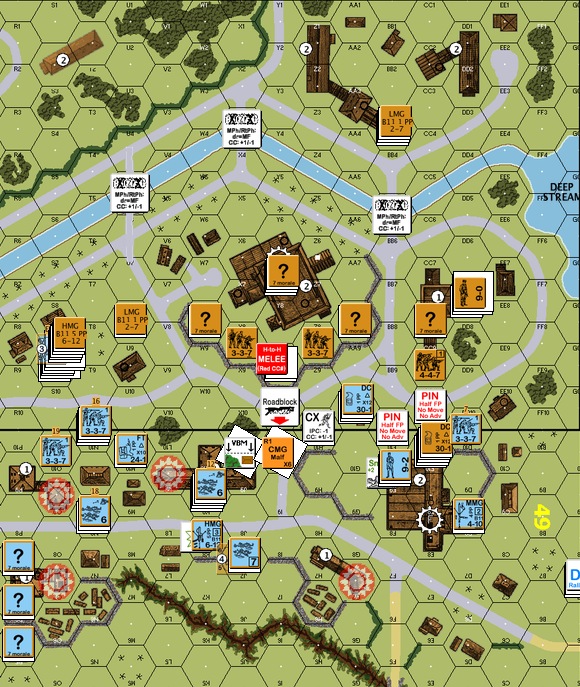
The Germans then looked up and met the eyes of the lonely Russian 10-3.  The Russian quickly grabbed the HMG, admirable but futile.  The STuG rode by and put down smoke from its dischargers.  The Germans 9-2 led 2 squads across the street into the Russian 10-3 hex.  The STuGIIIB continued its way and got behind the VC buildings.  Four buildings down and I would take the Russian HMG as well after we shoot the 10-3.

Ted gracefully conceded.

Aftermath


20140922_54b305d9a0cd84ec01284qW9l8oE0wLa-1

So here we go.  We have a front runner from each of the 3 groups :

  • Tourney winners – Erwin Lau
  • 5 years Experience and above – Anthony Leung
  • Newbies – Jackson Kwan

There will be games arranged at a later date to determine the final rankings amongst these three, subject to Hong Kong Society of Wargamers’ scheduled events and venue availability.

Watch the video!!

http://www.youtube.com/watch?v=RnqXRFauZFA

IMG_8125IMG_8126


DB081 Lack of Discernment AAR – Attacking

This scenario took place on Dec 15th 1927, a full 12 years before World War Two.  It’s based on some of the earlier conflicts between the Red Chinese and the Nationalists (Guomintang, GMT or Kuomintang, KMT).  The conflict took place in Canton 廣東, not too far away from Hong Kong.  The Canton Red Chinese overestimated their strategic position, started a general uprising on Dec 12th and the Nationalist Chinese came for a brutal visit.

DB081 Starting position-proc

Carl Nogueira and I played this scenario twice.  I was the attacker – KMT Chinese and Carl the Red Chinese.  We then switched sides and played it again, you will read about the second one from a later AAR.

The victory conditions of this scenario is structured around the multi-hex buildings on the map.  The ones north of the canal are worth 2 points.  The ones south of the canal are worth 1 point except for the two building designated as factories.  The game ends on Turn 4 if the KMT Chinese get 8 points, Turn 5 for 9 points, Turn 6 for 10 points and Turn 7 for 12 points.  The KMT has to accomplish that while losing no more than 24 CVPs.

I planned to focus the main body of my troops to the right.  They are to capture the building on the right.  From there they can attack the factory immediately to the south of the canal, meeting up with a smaller force on the left flank.  Capturing the right building also allows for the possibility of forces wading across the canal for the higher value buildings on the north bank.  The small force on the far left is to protect the buildings from possible Red Chinese reinforcement  on Turn 3.  You see, the Red Chinese can choose to introduce their reinforcements from the north (top) side of the map, or the west (left) side of the map.   However if they come in from the south side of the canal, the VP requirements for the KMT drops by 1.

Anyway, that’s the plan .. until bullets start flying.

DB081 KMT1 DF-proc

KMT Turn 1 : The KMT rushed across the street.  A fearful death star appeared on the left flank in the single hex two storey building I never paid attention to before.  On the 2nd level, there was an MMG, a HMG and an 8-1.  On the ground level, there’s the 37mm gun sporting an ROF of 3.  These guys shot up a few of the squads on the left, rendered my HMG team useless for the duration of the scenario and made the rest of the folks very nervous.  The fortunate bit was that the elite Chinese squads were well placed to offer smoke grenades in support.

I was perhaps too careful with the armoured cars.  They are 5 CVPs and 7 CVPs (with a 9-1 armour leader) each, points that I hope won’t contribute to the Red Chinese 25 CVP goal.  Fearing a gun on the right side of the board, I planned to sneak around the side of the roadblock.  However when we ran into the death star, we froze.  In retrospect, the 37mm infantry gun has little more than 6% chance (HE only) of killing the KMT Type 22 armour truck (Chris Edwards’ Kill Calculator).  Granted, MGs can kill these vehicles but freezing in place is not the proper tactic either.

DB081 RC1 Sniper killed RC 8-0 GMT Ldr wound malf deathstar-proc

Red Chinese Turn 1 : Folks in the Red Chinese death star probably didn’t get their ancestors properly lined up.  First, a sniper killed the 8-1 .. and then both the MMG and the HMG malfunctioned on the same shot!  The concealed squads in the factory advanced out to the walls, which was brilliant.  I am not entirely sure why I never made use of the upper levels of the buildings I had to negate the walls.

DB081 KMT2 Sniper broke crew fire lanes-proc

KMT Chinese Turn 2 : KMT attacks!  The turn opened with squads advancing into the smoke that the élite squads laid down.  A 8-0 leader on the right went across the street and kicked the door in with the squad behind him ready to fire.  Other squads moved up and found the second gun at the rear of the building to the right of the map, as expected.  You can see the  laid and the Red Chinese squads putting down residual fire very efficiently.  The deathstar saw the HMG fixed but the sniper returned and broke the crew!

DB081 KMT2 End CVP 4-proc

End of KMT Chinese Turn 2 : This showed how ineffective the KMT attack was.  Losses was light fortunately, the Red Chinese accrued 4 CVP so far.

Red Chinese Turn 2 : On the right of the map, the KMT squads in front of their target building hope to  survived enemy fire and return a massive Defensive Fire back.  The KMT got a MMG team together with a 9-2 and kept the MGs in the death star suppressed. The KMT Chinese were getting ready to attack again.

DB081 KMT3 MPh-proc

KMT Chinese Turn 3 : KMT troops advanced forward on the right into the building.  LMG fire from across the canal came straight down the street.  On the left flank the KMT Chinese figured they should take advantage of the crippled death star and tried to rush the building, only to find the bottom floor fortified.  Worse – it’s fortified with a building full of self rallying crew!

DB081 KMT3 End-proc

End of KMT Chinese Turn 3 : We got into the building on the right. The rush on the left failed as the squad got shot up and bounced off the side of the fortified building.  The centre was pretty decimated.  The leaders were working hard to convince a few to get back into the fight.

DB081 RC3 End-proc

Red Chinese Turn 3 : The reinforcement came in from the north.  Things were not looking up for the KMT Chinese.   We only had a foothold on the right.  The troops on the left and in the middle were broken in huddled masses.  KMT didn’t seem to have enough people to make a third try.

DB081 KMT4 MPh All Shot up-proc

KMT Chinese Turn 4 : The KMT made an all out attack for the factory and the rightmost buildings.  Whilst they would get the right most building, the KMT Chinese got shot up everywhere else.

DB081 KMT4 End CVP18-proc

End of KMT Chinese Turn 4 : The KMT Chinese captured the gun on the right although they haven’t quite secured that building.  The force in the middle were almost entirely reduced into broken stacks.  Folks on the right who were there to guard against the Red Chinese reinforcement decided to move north to have a go at the death star.  I really like Carl’s demonstration of high level tactics.  Here we have a position where, if I attack, makes no contribution to the CVP.  However if I don’t, it will always interfere with my attack elsewhere.

DB081 RC4 End-proc

Red Chinese Turn 4 : The Red Chinese counter attacked!  Can you see the stack with the “DM” counter on top and a grey dotted line that extended to the left?  There’s an MMG in the stack and I should have laid a fire lane down that path to stop the Red Chinese from counter attacking.  However instead I was distracted by the first squad that rushed up.  Now I got 2 big stacks of broken troops threatened by marauding Red Chinese troops.  Since the Red Chinese already racked up 25 CVP, the scenario ended and Carl Nogueira won as the defender.

Notice the 2 fortified locations Carl revealed after the game.  He had the commissar situated in a fortified location in the middle of the factory.  He also had the other fortified hex immediately behind.  That last hex would be his “Alamo” before the Red Chinese bow out of the building.  Capturing a building like so was going to take a few turns more.

I would have the opportunity to improve my play by being the Red Chinese defenders against Carl’s KMT Chinese.

That will be in the next AAR!


Shanghai 1937 in Flames!!!

"Shanghai 1937 - Stalingrad on the Yangtze" by Peter Harmsen

(This is an interview conducted via email, where I talked to Peter Harmsen, the author of “Shanghai 1937 – Stalingrad on the Yangtze” about Advanced Squad Leader.)

Iacta Alea Est!

Wargaming is a method for historians, professionals and hobbyists alike, to get inside the minds of the actors of past conflicts. The games, or simulations, can take place at the grand strategic level, as described in a previous post about the game Dai Senso. They can also offer a more intimate look at combat, putting the player in charge of just a handful of soldiers and facing him or her with difficult tactical decisions. The Advanced Squad Leader (ASL) system is an example of the latter. It has thousands of fans around the world who use its flexibility to play scenarios from a range of theaters during World War Two and the years just before and after – including the Second Sino-Japanese War. We asked Jackson Kwan, a veteran Hong Kong-based ASL player, to introduce the system and especially describe how its versatility facilitates scenarios from the war in China. (The Q & A was performed by email, with special thanks to Jon Halfin for editing.)

Very briefly, what is the Advanced Squad Leader system?

Advanced Squad Leader is a detailed tactical gaming system that models company to battalion level combat in the Second World War period.  It simulates an amazing range of combat parameters: from weather to terrain, national characteristics, leadership and morale, different weapon systems and artillery support.  This allows the examination of engagements from the Pacific theatre to desert terrain, to European theatre and even tundra conditions.  It’s detailed enough to have rules for night battles and for vision effects under differing moon phases.

A short synopsis can be found here:

http://en.wikipedia.org/wiki/Advanced_Squad_Leader

How do you generate new scenarios?

Scenario designers from all over work with Multi-Man Publishing and other third party publishers to produce scenario packs and/or entire new modules (settings) that includes map boards and new counters that represents new nationalities, troop types or weapon systems that did not already exist in the system. Scenario designers combine detailed research of certain engagements and various elements including weather, terrain, troop types, conditions and morale, weapons available and ammunition supply into an abstraction that may or may not completely parallel historical outcomes. The best scenarios often have a creative feeling of the historical events, yet balance out asymmetric conditions, allowing both sides equal chances of winning the engagement.

How good is the system at simulating the Second Sino-Japanese War? Are the results realistic, i.e. are they similar to what really happened during the war?

This is a game system that reflects the feel of the position the opposing commanders faced. It seeks to address asymmetric conditions that battles often are while giving both sides a balanced opportunity to prevail through specific winning conditions and other parameters.

T6 Axis Move-procFor example : if you look at the battle at Shanghai’s Sihang warehouse*) alone, you will find at least four scenarios from different designers that put their own interpretation to the events.  My favorite of the four is a scenario named “Shanghai in Flames” where the Imperial Japanese Army (IJA) battles top quality Chinese troops (who were still around at the time) across a generically represented map reflecting the terrain styles, into the warehouse. Some of the buildings start already on fire and may spread according to wind conditions as the battle progress. As the Chinese fight a desperate withdrawal through the streets against the IJA pushing aggressively in, as the spreading fire almost becomes a third player, routing friends and foes alike.

Producing realistic results is not the primary objective of Advanced Squad Leader designs.  Putting players under similar decision making parameters and operating constraints to reflect the feel of combat command is the bigger goal.

But making these battles competitive and fun is the biggest objective!

What are the main differences between scenarios based on the war in China and, say, scenarios from Europe 1939-1945?

Obvious differences are weapon systems that the IJA uses (vs various European combatant). Differences in national characteristics, leadership styles, training and morale level – of the Japanese, Chinese, Gurkhas etc vs the Germans, Soviets, partisans plus the myriad of Allied and Axis minors. Differences in weather and terrain – jungles, kunai, caves, beaches, marshes, palm trees and huts in the Pacific Theatre of Operations vs woods, brush, buildings, rubble etc in the European Theatre of Operations.

If people want to get into the ASL system, what should they do?

The heart of the Advanced Squad Leader system is the Advanced Squad Leader Rulebook (version 2).  There are various modules for different nationalities and theatres.  The more modules you have therefore, the more variation you will have in the scenarios you can play.  The best thing to do however for new players is: Get in touch with Advanced Squad Leader players in various cities (and there are tournaments held almost every month around the world  http://aslladder.com/asltournaments.html) and/or on online forums.  Advanced Squad Leader is primarily about the chap across the table and definitely not meant for solo play.  (Although a well-developed Solitaire ASL system does exist, it has been out of print for some time. It does indeed make solitaire play possible.)  Most people in the ASL community are willing to teach new players and proficiency in the basic rules usually requires 3 to 6 games before you are ready to move into the various spectra the system can provide.

The Advanced Squad Leader Starter Kit #1 is designed as an initial step to see if this game’s for them. The Starter Pack is a small, self-contained system that will help any new player make the decision as to whether to dive into the full system headfirst, at a minimal cost – and was designed to replace the long out of print original “introductory” module for Advanced Squad Leader “Paratrooper”.

*) An incident during the 1937 battle of Shanghai when during a general retreat about 400 Chinese soldiers stayed behind, defending the Sihang Warehouse next to Suzhou Creek. The decision to make the stand at the warehouse was mainly motivated by a wish to demonstrate to local and foreign opinion China’s willingness to continue the fight.

(Original of this interview can be found : China in WW2)

Roger B. MacGowan & Wargames

906629_828688150475781_3266142249287560170_o

Growing up with Avalon Hill wargames, I have long noticed the same signature on the boxes of some of the most loved wargames : The Russian Campaign, The Longest Day, Squad Leader, Advanced Squad Leader ..etc.

That signature belongs to a prolific designer and game publisher, Roger B MacGowan.

Please see his design gallery.
Please see the list of his art designs.

J116 Brigade Hill AAR, a PTO classic!


J116 - Setup-procThis is a game that I setup earlier in the year when I found that J116 Brigade Hill was going to be one of the scenarios in the Malaya Madness tourney.  Erwin & I managed to do a few turns before the Malaya Madness and sure enough, Brigade Hill was my last game at the tourney.

The Battle for Brigade Hill was part of a campaign where the IJA pushed the Australians along the Kokoda trail towards Port Moresby, Papua New Guinea, during the Second World War.  The IJA setup a blocking force between the Australian brigade headquarters and its forward battalions.  The cutoff Australians were therefore asked to reestablish contact with their headquarters.

I played the IJA and my buddy Erwin from Belgium, the Australians.  The Australians had to take 3 or more of the hill tops marked with “V”s.  The fourth “V” that you can’t see from the map above was under the foxhole on the top right.  This setup is taken from Chris Doary (of BattleSchool).  The Australians came in from the right.  The big hill was tough to defend apart from a reverse slope setup.  In this instance the big hill was left bare and covered by 2 medium machine guns from the hill on the top left and a mortar from the bottom left.  This channelled the Australians through the jungles on both sides of the big hill, ideal IJA country.  I put a HIP (“hidden initial placement”) in the second most likely frequented clump of jungle on the big hill.

J116 - T2 IJA - End Vol Breaks-proc

End of IJA Turn 2 : The Australians advanced carefully to their first VC position and probed the right IJA flank.  The mortar from the top right hill opened fire but it broke on the first shot.  The IJA chucked it down the hill in frustration.  The IJA on the right flank voluntarily broke and melted away into the jungle, looking to use the gully as the second line.

J116 - T3 IJA - Blocking on right Shoot Brits off Hill top Reinforcement entered 02-proc

End of IJA Turn 3: Guns and mortar from both of the small hills start shooting Australians off the big hill-top.  Reinforcements from both combatants entered.  The IJA chose to enter in the “back field” to help defence on the left flank and to tie some Australian units down.  The units on the right flank got into a blocking position and would gain concealment before the turn was over.

J116 - T4 IJA - ? 237 ambush 458 squad-proc

End of IJA Turn 4: The IJAs got aggressive on the right flank.  An IJA half squad was sent to unconceal an Australian squad.  It was killed in the process but the Australian squad was ambushed and killed in the subsequent close combat when a concealed IJA half squad moved in.  The IJA was pressured on the left flank however, the forward units pulled back and the reinforcement group pushed forth to the Australian hilltop.

J116 - T5 Bri - Mortars fight Leader wounded berserk-proc

Australian Turn 5: The opposing mortars continued to duke it out, the IJA finally caught a lucky shot that wounded its leader and made a half squad go berserk!

J116 - T5 Bri - HIP-proc

Australian Turn 5 (still): The IJA revealed a previously HIP’d unit in hex W7 when an Australian squad left its 9-2 leader behind.  We didn’t do this correctly though as the HIP’d unit should have appeared concealed.  Either way as such, the adjacent Australian squad piled in (which I was happy about) but they managed to roll an ambush against the IJA (which I was less delighted about).  The Australians decided to take their leader and withdrew.

J116 - T5 IJA after MPh-proc

IJA Turn 5: The last Australian turn put the IJA left flank under pressure.  The IJA reinforcement group decided to shift back to threaten the Australian rear.  The previously HIP’d IJA squad continued to pursuit the escaped Australian 9-1 (and the 458).  See that stack I noted as “Dummies” in the foxhole?  That hill would have been Australian quickly had Erwin know this.  The IJA stepped up their counterattack on their right flank.  The IJA broke the other Australian squad on the lower left of the map and the berserker piled in!

J116 - T5 IJA CC Entire Stack killed-proc

IJA Turn 5 (still): An  IJA HS jumped back into the 9-1 & 458 stack and managed to annihilate everyone in the hex.  The brokie routed away from the berserker on the bottom left at the moment, for a little while longer.

J116 - T6 Bri Mortar + Snakeeyes killed 8-1 breaks squad .. both MMGs broke-proc

IJA Turn 6: The hill on the bottom left was threatened by a slow-moving concealed Australian stack up the middle.  The wounded 8-0 in the lonely foxhole decided to grab the mortar himself and took a shot at the approaching Australians.  A snake eyes shot along with fire from the previously HIP’d IJA squad on the big hill broke the Australian squad and killed a leader.  This squad would then be eliminated for failure to rout.  Our death star on the top left tried to hold off the hoards and broke BOTH MMGs together!  Baadddd timing …

J116 - T6 IJA CCPh -procIJA Turn 6 (still): This was the last IJA turn before the final Australian onslaught.  The IJA made an unsuccessful effort to take the Australian fox hole on the top right.  The IJA berserker chased down and killed an Australian brokie on the far left.  A concealed IJA squad, determined to clear the field, advanced onto and killed a half squad in the middle right.  The MMG crews and some half squads stacked up on the top left hill.  Since IJA crew stripes instead of breaks, one round of gun fire would not be able to push them out of the hex.  If the Australian half squad moved up the hill and engaged the stack in close combat, the Australians wouldn’t be able to own the top left VP hex without another squad stepping in.  The IJA right flank resumed its blocking position.

J116 - T7 Bri End CC-proc

Australian Turn 7: On the top left of the map, the Australian half squad refused to be broken by IJA gun fire. It advanced up and engaged the IJA stack in close combat.  Since Hand to Hand combat is not an option for the Australians, the likely outcome here was that the units would be locked in a perpetual mêlée.

We rolled.  The Australians failed the “To Kill” number by 1!

The IJA got a Critical Reduction result, thereby killing the Australian half squad.

The IJAs won.

Other AARs:


“Crossing the Moro” by Lone Canuck, Pictorial

Got up on this fine Saturday morning after two days on the road and decided to give the mailbox a peep … found this delivered by Helen & Chris at BattleSchool today!  George Kelln’s (Lone Canuckdescription of the scenarios therein.

photo 1

photo 2

photo 3

AP90 Smashing The Hook (an AP9 “To The Bridge!” scenario)

I was chatting online about Gary Fortenberry’s new Advanced Squad Leader Action Pack “ASL Action Pack 9: To The Bridge!” when Sam Tyson offered to play.  The next thing I knew, I was experiencing a truly action packed scenario, well designed and well “interpreted” by Sam. This was February 1942 in Burma.  Patrols from the King’s Own Yorkshire Light Infantry discovered IJA roadblocks around Danyingon.  So elements from the King’s Own Yorkshire Light Infantry and the 1/7th Gurkha Rifles set out to evict the IJA from the area.

There were 2 roadblocks in predestinated positions on the map.  The British goes from the bottom of the map to the top.  They get an instant win when they clear both roadblocks or if there are no good order IJA troops around either roadblock after five and a half turns.  The British got a mix of armoured cars and (scary) Gurkha ladened carriers.  The IJA got to hide (always good) plus a Mountain Gun. 001 AP90 BT1 Start-proc

British Turn 1 : You can see where the IJA gun was hidden and where it was bore-sighted.  There was an MMG on the hill to the top left bore-sighted to a path through the jungle.  There was an IJA half squad hidden in the brush hoping that the British would pass him by and another IJA half squad near the first roadblock in the middle of the map.  There’s a scenario special rule that requires all hidden IJA to reveal themselves via Banzai attacks in Turn 4.  I figured that might be where the British would be by then.  The British were very aggressive in their first move given the short time frame.  My foxhole on the hill on the bottom of the map was immediately overran.  Nothing but a human speed bump!  The carrier hooked around the foxhole and made sure there was no escape for the IJA half squad therein. 003 AP90 BT2 AFPh Start-proc

British Turn 2 : The British methodically beat down the brush and found our first hidden IJA half squad.  A British armoured car headed straight for the defending IJA at the roadblock.  IJA’s LMG scored a hit and a lucky kill.  The IJA started backing off. 004 AP90 BT2 RtPh Vol Break-proc

British Turn 2 Rout Phase : The IJA started melting away before the British could engage them in close combat.  The IJA looked to delay and to collapse into the last roadblock gradually.  They formed a line right before the tree line where the hidden IJA half squad was. 005 AP90 JT3 DFPh Cleared Roadblock-proc

IJA Turn 3 : The end of the turn saw the IJA melting away again, collapsing towards the last roadblock.  Before the MMG team on the hill on the middle of the map did, they vaporized a British half squad coming down the jungle path.  The Brits then decided to use a carrier to create a trail break in the jungle nearby.

006 AP90 JT3 CCPh Jumped the Brits-proc IJA Turn 3 : The IJA MMG team from the middle of the map repositioned to around the last roadblock, MG trained onto the road.  A big stack of British troops successfully removed the first road block.  A British 9-1 and a Gurkha squad walked into the hidden IJA half squad in the last turn.  The half squad should have popped up in the earlier British Turn when this happened.  Hand to hand fighting nonetheless ensured immediately and they were all killed. 007 AP90 BT4 Gun appears carrier immo-proc

British Turn 4 : The Brits were out to chase down the routing IJA squads.  The first carrier sped down the road and the IJA gun roared from behind the second roadblock.  The carrier was hit and immobilized.  Meanwhile the hidden stack on the bottom of the map tried to get the British armoured car’s attention by slowly creeping towards the British backfield. 008 AP90 BT4 MG hit but bounced Int Gun kill carrier-proc

British Turn 4 still : The action heated up as the second carrier comes running down the path.  The MMG managed to score a hit but the bullets bounced off.  This carrier managed to hook around and cut off the IJA brokies’ rout path.  The third carrier went straight for the roadblock!  The gun crew intensive fired  and killed that one too.  The rest of the British troops moved in quickly.  This was Turn 4, the British had 2 more Movement Phases to go.

009 AP90 JT4 WP and formed a line-proc IJA  Turn 4 : The IJA mortar crew laid a white phosphorous (WP) round on the carrier but the Gurkhas were too tough for it.  The WP round did allow the IJA troops to slip by and escaped back to around the second roadblock.  The IJA gun killed the immobilised carrier, taking more of an interest in its Gurkha crew.   However, I should have left the gun pointing towards the right for the next British round. The British were consistently great at cutting rout paths and taking prisoners.  The IJA realised they need to stop the British from getting behind them if they were to survive – hence the line. 010 AP90 BT5 IJA Vol Break-proc

British Turn 5 : While their comrades held the line, the IJA on the left melted away so they could counter attack against the British troops at the roadblock.  The armoured car on the bottom of the map finally verified that we had a moving stack of dummies.  It was a miracle that the IJA kept this armoured car out of the battle for so long! 011 AP90 BT5 CC 2 Melees Big stack on Roadblock-proc

British Turn 5 still : The British were unlucky in that all four close combats started with IJA ambushes.  However the IJAs were killed around the gun and 2 of the fights resulted in melees.  Only on the right did we see a solitary but concealed leader slaughtered a British half squad and slipped deeper into the jungle. 012 AP90 JT5 Counter Attack!!-proc

IJA Turn 5 : The routed IJA again rallied and attacked towards the roadblock.  The British were assembling around the roadblock at this stage.  If they manage to clear the roadblock, they get an instant win but if not, they would need to makes sure there were no good order IJA troops around the area marked with a big red hexagon. 013 AP90 JT5 -9 Roadblock Clear mod-proc IJA Turn 5 – Game End : The close combat phase was a good one for the IJA, they reclaimed two of the hexes around the last road block.  However, the British were able clear the roadblock by rolling less than 10.  (You need to roll 2 or less on a pair of dice, but the Brits had enough people to get a -7 modifier.)

Mr. Sam Tyson won!!

FE27 The Bravest Thing I Ever Saw

This scenario from Fanatic Enterprises describes a situation in Bataan in January 6 1942.  The Americans fought a delaying action that saw the gunners from both sides exchange shells for shells.  Carl Nogueira played the defending American and I the attacking IJA in this after action report (AAR).  We actually exchanged sides and played this twice, with me getting my teeth kicked in both times.  This is already the less ugly version, rated PG-13.

The side that gained the most Victory Points (VP) wins.  You can gain Casualty Victory Points normally and you gain 1 VP for controlling each Level 2 hill hexes on your opponent’s side.  The Americans set up on the bottom of the map and the IJA on the top.  We get 5 and a half turns.

01 FE27 JT2 02 CC Kill-proc

IJA Turn 2 : You can see where the IJA guns were.  Line of sight (LOS) to the American hill tops were limited due to jungle terrain.  You can also see two hidden 2nd liners to slow down any sort of American counterattack.  The big stack in the middle of the top map were two IJA medium machine gun (MMGs), but their leader, a 9-1 who’s also the best leader in the IJA order of battle (OB) was killed by a sniper early in the game.  You can see the 3 lines of IJA advance on the American side.  The left most IJA rush would have been the most threatening but I failed to capitalise on the situation properly before they got wiped out.  The middle advance would be stuck for a while and in retrospect I should have strike out through the swamp towards the right to put the squeeze on the Americans on the hill on the right of the American positions.  On the right, the IJA caught and took an American 8-0 and a squad together with it in a flurry of hand-to-hand action.  At this point I expected the American guns to be towards the bottom of the map.

02 FE27 AT3 01 Start-proc

American Turn 3 : The IJA found the first American gun on the left by walking straight into it.  There was nothing left of the squad.  The attack on the left was also wiped out and the Americans started moving towards the right.  The attack in the middle was floundering as well.  The IJA on the right kept pushing towards the bottom of the map, fully expecting to find the second American gun there.

03 FE27 AT4 01 Start-proc

American Turn 4 : The American gun on the left malfunctioned!  The IJA forced their way through the bamboo to kill the gun crew before they had a chance to fix the infernal contraption.  You can see a blotch of red on the hilltop to the right where once again, the IJA found the other American gun the wrong way.  You can also see the pair of IJA MMGs moving in during the last turn as it didn’t look like the Americans were going to make a push to the north.

04 FE27 JT5 02 CC IJA dead US CR-proc

IJA Turn 5 : The IJA troops surrounded an American 8-0 and a 2nd liner in a 3 point stance.  The IJA were of course, feeling very pleased with themselves.  There was an IJA demolition charge laying on the ground in the middle.  That was the aftermath of an IJA half squad’s attempt to blow up the American MMG stack.  On the right, the IJA made another attempt up the hill and caught more Americans in close combat.  Unfortunately this IJA half squad could only take half of the American squad with it.  On the bottom right of the map you can see the Americans on a reverse slope defence configuration, looking to get the first shot in if any IJA pop over the crest line.  The probing stack of IJA troops however decided to move back up to their leader for a last push as time was running out.

05 FE27 AT5 01 Ring of Fire-proc

American Turn 5 : The “ring of fire” on the left broke the American squad but they failed to encircle the Americans properly.  Apparently you need to fire at the target sequentially for encirclement to happen (A7.7, note to self).

06 FE27 AT5 02 Ops-proc

American Turn 5 (still) : On the left, the broken American squad surrendered and the IJA picked the weakest (a 1-2-7) amongst the trio to be the guard.  That was the last mistake they would ever make.  The American 8-0 promptly jumped on the otherwise occupied IJA half squad in close combat …

07 FE27 AT5 02 Counter Capture-proc

American Turn 5 (aftermath) : The American 8-0 singlehandedly killed the IJA guards, rescued his men and found enough weapons to rearm half of his squad.  (Note to self : encircle properly & be mindful about who’s to play guards).

08 FE27 JT6 02 Banzai DC Hero-proc

Final IJA Turn : The IJA decided that they wouldn’t go down without a proper Banzai charge.  Therefore they targeted the gun crew who ventured out to retake a hill hex.  Just to be professional about it, they even short-strawed a poor chap to be a DC hero as well!  He was well perforated, his DC satchel went flying but he drew enough fire from his “friends” for them to jump on the American gun crew.

09 FE27 JT6 03 Wounded Leader-proc

Final IJA Turn (still) : An IJA leader in the middle rushed in and tried to grab the DC pack.  He got shot and was wounded as he picked it up and he never managed to place it.

10 FE27 JT6 04 CC again-proc

Final IJA Turn (almost done) : An MMG crew from the original “Ring of Fire” caught up with the American leader and squad on the left, knives drawn …

11 FE27 JT6 05 End-proc

Final : The banzai’ing IJA came victoriously out of the close combat on the right.  The folks on the left however would be locked in perpetual mêlée.  You would know I lost the game a long time ago if you can see the huge stack of IJA casualties.  Carl was nice enough to play this through to the bitter end!!

Lessons learned:

  • When playing against the Americans, the IJA needs to make good use of the Advance Phase.  Try to move into American Line Of Sight only in the Advance Phase, and if you can stay concealed, even better.  This way the IJA don’t have to take high American firepower with “First Fire Movement in Open Ground” (FFMO) and “First Fire Non Assault Move” (FFNAM) modifiers.  If the Americans fire in the following Prep Fire, they don’t get to move away and the IJA will have a chance to fire against their low morale (US Marines excepted).
  • Don’t give prisoners to someone who might not fare well in (close) combat.
  • Encirclement : remember to fire on the target sequentially.
  • Use 7 as a gauge, if you can get a result on a 7, it’s a good choice.  Alternatively, try to move in routes that stack so much DRMs on your opponent’s shot that he/she can’t get results on a 7.
  • Don’t spread your forces too thin.  There should be reserves behind an attack to exploit results.

Other thoughts?

A44 Blocking Action at Lipki AAR

I love PTO.  However, jungles do not present decent tank country.  Too much time spent in the PTO as a newbie can result in lopsided development that is short on armoured fighting vehicle (AFV) experience.

This scenario took place near Borisov (Russia), mid-1941 – the opening stages of Barbarossa.  Elements of the 1st Moscow Motor Rifle Division was sent to block the spearhead that was Guderian’s 18th Panzer Divison.

001 Turn 2 German Rally-proc

North is on the right of the map.  The Germans deployed on the top map (west) and the Russians came in from the bottom (east).  The Russians win when they exit more than 15 victory points (VPs) off the top edge of the map between the road on the top middle to the road on the top right. The other way to win was to kill enough Germans.  The KV2 was worth 7 VPs, the T-34 was also worth 7 points and each squad was worth 2 points.  As you already know, the Russians had a KV2,  a T34 M40 and a couple of BT7s.  The Germans had a couple of PzIIIGs, a halftrack sporting a 37mm gun with a high rate of fire (I forgot about the ATR that it also carried) and a couple of halftracks with the usual machine guns.  They were backed by a 28mm antitank gun and further reinforced by a pair of PzIVEs in Turn 4.

The above was the German Turn 2.  You can see the two Panzers on the left lying in wait and hoping to get a first shot at the Russians.  The antitank gun was towed to a clump of woods near the exit for a last-ditch defence.  The half track with the 37mm gun was on the right and they could hear the speedy BT7s and a convoy of trucks rumbling towards them.

002 Turn 3 Russian Move HT37L blew up BT-7 rof-proc


This was the Russian Turn 3.  The T34 came up the left and the PzIIIG fired, looking to scoot behind the woods quickly afterwards.

I rolled a 1,1 .. and  a 1.  Critical Hit!!

The T34 exploded into a burning wreck, and the German tankers sat stunned as bits of Russian tank rained down.  On the right, the 37mm gun pumped shot after shot into one of the BT7 and killed it.

001 Turn 3 German Idiot Move ATR-proc

This was the German Turn 3.  I am very inexperienced in tank warfare so you won’t see an end to idiotic moves in the near term.  This was one of them. I backed a PzIIIG up over the bridge on the left in the hope of being able to get away faster when the Russian tanks appear.  Not only did I presented my rear facing to the Russians, I forgot to button up.  The tank was immediately stunned by infantry fire and then killed by a Russian antitank rifle (ATR).  Things worked out better on the right as my 37mm gun shocked the other BT7.

005 Turn 4 German DPh Capers abound-proc

This was the German Turn 4.  To the left you can see another one of my moments.  The Germans were hoping to crash a halftrack through the woods on the left, get back on the road and circle around the back of the Russian trucks on the right.  However, they realised that trail breaking took a little time and by the time the half track emerged from the woods, it was looking down the barrel of a KV2!  So instead of breaking to the right of the map, they sped towards the left to escape.  The KV2 fired but the halftrack speed and its size saved it.  The surviving BT7 recovered from its shock and killed the gun-toting halftrack.  Unfortunately the reinforcing PzIVEs arrived and got it bracketed from two directions.

008 Turn 5 Russian DFPh Truck immo-proc

This was Russian turn 5.  Our escaping halftrack on the left had a Russian ATR squad on its tail.  The KV2 on the other hand laughed and used the trail-break created by the charitable halftrack to get to the “inside line” of the Germans.  The BT7 blew out its gun in a shootout with the PzIVe on its left (which also malf’d its gun) and was killed by the PzIVe on its right.  The right PzIVe proceeded to shoot up the Russian trucks one by one.

009 Turn 5 German MPh Berserk Charge Killed by Sniper-proc

During German turn 5, one of the German half squad had a berserk moment.  They got tired of the shooting and concluded that the proper thing to do was to charge the Russian medium machine gun.  So off they went.  They ran through Defensive First Fire, then Subsequent First Fire … jumping into the MMG nest, they survived Final Protective Fire!!  “.. and THIS is how it’s done!!” they yelled.  Meanwhile, Katya, the peasant girl sniper rolled her eyes, spat and muttered “Men” before shooting up the marauding German half squad and ended the lunacy.

011 Turn 6 Russian DF KV2 moved up German shot up trucks-proc

This was Russian Turn 6.  During the last German turn, the only Panzer with a functioning gun sped into its final position while its colleague proceeded to kill all the Russian trucks with its MGs on the right of the map.  However,  the KV2 killed the halftrack that tried to escape from in front of the wooden house.  The escaping halftrack to the left survived another shot from the Russian ATR and ran.  The KV2 crew watch incredulously as the crazy halftrack ran across its covered arc.  Then it realised that KV2 can’t intensive fire.  The halftrack disappeared behind some woods.  In this turn, the KV2 followed.  I can only imagine the commotion on the halftrack as the KV2 reappeared on its “rear view mirrors”.

012 Turn 7 Russian AFPh KV2 Malf-proc

This was Russian Turn 7.  The mighty KV2 lumbered towards the goal line.  The PzIVE and the antitank gun bounced shot after shot off its front armour.  The KV2 went to a “fork” position, threatening the German truck with its rear MGs while shooting back at the antitank gun with high explosives from its terrifying “bunker busting” 152mm gun.   The antitank gun crew worked as fast as they could, dreading the massive fireball that the next moment must bring.

Then for a moment, there was silence – the 152mm gun malfunctioned.

My First Foray into PTO terrain : ASL153 Totsugeki! AAR

I played ASL153 Totsugeki! a while ago with Brian Y.  I played a few PTO (Pacific Theatre of Operations) scenarios before but this is my first foray into full-blown jungle terrain.

The usual Chinese vs Japanese (IJA) or Canadian vs Japanese scenarios occurred in China or Hong Kong, both of which are not in PTO terrain.  ASL153 Totsugeki! however, took place in northern Burma.  “Totsugeki” is Japanese for “Charge”.  Chinese gunners, working with the Americans, were cut off in the jungle with fields of fire still uncleared.  The IJA 55th Regiment pushed in and everyone in the 6th Field Artillery Battery found themselves fighting for their lives.


A60-JT1a-proc

IJA pushed in from the top of the map.  There are three Chinese guns in specified hexes.  The Victory Conditions for the IJA is to eliminate or to capture all three Chinese guns and to occupy their hexes with good order crew/half squads/squads (“MMC” in ASL parlance) in 6.5 turns.  The Chinese has 14 first liners vs the IJA’s 11 but they were understandably shaky (ELR 2).

This is Japanese turn 1.  The IJA wasted no time in rushing both flanks.  They showed that the IJA squad will almost always get to where it wants to go.  The jungle hindrance of course helped a great deal.

A60-CT1 AFPh-proc

End of Chinese Turn 1 : you can see the IJA was successful in turning both flanks.  The Chinese 2 squads stack with the leader posed an issue though since it occupied a key position in the center of the map.   Approaching IJA units invariably got shot up.

A60-JT2 MPh CANDYGRAM!-proc

Japanese Turn 2: The IJA decide to get the party going with a DC Hero (“CANDYGRAM!!!”, a phrase favoured by one of my ASL mentors, Witchbottles).  Unfortunately the Chinese weren’t ready to go wild yet and promptly shot the messenger.

A60-JT2 CC Ambush Kill-proc

Japanese Turn 2 still : IJA forces slid down the left flanks, ambushed and killed the Chinese medium machine gun (MMG) team.  This flank looked shaky but the Chinese held firm in the middle.  That double squad Chinese stack in the middle were still chuckling over their DC hero kill.

A60-JT3 Banzai-proc


Japanese Turn 3 : The IJA was getting frustrated about not being to make much inroads in the centre and on the right flanks.  On top of it, trotting through the jungle was a very slow going affair.  So they decided to do a banzai attack!


A60-JT3 End-proc

This is my first banzai attack in jungle terrain and I started to appreciate how well banzai attacks go together with jungles.  It is got to be terrifying to have IJA troopers crashing out of the trees and falling into the ranks with bayonets and swords waving!  This charge allowed the IJA forces in the centre to link up with the right flank.

A60-JT5 End DFPh - both Chinese guns malf-proc

Japanese Turn 5 : The IJA spent turn 4 bringing the troops together for the final assault on the guns.  The IJA mass assault moved through the jungle.  The two guns on the flanks fired pointblank at the incoming IJA and they both malfunctioned!

A60-JT6 MPh Banzai Charge-proc

Japanese Turn 6: The IJA came into contact with the Chinese troops around the gun and one last banzai ensured!

A60-JT6 AFPh .. DC Hero shot-proc

Sensing that the game was almost over, a DC hero decided to gave it another go.  He too was shot before he could deliver the payload.  On the other hand the last banzai piled a few IJAs into the last gun hex.

A60-JT6 End-proc

The IJA captured the last Chinese gun and surrounded the defenders.

Totsugeki is a great introduction for me to the PTO terrain.  Going toward I’d very much like to explore the best ways for DC Heros  to play together with Banzai’ers.

I’d also like to commend Brian Y as a terrific ASL player.  Thanks for a great game Brian!

Please see also my friend Joss Attridge’s experience with Totsugeki : “Totsugeki (ASL 153)”

Banzai