ASL102 Point of the Sword

ASL 102.Setup-procGoogle Map : Juno, Sword, Langrune-sur-mer & Caen

This is a Normandy scenario, dated 6 June 1944, D-Day. The 4th Commando Brigade moved towards Langrune-sur-Mer and into elements of a Panzer division. They radioed the French Canadians nearby for help and they joined the fight on Turn 4.

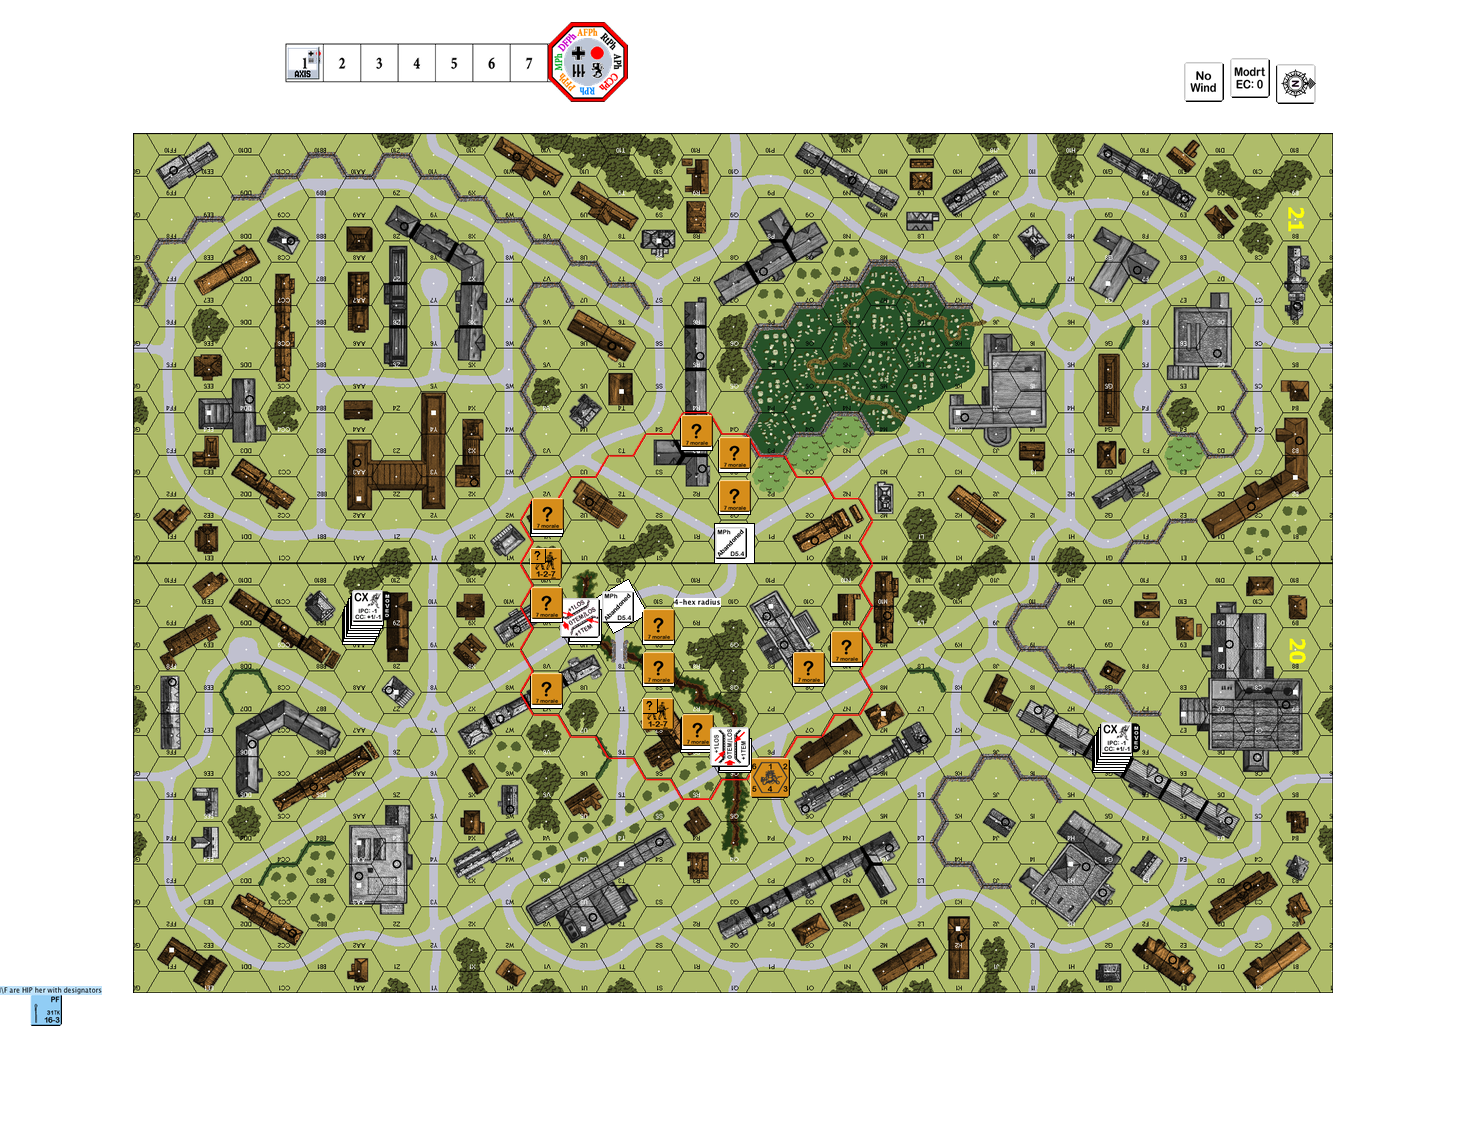
On the far north (left on-screen) of this board is a big patch of woods. As you move towards the south it’s vast tracts of open ground with little patches of grain and orchards. There’s a village on the south (right) with a lot of rowhouses and stone walls.

The commandos setup on the left at the edge of the woods. The Germans setup in the village. The commandos are assault engineers and so they get smoke grenades at 4 or less. They get some demolition charges and a 51” mortar. The French Canadians bring in a couple more mortars and heavy machine guns later on, also from the north.  The Germans get a heavy machine gun, a medium machine gun and a few light machine guns plus a 50” mortar.

The Germans have 3 fortified hexes in 3 different stone buildings. The Commonwealth wins immediately when they control 2 or more buildings that contain fortified hexes. Takezo played the Germans while I played the Commonwealth.ASL 102.1AlliedDFPh-proc

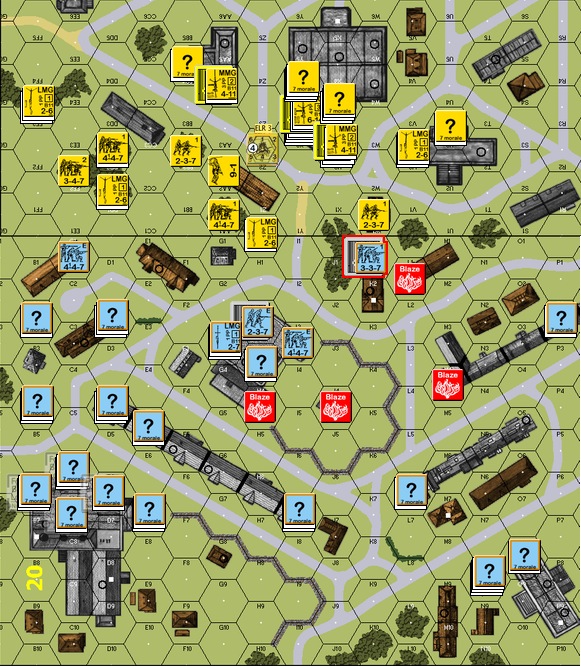
This is Allied Turn 1 :  the commandos started making the trek over the divide.  The mortar fired off a smoke round down the road where the German HMG pointed at.  I hoped to feint a left (east) and head right (west) when the French Canadians show up on Turn 4.  I made the mistake of putting the mortar too far back though.  Later on in the game it was unable to support the push.ASL 102.2AlliedMPh - -proc

Allied Turn 2 : My hero rushed up with a demolition charge to draw some fire away from his brothers.  He got than that.  He ran into a hidden German half squad in the woods and got shot by the Germans holed up in the buildings from the middle of the board.  The British sniper was very active as well, hitting the same stack of Germans at the top of the map multiple times!ASL 102.4AlliedDFPh-proc

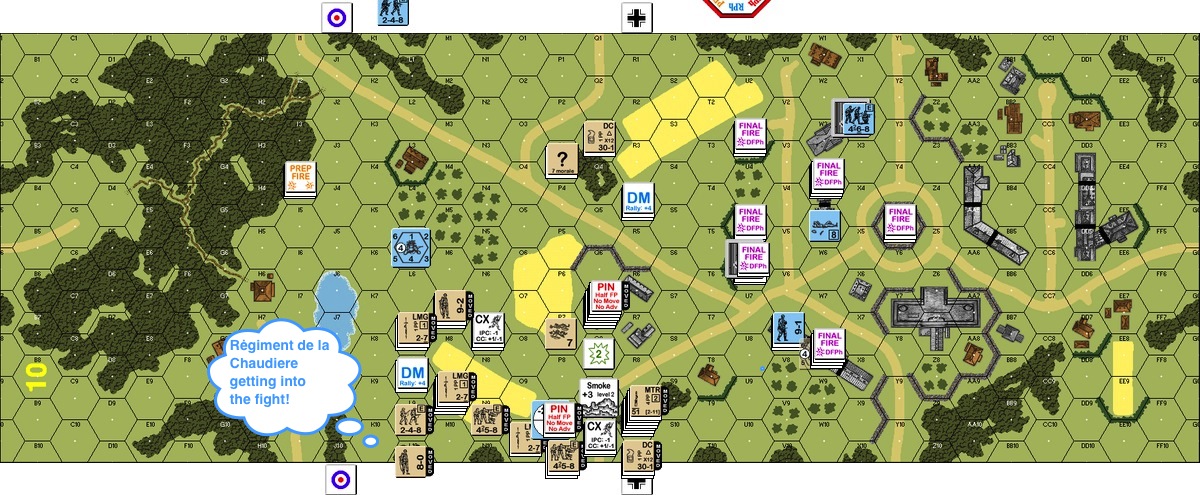
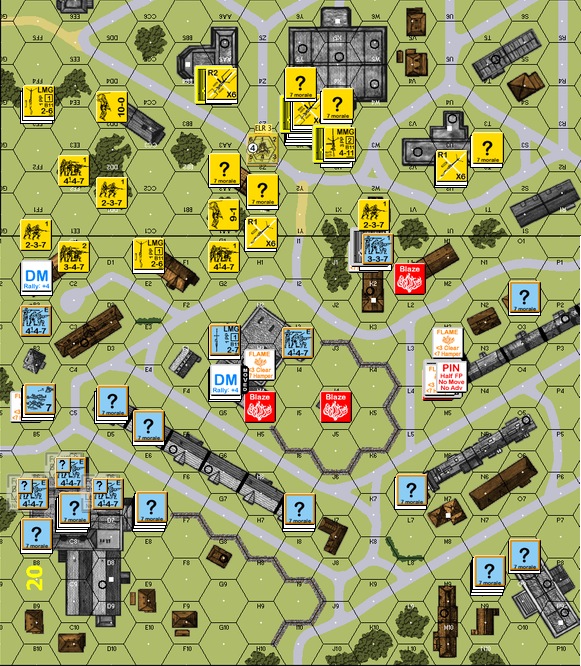
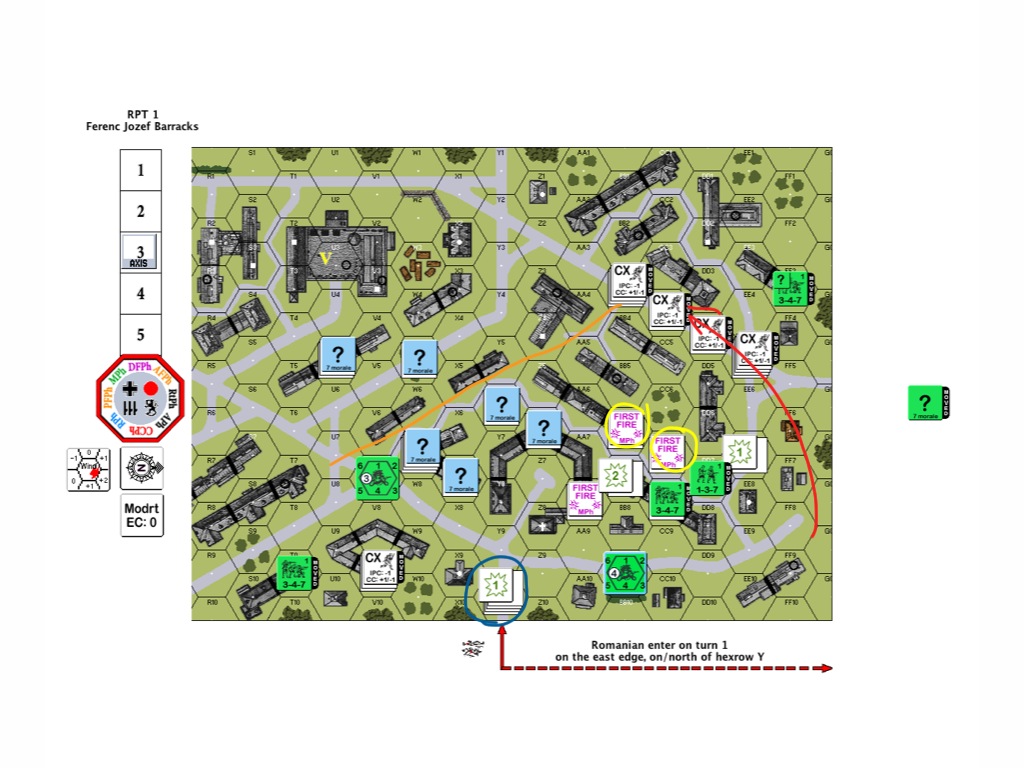
Allied Turn 4 and the French Canadians arrived at the scene.  There were a number of German MG and a mortar (in that roundabout) to content with, hence the entry was crowded and disorganised.  The commandos threw smoke grenades to cover their approach the best they could.  The British mortar was embarrassingly out-of-place.  By this time it was quite clear that the schwerpunkt was coming from the right (bottom).ASL 102.5AxisMPh-proc

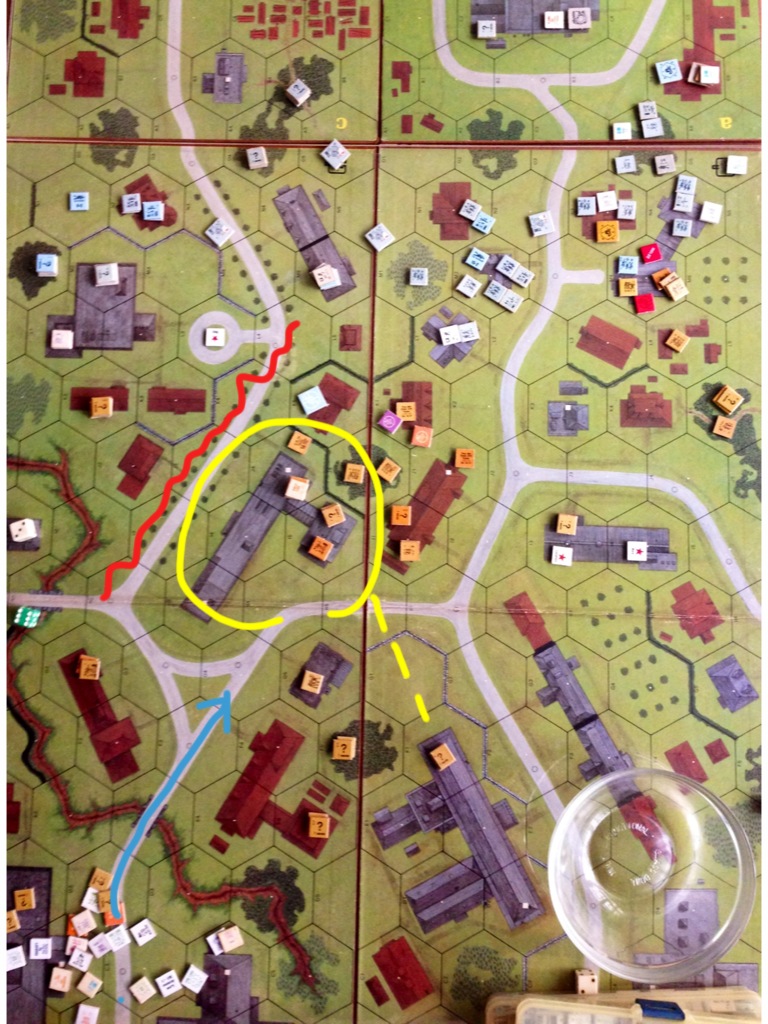
Axis Turn 5 : the Germans were moving back and to the west (bottom).  The lead Commonwealth troops moved fast enough to harassing the retreating Germans.  ASL 102.7AlliedAFPh-proc

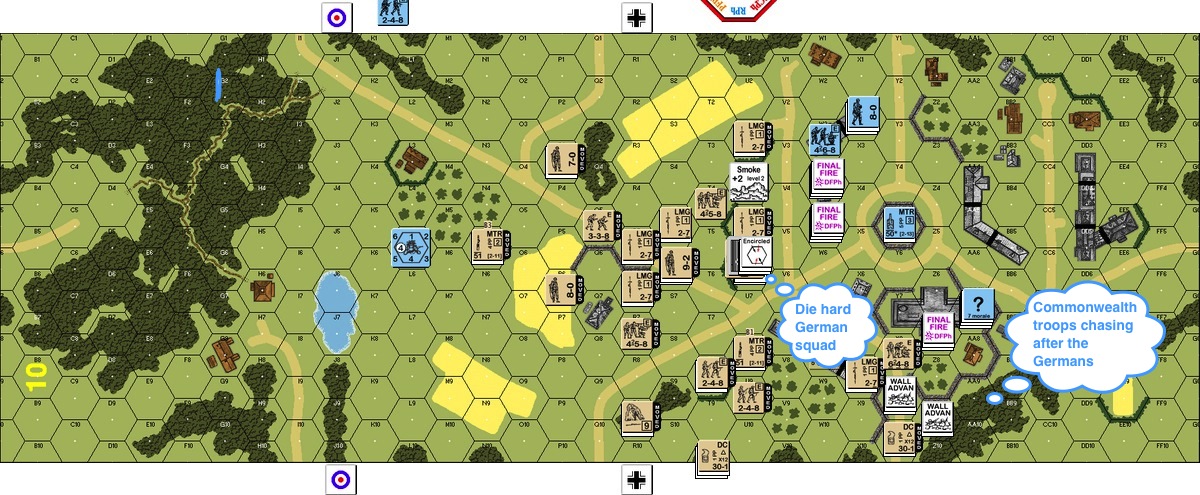
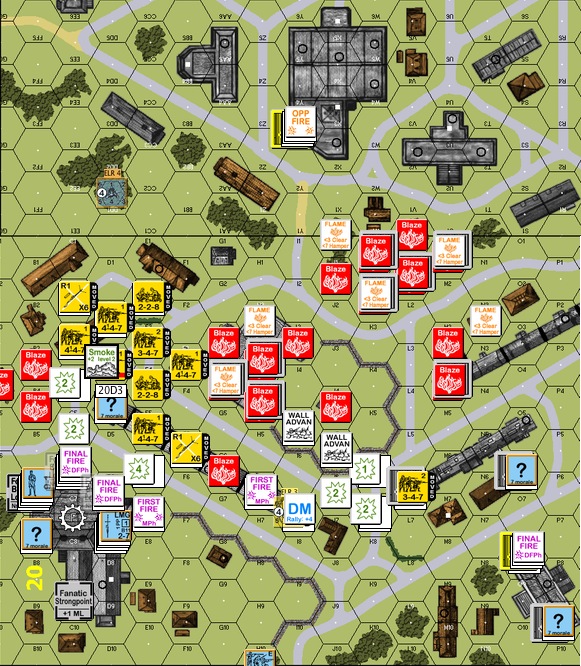
Allied Turn 7: there was a bit of drama with the Germans holed up on level 1 of a stone building.  Earlier shots pushed them towards being fanatic.  Rounds after rounds of fire couldn’t touch them.  The French Canadians figured they would give it a last try with a feeble little 50″ mortar.  Guess what?  They rolled snake eyes and got a critical hit!!  The crowd went wild (to the extend PBeM could..).  As the dice gods would have it : they then rolled boxcars for the IFC resolution …. I swore I heard my British counters groan from their boxes.

The Commonwealth troops, close behind the retreating Germans, moved to have them encircled.
ASL 102.8AlliedMPh-proc

Allied Turn 8 DFPh and I was out of time : Tazeko revealed where the Fortified hexes were after the last Allied Movement Phase.  The Commonwealth troops would end up advancing into 1 out of 3 of the fortified buildings as opposed to the 2 required by the victory conditions.

For those of you who played this before, you are right, there’s a slight mistake here.  The 3 fortified hexes should be in 3 different stone buildings.  Oh well, a game is a game!

Going forward there are a few things I will do differently as the attacker :

  • move forward more aggressively, seek to push the boundaries and set the tempo as opposed to having the tempo dictated to by the defence.
  • have the mortars move up together with the troops.
  • if I am to play this scenario as the attacker again, my commandos will seek to push up a lot further to allow the French Canadians space and cover to get on the board easier

Any thoughts and/or advice, please comment!

Resources : Joss Attridge’s “Point of the Sword (ASL102)” in HullDown.Org

Eglise de Langrune sur Mer, Calvados, France

Eglise de Langrune sur Mer, Calvados, France (Photo credit: Wikipedia)

A German prisoner captured by Canadian troops ...

A German prisoner captured by Canadian troops at Langrune sur Mer, 7 June 1944. (Photo credit: Wikipedia)

Headquarters, 4th Special Service Brigade, mak...

Headquarters, 4th Special Service Brigade, making their way from LCI(S)s (Landing Craft Infantry Small) onto ‘Nan Red’ Beach, JUNO Area, at St Aubin-sur-Mer at about 9 am on 6 June 1944 (Photo credit: Wikipedia)

Unboxing the “RISING SUN”!!

The Rising Sun is the latest reprint module from Multi-Man Publishing.  It’s an impressive combination of the out-of-print modules Code of Bushido and Gung Ho!.  The counter artwork was redone, the rules updated and the scenarios rebalanced, giving ASL‘rs everything he/she needs to get into the Pacific Theater of Operations (PTO).  While a lot of our American compatriots have gotten their copies already, I suspect the rest of the world is only starting to get theirs.

Here’s the unboxing of a copy that hit the PTO today!

IMG_6555IMG_6556IMG_6557IMG_6558IMG_6560IMG_6559IMG_6562IMG_6561IMG_6563IMG_6564


Resources :


A110 Shanghai In Flames

West wall of Sihang Warehouse, Shanghai, China, late Oct or early Nov 1937

Chinese soldiers on the roof of Sihang Warehouse, Shanghai, China, late Oct 1937

It was October 27 1937. The Imperial Japanese Army had already been in China for years. Manchuria and Beijing were already under Japanese control. Chiang Kai-Shek, the leader of the Chinese Nationalist Party and a graduate of the Imperial Japanese Army Academy had been until then, conceding to Japan’s demands at every turn while building up an army with the Germans (see the German helmets in the photo? The Tripartite Pact wasn’t signed until 1940.) The 88th Division was the elite of the Nationalist Chinese forces. Its 524th Regiment held out against IJA’s 3rd Divison at Sihang warehouse situated across the Whampoa River from the “foreign concessions” long enough to sway western opinions about IJA’s aggression on Chinese soil. (Here’s a GamesSquad Forum thread with a great writeup about the battle.)

I am playing another scenario around this battle at the same time – AP54 800 Heroes. You will certainly see an AAR here once that’s done. By the way, there was only 423 men and 16 officers defending the warehouse but they reported their numbers to be 800. Hence this incident is known to the Chinese as “800 Heroes” or “八百壯士”.

The interesting bit about A110 Shanghai in Flames is that the Blaze is the 3rd player. Both players need to work around it and even with it, as you will see.

I am fortunate enough to be playing the Chinese. Here’s the IJA Turn 1.
End of T1 Axis
The Sihang warehouse is the factory on the lower left of the screen. Three hexes within were fortified. I find the row house in front to be incredibly useful in providing blind hexes against IJA machine guns situated in the multilevel buildings at jump-off (top part of the picture). The IJA could slide down the far left, come through the row house (using the big stone building in the middle) or swing around the far right. I made sure that I got fire lanes down some of the streets and the leaders (there are only 2) sited to keep the chaps from cowering. I also made sure approaches to these machine guns were covered even if it’s the inherent firepower of lone squads, FFMO+FFNAM (penalties for moving on open ground and not using assault movement) is a deadly thing.
Axis Turn 2 - Chinese squad volunteered routing on the left to avoid CC
The above was the IJA turn 2. IJA pressed down on the left and the middle. A Chinese squad broke voluntarily to avoid close combat on the far left. The mission was to survive long enough to delay the IJA onslaught for as long as possible! The IJA machine guns from the top of the map were pretty threatening but my opponent had the worst of luck with the dice. They broke repeated and finally knock themselves out of the game!

The best thing I did was to lit the building on the bottom left of the screen above the factory (see the “flame” blow the broken unit?) up early. It soon developed into a blaze that denied the IJA use of a terrific jump off point for the final attack on the factory.
T5 Axis Move-proc
Okay, this is the Axis Turn 5 where the Chinese took the wraps off their heavy machine gun (lower left, “First Fire”) from within the factory and laid a fire lane down the street. Unfortunately it malfunctioned not long after. A light machine gun in the row house did the same joined by the medium machine gun from the bottom right at the end of the long street.

You can also see that the big stone building the middle was pretty much engulfed in flames. The IJA was forced to come through its immediate right. The Chinese was able to put a HS up the wall and laid out some pain as the IJA squads came towards it on open ground.

This is what I mean by the Blaze being the 3rd player. Time and time ahead the Chinese had to rout out of buildings as their hex bursted into flames but it also denied the IJA some really great positions.
T5 Allied AFPh - Sulking-proc
Two more IJA turns to go, the Chinese troops skulked like the best of them. The MMG on the bottom right should have went down to the other side of the row house and prep for the last fire lane but had to scoot upstairs instead to avoid the pesky IJA half squad hanging around the streets. The row house defence line was collapsing at this point.
T6 Axis Move-proc
IJA Turn 6 – the legendary IJA step-reduce steamroller! I was careful about planting each residual fire right but it’s awe-inspiring to see them running through the bullet storm.

The board’s on fire ..

After the Final IJA Movement PhaseThis was the scene immediately after the last IJA Defensive Fire Phase.  The Chinese saw no less than three Banzai attacks after waves of feints from reduced-strengths/half squads.  You can see where they were from the red “Human Wave” markers.  The Chinese heavy machine gun had already malfunctioned and their medium machine gun was out of place, so no fire lanes were possible.  They had to be careful about their shooting so they don’t run out of bullets before the IJA run out of squads.   The focus of course was to build a “wall of fire” in an inverted “v” immediately north of the factory.  The top three factory hexes in that “v” was fortified and was invaluable in stopping two out of three banzai attacks.

You can see the two places where the IJA broke in as well.  The Chinese could only spread out inside the factory so that the IJA couldn’t engage them all in close combat before time ran out.  Oh, stacked underneath the broken squad on the bottom end of the factory right next to the IJA squad was a 8-0 leader holding out his corner with a light machine gun!

Both players had to account for and in the Chinese case, “ally” with the Blaze.  The triangular cluster of houses top left of the factory should be lit up as soon as possible, as should the big stone complex (H2) in the middle of the board, top of the row house in the picture .  Blazes in these locations denied the IJA important jump-off points for attack.  The row house top right of the factory was a terrific defense line that allowed routs back into the factory (especially when the  left cluster of buildings were on fire).

Overall, an awesome scenario and I had an awesome opponent!

Resources :

S14 88s at Zon – a real nail biter!!

S14 88s at Zon is a starter kit scenario about the 101st’s run-in to a number of 88mm guns by the Zonsche Forest near the bridges over the Wilhelmina Canal. These bridges were vital to the British tanks that needed to dash through to Arnhem in Operation Market-Garden.

Turn 1 German Setup revealed

This is a 5 and half turn scenario that uses half of board w. There’s a hill in the middle of the board that leans towards the right. The right (east) part of the board is open ground and the left (west) is a little village with a meandering road going from north to south. The Screaming Eagles come in from the north and have to exit a certain number of units to the south (presumably where the bridge was). The Germans have 2 x 1st line squads, 4 x 2nd line squads and 2 x 88mms. I situated the 88mm guns at M2 and H1. The Americans have 11 squads of 7-4-7 firepower goodness, an MMG and 2 x bazookas.

The American push through the village to the west was slow. Time in time again, the use of spraying fire and fire lanes show its effectiveness even at low firepower when coupled with FFMO & FFNAM modifiers. The German tried to skulk as much as possible during their turns but once when they got careless and the Americans shot clean through four buildings (M7 to L3) and broke their HS in the open ground beyond.

The 88s were scary. Most shots they did had a base hit of 8 and when the hits land, it’s a FP16 flat shot all around for the whole squad.

The American did better for the most of the scenario in the open grounds to the right (west). However they found themselves running out of time towards the end and most squads got shot in their rush towards the entrance.

The Most Epic Moment goes to the Close Combat round when a paratrooper squad jumped a German 2nd line squad. The Germans got Ambush so they started cheering their lungs out. Then they rolled boxcars which started the Americans cheering! The Americans figured they were there to clean house so they stayed and looked to kill the German squad once and for all.

Then the Americans rolled boxcars as well. (*gasp*)

The Germans decided that’s already enough fun and so they infiltrated their butts out.

The most True To Real Life award goes to the American 8-1 leader who ran past Subsequent First Fire and through residual fire unscathed only to be shot in the back by a LMG 5 hexes away and broke at the exit hex.

End game revealed

The Most Heroic award though goes to the German 7-0 leader who stood his ground, concealed for most of the game pretending to be a squad at O3 (in the building to the lower left where you see him now).

Erwin is a great opponent to play against and I learned a bit more about guns and about laying residual fire in this scenario. 

Now for the next one, any recommendations?

Grognards Speaks : Advanced Squad Leader Articles That Change Their Lives

Detail: Espinoza Tawed Skin/Parchment model

If you are a Advanced Squad Leader player and you are not on online forums such as GameSquad yet, I suggest you do. You will find a terrific community of ASL’ers discussing rules, giving their reviews on scenarios and products. You will find a lot of support and from time to time, a better alternative to eBay in acquiring Advanced Squad Leader modules and Third Party Products.

Lately the grognards discussed ASL training articles that changed their (ASL) lives. This is obviously too good of a thread to pass up, so here it is:

This is the original thread on GameSquad forums.  I hope this helps you as much as it helps me!

Do let me know however of articles that helped you!

G15 Bone of Contention – Partisans vs Retreating German SS

On 31 August 1944, the SS-Panzer Abteilung 102, Waffen SS’s heavy tank division retreated towards Germany after a 20 day stand at Hill 112 near Caen (see Operation Jupiter).  In the map above the left most marker is Utah, second one from the left is Omaha, Hill 112 is the 2nd from the left and Rouen is the one to the left.

The division was almost destroyed by the heavy fighting and had to abandon their tanks at Rouen by the shore of the Seine.  On the night of August 31, a team of soldiers, mechanics and tankers crossed back to the western shore of the Seine to destroy the abandoned tanks.  Amongst the wrecks they found two abandon Panthers sitting immobile, with  local partisans trying to figure out the mechanical beasts.

The German’s mission was to destroy the two Panther’s and the partisans, the BCRA Maquis de Rouen, were to protect their prizes at all costs.

Witchbottles played the Germans and I the partisans.  We got German conscripts and self rallying crew pitted against partisans who couldn’t form fire groups, has low ammo and tend to break toys easily.

This is the initial setup, and the north is on the right.  The partisans couldn’t stack and couldn’t be more than four hexes away from a specified hex.  I looked to use the gully as a protected passage between the forces to the east (bottom of the map) and their comrades on the south side (left of the map).  The Germans enter from the left and the bottom of our screen.  As it turns out, the Germans from the left took the direct route but the Germans from the bottom took a long detour around the partisans to the north.

As the turns progress, this flanking move would take the northern defenders off their prepared positions.

Over to the south (left), an all out street fight ensured.  The partisans tried to stay concealed for protection but took every opportunity to snapshot the Germans between the one hex buildings.

photo 2-2

To the north (right) the Germans outflanked the partisans and started to make their way to the Panthers, darting between the tombstones.

After the game, Witchbottles observed that he would have rushed forward to occupy the large stone structure to the upper right of the northern partisan forces, to the right of the graveyard (dark green).  That would have secured the partisan’s northern flank, no doubts.

The German unit I marked off with a yellow circle and an arrow was the unit who managed to put a panzerfaust into the side of the Panther.  The partisans I marked off with rough dotted lines in the middle was the partisan squad that killed a German half squad with gunfire but attracted a sniper shot to the Panther on the top right (to the lower left of the dark green graveyard).  The shot that killed the partisan commander stunned the crew and they promptly abandoned their big toy.  One Panther burning, one Panther abandoned.

Turn 6 Axis AFPh - Killed Panther

A partisan squad managed to run to the graveyard walls and took a couple of shots at the approaching tank crew and promptly ran out of ammo.  The mechanics and crew realized they couldn’t get a good shot at the Panther from the graveyard and so they came over the walls.  In the German Turn 6 the game ended at the Advanced Fire Phase when the Germans nailed the second Panther.

In retrospect aside from moving to occupy the big stone building to the north and thus securing my northern flanks like Witchbottles advised, I should make better use of fire lanes and residual fire.  Next time!  You live and learn.

A big THANKYOU to Witchbottles for a very interesting game!

RPT1 (Finale) Ferenc Jozef Barracks – A View of Advanced Squad Leader Scenarios

Painting depicting Greek soldiers on bayonet c...

Painting depicting Greek soldiers on bayonet charge. (Photo credit: Wikipedia)

We picked the game back up at the start of the Hungarian Turn 3.  For those readers who just picked this up: the Hungarians are the ones with the pretty blue rim and the Romanians are the ones without.  The Hungarians were doing a fighting retreat from the bottom right of the map to the upper left.  The Romanians were hot in pursuit, racing the Hungarians through the city blocks and tried to stop them from ever reaching the barracks.

Two of the pursuing Romanian squads were ambushed by the retreating Hungarians.  Luckily the Hungarians weren’t looking for a fight but took the chance to slip away instead.  One of the escaping Hungarian squad even ran through a semicircle of gunfire to pull off their Houdini like escape!

Towards the end of the Romanian Turn 4, the Romanians caught up with a few Hungarian squads again but the preference was to position themselves to cut off the Hungarians from crossing the street back into the barracks.  Two of the Romanian half squads managed to slip through the Hungarians and took up a position on the side of street.  The other Romanian squad locked a Hungarian squad in melee, stopping them from running back in time.

T5 Romanian RPh - Start of the last turn

This is the start of the last Romanian turn, the last chance for the Romanians to get into, to clear and to hold onto the barracks.  Some of the Hungarian troops were held back, but some managed to cross back into the barracks in spite of Romanian gunfire in the open streets.  There was some pretty vicious hand to hand combat going on towards the top right of the map (“Melee”), strangers joint by an encounter by Chance and locked in perpetuity by Fate.

Sketch 2013-07-01 11_24_12

The Romanian 9th Cavalry poured into the streets amidst a wave of bloodcurdling screams.   The heavy machine gun (under the “9-1” leader counter) was a primary concern.   Some men ran to draw fire, others raced towards the barracks from all sides.  A Romanian 9-2 leader and a pair of half squads managed to run six hexes through the open streets and gun fire, jumped into the barracks and killed the defenders!!

T5 Romanian - CC end moment when Romanians has possession

Unfortunately their sacrifices were for nought as too many of their brothers had fallen.  The Hungarians folded back into the barracks in the last turn and negated the Romanian victory conditions of having to clear the structure of good order Hungarian troops.  Below is the Hungarian endgame.

T5 Hungarian End Game

A couple of thoughts for the Romanian player:

  • Your FP (of 3) is useless in cities. If you don’t have support weapons (most of mine malfunctioned), engage the Hungarians in CC.
  • Manage your schedule, if you can’t hold the Hungarians before the barracks you need to run up there quick and have at least 2 turns to battle through the barracks. Take a count of the hexes and you will realize the Romanians truly does not have time.
  • I suppose there are two approaches to this –
    • Move fast and try to make the retreating Hungarian units run through streets of fire
    • Go full contact and engage the Hungarians before they can break off towards the barracks.

If you happen to play this scenario as well, I’d appreciate it if you drop me a note to let me know how it went for you, especially if you played Romanian and you won!!

hu347Sax347S

DASL1 The Schoolhouse – Team Play

Photo taken early game

Last Sunday I spent the afternoon playing DASL1 The Schoolhouse.  I was thankfully partnered up with an experienced ASL’r, Simon, as the Russians.

This engagement took place on July 9 1943 at a Russian village at the Kursk salient called Ponyri.  The scenario card described this as “the most intense street fighting since Stalingrad“.  This engagement also saw the huge Ferdinand tank destroyer (aka “Elefant “or “Porsche Tiger”) in action.

I got to say : this is a VERY interesting scenario. The Germans (Lawrence, Erwin & Wah) had limited time before a whole new Russian army piled in. On one hand they needed to be aggressive as they were under time pressure, although they couldn’t be too aggressive as they had to be able to fall back to proper defensive positions when the Russian counterattack arrived.

My partner Simon did a terrific job defending the stone building (marked in yellow) to the immediate north of the intersection on board d. His use of  tunnels (one of them marked with yellow dotted line) to the two buildings behind (forfeited fortified buildings) as rout paths and to gain concealment was a beautiful thing to see. Too bad the Germans lost their flamethrower early in the game!!

The Russian defence involved the use of set demolition charges as well. The Russians fell back when necessary but did everything to delay the Germans until the counterattack arrived. One of the Elephants was torched with Molotov Cocktails when it tried to rush a killer stack. Two of the remaining three Elephants were immobilized but were in great positions. It didn’t look easy for the counterattacking Russian tanks if they want to hit back through the narrow streets.

The Germans tried rushing the street (marked with the wavy red line) in front of the stone building but was wiped out by spraying fire.  At one point the Germans got that stone building encircled, rush the ground floor and was in the process of destroying one end of the tunnels.

That was precisely when the counterattack showed on Turn 7 (marked with the blue arrow).

The lead tanks and the elite troopers of the 1st Battalion 1032nd Rifles helped defend the tunnels together with the 307th Rifles coming back through. I had to run at that point but my friends told me there was a human wave on the German’s left flank and Germans conceded on Turn 8.

How about coming home everyday to 30 mins of PBeM game over VASL?

Whether you are a fellow newbie who would like to learn together or an experienced ASLer who don’t mind helping me up the curve. I play to enjoy and to learn. Please message me at jackson-dot-kwan-at-gmail-dot-com!!

Google

RPT1 (Part 3) Ferenc Jozef Barracks – A View of Advanced Squad Leader Scenarios

Turn 2 Hungarian - PFPh

Turn 2 Hungarian – PFPh

We are back on RPT1 Ferenc Jozef Barracks.  Just so everyone remembers, the Romanian 9th Cavalry were the attackers and the Hungarian 1st Tank Division were the defenders.  This engagement was part of the horrendous 100 day siege of Budapest.  The Hungarians were fighting along Nazi Germany and the Romanians were Russian allies.  The goal of the scenario is for the Romanians to capture the barracks (marked with a yellow “V” by Don) seen on the top left of the map within a 5 turn (10 mins in real world) time frame .

Turn 2 Hungarian

The above was what it looked like at the start of the Hungarian Turn 2.  The Hungarians started moving back towards the barracks while keeping their guns pointed to areas where their Romanians pursuers would need to cross.

Turn 2 Hungarian DFPh

Turn 2 Hungarian DFPh

The Romanian 9-2 squad leader hiding all along together with a squad and a shiny new medium machine gun (in the middle on the bottom, circled in orange) decided it was the best time to come out of concealment and open fire at the Hungarians who came into sight.  Unfortunately the MMG went the way of the flamethrower and clonked out on the first volley!  Apart from making a mental note to launch a complaint against the armoury after the engagement there wasn’t a lot he could do.  The other chaps in the building to the bottom right heard the ruckus and joined in as well but they then realised they no longer had line of sight.

The Hungarian defenders did a beautiful job slipping away towards the barracks whilst staying in concealment.  (Note to self : watch & learn)

Turn 3 Romanian

Turn 3 Romanians DFPh

Turn 3 Romanians DFPh

The Romanians orchestrated a series of moves in the hopes of stopping the bulk of the Hungarians from reaching the barracks.  On the righthand side of the map, the Romanians successfully kept the 2 Hungarian squads (circled in yellow) distracted while they double-timed a number of squads up the boulevards to the west.  They also intended to engage and even kill a few of the Hungarian squads by hand to hand combat where they could.

On the bottom of the map, the fuming 9-2 squad leader and his squad (circled in blue) who were dragging their broken MMG across the street (Note to self: use “Dash” next time) got pinned under heavy fire.  So there they were, hugging the ground and cursing up a storm in the middle of the street.

The orange line through the street on top was where the Romanians planned to shoot at the Hungarians who would need to cross over to the next building on their way to the barracks.

Turn 3 Hungarian RPh

Turn 3 Hungarian RPh

The Romanians (circled in red) tried to grab a couple of the escaping Hungarians, but in both instances they were ambushed instead!  The Hungarians decided to withdraw and slipped away while the Romanian attackers were still hugging their guns in fright.

So here we are at the start of the Hungarian Turn 3.  The Romanians have only 2 turns left and the Hungarians has done an elegant job in slipping away intact as a force while mostly staying under concealment.

Will the Romanians catch up to the Hungarian masters of defence?  Keep an eye out for Part 4 of RPT Ferenc Jozef Barracks!

hu347Sax347S


How about coming home everyday to 30 mins of PBeM game over VASL?

Whether you are a fellow newbie who would like to learn together or an experienced ASLer who don’t mind helping me up the curve. I play to enjoy and to learn. Please message me at jackson-dot-kwan-at-gmail-dot-com!!

Google

“The Best Advice Garnered From Many An ASL’r Much Better Than I”

Iwo Jima

Jon H, aka “witchbottles”, the editor for the top notched Advanced Squad Leader newsletter “Point Blank!” gave me the following advice when I first join the GameSquad forums.

It’s only after a month later when I realize the true value of his words.  I went back to him and he gratefully gave me the permission to repost what he told me for the benefit of all.

So here we go …

The Best advice garnered from many an ASL’r much better than I:

  • Read the rules, pick one chapter every month and read front to back, including footnotes.  (Credited to Carl Noguiera)
  • Follow the time-honored “programmed instruction” (“Eight steps to ASL – A programmed instruction approach”, The General, v30n1) Basic infantry; MGs and SW; terrain variations; guns and mortars; Vehicles and AFVs; Climate changes; Air support; then paras and gliders; night ; then PTO; finally DTO . The system was designed by Jim Stahler, and it works!  (Jim Stahler – remember that German 9-2 counter?)
  • Read EVERYTHING you can get your hands on about ASL:
  • Use ROAR to understand play balance; use the ASL Scenario Archive advanced search routines to find scenarios to fall into the above mentioned order of learning.
  • It will go quick if you used to play Squad Leader. Big changes are in the vehicles, Guns, and defensive fire and support weapon mechanics. Walking in with Squad Leader – GI Anvil of Victory you have about 10% learned. ( the rest will be no longer used).
  • Play, play, and oh yeah …. PLAY. the more the merrier, and the most diff opponents you can find!  (Credited to Gary “Fort” Fortenberry and many, many others!)

KRL, Jon H

Kwan01

How about coming home everyday to 30 mins of PBeM game over VASL?

Whether you are a fellow newbie who would like to learn together or an experienced ASL’r who don’t mind helping me up the curve – please message me at jackson-dot-kwan-at-gmail-dot-com.  I play to enjoy and to learn!!